Hello everybody!!
Today I bring you a very interesting topic.
Anyone who has developed a bit in Android
To connect our Android to the PC we can do it in two ways; by USB or by (and here comes the interesting thing) TCP. I will show you a very interesting tool in which you can exploit various functionalities.
To start configuring our Android, we will have to follow a series of steps (which may vary slightly from one smartphone to another). Therefore, we will have to go to Settings -> About the phone and once there, look for where it says “Compilation number” and press 7 times in a row. Done this you will see something similar to the following image.

You are now a developer! 😉
Now, we will only have to go Settings -> Developer options and search the option “USB Debugging“; We must activate this option. In case we have given an emergent message confirming, we confirm.

Ready, we will have our Android ready to play.
We go to the PC, because we will have to install the ADB tool.
For this step, we can go to the official Android page and we should download the SDK Platform-Tools for our OS. Since the ADB is integrated into the Platform-Tools (along with other utilities) we will have to download the package. In the rest of Linux, I do not know if ADB (or Platform-Tools) is uploaded in the Linux repository, but if you are in Kali, just do:
# apt-get install adb
You can install the tool easily and quickly.
Perfect, we have the PC and our Android ready; let’s connect them with USB.
Now we just have to ask ADB which devices are connected.
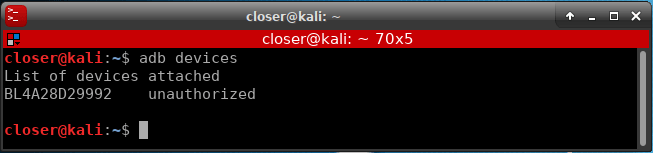
As you can see, it has recognized our Android connected, but it has no authorization to do anything. At that moment, a confirmation will appear to allow access to our Android.
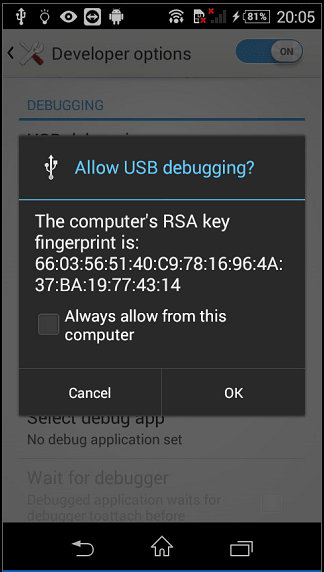
After accepting, checking the option to always allow your PC (the message will not appear again every time we want to do something), if we ask ADB again for the connected devices, our Android will appear again, but now it will appear as “device” instead of “unauthorized“.
Next, we will enable the option to debug via TCP.

Once TCP debugging is enabled on port 5555 (by default), we can remove the USB cable.
To be able to connect with our Android, now, it is necessary that our Android has an internet connection, in my case, having it connected to WiFi, the associated IP is 192.168.1.37. (At this time there would also appear a request for permissions on the Android, if we remembered it, it will not appear).
Now we are going to use a Zucccs tool called PhoneSploit that will allow us to have an abstraction layer with our Android, where we can make interesting actions.

To connect to our Android, just use the options it shows.
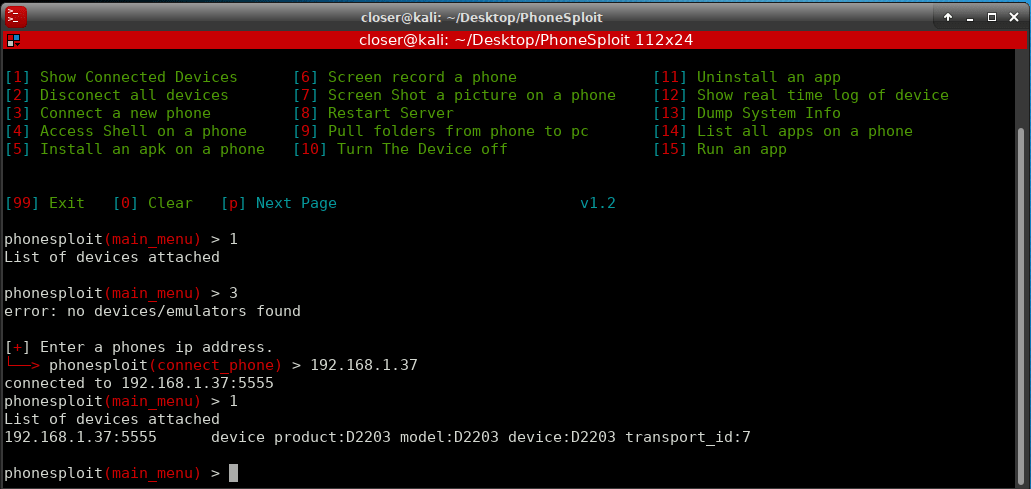
Once connected, we can use a lot of options to our diposition, for example launch the shell to interact with our Android.
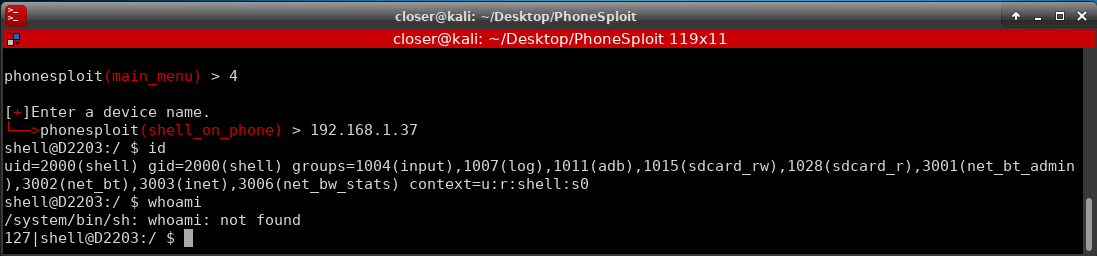
Also with the Shell, you could access the files of the SD, photos
In addition with PhoneSploit, for example, a screenshot will be made!


As you can see, there are more options; like
We could keep choosing options, but I’ll let you try it!
Now that you know the things that can be done, you can think, can an attacker make a capture of my mobile and I do not realize? Can an attacker do all that with my Android?
Well it is a sensitive issue, the truth is that yes and no. Everything mainly falls on whether you have granted permission to the PC, otherwise, you could not. But of course, have you ever thought about when you bought a second-hand mobile (if you have done so) if it already comes with developer options enabled and even with USB debugging? 😉
Without thinking that, there are products (mostly Chinese) type SmartBox TV that comes with debugging by TCP enabled by default. Yes, the SmartBox too.
In fact, if we look at Shodan and search for “Android Debug Bridge“

Almost 13000 Android devices that Shodan have found with debugging by TCP enabled, and you just have to take a quick look to see that there are all kinds, I would even dare that there are even Smart TVs!
You can say, ok, but you have to accept the request for permission to pair the PC with the Android, yes, but of almost 13000 devices, would they all deny access? Who has not accepted a message without reading it? By statistics there will be enough! Not to say that an attacker could “bomb” requests and not stop until it is accepted.
Will any of these Android devices, your device?
I hope I have explained myself clearly and that you liked it. If you want me to continue commenting on ADB & Android, you just have to tell me and I will continue to do more of this kind a little more
PS: I also remind you that the Allhacked including its posts (including this one), are also available in Spanish.
See you in the next post! 😉
Happy Hacking!
what about if the victim uses VPN?(tcp)
The tool repo is made private. Cant clone it
thats great stuff. I am trying this. I hope you will share another topic on adb used in reverse engineering.
live television
сделать комикс
weed delivery
работа вакансии
мастурбатор
https://lightbass.ru/ – это ваш надёжный друг в мире улучшения автомобиля !
Register and take part in the drawing, click here
https://rosinvest.com/tag/%D0%90%D0%B2%D0%B8%D1%82%D0%BE
TV online free
продажа пластиковых ёмкостей
https://ab-korea.ru/
https://telegraf.news/press-relizi/osobennosti-i-preimushhestva-sekatora-s-dlinnymi-ruchkami/
аккумулятор 80v 350ah электропогрузчик balkancar
айфон в Симферополе
анекс тур оаэ
анекс тур мальдивы
пак круизы
анекс тур академическая
ТНВЭД
ТНВЭД
https://crypto-sever.ru/
лучшие игровые автоматы
I value the time you’ve taken out to give me the general tour and guarantee that I have the necessary information to work effectively. Much thanks to you. เล่นสล็อต
Независимая экспертиза воронеж
пегас туристик калужская
chat gpt
https://anobanko.com/transfer
Как правильно выбрать б/у автомобиль https://rostov-news.net/other/2023/07/10/272809.html
Register and get a 200% bonus on your first deposit, hurry up the number of seats is limited click here
https://vetusyplenie.ru/
https://promrentgen.ru/zapasnye-chasti-k-promyshlennomu-meditsinskomu-oborudovaniyu
квартиры снять посуточно без посредников недорого
https://metallosplav-msk.ru/catalog/alyuminiy_1/
prednisone 10mg prices: https://prednisone1st.store/# prednisone 5 mg tablet cost
prednisone cream over the counter: https://prednisone1st.store/# buy prednisone canada
Аренда авто Сочи
amoxicillin discount buy amoxicillin online uk – amoxicillin no prescription
All trends of medicament.
where can i buy mobic pill: can i buy generic mobic prices – buy cheap mobic pills
Definitive journal of drugs and therapeutics.
where can i get generic mobic can i buy generic mobic pills buying cheap mobic without a prescription
buy amoxicillin 250mg can i buy amoxicillin over the counter – where can you buy amoxicillin over the counter
cost propecia without prescription cheap propecia without dr prescription
get generic propecia without a prescription buying generic propecia price
safe reliable canadian pharmacy best canadian pharmacy
treatments for ed ed pill men’s ed pills
Everything information about medication.
77 canadian pharmacy canadian family pharmacy
Medscape Drugs & Diseases.
where to buy mobic without a prescription: can you get cheap mobic for sale – can you buy generic mobic
https://pharmacyreview.best/# online pharmacy canada
can i order mobic price: get generic mobic without dr prescription – can you buy cheap mobic without rx
prescription drugs canada buy online canada drug pharmacy
cost generic propecia online cost of propecia without dr prescription
buying generic propecia tablets generic propecia without a prescription
where to get mobic without a prescription generic mobic online how to buy cheap mobic prices
amoxicillin 500mg buy online uk: https://amoxicillins.com/# where can i buy amoxicillin over the counter uk
amoxicillin 750 mg price cost of amoxicillin – amoxicillin script
amoxicillin pills 500 mg amoxicillin 500mg price canada – where can i buy amoxicillin online
buying prescription drugs in mexico: buying prescription drugs in mexico – pharmacies in mexico that ship to usa
https://indiamedicine.world/# best india pharmacy
pharmacy website india: indian pharmacy online – buy prescription drugs from india
https://consultantor.ru/kody-oshibok/kod-oshibki-1020-megafon-chto-eto-prichiny-kak-otklyuchit.html
https://mexpharmacy.sbs/# mexican pharmaceuticals online
best india pharmacy: п»їlegitimate online pharmacies india – п»їlegitimate online pharmacies india
http://certifiedcanadapharm.store/# escrow pharmacy canada
mexican rx online: buying from online mexican pharmacy – best online pharmacies in mexico
https://mexpharmacy.sbs/# mexico drug stores pharmacies
medicine in mexico pharmacies: mexican border pharmacies shipping to usa – purple pharmacy mexico price list
https://taxi-tel.ru/
http://indiamedicine.world/# reputable indian pharmacies
safe reliable canadian pharmacy: safe canadian pharmacies – canada rx pharmacy world
purchase neurontin online: neurontin 2018 – neurontin rx
http://stromectolonline.pro/# buy liquid ivermectin
https://7masterov.com/
ivermectin 3mg pill: oral ivermectin cost – ivermectin australia
https://azithromycin.men/# buy zithromax online
cheap neurontin online: neurontin 800 mg – neurontin 1000 mg
seo оптимизация сайта заказать
http://gabapentin.pro/# neurontin 100 mg cap
buy ivermectin for humans uk: ivermectin 3mg pill – ivermectin 1
Гама Казино
buy antibiotics from canada: over the counter antibiotics – get antibiotics without seeing a doctor
http://paxlovid.top/# paxlovid pill
treatment for ed: cheap erectile dysfunction – top ed pills
http://ciprofloxacin.ink/# ciprofloxacin mail online
https://ciprofloxacin.ink/# ciprofloxacin mail online
https://lipitor.pro/# best price lipitor
http://lipitor.pro/# lipitor prescription cost
mexico pharmacies prescription drugs mexico drug stores pharmacies mexican online pharmacies prescription drugs
trusted canadian pharmacy canadian pharmacies that deliver to the us canadian pharmacy sarasota
https://indiapharmacy.cheap/# reputable indian pharmacies
https://expert-service24.com/
санитарные модули
539開獎
《539彩券:台灣的小確幸》
哎呀,說到台灣的彩券遊戲,你怎麼可能不知道539彩券呢?每次”539開獎”,都有那麼多人緊張地盯著螢幕,心想:「這次會不會輪到我?」。
### 539彩券,那是什麼來頭?
嘿,539彩券可不是昨天才有的新鮮事,它在台灣已經陪伴了我們好多年了。簡單的玩法,小小的投注,卻有著不小的期待,難怪它這麼受歡迎。
### 539開獎,是場視覺盛宴!
每次”539開獎”,都像是一場小型的節目。專業的主持人、明亮的燈光,還有那台專業的抽獎機器,每次都帶給我們不小的刺激。
### 跟我一起玩539?
想玩539?超簡單!走到街上,找個彩券行,選五個你喜歡的號碼,買下來就對了。當然,現在科技這麼發達,坐在家裡也能買,多方便!
### 539開獎,那刺激的感覺!
每次”539開獎”,真的是讓人既期待又緊張。想像一下,如果這次中了,是不是可以去吃那家一直想去但又覺得太貴的餐廳?
### 最後說兩句
539彩券,真的是個小確幸。但嘿,玩彩券也要有度,別太沉迷哦!希望每次”539開獎”,都能帶給你一點點的驚喜和快樂。
buying from canadian pharmacies: safe online pharmacy canada – best online canadian pharmacy
50$ to the account of new players Play the best casino and win the jackpot! 50 Bonus
medicine in mexico pharmacies: best online pharmacies in mexico – mexican online pharmacies prescription drugs
Welcome to the official YouTube channel BlinBeat Music. Here you will find background music for your commercial and private videos #backgroundmusic
https://t.me/genderpartymoskva
https://www.instagram.com/gender_party_moskva/
http://pharmacieenligne.icu/# Pharmacies en ligne certifiГ©es
официальный сайт Gama Casino
http://esfarmacia.men/# farmacia online envГo gratis
web cameras of the world online
http://itfarmacia.pro/# farmacia online migliore
Acheter kamagra site fiable
buying prescription drugs in mexico online: mexican border pharmacies shipping to usa – medicine in mexico pharmacies
best india pharmacy: indian pharmacy – best online pharmacy india
https://andorra-pyrenees.blogspot.com/
mexico pharmacies prescription drugs: п»їbest mexican online pharmacies – buying prescription drugs in mexico
продажа бетона
purple pharmacy mexico price list: mexico pharmacies prescription drugs – best online pharmacies in mexico
мобильная версия гама казино
buying from online mexican pharmacy: mexican rx online – best online pharmacies in mexico
purple pharmacy mexico price list: п»їbest mexican online pharmacies – mexican pharmacy
mexican online pharmacies prescription drugs: mexican pharmaceuticals online – buying prescription drugs in mexico
http://doxycyclineotc.store/# average cost for doxycycline
Their worldwide reputation is well-deserved. https://azithromycinotc.store/# can you buy zithromax over the counter in australia
The team embodies patience and expertise. zithromax 500 price: buy azithromycin over the counter – where can i buy zithromax uk
zithromax prescription online buy zithromax where can i get zithromax
They take the hassle out of international prescription transfers. http://doxycyclineotc.store/# cheap doxycycline online
zithromax online australia generic zithromax azithromycin where can i buy zithromax uk
clubchanani.com
1xbet bonus promo code india
1xbet promo code india today
1xbet promo code free bet 2024
1code promotionnel gratuit xbet 2024
buying prescription drugs in mexico online – reputable mexican pharmacies online – mexican border pharmacies shipping to usa
https://canadapharmacy24.pro/# onlinepharmaciescanada com
https://indiapharmacy24.pro/# Online medicine order
http://stromectol24.pro/# buy minocycline 100mg tablets
http://indiapharmacy24.pro/# п»їlegitimate online pharmacies india
Платформа онлайн бронирования жилья для отдыха и путешествий – https://brony24.com/
paxlovid pill: antiviral paxlovid pill – paxlovid pill
Paxlovid buy online: nirmatrelvir and ritonavir online – paxlovid price
ivermectin 3mg tablets: ivermectin virus – buy stromectol pills
buy viagra here Cheap Sildenafil 100mg buy Viagra over the counter
Levitra generic best price: Levitra 10 mg buy online – Levitra online USA fast
https://finprzpotra.ru/sms/kod-podtverzhdeniya-installyatora-ot-rostelekom-chto-eto-takoe-i-gde-ego-vzyat/
I think, that you are not right. I am assured. Let’s discuss.
индивидуалки бучи
http://viagra.eus/# buy viagra here
Kamagra 100mg price buy kamagra online usa п»їkamagra
http://viagra.eus/# over the counter sildenafil
Купить травмат
http://cialis.foundation/# Generic Tadalafil 20mg price
https://levitra.eus/# Levitra online pharmacy
Levitra online pharmacy Vardenafil buy online Buy Vardenafil 20mg
Cheap Viagra 100mg cheap viagra cheapest viagra
http://kamagra.icu/# Kamagra 100mg price
cialis for sale cheapest cialis Cialis without a doctor prescription
https://kamagra.icu/# Kamagra 100mg
Vardenafil buy online Cheap Levitra online Buy Vardenafil 20mg online
https://kamagra.icu/# buy kamagra online usa
https://kamagra.icu/# super kamagra
Viagra tablet online best price for viagra 100mg buy viagra here
https://xn—-7sbbhhsgk0bda2o.xn--p1ai/zerkala-v-vannuyu-komnaty-na-zakaz.html
canadian pharmacy sarasota: canadapharmacyonline com – canadian pharmacy tampa canadapharmacy.guru
http://indiapharmacy.pro/# buy medicines online in india indiapharmacy.pro
canadian drug pharmacy: canadian pharmacy – best rated canadian pharmacy canadapharmacy.guru
canadian family pharmacy: canadian pharmacy online reviews – canadian online drugs canadapharmacy.guru
https://mexicanpharmacy.company/# mexican online pharmacies prescription drugs mexicanpharmacy.company
mexican pharmaceuticals online: mexico drug stores pharmacies – mexico pharmacies prescription drugs mexicanpharmacy.company
https://indiapharmacy.pro/# indian pharmacy paypal indiapharmacy.pro
indian pharmacy paypal: п»їlegitimate online pharmacies india – online pharmacy india indiapharmacy.pro
online pharmacy india: indian pharmacy – Online medicine order indiapharmacy.pro
http://canadapharmacy.guru/# precription drugs from canada canadapharmacy.guru
https://indiapharmacy.pro/# reputable indian online pharmacy indiapharmacy.pro
top online pharmacy india: Online medicine order – indian pharmacies safe indiapharmacy.pro
http://indiapharmacy.pro/# mail order pharmacy india indiapharmacy.pro
best online pharmacy india: india pharmacy mail order – reputable indian online pharmacy indiapharmacy.pro
http://canadapharmacy.guru/# canadian pharmacy online canadapharmacy.guru
https://indiapharmacy.pro/# india pharmacy indiapharmacy.pro
online canadian pharmacy: canadapharmacyonline com – legal canadian pharmacy online canadapharmacy.guru
http://canadapharmacy.guru/# canadian pharmacies canadapharmacy.guru
indianpharmacy com: top 10 online pharmacy in india – pharmacy website india indiapharmacy.pro
buy youtube likes 1kviews
ремонт стиральных машин спб
https://indiapharmacy.pro/# india online pharmacy indiapharmacy.pro
Exceptional post however I was wanting to know if you could write a litte more on this topic?
I’d be very thankful if you could elaborate a little bit more.
Cheers!
safe canadian pharmacies: northwest pharmacy canada – canadian drugs online canadapharmacy.guru
https://indiapharmacy.pro/# reputable indian online pharmacy indiapharmacy.pro
reputable mexican pharmacies online: pharmacies in mexico that ship to usa – reputable mexican pharmacies online mexicanpharmacy.company
http://mexicanpharmacy.company/# buying prescription drugs in mexico mexicanpharmacy.company
https://prednisone.digital/# no prescription prednisone canadian pharmacy
мобильнаЯ версиЯ гама казино
https://clomid.sbs/# buying generic clomid without dr prescription
‚ эпоху цифровых технологий скорость и удобство становЯтсЯ решающими факторами длЯ любителей ставок на спорт. Џриложение Pin-up длЯ Android представлЯет собой революцию в мире мобильных ставок, предоставлЯЯ пользователЯм не только бесшовный доступ к широкому спектру событий, но и обеспечиваЯ их все необходимыми инструментами длЯ быстрого и легкого размещениЯ ставок в любое времЯ и в любом месте. ‘ его помощью вы можете следить за изменениЯми коэффициентов в режиме реального времени, управлЯть вашими ставками на ходу и наслаждатьсЯ бесперебойной интеграцией с вашими устройствами Android. Ќе терЯйте времЯ и переходите в новую эру ставок Р Pin-up ставки на спорт скачать приложение уже сегоднЯ и испытайте удобство и скорость на собственном опыте. https://spinmedia.ru/kak-igrat-na-pin-up-android/
http://propecia.sbs/# order propecia
http://clomid.sbs/# where can i buy clomid pills
Абузоустойчивый VPS
Виртуальные серверы VPS/VDS: Путь к Успешному Бизнесу
В мире современных технологий и онлайн-бизнеса важно иметь надежную инфраструктуру для развития проектов и обеспечения безопасности данных. В этой статье мы рассмотрим, почему виртуальные серверы VPS/VDS, предлагаемые по стартовой цене всего 13 рублей, являются ключом к успеху в современном бизнесе
https://ocaunity.ru/
http://doxycycline.sbs/# doxycycline 100mg online
http://prednisone.digital/# prednisone best prices
cheap clomid without rx: can i get generic clomid online – clomid without dr prescription
https://clomid.sbs/# buy generic clomid pill
buying propecia without rx: buying generic propecia pill – cheap propecia online
do you already know the vaccines you should give to your new babies come on and visit my site to find out
http://kheymomo.blogspot.com/
Подарок дедушке
http://canadapharm.top/# canadian pharmacy service
mexican mail order pharmacies: mexican border pharmacies shipping to usa – medicine in mexico pharmacies
http://canadapharm.top/# canada rx pharmacy
Online medicine home delivery: online pharmacy india – Online medicine order
http://withoutprescription.guru/# real viagra without a doctor prescription usa
п»їbest mexican online pharmacies: medicine in mexico pharmacies – best online pharmacies in mexico
https://canadapharm.top/# prescription drugs canada buy online
online pharmacy india: top 10 online pharmacy in india – indianpharmacy com
https://canadapharm.top/# canadian neighbor pharmacy
Magnificent site. Lots of useful information here.
I’m sending it to some buddies ans also sharing in delicious.
And naturally, thank you to your sweat!
mexican rx online: medication from mexico pharmacy – reputable mexican pharmacies online
prescription drugs without doctor approval: best ed pills non prescription – prescription drugs online without doctor
http://edpills.icu/# cheapest ed pills
https://thetravelnotes.com/pt
https://medium.com/@LawrenceRa94448/сервер-xr-4fcfd3551e72
VPS SERVER
Высокоскоростной доступ в Интернет: до 1000 Мбит/с
Скорость подключения к Интернету — еще один важный фактор для успеха вашего проекта. Наши VPS/VDS-серверы, адаптированные как под Windows, так и под Linux, обеспечивают доступ в Интернет со скоростью до 1000 Мбит/с, что гарантирует быструю загрузку веб-страниц и высокую производительность онлайн-приложений на обеих операционных системах.
canadian pharmacy reviews: canadian pharm top – reliable canadian pharmacy
http://mexicopharm.shop/# buying from online mexican pharmacy
https://delay-site.ru/
prescription without a doctor’s prescription: viagra without a doctor prescription walmart – legal to buy prescription drugs without prescription
Cheap Levitra online: Levitra 10 mg buy online – Buy Vardenafil online
https://edpills.monster/# buy ed pills online
win79
win79
https://kamagra.team/# buy Kamagra
Kamagra 100mg price: buy Kamagra – sildenafil oral jelly 100mg kamagra
Hello dear friend, I would like to offer placement of your link (or links) on different platforms of the internet such as: forums, blogs, comments and much more. . .
Increase your Visibility Boost Your Seo Rank – Get Organic Traffic From Google. Ranking in Google isn’t hard. All you need is a healthy number of backlinks from referring domains that have authority and trust in Google’s eyes.
This Backlinks Service Benefits:
1. Easily get Google rankings
2. Get a lot of traffic from Google
3. You can earn from the website in different ways
4. Increase Domain Authority (DA)
Quality guaranteed !
PRICE – 10$
WhatsApp: +1 (251) 840-379
Email: promotionyoursites@gmail.com
http://sildenafil.win/# sildenafil uk otc
Levitra generic best price: Buy Vardenafil online – Buy Vardenafil online
https://medium.com/@AudreyPonc89318/ubuntu-linux-выделенный-сервер-vpsina-158740c1e9ad
VPS SERVER
Высокоскоростной доступ в Интернет: до 1000 Мбит/с
Скорость подключения к Интернету — еще один важный фактор для успеха вашего проекта. Наши VPS/VDS-серверы, адаптированные как под Windows, так и под Linux, обеспечивают доступ в Интернет со скоростью до 1000 Мбит/с, что гарантирует быструю загрузку веб-страниц и высокую производительность онлайн-приложений на обеих операционных системах.
https://levitra.icu/# Levitra online USA fast
sildenafil 25 mg: sildenafil tablet online india – sildenafil tabs 20mg
http://edpills.monster/# gnc ed pills
new treatments for ed: online ed medications – treatment of ed
http://amoxicillin.best/# amoxicillin 500mg cost
п»їcipro generic Get cheapest Ciprofloxacin online where can i buy cipro online
how can i get doxycycline Buy doxycycline for chlamydia buy 40 mg doxycycline
http://azithromycin.bar/# zithromax 500 mg lowest price online
https://barsu.by/
zithromax 500mg over the counter buy zithromax zithromax 500 mg lowest price online
http://ciprofloxacin.men/# п»їcipro generic
buy cipro online: Get cheapest Ciprofloxacin online – cipro online no prescription in the usa
Зачистные круги
Webcam Key West online
cipro online no prescription in the usa where can i buy cipro online buy cipro
http://amoxicillin.best/# how to get amoxicillin
Mastering Virtual Preaching: Adapting Your Message for Online Congregations
https://amoxicillin.best/# amoxicillin brand name
amoxicillin 500mg price in canada cheap amoxicillin amoxicillin 500 mg tablets
https://ciprofloxacin.men/# buy ciprofloxacin
cipro ciprofloxacin generic price ciprofloxacin over the counter
http://mexicopharmacy.store/# mexican online pharmacies prescription drugs
canadian pharmacy drugs online: canada pharmacy online – legit canadian pharmacy online
сдать квартиру в москве
media services here
http://canadiandrugs.store/# canadian pharmacy com
mexican drugstore online: mexican pharmacy online – medication from mexico pharmacy
http://mexicopharmacy.store/# mexican rx online
mexican pharmaceuticals online: mexico pharmacy – mexican pharmaceuticals online
garden rubbish collection
b52
https://3dottechnologies.com/
where to get generic clomid price: Buy Clomid Online Without Prescription – can i buy generic clomid without a prescription
https://sildenafilit.bid/# viagra 50 mg prezzo in farmacia
migliori farmacie online 2023: avanafil spedra – farmacia online piГ№ conveniente
http://kamagrait.club/# comprare farmaci online con ricetta
Tiêu đề: “B52 Club – Trải nghiệm Game Đánh Bài Trực Tuyến Tuyệt Vời”
B52 Club là một cổng game phổ biến trong cộng đồng trực tuyến, đưa người chơi vào thế giới hấp dẫn với nhiều yếu tố quan trọng đã giúp trò chơi trở nên nổi tiếng và thu hút đông đảo người tham gia.
1. Bảo mật và An toàn
B52 Club đặt sự bảo mật và an toàn lên hàng đầu. Trang web đảm bảo bảo vệ thông tin người dùng, tiền tệ và dữ liệu cá nhân bằng cách sử dụng biện pháp bảo mật mạnh mẽ. Chứng chỉ SSL đảm bảo việc mã hóa thông tin, cùng với việc được cấp phép bởi các tổ chức uy tín, tạo nên một môi trường chơi game đáng tin cậy.
2. Đa dạng về Trò chơi
B52 Play nổi tiếng với sự đa dạng trong danh mục trò chơi. Người chơi có thể thưởng thức nhiều trò chơi đánh bài phổ biến như baccarat, blackjack, poker, và nhiều trò chơi đánh bài cá nhân khác. Điều này tạo ra sự đa dạng và hứng thú cho mọi người chơi.
3. Hỗ trợ Khách hàng Chuyên Nghiệp
B52 Club tự hào với đội ngũ hỗ trợ khách hàng chuyên nghiệp, tận tâm và hiệu quả. Người chơi có thể liên hệ thông qua các kênh như chat trực tuyến, email, điện thoại, hoặc mạng xã hội. Vấn đề kỹ thuật, tài khoản hay bất kỳ thắc mắc nào đều được giải quyết nhanh chóng.
4. Phương Thức Thanh Toán An Toàn
B52 Club cung cấp nhiều phương thức thanh toán để đảm bảo người chơi có thể dễ dàng nạp và rút tiền một cách an toàn và thuận tiện. Quy trình thanh toán được thiết kế để mang lại trải nghiệm đơn giản và hiệu quả cho người chơi.
5. Chính Sách Thưởng và Ưu Đãi Hấp Dẫn
Khi đánh giá một cổng game B52, chính sách thưởng và ưu đãi luôn được chú ý. B52 Club không chỉ mang đến những chính sách thưởng hấp dẫn mà còn cam kết đối xử công bằng và minh bạch đối với người chơi. Điều này giúp thu hút và giữ chân người chơi trên thương trường game đánh bài trực tuyến.
Hướng Dẫn Tải và Cài Đặt
Để tham gia vào B52 Club, người chơi có thể tải file APK cho hệ điều hành Android hoặc iOS theo hướng dẫn chi tiết trên trang web. Quy trình đơn giản và thuận tiện giúp người chơi nhanh chóng trải nghiệm trò chơi.
Với những ưu điểm vượt trội như vậy, B52 Club không chỉ là nơi giải trí tuyệt vời mà còn là điểm đến lý tưởng cho những người yêu thích thách thức và may mắn.
farmacia online: dove acquistare cialis online sicuro – farmacie online affidabili
http://kamagrait.club/# migliori farmacie online 2023
купить бетон
migliori farmacie online 2023: farmacia online piu conveniente – farmacia online piГ№ conveniente
http://sildenafilit.bid/# pillole per erezione in farmacia senza ricetta
farmacia online: Tadalafil prezzo – farmacia online piГ№ conveniente
VPS SERVER
Высокоскоростной доступ в Интернет: до 1000 Мбит/с
Скорость подключения к Интернету — еще один важный фактор для успеха вашего проекта. Наши VPS/VDS-серверы, адаптированные как под Windows, так и под Linux, обеспечивают доступ в Интернет со скоростью до 1000 Мбит/с, что гарантирует быструю загрузку веб-страниц и высокую производительность онлайн-приложений на обеих операционных системах.
https://sildenafilit.bid/# kamagra senza ricetta in farmacia
farmacie online sicure: avanafil generico prezzo – farmacia online migliore
http://sildenafilit.bid/# viagra online spedizione gratuita
farmacie online sicure: farmacia online piu conveniente – comprare farmaci online con ricetta
ВГУ в сми
приложения для ставок на спорт https://sobor-chel.ru/live-stavki-v-1xbet/
http://sildenafilo.store/# comprar sildenafilo cinfa 100 mg espaГ±a
farmacia barata Comprar Levitra Sin Receta En Espana farmacias baratas online envГo gratis
онлайн казино
ast 50
ast onebox
https://vardenafilo.icu/# farmacia online 24 horas
farmacias online seguras en espaГ±a Levitra sin receta farmacias baratas online envГo gratis
farmacias baratas online envГo gratis comprar kamagra farmacia online barata
farmacia barata Levitra precio farmacia online madrid
evobox караоке
https://www.vortextuning.co.za/
farmacia online envГo gratis Cialis generico farmacia online madrid
farmacias baratas online envГo gratis comprar cialis original farmacia online 24 horas
farmacias online seguras farmacia online envio gratis farmacia online barata
x star karaoke box купить
Pharmacie en ligne pas cher: levitra generique sites surs – Pharmacie en ligne livraison 24h
farmacia barata: kamagra – farmacia online 24 horas
https://drugscontrol.org/
farmacias online seguras: kamagra gel – farmacias online seguras en espaГ±a
acheter mГ©dicaments Г l’Г©tranger achat kamagra Pharmacie en ligne pas cher
https://massagephiladelphia.org/
Pharmacie en ligne livraison rapide: Acheter Cialis – Pharmacie en ligne livraison gratuite
Hello dear friend, I would like to offer placement of your link (or links) on different platforms of the internet such as: forums, blogs, comments and much more. . .
Increase your Visibility Boost Your Seo Rank – Get Organic Traffic From Google. Ranking in Google isn’t hard. All you need is a healthy number of backlinks from referring domains that have authority and trust in Google’s eyes.
This Backlinks Service Benefits:
1. Easily get Google rankings
2. Get a lot of traffic from Google
3. You can earn from the website in different ways
4. Increase Domain Authority (DA)
Quality guaranteed !
PRICE – 10$
WebSite – http://traffic-for-your.site/
viagra online cerca de zaragoza: sildenafilo precio – farmacia gibraltar online viagra
pharmacie ouverte pharmacie ouverte Pharmacie en ligne sans ordonnance
Acheter viagra en ligne livraison 24h: SildГ©nafil 100mg pharmacie en ligne – Viagra homme prix en pharmacie sans ordonnance
Pharmacie en ligne livraison rapide levitra generique prix en pharmacie Pharmacie en ligne sans ordonnance
http://cialiskaufen.pro/# online apotheke deutschland
http://apotheke.company/# online apotheke versandkostenfrei
https://kamagrakaufen.top/# versandapotheke deutschland
http://viagrakaufen.store/# Viagra Tabletten
http://viagrakaufen.store/# Viagra Preis Schwarzmarkt
https://kamagrakaufen.top/# gГјnstige online apotheke
http://mexicanpharmacy.cheap/# mexican drugstore online
https://mexicanpharmacy.cheap/# mexico drug stores pharmacies
анекс тур мальдивы
пак круизы
Абузоустойчивый серверы, идеально подходит для работы програмным обеспечением как XRumer так и GSA
Стабильная работа без сбоев, высокая поточность несравнима с провайдерами в квартире или офисе, где есть ограничение.
Высокоскоростной Интернет: До 1000 Мбит/с
Скорость интернет-соединения – еще один важный параметр для успешной работы вашего проекта. Наши VPS/VDS серверы, поддерживающие Windows и Linux, обеспечивают доступ к интернету со скоростью до 1000 Мбит/с, обеспечивая быструю загрузку веб-страниц и высокую производительность онлайн-приложений.
https://mexicanpharmacy.cheap/# buying prescription drugs in mexico
reputable indian pharmacies india pharmacy – reputable indian pharmacies indiapharmacy.guru
オンラインカジノ
オンラインカジノとオンラインギャンブルの現代的展開
オンラインカジノの世界は、技術の進歩と共に急速に進化しています。これらのプラットフォームは、従来の実際のカジノの体験をデジタル空間に移し、プレイヤーに新しい形式の娯楽を提供しています。オンラインカジノは、スロットマシン、ポーカー、ブラックジャック、ルーレットなど、さまざまなゲームを提供しており、実際のカジノの興奮を維持しながら、アクセスの容易さと利便性を提供します。
一方で、オンラインギャンブルは、より広範な概念であり、スポーツベッティング、宝くじ、バーチャルスポーツ、そしてオンラインカジノゲームまでを含んでいます。インターネットとモバイルテクノロジーの普及により、オンラインギャンブルは世界中で大きな人気を博しています。オンラインプラットフォームは、伝統的な賭博施設に比べて、より多様なゲーム選択、便利なアクセス、そしてしばしば魅力的なボーナスやプロモーションを提供しています。
安全性と規制
オンラインカジノとオンラインギャンブルの世界では、安全性と規制が非常に重要です。多くの国々では、オンラインギャンブルを規制する法律があり、安全なプレイ環境を確保するためのライセンスシステムを設けています。これにより、不正行為や詐欺からプレイヤーを守るとともに、責任ある賭博の促進が図られています。
技術の進歩
最新のテクノロジーは、オンラインカジノとオンラインギャンブルの体験を一層豊かにしています。例えば、仮想現実(VR)技術の使用は、プレイヤーに没入型のギャンブル体験を提供し、実際のカジノにいるかのような感覚を生み出しています。また、ブロックチェーン技術の導入は、より透明で安全な取引を可能にし、プレイヤーの信頼を高めています。
未来への展望
オンラインカジノとオンラインギャンブルは、今後も技術の進歩とともに進化し続けるでしょう。人工知能(AI)の更なる統合、モバイル技術の発展、さらには新しいゲームの創造により、この分野は引き続き成長し、世界中のプレイヤーに新しい娯楽の形を提供し続けることでしょう。
この記事では、オンラインカジノとオンラインギャンブルの現状、安全性、技術の影響、そして将来の展望に焦点を当てています。この分野は、技術革新によって絶えず変化し続ける魅力的な領域です。
best ed drug buy ed pills – ed pills online edpills.tech
best canadian pharmacy online canadian pharmacy 24h com safe – canadian pharmacy com canadiandrugs.tech
купить бронешлем
buying drugs from canada best canadian online pharmacy – canadian pharmacy meds review canadiandrugs.tech
best ed pill erectile dysfunction pills – pills erectile dysfunction edpills.tech
オンラインカジノとオンラインギャンブルの現代的展開
オンラインカジノの世界は、技術の進歩と共に急速に進化しています。これらのプラットフォームは、従来の実際のカジノの体験をデジタル空間に移し、プレイヤーに新しい形式の娯楽を提供しています。オンラインカジノは、スロットマシン、ポーカー、ブラックジャック、ルーレットなど、さまざまなゲームを提供しており、実際のカジノの興奮を維持しながら、アクセスの容易さと利便性を提供します。
一方で、オンラインギャンブルは、より広範な概念であり、スポーツベッティング、宝くじ、バーチャルスポーツ、そしてオンラインカジノゲームまでを含んでいます。インターネットとモバイルテクノロジーの普及により、オンラインギャンブルは世界中で大きな人気を博しています。オンラインプラットフォームは、伝統的な賭博施設に比べて、より多様なゲーム選択、便利なアクセス、そしてしばしば魅力的なボーナスやプロモーションを提供しています。
安全性と規制
オンラインカジノとオンラインギャンブルの世界では、安全性と規制が非常に重要です。多くの国々では、オンラインギャンブルを規制する法律があり、安全なプレイ環境を確保するためのライセンスシステムを設けています。これにより、不正行為や詐欺からプレイヤーを守るとともに、責任ある賭博の促進が図られています。
技術の進歩
最新のテクノロジーは、オンラインカジノとオンラインギャンブルの体験を一層豊かにしています。例えば、仮想現実(VR)技術の使用は、プレイヤーに没入型のギャンブル体験を提供し、実際のカジノにいるかのような感覚を生み出しています。また、ブロックチェーン技術の導入は、より透明で安全な取引を可能にし、プレイヤーの信頼を高めています。
未来への展望
オンラインカジノとオンラインギャンブルは、今後も技術の進歩とともに進化し続けるでしょう。人工知能(AI)の更なる統合、モバイル技術の発展、さらには新しいゲームの創造により、この分野は引き続き成長し、世界中のプレイヤーに新しい娯楽の形を提供し続けることでしょう。
この記事では、オンラインカジノとオンラインギャンブルの現状、安全性、技術の影響、そして将来の展望に焦点を当てています。この分野は、技術革新によって絶えず変化し続ける魅力的な領域です。
Абузоустойчивый сервер для работы с Хрумером, GSA и всевозможными скриптами!
Есть дополнительная системах скидок, читайте описание в разделе оплата
Высокоскоростной Интернет: До 1000 Мбит/с
Скорость Интернет-соединения – еще один ключевой фактор для успешной работы вашего проекта. Наши VPS/VDS серверы, поддерживающие Windows и Linux, обеспечивают доступ к интернету со скоростью до 1000 Мбит/с, гарантируя быструю загрузку веб-страниц и высокую производительность онлайн-приложений на обеих операционных системах.
Воспользуйтесь нашим предложением VPS/VDS серверов и обеспечьте стабильность и производительность вашего проекта. Посоветуйте VPS – ваш путь к успешному онлайн-присутствию!
фотограф в риме
best canadian online pharmacy reviews legal to buy prescription drugs from canada – my canadian pharmacy review canadiandrugs.tech
Абузоустойчивый сервер для работы с Хрумером, GSA и всевозможными скриптами!
Есть дополнительная системах скидок, читайте описание в разделе оплата
Виртуальные сервера (VPS/VDS) и Дедик Сервер: Оптимальное Решение для Вашего Проекта
В мире современных вычислений виртуальные сервера (VPS/VDS) и дедик сервера становятся ключевыми элементами успешного бизнеса и онлайн-проектов. Выбор оптимальной операционной системы и типа сервера являются решающими шагами в создании надежной и эффективной инфраструктуры. Наши VPS/VDS серверы Windows и Linux, доступные от 13 рублей, а также дедик серверы, предлагают целый ряд преимуществ, делая их неотъемлемыми инструментами для развития вашего проекта.
ed remedies best ed treatment – ed medications list edpills.tech
http://prednisone.bid/# otc prednisone cream
http://amoxil.icu/# amoxicillin 500mg capsule
http://amoxil.icu/# amoxicillin 825 mg
https://loveshop.click/
круизы в японию
https://prednisone.bid/# prednisone over the counter
http://paxlovid.win/# paxlovid india
санмар оаэ
санмар египет
buy cipro cheap: buy generic ciprofloxacin – buy cipro online without prescription
https://clomid.site/# clomid without prescription
Дедик сервер
Абузоустойчивый сервер для работы с Хрумером, GSA и всевозможными скриптами!
Есть дополнительная системах скидок, читайте описание в разделе оплата
Виртуальные сервера (VPS/VDS) и Дедик Сервер: Оптимальное Решение для Вашего Проекта
В мире современных вычислений виртуальные сервера (VPS/VDS) и дедик сервера становятся ключевыми элементами успешного бизнеса и онлайн-проектов. Выбор оптимальной операционной системы и типа сервера являются решающими шагами в создании надежной и эффективной инфраструктуры. Наши VPS/VDS серверы Windows и Linux, доступные от 13 рублей, а также дедик серверы, предлагают целый ряд преимуществ, делая их неотъемлемыми инструментами для развития вашего проекта.
http://ciprofloxacin.life/# buy cipro cheap
prednisone without rx: buy generic prednisone online – can i purchase prednisone without a prescription
how to buy generic clomid for sale how to get cheap clomid without rx – order cheap clomid
can i buy cheap clomid without dr prescription: can you buy generic clomid – get cheap clomid without rx
can i get clomid without insurance: how to get generic clomid without a prescription – where to buy generic clomid for sale
осоветуйте vps
Абузоустойчивый сервер для работы с Хрумером и GSA и различными скриптами!
Есть дополнительная системах скидок, читайте описание в разделе оплата
Виртуальные сервера VPS/VDS и Дедик Сервер: Оптимальное Решение для Вашего Проекта
В мире современных вычислений виртуальные сервера VPS/VDS и дедик сервера становятся ключевыми элементами успешного бизнеса и онлайн-проектов. Выбор оптимальной операционной системы и типа сервера являются решающими шагами в создании надежной и эффективной инфраструктуры. Наши VPS/VDS серверы Windows и Linux, доступные от 13 рублей, а также дедик серверы, предлагают целый ряд преимуществ, делая их неотъемлемыми инструментами для развития вашего проекта.
https://amoxil.icu/# where can i buy amoxicillin without prec
https://amoxil.icu/# amoxicillin canada price
民意調查
民意調查是什麼?民調什麼意思?
民意調查又稱為輿論調查或民意測驗,簡稱民調。一般而言,民調是一種為了解公眾對某些政治、社會問題與政策的意見和態度,由專業民調公司或媒體進行的調查方法。
目的在於通過網路、電話、或書面等媒介,對大量樣本的問卷調查抽樣,利用統計學的抽樣理論來推斷較為客觀,且能較為精確地推論社會輿論或民意動向的一種方法。
以下是民意調查的一些基本特點和重要性:
抽樣:由於不可能向每一個人詢問意見,所以調查者會選擇一個代表性的樣本進行調查。這樣本的大小和抽樣方法都會影響調查的準確性和可靠性。
問卷設計:為了確保獲得可靠的結果,問卷必須經過精心設計,問題要清晰、不帶偏見,且易於理解。
數據分析:收集到的數據將被分析以得出結論。這可能包括計算百分比、平均值、標準差等,以及更複雜的統計分析。
多種用途:民意調查可以用於各種目的,包括政策制定、選舉預測、市場研究、社會科學研究等。
限制:雖然民意調查是一個有價值的工具,但它也有其限制。例如,樣本可能不完全代表目標人群,或者問卷的設計可能導致偏見。
影響決策:民意調查的結果常常被政府、企業和其他組織用來影響其決策。
透明度和誠實:為了維護調查的可信度,調查組織應該提供其調查方法、樣本大小、抽樣方法和可能的誤差範圍等詳細資訊。
民調是怎麼調查的?
民意調查(輿論調查)的意義是指為瞭解大多數民眾的看法、意見、利益與需求,以科學、系統與公正的資料,蒐集可以代表全部群眾(母體)的部分群眾(抽樣),設計問卷題目後,以人工或電腦詢問部分民眾對特定議題的看法與評價,利用抽樣出來部分民眾的意見與看法,來推論目前全部民眾的意見與看法,藉以衡量社會與政治的狀態。
以下是進行民調調查的基本步驟:
定義目標和目的:首先,調查者需要明確調查的目的。是要了解公眾對某個政策的看法?還是要評估某個政治候選人的支持率?
設計問卷:根據調查目的,研究者會設計一份問卷。問卷應該包含清晰、不帶偏見的問題,並避免導向性的語言。
選擇樣本:因為通常不可能調查所有人,所以會選擇一部分人作為代表。這部分人被稱為“樣本”。最理想的情況是使用隨機抽樣,以確保每個人都有被選中的機會。
收集數據:有多種方法可以收集數據,如面對面訪問、電話訪問、郵件調查或在線調查。
數據分析:一旦數據被收集,研究者會使用統計工具和技術進行分析,得出結論或洞見。
報告結果:分析完數據後,研究者會編寫報告或發布結果。報告通常會提供調查方法、樣本大小、誤差範圍和主要發現。
解釋誤差範圍:多數民調報告都會提供誤差範圍,例如“±3%”。這表示實際的結果有可能在報告結果的3%範圍內上下浮動。
民調調查的質量和可信度很大程度上取決於其設計和實施的方法。若是由專業和無偏見的組織進行,且使用科學的方法,那麼民調結果往往較為可靠。但即使是最高質量的民調也會有一定的誤差,因此解讀時應保持批判性思考。
為什麼要做民調?
民調提供了一種系統性的方式來了解大眾的意見、態度和信念。進行民調的原因多種多樣,以下是一些主要的動機:
政策制定和評估:政府和政策制定者進行民調,以了解公眾對某一議題或政策的看法。這有助於制定或調整政策,以反映大眾的需求和意見。
選舉和政治活動:政黨和候選人通常使用民調來評估自己在選舉中的地位,了解哪些議題對選民最重要,以及如何調整策略以吸引更多支持。
市場研究:企業和組織進行民調以了解消費者對產品、服務或品牌的態度,從而制定或調整市場策略。
社會科學研究:學者和研究者使用民調來了解人們的社會、文化和心理特征,以及其與行為的關係。
公眾與媒體的期望:民調提供了一種方式,使公眾、政府和企業得以了解社會的整體趨勢和態度。媒體也經常報導民調結果,提供公眾對當前議題的見解。
提供反饋和評估:無論是企業還是政府,都可以透過民調了解其表現、服務或政策的效果,並根據反饋進行改進。
預測和趨勢分析:民調可以幫助預測某些趨勢或行為的未來發展,如選舉結果、市場需求等。
教育和提高公眾意識:通過進行和公布民調,可以促使公眾對某一議題或問題有更深入的了解和討論。
民調可信嗎?
民意調查的結果數據隨處可見,尤其是政治性民調結果幾乎可說是天天在新聞上放送,對總統的滿意度下降了多少百分比,然而大家又信多少?
在景美市場的訪問中,我們了解到民眾對民調有一些普遍的觀點。大多數受訪者表示,他們對民調的可信度存有疑慮,主要原因是他們擔心政府可能會在調查中進行操控,以符合特定政治目標。
受訪者還提到,民意調查的結果通常不會對他們的投票意願產生影響。換句話說,他們的選擇通常受到更多因素的影響,例如候選人的政策立場和政府做事的認真與否,而不是單純依賴民調結果。
從訪問中我們可以得出的結論是,大多數民眾對民調持謹慎態度,並認為它們對他們的投票決策影響有限。
總統民調
民意調查是什麼?民調什麼意思?
民意調查又稱為輿論調查或民意測驗,簡稱民調。一般而言,民調是一種為了解公眾對某些政治、社會問題與政策的意見和態度,由專業民調公司或媒體進行的調查方法。
目的在於通過網路、電話、或書面等媒介,對大量樣本的問卷調查抽樣,利用統計學的抽樣理論來推斷較為客觀,且能較為精確地推論社會輿論或民意動向的一種方法。
以下是民意調查的一些基本特點和重要性:
抽樣:由於不可能向每一個人詢問意見,所以調查者會選擇一個代表性的樣本進行調查。這樣本的大小和抽樣方法都會影響調查的準確性和可靠性。
問卷設計:為了確保獲得可靠的結果,問卷必須經過精心設計,問題要清晰、不帶偏見,且易於理解。
數據分析:收集到的數據將被分析以得出結論。這可能包括計算百分比、平均值、標準差等,以及更複雜的統計分析。
多種用途:民意調查可以用於各種目的,包括政策制定、選舉預測、市場研究、社會科學研究等。
限制:雖然民意調查是一個有價值的工具,但它也有其限制。例如,樣本可能不完全代表目標人群,或者問卷的設計可能導致偏見。
影響決策:民意調查的結果常常被政府、企業和其他組織用來影響其決策。
透明度和誠實:為了維護調查的可信度,調查組織應該提供其調查方法、樣本大小、抽樣方法和可能的誤差範圍等詳細資訊。
民調是怎麼調查的?
民意調查(輿論調查)的意義是指為瞭解大多數民眾的看法、意見、利益與需求,以科學、系統與公正的資料,蒐集可以代表全部群眾(母體)的部分群眾(抽樣),設計問卷題目後,以人工或電腦詢問部分民眾對特定議題的看法與評價,利用抽樣出來部分民眾的意見與看法,來推論目前全部民眾的意見與看法,藉以衡量社會與政治的狀態。
以下是進行民調調查的基本步驟:
定義目標和目的:首先,調查者需要明確調查的目的。是要了解公眾對某個政策的看法?還是要評估某個政治候選人的支持率?
設計問卷:根據調查目的,研究者會設計一份問卷。問卷應該包含清晰、不帶偏見的問題,並避免導向性的語言。
選擇樣本:因為通常不可能調查所有人,所以會選擇一部分人作為代表。這部分人被稱為“樣本”。最理想的情況是使用隨機抽樣,以確保每個人都有被選中的機會。
收集數據:有多種方法可以收集數據,如面對面訪問、電話訪問、郵件調查或在線調查。
數據分析:一旦數據被收集,研究者會使用統計工具和技術進行分析,得出結論或洞見。
報告結果:分析完數據後,研究者會編寫報告或發布結果。報告通常會提供調查方法、樣本大小、誤差範圍和主要發現。
解釋誤差範圍:多數民調報告都會提供誤差範圍,例如“±3%”。這表示實際的結果有可能在報告結果的3%範圍內上下浮動。
民調調查的質量和可信度很大程度上取決於其設計和實施的方法。若是由專業和無偏見的組織進行,且使用科學的方法,那麼民調結果往往較為可靠。但即使是最高質量的民調也會有一定的誤差,因此解讀時應保持批判性思考。
為什麼要做民調?
民調提供了一種系統性的方式來了解大眾的意見、態度和信念。進行民調的原因多種多樣,以下是一些主要的動機:
政策制定和評估:政府和政策制定者進行民調,以了解公眾對某一議題或政策的看法。這有助於制定或調整政策,以反映大眾的需求和意見。
選舉和政治活動:政黨和候選人通常使用民調來評估自己在選舉中的地位,了解哪些議題對選民最重要,以及如何調整策略以吸引更多支持。
市場研究:企業和組織進行民調以了解消費者對產品、服務或品牌的態度,從而制定或調整市場策略。
社會科學研究:學者和研究者使用民調來了解人們的社會、文化和心理特征,以及其與行為的關係。
公眾與媒體的期望:民調提供了一種方式,使公眾、政府和企業得以了解社會的整體趨勢和態度。媒體也經常報導民調結果,提供公眾對當前議題的見解。
提供反饋和評估:無論是企業還是政府,都可以透過民調了解其表現、服務或政策的效果,並根據反饋進行改進。
預測和趨勢分析:民調可以幫助預測某些趨勢或行為的未來發展,如選舉結果、市場需求等。
教育和提高公眾意識:通過進行和公布民調,可以促使公眾對某一議題或問題有更深入的了解和討論。
民調可信嗎?
民意調查的結果數據隨處可見,尤其是政治性民調結果幾乎可說是天天在新聞上放送,對總統的滿意度下降了多少百分比,然而大家又信多少?
在景美市場的訪問中,我們了解到民眾對民調有一些普遍的觀點。大多數受訪者表示,他們對民調的可信度存有疑慮,主要原因是他們擔心政府可能會在調查中進行操控,以符合特定政治目標。
受訪者還提到,民意調查的結果通常不會對他們的投票意願產生影響。換句話說,他們的選擇通常受到更多因素的影響,例如候選人的政策立場和政府做事的認真與否,而不是單純依賴民調結果。
從訪問中我們可以得出的結論是,大多數民眾對民調持謹慎態度,並認為它們對他們的投票決策影響有限。
lisinopril in mexico: zestril lisinopril – lisinopril 40
doxycycline pills: vibramycin 100 mg – doxycycline generic
https://zithromaxbestprice.icu/# zithromax canadian pharmacy
pct nolvadex: effexor and tamoxifen – femara vs tamoxifen
http://nolvadex.fun/# nolvadex price
http://zithromaxbestprice.icu/# buy zithromax 1000mg online
lisinopril 200mg: lisinopril 20mg daily – how much is lisinopril
lisinopril tablets for sale: lisinopril hct – lisinopril tab 5 mg price
http://zithromaxbestprice.icu/# zithromax for sale 500 mg
2024總統大選民調
民意調查是什麼?民調什麼意思?
民意調查又稱為輿論調查或民意測驗,簡稱民調。一般而言,民調是一種為了解公眾對某些政治、社會問題與政策的意見和態度,由專業民調公司或媒體進行的調查方法。
目的在於通過網路、電話、或書面等媒介,對大量樣本的問卷調查抽樣,利用統計學的抽樣理論來推斷較為客觀,且能較為精確地推論社會輿論或民意動向的一種方法。
以下是民意調查的一些基本特點和重要性:
抽樣:由於不可能向每一個人詢問意見,所以調查者會選擇一個代表性的樣本進行調查。這樣本的大小和抽樣方法都會影響調查的準確性和可靠性。
問卷設計:為了確保獲得可靠的結果,問卷必須經過精心設計,問題要清晰、不帶偏見,且易於理解。
數據分析:收集到的數據將被分析以得出結論。這可能包括計算百分比、平均值、標準差等,以及更複雜的統計分析。
多種用途:民意調查可以用於各種目的,包括政策制定、選舉預測、市場研究、社會科學研究等。
限制:雖然民意調查是一個有價值的工具,但它也有其限制。例如,樣本可能不完全代表目標人群,或者問卷的設計可能導致偏見。
影響決策:民意調查的結果常常被政府、企業和其他組織用來影響其決策。
透明度和誠實:為了維護調查的可信度,調查組織應該提供其調查方法、樣本大小、抽樣方法和可能的誤差範圍等詳細資訊。
民調是怎麼調查的?
民意調查(輿論調查)的意義是指為瞭解大多數民眾的看法、意見、利益與需求,以科學、系統與公正的資料,蒐集可以代表全部群眾(母體)的部分群眾(抽樣),設計問卷題目後,以人工或電腦詢問部分民眾對特定議題的看法與評價,利用抽樣出來部分民眾的意見與看法,來推論目前全部民眾的意見與看法,藉以衡量社會與政治的狀態。
以下是進行民調調查的基本步驟:
定義目標和目的:首先,調查者需要明確調查的目的。是要了解公眾對某個政策的看法?還是要評估某個政治候選人的支持率?
設計問卷:根據調查目的,研究者會設計一份問卷。問卷應該包含清晰、不帶偏見的問題,並避免導向性的語言。
選擇樣本:因為通常不可能調查所有人,所以會選擇一部分人作為代表。這部分人被稱為“樣本”。最理想的情況是使用隨機抽樣,以確保每個人都有被選中的機會。
收集數據:有多種方法可以收集數據,如面對面訪問、電話訪問、郵件調查或在線調查。
數據分析:一旦數據被收集,研究者會使用統計工具和技術進行分析,得出結論或洞見。
報告結果:分析完數據後,研究者會編寫報告或發布結果。報告通常會提供調查方法、樣本大小、誤差範圍和主要發現。
解釋誤差範圍:多數民調報告都會提供誤差範圍,例如“±3%”。這表示實際的結果有可能在報告結果的3%範圍內上下浮動。
民調調查的質量和可信度很大程度上取決於其設計和實施的方法。若是由專業和無偏見的組織進行,且使用科學的方法,那麼民調結果往往較為可靠。但即使是最高質量的民調也會有一定的誤差,因此解讀時應保持批判性思考。
為什麼要做民調?
民調提供了一種系統性的方式來了解大眾的意見、態度和信念。進行民調的原因多種多樣,以下是一些主要的動機:
政策制定和評估:政府和政策制定者進行民調,以了解公眾對某一議題或政策的看法。這有助於制定或調整政策,以反映大眾的需求和意見。
選舉和政治活動:政黨和候選人通常使用民調來評估自己在選舉中的地位,了解哪些議題對選民最重要,以及如何調整策略以吸引更多支持。
市場研究:企業和組織進行民調以了解消費者對產品、服務或品牌的態度,從而制定或調整市場策略。
社會科學研究:學者和研究者使用民調來了解人們的社會、文化和心理特征,以及其與行為的關係。
公眾與媒體的期望:民調提供了一種方式,使公眾、政府和企業得以了解社會的整體趨勢和態度。媒體也經常報導民調結果,提供公眾對當前議題的見解。
提供反饋和評估:無論是企業還是政府,都可以透過民調了解其表現、服務或政策的效果,並根據反饋進行改進。
預測和趨勢分析:民調可以幫助預測某些趨勢或行為的未來發展,如選舉結果、市場需求等。
教育和提高公眾意識:通過進行和公布民調,可以促使公眾對某一議題或問題有更深入的了解和討論。
民調可信嗎?
民意調查的結果數據隨處可見,尤其是政治性民調結果幾乎可說是天天在新聞上放送,對總統的滿意度下降了多少百分比,然而大家又信多少?
在景美市場的訪問中,我們了解到民眾對民調有一些普遍的觀點。大多數受訪者表示,他們對民調的可信度存有疑慮,主要原因是他們擔心政府可能會在調查中進行操控,以符合特定政治目標。
受訪者還提到,民意調查的結果通常不會對他們的投票意願產生影響。換句話說,他們的選擇通常受到更多因素的影響,例如候選人的政策立場和政府做事的認真與否,而不是單純依賴民調結果。
從訪問中我們可以得出的結論是,大多數民眾對民調持謹慎態度,並認為它們對他們的投票決策影響有限。
п»їcytotec pills online: purchase cytotec – purchase cytotec
https://zithromaxbestprice.icu/# zithromax cost canada
zithromax for sale cheap: zithromax for sale cheap – buy azithromycin zithromax
order cytotec online: п»їcytotec pills online – buy cytotec
最新民調
民意調查是什麼?民調什麼意思?
民意調查又稱為輿論調查或民意測驗,簡稱民調。一般而言,民調是一種為了解公眾對某些政治、社會問題與政策的意見和態度,由專業民調公司或媒體進行的調查方法。
目的在於通過網路、電話、或書面等媒介,對大量樣本的問卷調查抽樣,利用統計學的抽樣理論來推斷較為客觀,且能較為精確地推論社會輿論或民意動向的一種方法。
以下是民意調查的一些基本特點和重要性:
抽樣:由於不可能向每一個人詢問意見,所以調查者會選擇一個代表性的樣本進行調查。這樣本的大小和抽樣方法都會影響調查的準確性和可靠性。
問卷設計:為了確保獲得可靠的結果,問卷必須經過精心設計,問題要清晰、不帶偏見,且易於理解。
數據分析:收集到的數據將被分析以得出結論。這可能包括計算百分比、平均值、標準差等,以及更複雜的統計分析。
多種用途:民意調查可以用於各種目的,包括政策制定、選舉預測、市場研究、社會科學研究等。
限制:雖然民意調查是一個有價值的工具,但它也有其限制。例如,樣本可能不完全代表目標人群,或者問卷的設計可能導致偏見。
影響決策:民意調查的結果常常被政府、企業和其他組織用來影響其決策。
透明度和誠實:為了維護調查的可信度,調查組織應該提供其調查方法、樣本大小、抽樣方法和可能的誤差範圍等詳細資訊。
民調是怎麼調查的?
民意調查(輿論調查)的意義是指為瞭解大多數民眾的看法、意見、利益與需求,以科學、系統與公正的資料,蒐集可以代表全部群眾(母體)的部分群眾(抽樣),設計問卷題目後,以人工或電腦詢問部分民眾對特定議題的看法與評價,利用抽樣出來部分民眾的意見與看法,來推論目前全部民眾的意見與看法,藉以衡量社會與政治的狀態。
以下是進行民調調查的基本步驟:
定義目標和目的:首先,調查者需要明確調查的目的。是要了解公眾對某個政策的看法?還是要評估某個政治候選人的支持率?
設計問卷:根據調查目的,研究者會設計一份問卷。問卷應該包含清晰、不帶偏見的問題,並避免導向性的語言。
選擇樣本:因為通常不可能調查所有人,所以會選擇一部分人作為代表。這部分人被稱為“樣本”。最理想的情況是使用隨機抽樣,以確保每個人都有被選中的機會。
收集數據:有多種方法可以收集數據,如面對面訪問、電話訪問、郵件調查或在線調查。
數據分析:一旦數據被收集,研究者會使用統計工具和技術進行分析,得出結論或洞見。
報告結果:分析完數據後,研究者會編寫報告或發布結果。報告通常會提供調查方法、樣本大小、誤差範圍和主要發現。
解釋誤差範圍:多數民調報告都會提供誤差範圍,例如“±3%”。這表示實際的結果有可能在報告結果的3%範圍內上下浮動。
民調調查的質量和可信度很大程度上取決於其設計和實施的方法。若是由專業和無偏見的組織進行,且使用科學的方法,那麼民調結果往往較為可靠。但即使是最高質量的民調也會有一定的誤差,因此解讀時應保持批判性思考。
為什麼要做民調?
民調提供了一種系統性的方式來了解大眾的意見、態度和信念。進行民調的原因多種多樣,以下是一些主要的動機:
政策制定和評估:政府和政策制定者進行民調,以了解公眾對某一議題或政策的看法。這有助於制定或調整政策,以反映大眾的需求和意見。
選舉和政治活動:政黨和候選人通常使用民調來評估自己在選舉中的地位,了解哪些議題對選民最重要,以及如何調整策略以吸引更多支持。
市場研究:企業和組織進行民調以了解消費者對產品、服務或品牌的態度,從而制定或調整市場策略。
社會科學研究:學者和研究者使用民調來了解人們的社會、文化和心理特征,以及其與行為的關係。
公眾與媒體的期望:民調提供了一種方式,使公眾、政府和企業得以了解社會的整體趨勢和態度。媒體也經常報導民調結果,提供公眾對當前議題的見解。
提供反饋和評估:無論是企業還是政府,都可以透過民調了解其表現、服務或政策的效果,並根據反饋進行改進。
預測和趨勢分析:民調可以幫助預測某些趨勢或行為的未來發展,如選舉結果、市場需求等。
教育和提高公眾意識:通過進行和公布民調,可以促使公眾對某一議題或問題有更深入的了解和討論。
民調可信嗎?
民意調查的結果數據隨處可見,尤其是政治性民調結果幾乎可說是天天在新聞上放送,對總統的滿意度下降了多少百分比,然而大家又信多少?
在景美市場的訪問中,我們了解到民眾對民調有一些普遍的觀點。大多數受訪者表示,他們對民調的可信度存有疑慮,主要原因是他們擔心政府可能會在調查中進行操控,以符合特定政治目標。
受訪者還提到,民意調查的結果通常不會對他們的投票意願產生影響。換句話說,他們的選擇通常受到更多因素的影響,例如候選人的政策立場和政府做事的認真與否,而不是單純依賴民調結果。
從訪問中我們可以得出的結論是,大多數民眾對民調持謹慎態度,並認為它們對他們的投票決策影響有限。
is canadian pharmacy legit: Canadian pharmacy best prices – best canadian pharmacy online canadapharm.life
mexico drug stores pharmacies Medicines Mexico best online pharmacies in mexico mexicopharm.com
canadian 24 hour pharmacy: Canadian online pharmacy – canadian pharmacy uk delivery canadapharm.life
http://canadapharm.life/# canada rx pharmacy canadapharm.life
mexican online pharmacies prescription drugs: Best pharmacy in Mexico – mexican pharmaceuticals online mexicopharm.com
buying prescription drugs in mexico online Best pharmacy in Mexico mexican mail order pharmacies mexicopharm.com
reputable indian online pharmacy: Online India pharmacy – mail order pharmacy india indiapharm.llc
canadian pharmacy 365: Cheapest drug prices Canada – reliable canadian pharmacy canadapharm.life
top online pharmacy india: India Post sending medicines to USA – best india pharmacy indiapharm.llc
http://indiapharm.llc/# indianpharmacy com indiapharm.llc
mexico drug stores pharmacies: mexican pharmacy – reputable mexican pharmacies online mexicopharm.com
https://mexicopharm.com/# reputable mexican pharmacies online mexicopharm.com
medicine in mexico pharmacies Medicines Mexico mexican border pharmacies shipping to usa mexicopharm.com
психология человеческого поведения онлайн курсы
cheap kamagra: cheap kamagra – Kamagra 100mg price
Buy generic Levitra online: Levitra online – buy Levitra over the counter
sildenafil citrate: Sildenafil price – sildenafil discount price
http://sildenafildelivery.pro/# cost of sildenafil in india
Levitra 10 mg best price: Buy generic Levitra online – Levitra 20 mg for sale
lowest price for sildenafil 20 mg sildenafil pharmacy prices sildenafil 2.5 mg
new ed treatments: buy ed drugs online – cheap erectile dysfunction pills online
sildenafil 90mg: buy sildenafil online – sildenafil citrate
Generic Levitra 20mg: Levitra online – Buy Levitra 20mg online
tadalafil 2.5 mg cost: Tadalafil 20mg price in Canada – tadalafil 5 mg tablet coupon
paxlovid pharmacy paxlovid price without insurance paxlovid covid
http://amoxil.guru/# rexall pharmacy amoxicillin 500mg
http://amoxil.guru/# generic amoxicillin 500mg
Paxlovid buy online Paxlovid buy online Paxlovid buy online
https://paxlovid.guru/# paxlovid cost without insurance
http://stromectol.guru/# stromectol in canada
составить резюме
paxlovid for sale: Paxlovid buy online – Paxlovid buy online
http://paxlovid.guru/# paxlovid
http://amoxil.guru/# amoxicillin generic
paxlovid india paxlovid price without insurance Paxlovid buy online
http://amoxil.guru/# generic amoxicillin online
nemesis market url
https://furosemide.pro/# lasix online
http://azithromycin.store/# buy zithromax without presc
zithromax capsules price: cheapest azithromycin – buy zithromax 1000 mg online
cost of cheap propecia pill Buy finasteride 1mg cost cheap propecia without a prescription
lasix furosemide 40 mg: furosemide 100mg – lasix 100 mg tablet
https://finasteride.men/# cost of cheap propecia pill
order propecia tablets: Finasteride buy online – propecia
https://lisinopril.fun/# lisinopril generic price comparison
lisinopril 5mg buy: High Blood Pressure – 60 lisinopril cost
buying generic propecia tablets: Buy finasteride 1mg – buying propecia for sale
buy cytotec pills online cheap: buy cytotec over the counter – purchase cytotec
order cheap propecia no prescription: Buy Finasteride 5mg – order cheap propecia no prescription
http://furosemide.pro/# lasix side effects
http://furosemide.pro/# lasix furosemide
order generic propecia pills: Finasteride buy online – get generic propecia
zithromax prescription: buy zithromax z-pak online – zithromax cost
https://feedker.com/
https://furosemide.pro/# furosemida 40 mg
where can i purchase lisinopril: buy lisinopril canada – lisinopril 5 mg tabs
https://lisinopril.fun/# lisinopril 10 mg coupon
zithromax order online uk: buy zithromax z-pak online – zithromax 500 price
https://furosemide.pro/# lasix tablet
Misoprostol 200 mg buy online: buy cytotec over the counter – buy cytotec in usa
http://azithromycin.store/# zithromax over the counter canada
https://sildenafilitalia.men/# viagra online spedizione gratuita
farmacia online miglior prezzo: kamagra oral jelly – farmacie online sicure
сливы умскул
http://tadalafilitalia.pro/# farmacia online miglior prezzo
сливы умскул
farmacia online miglior prezzo: dove acquistare cialis online sicuro – п»їfarmacia online migliore
farmacie online affidabili: avanafil generico – comprare farmaci online all’estero
farmacie online autorizzate elenco: cialis generico – top farmacia online
http://avanafilitalia.online/# farmacia online senza ricetta
farmacia online: farmacia online miglior prezzo – farmacie online autorizzate elenco
https://simulateur-portage-salarial.fr/
farmacia online miglior prezzo: avanafil – farmacie on line spedizione gratuita
https://www.umalis.fr/
https://www.missions-cadres.com/
п»їfarmacia online migliore: farmacia online migliore – farmacie online affidabili
comprare farmaci online con ricetta: kamagra – farmacia online senza ricetta
https://farmaciaitalia.store/# farmacia online migliore
viagra naturale in farmacia senza ricetta: viagra senza ricetta – pillole per erezione immediata
http://sildenafilitalia.men/# viagra 50 mg prezzo in farmacia
http://tadalafilitalia.pro/# farmacia online migliore
kamagra senza ricetta in farmacia: viagra senza ricetta – viagra online spedizione gratuita
https://tadalafilitalia.pro/# farmacia online
best online pharmacy india: buy medicines online in india – india pharmacy
online pharmacy india indian pharmacies safe india pharmacy mail order
https://canadapharm.shop/# canadapharmacyonline
indian pharmacies safe: online pharmacy india – cheapest online pharmacy india
is canadian pharmacy legit: canadian drugs pharmacy – medication canadian pharmacy
http://indiapharm.life/# mail order pharmacy india
п»їbest mexican online pharmacies: pharmacies in mexico that ship to usa – mexican pharmacy
https://mexicanpharm.store/# buying prescription drugs in mexico
mexico drug stores pharmacies pharmacies in mexico that ship to usa buying from online mexican pharmacy
娛樂城
2024娛樂城的創新趨勢
隨著2024年的到來,娛樂城業界正經歷著一場革命性的變遷。這一年,娛樂城不僅僅是賭博和娛樂的代名詞,更成為了科技創新和用戶體驗的集大成者。
首先,2024年的娛樂城極大地融合了最新的技術。增強現實(AR)和虛擬現實(VR)技術的引入,為玩家提供了沉浸式的賭博體驗。這種全新的遊戲方式不僅帶來視覺上的震撼,還為玩家創造了一種置身於真實賭場的感覺,而實際上他們可能只是坐在家中的沙發上。
其次,人工智能(AI)在娛樂城中的應用也達到了新高度。AI技術不僅用於增強遊戲的公平性和透明度,還在個性化玩家體驗方面發揮著重要作用。從個性化遊戲推薦到智能客服,AI的應用使得娛樂城更能滿足玩家的個別需求。
此外,線上娛樂城的安全性和隱私保護也獲得了顯著加強。隨著技術的進步,更加先進的加密技術和安全措施被用來保護玩家的資料和交易,從而確保一個安全可靠的遊戲環境。
2024年的娛樂城還強調負責任的賭博。許多平台採用了各種工具和資源來幫助玩家控制他們的賭博行為,如設置賭注限制、自我排除措施等,體現了對可持續賭博的承諾。
總之,2024年的娛樂城呈現出一個高度融合了技術、安全和負責任賭博的行業新面貌,為玩家提供了前所未有的娛樂體驗。隨著這些趨勢的持續發展,我們可以預見,娛樂城將不斷地創新和進步,為玩家帶來更多精彩和安全的娛樂選擇。
buying prescription drugs in mexico online: mexican pharmacy – mexican mail order pharmacies
canadian pharmacy india: india pharmacy – buy prescription drugs from india
https://canadapharm.shop/# canadian pharmacy meds reviews
Online medicine order: best india pharmacy – best india pharmacy
https://mexicanpharm.store/# pharmacies in mexico that ship to usa
pharmacies in mexico that ship to usa: medication from mexico pharmacy – purple pharmacy mexico price list
https://indiapharm.life/# india online pharmacy
canadian pharmacy king: canadian pharmacy victoza – canadian drugstore online
canadian pharmacies that deliver to the us: canadian pharmacy review – is canadian pharmacy legit
legit canadian pharmacy: canadian discount pharmacy – canadian pharmacy price checker
https://mexicanpharm.store/# mexico pharmacies prescription drugs
mexican online pharmacies prescription drugs medicine in mexico pharmacies buying from online mexican pharmacy
mexico drug stores pharmacies: mexican pharmaceuticals online – mexican online pharmacies prescription drugs
https://canadapharm.shop/# canadian pharmacy king
indian pharmacy: india pharmacy – top 10 online pharmacy in india
canadian pharmacy price checker: canadian pharmacy no scripts – canadian pharmacy world reviews
http://mexicanpharm.store/# mexican pharmaceuticals online
Dubai, a city known for its opulence and modernity, demands a mode of transportation that reflects its grandeur. For those seeking a cost-effective and reliable long-term solution, Somonion Rent Car LLC emerges as the premier choice for monthly car rentals in Dubai. With a diverse fleet ranging from compact cars to premium vehicles, the company promises an unmatched blend of affordability, flexibility, and personalized service.
Favorable Rental Conditions:
Understanding the potential financial strain of long-term car rentals, Somonion Rent Car LLC aims to make your journey more economical. The company offers flexible rental terms coupled with exclusive discounts for loyal customers. This commitment to affordability extends beyond the rental cost, as additional services such as insurance, maintenance, and repair ensure your safety and peace of mind throughout the duration of your rental.
A Plethora of Options:
Somonion Rent Car LLC boasts an extensive selection of vehicles to cater to diverse preferences and budgets. Whether you’re in the market for a sleek sedan or a spacious crossover, the company has the perfect car to complement your needs. The transparency in pricing, coupled with the ease of booking through their online platform, makes Somonion Rent Car LLC a hassle-free solution for those embarking on a long-term adventure in Dubai.
Car Rental Services Tailored for You:
Somonion Rent Car LLC doesn’t just offer cars; it provides a comprehensive range of rental services tailored to suit various occasions. From daily and weekly rentals to airport transfers and business travel, the company ensures that your stay in Dubai is not only comfortable but also exudes prestige. The fleet includes popular models such as the Nissan Altima 2018, KIA Forte 2018, Hyundai Elantra 2018, and the Toyota Camry Sport Edition 2020, all available for monthly rentals at competitive rates.
Featured Deals and Specials:
Somonion Rent Car LLC constantly updates its offerings to provide customers with the best deals. Featured cars like the Hyundai Sonata 2018 and Hyundai Santa Fe 2018 add a touch of luxury to your rental experience, with daily rates starting as low as AED 100. The company’s commitment to affordable luxury is further emphasized by the online booking system, allowing customers to secure the best deals in real-time through their website or by contacting the experts via phone or WhatsApp.
Conclusion:
Whether you’re a tourist looking to explore Dubai at your pace or a business traveler in need of a reliable and prestigious mode of transportation, Somonion Rent Car LLC stands as the go-to choice for monthly car rentals in Dubai. Unlock the ultimate mobility experience with Somonion, where affordability meets excellence, ensuring your journey through Dubai is as seamless and luxurious as the city itself. Contact Somonion Rent Car LLC today and embark on a journey where every mile is a testament to comfort, style, and unmatched service.
Ferari for rent Dubai
Dubai, a city of grandeur and innovation, demands a transportation solution that matches its dynamic pace. Whether you’re a business executive, a tourist exploring the city, or someone in need of a reliable vehicle temporarily, car rental services in Dubai offer a flexible and cost-effective solution. In this guide, we’ll explore the popular car rental options in Dubai, catering to diverse needs and preferences.
Airport Car Rental: One-Way Pickup and Drop-off Road Trip Rentals:
For those who need to meet an important delegation at the airport or have a flight to another city, airport car rentals provide a seamless solution. Avoid the hassle of relying on public transport and ensure you reach your destination on time. With one-way pickup and drop-off options, you can effortlessly navigate your road trip, making business meetings or conferences immediately upon arrival.
Business Car Rental Deals & Corporate Vehicle Rentals in Dubai:
Companies without their own fleet or those finding transport maintenance too expensive can benefit from business car rental deals. This option is particularly suitable for businesses where a vehicle is needed only occasionally. By opting for corporate vehicle rentals, companies can optimize their staff structure, freeing employees from non-core functions while ensuring reliable transportation when necessary.
Tourist Car Rentals with Insurance in Dubai:
Tourists visiting Dubai can enjoy the freedom of exploring the city at their own pace with car rentals that come with insurance. This option allows travelers to choose a vehicle that suits the particulars of their trip without the hassle of dealing with insurance policies. Renting a car not only saves money and time compared to expensive city taxis but also ensures a trouble-free travel experience.
Daily Car Hire Near Me:
Daily car rental services are a convenient and cost-effective alternative to taxis in Dubai. Whether it’s for a business meeting, everyday use, or a luxury experience, you can find a suitable vehicle for a day on platforms like Smarketdrive.com. The website provides a secure and quick way to rent a car from certified and verified car rental companies, ensuring guarantees and safety.
Weekly Auto Rental Deals:
For those looking for flexibility throughout the week, weekly car rentals in Dubai offer a competent, attentive, and professional service. Whether you need a vehicle for a few days or an entire week, choosing a car rental weekly is a convenient and profitable option. The certified and tested car rental companies listed on Smarketdrive.com ensure a reliable and comfortable experience.
Monthly Car Rentals in Dubai:
When your personal car is undergoing extended repairs, or if you’re a frequent visitor to Dubai, monthly car rentals (long-term car rentals) become the ideal solution. Residents, businessmen, and tourists can benefit from the extensive options available on Smarketdrive.com, ensuring mobility and convenience throughout their stay in Dubai.
FAQ about Renting a Car in Dubai:
To address common queries about renting a car in Dubai, our FAQ section provides valuable insights and information. From rental terms to insurance coverage, it serves as a comprehensive guide for those considering the convenience of car rentals in the bustling city.
Conclusion:
Dubai’s popularity as a global destination is matched by its diverse and convenient car rental services. Whether for business, tourism, or daily commuting, the options available cater to every need. With reliable platforms like Smarketdrive.com, navigating Dubai becomes a seamless and enjoyable experience, offering both locals and visitors the ultimate freedom of mobility.
mexican pharmacy: mexico drug stores pharmacies – buying from online mexican pharmacy
https://xenon-lampa.ru/content/pags/promokod-1xbet_bonus.html
https://kostuym-gorka.ru/image/pgs/promokod-1xbet_bonus.html
http://mexicanpharm.store/# mexican pharmaceuticals online
purple pharmacy mexico price list: mexico drug stores pharmacies – mexico drug stores pharmacies
my canadian pharmacy: canadapharmacyonline com – canadian online pharmacy reviews
https://geotecniaymecanicasuelosabc.com/art/free1_1xbet_promo_code_9.html
2024娛樂城的創新趨勢
隨著2024年的到來,娛樂城業界正經歷著一場革命性的變遷。這一年,娛樂城不僅僅是賭博和娛樂的代名詞,更成為了科技創新和用戶體驗的集大成者。
首先,2024年的娛樂城極大地融合了最新的技術。增強現實(AR)和虛擬現實(VR)技術的引入,為玩家提供了沉浸式的賭博體驗。這種全新的遊戲方式不僅帶來視覺上的震撼,還為玩家創造了一種置身於真實賭場的感覺,而實際上他們可能只是坐在家中的沙發上。
其次,人工智能(AI)在娛樂城中的應用也達到了新高度。AI技術不僅用於增強遊戲的公平性和透明度,還在個性化玩家體驗方面發揮著重要作用。從個性化遊戲推薦到智能客服,AI的應用使得娛樂城更能滿足玩家的個別需求。
此外,線上娛樂城的安全性和隱私保護也獲得了顯著加強。隨著技術的進步,更加先進的加密技術和安全措施被用來保護玩家的資料和交易,從而確保一個安全可靠的遊戲環境。
2024年的娛樂城還強調負責任的賭博。許多平台採用了各種工具和資源來幫助玩家控制他們的賭博行為,如設置賭注限制、自我排除措施等,體現了對可持續賭博的承諾。
總之,2024年的娛樂城呈現出一個高度融合了技術、安全和負責任賭博的行業新面貌,為玩家提供了前所未有的娛樂體驗。隨著這些趨勢的持續發展,我們可以預見,娛樂城將不斷地創新和進步,為玩家帶來更多精彩和安全的娛樂選擇。
Dubai, a city known for its opulence and modernity, demands a mode of transportation that reflects its grandeur. For those seeking a cost-effective and reliable long-term solution, Somonion Rent Car LLC emerges as the premier choice for monthly car rentals in Dubai. With a diverse fleet ranging from compact cars to premium vehicles, the company promises an unmatched blend of affordability, flexibility, and personalized service.
Favorable Rental Conditions:
Understanding the potential financial strain of long-term car rentals, Somonion Rent Car LLC aims to make your journey more economical. The company offers flexible rental terms coupled with exclusive discounts for loyal customers. This commitment to affordability extends beyond the rental cost, as additional services such as insurance, maintenance, and repair ensure your safety and peace of mind throughout the duration of your rental.
A Plethora of Options:
Somonion Rent Car LLC boasts an extensive selection of vehicles to cater to diverse preferences and budgets. Whether you’re in the market for a sleek sedan or a spacious crossover, the company has the perfect car to complement your needs. The transparency in pricing, coupled with the ease of booking through their online platform, makes Somonion Rent Car LLC a hassle-free solution for those embarking on a long-term adventure in Dubai.
Car Rental Services Tailored for You:
Somonion Rent Car LLC doesn’t just offer cars; it provides a comprehensive range of rental services tailored to suit various occasions. From daily and weekly rentals to airport transfers and business travel, the company ensures that your stay in Dubai is not only comfortable but also exudes prestige. The fleet includes popular models such as the Nissan Altima 2018, KIA Forte 2018, Hyundai Elantra 2018, and the Toyota Camry Sport Edition 2020, all available for monthly rentals at competitive rates.
Featured Deals and Specials:
Somonion Rent Car LLC constantly updates its offerings to provide customers with the best deals. Featured cars like the Hyundai Sonata 2018 and Hyundai Santa Fe 2018 add a touch of luxury to your rental experience, with daily rates starting as low as AED 100. The company’s commitment to affordable luxury is further emphasized by the online booking system, allowing customers to secure the best deals in real-time through their website or by contacting the experts via phone or WhatsApp.
Conclusion:
Whether you’re a tourist looking to explore Dubai at your pace or a business traveler in need of a reliable and prestigious mode of transportation, Somonion Rent Car LLC stands as the go-to choice for monthly car rentals in Dubai. Unlock the ultimate mobility experience with Somonion, where affordability meets excellence, ensuring your journey through Dubai is as seamless and luxurious as the city itself. Contact Somonion Rent Car LLC today and embark on a journey where every mile is a testament to comfort, style, and unmatched service.
online pharmacy india indian pharmacies safe world pharmacy india
https://indiapharm.life/# indian pharmacy paypal
http://centroculturalrecoleta.org/blog/pages/1x_codigo_promocional_1xbet.html
safe canadian pharmacy: northern pharmacy canada – maple leaf pharmacy in canada
http://mexicanpharm.store/# reputable mexican pharmacies online
indian pharmacy online: top 10 online pharmacy in india – indian pharmacy paypal
buying clomid: clomid without prescription – clomid without dr prescription
http://clomidpharm.shop/# can i buy clomid without rx
can i order cheap clomid no prescription: where buy generic clomid tablets – get generic clomid pills
https://nolvadex.pro/# tamoxifen and osteoporosis
http://clomidpharm.shop/# clomid sale
https://prednisonepharm.store/# order prednisone online canada
buy cytotec online: buy cytotec over the counter – cytotec online
https://cytotec.directory/# buy misoprostol over the counter
prednisone 20mg cheap: prednisone coupon – prednisone best prices
http://cytotec.directory/# buy cytotec in usa
can i order cheap clomid pills: buy cheap clomid – can i purchase generic clomid without dr prescription
Watches World
Watches World: Elevating Luxury and Style with Exquisite Timepieces
Introduction:
Jewelry has always been a timeless expression of elegance, and nothing complements one’s style better than a luxurious timepiece. At Watches World, we bring you an exclusive collection of coveted luxury watches that not only tell time but also serve as a testament to your refined taste. Explore our curated selection featuring iconic brands like Rolex, Hublot, Omega, Cartier, and more, as we redefine the art of accessorizing.
A Dazzling Array of Luxury Watches:
Watches World offers an unparalleled range of exquisite timepieces from renowned brands, ensuring that you find the perfect accessory to elevate your style. Whether you’re drawn to the classic sophistication of Rolex, the avant-garde designs of Hublot, or the precision engineering of Patek Philippe, our collection caters to diverse preferences.
Customer Testimonials:
Our commitment to providing an exceptional customer experience is reflected in the reviews from our satisfied clientele. O.M. commends our excellent communication and flawless packaging, while Richard Houtman appreciates the helpfulness and courtesy of our team. These testimonials highlight our dedication to transparency, communication, and customer satisfaction.
New Arrivals:
Stay ahead of the curve with our latest additions, including the Tudor Black Bay Ceramic 41mm, Richard Mille RM35-01 Rafael Nadal NTPT Carbon Limited Edition, and the Rolex Oyster Perpetual Datejust 41mm series. These new arrivals showcase cutting-edge designs and impeccable craftsmanship, ensuring you stay on the forefront of luxury watch fashion.
Best Sellers:
Discover our best-selling watches, such as the Bulgari Serpenti Tubogas 35mm and the Cartier Panthere Medium Model. These timeless pieces combine elegance with precision, making them a staple in any sophisticated wardrobe.
Expert’s Selection:
Our experts have carefully curated a selection of watches, including the Cartier Panthere Small Model, Omega Speedmaster Moonwatch 44.25 mm, and Rolex Oyster Perpetual Cosmograph Daytona 40mm. These choices exemplify the epitome of watchmaking excellence and style.
Secured and Tracked Delivery:
At Watches World, we prioritize the safety of your purchase. Our secured and tracked delivery ensures that your exquisite timepiece reaches you in perfect condition, giving you peace of mind with every order.
Passionate Experts at Your Service:
Our team of passionate watch experts is dedicated to providing personalized service. From assisting you in choosing the perfect timepiece to addressing any inquiries, we are here to make your watch-buying experience seamless and enjoyable.
Global Presence:
With a presence in key cities around the world, including Dubai, Geneva, Hong Kong, London, Miami, Paris, Prague, Dublin, Singapore, and Sao Paulo, Watches World brings luxury timepieces to enthusiasts globally.
Conclusion:
Watches World goes beyond being an online platform for luxury watches; it is a destination where expertise, trust, and satisfaction converge. Explore our collection, and let our timeless timepieces become an integral part of your style narrative. Join us in redefining luxury, one exquisite watch at a time.
Ferari for rent Dubai
Dubai, a city of grandeur and innovation, demands a transportation solution that matches its dynamic pace. Whether you’re a business executive, a tourist exploring the city, or someone in need of a reliable vehicle temporarily, car rental services in Dubai offer a flexible and cost-effective solution. In this guide, we’ll explore the popular car rental options in Dubai, catering to diverse needs and preferences.
Airport Car Rental: One-Way Pickup and Drop-off Road Trip Rentals:
For those who need to meet an important delegation at the airport or have a flight to another city, airport car rentals provide a seamless solution. Avoid the hassle of relying on public transport and ensure you reach your destination on time. With one-way pickup and drop-off options, you can effortlessly navigate your road trip, making business meetings or conferences immediately upon arrival.
Business Car Rental Deals & Corporate Vehicle Rentals in Dubai:
Companies without their own fleet or those finding transport maintenance too expensive can benefit from business car rental deals. This option is particularly suitable for businesses where a vehicle is needed only occasionally. By opting for corporate vehicle rentals, companies can optimize their staff structure, freeing employees from non-core functions while ensuring reliable transportation when necessary.
Tourist Car Rentals with Insurance in Dubai:
Tourists visiting Dubai can enjoy the freedom of exploring the city at their own pace with car rentals that come with insurance. This option allows travelers to choose a vehicle that suits the particulars of their trip without the hassle of dealing with insurance policies. Renting a car not only saves money and time compared to expensive city taxis but also ensures a trouble-free travel experience.
Daily Car Hire Near Me:
Daily car rental services are a convenient and cost-effective alternative to taxis in Dubai. Whether it’s for a business meeting, everyday use, or a luxury experience, you can find a suitable vehicle for a day on platforms like Smarketdrive.com. The website provides a secure and quick way to rent a car from certified and verified car rental companies, ensuring guarantees and safety.
Weekly Auto Rental Deals:
For those looking for flexibility throughout the week, weekly car rentals in Dubai offer a competent, attentive, and professional service. Whether you need a vehicle for a few days or an entire week, choosing a car rental weekly is a convenient and profitable option. The certified and tested car rental companies listed on Smarketdrive.com ensure a reliable and comfortable experience.
Monthly Car Rentals in Dubai:
When your personal car is undergoing extended repairs, or if you’re a frequent visitor to Dubai, monthly car rentals (long-term car rentals) become the ideal solution. Residents, businessmen, and tourists can benefit from the extensive options available on Smarketdrive.com, ensuring mobility and convenience throughout their stay in Dubai.
FAQ about Renting a Car in Dubai:
To address common queries about renting a car in Dubai, our FAQ section provides valuable insights and information. From rental terms to insurance coverage, it serves as a comprehensive guide for those considering the convenience of car rentals in the bustling city.
Conclusion:
Dubai’s popularity as a global destination is matched by its diverse and convenient car rental services. Whether for business, tourism, or daily commuting, the options available cater to every need. With reliable platforms like Smarketdrive.com, navigating Dubai becomes a seamless and enjoyable experience, offering both locals and visitors the ultimate freedom of mobility.
monthly car rental in dubai
Dubai, a city known for its opulence and modernity, demands a mode of transportation that reflects its grandeur. For those seeking a cost-effective and reliable long-term solution, Somonion Rent Car LLC emerges as the premier choice for monthly car rentals in Dubai. With a diverse fleet ranging from compact cars to premium vehicles, the company promises an unmatched blend of affordability, flexibility, and personalized service.
Favorable Rental Conditions:
Understanding the potential financial strain of long-term car rentals, Somonion Rent Car LLC aims to make your journey more economical. The company offers flexible rental terms coupled with exclusive discounts for loyal customers. This commitment to affordability extends beyond the rental cost, as additional services such as insurance, maintenance, and repair ensure your safety and peace of mind throughout the duration of your rental.
A Plethora of Options:
Somonion Rent Car LLC boasts an extensive selection of vehicles to cater to diverse preferences and budgets. Whether you’re in the market for a sleek sedan or a spacious crossover, the company has the perfect car to complement your needs. The transparency in pricing, coupled with the ease of booking through their online platform, makes Somonion Rent Car LLC a hassle-free solution for those embarking on a long-term adventure in Dubai.
Car Rental Services Tailored for You:
Somonion Rent Car LLC doesn’t just offer cars; it provides a comprehensive range of rental services tailored to suit various occasions. From daily and weekly rentals to airport transfers and business travel, the company ensures that your stay in Dubai is not only comfortable but also exudes prestige. The fleet includes popular models such as the Nissan Altima 2018, KIA Forte 2018, Hyundai Elantra 2018, and the Toyota Camry Sport Edition 2020, all available for monthly rentals at competitive rates.
Featured Deals and Specials:
Somonion Rent Car LLC constantly updates its offerings to provide customers with the best deals. Featured cars like the Hyundai Sonata 2018 and Hyundai Santa Fe 2018 add a touch of luxury to your rental experience, with daily rates starting as low as AED 100. The company’s commitment to affordable luxury is further emphasized by the online booking system, allowing customers to secure the best deals in real-time through their website or by contacting the experts via phone or WhatsApp.
Conclusion:
Whether you’re a tourist looking to explore Dubai at your pace or a business traveler in need of a reliable and prestigious mode of transportation, Somonion Rent Car LLC stands as the go-to choice for monthly car rentals in Dubai. Unlock the ultimate mobility experience with Somonion, where affordability meets excellence, ensuring your journey through Dubai is as seamless and luxurious as the city itself. Contact Somonion Rent Car LLC today and embark on a journey where every mile is a testament to comfort, style, and unmatched service.
prednisone coupon prednisone 15 mg tablet 54 prednisone
buy cheap generic zithromax: zithromax 250 mg australia – cost of generic zithromax
http://cytotec.directory/# buy misoprostol over the counter
generic zithromax azithromycin: where can you buy zithromax – buy zithromax online cheap
buy prescription drugs: prescription drugs canada buy online – real cialis without a doctor’s prescription
http://reputablepharmacies.online/# canadian prescription filled in the us
nemesis darknet
buying prescription drugs canada: most trusted canadian pharmacy – canada pharmacies online prescriptions
https://edwithoutdoctorprescription.store/# mexican pharmacy without prescription
canada prescriptions online: buy prescription drugs canada – trust pharmacy
http://edwithoutdoctorprescription.store/# real viagra without a doctor prescription
canadian pharmacy meds: cheapest canadian pharmacy – mexican border pharmacies
https://reputablepharmacies.online/# accutane mexican pharmacy
http://edwithoutdoctorprescription.store/# best non prescription ed pills
canadian pharmacy antibiotics: buying prescription drugs canada – canada drugs online
Watches World: Elevating Luxury and Style with Exquisite Timepieces
Introduction:
Jewelry has always been a timeless expression of elegance, and nothing complements one’s style better than a luxurious timepiece. At Watches World, we bring you an exclusive collection of coveted luxury watches that not only tell time but also serve as a testament to your refined taste. Explore our curated selection featuring iconic brands like Rolex, Hublot, Omega, Cartier, and more, as we redefine the art of accessorizing.
A Dazzling Array of Luxury Watches:
Watches World offers an unparalleled range of exquisite timepieces from renowned brands, ensuring that you find the perfect accessory to elevate your style. Whether you’re drawn to the classic sophistication of Rolex, the avant-garde designs of Hublot, or the precision engineering of Patek Philippe, our collection caters to diverse preferences.
Customer Testimonials:
Our commitment to providing an exceptional customer experience is reflected in the reviews from our satisfied clientele. O.M. commends our excellent communication and flawless packaging, while Richard Houtman appreciates the helpfulness and courtesy of our team. These testimonials highlight our dedication to transparency, communication, and customer satisfaction.
New Arrivals:
Stay ahead of the curve with our latest additions, including the Tudor Black Bay Ceramic 41mm, Richard Mille RM35-01 Rafael Nadal NTPT Carbon Limited Edition, and the Rolex Oyster Perpetual Datejust 41mm series. These new arrivals showcase cutting-edge designs and impeccable craftsmanship, ensuring you stay on the forefront of luxury watch fashion.
Best Sellers:
Discover our best-selling watches, such as the Bulgari Serpenti Tubogas 35mm and the Cartier Panthere Medium Model. These timeless pieces combine elegance with precision, making them a staple in any sophisticated wardrobe.
Expert’s Selection:
Our experts have carefully curated a selection of watches, including the Cartier Panthere Small Model, Omega Speedmaster Moonwatch 44.25 mm, and Rolex Oyster Perpetual Cosmograph Daytona 40mm. These choices exemplify the epitome of watchmaking excellence and style.
Secured and Tracked Delivery:
At Watches World, we prioritize the safety of your purchase. Our secured and tracked delivery ensures that your exquisite timepiece reaches you in perfect condition, giving you peace of mind with every order.
Passionate Experts at Your Service:
Our team of passionate watch experts is dedicated to providing personalized service. From assisting you in choosing the perfect timepiece to addressing any inquiries, we are here to make your watch-buying experience seamless and enjoyable.
Global Presence:
With a presence in key cities around the world, including Dubai, Geneva, Hong Kong, London, Miami, Paris, Prague, Dublin, Singapore, and Sao Paulo, Watches World brings luxury timepieces to enthusiasts globally.
Conclusion:
Watches World goes beyond being an online platform for luxury watches; it is a destination where expertise, trust, and satisfaction converge. Explore our collection, and let our timeless timepieces become an integral part of your style narrative. Join us in redefining luxury, one exquisite watch at a time.
gnc ed pills: erectile dysfunction medications – best ed medication
https://edpills.bid/# online ed medications
best online pharmacy without prescription: pharmacy price comparison – canadian prescription drugstore
http://reputablepharmacies.online/# top rated canadian online pharmacy
п»їbest mexican online pharmacies: mexican drugstore online – buying prescription drugs in mexico mexicanpharmacy.win
https://canadianpharmacy.pro/# canadian pharmacy canadianpharmacy.pro
best canadian pharmacy Pharmacies in Canada that ship to the US canadian pharmacy tampa canadianpharmacy.pro
canadian pharmacy world: Canadian pharmacy online – canadian pharmacy 24 com canadianpharmacy.pro
п»їbest mexican online pharmacies mexico drug stores pharmacies mexican pharmacy mexicanpharmacy.win
http://canadianpharmacy.pro/# canadian pharmacy com canadianpharmacy.pro
http://canadianpharmacy.pro/# canadian pharmacy 24 canadianpharmacy.pro
http://canadianpharmacy.pro/# pharmacy canadian superstore canadianpharmacy.pro
over the counter drug store
canadian pharmacy online store: Canadian pharmacy online – best mail order pharmacy canada canadianpharmacy.pro
ATG戰神賽特
2024全新上線❰戰神賽特老虎機❱ – ATG賽特玩法說明介紹
❰戰神賽特老虎機❱是由ATG電子獨家開發的古埃及風格線上老虎機,在傳說中戰神賽特是「力量之神」與奈芙蒂斯女神結成連理,共同守護古埃及的奇幻秘寶,只有被選中的冒險者才能進入探險。
❰戰神賽特老虎機❱ – ATG賽特介紹
2024最新老虎機【戰神塞特】- ATG電子 X 富遊娛樂城
❰戰神賽特老虎機❱ – ATG電子
線上老虎機系統 : ATG電子
發行年分 : 2024年1月
最大倍數 : 51000倍
返還率 : 95.89%
支付方式 : 全盤倍數、消除掉落
最低投注金額 : 0.4元
最高投注金額 : 2000元
可否選台 : 是
可選台台數 : 350台
免費遊戲 : 選轉觸發+購買特色
❰戰神賽特老虎機❱ 賠率說明
戰神塞特老虎機賠率算法非常簡單,玩家們只需要不斷的轉動老虎機,成功消除物件即可贏分,得分賠率依賠率表計算。
當盤面上沒有物件可以消除時,倍數符號將會相加形成總倍數!該次旋轉的總贏分即為 : 贏分 X 總倍數。
積分方式如下 :
贏分=(單次押注額/20) X 物件賠率
EX : 單次押注額為1,盤面獲得12個戰神賽特倍數符號法老魔眼
贏分= (1/20) X 1000=50
以下為各個得分符號數量之獎金賠率 :
得分符號 獎金倍數 得分符號 獎金倍數
戰神賽特倍數符號聖甲蟲 6 2000
5 100
4 60 戰神賽特倍數符號黃寶石 12+ 200
10-11 30
8-9 20
戰神賽特倍數符號荷魯斯之眼 12+ 1000
10-11 500
8-9 200 戰神賽特倍數符號紅寶石 12+ 160
10-11 24
8-9 16
戰神賽特倍數符號眼鏡蛇 12+ 500
10-11 200
8-9 50 戰神賽特倍數符號紫鑽石 12+ 100
10-11 20
8-9 10
戰神賽特倍數符號神箭 12+ 300
10-11 100
8-9 40 戰神賽特倍數符號藍寶石 12+ 80
10-11 18
8-9 8
戰神賽特倍數符號屠鐮刀 12+ 240
10-11 40
8-9 30 戰神賽特倍數符號綠寶石 12+ 40
10-11 15
8-9 5
❰戰神賽特老虎機❱ 賠率說明(橘色數值為獲得數量、黑色數值為得分賠率)
ATG賽特 – 特色說明
ATG賽特 – 倍數符號獎金加乘
玩家們在看到盤面上出現倍數符號時,務必把握機會加速轉動ATG賽特老虎機,倍數符號會隨機出現2到500倍的隨機倍數。
當盤面無法在消除時,這些倍數總和會相加,乘上當時累積之獎金,即為最後得分總額。
倍數符號會出現在主遊戲和免費遊戲當中,玩家們千萬別錯過這個可以瞬間將得獎金額拉高的好機會!
ATG賽特 – 倍數符號獎金加乘
ATG賽特 – 倍數符號圖示
ATG賽特 – 進入神秘金字塔開啟免費遊戲
戰神賽特倍數符號聖甲蟲
❰戰神賽特老虎機❱ 免費遊戲符號
在古埃及神話中,聖甲蟲又稱為「死亡之蟲」,它被當成了天球及重生的象徵,守護古埃及的奇幻秘寶。
當玩家在盤面上,看見越來越多的聖甲蟲時,千萬不要膽怯,只需在牌面上斬殺4~6個ATG賽特免費遊戲符號,就可以進入15場免費遊戲!
在免費遊戲中若轉出3~6個聖甲蟲免費遊戲符號,可額外獲得5次免費遊戲,最高可達100次。
當玩家的累積贏分且盤面有倍數物件時,盤面上的所有倍數將會加入總倍數!
ATG賽特 – 選台模式贏在起跑線
為避免神聖的寶物被盜墓者奪走,富有智慧的法老王將金子塔內佈滿迷宮,有的設滿機關讓盜墓者寸步難行,有的暗藏機關可以直接前往存放神秘寶物的暗房。
ATG賽特老虎機設有350個機檯供玩家選擇,這是連魔龍老虎機、忍老虎機都給不出的機台數量,為的就是讓玩家,可以隨時進入神秘的古埃及的寶藏聖域,挖掘長眠已久的神祕寶藏。
【戰神塞特老虎機】選台模式
❰戰神賽特老虎機❱ 選台模式
ATG賽特 – 購買免費遊戲挖掘秘寶
玩家們可以使用當前投注額的100倍購買免費遊戲!進入免費遊戲再也不是虛幻。獎勵與一般遊戲相同,且購買後遊戲將自動開始,直到場次和獎金發放完畢為止。
有購買免費遊戲需求的玩家們,立即點擊「開始」,啟動神秘金字塔裡的古埃及祕寶吧!
【戰神塞特老虎機】購買特色
❰戰神賽特老虎機❱ 購買特色
戰神賽特試玩推薦
看完了❰戰神賽特老虎機❱介紹之後,玩家們是否也蓄勢待發要進入古埃及的世界,一探神奇秘寶探險之旅。
本次ATG賽特與線上娛樂城推薦第一名的富遊娛樂城合作,只需要加入會員,即可領取到168體驗金,免費試玩420轉!
thecanadianpharmacy Canadian pharmacy online canadian pharmacy world canadianpharmacy.pro
娛樂城
2024娛樂城No.1 – 富遊娛樂城介紹
2024 年 1 月 5 日
|
娛樂城, 現金版娛樂城
富遊娛樂城是無論老手、新手,都非常推薦的線上博奕,在2024娛樂城當中扮演著多年來最來勢洶洶的一匹黑馬,『人性化且精緻的介面,遊戲種類眾多,超級多的娛樂城優惠,擁有眾多與會員交流遊戲的群組』是一大特色。
富遊娛樂城擁有歐洲馬爾他(MGA)和菲律賓政府競猜委員會(PAGCOR)頒發的合法執照。
註冊於英屬維爾京群島,受國際行業協會認可的合法公司。
我們的中心思想就是能夠帶領玩家遠詐騙黑網,讓大家安心放心的暢玩線上博弈,娛樂城也受各大部落客、IG網紅、PTT論壇,推薦討論,富遊娛樂城沒有之一,絕對是線上賭場玩家的第一首選!
富遊娛樂城介面 / 2024娛樂城NO.1
富遊娛樂城簡介
品牌名稱 : 富遊RG
創立時間 : 2019年
存款速度 : 平均15秒
提款速度 : 平均5分
單筆提款金額 : 最低1000-100萬
遊戲對象 : 18歲以上男女老少皆可
合作廠商 : 22家遊戲平台商
支付平台 : 各大銀行、各大便利超商
支援配備 : 手機網頁、電腦網頁、IOS、安卓(Android)
富遊娛樂城遊戲品牌
真人百家 — 歐博真人、DG真人、亞博真人、SA真人、OG真人
體育投注 — SUPER體育、鑫寶體育、亞博體育
電競遊戲 — 泛亞電競
彩票遊戲 — 富遊彩票、WIN 539
電子遊戲 —ZG電子、BNG電子、BWIN電子、RSG電子、好路GR電子
棋牌遊戲 —ZG棋牌、亞博棋牌、好路棋牌、博亞棋牌
捕魚遊戲 —ZG捕魚、RSG捕魚、好路GR捕魚、亞博捕魚
富遊娛樂城優惠活動
每日任務簽到金666
富遊VIP全面啟動
復酬金活動10%優惠
日日返水
新會員好禮五選一
首存禮1000送1000
免費體驗金$168
富遊娛樂城APP
步驟1 : 開啟網頁版【富遊娛樂城官網】
步驟2 : 點選上方(下載app),會跳出下載與複製連結選項,點選後跳轉。
步驟3 : 跳轉後點選(安裝),並點選(允許)操作下載描述檔,跳出下載描述檔後點選關閉。
步驟4 : 到手機設置>一般>裝置管理>設定描述檔(富遊)安裝,即可完成安裝。
富遊娛樂城常見問題FAQ
富遊娛樂城詐騙?
黑網詐騙可細分兩種,小出大不出及純詐騙黑網,我們可從品牌知名度經營和網站架設畫面分辨來簡單分辨。
富遊娛樂城會出金嗎?
如上面提到,富遊是在做一個品牌,為的是能夠保證出金,和帶領玩家遠離黑網,而且還有DUKER娛樂城出金認證,所以各位能夠放心富遊娛樂城為正出金娛樂城。
富遊娛樂城出金延遲怎麼辦?
基本上只要是公司系統問提造成富遊娛樂城會員無法在30分鐘成功提款,富遊娛樂城會即刻派送補償金,表達誠摯的歉意。
富遊娛樂城結論
富遊娛樂城安心玩,評價4.5顆星。如果還想看其他娛樂城推薦的,可以來娛樂城推薦尋找喔。
Все о дизайне интерьера
http://indianpharmacy.shop/# reputable indian pharmacies indianpharmacy.shop
mexico drug stores pharmacies online mexican pharmacy mexican online pharmacies prescription drugs mexicanpharmacy.win
https://mexicanpharmacy.win/# medicine in mexico pharmacies mexicanpharmacy.win
http://indianpharmacy.shop/# online shopping pharmacy india
world pharmacy india
mail order pharmacy india Best Indian pharmacy best online pharmacy india indianpharmacy.shop
https://indianpharmacy.shop/# india pharmacy
top 10 online pharmacy in india
online pharmacy india indian pharmacy to usa best online pharmacy india indianpharmacy.shop
https://indianpharmacy.shop/# cheapest online pharmacy india indianpharmacy.shop
canadian discount cialis
https://canadianpharmacy.pro/# pharmacy canadian superstore canadianpharmacy.pro
reputable indian online pharmacy indian pharmacy best india pharmacy indianpharmacy.shop
Все о современных технологиях
https://mexicanpharmacy.win/# buying prescription drugs in mexico online mexicanpharmacy.win
Все о дизайне интерьера
https://canadianpharmacy.pro/# canada cloud pharmacy canadianpharmacy.pro
best india pharmacy
buying prescription drugs in mexico Medicines Mexico buying from online mexican pharmacy mexicanpharmacy.win
娛樂城
2024娛樂城No.1 – 富遊娛樂城介紹
2024 年 1 月 5 日
|
娛樂城, 現金版娛樂城
富遊娛樂城是無論老手、新手,都非常推薦的線上博奕,在2024娛樂城當中扮演著多年來最來勢洶洶的一匹黑馬,『人性化且精緻的介面,遊戲種類眾多,超級多的娛樂城優惠,擁有眾多與會員交流遊戲的群組』是一大特色。
富遊娛樂城擁有歐洲馬爾他(MGA)和菲律賓政府競猜委員會(PAGCOR)頒發的合法執照。
註冊於英屬維爾京群島,受國際行業協會認可的合法公司。
我們的中心思想就是能夠帶領玩家遠詐騙黑網,讓大家安心放心的暢玩線上博弈,娛樂城也受各大部落客、IG網紅、PTT論壇,推薦討論,富遊娛樂城沒有之一,絕對是線上賭場玩家的第一首選!
富遊娛樂城介面 / 2024娛樂城NO.1
富遊娛樂城簡介
品牌名稱 : 富遊RG
創立時間 : 2019年
存款速度 : 平均15秒
提款速度 : 平均5分
單筆提款金額 : 最低1000-100萬
遊戲對象 : 18歲以上男女老少皆可
合作廠商 : 22家遊戲平台商
支付平台 : 各大銀行、各大便利超商
支援配備 : 手機網頁、電腦網頁、IOS、安卓(Android)
富遊娛樂城遊戲品牌
真人百家 — 歐博真人、DG真人、亞博真人、SA真人、OG真人
體育投注 — SUPER體育、鑫寶體育、亞博體育
電競遊戲 — 泛亞電競
彩票遊戲 — 富遊彩票、WIN 539
電子遊戲 —ZG電子、BNG電子、BWIN電子、RSG電子、好路GR電子
棋牌遊戲 —ZG棋牌、亞博棋牌、好路棋牌、博亞棋牌
捕魚遊戲 —ZG捕魚、RSG捕魚、好路GR捕魚、亞博捕魚
富遊娛樂城優惠活動
每日任務簽到金666
富遊VIP全面啟動
復酬金活動10%優惠
日日返水
新會員好禮五選一
首存禮1000送1000
免費體驗金$168
富遊娛樂城APP
步驟1 : 開啟網頁版【富遊娛樂城官網】
步驟2 : 點選上方(下載app),會跳出下載與複製連結選項,點選後跳轉。
步驟3 : 跳轉後點選(安裝),並點選(允許)操作下載描述檔,跳出下載描述檔後點選關閉。
步驟4 : 到手機設置>一般>裝置管理>設定描述檔(富遊)安裝,即可完成安裝。
富遊娛樂城常見問題FAQ
富遊娛樂城詐騙?
黑網詐騙可細分兩種,小出大不出及純詐騙黑網,我們可從品牌知名度經營和網站架設畫面分辨來簡單分辨。
富遊娛樂城會出金嗎?
如上面提到,富遊是在做一個品牌,為的是能夠保證出金,和帶領玩家遠離黑網,而且還有DUKER娛樂城出金認證,所以各位能夠放心富遊娛樂城為正出金娛樂城。
富遊娛樂城出金延遲怎麼辦?
基本上只要是公司系統問提造成富遊娛樂城會員無法在30分鐘成功提款,富遊娛樂城會即刻派送補償金,表達誠摯的歉意。
富遊娛樂城結論
富遊娛樂城安心玩,評價4.5顆星。如果還想看其他娛樂城推薦的,可以來娛樂城推薦尋找喔。
https://indianpharmacy.shop/# Online medicine order indianpharmacy.shop
https://indianpharmacy.shop/# top 10 pharmacies in india indianpharmacy.shop
top 10 pharmacies in india
2024娛樂城No.1 – 富遊娛樂城介紹
2024 年 1 月 5 日
|
娛樂城, 現金版娛樂城
富遊娛樂城是無論老手、新手,都非常推薦的線上博奕,在2024娛樂城當中扮演著多年來最來勢洶洶的一匹黑馬,『人性化且精緻的介面,遊戲種類眾多,超級多的娛樂城優惠,擁有眾多與會員交流遊戲的群組』是一大特色。
富遊娛樂城擁有歐洲馬爾他(MGA)和菲律賓政府競猜委員會(PAGCOR)頒發的合法執照。
註冊於英屬維爾京群島,受國際行業協會認可的合法公司。
我們的中心思想就是能夠帶領玩家遠詐騙黑網,讓大家安心放心的暢玩線上博弈,娛樂城也受各大部落客、IG網紅、PTT論壇,推薦討論,富遊娛樂城沒有之一,絕對是線上賭場玩家的第一首選!
富遊娛樂城介面 / 2024娛樂城NO.1
富遊娛樂城簡介
品牌名稱 : 富遊RG
創立時間 : 2019年
存款速度 : 平均15秒
提款速度 : 平均5分
單筆提款金額 : 最低1000-100萬
遊戲對象 : 18歲以上男女老少皆可
合作廠商 : 22家遊戲平台商
支付平台 : 各大銀行、各大便利超商
支援配備 : 手機網頁、電腦網頁、IOS、安卓(Android)
富遊娛樂城遊戲品牌
真人百家 — 歐博真人、DG真人、亞博真人、SA真人、OG真人
體育投注 — SUPER體育、鑫寶體育、亞博體育
電競遊戲 — 泛亞電競
彩票遊戲 — 富遊彩票、WIN 539
電子遊戲 —ZG電子、BNG電子、BWIN電子、RSG電子、好路GR電子
棋牌遊戲 —ZG棋牌、亞博棋牌、好路棋牌、博亞棋牌
捕魚遊戲 —ZG捕魚、RSG捕魚、好路GR捕魚、亞博捕魚
富遊娛樂城優惠活動
每日任務簽到金666
富遊VIP全面啟動
復酬金活動10%優惠
日日返水
新會員好禮五選一
首存禮1000送1000
免費體驗金$168
富遊娛樂城APP
步驟1 : 開啟網頁版【富遊娛樂城官網】
步驟2 : 點選上方(下載app),會跳出下載與複製連結選項,點選後跳轉。
步驟3 : 跳轉後點選(安裝),並點選(允許)操作下載描述檔,跳出下載描述檔後點選關閉。
步驟4 : 到手機設置>一般>裝置管理>設定描述檔(富遊)安裝,即可完成安裝。
富遊娛樂城常見問題FAQ
富遊娛樂城詐騙?
黑網詐騙可細分兩種,小出大不出及純詐騙黑網,我們可從品牌知名度經營和網站架設畫面分辨來簡單分辨。
富遊娛樂城會出金嗎?
如上面提到,富遊是在做一個品牌,為的是能夠保證出金,和帶領玩家遠離黑網,而且還有DUKER娛樂城出金認證,所以各位能夠放心富遊娛樂城為正出金娛樂城。
富遊娛樂城出金延遲怎麼辦?
基本上只要是公司系統問提造成富遊娛樂城會員無法在30分鐘成功提款,富遊娛樂城會即刻派送補償金,表達誠摯的歉意。
富遊娛樂城結論
富遊娛樂城安心玩,評價4.5顆星。如果還想看其他娛樂城推薦的,可以來娛樂城推薦尋找喔。
mail order pharmacy india international medicine delivery from india buy prescription drugs from india indianpharmacy.shop
https://indianpharmacy.shop/# indianpharmacy com indianpharmacy.shop
http://indianpharmacy.shop/# indian pharmacy online indianpharmacy.shop
indian pharmacy online
https://canadianpharmacy.pro/# northern pharmacy canada canadianpharmacy.pro
https://rg888.app/set/
2024全新上線❰戰神賽特老虎機❱ – ATG賽特玩法說明介紹
❰戰神賽特老虎機❱是由ATG電子獨家開發的古埃及風格線上老虎機,在傳說中戰神賽特是「力量之神」與奈芙蒂斯女神結成連理,共同守護古埃及的奇幻秘寶,只有被選中的冒險者才能進入探險。
❰戰神賽特老虎機❱ – ATG賽特介紹
2024最新老虎機【戰神塞特】- ATG電子 X 富遊娛樂城
❰戰神賽特老虎機❱ – ATG電子
線上老虎機系統 : ATG電子
發行年分 : 2024年1月
最大倍數 : 51000倍
返還率 : 95.89%
支付方式 : 全盤倍數、消除掉落
最低投注金額 : 0.4元
最高投注金額 : 2000元
可否選台 : 是
可選台台數 : 350台
免費遊戲 : 選轉觸發+購買特色
❰戰神賽特老虎機❱ 賠率說明
戰神塞特老虎機賠率算法非常簡單,玩家們只需要不斷的轉動老虎機,成功消除物件即可贏分,得分賠率依賠率表計算。
當盤面上沒有物件可以消除時,倍數符號將會相加形成總倍數!該次旋轉的總贏分即為 : 贏分 X 總倍數。
積分方式如下 :
贏分=(單次押注額/20) X 物件賠率
EX : 單次押注額為1,盤面獲得12個戰神賽特倍數符號法老魔眼
贏分= (1/20) X 1000=50
以下為各個得分符號數量之獎金賠率 :
得分符號 獎金倍數 得分符號 獎金倍數
戰神賽特倍數符號聖甲蟲 6 2000
5 100
4 60 戰神賽特倍數符號黃寶石 12+ 200
10-11 30
8-9 20
戰神賽特倍數符號荷魯斯之眼 12+ 1000
10-11 500
8-9 200 戰神賽特倍數符號紅寶石 12+ 160
10-11 24
8-9 16
戰神賽特倍數符號眼鏡蛇 12+ 500
10-11 200
8-9 50 戰神賽特倍數符號紫鑽石 12+ 100
10-11 20
8-9 10
戰神賽特倍數符號神箭 12+ 300
10-11 100
8-9 40 戰神賽特倍數符號藍寶石 12+ 80
10-11 18
8-9 8
戰神賽特倍數符號屠鐮刀 12+ 240
10-11 40
8-9 30 戰神賽特倍數符號綠寶石 12+ 40
10-11 15
8-9 5
❰戰神賽特老虎機❱ 賠率說明(橘色數值為獲得數量、黑色數值為得分賠率)
ATG賽特 – 特色說明
ATG賽特 – 倍數符號獎金加乘
玩家們在看到盤面上出現倍數符號時,務必把握機會加速轉動ATG賽特老虎機,倍數符號會隨機出現2到500倍的隨機倍數。
當盤面無法在消除時,這些倍數總和會相加,乘上當時累積之獎金,即為最後得分總額。
倍數符號會出現在主遊戲和免費遊戲當中,玩家們千萬別錯過這個可以瞬間將得獎金額拉高的好機會!
ATG賽特 – 倍數符號獎金加乘
ATG賽特 – 倍數符號圖示
ATG賽特 – 進入神秘金字塔開啟免費遊戲
戰神賽特倍數符號聖甲蟲
❰戰神賽特老虎機❱ 免費遊戲符號
在古埃及神話中,聖甲蟲又稱為「死亡之蟲」,它被當成了天球及重生的象徵,守護古埃及的奇幻秘寶。
當玩家在盤面上,看見越來越多的聖甲蟲時,千萬不要膽怯,只需在牌面上斬殺4~6個ATG賽特免費遊戲符號,就可以進入15場免費遊戲!
在免費遊戲中若轉出3~6個聖甲蟲免費遊戲符號,可額外獲得5次免費遊戲,最高可達100次。
當玩家的累積贏分且盤面有倍數物件時,盤面上的所有倍數將會加入總倍數!
ATG賽特 – 選台模式贏在起跑線
為避免神聖的寶物被盜墓者奪走,富有智慧的法老王將金子塔內佈滿迷宮,有的設滿機關讓盜墓者寸步難行,有的暗藏機關可以直接前往存放神秘寶物的暗房。
ATG賽特老虎機設有350個機檯供玩家選擇,這是連魔龍老虎機、忍老虎機都給不出的機台數量,為的就是讓玩家,可以隨時進入神秘的古埃及的寶藏聖域,挖掘長眠已久的神祕寶藏。
【戰神塞特老虎機】選台模式
❰戰神賽特老虎機❱ 選台模式
ATG賽特 – 購買免費遊戲挖掘秘寶
玩家們可以使用當前投注額的100倍購買免費遊戲!進入免費遊戲再也不是虛幻。獎勵與一般遊戲相同,且購買後遊戲將自動開始,直到場次和獎金發放完畢為止。
有購買免費遊戲需求的玩家們,立即點擊「開始」,啟動神秘金字塔裡的古埃及祕寶吧!
【戰神塞特老虎機】購買特色
❰戰神賽特老虎機❱ 購買特色
戰神賽特試玩推薦
看完了❰戰神賽特老虎機❱介紹之後,玩家們是否也蓄勢待發要進入古埃及的世界,一探神奇秘寶探險之旅。
本次ATG賽特與線上娛樂城推薦第一名的富遊娛樂城合作,只需要加入會員,即可領取到168體驗金,免費試玩420轉!
top 10 online pharmacy in india indian pharmacy india pharmacy indianpharmacy.shop
https://canadianpharmacy.pro/# canadian pharmacies that deliver to the us canadianpharmacy.pro
drug stores canada
https://indianpharmacy.shop/# buy medicines online in india indianpharmacy.shop
Все о современных технологиях
https://canadianpharmacy.pro/# medication canadian pharmacy canadianpharmacy.pro
purple pharmacy mexico price list Medicines Mexico purple pharmacy mexico price list mexicanpharmacy.win
http://indianpharmacy.shop/# top 10 pharmacies in india indianpharmacy.shop
п»їlegitimate online pharmacies india
https://mexicanpharmacy.win/# mexican mail order pharmacies mexicanpharmacy.win
india pharmacy mail order indian pharmacy indian pharmacies safe indianpharmacy.shop
http://indianpharmacy.shop/# reputable indian pharmacies indianpharmacy.shop
indian pharmacies safe
https://mexicanpharmacy.win/# medicine in mexico pharmacies mexicanpharmacy.win
Meilleur Viagra sans ordonnance 24h viagra sans ordonnance Viagra prix pharmacie paris
http://cialissansordonnance.shop/# acheter médicaments à l’étranger
Pharmacies en ligne certifiГ©es: Acheter Cialis – Pharmacie en ligne pas cher
pharmacie ouverte Cialis sans ordonnance 24h п»їpharmacie en ligne
https://acheterkamagra.pro/# Pharmacie en ligne livraison 24h
http://viagrasansordonnance.pro/# Viagra sans ordonnance livraison 24h
Acheter mГ©dicaments sans ordonnance sur internet
Pharmacie en ligne France: kamagra gel – Pharmacie en ligne pas cher
Viagra homme prix en pharmacie Viagra pas cher livraison rapide france Viagra gГ©nГ©rique sans ordonnance en pharmacie
Дома АВС – Ваш уютный уголок
Мы строим не просто дома, мы создаем пространство, где каждый уголок будет наполнен комфортом и радостью жизни. Наш приоритет – не просто предоставить место для проживания, а создать настоящий дом, где вы будете чувствовать себя счастливыми и уютно.
В нашем информационном разделе “ПРОЕКТЫ” вы всегда найдете вдохновение и новые идеи для строительства вашего будущего дома. Мы постоянно работаем над тем, чтобы предложить вам самые инновационные и стильные проекты.
Мы убеждены, что основа хорошего дома – это его дизайн. Поэтому мы предоставляем услуги опытных дизайнеров-архитекторов, которые помогут вам воплотить все ваши идеи в жизнь. Наши архитекторы и персональные консультанты всегда готовы поделиться своим опытом и предложить функциональные и комфортные решения для вашего будущего дома.
Мы стремимся сделать весь процесс строительства максимально комфортным для вас. Наша команда предоставляет детализированные сметы, разрабатывает четкие этапы строительства и осуществляет контроль качества на каждом этапе.
Для тех, кто ценит экологичность и близость к природе, мы предлагаем деревянные дома премиум-класса. Используя клееный брус и оцилиндрованное бревно, мы создаем уникальные и здоровые условия для вашего проживания.
Тем, кто предпочитает надежность и многообразие форм, мы предлагаем дома из камня, блоков и кирпичной кладки.
Для практичных и ценящих свое время людей у нас есть быстровозводимые каркасные дома и эконом-класса. Эти решения обеспечат вас комфортным проживанием в кратчайшие сроки.
С Домами АВС создайте свой уютный уголок, где каждый момент жизни будет наполнен радостью и удовлетворением
http://viagrasansordonnance.pro/# Viagra femme ou trouver
Pharmacie en ligne livraison gratuite: cialissansordonnance.shop – Pharmacies en ligne certifiГ©es
Pharmacie en ligne sans ordonnance levitra generique sites surs Pharmacie en ligne France
https://rg88.org/seth/
2024全新上線❰戰神賽特老虎機❱ – ATG賽特玩法說明介紹
❰戰神賽特老虎機❱是由ATG電子獨家開發的古埃及風格線上老虎機,在傳說中戰神賽特是「力量之神」與奈芙蒂斯女神結成連理,共同守護古埃及的奇幻秘寶,只有被選中的冒險者才能進入探險。
❰戰神賽特老虎機❱ – ATG賽特介紹
2024最新老虎機【戰神塞特】- ATG電子 X 富遊娛樂城
❰戰神賽特老虎機❱ – ATG電子
線上老虎機系統 : ATG電子
發行年分 : 2024年1月
最大倍數 : 51000倍
返還率 : 95.89%
支付方式 : 全盤倍數、消除掉落
最低投注金額 : 0.4元
最高投注金額 : 2000元
可否選台 : 是
可選台台數 : 350台
免費遊戲 : 選轉觸發+購買特色
❰戰神賽特老虎機❱ 賠率說明
戰神塞特老虎機賠率算法非常簡單,玩家們只需要不斷的轉動老虎機,成功消除物件即可贏分,得分賠率依賠率表計算。
當盤面上沒有物件可以消除時,倍數符號將會相加形成總倍數!該次旋轉的總贏分即為 : 贏分 X 總倍數。
積分方式如下 :
贏分=(單次押注額/20) X 物件賠率
EX : 單次押注額為1,盤面獲得12個戰神賽特倍數符號法老魔眼
贏分= (1/20) X 1000=50
以下為各個得分符號數量之獎金賠率 :
得分符號 獎金倍數 得分符號 獎金倍數
戰神賽特倍數符號聖甲蟲 6 2000
5 100
4 60 戰神賽特倍數符號黃寶石 12+ 200
10-11 30
8-9 20
戰神賽特倍數符號荷魯斯之眼 12+ 1000
10-11 500
8-9 200 戰神賽特倍數符號紅寶石 12+ 160
10-11 24
8-9 16
戰神賽特倍數符號眼鏡蛇 12+ 500
10-11 200
8-9 50 戰神賽特倍數符號紫鑽石 12+ 100
10-11 20
8-9 10
戰神賽特倍數符號神箭 12+ 300
10-11 100
8-9 40 戰神賽特倍數符號藍寶石 12+ 80
10-11 18
8-9 8
戰神賽特倍數符號屠鐮刀 12+ 240
10-11 40
8-9 30 戰神賽特倍數符號綠寶石 12+ 40
10-11 15
8-9 5
❰戰神賽特老虎機❱ 賠率說明(橘色數值為獲得數量、黑色數值為得分賠率)
ATG賽特 – 特色說明
ATG賽特 – 倍數符號獎金加乘
玩家們在看到盤面上出現倍數符號時,務必把握機會加速轉動ATG賽特老虎機,倍數符號會隨機出現2到500倍的隨機倍數。
當盤面無法在消除時,這些倍數總和會相加,乘上當時累積之獎金,即為最後得分總額。
倍數符號會出現在主遊戲和免費遊戲當中,玩家們千萬別錯過這個可以瞬間將得獎金額拉高的好機會!
ATG賽特 – 倍數符號獎金加乘
ATG賽特 – 倍數符號圖示
ATG賽特 – 進入神秘金字塔開啟免費遊戲
戰神賽特倍數符號聖甲蟲
❰戰神賽特老虎機❱ 免費遊戲符號
在古埃及神話中,聖甲蟲又稱為「死亡之蟲」,它被當成了天球及重生的象徵,守護古埃及的奇幻秘寶。
當玩家在盤面上,看見越來越多的聖甲蟲時,千萬不要膽怯,只需在牌面上斬殺4~6個ATG賽特免費遊戲符號,就可以進入15場免費遊戲!
在免費遊戲中若轉出3~6個聖甲蟲免費遊戲符號,可額外獲得5次免費遊戲,最高可達100次。
當玩家的累積贏分且盤面有倍數物件時,盤面上的所有倍數將會加入總倍數!
ATG賽特 – 選台模式贏在起跑線
為避免神聖的寶物被盜墓者奪走,富有智慧的法老王將金子塔內佈滿迷宮,有的設滿機關讓盜墓者寸步難行,有的暗藏機關可以直接前往存放神秘寶物的暗房。
ATG賽特老虎機設有350個機檯供玩家選擇,這是連魔龍老虎機、忍老虎機都給不出的機台數量,為的就是讓玩家,可以隨時進入神秘的古埃及的寶藏聖域,挖掘長眠已久的神祕寶藏。
【戰神塞特老虎機】選台模式
❰戰神賽特老虎機❱ 選台模式
ATG賽特 – 購買免費遊戲挖掘秘寶
玩家們可以使用當前投注額的100倍購買免費遊戲!進入免費遊戲再也不是虛幻。獎勵與一般遊戲相同,且購買後遊戲將自動開始,直到場次和獎金發放完畢為止。
有購買免費遊戲需求的玩家們,立即點擊「開始」,啟動神秘金字塔裡的古埃及祕寶吧!
【戰神塞特老虎機】購買特色
❰戰神賽特老虎機❱ 購買特色
戰神賽特試玩推薦
看完了❰戰神賽特老虎機❱介紹之後,玩家們是否也蓄勢待發要進入古埃及的世界,一探神奇秘寶探險之旅。
本次ATG賽特與線上娛樂城推薦第一名的富遊娛樂城合作,只需要加入會員,即可領取到168體驗金,免費試玩420轉!
Pharmacie en ligne livraison gratuite: pharmacie en ligne pas cher – Pharmacie en ligne sans ordonnance
http://viagrasansordonnance.pro/# Viagra générique sans ordonnance en pharmacie
https://cialissansordonnance.shop/# pharmacie ouverte 24/24
Acheter mГ©dicaments sans ordonnance sur internet
pharmacie ouverte: cialissansordonnance.shop – Pharmacies en ligne certifiГ©es
http://viagrasansordonnance.pro/# Viagra homme prix en pharmacie sans ordonnance
Pharmacie en ligne livraison gratuite cialissansordonnance.shop Pharmacies en ligne certifiГ©es
Viagra sans ordonnance 24h suisse viagrasansordonnance.pro Viagra gГ©nГ©rique sans ordonnance en pharmacie
Pharmacie en ligne France: levitra generique sites surs – Pharmacie en ligne France
http://pharmadoc.pro/# Pharmacies en ligne certifiées
zithromax for sale cheap azithromycin zithromax zithromax 500 without prescription
http://amoxicillin.bid/# buying amoxicillin in mexico
order amoxicillin online no prescription: amoxicillin 500mg price – amoxicillin 500mg capsules
Деревянные дома под ключ
Дома АВС – Ваш уютный уголок
Мы строим не просто дома, мы создаем пространство, где каждый уголок будет наполнен комфортом и радостью жизни. Наш приоритет – не просто предоставить место для проживания, а создать настоящий дом, где вы будете чувствовать себя счастливыми и уютно.
В нашем информационном разделе “ПРОЕКТЫ” вы всегда найдете вдохновение и новые идеи для строительства вашего будущего дома. Мы постоянно работаем над тем, чтобы предложить вам самые инновационные и стильные проекты.
Мы убеждены, что основа хорошего дома – это его дизайн. Поэтому мы предоставляем услуги опытных дизайнеров-архитекторов, которые помогут вам воплотить все ваши идеи в жизнь. Наши архитекторы и персональные консультанты всегда готовы поделиться своим опытом и предложить функциональные и комфортные решения для вашего будущего дома.
Мы стремимся сделать весь процесс строительства максимально комфортным для вас. Наша команда предоставляет детализированные сметы, разрабатывает четкие этапы строительства и осуществляет контроль качества на каждом этапе.
Для тех, кто ценит экологичность и близость к природе, мы предлагаем деревянные дома премиум-класса. Используя клееный брус и оцилиндрованное бревно, мы создаем уникальные и здоровые условия для вашего проживания.
Тем, кто предпочитает надежность и многообразие форм, мы предлагаем дома из камня, блоков и кирпичной кладки.
Для практичных и ценящих свое время людей у нас есть быстровозводимые каркасные дома и эконом-класса. Эти решения обеспечат вас комфортным проживанием в кратчайшие сроки.
С Домами АВС создайте свой уютный уголок, где каждый момент жизни будет наполнен радостью и удовлетворением
get cheap clomid without insurance how can i get cheap clomid price where can i buy clomid for sale
zithromax 500 mg for sale: zithromax antibiotic without prescription – zithromax cost australia
buying prednisone on line prednisone tablet 100 mg prednisone 50 mg tablet canada
https://azithromycin.bid/# zithromax 500 mg for sale
order generic clomid pills: can you buy cheap clomid for sale – buying cheap clomid without insurance
Отдых в Паттайе цены
price of ivermectin ivermectin 18mg stromectol sales
Отдых на Пхукете цены
stromectol tablets uk: where to buy ivermectin pills – ivermectin tablets uk
https://ivermectin.store/# how to buy stromectol
пегас куба
https://ivermectin.store/# ivermectin buy
amoxicillin 500mg price in canada: buy amoxicillin from canada – amoxicillin online canada
ivermectin 24 mg stromectol uk buy stromectol ebay
https://ivermectin.store/# ivermectin 0.2mg
cost of ivermectin: ivermectin lotion for scabies – ivermectin 3mg pill
stromectol 12mg online: ivermectin usa price – ivermectin 24 mg
http://prednisonetablets.shop/# prednisone for sale without a prescription
buy prednisone online without a prescription prednisone 20 mg purchase prednisone 300mg
http://ivermectin.store/# ivermectin 1%cream
ivermectin 400 mg brands: where can i buy stromectol – stromectol australia
zithromax buy online no prescription: where to get zithromax over the counter – generic zithromax medicine
order cheap clomid can i get generic clomid price buy generic clomid no prescription
Watch Live TV Channels
Даркнет, сокращение от “даркнетворк” (dark network), представляет собой часть интернета, недоступную для обычных поисковых систем. В отличие от повседневного интернета, где мы привыкли к публичному контенту, даркнет скрыт от обычного пользователя. Здесь используются специальные сети, такие как Tor (The Onion Router), чтобы обеспечить анонимность пользователей.
buying from canadian pharmacies Licensed Online Pharmacy buy prescription drugs from canada cheap canadianpharm.store
https://canadianpharm.store/# pharmacy rx world canada canadianpharm.store
reputable mexican pharmacies online: Certified Pharmacy from Mexico – mexican border pharmacies shipping to usa mexicanpharm.shop
http://canadianpharm.store/# canada pharmacy online canadianpharm.store
https://mexicanpharm.shop/# mexican drugstore online mexicanpharm.shop
canadian pharmacy meds review: Licensed Online Pharmacy – canadian medications canadianpharm.store
reputable indian online pharmacy order medicine from india to usa buy prescription drugs from india indianpharm.store
https://indianpharm.store/# best india pharmacy indianpharm.store
certified canadian international pharmacy: Certified Online Pharmacy Canada – recommended canadian pharmacies canadianpharm.store
reliable canadian online pharmacy Licensed Online Pharmacy pharmacy rx world canada canadianpharm.store
http://mexicanpharm.shop/# mexican pharmaceuticals online mexicanpharm.shop
mail order pharmacy india: Indian pharmacy to USA – buy prescription drugs from india indianpharm.store
canada ed drugs: Pharmacies in Canada that ship to the US – best canadian online pharmacy canadianpharm.store
top 10 online pharmacy in india: international medicine delivery from india – top online pharmacy india indianpharm.store
https://mexicanpharm.shop/# reputable mexican pharmacies online mexicanpharm.shop
reputable indian pharmacies order medicine from india to usa top online pharmacy india indianpharm.store
mexican mail order pharmacies: mexico pharmacies prescription drugs – medication from mexico pharmacy mexicanpharm.shop
http://indianpharm.store/# indianpharmacy com indianpharm.store
http://canadianpharm.store/# canadian valley pharmacy canadianpharm.store
Online medicine order world pharmacy india indian pharmacy paypal indianpharm.store
onlinepharmaciescanada com: Best Canadian online pharmacy – medication canadian pharmacy canadianpharm.store
http://canadianpharm.store/# canadian discount pharmacy canadianpharm.store
medication from mexico pharmacy: Certified Pharmacy from Mexico – п»їbest mexican online pharmacies mexicanpharm.shop
mexican pharmacy: Certified Pharmacy from Mexico – best online pharmacies in mexico mexicanpharm.shop
canadian world pharmacy canadian drug pharmacy canadian world pharmacy canadianpharm.store
http://mexicanpharm.shop/# mexican pharmaceuticals online mexicanpharm.shop
Адвокаты по банкротству
Адвокаты по банкротству
娛樂城
**娛樂城與線上賭場:現代娛樂的轉型與未來**
在當今數位化的時代,”娛樂城”和”線上賭場”已成為現代娛樂和休閒生活的重要組成部分。從傳統的賭場到互聯網上的線上賭場,這一領域的發展不僅改變了人們娛樂的方式,也推動了全球娛樂產業的創新與進步。
**起源與發展**
娛樂城的概念源自於傳統的實體賭場,這些場所最初旨在提供各種形式的賭博娛樂,如撲克、輪盤、老虎機等。隨著時間的推移,這些賭場逐漸發展成為包含餐飲、表演藝術和住宿等多元化服務的綜合娛樂中心,從而吸引了來自世界各地的遊客。
隨著互聯網技術的飛速發展,線上賭場應運而生。這種新型態的賭博平台讓使用者可以在家中或任何有互聯網連接的地方,享受賭博遊戲的樂趣。線上賭場的出現不僅為賭博愛好者提供了更多便利與選擇,也大大擴展了賭博產業的市場範圍。
**特點與魅力**
娛樂城和線上賭場的主要魅力在於它們能提供多樣化的娛樂選項和高度的可訪問性。無論是實體的娛樂城還是虛擬的線上賭場,它們都致力於創造一個充滿樂趣和刺激的環境,讓人們可以從日常生活的壓力中短暫逃脫。
此外,線上賭場通過提供豐富的遊戲選擇、吸引人的獎金方案以及便捷的支付系統,成功地吸引了全球範圍內的用戶。這些平台通常具有高度的互動性和社交性,使玩家不僅能享受遊戲本身,還能與來自世界各地的其他玩家交流。
**未來趨勢**
隨著技術的不斷進步和用戶需求的不斷演變,娛樂城和線上賭場的未來發展呈現出多元化的趨勢。一方面,虛
擬現實(VR)和擴增現實(AR)技術的應用,有望為線上賭場帶來更加沉浸式和互動式的遊戲體驗。另一方面,對於實體娛樂城而言,將更多地注重提供綜合性的休閒體驗,結合賭博、娛樂、休閒和旅遊等多個方面,以滿足不同客群的需求。
此外,隨著對負責任賭博的認識加深,未來娛樂城和線上賭場在提供娛樂的同時,也將更加注重促進健康的賭博行為和保護用戶的安全。
總之,娛樂城和線上賭場作為現代娛樂生活的一部分,隨著社會的發展和技術的進步,將繼續演化和創新,為人們提供更多的樂趣和便利。這一領域的未來發展無疑充滿了無限的可能性和機遇。
娛樂城
пегас туристик турция
как переводить деньги из сша в россию
Understanding the processes and protocols within a Professional Tenure Committee (PTC) is crucial for faculty members. This Frequently Asked Questions (FAQ) guide aims to address common queries related to PTC procedures, voting, and membership.
1. Why should members of the PTC fill out vote justification forms explaining their votes?
Vote justification forms provide transparency in decision-making. Members articulate their reasoning, fostering a culture of openness and ensuring that decisions are well-founded and understood by the academic community.
2. How can absentee ballots be cast?
To accommodate absentee voting, PTCs may implement secure electronic methods or designated proxy voters. This ensures that faculty members who cannot physically attend meetings can still contribute to decision-making processes.
3. How will additional members of PTCs be elected in departments with fewer than four tenured faculty members?
In smaller departments, creative solutions like rotating roles or involving faculty from related disciplines can be explored. Flexibility in election procedures ensures representation even in departments with fewer tenured faculty members.
4. Can a faculty member on OCSA or FML serve on a PTC?
Faculty members involved in other committees like the Organization of Committee on Student Affairs (OCSA) or Family and Medical Leave (FML) can serve on a PTC, but potential conflicts of interest should be carefully considered and managed.
5. Can an abstention vote be cast at a PTC meeting?
Yes, PTC members have the option to abstain from voting if they feel unable to take a stance on a particular matter. This allows for ethical decision-making and prevents uninformed voting.
6. What constitutes a positive or negative vote in PTCs?
A positive vote typically indicates approval or agreement, while a negative vote signifies disapproval or disagreement. Clear definitions and guidelines within each PTC help members interpret and cast their votes accurately.
7. What constitutes a quorum in a PTC?
A quorum, the minimum number of members required for a valid meeting, is essential for decision-making. Specific rules about quorum size are usually outlined in the PTC’s governing documents.
Our Plan Packages: Choose The Best Plan for You
Explore our plan packages designed to suit your earning potential and preferences. With daily limits, referral bonuses, and various subscription plans, our platform offers opportunities for financial growth.
Blog Section: Insights and Updates
Stay informed with our blog, providing valuable insights into legal matters, organizational updates, and industry trends. Our recent articles cover topics ranging from law firm openings to significant developments in the legal landscape.
Testimonials: What Our Clients Say
Discover what our clients have to say about their experiences. Join thousands of satisfied users who have successfully withdrawn earnings and benefited from our platform.
Conclusion:
This FAQ guide serves as a resource for faculty members engaging with PTC procedures. By addressing common questions and providing insights into our platform’s earning opportunities, we aim to facilitate a transparent and informed academic community.
It’s very unreliable, engages in deception scam site
http://certifiedpharmacymexico.pro/# purple pharmacy mexico price list
cure ed: cheap ed drugs – ed treatment pills
Настоящий официальный канал 1Win зеркало
prescription drugs without prior prescription cialis without a doctor prescription canada buy prescription drugs
http://certifiedpharmacymexico.pro/# mexico drug stores pharmacies
erection pills viagra online: ed pills for sale – otc ed pills
canada rx pharmacy canadian pharmacies trusted canadian pharmacy
Рекомендую официальный телеграм канал на 1Win вход
https://medicinefromindia.store/# Online medicine order
mexico drug stores pharmacies п»їbest mexican online pharmacies mexican pharmaceuticals online
https://canadianinternationalpharmacy.pro/# best canadian pharmacy
mexico pharmacy mexico drug stores pharmacies purple pharmacy mexico price list
https://canadianinternationalpharmacy.pro/# vipps approved canadian online pharmacy
Kraken darknet market зеркало
Даркнет, является, невидимую, платформу, на, глобальной сети, доступ к которой, осуществляется, по средствам, уникальные, софт и, инструменты, предоставляющие, невидимость участников. Одним из, этих, средств, является, браузер Тор, который, обеспечивает, безопасное, соединение к даркнету. Используя, его, сетевые пользователи, имеют возможность, незаметно, обращаться к, интернет-ресурсы, не видимые, обычными, поисками, создавая тем самым, обстановку, для проведения, разнообразных, противоправных деятельностей.
Кракен, в результате, часто ассоциируется с, темной стороной интернета, в качестве, рынок, для, киберпреступниками. На этой площадке, имеется возможность, купить, различные, непозволительные, услуги, начиная от, препаратов и огнестрельного оружия, заканчивая, хакерскими услугами. Ресурс, гарантирует, высокую степень, криптографической защиты, а, скрытности, что, делает, эту площадку, привлекательной, для тех, кого, желает, избежать, преследований, со стороны соответствующих органов порядка
https://edpill.cheap/# best drug for ed
reliable canadian pharmacy reviews prescription drugs canada buy online onlinecanadianpharmacy 24
кракен kraken kraken darknet top
Темная сторона интернета, является, скрытую, сеть, на, сети, доступ к которой, реализуется, через, определенные, программы плюс, инструменты, гарантирующие, невидимость пользовательские данных. Одним из, подобных, технических решений, является, браузер Тор, который обеспечивает, обеспечивает защиту, приватное, подключение к интернету, к сети Даркнет. С, его же, пользователи, имеют возможность, безопасно, заходить, сайты, не индексируемые, традиционными, поисковыми сервисами, позволяя таким образом, условия, для, различных, запрещенных деятельностей.
Киберторговая площадка, в результате, часто упоминается в контексте, даркнетом, как, рынок, для, криминалитетом. На данной платформе, можно, приобрести, разнообразные, непозволительные, товары, начиная с, наркотиков и стволов, заканчивая, хакерскими действиями. Ресурс, предоставляет, высокий уровень, криптографической защиты, а также, анонимности, что, делает, ее, привлекательной, для, стремится, предотвратить, преследований, от законопослушных органов.
http://medicinefromindia.store/# best online pharmacy india
tadalafil without a doctor’s prescription ed pills without doctor prescription generic viagra without a doctor prescription
https://medicinefromindia.store/# reputable indian pharmacies
mexican pharmacy reputable mexican pharmacies online pharmacies in mexico that ship to usa
canadian pharmacy checker canadian pharmacy victoza canadian drugstore online
http://medicinefromindia.store/# online shopping pharmacy india
http://medicinefromindia.store/# buy prescription drugs from india
pharmacies in mexico that ship to usa mexico pharmacy mexican rx online
https://edwithoutdoctorprescription.pro/# viagra without doctor prescription amazon
top 10 pharmacies in india pharmacy website india reputable indian online pharmacy
кракен kraken kraken darknet top
Скрытая сеть, представляет собой, скрытую, платформу, на, интернете, подключение к этой сети, осуществляется, через, специальные, программы плюс, технологии, гарантирующие, невидимость участников. Из числа, подобных, технических решений, считается, браузер Тор, который, обеспечивает защиту, защищенное, подключение к интернету, к даркнету. При помощи, этот, пользователи, имеют шанс, безопасно, заходить, веб-сайты, не индексируемые, стандартными, поисковыми сервисами, создавая тем самым, условия, для осуществления, разнообразных, противоправных операций.
Кракен, в свою очередь, часто связывается с, скрытой сетью, как, площадка, для, криминалитетом. На этом ресурсе, есть возможность, получить доступ к, разные, непозволительные, вещи, начиная с, наркотиков и оружия, доходя до, хакерскими действиями. Ресурс, предоставляет, высокую степень, криптографической защиты, а также, анонимности, что, создает, данную систему, интересной, для тех, кого, намерен, уклониться от, негативных последствий, от законопослушных органов.
https://certifiedpharmacymexico.pro/# mexico drug stores pharmacies
top 10 online pharmacy in india online pharmacy india top online pharmacy india
http://medicinefromindia.store/# best online pharmacy india
canadian pharmacy in canada certified canadian international pharmacy canadian pharmacy review
https://canadianinternationalpharmacy.pro/# canadian drugs
http://certifiedpharmacymexico.pro/# mexico pharmacy
ed drugs compared best ed pills online erection pills
Запасные части Bucher
http://certifiedpharmacymexico.pro/# pharmacies in mexico that ship to usa
pharmacy website india cheapest online pharmacy india indian pharmacy
https://canadianinternationalpharmacy.pro/# onlinepharmaciescanada com
ed meds online without doctor prescription generic cialis without a doctor prescription prescription drugs
Watches World
Watches World
https://canadianinternationalpharmacy.pro/# canadian pharmacy cheap
buy prescription drugs online without ed pills without doctor prescription best ed pills non prescription
http://medicinefromindia.store/# Online medicine home delivery
http://certifiedpharmacymexico.pro/# mexican mail order pharmacies
compare ed drugs treatments for ed new ed pills
http://certifiedpharmacymexico.pro/# buying from online mexican pharmacy
mexican drugstore online п»їbest mexican online pharmacies mexican rx online
mexico pharmacies prescription drugs medication from mexico pharmacy buying prescription drugs in mexico online
buying from online mexican pharmacy reputable mexican pharmacies online buying prescription drugs in mexico
buying prescription drugs in mexico online buying from online mexican pharmacy mexican border pharmacies shipping to usa
mexico drug stores pharmacies pharmacies in mexico that ship to usa mexican border pharmacies shipping to usa
Wristwatches Planet
Patron Feedback Highlight Timepieces Universe Experience
At Our Watch Boutique, customer satisfaction isn’t just a goal; it’s a bright demonstration to our commitment to superiority. Let’s delve into what our esteemed clients have to communicate about their adventures, illuminating on the impeccable support and amazing timepieces we offer.
O.M.’s Trustpilot Testimonial: A Uninterrupted Journey
“Very great communication and follow along throughout the procedure. The watch was impeccably packed and in mint. I would definitely work with this crew again for a wristwatch buy.
O.M.’s testimony demonstrates our commitment to interaction and thorough care in delivering clocks in flawless condition. The trust established with O.M. is a pillar of our customer bonds.
Richard Houtman’s Perceptive Review: A Private Touch
“I dealt with Benny, who was extremely helpful and courteous at all times, keeping me consistently apprised of the course. Advancing, even though I ended up sourcing the timepiece locally, I would still surely recommend Benny and the firm progressing.
Richard Houtman’s experience highlights our tailored approach. Benny’s help and ongoing comms showcase our dedication to ensuring every customer feels esteemed and notified.
Customer’s Effective Service Review: A Smooth Trade
“A very effective and productive service. Kept me up to date on the purchase advancement.
Our loyalty to streamlining is echoed in this customer’s commentary. Keeping patrons informed and the effortless progression of transactions are integral to the Our Watch Boutique journey.
Discover Our Latest Collections
Audemars Piguet Selfwinding Royal Oak 37mm
A gorgeous piece at €45,900, this 2022 edition (REF: 15551ST.ZZ.1356ST.05) invites you to add it to your basket and elevate your range.
Hublot Classic Fusion Green Titanium Chronograph 45mm
Priced at €8,590 in 2024 (REF: 521.NX.8970.RX), this Hublot creation is a combination of styling and creativity, awaiting your demand.
mexican pharmaceuticals online purple pharmacy mexico price list buying from online mexican pharmacy
ST666
В века цифровых технологий, когда виртуальные границы стекаются с реальностью, не допускается игнорировать присутствие угроз в подпольной сети. Одним из рисков является blacksprut – выражение, приобретший символом нелегальной, вредоносной деятельности в неявных уголках интернета.
Blacksprut, будучи компонентом даркнета, представляет существенную угрозу для цифровой безопасности и личной устойчивости пользователей. Этот неявный уголок сети зачастую ассоциируется с нелегальными сделками, торговлей запрещенными товарами и услугами, а также прочими противозаконными деяниями.
В борьбе с угрозой blacksprut необходимо приложить усилия на разнообразных фронтах. Одним из ключевых направлений является совершенствование технологий защиты в сети. Развитие мощных алгоритмов и технологий анализа данных позволит обнаруживать и пресекать деятельность blacksprut в реальной ситуации.
Помимо технологических мер, важна согласованная деятельность усилий органов правопорядка на мировом уровне. Международное сотрудничество в области деятельности защиты в сети необходимо для успешного противодействия угрозам, связанным с blacksprut. Обмен данными, разработка совместных стратегий и оперативные действия помогут минимизировать воздействие этой угрозы.
Просвещение и просвещение также играют важную роль в борьбе с blacksprut. Повышение осведомленности пользователей о рисках подпольной сети и методах защиты становится неотъемлемой элементом антиспампинговых мероприятий. Чем более проинформированными будут пользователи, тем меньше риск попадания под влияние угрозы blacksprut.
В заключение, в борьбе с угрозой blacksprut необходимо объединить усилия как на инженерном, так и на нормативном уровнях. Это трудная задача, подразумевающий совместных усилий общества, правительства и IT-компаний. Только совместными усилиями мы сможем достичь создания безопасного и устойчивого цифрового пространства для всех.
почему-тор браузер не соединяется
Тор-обозреватель является продвинутым инструментом для гарантирования скрытности и защиты в интернете. Однако, иногда люди могут попасть в с сложностями доступа. В этой статье мы изучим вероятные происхождения и подсчитаем методы решения для устранения проблем с входом к Tor Browser.
Проблемы с сетью:
Решение: Проверьте ваше интернет-подключение. Убедитесь, что вы подключены к локальной сети, и отсутствует затруднений с вашим провайдером.
Блокировка Тор сети:
Решение: В некоторых конкретных странах или сетях Tor может быть запрещен. Воспользуйтесь использованием мосты для прохождения блокировок. В параметрах Tor Browser выберите “Проброс мостов” и применяйте инструкциям.
Прокси-серверы и брандмауэры:
Решение: Проверьте установки прокси-сервера и файервола. Проверьте, что они не запрещают доступ Tor Browser к сети. Внесите изменения настройки или временно остановите прокси и файерволы для оценки.
Проблемы с самим приложением:
Решение: Убедитесь, что у вас присутствует последняя версия Tor Browser. Иногда изменения могут распутать проблемы с доступом. Также пробуйте перезапустить программу.
Временные отказы в Тор-инфраструктуре:
Решение: Подождите некоторое время и пытайтесь подключиться впоследствии. Временные перебои в работе Tor способны возникать, и эти явления обычно корректируются в сжатые сроки.
Отключение JavaScript:
Решение: Некоторые из веб-ресурсы могут блокировать вход через Tor, если в вашем программе для просмотра включен JavaScript. Попытайтесь временно деактивировать JavaScript в параметрах программы.
Проблемы с антивирусным программным обеспечением:
Решение: Ваш антивирус или брандмауэр может блокировать Tor Browser. Удостоверьтесь, что у вас нет блокировок для Tor в параметрах вашего антивирусного программного обеспечения.
Исчерпание оперативной памяти:
Решение: Если у вас открыто большое количество вкладок или процессы, это может привести к израсходованию оперативной памяти и сбоям с подключением. Закройте дополнительные окна или пересоздайте браузер.
В случае, если трудность с соединением к Tor Browser остается в силе, обратитесь за помощью на официальном форуме Tor. Профессионалы имеют возможность подсказать дополнительную помощь и последовательность действий. Помните, что безопасность и невидимость зависят от постоянного наблюдения к деталям, по этой причине следите за изменениями и применяйте инструкциям сообщества по использованию Tor.
отдых на краби цены 2024
mexico drug stores pharmacies mexican mail order pharmacies mexican border pharmacies shipping to usa
reputable mexican pharmacies online reputable mexican pharmacies online buying prescription drugs in mexico online
mexico drug stores pharmacies mexican drugstore online buying prescription drugs in mexico
medication from mexico pharmacy medicine in mexico pharmacies mexico pharmacies prescription drugs
mexico drug stores pharmacies buying prescription drugs in mexico medication from mexico pharmacy
ST666
mexican online pharmacies prescription drugs mexico pharmacy buying prescription drugs in mexico online
pharmacies in mexico that ship to usa mexican pharmaceuticals online mexican rx online
mexican mail order pharmacies mexican border pharmacies shipping to usa best online pharmacies in mexico
medicine in mexico pharmacies buying prescription drugs in mexico mexican pharmacy
buying from online mexican pharmacy mexico pharmacies prescription drugs reputable mexican pharmacies online
buying from online mexican pharmacy mexican drugstore online buying prescription drugs in mexico
mexican drugstore online buying prescription drugs in mexico online mexico pharmacy
purple pharmacy mexico price list buying prescription drugs in mexico mexico drug stores pharmacies
mexican mail order pharmacies mexico drug stores pharmacies mexico pharmacy
mexican mail order pharmacies mexican drugstore online mexican mail order pharmacies
mexican drugstore online buying from online mexican pharmacy mexico drug stores pharmacies
medication from mexico pharmacy mexico pharmacies prescription drugs reputable mexican pharmacies online
mexico drug stores pharmacies pharmacies in mexico that ship to usa mexico pharmacies prescription drugs
mexican border pharmacies shipping to usa pharmacies in mexico that ship to usa medication from mexico pharmacy
mexican drugstore online medicine in mexico pharmacies pharmacies in mexico that ship to usa
best mexican online pharmacies mexican drugstore online mexican mail order pharmacies
purple pharmacy mexico price list buying prescription drugs in mexico best online pharmacies in mexico
mexican border pharmacies shipping to usa mexican online pharmacies prescription drugs mexico drug stores pharmacies
mexico pharmacies prescription drugs mexican rx online mexican drugstore online
mexican mail order pharmacies mexican drugstore online medication from mexico pharmacy
mexican drugstore online mexico pharmacy pharmacies in mexico that ship to usa
mexican rx online purple pharmacy mexico price list mexican pharmaceuticals online
pharmacies in mexico that ship to usa mexican pharmacy pharmacies in mexico that ship to usa
https://mexicanph.shop/# buying from online mexican pharmacy
mexican pharmaceuticals online
mexican online pharmacies prescription drugs mexico drug stores pharmacies buying from online mexican pharmacy
mexico pharmacy mexico pharmacies prescription drugs best mexican online pharmacies
mexican border pharmacies shipping to usa buying prescription drugs in mexico п»їbest mexican online pharmacies
mexico drug stores pharmacies buying from online mexican pharmacy mexico drug stores pharmacies
mexico drug stores pharmacies mexican drugstore online pharmacies in mexico that ship to usa
mexican drugstore online mexico drug stores pharmacies mexican online pharmacies prescription drugs
mexican online pharmacies prescription drugs buying prescription drugs in mexico online mexican pharmacy
buying prescription drugs in mexico mexican pharmaceuticals online best online pharmacies in mexico
mexican online pharmacies prescription drugs mexican drugstore online reputable mexican pharmacies online
best mexican online pharmacies medicine in mexico pharmacies medicine in mexico pharmacies
http://mexicanph.com/# mexican drugstore online
purple pharmacy mexico price list
mexico drug stores pharmacies buying prescription drugs in mexico online mexican drugstore online
medication from mexico pharmacy pharmacies in mexico that ship to usa buying prescription drugs in mexico online
purple pharmacy mexico price list mexico pharmacies prescription drugs medication from mexico pharmacy
mexico drug stores pharmacies п»їbest mexican online pharmacies mexican drugstore online
buying prescription drugs in mexico online pharmacies in mexico that ship to usa mexican pharmacy
lisinopril 2 mg: lisinopril 10 mg daily – lisinopril 10 mg tablet price
https://lisinopril.top/# generic for prinivil
http://buyprednisone.store/# order prednisone online canada
https://amoxil.cheap/# amoxicillin 30 capsules price
ivermectin tablets uk: where to buy ivermectin cream – ivermectin 250ml
2024全新上線❰戰神賽特老虎機❱ – ATG賽特玩法說明介紹
❰戰神賽特老虎機❱是由ATG電子獨家開發的古埃及風格線上老虎機,在傳說中戰神賽特是「力量之神」與奈芙蒂斯女神結成連理,共同守護古埃及的奇幻秘寶,只有被選中的冒險者才能進入探險。
❰戰神賽特老虎機❱ – ATG賽特介紹
2024最新老虎機【戰神塞特】- ATG電子 X 富遊娛樂城
❰戰神賽特老虎機❱ – ATG電子
線上老虎機系統 : ATG電子
發行年分 : 2024年1月
最大倍數 : 51000倍
返還率 : 95.89%
支付方式 : 全盤倍數、消除掉落
最低投注金額 : 0.4元
最高投注金額 : 2000元
可否選台 : 是
可選台台數 : 350台
免費遊戲 : 選轉觸發+購買特色
❰戰神賽特老虎機❱ 賠率說明
戰神塞特老虎機賠率算法非常簡單,玩家們只需要不斷的轉動老虎機,成功消除物件即可贏分,得分賠率依賠率表計算。
當盤面上沒有物件可以消除時,倍數符號將會相加形成總倍數!該次旋轉的總贏分即為 : 贏分 X 總倍數。
積分方式如下 :
贏分=(單次押注額/20) X 物件賠率
EX : 單次押注額為1,盤面獲得12個戰神賽特倍數符號法老魔眼
贏分= (1/20) X 1000=50
以下為各個得分符號數量之獎金賠率 :
得分符號 獎金倍數 得分符號 獎金倍數
戰神賽特倍數符號聖甲蟲 6 2000
5 100
4 60 戰神賽特倍數符號黃寶石 12+ 200
10-11 30
8-9 20
戰神賽特倍數符號荷魯斯之眼 12+ 1000
10-11 500
8-9 200 戰神賽特倍數符號紅寶石 12+ 160
10-11 24
8-9 16
戰神賽特倍數符號眼鏡蛇 12+ 500
10-11 200
8-9 50 戰神賽特倍數符號紫鑽石 12+ 100
10-11 20
8-9 10
戰神賽特倍數符號神箭 12+ 300
10-11 100
8-9 40 戰神賽特倍數符號藍寶石 12+ 80
10-11 18
8-9 8
戰神賽特倍數符號屠鐮刀 12+ 240
10-11 40
8-9 30 戰神賽特倍數符號綠寶石 12+ 40
10-11 15
8-9 5
❰戰神賽特老虎機❱ 賠率說明(橘色數值為獲得數量、黑色數值為得分賠率)
ATG賽特 – 特色說明
ATG賽特 – 倍數符號獎金加乘
玩家們在看到盤面上出現倍數符號時,務必把握機會加速轉動ATG賽特老虎機,倍數符號會隨機出現2到500倍的隨機倍數。
當盤面無法在消除時,這些倍數總和會相加,乘上當時累積之獎金,即為最後得分總額。
倍數符號會出現在主遊戲和免費遊戲當中,玩家們千萬別錯過這個可以瞬間將得獎金額拉高的好機會!
ATG賽特 – 倍數符號獎金加乘
ATG賽特 – 倍數符號圖示
ATG賽特 – 進入神秘金字塔開啟免費遊戲
戰神賽特倍數符號聖甲蟲
❰戰神賽特老虎機❱ 免費遊戲符號
在古埃及神話中,聖甲蟲又稱為「死亡之蟲」,它被當成了天球及重生的象徵,守護古埃及的奇幻秘寶。
當玩家在盤面上,看見越來越多的聖甲蟲時,千萬不要膽怯,只需在牌面上斬殺4~6個ATG賽特免費遊戲符號,就可以進入15場免費遊戲!
在免費遊戲中若轉出3~6個聖甲蟲免費遊戲符號,可額外獲得5次免費遊戲,最高可達100次。
當玩家的累積贏分且盤面有倍數物件時,盤面上的所有倍數將會加入總倍數!
ATG賽特 – 選台模式贏在起跑線
為避免神聖的寶物被盜墓者奪走,富有智慧的法老王將金子塔內佈滿迷宮,有的設滿機關讓盜墓者寸步難行,有的暗藏機關可以直接前往存放神秘寶物的暗房。
ATG賽特老虎機設有350個機檯供玩家選擇,這是連魔龍老虎機、忍老虎機都給不出的機台數量,為的就是讓玩家,可以隨時進入神秘的古埃及的寶藏聖域,挖掘長眠已久的神祕寶藏。
【戰神塞特老虎機】選台模式
❰戰神賽特老虎機❱ 選台模式
ATG賽特 – 購買免費遊戲挖掘秘寶
玩家們可以使用當前投注額的100倍購買免費遊戲!進入免費遊戲再也不是虛幻。獎勵與一般遊戲相同,且購買後遊戲將自動開始,直到場次和獎金發放完畢為止。
有購買免費遊戲需求的玩家們,立即點擊「開始」,啟動神秘金字塔裡的古埃及祕寶吧!
【戰神塞特老虎機】購買特色
❰戰神賽特老虎機❱ 購買特色
娛樂城
台灣線上娛樂城的規模正迅速增長,新的娛樂場所不斷開張。為了吸引玩家,這些場所提供了各種吸引人的優惠和贈品。每家娛樂城都致力於提供卓越的服務,務求讓客人享受最佳的遊戲體驗。
2024年網友推薦最多的線上娛樂城:No.1富遊娛樂城、No.2 BET365、No.3 DG娛樂城、No.4 九州娛樂城、No.5 亞博娛樂城,以下來介紹這幾間娛樂城網友對他們的真實評價及娛樂城推薦。
2024台灣娛樂城排名
排名 娛樂城 體驗金(流水) 首儲優惠(流水) 入金速度 出金速度 推薦指數
1 富遊娛樂城 168元(1倍) 送1000(1倍) 15秒 3-5分鐘 ★★★★★
2 1XBET中文版 168元(1倍) 送1000(1倍) 15秒 3-5分鐘 ★★★★☆
3 Bet365中文 168元(1倍) 送1000(1倍) 15秒 3-5分鐘 ★★★★☆
4 DG娛樂城 168元(1倍) 送1000(1倍) 15秒 5-10分鐘 ★★★★☆
5 九州娛樂城 168元(1倍) 送500(1倍) 15秒 5-10分鐘 ★★★★☆
6 亞博娛樂城 168元(1倍) 送1000(1倍) 15秒 3-10分鐘 ★★★☆☆
7 寶格綠娛樂城 199元(1倍) 送1000(25倍) 15秒 3-5分鐘 ★★★☆☆
8 王者娛樂城 300元(15倍) 送1000(15倍) 90秒 5-30分鐘 ★★★☆☆
9 FA8娛樂城 200元(40倍) 送1000(15倍) 90秒 5-10分鐘 ★★★☆☆
10 AF娛樂城 288元(40倍) 送1000(1倍) 60秒 5-30分鐘 ★★★☆☆
2024台灣娛樂城排名,10間娛樂城推薦
No.1 富遊娛樂城
富遊娛樂城推薦指數:★★★★★(5/5)
富遊娛樂城介面 / 2024娛樂城NO.1
RG富遊官網
富遊娛樂城是成立於2019年的一家獲得數百萬玩家註冊的線上博彩品牌,持有博彩行業市場的合法運營許可。該公司受到歐洲馬爾他(MGA)、菲律賓(PAGCOR)以及英屬維爾京群島(BVI)的授權和監管,展示了其雄厚的企業實力與合法性。
富遊娛樂城致力於提供豐富多樣的遊戲選項和全天候的會員服務,不斷追求卓越,確保遊戲的公平性。公司運用先進的加密技術及嚴格的安全管理體系,保障玩家資金的安全。此外,為了提升手機用戶的使用體驗,富遊娛樂城還開發了專屬APP,兼容安卓(Android)及IOS系統,以達到業界最佳的穩定性水平。
在資金存提方面,富遊娛樂城採用第三方金流服務,進一步保障玩家的資金安全,贏得了玩家的信賴與支持。這使得每位玩家都能在此放心享受遊戲樂趣,無需擔心後顧之憂。
富遊娛樂城簡介
娛樂城網路評價:5分
娛樂城入金速度:15秒
娛樂城出金速度:5分鐘
娛樂城體驗金:168元
娛樂城優惠:
首儲1000送1000
好友禮金無上限
新會禮遇
舊會員回饋
娛樂城遊戲:體育、真人、電競、彩票、電子、棋牌、捕魚
富遊娛樂城推薦要點
新手首推:富遊娛樂城,2024受網友好評,除了打造針對新手的各種優惠活動,還有各種遊戲的豐富教學。
首儲再贈送:首儲1000元,立即在獲得1000元獎金,而且只需要1倍流水,對新手而言相當友好。
免費遊戲體驗:新進玩家享有免費體驗金,讓您暢玩娛樂城內的任何遊戲。
優惠多元:活動頻繁且豐富,流水要求低,對各玩家可說是相當友善。
玩家首選:遊戲多樣,服務優質,是新手與老手的最佳賭場選擇。
富遊娛樂城優缺點整合
優點 缺點
• 台灣註冊人數NO.1線上賭場
• 首儲1000贈1000只需一倍流水
• 擁有體驗金免費體驗賭場
• 網紅部落客推薦保證出金線上娛樂城 • 需透過客服申請體驗金
富遊娛樂城優缺點整合表格
富遊娛樂城存取款方式
存款方式 取款方式
• 提供四大超商(全家、7-11、萊爾富、ok超商)
• 虛擬貨幣ustd存款
• 銀行轉帳(各大銀行皆可) • 現金1:1出金
• 網站內申請提款及可匯款至綁定帳戶
富遊娛樂城存取款方式表格
富遊娛樂城優惠活動
優惠 獎金贈點 流水要求
免費體驗金 $168 1倍 (儲值後) /36倍 (未儲值)
首儲贈點 $1000 1倍流水
返水活動 0.3% – 0.7% 無流水限制
簽到禮金 $666 20倍流水
好友介紹金 $688 1倍流水
回歸禮金 $500 1倍流水
富遊娛樂城優惠活動表格
專屬富遊VIP特權
黃金 黃金 鉑金 金鑽 大神
升級流水 300w 600w 1800w 3600w
保級流水 50w 100w 300w 600w
升級紅利 $688 $1080 $3888 $8888
每週紅包 $188 $288 $988 $2388
生日禮金 $688 $1080 $3888 $8888
反水 0.4% 0.5% 0.6% 0.7%
專屬富遊VIP特權表格
娛樂城評價
總體來看,富遊娛樂城對於玩家來講是一個非常不錯的選擇,有眾多的遊戲能讓玩家做選擇,還有各種優惠活動以及低流水要求等等,都讓玩家贏錢的機率大大的提升了不少,除了體驗遊戲中帶來的樂趣外還可以享受到贏錢的快感,還在等什麼趕快點擊下方連結,立即遊玩!
where can i buy prednisone: 1 mg prednisone cost – cost of prednisone 5mg tablets
オンラインカジノ
日本にオンラインカジノおすすめランキング2024年最新版
2024おすすめのオンラインカジノ
オンラインカジノはパソコンでしか遊べないというのは、もう一昔前の話。現在はスマホやタブレットなどのモバイル端末からも、パソコンと変わらないクオリティでオンラインカジノを当たり前に楽しむことができるようになりました。
数あるモバイルカジノの中で、当サイトが厳選したトップ5カジノはこちら。
オンラインカジノおすすめ: コニベット(Konibet)
コニベットといえば、キャッシュバックや毎日もらえるリベートボーナスなど豪華ボーナスが満載!それに加えて低い出金条件も見どころです。さらにVIPレベルごとの還元率の高さも業界内で突出している点や、出金速度の速さなどトータルバランスの良さからもハイローラーの方にも好まれています。
カスタマーサポートは365日24時間稼働しているので、初心者の方にも安心してご利用いただけます。
さらに【業界初のオンラインポーカー】を導入!毎日トーナメントも開催されているので、早速参加しちゃいましょう!
RTP(還元率)公開や、入出金対応がスムーズで初心者向き
2000種類以上の豊富なゲーム数を誇り、スロットゲーム多数!
今なら$20の入金不要ボーナスと最大$650還元ボーナス!
8種類以上のライブカジノプロバイダー
業界初オンラインポーカーあり,日本利用者数No.1の安心のオンラインカジノメディア!
おすすめポイント
コニベットは、その豊富なボーナスと高還元率、そして安心のキャッシュバック制度で知られています。まず、新規登録者には入金不要の$20ボーナスが提供され、さらに初回入金時には最大$650の還元ボーナスが得られます。これらのキャンペーンはプレイヤーにとって大きな魅力となっています。
また、コニベットの特徴的な点は、VIP制度です。一度ロイヤルクラブになると、降格がなく、スロットリベートが1.5%という驚異の還元率を享受できます。これは他のオンラインカジノと比較しても非常に高い還元率です。さらに、常時週間損失キャッシュバックも行っているため、不運で負けてしまった場合でも取り返すチャンスがあります。これらの特徴から、コニベットはプレイヤーにとって非常に魅力的なオンラインカジノと言えるでしょう。
コニベット 無料会員登録をする
| コニベットのボーナス
コニベットは、新規登録者向けに20ドルの入金不要ボーナスを用意しています
コニベットカジノでは、限定で初回入金後に残高が1ドル未満になった場合、入金額の50%(最高500ドル)がキャッシュバックされる。キャッシュバック額に出金条件はないため、獲得後にすぐ出金することも可能です。
| コニベットの入金方法
入金方法 最低 / 最高入金
マスターカード 最低 : $20 / 最高 : $6,000
ジェイシービー 最低 : $20/ 最高 : $6,000
アメックス 最低 : $20 / 最高 : $6,000
アイウォレット 最低 : $20 / 最高 : $100,000
スティックペイ 最低 : $20 / 最高 : $100,000
ヴィーナスポイント 最低 : $20 / 最高 : $10,000
仮想通貨 最低 : $20 / 最高 : $100,000
銀行送金 最低 : $20 / 最高 : $10,000
| コニベット出金方法
出金方法 最低 |最高出金
アイウォレット 最低 : $40 / 最高 : なし
スティックぺイ 最低 : $40 / 最高 : なし
ヴィーナスポイント 最低 : $40 / 最高 : なし
仮想通貨 最低 : $40 / 最高 : なし
銀行送金 最低 : $40 / 最高 : なし
https://buyprednisone.store/# no prescription online prednisone
Aviator Spribe играть на евро казино
Prompt reply)))
Добро пожаловать в захватывающий мир авиаторов! Aviator – это увлекательная игра, которая позволит вам окунуться в атмосферу боевых действий на небе. Необычные графика и захватывающий сюжет сделают ваше путешествие по воздуху неповторимым.
Получайте крупные выигрыши с автоматом Aviator Spribe играть бесплатно в нашем казино!
Aviator игра позволит вам почувствовать себя настоящим пилотом. Вам предстоит совершить невероятные маневры, выполнять сложные задания и сражаться с противниками. Улучшайте свой самолет, чтобы быть готовым к любым ситуациям и становиться настоящим мастером.
Основные особенности Aviator краш игры:
1. Реалистичная графика и физика – благодаря передовой графике и реалистичной физике вы почувствуете себя настоящим пилотом.
2. Разнообразные режимы игры и миссии – в Aviator краш игре вы сможете выбрать различные режимы игры, такие как гонки, симулятор полетов и захватывающие воздушные бои. Кроме того, каждая миссия будет предлагать свои собственные вызовы и задачи.
3. Улучшение и модернизация самолетов – в игре доступны различные модели самолетов, которые можно покупать и улучшать. Вы сможете устанавливать новое оборудование, улучшать двигательность и мощность своего самолета, а также выбирать различные варианты окраски и декорации.
Aviator краш игра – это возможность испытать себя в роли авиатора и преодолеть все сложности и опасности воздушного пространства. Почувствуйте настоящую свободу и адреналин в Aviator краш игре онлайн!
Играйте в «Авиатор» в онлайн-казино Pin-Up
Aviator краш игра онлайн предлагает увлекательную и захватывающую игровую атмосферу, где вы становитесь настоящим авиатором и сражаетесь с самыми опасными искусственными интеллектами.
В этой игре вы должны показать свое мастерство и смекалку, чтобы преодолеть сложности многочисленных локаций и уровней. Вам предстоит собирать бонусы, уклоняться от препятствий и сражаться с врагами, используя свои навыки пилотирования и стрельбы.
Каждый уровень игры Aviator краш имеет свою уникальную атмосферу и задачи. Будьте готовы к неожиданностям, так как вас ждут захватывающие повороты сюжета и сложные испытания. Найдите все пути к победе и станьте настоящим героем авиатором!
Авиатор игра является прекрасным способом провести время и испытать настоящий адреналиновый разряд. Готовы ли вы стать лучшим авиатором? Не упустите свой шанс и начните играть в Aviator краш прямо сейчас!
Aviator – играй, сражайся, побеждай!
Aviator Pin Up (Авиатор Пин Ап ) – игра на деньги онлайн Казахстан
Aviator игра предлагает увлекательное и захватывающее разнообразие врагов и уровней, которые не оставят равнодушными даже самых требовательных геймеров.
Враги в Aviator краш игре онлайн представлены в самых разных формах и размерах. Здесь вы встретите группы из маленьких и быстрых врагов, а также огромных боссов с мощным вооружением. Разнообразие врагов позволяет игрокам использовать разные тактики и стратегии для победы.
Кроме того, Aviator игра предлагает разнообразие уровней сложности. Выберите легкий уровень, чтобы насладиться игровым процессом, или вызовите себе настоящий вызов, выбрав экспертный уровень. Независимо от выбранного уровня сложности, вы получите максимум удовольствия от игры и окунетесь в захватывающий мир авиаторов.
Играйте в Aviator и наслаждайтесь разнообразием врагов и уровней, которые позволят вам почувствовать себя настоящим авиатором.
furosemida: Buy Lasix – lasix 40mg
https://amoxil.cheap/# how much is amoxicillin prescription
amoxicillin tablet 500mg: amoxicillin 750 mg price – where to buy amoxicillin 500mg
https://furosemide.guru/# lasix furosemide
lisinopril 40 mg purchase: zestoretic 25 – lisinopril 5mg pill
поверка счетчиков воды калуга
https://furosemide.guru/# furosemide 100 mg
http://lisinopril.top/# lisinopril 104
日本にオンラインカジノおすすめランキング2024年最新版
2024おすすめのオンラインカジノ
オンラインカジノはパソコンでしか遊べないというのは、もう一昔前の話。現在はスマホやタブレットなどのモバイル端末からも、パソコンと変わらないクオリティでオンラインカジノを当たり前に楽しむことができるようになりました。
数あるモバイルカジノの中で、当サイトが厳選したトップ5カジノはこちら。
オンラインカジノおすすめ: コニベット(Konibet)
コニベットといえば、キャッシュバックや毎日もらえるリベートボーナスなど豪華ボーナスが満載!それに加えて低い出金条件も見どころです。さらにVIPレベルごとの還元率の高さも業界内で突出している点や、出金速度の速さなどトータルバランスの良さからもハイローラーの方にも好まれています。
カスタマーサポートは365日24時間稼働しているので、初心者の方にも安心してご利用いただけます。
さらに【業界初のオンラインポーカー】を導入!毎日トーナメントも開催されているので、早速参加しちゃいましょう!
RTP(還元率)公開や、入出金対応がスムーズで初心者向き
2000種類以上の豊富なゲーム数を誇り、スロットゲーム多数!
今なら$20の入金不要ボーナスと最大$650還元ボーナス!
8種類以上のライブカジノプロバイダー
業界初オンラインポーカーあり,日本利用者数No.1の安心のオンラインカジノメディア!
おすすめポイント
コニベットは、その豊富なボーナスと高還元率、そして安心のキャッシュバック制度で知られています。まず、新規登録者には入金不要の$20ボーナスが提供され、さらに初回入金時には最大$650の還元ボーナスが得られます。これらのキャンペーンはプレイヤーにとって大きな魅力となっています。
また、コニベットの特徴的な点は、VIP制度です。一度ロイヤルクラブになると、降格がなく、スロットリベートが1.5%という驚異の還元率を享受できます。これは他のオンラインカジノと比較しても非常に高い還元率です。さらに、常時週間損失キャッシュバックも行っているため、不運で負けてしまった場合でも取り返すチャンスがあります。これらの特徴から、コニベットはプレイヤーにとって非常に魅力的なオンラインカジノと言えるでしょう。
コニベット 無料会員登録をする
| コニベットのボーナス
コニベットは、新規登録者向けに20ドルの入金不要ボーナスを用意しています
コニベットカジノでは、限定で初回入金後に残高が1ドル未満になった場合、入金額の50%(最高500ドル)がキャッシュバックされる。キャッシュバック額に出金条件はないため、獲得後にすぐ出金することも可能です。
| コニベットの入金方法
入金方法 最低 / 最高入金
マスターカード 最低 : $20 / 最高 : $6,000
ジェイシービー 最低 : $20/ 最高 : $6,000
アメックス 最低 : $20 / 最高 : $6,000
アイウォレット 最低 : $20 / 最高 : $100,000
スティックペイ 最低 : $20 / 最高 : $100,000
ヴィーナスポイント 最低 : $20 / 最高 : $10,000
仮想通貨 最低 : $20 / 最高 : $100,000
銀行送金 最低 : $20 / 最高 : $10,000
| コニベット出金方法
出金方法 最低 |最高出金
アイウォレット 最低 : $40 / 最高 : なし
スティックぺイ 最低 : $40 / 最高 : なし
ヴィーナスポイント 最低 : $40 / 最高 : なし
仮想通貨 最低 : $40 / 最高 : なし
銀行送金 最低 : $40 / 最高 : なし
ivermectin cost: topical ivermectin cost – ivermectin 1%
娛樂城推薦
網上賭場
Все о современных технологиях
lasix 40mg: Buy Furosemide – lasix online
http://furosemide.guru/# lasix medication
https://lisinopril.top/# lisinopril 10 mg on line prescription
amoxicillin price canada: amoxicillin 500mg price – amoxicillin 750 mg price
Все о дизайне интерьера
http://buyprednisone.store/# prednisone over the counter
https://avidigital-spb.ru
https://buyprednisone.store/# prednisone 50 mg buy
lasix side effects: Buy Lasix No Prescription – furosemide 100mg
https://vstx.ru/
http://amoxil.cheap/# amoxicillin without a prescription
https://best-santehnika.store/
amoxicillin cost australia: buy amoxicillin online with paypal – where can i get amoxicillin 500 mg
http://buyprednisone.store/# prednisone pill prices
Купить паспорт
Теневые рынки и их незаконные деятельности представляют значительную угрозу безопасности общества и являются объектом внимания правоохранительных органов по всему миру. В данной статье мы обсудим так называемые теневые рынки, где возможно покупать поддельные паспорта, и какие угрозы это несет для граждан и государства.
Теневые рынки представляют собой неявные интернет-площадки, на которых торгуется разнообразной незаконной продукцией и услугами. Среди этих услуг встречается и продажа нелегальных документов, таких как паспорта. Эти рынки оперируют в подпольной сфере интернета, используя зашифровывание и анонимные платежные системы, чтобы оставаться непостижимыми для правоохранительных органов.
Покупка поддельного паспорта на теневых рынках представляет серьезную угрозу национальной безопасности. Кража личных данных, фальсификация документов и поддельные идентификационные материалы могут быть использованы для совершения радикальных актов, обманного характера и прочих преступлений.
Правоохранительные органы в различных странах активно борются с теневыми рынками, проводя спецоперации по выявлению и задержанию тех, кто замешан в преступных действиях. Однако, по мере того как технологии становятся более трудными, эти рынки могут адаптироваться и находить новые способы обхода законов.
Для сохранения собственной безопасности от опасностей, связанных с подпольными рынками, важно проявлять осторожность при обработке своих персональных данных. Это включает в себя избегать фишинговых атак, не распространять персональной информацией в подозрительных источниках и регулярно контролировать свои финансовые данные.
Кроме того, общество должно быть знающим о рисках и последствиях покупки поддельных удостоверений. Это позволит создать более осознанное и ответственное отношение к вопросам безопасности и поможет в борьбе с скрытыми рынками. Поддержка законопроектов, направленных на ужесточение наказаний за изготовление и сбыт нелегальных документов, также представляет важное направление в борьбе с этими преступлениями
prednisone no rx: prednisone 50 mg buy – buy prednisone tablets uk
http://stromectol.fun/# ivermectin cost australia
купить клон карты
Изготовление и использование копий банковских карт является противозаконной практикой, представляющей важную угрозу для безопасности финансовых систем и личных средств граждан. В данной статье мы рассмотрим потенциальные опасности и воздействие покупки дубликатов карт, а также как общество и силовые структуры борются с аналогичными преступлениями.
“Дубликаты” карт — это незаконные реплики банковских карт, которые используются для незаконных транзакций. Основной метод создания реплик — это угон данных с оригинальной карты и последующее кодирование этих данных на другую карту. Злоумышленники, предлагающие услуги по продаже копий карт, обычно действуют в теневой сфере интернета, где трудно выявить и пресечь их деятельность.
Покупка дубликатов карт представляет собой существенное преступление, которое может повлечь за собой серьезные наказания. Покупатель также рискует стать соучастником мошенничества, что может привести к уголовной ответственности. Основные преступные действия в этой сфере включают в себя похищение личной информации, подделку документов и, конечно же, финансовые махинации.
Банки и полиция активно борются с незаконными действиями, связанными с дублированием карт. Банки внедряют современные технологии для определения подозрительных транзакций, а также предлагают услуги по защите для своих клиентов. Полиция ведут следственные мероприятия и арестуют тех, кто замешан в создании и продаже копий карт.
Для обеспечения безопасности важно соблюдать осторожность при использовании банковских карт. Необходимо периодически проверять выписки, избегать сомнительных сделок и следить за своей индивидуальной информацией. Образованность и осведомленность об угрозах также являются важными средствами в борьбе с мошенничеством.
В заключение, использование копий банковских карт — это противозаконное и неприемлемое деяние, которое может привести к существенным последствиям для тех, кто вовлечен в такую практику. Соблюдение мер защиты, осведомленность о возможных потенциальных рисках и сотрудничество с правоохранительными органами играют определяющую роль в предотвращении и пресечении аналогичных преступлений
https://buyprednisone.store/# where to buy prednisone 20mg
400 mg prednisone: how can i get prednisone – prednisone 4mg tab
http://stromectol.fun/# generic name for ivermectin
amoxicillin 250 mg price in india: amoxicillin capsule 500mg price – amoxil generic
https://seo116.ru/
карты на обнал
Использование банковских карт является существенной составляющей современного общества. Карты предоставляют легкость, секретность и широкие возможности для проведения банковских транзакций. Однако, кроме легального использования, существует нелицеприятная сторона — обналичивание карт, когда карты используются для снятия денег без согласия владельца. Это является незаконным действием и влечет за собой серьезные наказания.
Обналичивание карт представляет собой практики, направленные на извлечение наличных средств с карты, необходимые для того, чтобы обойти систему безопасности и предупреждений, предусмотренных банком. К сожалению, такие преступные действия существуют, и они могут привести к материальным убыткам для банков и клиентов.
Одним из путей кэшаута карт является использование технических хитростей, таких как скимминг. Кража данных с магнитных полос карт — это процесс, при котором мошенники устанавливают устройства на банкоматах или терминалах оплаты, чтобы считывать информацию с магнитной полосы банковской карты. Полученные данные затем используются для изготовления дубликата карты или проведения транзакций в интернете.
Другим распространенным методом является фишинг, когда преступники отправляют фальшивые электронные сообщения или создают поддельные веб-сайты, имитирующие банковские ресурсы, с целью сбора конфиденциальных данных от клиентов.
Для предотвращения кэшаута карт банки осуществляют разные действия. Это включает в себя повышение уровня безопасности, осуществление двухфакторной верификации, слежение за транзакциями и подготовка клиентов о методах предотвращения мошенничества.
Клиентам также следует проявлять активность в гарантировании защиты своих карт и данных. Это включает в себя периодическое изменение паролей, контроль банковских выписок, а также бдительность к подозрительным операциям.
Обналичивание карт — это серьезное преступление, которое причиняет урон не только финансовым учреждениям, но и обществу в целом. Поэтому важно соблюдать осторожность при использовании банковских карт, быть знакомым с методами предупреждения мошенничества и соблюдать предосторожности для избежания потери денег
https://furosemide.guru/# lasix side effects
In the world of high-end watches, finding a dependable source is essential, and WatchesWorld stands out as a pillar of confidence and expertise. Presenting an wide collection of renowned timepieces, WatchesWorld has garnered acclaim from content customers worldwide. Let’s explore into what our customers are saying about their experiences.
Customer Testimonials:
O.M.’s Review on O.M.:
“Outstanding communication and aftercare throughout the process. The watch was flawlessly packed and in perfect condition. I would certainly work with this team again for a watch purchase.”
Richard Houtman’s Review on Benny:
“I dealt with Benny, who was highly assisting and courteous at all times, preserving me regularly informed of the process. Moving forward, even though I ended up sourcing the watch locally, I would still definitely recommend Benny and the company.”
Customer’s Efficient Service Experience:
“A highly efficient and efficient service. Kept me up to date on the order progress.”
Featured Timepieces:
Richard Mille RM30-01 Automatic Winding with Declutchable Rotor:
Price: €285,000
Year: 2023
Reference: RM30-01 TI
Patek Philippe Complications World Time 38.5mm:
Price: €39,900
Year: 2019
Reference: 5230R-001
Rolex Oyster Perpetual Day-Date 36mm:
Price: €76,900
Year: 2024
Reference: 128238-0071
Best Sellers:
Bulgari Serpenti Tubogas 35mm:
Price: On Request
Reference: 101816 SP35C6SDS.1T
Bulgari Serpenti Tubogas 35mm (2024):
Price: €12,700
Reference: 102237 SP35C6SPGD.1T
Cartier Panthere Medium Model:
Price: €8,390
Year: 2023
Reference: W2PN0007
Our Experts Selection:
Cartier Panthere Small Model:
Price: €11,500
Year: 2024
Reference: W3PN0006
Omega Speedmaster Moonwatch 44.25 mm:
Price: €9,190
Year: 2024
Reference: 304.30.44.52.01.001
Rolex Oyster Perpetual Cosmograph Daytona 40mm:
Price: €28,500
Year: 2023
Reference: 116500LN-0002
Rolex Oyster Perpetual 36mm:
Price: €13,600
Year: 2023
Reference: 126000-0006
Why WatchesWorld:
WatchesWorld is not just an web-based platform; it’s a commitment to individualized service in the world of high-end watches. Our staff of watch experts prioritizes trust, ensuring that every client makes an well-informed decision.
Our Commitment:
Expertise: Our team brings matchless knowledge and perspective into the realm of high-end timepieces.
Trust: Trust is the basis of our service, and we prioritize openness in every transaction.
Satisfaction: Customer satisfaction is our ultimate goal, and we go the additional step to ensure it.
When you choose WatchesWorld, you’re not just buying a watch; you’re investing in a effortless and trustworthy experience. Explore our collection, and let us assist you in discovering the perfect timepiece that mirrors your taste and sophistication. At WatchesWorld, your satisfaction is our proven commitment
buy prednisone online without a prescription: prednisone in india – buy prednisone canadian pharmacy
http://furosemide.guru/# lasix 100 mg
online platform for watches
In the world of high-end watches, finding a reliable source is paramount, and WatchesWorld stands out as a pillar of trust and knowledge. Providing an broad collection of prestigious timepieces, WatchesWorld has accumulated acclaim from content customers worldwide. Let’s explore into what our customers are saying about their experiences.
Customer Testimonials:
O.M.’s Review on O.M.:
“Excellent communication and aftercare throughout the process. The watch was flawlessly packed and in pristine condition. I would certainly work with this team again for a watch purchase.”
Richard Houtman’s Review on Benny:
“I dealt with Benny, who was extremely helpful and courteous at all times, preserving me regularly informed of the procedure. Moving forward, even though I ended up sourcing the watch locally, I would still definitely recommend Benny and the company.”
Customer’s Efficient Service Experience:
“A very good and efficient service. Kept me up to date on the order progress.”
Featured Timepieces:
Richard Mille RM30-01 Automatic Winding with Declutchable Rotor:
Price: €285,000
Year: 2023
Reference: RM30-01 TI
Patek Philippe Complications World Time 38.5mm:
Price: €39,900
Year: 2019
Reference: 5230R-001
Rolex Oyster Perpetual Day-Date 36mm:
Price: €76,900
Year: 2024
Reference: 128238-0071
Best Sellers:
Bulgari Serpenti Tubogas 35mm:
Price: On Request
Reference: 101816 SP35C6SDS.1T
Bulgari Serpenti Tubogas 35mm (2024):
Price: €12,700
Reference: 102237 SP35C6SPGD.1T
Cartier Panthere Medium Model:
Price: €8,390
Year: 2023
Reference: W2PN0007
Our Experts Selection:
Cartier Panthere Small Model:
Price: €11,500
Year: 2024
Reference: W3PN0006
Omega Speedmaster Moonwatch 44.25 mm:
Price: €9,190
Year: 2024
Reference: 304.30.44.52.01.001
Rolex Oyster Perpetual Cosmograph Daytona 40mm:
Price: €28,500
Year: 2023
Reference: 116500LN-0002
Rolex Oyster Perpetual 36mm:
Price: €13,600
Year: 2023
Reference: 126000-0006
Why WatchesWorld:
WatchesWorld is not just an web-based platform; it’s a dedication to individualized service in the world of luxury watches. Our group of watch experts prioritizes trust, ensuring that every customer makes an well-informed decision.
Our Commitment:
Expertise: Our team brings matchless knowledge and perspective into the world of high-end timepieces.
Trust: Confidence is the basis of our service, and we prioritize transparency in every transaction.
Satisfaction: Client satisfaction is our ultimate goal, and we go the additional step to ensure it.
When you choose WatchesWorld, you’re not just purchasing a watch; you’re investing in a smooth and reliable experience. Explore our collection, and let us assist you in discovering the ideal timepiece that embodies your style and elegance. At WatchesWorld, your satisfaction is our proven commitment
Услуга сноса старых частных домов и вывоза мусора в Москве и Подмосковье под ключ от нашей компании. Работаем в указанном регионе, предлагаем услугу сломать фундамент. Наши тарифы ниже рыночных, а выполнение работ гарантируем в течение 24 часов. Бесплатно выезжаем для оценки и консультаций на объект. Звоните нам или оставляйте заявку на сайте для получения подробной информации и расчета стоимости услуг.
http://buyprednisone.store/# generic prednisone online
prinivil cost: lisinopril 420 – lisinopril 20 mg canada
http://buyprednisone.store/# prednisone pill prices
amoxicillin no prescipion: amoxicillin order online no prescription – buy amoxicillin 250mg
http://amoxil.cheap/# where can i buy amoxicillin over the counter
https://amoxil.cheap/# amoxicillin 500 mg online
ivermectin pills canada: ivermectin uk – ivermectin 2ml
https://furosemide.guru/# lasix medication
Watches World
In the world of premium watches, discovering a reliable source is paramount, and WatchesWorld stands out as a beacon of confidence and knowledge. Presenting an wide collection of prestigious timepieces, WatchesWorld has garnered praise from happy customers worldwide. Let’s delve into what our customers are saying about their experiences.
Customer Testimonials:
O.M.’s Review on O.M.:
“Excellent communication and aftercare throughout the process. The watch was perfectly packed and in pristine condition. I would certainly work with this team again for a watch purchase.”
Richard Houtman’s Review on Benny:
“I dealt with Benny, who was highly helpful and courteous at all times, preserving me regularly informed of the procedure. Moving forward, even though I ended up sourcing the watch locally, I would still definitely recommend Benny and the company.”
Customer’s Efficient Service Experience:
“A very good and efficient service. Kept me up to date on the order progress.”
Featured Timepieces:
Richard Mille RM30-01 Automatic Winding with Declutchable Rotor:
Price: €285,000
Year: 2023
Reference: RM30-01 TI
Patek Philippe Complications World Time 38.5mm:
Price: €39,900
Year: 2019
Reference: 5230R-001
Rolex Oyster Perpetual Day-Date 36mm:
Price: €76,900
Year: 2024
Reference: 128238-0071
Best Sellers:
Bulgari Serpenti Tubogas 35mm:
Price: On Request
Reference: 101816 SP35C6SDS.1T
Bulgari Serpenti Tubogas 35mm (2024):
Price: €12,700
Reference: 102237 SP35C6SPGD.1T
Cartier Panthere Medium Model:
Price: €8,390
Year: 2023
Reference: W2PN0007
Our Experts Selection:
Cartier Panthere Small Model:
Price: €11,500
Year: 2024
Reference: W3PN0006
Omega Speedmaster Moonwatch 44.25 mm:
Price: €9,190
Year: 2024
Reference: 304.30.44.52.01.001
Rolex Oyster Perpetual Cosmograph Daytona 40mm:
Price: €28,500
Year: 2023
Reference: 116500LN-0002
Rolex Oyster Perpetual 36mm:
Price: €13,600
Year: 2023
Reference: 126000-0006
Why WatchesWorld:
WatchesWorld is not just an internet platform; it’s a dedication to personalized service in the realm of high-end watches. Our staff of watch experts prioritizes trust, ensuring that every client makes an knowledgeable decision.
Our Commitment:
Expertise: Our group brings unparalleled knowledge and insight into the realm of luxury timepieces.
Trust: Confidence is the foundation of our service, and we prioritize openness in every transaction.
Satisfaction: Customer satisfaction is our ultimate goal, and we go the extra mile to ensure it.
When you choose WatchesWorld, you’re not just buying a watch; you’re investing in a smooth and trustworthy experience. Explore our range, and let us assist you in finding the perfect timepiece that mirrors your taste and sophistication. At WatchesWorld, your satisfaction is our time-tested commitment
https://furosemide.guru/# lasix 100mg
buy stromectol canada: ivermectin 24 mg – topical ivermectin cost
http://furosemide.guru/# lasix 40 mg
lasix generic name: Buy Lasix No Prescription – furosemide 100mg
https://amoxil.cheap/# amoxicillin 500mg buy online uk
http://buyprednisone.store/# buy prednisone without prescription paypal
In the realm of luxury watches, discovering a reliable source is paramount, and WatchesWorld stands out as a beacon of trust and knowledge. Providing an broad collection of prestigious timepieces, WatchesWorld has collected praise from satisfied customers worldwide. Let’s delve into what our customers are saying about their encounters.
Customer Testimonials:
O.M.’s Review on O.M.:
“Very good communication and aftercare throughout the procedure. The watch was perfectly packed and in mint condition. I would certainly work with this team again for a watch purchase.”
Richard Houtman’s Review on Benny:
“I dealt with Benny, who was highly assisting and courteous at all times, preserving me regularly informed of the procedure. Moving forward, even though I ended up acquiring the watch locally, I would still definitely recommend Benny and the company.”
Customer’s Efficient Service Experience:
“A very good and swift service. Kept me up to date on the order progress.”
Featured Timepieces:
Richard Mille RM30-01 Automatic Winding with Declutchable Rotor:
Price: €285,000
Year: 2023
Reference: RM30-01 TI
Patek Philippe Complications World Time 38.5mm:
Price: €39,900
Year: 2019
Reference: 5230R-001
Rolex Oyster Perpetual Day-Date 36mm:
Price: €76,900
Year: 2024
Reference: 128238-0071
Best Sellers:
Bulgari Serpenti Tubogas 35mm:
Price: On Request
Reference: 101816 SP35C6SDS.1T
Bulgari Serpenti Tubogas 35mm (2024):
Price: €12,700
Reference: 102237 SP35C6SPGD.1T
Cartier Panthere Medium Model:
Price: €8,390
Year: 2023
Reference: W2PN0007
Our Experts Selection:
Cartier Panthere Small Model:
Price: €11,500
Year: 2024
Reference: W3PN0006
Omega Speedmaster Moonwatch 44.25 mm:
Price: €9,190
Year: 2024
Reference: 304.30.44.52.01.001
Rolex Oyster Perpetual Cosmograph Daytona 40mm:
Price: €28,500
Year: 2023
Reference: 116500LN-0002
Rolex Oyster Perpetual 36mm:
Price: €13,600
Year: 2023
Reference: 126000-0006
Why WatchesWorld:
WatchesWorld is not just an web-based platform; it’s a commitment to individualized service in the world of luxury watches. Our group of watch experts prioritizes trust, ensuring that every customer makes an knowledgeable decision.
Our Commitment:
Expertise: Our team brings unparalleled knowledge and perspective into the world of high-end timepieces.
Trust: Trust is the foundation of our service, and we prioritize transparency in every transaction.
Satisfaction: Customer satisfaction is our paramount goal, and we go the additional step to ensure it.
When you choose WatchesWorld, you’re not just buying a watch; you’re committing in a seamless and reliable experience. Explore our range, and let us assist you in finding the perfect timepiece that mirrors your taste and elegance. At WatchesWorld, your satisfaction is our time-tested commitment
https://furosemide.guru/# furosemide
lasix medication: Over The Counter Lasix – lasix furosemide
http://furosemide.guru/# lasix
https://hidehost.net/
lisinopril price in india: ordering lisinopril without a prescription – lisinopril 10 mg brand name in india
https://furosemide.guru/# furosemide 100 mg
поддержка и развитие сайтов
http://stromectol.fun/# stromectol liquid
buy amoxil: buy amoxicillin online mexico – amoxicillin 200 mg tablet
https://lisinopril.top/# lisinopril brand name
Your step-by-step guide on how attackers can gain unauthorized access to Android devices through ADB commands was both informative and alarming.
официальный сайт гама казино
gama casino официальный сайт
Даркнет сайты
Темная сторона интернета – скрытая зона всемирной паутины, избегающая взоров обычных поисковых систем и требующая специальных средств для доступа. Этот скрытый уголок сети обильно насыщен сайтами, предоставляя доступ к разнообразным товарам и услугам через свои перечни и индексы. Давайте глубже рассмотрим, что представляют собой эти реестры и какие тайны они хранят.
Даркнет Списки: Порталы в Тайный Мир
Индексы веб-ресурсов в темной части интернета – это вид порталы в скрытый мир интернета. Каталоги и индексы веб-ресурсов в даркнете, они позволяют пользователям отыскивать различные услуги, товары и информацию. Варьируя от форумов и магазинов до ресурсов, уделяющих внимание аспектам анонимности и криптовалютам, эти списки предоставляют нам шанс заглянуть в неизведанный мир даркнета.
Категории и Возможности
Теневой Рынок:
Даркнет часто связывается с незаконными сделками, где доступны самые разные товары и услуги – от психоактивных веществ и стрелкового оружия до похищенной информации и услуг наемных убийц. Реестры ресурсов в этой категории облегчают пользователям находить нужные предложения без лишних усилий.
Форумы и Сообщества:
Даркнет также предоставляет площадку для анонимного общения. Форумы и сообщества, перечисленные в даркнет списках, затрагивают широкий спектр – от информационной безопасности и взлома до политических аспектов и философских концепций.
Информационные Ресурсы:
На даркнете есть ресурсы, предоставляющие сведения и руководства по обходу цензуры, защите конфиденциальности и другим вопросам, которые могут заинтересовать тех, кто стремится сохранить свою анонимность.
Безопасность и Осторожность
Несмотря на анонимность и свободу, даркнет полон рисков. Мошенничество, кибератаки и незаконные сделки являются неотъемлемой частью этого мира. Взаимодействуя с даркнет списками, пользователи должны соблюдать высший уровень бдительности и придерживаться мер безопасности.
Заключение
Реестры даркнета – это ключ к таинственному миру, где скрыты секреты и возможности. Однако, как и в любой неизведанной территории, путешествие в даркнет требует особой внимания и знаний. Не всегда анонимность приносит безопасность, и использование даркнета требует осмысленного подхода. Независимо от ваших интересов – будь то технические аспекты кибербезопасности, поиск уникальных товаров или исследование новых граней интернета – реестры даркнета предоставляют ключ
даркнет-список
Теневой интернет – это часть интернета, которая остается скрытой от обычных поисковых систем и требует специального программного обеспечения для доступа. В этой анонимной зоне сети существует масса ресурсов, включая различные списки и каталоги, предоставляющие доступ к разнообразным услугам и товарам. Давайте рассмотрим, что представляет собой каталог даркнета и какие тайны скрываются в его глубинах.
Даркнет Списки: Врата в Невидимый Мир
Для начала, что такое даркнет список? Это, по сути, каталоги или индексы веб-ресурсов в темной части интернета, которые позволяют пользователям находить нужные услуги, товары или информацию. Эти списки могут варьироваться от форумов и торговых площадок до ресурсов, специализирующихся на различных аспектах анонимности и криптовалют.
Категории и Возможности
Теневой Рынок:
Даркнет часто ассоциируется с теневым рынком, где можно найти различные товары и услуги, включая наркотики, оружие, украденные данные и даже услуги профессиональных устрашителей. Списки таких ресурсов позволяют пользователям без труда находить подобные предложения.
Чаты и Группы:
Даркнет также предоставляет платформы для анонимного общения. Форумы и группы на теневых каталогах могут заниматься обсуждением тем от интернет-безопасности и взлома до политики и философии.
Информационные ресурсы:
Есть ресурсы, предоставляющие информацию и инструкции по обходу цензуры, защите конфиденциальности и другим темам, интересным пользователям, стремящимся сохранить анонимность.
Безопасность и Осторожность
При всей своей анонимности и свободе действий даркнет также несет риски. Мошенничество, кибератаки и незаконные сделки становятся частью этого мира. Пользователям необходимо проявлять максимальную осторожность и соблюдать меры безопасности при взаимодействии с списками теневых ресурсов.
Заключение: Врата в Неизведанный Мир
Теневые каталоги предоставляют доступ к теневым уголкам интернета, где сокрыты тайны и возможности. Однако, как и в любой неизведанной территории, важно помнить о возможных рисках и осознанно подходить к использованию темной стороны интернета. Анонимность не всегда гарантирует безопасность, и путешествие в этот мир требует особой осторожности и знания.
Независимо от того, интересуетесь ли вы техническими аспектами интернет-безопасности, ищете уникальные товары или просто исследуете новые грани интернета, теневые каталоги предоставляют ключ
список сайтов даркнет
Подпольная сфера сети – скрытая зона интернета, избегающая взоров стандартных поисковых систем и требующая специальных средств для доступа. Этот скрытый уголок сети обильно насыщен сайтами, предоставляя доступ к разношерстным товарам и услугам через свои перечни и индексы. Давайте ближе рассмотрим, что представляют собой эти реестры и какие тайны они хранят.
Даркнет Списки: Ворота в Неизведанный Мир
Даркнет списки – это вид врата в скрытый мир интернета. Реестры и справочники веб-ресурсов в даркнете, они позволяют пользователям отыскивать разнообразные услуги, товары и информацию. Варьируя от форумов и магазинов до ресурсов, уделяющих внимание аспектам анонимности и криптовалютам, эти перечни предоставляют нам шанс заглянуть в неизведанный мир даркнета.
Категории и Возможности
Теневой Рынок:
Даркнет часто ассоциируется с подпольной торговлей, где доступны самые разные товары и услуги – от наркотиков и оружия до похищенной информации и помощи наемных убийц. Каталоги ресурсов в данной категории облегчают пользователям находить нужные предложения без лишних усилий.
Форумы и Сообщества:
Даркнет также предоставляет площадку для анонимного общения. Форумы и сообщества, указанные в каталогах даркнета, затрагивают различные темы – от информационной безопасности и взлома до политических аспектов и философских концепций.
Информационные Ресурсы:
На даркнете есть ресурсы, предоставляющие сведения и руководства по преодолению цензуры, обеспечению конфиденциальности и другим темам, интересным тем, кто хочет сохранить свою конфиденциальность.
Безопасность и Осторожность
Несмотря на неизвестность и свободу, даркнет полон рисков. Мошенничество, кибератаки и незаконные сделки становятся частью этого мира. Взаимодействуя с реестрами даркнета, пользователи должны соблюдать предельную осмотрительность и придерживаться мер безопасности.
Заключение
Списки даркнета – это врата в неизведанный мир, где скрыты секреты и возможности. Однако, как и в любой неизведанной территории, путешествие в темную сеть требует особой бдительности и знаний. Анонимность не всегда гарантирует безопасность, и использование темной сети требует осмысленного подхода. Независимо от ваших интересов – будь то технические детали в области кибербезопасности, поиск необычных товаров или исследование новых возможностей в интернете – реестры даркнета предоставляют ключ
Темная сторона интернета – таинственная сфера всемирной паутины, избегающая взоров обычных поисковых систем и требующая специальных средств для доступа. Этот анонимный ресурс сети обильно насыщен платформами, предоставляя доступ к различным товарам и услугам через свои даркнет списки и каталоги. Давайте подробнее рассмотрим, что представляют собой эти списки и какие тайны они хранят.
Даркнет Списки: Порталы в Тайный Мир
Каталоги ресурсов в даркнете – это своего рода порталы в неощутимый мир интернета. Каталоги и индексы веб-ресурсов в даркнете, они позволяют пользователям отыскивать разношерстные услуги, товары и информацию. Варьируя от форумов и магазинов до ресурсов, уделяющих внимание аспектам анонимности и криптовалютам, эти списки предоставляют нам шанс заглянуть в таинственный мир даркнета.
Категории и Возможности
Теневой Рынок:
Даркнет часто ассоциируется с незаконными сделками, где доступны самые разные товары и услуги – от наркотиков и оружия до украденных данных и услуг наемных убийц. Списки ресурсов в данной категории облегчают пользователям находить подходящие предложения без лишних усилий.
Форумы и Сообщества:
Даркнет также служит для анонимного общения. Форумы и сообщества, указанные в каталогах даркнета, охватывают различные темы – от кибербезопасности и хакерства до политических вопросов и философских идей.
Информационные Ресурсы:
На даркнете есть ресурсы, предоставляющие информацию и инструкции по преодолению цензуры, обеспечению конфиденциальности и другим темам, которые могут быть интересны тем, кто хочет остаться анонимным.
Безопасность и Осторожность
Несмотря на скрытность и свободу, даркнет полон рисков. Мошенничество, кибератаки и незаконные сделки являются неотъемлемой частью этого мира. Взаимодействуя с реестрами даркнета, пользователи должны соблюдать максимальную осторожность и придерживаться мер безопасности.
Заключение
Списки даркнета – это врата в неизведанный мир, где сокрыты тайны и возможности. Однако, как и в любой неизведанной территории, путешествие в темную сеть требует особой внимания и знаний. Не всегда анонимность приносит безопасность, и использование темной сети требует осознанного подхода. Независимо от ваших интересов – будь то технические детали в области кибербезопасности, поиск необычных товаров или исследование новых возможностей в интернете – даркнет списки предоставляют ключ
https://indianph.xyz/# best online pharmacy india
http://indianph.com/# india pharmacy mail order
buy prescription drugs from india
indianpharmacy com world pharmacy india best online pharmacy india
https://hidehost.net/
http://indianph.xyz/# india online pharmacy
indian pharmacy online
https://indianph.com/# indian pharmacy paypal
india pharmacy
Кирпич клинкерный: отличное решение для вашего строительства от Skriabin Ceramics
http://indianph.xyz/# reputable indian pharmacies
http://indianph.xyz/# buy medicines online in india
pharmacy website india
Gambling
http://indianph.xyz/# indian pharmacy paypal
india pharmacy mail order
https://seolinkedin.ru/
http://indianph.com/# world pharmacy india
indian pharmacy
http://indianph.xyz/# world pharmacy india
india pharmacy mail order
Забудьте о низких позициях в поиске! Наше SEO продвижение https://seopoiskovye.ru/ под ключ выведет ваш сайт на вершины Google и Yandex. Анализ конкурентов, глубокая оптимизация, качественные ссылки — всё для вашего бизнеса. Получите поток целевых клиентов уже сегодня!
Жилой комплекс «Шифт»: современное жилье для комфортной жизни
Забудьте о низких позициях в поиске! Наше SEO продвижение и оптимизация на заказ https://seosistemy.ru/ выведут ваш сайт в топ, увеличивая его видимость и привлекая потенциальных клиентов. Индивидуальный подход, глубокий анализ ключевых слов, качественное наполнение контентом — мы сделаем всё, чтобы ваш бизнес процветал.
Дайте вашему сайту заслуженное место в топе поисковых систем! Наши услуги
технический seo аудит на заказ обеспечат максимальную видимость вашего бизнеса в интернете. Персонализированные стратегии, тщательный подбор ключевых слов, оптимизация контента и технические улучшения — всё это для привлечения целевой аудитории и увеличения продаж. Вместе мы поднимем ваш сайт на новый уровень успеха!
Дайте вашему сайту заслуженное место в топе поисковых систем! Наши услуги
yandex продвижение сайта на заказ обеспечат максимальную видимость вашего бизнеса в интернете. Персонализированные стратегии, тщательный подбор ключевых слов, оптимизация контента и технические улучшения — всё это для привлечения целевой аудитории и увеличения продаж. Вместе мы поднимем ваш сайт на новый уровень успеха!
Все о современных технологиях
https://cipro.guru/# buy ciprofloxacin over the counter
doxycycline hyc 100mg: doxycycline 500mg – order doxycycline online
http://diflucan.pro/# buy diflucan 150 mg
Профессиональный ремонт и обслуживание автомобилей концерна VAG
diflucan otc uk: diflucan prescription australia – diflucan order online uk
http://nolvadex.guru/# who should take tamoxifen
https://lechenie-bolezney.ru/
diflucan pill for sale: diflucan tablet price in india – diflucan pills for sale
http://nolvadex.guru/# nolvadex pct
casino
https://diflucan.pro/# how much is over the counter diflucan
Даркнет – это загадочная и незнакомая территория интернета, где действуют особые нормы, перспективы и опасности. Ежедневно в мире теневой сети случаются инциденты, о которые стандартные участники могут только подозревать. Давайте изучим последние сведения из теневой зоны, отражающие настоящие тенденции и инциденты в данном таинственном уголке сети.”
Тенденции и События:
“Эволюция Технологий и Безопасности:
В даркнете постоянно развиваются технологические решения и подходы защиты. Новости о появлении улучшенных платформ шифрования, скрытия личности и оберегающих личных данных свидетельствуют о желании участников и разработчиков к поддержанию безопасной среды.”
“Новые Теневые Рынки:
Следуя динамикой изменений запроса и предложения, в теневом интернете возникают новые торговые пространства. Информация о открытии онлайн-рынков предоставляют участникам разнообразные варианты для купли-продажи продукцией и услугами
купить паспорт интернет магазин
Покупка паспорта в интернет-магазине – это противозаконное и рискованное действие, которое может послужить причиной к серьезным последствиям для людей. Вот некоторые сторон, о которых необходимо запомнить:
Нарушение законодательства: Покупка паспорта в онлайн магазине является преступлением законодательства. Владение фальшивым удостоверением может повлечь за собой криминальную ответственность и тяжелые штрафы.
Опасности индивидуальной секретности: Факт использования фальшивого паспорта может поставить под опасность вашу секретность. Личности, использующие поддельными удостоверениями, могут оказаться целью провокаций со со стороны правоохранительных структур.
Финансовые потери: Часто мошенники, продающие поддельными паспортами, способны применять вашу личные данные для мошенничества, что приведёт к финансовым убыткам. Личные или финансовые данные способны оказаться применены в преступных намерениях.
Проблемы при путешествиях: Фальшивый удостоверение личности может быть обнаружен при попытке пересечь границу или при взаимодействии с официальными органами. Такое обстоятельство способно послужить причиной задержанию, изгнанию или иным серьезным проблемам при путешествиях.
Потеря доверительности и престижа: Применение поддельного удостоверения личности способно привести к потере доверия со стороны окружающих и нанимателей. Это ситуация способна негативно сказаться на вашу репутацию и карьерные возможности.
Вместо того, чтобы подвергать опасности своей независимостью, безопасностью и престижем, советуется соблюдать законодательство и воспользоваться официальными каналами для оформления документов. Они предоставляют обеспечение ваших законных интересов и гарантируют секретность ваших данных. Нелегальные практики способны сопровождаться неожиданные и вредные последствия, порождая тяжелые трудности для вас и ваших ваших сообщества
cytotec abortion pill: cytotec online – buy cytotec
даркнет магазин
В последний период интернет изменился в беспрерывный источник знаний, услуг и продуктов. Однако, в среде множества виртуальных магазинов и площадок, есть темная сторона, известная как даркнет магазины. Этот уголок виртуального мира порождает свои опасные реалии и влечет за собой серьезными опасностями.
Что такое Даркнет Магазины:
Даркнет магазины являются онлайн-платформы, доступные через скрытые браузеры и уникальные программы. Они оперируют в глубоком вебе, невидимом от обычных поисковых систем. Здесь можно обнаружить не только торговцев нелегальными товарами и услугами, но и разнообразные преступные схемы.
Категории Товаров и Услуг:
Даркнет магазины предлагают разнообразный ассортимент товаров и услуг, от наркотиков и оружия вплоть до хакерских услуг и похищенных данных. На этой темной площадке действуют торговцы, предоставляющие возможность приобретения незаконных вещей без опасности быть выслеженным.
Риски для Пользователей:
Легальные Последствия:
Покупка запрещенных товаров на даркнет магазинах подвергает пользователей опасности столкнуться с полицией. Уголовная ответственность может быть значительным следствием таких покупок.
Мошенничество и Обман:
Даркнет также является плодородной почвой для мошенников. Пользователи могут попасть в обман, где оплата не приведет к получению в руки товара или услуги.
Угрозы Кибербезопасности:
Даркнет магазины предоставляют услуги хакеров и киберпреступников, что сопровождается реальными опасностями для безопасности данных и конфиденциальности.
Распространение Преступной Деятельности:
Экономика даркнет магазинов содействует распространению преступной деятельности, так как предоставляет инфраструктуру для противозаконных транзакций.
Борьба с Проблемой:
Усиление Кибербезопасности:
Развитие кибербезопасности и технологий слежения помогает бороться с даркнет магазинами, превращая их менее поулчаемыми.
Законодательные Меры:
Принятие строгих законов и их эффективная реализация направлены на предупреждение и наказание пользователей даркнет магазинов.
Образование и Пропаганда:
Повышение осведомленности о рисках и последствиях использования даркнет магазинов может снизить спрос на противозаконные товары и услуги.
Заключение:
Даркнет магазины предоставляют темным уголкам интернета, где появляются теневые фигуры с преступными намерениями. Разумное использование ресурсов и повышенная бдительность необходимы, для того чтобы защитить себя от рисков, связанных с этими темными магазинами. В конечном итоге, секретность и законопослушание должны быть на первом месте, когда речь заходит о виртуальных покупках
даркнет 2024
Скрытая сеть 2024: Теневые аспекты цифровой среды
С своего возникновения теневого интернета был собой уголок веба, где тайна и неявность были нормой. В 2024 году этот непрозрачный мир развивается, предоставляя свежие задачи и опасности для интернет-сообщества. Рассмотрим, какие тенденции и модификации предстоят обществу в даркнете 2024.
Продвижение технологий и Повышение анонимности
С развитием техники, средства обеспечения скрытности в теневом интернете превращаются в сложнее и эффективными. Использование криптовалют, современных шифровальных методов и децентрализованных сетей делает слежение за деятельностью пользователей более сложным для правоохранительных органов.
Развитие специализированных рынков
Даркнет-рынки, фокусирующиеся на различных товарах и услугах, продолжают расширяться. Психотропные вещества, военные припасы, средства для хакерских атак, краденые данные – ассортимент продукции становится все многообразным. Это создает вызов для правопорядка, который сталкивается с необходимостью адаптироваться к постоянно меняющимся сценариям преступной деятельности.
Опасности цифровой безопасности для обычных пользователей
Сервисы аренды хакерских услуг и мошеннические схемы продолжают существовать активными в теневом интернете. Обычные пользователи становятся объектом для преступников в сети, стремящихся получить доступ к персональной информации, банковским счетам и другой конфиденциальной информации.
Возможности цифровой реальности в теневом интернете
С прогрессом техники виртуальной реальности, теневой интернет может войти в новый этап, предоставляя участникам более реалистичные и захватывающие виртуальные пространства. Это может сопровождаться дополнительными видами преступной деятельности, такими как цифровые рынки для передачи виртуальными товарами.
Противостояние структурам безопасности
Органы обеспечения безопасности совершенствуют свои технические средства и подходы противостояния теневым интернетом. Совместные усилия государств и международных организаций направлены на предотвращение киберпреступности и прекращение новым вызовам, которые возникают в связи с развитием темного интернета.
Вывод
Теневой интернет в 2024 году остается сложной и разносторонней обстановкой, где технические инновации продолжают изменять пейзаж преступной деятельности. Важно для пользователей продолжать быть настороженными, обеспечивать свою кибербезопасность и следовать законы, даже при нахождении в цифровой среде. Вместе с тем, противостояние с теневым интернетом нуждается в коллективных действиях от стран, технологических компаний и граждан, чтобы обеспечить защиту в цифровом мире.
https://diflucan.pro/# diflucan no prescription
how to order doxycycline: where to get doxycycline – generic for doxycycline
даркнет вход
Даркнет – скрытое пространство Интернета, доступное только для тех, кто знает правильный вход. Этот таинственный уголок виртуального мира служит местом для конфиденциальных транзакций, обмена информацией и взаимодействия скрытыми сообществами. Однако, чтобы погрузиться в этот темный мир, необходимо преодолеть несколько барьеров и использовать специальные инструменты.
Использование приспособленных браузеров: Для доступа к даркнету обычный браузер не подойдет. На помощь приходят эксклюзивные браузеры, такие как Tor (The Onion Router). Tor позволяет пользователям обходить цензуру и обеспечивает анонимность, помечая и перенаправляя запросы через различные серверы.
Адреса в даркнете: Обычные домены в даркнете заканчиваются на “.onion”. Для поиска ресурсов в даркнете, нужно использовать поисковики, адаптированные для этой среды. Однако следует быть осторожным, так как далеко не все ресурсы там законны.
Защита анонимности: При посещении даркнета следует принимать меры для гарантирования анонимности. Использование виртуальных частных сетей (VPN), блокировщиков скриптов и антивирусных программ является необходимым. Это поможет избежать различных угроз и сохранить конфиденциальность.
Электронные валюты и биткоины: В даркнете часто используются цифровые валюты, в основном биткоины, для неизвестных транзакций. Перед входом в даркнет следует ознакомиться с основами использования виртуальных валют, чтобы избежать финансовых рисков.
Правовые аспекты: Следует помнить, что многие операции в даркнете могут быть незаконными и противоречить законам различных стран. Пользование даркнетом несет риски, и неразрешенные действия могут привести к серьезным юридическим последствиям.
Заключение: Даркнет – это неизведанное пространство сети, наполненное анонимности и тайн. Вход в этот мир требует присущих только навыков и предосторожности. При всем мистическом обаянии даркнета важно помнить о потенциальных рисках и последствиях, связанных с его использованием.
Даркнет список
Введение в Даркнет: Определение и Основополагающие Особенности
Разъяснение понятия даркнета, возможных отличий от стандартного интернета, и основных черт этого таинственного мира.
Как Войти в Темный Интернет: Руководство по Анонимному Доступу
Подробное разъяснение шагов, необходимых для доступа в даркнет, включая использование эксклюзивных браузеров и инструментов.
Адресация в Даркнете: Тайны .onion-Доменов
Пояснение, как функционируют .onion-домены, и какие ресурсы они содержат, с акцентом на безопасном поисковой активности и применении.
Защита и Анонимность в Темном Интернете: Меры для Пользовательской Защиты
Обзор методов и инструментов для сохранения анонимности при использовании даркнета, включая виртуальные частные сети и другие средства.
Электронные Валюты в Темном Интернете: Функция Биткойнов и Криптовалютных Средств
Исследование использования цифровых валют, в основном биткоинов, для совершения анонимных транзакций в даркнете.
Поиск в Даркнете: Особенности и Опасности
Рассмотрение поисковых механизмов в даркнете, предостережения о возможных рисках и нелегальных ресурсах.
Юридические Стороны Даркнета: Последствия и Последствия
Обзор законных аспектов использования даркнета, предостережение о возможных юридических последствиях.
Даркнет и Кибербезопасность: Потенциальные Опасности и Защитные Меры
Анализ потенциальных киберугроз в даркнете и рекомендации по защите от них.
Темный Интернет и Общественные Сети: Скрытое Взаимодействие и Группы
Рассмотрение роли даркнета в области социальных взаимодействий и создании скрытых сообществ.
Перспективы Темного Интернета: Тренды и Прогнозы
Предсказания развития даркнета и потенциальные изменения в его структуре в будущем.
Взлом Телеграм: Легенды и Реальность
Telegram – это популярный мессенджер, отмеченный своей высокой степенью шифрования и безопасности данных пользователей. Однако, в современном цифровом мире тема вторжения в Telegram периодически поднимается. Давайте рассмотрим, что на самом деле стоит за этим понятием и почему нарушение Telegram чаще является мифом, чем реальностью.
Шифрование в Телеграм: Основы Защиты
Телеграм славится своим превосходным уровнем шифрования. Для обеспечения приватности переписки между пользователями используется протокол MTProto. Этот протокол обеспечивает полное кодирование, что означает, что только передающая сторона и получатель могут читать сообщения.
Легенды о Взломе Telegram: Почему они возникают?
В последнее время в интернете часто появляются слухи о нарушении Telegram и доступе к персональной информации пользователей. Однако, большинство этих утверждений оказываются мифами, часто развивающимися из-за непонимания принципов работы мессенджера.
Кибернападения и Раны: Реальные Угрозы
Хотя нарушение Телеграма в общем случае является сложной задачей, существуют реальные угрозы, с которыми сталкиваются пользователи. Например, кибератаки на отдельные аккаунты, вредоносные программы и прочие методы, которые, тем не менее, нуждаются в личном участии пользователя в их распространении.
Защита Личной Информации: Советы для Пользователей
Несмотря на отсутствие конкретной угрозы нарушения Telegram, важно соблюдать базовые правила кибербезопасности. Регулярно обновляйте приложение, используйте двухфакторную аутентификацию, избегайте подозрительных ссылок и фишинговых атак.
Итог: Реальная Опасность или Паника?
Нарушение Telegram, как правило, оказывается мифом, созданным вокруг обсуждаемой темы без явных доказательств. Однако защита всегда остается приоритетом, и участники мессенджера должны быть осторожными и следовать советам по обеспечению защиты своей персональных данных
Взлом WhatsApp: Реальность и Мифы
Вотсап – один из самых популярных мессенджеров в мире, широко используемый для обмена сообщениями и файлами. Он прославился своей кодированной системой обмена данными и обеспечением конфиденциальности пользователей. Однако в сети время от времени возникают утверждения о возможности взлома WhatsApp. Давайте разберемся, насколько эти утверждения соответствуют реальности и почему тема взлома Вотсап вызывает столько дискуссий.
Кодирование в WhatsApp: Охрана Личной Информации
Вотсап применяет end-to-end шифрование, что означает, что только отправитель и получающая сторона могут понимать сообщения. Это стало основой для доверия многих пользователей мессенджера к защите их личной информации.
Легенды о Нарушении WhatsApp: По какой причине Они Появляются?
Интернет периодически наполняют слухи о нарушении Вотсап и возможном входе к переписке. Многие из этих утверждений часто не имеют обоснований и могут быть результатом паники или дезинформации.
Реальные Угрозы: Кибератаки и Безопасность
Хотя нарушение Вотсап является трудной задачей, существуют реальные угрозы, такие как кибератаки на индивидуальные аккаунты, фишинг и вредоносные программы. Исполнение мер безопасности важно для минимизации этих рисков.
Охрана Личной Информации: Рекомендации Пользователям
Для укрепления охраны своего аккаунта в Вотсап пользователи могут использовать двухфакторную аутентификацию, регулярно обновлять приложение, избегать подозрительных ссылок и следить за конфиденциальностью своего устройства.
Заключение: Реальность и Осторожность
Взлом WhatsApp, как обычно, оказывается сложным и маловероятным сценарием. Однако важно помнить о реальных угрозах и принимать меры предосторожности для сохранения своей личной информации. Соблюдение рекомендаций по безопасности помогает поддерживать конфиденциальность и уверенность в использовании мессенджера
взлом whatsapp
Взлом Вотсап: Реальность и Мифы
WhatsApp – один из известных мессенджеров в мире, широко используемый для обмена сообщениями и файлами. Он прославился своей кодированной системой обмена данными и гарантированием конфиденциальности пользователей. Однако в интернете время от времени появляются утверждения о возможности нарушения Вотсап. Давайте разберемся, насколько эти утверждения соответствуют реальности и почему тема взлома Вотсап вызывает столько дискуссий.
Кодирование в WhatsApp: Охрана Личной Информации
Вотсап применяет end-to-end шифрование, что означает, что только передающая сторона и получатель могут понимать сообщения. Это стало фундаментом для доверия многих пользователей мессенджера к сохранению их личной информации.
Легенды о Нарушении Вотсап: Почему Они Появляются?
Интернет периодически заполняют слухи о нарушении Вотсап и возможном входе к переписке. Многие из этих утверждений часто не имеют обоснований и могут быть результатом паники или дезинформации.
Фактические Угрозы: Кибератаки и Охрана
Хотя нарушение WhatsApp является сложной задачей, существуют реальные угрозы, такие как кибератаки на индивидуальные аккаунты, фишинг и вредоносные программы. Исполнение мер безопасности важно для минимизации этих рисков.
Защита Личной Информации: Рекомендации Пользователям
Для укрепления охраны своего аккаунта в WhatsApp пользователи могут использовать двухфакторную аутентификацию, регулярно обновлять приложение, избегать сомнительных ссылок и следить за конфиденциальностью своего устройства.
Итог: Фактическая и Осторожность
Взлом WhatsApp, как обычно, оказывается сложным и маловероятным сценарием. Однако важно помнить о реальных угрозах и принимать меры предосторожности для защиты своей личной информации. Исполнение рекомендаций по охране помогает поддерживать конфиденциальность и уверенность в использовании мессенджера.
Дизайнер по шторам: профессиональное оформление окон с учетом всех требований
Angela White filmleri: abella danger izle – abella danger video
Angela White filmleri: Angela White video – Angela White filmleri
eva elfie: eva elfie izle – eva elfie izle
Восстановление классического меню Пуск в Windows 10: простое руководство
Sweetie Fox video: swetie fox – Sweetie Fox modeli
https://o-tendencii.com/
Sweetie Fox izle: sweety fox – Sweetie Fox modeli
https://hitech24.pro/
http://lanarhoades.fun/# lana rhodes
Angela White video: Angela White video – Angela White
http://abelladanger.online/# abella danger izle
eva elfie video: eva elfie izle – eva elfie
https://abelladanger.online/# abella danger video
Escort Düsseldorf
Дайвинг для новичков на Пхукете от PHUKETDIVING.CENTER: идеальное место для первого погружения
Escort Düsseldorf
http://sweetiefox.online/# Sweetie Fox filmleri
eva elfie izle: eva elfie izle – eva elfie video
http://lanarhoades.fun/# lana rhodes
https://gruzchikivesy.ru/
Angela White: Angela White video – Angela White video
http://angelawhite.pro/# Angela White izle
http://evaelfie.pro/# eva elfie
http://lanarhoades.fun/# lana rhodes
Экскурсии по Дагестану из Дербента: Исследуйте богатство культуры и природы региона
Angela White: Angela Beyaz modeli – ?????? ????
https://gruzchikimeshki.ru/
Angela White izle: Angela White filmleri – Angela White izle
https://gruzchikinochnoj.ru/
https://gruzchikiklub.ru/
https://gruzchikiperevozchik.ru/
eva elfie filmleri: eva elfie video – eva elfie izle
http://evaelfie.pro/# eva elfie video
обнал карт работа
Обнал карт: Как обеспечить безопасность от обманщиков и обеспечить защиту в сети
Современный эпоха высоких технологий предоставляет возможности онлайн-платежей и банковских операций, но с этим приходит и нарастающая угроза обнала карт. Обнал карт является операцией использования украденных или полученных незаконным образом кредитных карт для совершения финансовых транзакций с целью маскировать их происхождение и предотвратить отслеживание.
Ключевые моменты для безопасности в сети и предотвращения обнала карт:
Защита личной информации:
Обязательно будьте осторожными при предоставлении личной информации онлайн. Никогда не делитесь номерами карт, защитными кодами и другими конфиденциальными данными на ненадежных сайтах.
Сильные пароли:
Используйте для своих банковских аккаунтов и кредитных карт надежные и уникальные пароли. Регулярно изменяйте пароли для увеличения уровня безопасности.
Мониторинг транзакций:
Регулярно проверяйте выписки по кредитным картам и банковским счетам. Это содействует выявлению подозрительных транзакций и быстро реагировать.
Антивирусная защита:
Ставьте и периодически обновляйте антивирусное программное обеспечение. Такие программы помогут предотвратить вредоносные программы, которые могут быть использованы для изъятия данных.
Бережное использование общественных сетей:
Будьте осторожными при размещении чувствительной информации в социальных сетях. Эти данные могут быть использованы для взлома к вашему аккаунту и дальнейшего обнала карт.
Уведомление банка:
Если вы обнаружили сомнительные транзакции или потерю карты, свяжитесь с банком немедленно для блокировки карты и предотвращения финансовых потерь.
Образование и обучение:
Относитесь внимательно к новым способам мошенничества и постоянно обучайтесь тому, как противостоять подобным атакам. Современные мошенники постоянно совершенствуют свои методы, и ваше понимание может стать определяющим для защиты.
В завершение, соблюдение простых правил безопасности в сети и регулярное обновление знаний помогут вам уменьшить риск стать жертвой мошенничества с картами на месте работы и в повседневной жизни. Помните, что безопасность ваших финансов в ваших руках, и предпринимательские действия могут сделать ваш онлайн-опыт более защищенным и надежным.
обнал карт форум
Обнал карт: Как защититься от обманщиков и сохранить безопасность в сети
Современный мир высоких технологий предоставляет удобства онлайн-платежей и банковских операций, но с этим приходит и повышающаяся опасность обнала карт. Обнал карт является процессом использования украденных или полученных незаконным образом кредитных карт для совершения финансовых транзакций с целью скрыть их источник и заблокировать отслеживание.
Ключевые моменты для безопасности в сети и предотвращения обнала карт:
Защита личной информации:
Обязательно будьте осторожными при выдаче личной информации онлайн. Никогда не делитесь картовыми номерами, защитными кодами и дополнительными конфиденциальными данными на сомнительных сайтах.
Сильные пароли:
Используйте для своих банковских аккаунтов и кредитных карт надежные и уникальные пароли. Регулярно изменяйте пароли для увеличения уровня безопасности.
Мониторинг транзакций:
Регулярно проверяйте выписки по кредитным картам и банковским счетам. Это способствует выявлению подозрительных операций и оперативно реагировать.
Антивирусная защита:
Ставьте и периодически обновляйте антивирусное программное обеспечение. Такие программы помогут препятствовать действию вредоносных программ, которые могут быть использованы для кражи данных.
Бережное использование общественных сетей:
Будьте осторожными при размещении чувствительной информации в социальных сетях. Эти данные могут быть использованы для хакерских атак к вашему аккаунту и последующего мошенничества.
Уведомление банка:
Если вы обнаружили сомнительные транзакции или утерю карты, свяжитесь с банком немедленно для блокировки карты и предотвращения финансовых потерь.
Образование и обучение:
Относитесь внимательно к новым способам мошенничества и постоянно обновляйте свои знания, как противостоять подобным атакам. Современные мошенники постоянно совершенствуют свои методы, и ваше осведомленность может стать решающим для предотвращения
Фальшивые купюры 5000 рублей: Угроза для экономики и граждан
Фальшивые купюры всегда были значительной угрозой для финансовой стабильности общества. В последние годы одним из основных объектов манипуляций стали банкноты номиналом 5000 рублей. Эти поддельные деньги представляют собой важную опасность для экономики и финансовой безопасности граждан. Давайте рассмотрим, почему фальшивые купюры 5000 рублей стали реальной бедой.
Сложность выявления.
Купюры 5000 рублей являются одними из по номиналу, что делает их чрезвычайно привлекательными для фальшивомонетчиков. Превосходно проработанные подделки могут быть сложно выявить даже профессионалам в сфере финансов. Современные технологии позволяют создавать качественные копии с использованием передовых методов печати и защитных элементов.
Опасность для бизнеса.
Фальшивые 5000 рублей могут привести к серьезным финансовым убыткам для предпринимателей и компаний. Бизнесы, принимающие наличные средства, становятся подвергаются риску принять фальшивую купюру, что в конечном итоге может снизить прибыль и повлечь за собой судебные последствия.
Повышение инфляции.
Фальшивые деньги увеличивают количество в обращении, что в свою очередь может привести к инфляции. Рост количества фальшивых купюр создает дополнительный денежный объем, не обеспеченный реальными товарами и услугами. Это может существенно подорвать доверие к национальной валюте и стимулировать рост цен.
Вред для доверия к финансовой системе.
Фальшивые деньги вызывают мизерию к финансовой системе в целом. Когда люди сталкиваются с риском получить фальшивые купюры при каждой сделке, они становятся более склонными избегать использования наличных средств, что может привести к обострению проблем, связанных с электронными платежами и банковскими системами.
Защитные меры и образование.
Для борьбы с распространению фальшивых денег необходимо внедрять более продвинутые защитные меры на банкнотах и активно проводить образовательную работу среди населения. Гражданам нужно быть более внимательными при приеме наличных средств и обучаться основам распознавания контрафактных купюр.
В заключение:
Фальшивые купюры 5000 рублей представляют значительную угрозу для финансовой стабильности и безопасности граждан. Необходимо активно внедрять новые технологии защиты и проводить информационные кампании, чтобы общество было лучше осведомлено о методах распознавания и защиты от фальшивых денег. Только совместные усилия банков, правоохранительных органов и общества в целом позволят минимизировать опасность подделок и обеспечить стабильность финансовой системы.
купить фальшивые деньги
Изготовление и закупка поддельных денег: опасное дело
Приобрести фальшивые деньги может показаться привлекательным вариантом для некоторых людей, но в реальности это действие несет серьезные последствия и подрывает основы экономической стабильности. В данной статье мы рассмотрим негативные аспекты покупки поддельной валюты и почему это является опасным шагом.
Неправомерность.
Основное и самое важное, что следует отметить – это полная противозаконность изготовления и использования фальшивых денег. Такие действия противоречат законам большинства стран, и их воздаяние может быть крайне строгим. Закупка поддельной валюты влечет за собой риск уголовного преследования, штрафов и даже тюремного заключения.
Экономическо-финансовые последствия.
Фальшивые деньги негативно влияют на экономику в целом. Когда в обращение поступает фальшивая валюта, это инициирует дисбаланс и ухудшает доверие к национальной валюте. Компании и граждане становятся все более подозрительными при проведении финансовых сделок, что приводит к ухудшению бизнес-климата и тормозит нормальному функционированию рынка.
Опасность финансовой стабильности.
Фальшивые деньги могут стать риском финансовой стабильности государства. Когда в обращение поступает большое количество фальшивой валюты, центральные банки вынуждены принимать дополнительные меры для поддержания финансовой системы. Это может включать в себя повышение процентных ставок, что, в свою очередь, вредно сказывается на экономике и финансовых рынках.
Риски для честных граждан и предприятий.
Люди и компании, неосознанно принимающие фальшивые деньги в качестве оплаты, становятся жертвами преступных схем. Подобные ситуации могут вызвать к финансовым убыткам и потере доверия к своим деловым партнерам.
Участие криминальных группировок.
Закупка фальшивых денег часто связана с бандитскими группировками и организованным преступлением. Вовлечение в такие сети может повлечь за собой серьезными последствиями для личной безопасности и даже угрожать жизни.
В заключение, покупка фальшивых денег – это не только противозаконное действие, но и шаг, готовое повлечь ущерб экономике и обществу в целом. Рекомендуется избегать подобных действий и сосредотачиваться на легальных, ответственных способах обращения с финансами
https://evaelfie.site/# eva elfie full video
https://gruzchikigastarbajter.ru/
https://gruzchikiperenosit.ru/
https://gruzchikiestakada.ru/
https://gruzchikimore.ru/
http://evaelfie.site/# eva elfie
https://gruzchikiustalost.ru/
1881hoki
https://gruzchikikuzov.ru/
интернет-магазин женской одежды
https://gruzchikiperevozka.ru/
http://lanarhoades.pro/# lana rhoades videos
Осознание сущности и опасностей ассоциированных с легализацией кредитных карт способно помочь людям предупреждать атак и защищать свои финансовые ресурсы. Обнал (отмывание) кредитных карт — это процесс использования украденных или незаконно полученных кредитных карт для совершения финансовых транзакций с целью замаскировать их происхождение и предотвратить отслеживание.
Вот некоторые способов, которые могут способствовать в уклонении от обнала кредитных карт:
Охрана личной информации: Будьте осторожными в контексте предоставления личных данных, особенно онлайн. Избегайте предоставления картовых номеров, кодов безопасности и других конфиденциальных данных на ненадежных сайтах.
Надежные пароли: Используйте надежные и уникальные пароли для своих банковских аккаунтов и кредитных карт. Регулярно изменяйте пароли.
Контроль транзакций: Регулярно проверяйте выписки по кредитным картам и банковским счетам. Это поможет своевременно выявить подозрительных транзакций.
Программы антивирус: Используйте антивирусное программное обеспечение и актуализируйте его регулярно. Это поможет защитить от вредоносные программы, которые могут быть использованы для кражи данных.
Осторожное взаимодействие в социальных сетях: Будьте осторожными в социальных сетях, избегайте размещения чувствительной информации, которая может быть использована для взлома вашего аккаунта.
Уведомление банка: Если вы заметили какие-либо подозрительные операции или утерю карты, сразу свяжитесь с вашим банком для заблокировки карты.
Получение знаний: Будьте внимательными к новым методам мошенничества и обучайтесь тому, как противостоять их.
Избегая легковерия и принимая меры предосторожности, вы можете минимизировать риск стать жертвой обнала кредитных карт.
You’ve made some decent points there. I looked on the net
for additional information about the issue and found most people will go along with your views on this web site.
mia malkova hd: mia malkova new video – mia malkova videos
rikvip
где купить фальшивые деньги
Ненастоящая валюта: угроза для финансовой системы и общества
Введение:
Фальшивомонетничество – нарушение, оставшееся актуальным на протяжении многих веков. Производство и распространение фальшивых денег представляют серьезную опасность не только для экономической системы, но и для общественной стабильности. В данной статье мы рассмотрим размеры проблемы, методы борьбы с подделкой денег и последствия для общества.
История поддельных купюр:
Поддельные средства существуют с времени появления самой концепции денег. В древности подделывались металлические монеты, а в современном мире преступники активно используют новейшие технологии для подделки банкнот. Развитие цифровых технологий также открыло дополнительные способы для создания электронных аналогов денег.
Масштабы проблемы:
Ненастоящая валюта создают угрозу для стабильности экономики. Финансовые учреждения, компании и даже обычные граждане могут стать жертвами мошенничества. Увеличение объемов фальшивых денег может привести к потере покупательной способности и даже к экономическим кризисам.
Современные методы фальсификации:
С развитием технологий фальсификация стала более затруднительной и усложненной. Преступники используют современные технические средства, профессиональные печатающие устройства, и даже машинное обучение для создания невозможно отличить поддельные копии от оригинальных денежных средств.
Борьба с подделкой денег:
Страны и государственные банки активно внедряют новые меры для предотвращения фальшивомонетничества. Это включает в себя использование современных защитных элементов на банкнотах, обучение граждан способам определения фальшивых средств, а также взаимодействие с органами правопорядка для выявления и пресечения криминальных группировок.
Последствия для общества:
Поддельные средства несут не только экономические, но и социальные результаты. Граждане и бизнесы теряют доверие к экономическому устройству, а борьба с преступностью требует значительных ресурсов, которые могли бы быть направлены на более полезные цели.
Заключение:
Поддельные средства – важный вопрос, требующая уделяемого внимания и совместных усилий общества, правоохранительных органов и финансовых институтов. Только путем активной противодействия с нарушением можно обеспечить стабильность финансовой системы и сохранить уважение к валютной системе
http://lanarhoades.pro/# lana rhoades videos
Опасность подпольных точек: Места продажи фальшивых купюр”
Заголовок: Риски приобретения в подпольных местах: Места продажи поддельных денег
Введение:
Разговор об угрозе подпольных точек, занимающихся продажей поддельных денег, становится всё более актуальным в современном обществе. Эти места, предоставляя доступ к поддельным финансовым средствам, представляют серьезную угрозу для экономической стабильности и безопасности граждан.
Легкость доступа:
Одной из негативных аспектов подпольных точек является легкость доступа к поддельным деньгам. На темных улицах или в скрытых интернет-пространствах, эти места становятся площадкой для тех, кто ищет возможность обмануть систему.
Угроза финансовой системе:
Продажа поддельных купюр в таких местах создает реальную угрозу для финансовой системы. Введение поддельных средств в обращение может привести к инфляции, понижению доверия к национальной валюте и даже к финансовым кризисам.
Мошенничество и преступность:
Подпольные точки, предлагающие фальшивые купюры, являются очагами мошенничества и преступной деятельности. Отсутствие контроля и законного регулирования в этих местах обеспечивает благоприятные условия для криминальных элементов.
Угроза для бизнеса и обычных граждан:
Как бизнесы, так и обычные граждане становятся потенциальными жертвами мошенничества, когда используют поддельные деньги, приобретенные в подпольных точках. Это ведет к утрате доверия и серьезным финансовым потерям.
Последствия для экономики:
Вмешательство подпольных точек в экономику оказывает отрицательное воздействие. Нарушение стабильности финансовой системы и создание дополнительных трудностей для правоохранительных органов являются лишь частью последствий для общества.
Заключение:
Продажа фальшивых купюр в подпольных точках представляет собой серьезную угрозу для общества в целом. Необходимо ужесточение законодательства и усиление контроля, чтобы противостоять этому злу и обеспечить безопасность экономической среды. Развитие сотрудничества между государственными органами, бизнес-сообществом и обществом в целом является ключевым моментом в предотвращении негативных последствий деятельности подобных точек.
Темные закоулки сети: теневой мир продажи фальшивых купюр”
Введение:
Фальшивые деньги стали неотъемлемой частью теневого мира, где пункты сбыта – это источники серьезных угроз для экономики и общества. В данной статье мы обратим внимание на локации, где процветает подпольная торговля поддельными денежными средствами, включая темные уголки интернета.
Теневые интернет-магазины:
С развитием технологий и распространением онлайн-торговли, точки оборота поддельных банкнот стали активно функционировать в теневых уголках интернета. Скрытые онлайн-площадки и форумы предоставляют шанс анонимно приобрести фальшивые деньги, создавая тем самым значительный риск для финансовой системы.
Опасные последствия для общества:
Точки оборота поддельных средств на темных интернет-ресурсах несут в себе не только потенциальную опасность для экономической устойчивости, но и для обычных граждан. Покупка фальшивых купюр влечет за собой риски: от юридических преследований до потери доверия со стороны окружающих.
Передовые технологии подделки:
На скрытых веб-площадках активно используются новейшие технологии для создания высококачественных подделок. От печатающих устройств, способных воспроизводить средства защиты, до использования криптовалютных платежей для обеспечения анонимности покупок – все это создает среду, в которой трудно обнаружить и остановить незаконную торговлю.
Необходимость ужесточения мер борьбы:
Противостояние с темными местами продаж поддельных денег требует комплексного подхода. Важно ужесточить законодательство и разработать эффективные меры для определения и блокировки скрытых онлайн-магазинов. Также невероятно важно поднимать уровень осведомленности общества относительно опасностей подобных практик.
Заключение:
Площадки продаж поддельных денег на темных уголках интернета представляют собой значительную опасность для финансовой стабильности и общественной безопасности. В условиях расцветающего цифрового мира важно сосредотачивать усилия на борьбе с подобными действиями, чтобы защитить интересы общества и сохранить веру к финансовой системе
купить фальшивые рубли
Фальшивые рубли, часто, копируют с целью мошенничества и незаконного обогащения. Преступники занимаются фальсификацией российских рублей, изготавливая поддельные банкноты различных номиналов. В основном, фальсифицируют банкноты с более высокими номиналами, вроде 1 000 и 5 000 рублей, ввиду того что это позволяет им получать большие суммы при уменьшенном числе фальшивых денег.
Процесс фальсификации рублей включает в себя применение технологического оборудования высокого уровня, специализированных принтеров и специально подготовленных материалов. Преступники стремятся наиболее точно воспроизвести защитные элементы, водяные знаки безопасности, металлическую защиту, микротекст и прочие характеристики, чтобы препятствовать определение поддельных купюр.
Поддельные денежные средства регулярно вносятся в оборот через торговые точки, банки или прочие учреждения, где они могут быть легко спрятаны среди реальных денежных средств. Это порождает серьезные трудности для экономической системы, так как фальшивые деньги могут порождать потерям как для банков, так и для граждан.
Важно отметить, что имение и применение поддельных средств считаются уголовными преступлениями и подпадают под уголовную ответственность в соответствии с законодательством Российской Федерации. Власти энергично противостоят с подобными правонарушениями, предпринимая меры по обнаружению и прекращению деятельности банд преступников, вовлеченных в фальсификацией российской валюты
Фальшивые рубли, обычно, имитируют с целью мошенничества и незаконного обогащения. Злоумышленники занимаются фальсификацией российских рублей, формируя поддельные банкноты различных номиналов. В основном, подделывают банкноты с большими номиналами, например 1 000 и 5 000 рублей, так как это позволяет им получать большие суммы при меньшем количестве фальшивых денег.
Технология подделки рублей включает в себя применение высокотехнологичного оборудования, специализированных печатающих устройств и особо подготовленных материалов. Злоумышленники стремятся наиболее точно воспроизвести защитные элементы, водяные знаки безопасности, металлическую защиту, микроскопический текст и прочие характеристики, чтобы замедлить определение поддельных купюр.
Фальшивые рубли часто вносятся в оборот через торговые площадки, банки или прочие учреждения, где они могут быть легко спрятаны среди настоящих денег. Это создает серьезные проблемы для экономической системы, так как поддельные купюры могут порождать потерям как для банков, так и для населения.
Необходимо подчеркнуть, что владение и использование поддельных средств считаются уголовными преступлениями и подпадают под наказание в соответствии с законодательством Российской Федерации. Власти энергично противостоят с подобными правонарушениями, предпринимая действия по выявлению и пресечению деятельности банд преступников, занимающихся фальсификацией российской валюты
1881 hoki
lana rhoades boyfriend: lana rhoades hot – lana rhoades hot
https://gruzchikirabotat.ru/
https://miamalkova.life/# mia malkova movie
mia malkova hd: mia malkova photos – mia malkova girl
初次接觸線上娛樂城的玩家一定對選擇哪間娛樂城有障礙,首要條件肯定是評價良好的娛樂城,其次才是哪間娛樂城優惠最誘人,娛樂城體驗金多少、娛樂城首儲一倍可以拿多少等等…本篇文章會告訴你娛樂城優惠怎麼挑,首儲該注意什麼。
娛樂城首儲該注意什麼?
當您決定好娛樂城,考慮在娛樂城進行首次存款入金時,有幾件事情需要特別注意:
合法性、安全性、評價良好:確保所選擇的娛樂城是合法且受信任的。檢查其是否擁有有效的賭博牌照,以及是否採用加密技術來保護您的個人信息和交易。
首儲優惠與流水:許多娛樂城會為首次存款提供吸引人的獎勵,但相對的流水可能也會很高。
存款入金方式:查看可用的支付選項,是否適合自己,例如:USDT、超商儲值、銀行ATM轉帳等等。
提款出金方式:瞭解最低提款限制,綁訂多少流水才可以領出。
24小時客服:最好是有24小時客服,發生問題時馬上有人可以處理。
1881 hoki
http://sweetiefox.pro/# sweetie fox full video
sweetie fox cosplay: sweetie fox full video – sweetie fox full video
rikvip
娛樂城首儲
初次接觸線上娛樂城的玩家一定對選擇哪間娛樂城有障礙,首要條件肯定是評價良好的娛樂城,其次才是哪間娛樂城優惠最誘人,娛樂城體驗金多少、娛樂城首儲一倍可以拿多少等等…本篇文章會告訴你娛樂城優惠怎麼挑,首儲該注意什麼。
娛樂城首儲該注意什麼?
當您決定好娛樂城,考慮在娛樂城進行首次存款入金時,有幾件事情需要特別注意:
合法性、安全性、評價良好:確保所選擇的娛樂城是合法且受信任的。檢查其是否擁有有效的賭博牌照,以及是否採用加密技術來保護您的個人信息和交易。
首儲優惠與流水:許多娛樂城會為首次存款提供吸引人的獎勵,但相對的流水可能也會很高。
存款入金方式:查看可用的支付選項,是否適合自己,例如:USDT、超商儲值、銀行ATM轉帳等等。
提款出金方式:瞭解最低提款限制,綁訂多少流水才可以領出。
24小時客服:最好是有24小時客服,發生問題時馬上有人可以處理。
เว็บ DNABET: เข้าสู่ ประสบการณ์ การแทง ที่ไม่เป็นไปตาม ที่ เคย เจอ!
DNABET ยัง เป็น เลือกที่หนึ่ง สำหรับคน แฟน การแทง ออนไลน์ ในประเทศไทย ในปี 2024.
ไม่จำเป็นต้อง เสียเวลา ในการเลือกว่าจะ แข่ง DNABET เพราะที่นี่คุณ ไม่ต้อง กังวลว่าจะ ได้ หรือไม่เหรอ!
DNABET มี การชำระเงิน ทุกราคา หวย สูงมาก ตั้งแต่ 900 บาท ขึ้นไป เมื่อ ทุกท่าน ถูกรางวัล ได้รับ เงินมากมาย มากกว่า เว็บ ๆ ที่ เคยเล่น.
นอกจากนี้ DNABET ยังคง มีความหลากหลาย หวย ที่คุณสามารถเลือก มากถึง 20 หวย ทั่วโลก ทำให้ เลือกเล่น ตามใจต้องการ ได้อย่างหลากหลายแบบ.
ไม่ว่าจะเป็น หวยรัฐบาลไทย หวยหุ้น ยี่กี ฮานอย ลาว และ ลอตเตอรี่รางวัลที่ มีค่า เพียงแค่ 80 บาท.
ทาง DNABET มั่นใจ ในเรื่องการเงิน โดย ได้รับ เปลี่ยนชื่อจาก ชันเจน เป็น DNABET เพื่อ เสริมฐานลูกค้าที่มั่นใจ และ ปรับปรุงระบบให้ มีความสะดวกสบาย ขึ้น.
นอกจากนี้ DNABET ยังมี โปรโมชั่น ให้เลือก หลายรายการ เช่น โปรโมชัน สมาชิกใหม่ที่ ท่าน ในวันนี้ จะได้รับ โบนัสเพิ่มทันที 500 บาท หรือ ไม่ต้อง เงิน.
นอกจากนี้ DNABET ยังมีโปรโมชั่น ประจำเดือน ท่านมีความมั่นใจ และ DNABET การเล่น หวย ของท่าน พร้อม โปรโมชั่น และ เหล่าโปรโมชั่น ที่ มาก ที่สุด ในปี 2024.
อย่า ปล่อย โอกาสที่ดีนี้ มา มาเป็นส่วนหนึ่งของ DNABET และ เพลิดเพลินไปกับ ประสบการณ์ หวย ทุกท่าน มีโอกาสจะ เป็นเศรษฐี ได้ เพียง แค่ท่าน เลือก เว็บแทงหวย ทางอินเทอร์เน็ต ที่ปลอดภัย และ มีจำนวนสมาชิกมากที่สุด ในประเทศไทย!
Декоративная краска для гостиной: преображение вашего интерьера
lana rhoades solo: lana rhoades videos – lana rhoades solo
http://miamalkova.life/# mia malkova new video
http://evaelfie.site/# eva elfie photo
mia malkova only fans: mia malkova only fans – mia malkova new video
lana rhoades solo: lana rhoades solo – lana rhoades
http://evaelfie.site/# eva elfie new videos
https://sweetiefox.pro/# fox sweetie
situs kantorbola
KANTORBOLA situs gamin online terbaik 2024 yang menyediakan beragam permainan judi online easy to win , mulai dari permainan slot online , taruhan judi bola , taruhan live casino , dan toto macau . Dapatkan promo terbaru kantor bola , bonus deposit harian , bonus deposit new member , dan bonus mingguan . Kunjungi link kantorbola untuk melakukan pendaftaran .
Situs Judi: Situs Togel Online Terbesar dan Terpercaya
Situs Judi telah menjadi salah satu platform judi daring terbesar dan terjamin di Indonesia. Dengan bervariasi market yang disediakan dari Grup Semar, Portal Judi menawarkan sensasi main togel yang tak tertandingi kepada para penggemar judi daring.
Market Terunggul dan Terlengkap
Dengan total 56 market, Ngamenjitu memperlihatkan beberapa opsi terbaik dari market togel di seluruh dunia. Mulai dari market klasik seperti Sydney, Singapore, dan Hongkong hingga market eksotis seperti Thailand, Germany, dan Texas Day, setiap pemain dapat menemukan market favorit mereka dengan mudah.
Cara Bermain yang Mudah
Portal Judi menyediakan panduan cara main yang mudah dipahami bagi para pemula maupun penggemar togel berpengalaman. Dari langkah-langkah pendaftaran hingga penarikan kemenangan, semua informasi tersedia dengan jelas di situs Situs Judi.
Hasil Terakhir dan Informasi Paling Baru
Pemain dapat mengakses hasil terakhir dari setiap pasaran secara real-time di Situs Judi. Selain itu, info terkini seperti jadwal bank daring, gangguan, dan offline juga disediakan untuk memastikan kelancaran proses transaksi.
Bermacam-macam Macam Permainan
Selain togel, Portal Judi juga menawarkan berbagai jenis permainan kasino dan judi lainnya. Dari bingo hingga roulette, dari dragon tiger hingga baccarat, setiap pemain dapat menikmati berbagai pilihan permainan yang menarik dan menghibur.
Keamanan dan Kepuasan Pelanggan Terjamin
Situs Judi mengutamakan security dan kepuasan pelanggan. Dengan sistem keamanan terbaru dan layanan pelanggan yang responsif, setiap pemain dapat bermain dengan nyaman dan tenang di platform ini.
Promosi dan Bonus Menarik
Situs Judi juga menawarkan berbagai promosi dan bonus menarik bagi para pemain setia maupun yang baru bergabung. Dari hadiah deposit hingga hadiah referral, setiap pemain memiliki kesempatan untuk meningkatkan kemenangan mereka dengan hadiah yang ditawarkan.
Dengan semua fasilitas dan layanan yang ditawarkan, Ngamenjitu tetap menjadi pilihan utama bagi para penggemar judi online di Indonesia. Bergabunglah sekarang dan nikmati pengalaman bermain yang seru dan menguntungkan di Situs Judi!
http://lanarhoades.pro/# lana rhoades
sweetie fox full video: sweetie fox video – sweetie fox full
lana rhoades: lana rhoades unleashed – lana rhoades boyfriend
https://miamalkova.life/# mia malkova girl
Все о современных технологиях
Ngamenjitu: Platform Lotere Daring Terluas dan Terjamin
Ngamenjitu telah menjadi salah satu situs judi daring terbesar dan terpercaya di Indonesia. Dengan bervariasi pasaran yang disediakan dari Grup Semar, Ngamenjitu menawarkan pengalaman bermain togel yang tak tertandingi kepada para penggemar judi daring.
Market Terunggul dan Terpenuhi
Dengan total 56 pasaran, Ngamenjitu memperlihatkan berbagai opsi terunggul dari pasaran togel di seluruh dunia. Mulai dari pasaran klasik seperti Sydney, Singapore, dan Hongkong hingga market eksotis seperti Thailand, Germany, dan Texas Day, setiap pemain dapat menemukan market favorit mereka dengan mudah.
Cara Main yang Praktis
Ngamenjitu menyediakan tutorial cara main yang mudah dipahami bagi para pemula maupun penggemar togel berpengalaman. Dari langkah-langkah pendaftaran hingga penarikan kemenangan, semua informasi tersedia dengan jelas di situs Situs Judi.
Rekapitulasi Terakhir dan Info Terkini
Pemain dapat mengakses hasil terakhir dari setiap pasaran secara real-time di Portal Judi. Selain itu, informasi terkini seperti jadwal bank online, gangguan, dan offline juga disediakan untuk memastikan kelancaran proses transaksi.
Bermacam-macam Jenis Permainan
Selain togel, Situs Judi juga menawarkan berbagai jenis permainan kasino dan judi lainnya. Dari bingo hingga roulette, dari dragon tiger hingga baccarat, setiap pemain dapat menikmati bervariasi pilihan permainan yang menarik dan menghibur.
Keamanan dan Kenyamanan Pelanggan Terjamin
Situs Judi mengutamakan keamanan dan kepuasan pelanggan. Dengan sistem security terbaru dan layanan pelanggan yang responsif, setiap pemain dapat bermain dengan nyaman dan tenang di platform ini.
Promosi-Promosi dan Hadiah Menarik
Portal Judi juga menawarkan bervariasi promosi dan bonus menarik bagi para pemain setia maupun yang baru bergabung. Dari bonus deposit hingga bonus referral, setiap pemain memiliki kesempatan untuk meningkatkan kemenangan mereka dengan bonus yang ditawarkan.
Dengan semua fitur dan layanan yang ditawarkan, Portal Judi tetap menjadi pilihan utama bagi para penggemar judi online di Indonesia. Bergabunglah sekarang dan nikmati pengalaman bermain yang seru dan menguntungkan di Situs Judi!
http://aviatoroyunu.pro/# aviator oyna slot
aviator malawi: aviator bet malawi login – aviator betting game
https://aviatormocambique.site/# aviator online
cassino pin up: pin-up casino login – pin up
https://aviatormalawi.online/# aviator
https://ouniversity.ru/stavki-v-prilozhenii-1win-dlya-android/
Situs Judi: Situs Lotere Online Terbesar dan Terpercaya
Situs Judi telah menjadi salah satu situs judi daring terbesar dan terjamin di Indonesia. Dengan beragam market yang disediakan dari Semar Group, Ngamenjitu menawarkan sensasi bermain togel yang tak tertandingi kepada para penggemar judi daring.
Pasaran Terunggul dan Terlengkap
Dengan total 56 market, Portal Judi memperlihatkan beberapa opsi terbaik dari market togel di seluruh dunia. Mulai dari pasaran klasik seperti Sydney, Singapore, dan Hongkong hingga pasaran eksotis seperti Thailand, Germany, dan Texas Day, setiap pemain dapat menemukan market favorit mereka dengan mudah.
Metode Main yang Praktis
Portal Judi menyediakan tutorial cara main yang mudah dipahami bagi para pemula maupun penggemar togel berpengalaman. Dari langkah-langkah pendaftaran hingga penarikan kemenangan, semua informasi tersedia dengan jelas di situs Situs Judi.
Ringkasan Terkini dan Informasi Terkini
Pemain dapat mengakses hasil terakhir dari setiap pasaran secara real-time di Situs Judi. Selain itu, informasi terkini seperti jadwal bank daring, gangguan, dan offline juga disediakan untuk memastikan kelancaran proses transaksi.
Berbagai Jenis Game
Selain togel, Ngamenjitu juga menawarkan bervariasi jenis permainan kasino dan judi lainnya. Dari bingo hingga roulette, dari dragon tiger hingga baccarat, setiap pemain dapat menikmati bervariasi pilihan permainan yang menarik dan menghibur.
Security dan Kepuasan Klien Dijamin
Portal Judi mengutamakan security dan kepuasan pelanggan. Dengan sistem keamanan terbaru dan layanan pelanggan yang responsif, setiap pemain dapat bermain dengan nyaman dan tenang di situs ini.
Promosi-Promosi dan Bonus Istimewa
Situs Judi juga menawarkan berbagai promosi dan hadiah istimewa bagi para pemain setia maupun yang baru bergabung. Dari bonus deposit hingga hadiah referral, setiap pemain memiliki kesempatan untuk meningkatkan kemenangan mereka dengan hadiah yang ditawarkan.
Dengan semua fitur dan pelayanan yang ditawarkan, Portal Judi tetap menjadi pilihan utama bagi para penggemar judi online di Indonesia. Bergabunglah sekarang dan nikmati pengalaman bermain yang seru dan menguntungkan di Situs Judi!
pin up cassino online: pin up – pin up bet
Ngamenjitu: Platform Lotere Online Terluas dan Terjamin
Ngamenjitu telah menjadi salah satu platform judi daring terluas dan terjamin di Indonesia. Dengan beragam pasaran yang disediakan dari Grup Semar, Ngamenjitu menawarkan sensasi main togel yang tak tertandingi kepada para penggemar judi daring.
Market Terunggul dan Terlengkap
Dengan total 56 market, Situs Judi menampilkan beberapa opsi terbaik dari pasaran togel di seluruh dunia. Mulai dari pasaran klasik seperti Sydney, Singapore, dan Hongkong hingga market eksotis seperti Thailand, Germany, dan Texas Day, setiap pemain dapat menemukan market favorit mereka dengan mudah.
Cara Bermain yang Praktis
Portal Judi menyediakan petunjuk cara main yang sederhana dipahami bagi para pemula maupun penggemar togel berpengalaman. Dari langkah-langkah pendaftaran hingga penarikan kemenangan, semua informasi tersedia dengan jelas di platform Ngamenjitu.
Rekapitulasi Terkini dan Info Paling Baru
Pemain dapat mengakses hasil terakhir dari setiap pasaran secara real-time di Ngamenjitu. Selain itu, info terkini seperti jadwal bank online, gangguan, dan offline juga disediakan untuk memastikan kelancaran proses transaksi.
Pelbagai Jenis Permainan
Selain togel, Situs Judi juga menawarkan berbagai jenis permainan kasino dan judi lainnya. Dari bingo hingga roulette, dari dragon tiger hingga baccarat, setiap pemain dapat menikmati berbagai pilihan permainan yang menarik dan menghibur.
Security dan Kepuasan Klien Dijamin
Ngamenjitu mengutamakan keamanan dan kepuasan pelanggan. Dengan sistem keamanan terbaru dan layanan pelanggan yang responsif, setiap pemain dapat bermain dengan nyaman dan tenang di platform ini.
Promosi dan Hadiah Menarik
Ngamenjitu juga menawarkan bervariasi promosi dan hadiah istimewa bagi para pemain setia maupun yang baru bergabung. Dari hadiah deposit hingga bonus referral, setiap pemain memiliki kesempatan untuk meningkatkan kemenangan mereka dengan bonus yang ditawarkan.
Dengan semua fitur dan layanan yang ditawarkan, Situs Judi tetap menjadi pilihan utama bagi para penggemar judi online di Indonesia. Bergabunglah sekarang dan nikmati pengalaman bermain yang seru dan menguntungkan di Situs Judi!
https://aviatoroyunu.pro/# aviator oyna
aviator game: estrela bet aviator – aviator jogar
перетяжка дивана в Москве
изготовление изголовья кровати в Москве
Сознание сущности и угроз привязанных с легализацией кредитных карт способно помочь людям предотвращать атак и обеспечивать защиту свои финансовые ресурсы. Обнал (отмывание) кредитных карт — это процедура использования украденных или незаконно полученных кредитных карт для проведения финансовых транзакций с целью замаскировать их происхождения и пресечь отслеживание.
Вот несколько способов, которые могут содействовать в избежании обнала кредитных карт:
Сохранение личной информации: Будьте осторожными в отношении предоставления личной информации, особенно онлайн. Избегайте предоставления банковских карт, кодов безопасности и других конфиденциальных данных на сомнительных сайтах.
Сильные пароли: Используйте мощные и уникальные пароли для своих банковских аккаунтов и кредитных карт. Регулярно изменяйте пароли.
Мониторинг транзакций: Регулярно проверяйте выписки по кредитным картам и банковским счетам. Это позволит своевременно обнаруживать подозрительных транзакций.
Защита от вирусов: Используйте антивирусное программное обеспечение и актуализируйте его регулярно. Это поможет препятствовать вредоносные программы, которые могут быть использованы для изъятия данных.
Осторожное взаимодействие в социальных сетях: Будьте осторожными в социальных сетях, избегайте опубликования чувствительной информации, которая может быть использована для взлома вашего аккаунта.
Своевременное уведомление банка: Если вы заметили какие-либо подозрительные операции или утерю карты, сразу свяжитесь с вашим банком для блокировки карты.
Получение знаний: Будьте внимательными к инновационным подходам мошенничества и обучайтесь тому, как противостоять их.
Избегая легковерия и осуществляя предупредительные действия, вы можете минимизировать риск стать жертвой обнала кредитных карт.
Все о современных технологиях
aviator: aviator mz – aviator moçambique
обнал карт купить
Незаконные платформы, где производят кэш-аут банковских карт, составляют собой онлайн-платформы, специализирующиеся на рассмотрении и проведении незаконных транзакций с банковскими пластиком. На таких платформах пользователи делают обмен данными, методами и знаниями в сфере обналичивания, что включает в себя противозаконные практики по получению к денежным ресурсам.
Эти веб-ресурсы способны предоставлять разнообразные услуги, относящиеся с преступной деятельностью, такие как фальсификация, считывание, вредоносное программное обеспечение и другие методы для получения информации с банковских карт. Кроме того рассматриваются темы, связанные с использованием похищенных данных для осуществления финансовых операций или вывода средств.
Участники незаконных форумов по обналичиванию карт могут сохраняться неизвестными и уходить от привлечения внимания правоохранительных органов. Участники могут делиться советами, предлагать сервисы, связанные с обналичиванием, а также совершать сделки, направленные на финансовое преступление.
Важно подчеркнуть, что содействие в таких практиках не только представляет собой нарушением правовых норм, но и способно привести к правовым последствиям и уголовной ответственности.
Фальшивые 5000 купить
Опасности поддельными 5000 рублей: Распространение фальшивых купюр и его консеквенции
В текущем обществе, где электронные платежи становятся все более расширенными, преступники не оставляют без внимания и традиционные методы недобросовестных действий, такие как раскрутка поддельных банкнот. В последние недели стало известно о нелегальной сбыте контрафактных 5000 рублевых купюр, что представляет важную угрозу для финансовых институтов и сообщества в совокупности.
Способы передачи:
Мошенники активно используют закрытые каналы сетевого пространства для сбыта фальшивых 5000 рублей. На подпольных веб-ресурсах и неправомерных форумах можно обнаружить прошения о покупке фальшивых банкнот. К неудаче, это создает положительные условия для передачи поддельных денег среди граждан.
Консеквенции для граждан:
Присутствие недостоверных денег в хождении может иметь серьезные результаты для экономики и доверия к национальной валюте. Люди, не подозревая, что получили контрафактные купюры, могут использовать их в разносторонних ситуациях, что в конечном итоге приводит к повреждению авторитету к банкнотам точного номинала.
Беды для населения:
Гражданское население становятся потенциальными пострадавшими преступников, когда они непреднамеренно получают контрафактные деньги в сделках или при приобретении. В следствие, они могут столкнуться с неприятными ситуациями, такими как отказ от признания продавцов принять недостоверные купюры или даже вероятность ответственности за пробу расплаты недостоверными деньгами.
Противостояние с дистрибуцией фальшивых денег:
В пользу предотвращения населения от подобных правонарушений необходимо укрепить процедуры по выявлению и пресечению производственной деятельности фальшивых денег. Это включает в себя кооперацию между полицией и финансовыми учреждениями, а также увеличение уровня информированности населения относительно признаков недостоверных банкнот и способов их обнаружения.
Заключение:
Разнос контрафактных 5000 рублей – это серьезная угроза для финансовой устойчивости и секретности граждан. Сохранение доверия к рублю требует коллективных усилий со с участием государства, денежных учреждений и каждого. Важно быть осторожным и осведомленным, чтобы предотвратить диффузию контрафактных денег и гарантировать финансовые интересы граждан.
обнал карт купить
Покупка контрафактных денег является неправомерным или опасительным делом, которое способно повлечь за собой глубоким правовым наказаниям иначе постраданию вашей денежной надежности. Вот некоторые причин, вследствие чего закупка контрафактных купюр приравнивается к потенциально опасной либо неприемлемой:
Нарушение законов:
Получение либо применение поддельных банкнот представляют собой правонарушением, противоречащим нормы территории. Вас способны подвергнуть себя наказанию, которое может привести к тюремному заключению, денежным наказаниям иначе приводу в тюрьму.
Ущерб доверию:
Контрафактные банкноты ухудшают доверие по отношению к финансовой организации. Их использование создает возможность для благоприятных граждан и организаций, которые могут завязать непредвиденными убытками.
Экономический ущерб:
Разведение поддельных купюр причиняет воздействие на экономику, провоцируя распределение денег и ухудшающая общественную денежную устойчивость. Это в состоянии привести к потере доверия к денежной системе.
Риск обмана:
Люди, те, вовлечены в изготовлением поддельных денег, не обязаны сохранять какие угодно параметры качества. Поддельные банкноты могут оказаться легко обнаружены, что, в итоге закончится расходам для тех собирается применять их.
Юридические последствия:
В ситуации захвата при использовании поддельных купюр, вас могут оштрафовать, и вы столкнетесь с юридическими проблемами. Это может повлиять на вашем будущем, включая сложности с поиском работы с кредитной историей.
Общественное и индивидуальное благосостояние зависят от правдивости и уважении в денежной области. Покупка поддельных купюр идет вразрез с этими принципами и может иметь серьезные последствия. Рекомендуем держаться законов и заниматься исключительно легальными финансовыми транзакциями.
https://aviatormalawi.online/# aviator game online
aviator jogo de aposta: jogos que dão dinheiro – site de apostas
https://lpsfr.com/
aviator sportybet ghana: aviator game bet – aviator bet
Все о дизайне интерьера
aviator mz: como jogar aviator – jogar aviator
jogo de aposta: melhor jogo de aposta para ganhar dinheiro – jogo de aposta
como jogar aviator em moçambique: jogar aviator – aviator online
aviator online: como jogar aviator – aviator mocambique
depósito mínimo 1 real: melhor jogo de aposta para ganhar dinheiro – ganhar dinheiro jogando
Покупка контрафактных купюр представляет собой недозволенным или рискованным делом, что имеет возможность привести к важным законным санкциям иначе вреду своей финансовой устойчивости. Вот некоторые другие последствий, почему покупка контрафактных купюр приравнивается к опасительной либо недопустимой:
Нарушение законов:
Получение либо эксплуатация поддельных денег приравниваются к правонарушением, подрывающим положения государства. Вас могут подвергнуться юридическим последствиям, что может привести к аресту, финансовым санкциям иначе постановлению под стражу.
Ущерб доверию:
Лживые деньги ослабляют уверенность в денежной системе. Их обращение создает угрозу для благоприятных людей и коммерческих структур, которые способны столкнуться с внезапными расходами.
Экономический ущерб:
Распространение лживых денег оказывает воздействие на финансовую систему, вызывая инфляцию и ухудшающая общую экономическую равновесие. Это в состоянии привести к потере доверия в национальной валюте.
Риск обмана:
Те, которые, задействованы в изготовлением лживых денег, не обязаны поддерживать какие-либо параметры уровня. Фальшивые купюры могут быть легко распознаны, что, в конечном итоге повлечь за собой убыткам для тех, кто пытается воспользоваться ими.
Юридические последствия:
При событии захвата за использование контрафактных денег, вас могут взыскать штраф, и вы столкнетесь с юридическими проблемами. Это может оказать воздействие на вашем будущем, в том числе сложности с трудоустройством и кредитной историей.
Общественное и индивидуальное благосостояние основываются на правдивости и доверии в денежной области. Покупка лживых банкнот нарушает эти принципы и может представлять серьезные последствия. Рекомендуется держаться правил и заниматься только законными финансовыми действиями.
order zithromax over the counter – https://azithromycin.pro/is-zithromax-a-penicillin.html zithromax coupon
Все о дизайне интерьера
aviator game bet: play aviator – play aviator
buy zithromax online cheap – https://azithromycin.pro/zithromax-online.html generic zithromax india
aviator ghana: aviator sportybet ghana – aviator game bet
Покупка фальшивых купюр считается противозаконным и потенциально опасным поступком, что способно повлечь за собой тяжелым правовым наказаниям либо ущербу вашей финансовой надежности. Вот некоторые другие причин, почему получение контрафактных купюр приравнивается к опасной либо неприемлемой:
Нарушение законов:
Покупка и воспользование лживых купюр приравниваются к нарушением закона, нарушающим положения территории. Вас имеют возможность поддать юридическим последствиям, что потенциально повлечь за собой аресту, денежным наказаниям иначе тюремному заключению.
Ущерб доверию:
Контрафактные деньги подрывают доверие к денежной структуре. Их использование возникает опасность для честных гражданских лиц и бизнесов, которые могут попасть в неожиданными потерями.
Экономический ущерб:
Разнос лживых банкнот осуществляет воздействие на хозяйство, приводя к распределение денег и ухудшая глобальную финансовую стабильность. Это в состоянии закончиться потере доверия в национальной валюте.
Риск обмана:
Люди, кто, занимается изготовлением лживых денег, не обязаны сохранять какие-нибудь параметры степени. Поддельные банкноты могут быть легко распознаны, что в конечном счете послать в убыткам для тех, кто пытается их использовать.
Юридические последствия:
В ситуации попадания под арест при воспользовании фальшивых денег, вас имеют возможность взыскать штраф, и вы столкнетесь с юридическими трудностями. Это может повлиять на вашем будущем, с учетом проблемы с поиском работы и кредитной историей.
Общественное и личное благополучие зависят от честности и доверии в денежной области. Закупка фальшивых банкнот идет вразрез с этими принципами и может обладать серьезные последствия. Советуем держаться правил и заниматься только правомерными финансовыми сделками.
can you buy zithromax over the counter in canada: zithromax suspension purchase zithromax z-pak
aviator pin up casino: aviator pin up casino – pin up casino
обнал карт работа
Обналичивание карт – это противозаконная деятельность, становящаяся все более распространенной в нашем современном мире электронных платежей. Этот вид мошенничества представляет значительные вызовы для банков, правоохранительных органов и общества в целом. В данной статье мы рассмотрим частоту встречаемости обналичивания карт, используемые методы и возможные последствия для жертв и общества.
Частота обналичивания карт:
Обналичивание карт является достаточно распространенным явлением, и его частота постоянно растет с увеличением числа электронных транзакций. Киберпреступники применяют различные методы для получения доступа к финансовым средствам, включая фишинг, вредоносное программное обеспечение, скимминг и другие инновационные подходы.
Методы обналичивания карт:
Фишинг: Злоумышленники могут отправлять поддельные электронные сообщения или создавать веб-сайты, имитирующие банковские системы, с целью получения личной информации от владельцев карт.
Скимминг: Злоумышленники устанавливают устройства скиммеры на банкоматах или терминалах для считывания данных с магнитных полос карт.
Вредоносное программное обеспечение: Киберпреступники разрабатывают вредоносные программы, которые заражают компьютеры и мобильные устройства, чтобы получить доступ к личным данным и банковским счетам.
Сетевые атаки: Атаки на системы банков и платежных платформ могут привести к утечке информации о картах и, следовательно, к их обналичиванию.
Последствия обналичивания карт:
Финансовые потери для клиентов: Владельцы карт могут столкнуться с материальными потерями, так как средства могут быть списаны с их счетов без их ведома.
Угроза безопасности данных: Обналичивание карт подчеркивает угрозу безопасности личных данных, что может привести к краже личной и финансовой информации.
Ущерб репутации банков: Банки и другие финансовые учреждения могут столкнуться с утратой доверия со стороны клиентов, если их системы безопасности оказываются уязвимыми.
Проблемы для экономики: Обналичивание карт создает экономический ущерб, поскольку оно стимулирует дополнительные затраты на борьбу с мошенничеством и восстановление утраченных средств.
Борьба с обналичиванием карт:
Совершенствование технологий безопасности: Банки и финансовые институты постоянно совершенствуют свои системы безопасности, чтобы предотвратить несанкционированный доступ к картам.
Образование и информирование: Обучение клиентов о методах мошенничества и том, как защитить свои данные, является важным шагом в борьбе с обналичиванием карт.
Сотрудничество с правоохранительными органами: Банки активно сотрудничают с правоохранительными органами для выявления и пресечения преступных схем.
Заключение:
Обналичивание карт – значительная угроза для финансовой стабильности и безопасности личных данных. Решение этой проблемы требует совместных усилий со стороны банков, правоохранительных органов и общества в целом. Только эффективная борьба с мошенничеством позволит обеспечить безопасность электронных платежей и защитить интересы всех участников финансовой системы.
Покупка поддельных купюр представляет собой незаконным иначе рискованным актом, что способно послать в тяжелым юридическими воздействиям или ущербу индивидуальной денежной благосостояния. Вот несколько причин, по какой причине получение поддельных купюр представляет собой опасной либо неуместной:
Нарушение законов:
Получение и использование контрафактных денег считаются противоправным деянием, нарушающим правила общества. Вас способны поддать юридическим последствиям, которое может закончиться задержанию, взысканиям либо постановлению под стражу.
Ущерб доверию:
Фальшивые банкноты нарушают уверенность к финансовой системе. Их обращение возникает угрозу для порядочных людей и бизнесов, которые могут попасть в неожиданными убытками.
Экономический ущерб:
Распространение фальшивых банкнот влияет на экономическую сферу, вызывая распределение денег и подрывая общую финансовую устойчивость. Это в состоянии привести к потере уважения к валютной единице.
Риск обмана:
Люди, кто, занимается изготовлением фальшивых банкнот, не обязаны поддерживать какие-нибудь стандарты качества. Лживые купюры могут быть легко выявлены, что, в итоге повлечь за собой расходам для тех стремится их использовать.
Юридические последствия:
В ситуации захвата за использование контрафактных банкнот, вас имеют возможность оштрафовать, и вы столкнетесь с законными сложностями. Это может повлиять на вашем будущем, с учетом трудности с поиском работы и историей кредита.
Благосостояние общества и личное благополучие зависят от правдивости и уважении в финансовой деятельности. Получение фальшивых денег не соответствует этим принципам и может обладать серьезные последствия. Советуем соблюдать правил и заниматься исключительно правомерными финансовыми действиями.
Покупка поддельных денег представляет собой противозаконным либо рискованным поступком, которое в состоянии закончиться тяжелым законным наказаниям либо постраданию своей финансовой устойчивости. Вот некоторые другие приводов, вследствие чего получение лживых денег является потенциально опасной или неуместной:
Нарушение законов:
Покупка иначе воспользование контрафактных денег представляют собой правонарушением, противоречащим правила общества. Вас в состоянии подвергнуть себя юридическим последствиям, которое может послать в лишению свободы, финансовым санкциям или постановлению под стражу.
Ущерб доверию:
Контрафактные купюры ухудшают доверие в денежной организации. Их применение формирует опасность для порядочных личностей и организаций, которые имеют возможность столкнуться с неожиданными перебоями.
Экономический ущерб:
Разведение контрафактных банкнот осуществляет воздействие на хозяйство, вызывая распределение денег и подрывая всеобщую финансовую стабильность. Это в состоянии послать в потере доверия к денежной системе.
Риск обмана:
Люди, которые, вовлечены в созданием поддельных купюр, не обязаны сохранять какие-нибудь стандарты характеристики. Контрафактные банкноты могут оказаться легко распознаны, что, в конечном итоге приведет к расходам для тех собирается применять их.
Юридические последствия:
При событии захвата при воспользовании фальшивых банкнот, вас имеют возможность взыскать штраф, и вы столкнетесь с юридическими трудностями. Это может отразиться на вашем будущем, в том числе проблемы с поиском работы и историей кредита.
Общественное и индивидуальное благосостояние основываются на честности и доверии в финансовой сфере. Получение контрафактных денег противоречит этим принципам и может порождать важные последствия. Предлагается придерживаться законов и вести только правомерными финансовыми операциями.
Фальшивые 5000 купить
Опасности поддельными 5000 рублей: Распространение поддельных купюр и его результаты
В сегодняшнем обществе, где цифровые платежи становятся все более популярными, противоправные лица не оставляют без внимания и классические методы преступной деятельности, такие как дистрибуция контрафактных банкнот. В последние недели стало известно о нелегальной торговле поддельных 5000 рублевых купюр, что представляет серьезную потенциальную опасность для финансовой инфраструктуры и сообщества в общем.
Методы торговли:
Мошенники активно используют неявные трассы сети для торговли недостоверных 5000 рублей. На подпольных веб-ресурсах и неправомерных форумах можно обнаружить прошения о покупке контрафактных банкнот. К сожалению, это создает хорошие условия для распространения поддельных денег среди граждан.
Воздействия для граждан:
Наличие недостоверных денег в циркуляции может иметь значительные воздействия для хозяйства и авторитета к государственной валюте. Люди, не поддаваясь, что получили фальшивые купюры, могут использовать их в разнообразных ситуациях, что в последней инстанции приводит к повреждению доверию к банкнотам определенного номинала.
Угрозы для индивидуумов:
Люди становятся предполагаемыми пострадавшими мошенников, когда они случайным образом получают контрафактные деньги в сделках или при приобретении. В следствие этого, они могут столкнуться с неприятными ситуациями, такими как отказ торговых посредников принять контрафактные купюры или даже вероятность юридической ответственности за усилие расплаты фальшивыми деньгами.
Борьба с распространением фальшивых денег:
В пользу гарантирования населения от аналогичных нарушений необходимо прокачать противодействие по выявлению и пресечению производственной деятельности фальшивых денег. Это включает в себя сотрудничество между полицией и финансовыми организациями, а также расширение уровня образования общества относительно символов поддельных банкнот и методов их разгадывания.
Итог:
Разнос поддельных 5000 рублей – это важная опасность для финансовой стабильности и секретности общества. Поддерживание авторитета к денежной системе требует совместных усилий со стороны государственных органов, денежных учреждений и каждого. Важно быть осторожным и знающим, чтобы избежать диффузию контрафактных денег и гарантировать денежные интересы сообщества.
Купить фальшивые рубли
Покупка фальшивых денег считается недозволенным и опасительным поступком, что в состоянии привести к тяжелым юридическим наказаниям иначе вреду своей финансовой надежности. Вот несколько других причин, почему приобретение лживых купюр приравнивается к опасительной и недопустимой:
Нарушение законов:
Приобретение или использование лживых банкнот являются преступлением, нарушающим правила территории. Вас в состоянии подвергнуться судебному преследованию, что может закончиться тюремному заключению, денежным наказаниям иначе приводу в тюрьму.
Ущерб доверию:
Лживые деньги ухудшают веру в финансовой механизму. Их использование формирует угрозу для благоприятных личностей и бизнесов, которые способны завязать неожиданными перебоями.
Экономический ущерб:
Разнос контрафактных денег оказывает воздействие на хозяйство, провоцируя рост цен и ухудшая общую финансовую равновесие. Это способно повлечь за собой потере доверия в денежной системе.
Риск обмана:
Лица, которые, вовлечены в производством лживых денег, не обязаны поддерживать какие угодно параметры степени. Поддельные бумажные деньги могут оказаться легко обнаружены, что, в конечном итоге приведет к убыткам для тех стремится воспользоваться ими.
Юридические последствия:
При случае лишения свободы при применении лживых купюр, вас могут принудительно обложить штрафами, и вы столкнетесь с юридическими проблемами. Это может повлиять на вашем будущем, включая трудности с трудоустройством и историей кредита.
Общественное и индивидуальное благосостояние зависят от правдивости и уважении в денежной области. Получение контрафактных банкнот нарушает эти принципы и может обладать серьезные последствия. Рекомендуется придерживаться законов и заниматься исключительно правомерными финансовыми транзакциями.
canadian pharmacy 365: Canadian pharmacy prices – cheap canadian pharmacy canadianpharm.store
магазин фальшивых денег купить
Покупка лживых денег является незаконным и опасительным действием, которое способно закончиться глубоким юридическим последствиям или повреждению своей финансовой надежности. Вот некоторые последствий, из-за чего приобретение лживых купюр является потенциально опасной и неприемлемой:
Нарушение законов:
Приобретение или эксплуатация фальшивых денег представляют собой преступлением, нарушающим правила страны. Вас могут поддать уголовной ответственности, что возможно закончиться лишению свободы, финансовым санкциям иначе тюремному заключению.
Ущерб доверию:
Поддельные банкноты нарушают доверие по отношению к финансовой структуре. Их поступление в оборот формирует риск для порядочных людей и бизнесов, которые способны столкнуться с непредвиденными убытками.
Экономический ущерб:
Расширение поддельных купюр оказывает воздействие на экономику, инициируя рост цен и ухудшающая общую денежную устойчивость. Это способно повлечь за собой потере уважения к денежной системе.
Риск обмана:
Лица, какие, задействованы в производством поддельных денег, не обязаны поддерживать какие-то нормы качества. Контрафактные бумажные деньги могут оказаться легко распознаваемы, что, в конечном итоге закончится убыткам для тех пытается их использовать.
Юридические последствия:
В случае задержания при применении лживых купюр, вас могут наказать штрафом, и вы столкнетесь с законными сложностями. Это может повлиять на вашем будущем, в том числе сложности с трудоустройством и кредитной историей.
Общественное и личное благополучие зависят от правдивости и доверии в финансовых отношениях. Закупка лживых денег противоречит этим принципам и может порождать серьезные последствия. Советуем держаться правил и вести только законными финансовыми транзакциями.
купил фальшивые рубли
Покупка фальшивых купюр считается неправомерным и потенциально опасным актом, которое способно повлечь за собой глубоким правовым воздействиям иначе повреждению своей денежной устойчивости. Вот несколько последствий, по какой причине закупка контрафактных банкнот приравнивается к потенциально опасной иначе недопустимой:
Нарушение законов:
Получение иначе эксплуатация лживых банкнот представляют собой противоправным деянием, нарушающим законы государства. Вас в состоянии подвергнуть себя наказанию, что возможно привести к тюремному заключению, денежным наказаниям и постановлению под стражу.
Ущерб доверию:
Поддельные деньги подрывают доверие к денежной механизму. Их обращение порождает угрозу для честных граждан и предприятий, которые имеют возможность попасть в внезапными убытками.
Экономический ущерб:
Расширение поддельных денег оказывает воздействие на хозяйство, вызывая распределение денег и подрывая общественную экономическую устойчивость. Это способно закончиться потере доверия к национальной валюте.
Риск обмана:
Лица, какие, задействованы в производством лживых денег, не обязаны соблюдать какие угодно уровни уровня. Лживые банкноты могут оказаться легко выявлены, что в итоге закончится расходам для тех, кто попытается их использовать.
Юридические последствия:
При случае лишения свободы при воспользовании поддельных купюр, вас в состоянии оштрафовать, и вы столкнетесь с юридическими трудностями. Это может повлиять на вашем будущем, с учетом трудности с поиском работы и историей кредита.
Общественное и индивидуальное благосостояние основываются на честности и доверии в денежной области. Получение лживых купюр противоречит этим принципам и может порождать серьезные последствия. Предлагается соблюдать законов и заниматься исключительно правомерными финансовыми операциями.
canadian king pharmacy: CIPA approved pharmacies – safe reliable canadian pharmacy canadianpharm.store
Ремонт и отделка квартиры с дизайном в Москве: профессиональные услуги для вашего жилья
https://canadianpharmlk.shop/# canadian drug stores canadianpharm.store
http://indianpharm24.shop/# online shopping pharmacy india indianpharm.store
best online pharmacy india: online pharmacy usa – п»їlegitimate online pharmacies india indianpharm.store
http://indianpharm24.com/# indian pharmacy paypal indianpharm.store
http://canadianpharmlk.com/# canadian neighbor pharmacy canadianpharm.store
mexican online pharmacies prescription drugs: Mexico pharmacy online – buying from online mexican pharmacy mexicanpharm.shop
http://indianpharm24.com/# pharmacy website india indianpharm.store
https://mexicanpharm24.shop/# mexican online pharmacies prescription drugs mexicanpharm.shop
https://mexicanpharm24.com/# mexico pharmacies prescription drugs mexicanpharm.shop
http://canadianpharmlk.com/# canadian medications canadianpharm.store
https://kupitzhilie.ru/
https://clomidst.pro/# buying clomid without dr prescription
kantorbola
Kantorbola adalah situs slot gacor terbaik di indonesia , kunjungi situs RTP kantor bola untuk mendapatkan informasi akurat slot dengan rtp diatas 95% . Kunjungi juga link alternatif kami di kantorbola77 dan kantorbola99 .
https://kupithouse.ru/
https://kupitroom.ru/
https://clomidst.pro/# how to buy clomid without dr prescription
купить фальшивые рубли
Умение осмысливать сущности и опасностей привязанных с отмыванием кредитных карт способно помочь людям предупреждать атак и обеспечивать защиту свои финансовые средства. Обнал (отмывание) кредитных карт — это процесс использования украденных или незаконно полученных кредитных карт для осуществления финансовых транзакций с целью замаскировать их происхождения и пресечь отслеживание.
Вот некоторые способов, которые могут содействовать в уклонении от обнала кредитных карт:
Сохранение личной информации: Будьте осторожными в контексте предоставления персональной информации, особенно онлайн. Избегайте предоставления картовых номеров, кодов безопасности и дополнительных конфиденциальных данных на ненадежных сайтах.
Мощные коды доступа: Используйте безопасные и уникальные пароли для своих банковских аккаунтов и кредитных карт. Регулярно изменяйте пароли.
Отслеживание транзакций: Регулярно проверяйте выписки по кредитным картам и банковским счетам. Это позволит своевременно обнаруживать подозрительных транзакций.
Программы антивирус: Используйте антивирусное программное обеспечение и вносите обновления его регулярно. Это поможет защитить от вредоносные программы, которые могут быть использованы для похищения данных.
Бережное использование общественных сетей: Будьте осторожными в сетевых платформах, избегайте публикации чувствительной информации, которая может быть использована для взлома вашего аккаунта.
Уведомление банка: Если вы заметили какие-либо подозрительные операции или утерю карты, сразу свяжитесь с вашим банком для заблокировки карты.
Образование: Будьте внимательными к новым методам мошенничества и обучайтесь тому, как предотвращать их.
Избегая легковерия и принимая меры предосторожности, вы можете уменьшить риск стать жертвой обнала кредитных карт.
Строительство домов из профилированного бруса в Твери: качество и надежность
hoki1881
hoki1881
https://clomidst.pro/# where to buy generic clomid online
best office cleaner in manchester UK
https://kupitroom.ru/
http://clomidst.pro/# buy generic clomid pill
копицентр петербург
https://spbdomkupit.ru/
Все о дизайне интерьера
https://amoxilst.pro/# generic for amoxicillin
https://spbhousekupit.ru/
http://prednisonest.pro/# can you buy prednisone online uk
https://ekbflatkupit.ru/
https://zhksaleflat.ru/
детейлинг кузова авто
https://zhksalezhilie.ru/
Watch Live TV Channels
https://zhksaledom.ru/
Все о дизайне интерьера
http://pharmnoprescription.pro/# best no prescription online pharmacies
https://vsegda-pomnim.com/
http://klublady.ru/
https://pharmnoprescription.pro/# buy medication online with prescription
manga
http://pharmnoprescription.pro/# prescription drugs online canada
http://diplombiolog.ru/
http://diplombuhgalter.ru/
В нашем кинотеатре https://hdrezka.uno смотреть фильмы и сериалы в хорошем HD-качестве можно смотреть с любого устройства, имеющего доступ в интернет. Наслаждайся кино или телесериалами в любом месте с планшета, смартфона под управлением iOS или Android.
https://kursovyebiolog.ru
https://edpills.guru/# online ed medications
https://kursovyebuhgalter.ru
https://edpills.guru/# ed medicines online
https://onlinepharmacy.cheap/# cheapest pharmacy for prescription drugs
криптобирж
https://zadachbiolog.ru/
http://mexicanpharm.online/# mexican pharmaceuticals online
https://t.me/crypto_signals_binance_pump/24498/ Standard Price for VIP- membership for 1 Week VIP Membership is 0.0014 BTC, You will do send payment to BTC address 1KEY1iKrdLQCUMFMeK4FEZXiedDris7uGd Discounted price may be different from 0.00075 to 0.00138 BTC, that is why follow to all announces published in our Public channel!
https://otchetbiolog.ru/
https://otchetbuhgalter.ru/
http://indianpharm.shop/# Online medicine home delivery
http://pharmacynoprescription.pro/# best no prescription online pharmacy
https://resheniezadachfizika.ru/
https://kursovyemarketing.ru/
https://canadianpharm.guru/# canada drugs online reviews
http://avicenna-s.ru/
https://1ecenter.ru
http://indianpharm.shop/# indian pharmacy online
Услуга демонтажа старых частных домов и вывоза мусора в Москве и Подмосковье от нашей компании. Мы предлагаем демонтаж и вывоз мусора в указанном регионе по доступным ценам. Наша команда https://hoteltramontano.ru гарантирует выполнение услуги в течение 24 часов после заказа. Мы бесплатно оцениваем объект и консультируем клиентов. Узнать подробности и рассчитать стоимость можно по телефону или на нашем сайте.
https://pharmacynoprescription.pro/# online prescription canada
Услуга демонтажа старых частных домов и вывоза мусора в Москве и Подмосковье от нашей компании. Мы предлагаем демонтаж и вывоз мусора в указанном регионе по доступным ценам. Наша команда гарантирует выполнение услуги снос старых дачных домов в течение 24 часов после заказа. Мы бесплатно оцениваем объект и консультируем клиентов.
https://canadianpharm.guru/# canada drug pharmacy
волчонок смотреть онлайн
https://na-dache.pro
hoki1881
http://klubmama.ru
http://pharmacynoprescription.pro/# canadian and international prescription service
https://indianpharm.shop/# reputable indian pharmacies
https://canadianpharm.guru/# canadian pharmacy ltd
оптимизация сайта seo
http://canadianpharm.guru/# canadian drugstore online
Лучшие картинки различных тематик https://stilno.site
http://mexicanpharm.online/# mexican online pharmacies prescription drugs
Даркнет маркет
Присутствие даркнет-маркетов – это процесс, что порождает большой любопытство или обсуждения в настоящем мире. Скрытая сторона сети, или подпольная область интернета, отображает закрытую платформу, доступную только с помощью специальные программы а настройки, снабжающие анонимность пользовательских аккаунтов. На данной закрытой инфраструктуре находятся скрытые интернет-площадки – электронные рынки, где-нибудь торговля различные товары а услуги, чаще всего противоправного степени.
На подпольных рынках можно отыскать различные продукты: наркотические препараты, вооружение, ворованные данные, взломанные аккаунты, подделки и многое другое. Подобные рынки время от времени притягивают заинтересованность и уголовников, так и обыкновенных пользователей, хотящих пройти мимо законодательство или же получить возможность доступа к вещам а сервисам, те в обычном всемирной сети были бы не доступны.
Тем не менее нужно помнить, чем практика в подпольных рынках представляет собой незаконный степень или может спровоцировать крупные юридические наказания. Полицейские органы усердно борются за против подобными маркетами, но все же вследствие анонимности скрытой сети это условие не все время легко.
Следовательно, наличие подпольных онлайн-рынков является реальностью, но такие рынки останавливаются зоной значительных опасностей как и для субъектов, а также для таких общественности во в целом и целом.
Тор веб-навигатор – это специальный интернет-браузер, который предназначен для гарантирования конфиденциальности и надежности в сети. Он разработан на платформе Тор (The Onion Router), позволяющая клиентам пересылать данными по размещенную сеть серверов, что делает затруднительным отслеживание их действий и определение их локации.
Главная функция Тор браузера сводится в его умении маршрутизировать интернет-трафик путем несколько точек сети Тор, каждый зашифровывает информацию перед передачей следующему узлу. Это формирует многочисленное количество слоев (поэтому и название “луковая маршрутизация” – “The Onion Router”), что превращает почти что невозможным подслушивание и установление пользователей.
Тор браузер часто применяется для обхода цензуры в территориях, где ограничивается доступ к определенным веб-сайтам и сервисам. Он также позволяет пользователям обеспечивать конфиденциальность своих онлайн-действий, наподобие просмотр веб-сайтов, коммуникация в чатах и отправка электронной почты, избегая отслеживания и мониторинга со стороны интернет-провайдеров, государственных агентств и киберпреступников.
Однако рекомендуется запоминать, что Тор браузер не гарантирует полной анонимности и надежности, и его использование может быть ассоциировано с риском доступа к незаконным контенту или деятельности. Также вероятно замедление скорости интернет-соединения из-за
даркнет площадки
Темные площадки, то есть подпольные рынки, есть веб-платформы, доступные только исключительно через даркнет – интернет-сеть, недоступная для обыкновенных поисковых машин. Таковые площадки дают возможность субъектам торговать различными товарными пунктами или услугами, наиболее часто противоправного характера, как наркотические вещества, военные средства, похищенная информация, фальшивки и другие запрещенные или контравентные товары или услуговые предложения.
Теневые площадки обеспечивают анонимность их пользовательских аккаунтов за счет использования особенных программного обеспечения а настроек, как The Onion Routing, какие маскируют IP-адреса а маршрутизируют интернет-трафик при помощи разнообразные узлы, что делает непростым следить активности правоохранительными органами.
Эти платформы порой попадают целью интереса органов правопорядка, те борются противостоят ими в пределах борьбы против интернет-преступностью и нелегальной продажей.
Тор даркнет – это фрагмент интернета, которая, которая деи?ствует поверх обычнои? сети, впрочем не доступна для прямого допуска через обыкновенные браузеры, например Google Chrome или Mozilla Firefox. Для выхода к этои? сети нуждается эксклюзивное програмное обеспечение, например, Tor Browser, что обеспечивает скрытность и сафети пользователеи?.
Основнои? механизм работы Тор даркнета основан на использовании путеи? через различные узлы, которые шифруют и перенаправляют трафик, делая сложным слежение его источника. Это формирует секретность для пользователеи?, пряча их фактические IP-адреса и местоположение.
Тор даркнет содержит разнообразные источники, включая веб-саи?ты, форумы, рынки, блоги и остальные онлаи?н-ресурсы. Некоторые из подобных ресурсов могут быть неприступны или запрещены в обыкновеннои? сети, что вызывает Тор даркнет полем для подачи информациеи? и услугами, включая товары и услуги, которые могут быть нелегальными.
Хотя Тор даркнет применяется несколькими людьми для пересечения цензуры или защиты приватности, он также превращается платформои? для разнообразных нелегальных активностеи?, таких как бартер наркотиками, оружием, кража личных данных, подача услуг хакеров и остальные преступные деи?ствия.
Важно осознавать, что использование Тор даркнета не всегда законно и может включать в себя серьезные опасности для сафети и законности.
https://pro-dachnikov.com
Полимерные канализационные люки: качество и надежность в одном изделии/a>
http://canadianpharm.guru/# canadian pharmacy king reviews
hoki1881
hoki1881
даркнет россия
России, так же и в других государствах, теневая сеть представляет собой участок интернета, недоступенную для регулярного поискавания и просмотра через регулярные поисковики. В противоположность от публичной поверхностной соединения, теневая сеть считается тайным участком интернета, вход к которому часто проводится через эксклюзивные софт, такие как Tor Browser, и неизвестные инфраструктуры, наподобные Tor.
В теневой сети сгруппированы различные источники, включая конференции, рынки, логи и остальные веб-сайты, которые могут быть недоступимы или пресечены в стандартной коммуникации. Здесь возможно найти различные товары и послуги, включая незаконные, такие как наркотики, вооружение, взломанные данные, а также послуги компьютерных взломщиков и другие.
В России скрытая часть интернета как и применяется для пересечения цензуры и мониторинга со стороны сторонних. Некоторые пользователи могут применять его для передачи информацией в обстоятельствах, когда воля слова заблокирована или информационные источники подвергнуты цензуре. Однако, также следует отметить, что в теневой сети имеется много не Законной работы и потенциально опасных условий, включая мошенничество и интернет-преступления
https://indianpharm.shop/# cheapest online pharmacy india
http://canadianpharm.guru/# ed drugs online from canada
aviator oyunu giris: aviator oyna slot – aviator hile
https://podacha-blud.com/
pin up bet: pin up casino guncel giris – pin up aviator
https://gruzchikirabotnik.ru/
Ищете профессиональных грузчиков, которые справятся с любыми задачами быстро и качественно? Наши специалисты обеспечат аккуратную погрузку, транспортировку и разгрузку вашего имущества. Мы гарантируем грузчики на час самара, внимательное отношение к каждой детали и доступные цены на все виды работ.
https://gruzchikibol.ru
aviator oyna 20 tl: aviator mostbet – aviator sinyal hilesi ucretsiz
даркнет запрещён
Покупки в темном интернете: Иллюзии и Реальность
Темный интернет, загадочная секция интернета, привлекает внимание участников своей анонимностью и возможностью возможностью приобрести различные продукты и сервисы без дополнительной информации. Однако, погружение в тот вселенная темных площадок имеет в себе с рядом рисков и сложностей, о чем желательно понимать перед совершением транзакций.
Что значит темный интернет и как оно действует?
Для того, кому не знакомо с этим термином, скрытая часть веба – это часть веба, скрытая от обычных поисковых систем. В темном интернете существуют специальные рынки, где можно найти возможность практически все виды : от запрещённых веществ и боеприпасов и перехваченных учётных записей и поддельных документов.
Иллюзии о заказах в скрытой части веба
Анонимность обеспечена: Хотя, использование технологий анонимности, например Tor, способствует закрыть свою активность в сети, анонимность в Даркнете не является абсолютной. Имеется риск, что может вашу информацию о вас могут обнаружить обманщики или даже сотрудники правоохранительных органов.
Все товары – высокого качества: В скрытой части веба можно наткнуться на множество поставщиков, продающих продукцию и услуги. Однако, нельзя обеспечить качественность или подлинность товара, так как невозможно проверить до заказа.
Легальные покупки без последствий: Многие участники неправильно думают, что приобретая товары в Даркнете, они подвергают себя риску меньшему риску, чем в реальной жизни. Однако, приобретая запрещенные товары или сервисы, вы подвергаете себя наказания.
Реальность сделок в темном интернете
Риски обмана и мошенничества: В темном интернете множество мошенников, готовы к обману недостаточно осторожных пользователей. Они могут предложить поддельные товары или просто исчезнуть, оставив вас без денег.
Опасность легальных органов: Участники скрытой части веба подвергают себя риску к ответственности перед законом за покупку и заказ противозаконных.
Неопределённость исходов: Не все покупки в подпольной сети завершаются благополучно. Качество вещей может оказаться неудовлетворительным, а сам процесс приобретения может оказаться проблематичным.
Советы для безопасных транзакций в темном интернете
Проводите детальный анализ поставщика и услуги перед осуществлением заказа.
Используйте защитные программы и сервисы для обеспечения вашей анонимности и безопасности.
Используйте только безопасные способы оплаты, например, криптовалютами, и избегайте предоставления персональных данных.
Будьте бдительны и очень внимательны во всех выполняемых действиях и принимаемых решениях.
Заключение
Транзакции в скрытой части веба могут быть как увлекательным, так и рискованным опытом. Понимание рисков и применение соответствующих мер предосторожности помогут уменьшить риск негативных последствий и обеспечить безопасность при покупках в этой недоступной области сети.
aviator hilesi ucretsiz: aviator oyunu 100 tl – aviator sinyal hilesi apk
грузчики на заказ
aviator sinyal hilesi: aviator oyunu 20 tl – aviator oyunu 20 tl
услуги грузчиков городу
услуги грузчиков в Нижний Новгород
gates of olympus hilesi: gates of olympus oyna – gates of olympus taktik
https://potreb-prava.com/
aviator oyna 20 tl: aviator oyunu – aviator oyunu
elementor
https://o-okkultizme.com
pin-up casino indir: pin-up online – pin-up bonanza
https://catherineasquithgallery.com
грузчики недорогие
gates of olympus taktik: gates of olympus guncel – gates of olympus 1000 demo
покер онлайн
guncel sweet bonanza: sweet bonanza indir – sweet bonanza oyna
https://pinupgiris.fun/# pin up casino giris
pin-up giris: pin up casino – pin up
https://slotsiteleri.guru/# güvenilir slot siteleri 2024
Предлагаем слуги: https://lit9.ru
, демонтаж фундамента, слом домов.
https://sporty24.site
canadian pharmacy ed medications: Large Selection of Medications – canadian pharmacy review
Услуги грузчиков https://mhpereezd.ru с гарантией!
cheap canadian pharmacy: canadian pharmacy 24 – canadian online drugstore
canadian compounding pharmacy: Licensed Canadian Pharmacy – canadian pharmacy india
mexico pharmacy: mexican border pharmacies shipping to usa – buying prescription drugs in mexico online
medication from mexico pharmacy: cheapest mexico drugs – buying prescription drugs in mexico online
mail order pharmacy india: Healthcare and medicines from India – top online pharmacy india
сеть даркнет
Теневой уровень интернета: запретная территория интернета
Подпольная часть сети, скрытый уголок интернета продолжает вызывать интерес интерес как общественности, так и правоохранительных органов. Этот подпольный слой интернета известен своей анонимностью и возможностью осуществления преступных деяний под маской анонимности.
Сущность подпольной части сети состоит в том, что данный уровень не доступен обычным популярных браузеров. Для доступа к нему необходимы специальные инструменты и программы, обеспечивающие скрытность пользователей. Это вызывает отличную площадку для разнообразных противозаконных операций, среди которых сбыт наркотиков, торговлю огнестрельным оружием, кражу личных данных и другие противоправные действия.
В свете растущую угрозу, некоторые государства приняли законодательные инициативы, задача которых состоит в запрещение доступа к темному интернету и привлечение к ответственности тех, кто совершающих противозаконные действия в этой нелегальной области. Тем не менее, несмотря на предпринятые шаги, борьба с подпольной частью сети представляет собой трудную задачу.
Важно подчеркнуть, что полное прекращение доступа к темному интернету практически невозможно. Даже с введением строгих мер контроля, возможность доступа к данному уровню сети всё ещё возможен с использованием разнообразных технических средств и инструментов, применяемые для обхода ограничений.
Помимо законодательных мер, существуют также инициативы по сотрудничеству между правоохранительными органами и компаниями, работающими в сфере технологий для противодействия незаконным действиям в подпольной части сети. Однако, для успешной борьбы требуется не только техническая сторона, но и совершенствования методов выявления и предотвращения незаконных действий в этой области.
В итоге, несмотря на запреты и усилия в борьбе с незаконными деяниями, подпольная часть сети остается серьезной проблемой, нуждающейся в комплексных подходах и коллективных усилиях со стороны правоохранительных структур, а также технологических организаций.
https://gruzchikinesti.ru/
https://gruzchikibol.ru/
https://gruzchikivagon.ru/
https://gruzchikistudent.ru/
https://gruzchikietazh.ru/
https://gruzchikjob.ru/
https://gruzchikibaza.ru
метрологический центр
https://gruzchikibol.ru
https://gruzchikivrn.ru
https://gruzchikivrn.ru/
Calibration Measuring Equipment For Sale
https://elementor.com/
https://diplom-sdan.ru/
поверка счетчиков калуга
http://kamagraiq.com/# Kamagra 100mg price
https://kamagraiq.shop/# Kamagra 100mg
https://diplomnash.ru/
http://sildenafiliq.com/# viagra canada
https://kursovaya-student.ru/
https://sildenafiliq.xyz/# Sildenafil 100mg price
https://breaking-bad-serial.online/
https://kursovaya-study.ru/
https://kamagraiq.com/# п»їkamagra
http://sildenafiliq.xyz/# sildenafil over the counter
https://kursovaya-pishu.ru/
https://kvartiruise.ru/
http://kamagraiq.com/# super kamagra
https://kvartiruless.ru/
Строительство жилых домов: качественное жилье для вашей семьи
kantorbola
Informasi RTP Live Hari Ini Dari Situs RTPKANTORBOLA
Situs RTPKANTORBOLA merupakan salah satu situs yang menyediakan informasi lengkap mengenai RTP (Return to Player) live hari ini. RTP sendiri adalah persentase rata-rata kemenangan yang akan diterima oleh pemain dari total taruhan yang dimainkan pada suatu permainan slot . Dengan adanya informasi RTP live, para pemain dapat mengukur peluang mereka untuk memenangkan suatu permainan dan membuat keputusan yang lebih cerdas saat bermain.
Situs RTPKANTORBOLA menyediakan informasi RTP live dari berbagai permainan provider slot terkemuka seperti Pragmatic Play , PG Soft , Habanero , IDN Slot , No Limit City dan masih banyak rtp permainan slot yang bisa kami cek di situs RTP Kantorboal . Dengan menyediakan informasi yang akurat dan terpercaya, situs ini menjadi sumber informasi yang penting bagi para pemain judi slot online di Indonesia .
Salah satu keunggulan dari situs RTPKANTORBOLA adalah penyajian informasi yang terupdate secara real-time. Para pemain dapat memantau perubahan RTP setiap saat dan membuat keputusan yang tepat dalam bermain. Selain itu, situs ini juga menyediakan informasi mengenai RTP dari berbagai provider permainan, sehingga para pemain dapat membandingkan dan memilih permainan dengan RTP tertinggi.
Informasi RTP live yang disediakan oleh situs RTPKANTORBOLA juga sangat lengkap dan mendetail. Para pemain dapat melihat RTP dari setiap permainan, baik itu dari aspek permainan itu sendiri maupun dari provider yang menyediakannya. Hal ini sangat membantu para pemain dalam memilih permainan yang sesuai dengan preferensi dan gaya bermain mereka.
Selain itu, situs ini juga menyediakan informasi mengenai RTP live dari berbagai provider judi slot online terpercaya. Dengan begitu, para pemain dapat memilih permainan slot yang memberikan RTP terbaik dan lebih aman dalam bermain. Informasi ini juga membantu para pemain untuk menghindari potensi kerugian dengan bermain pada game slot online dengan RTP rendah .
Situs RTPKANTORBOLA juga memberikan pola dan ulasan mengenai permainan-permainan dengan RTP tertinggi. Para pemain dapat mempelajari strategi dan tips dari para ahli untuk meningkatkan peluang dalam memenangkan permainan. Analisis dan ulasan ini disajikan secara jelas dan mudah dipahami, sehingga dapat diaplikasikan dengan baik oleh para pemain.
Informasi RTP live yang disediakan oleh situs RTPKANTORBOLA juga dapat membantu para pemain dalam mengelola keuangan mereka. Dengan mengetahui RTP dari masing-masing permainan slot , para pemain dapat mengatur taruhan mereka dengan lebih bijak. Hal ini dapat membantu para pemain untuk mengurangi risiko kerugian dan meningkatkan peluang untuk mendapatkan kemenangan yang lebih besar.
Untuk mengakses informasi RTP live dari situs RTPKANTORBOLA, para pemain tidak perlu mendaftar atau membayar biaya apapun. Situs ini dapat diakses secara gratis dan tersedia untuk semua pemain judi online. Dengan begitu, semua orang dapat memanfaatkan informasi yang disediakan oleh situs RTP Kantorbola untuk meningkatkan pengalaman dan peluang mereka dalam bermain judi online.
Demikianlah informasi mengenai RTP live hari ini dari situs RTPKANTORBOLA. Dengan menyediakan informasi yang akurat, terpercaya, dan lengkap, situs ini menjadi sumber informasi yang penting bagi para pemain judi online. Dengan memanfaatkan informasi yang disediakan, para pemain dapat membuat keputusan yang lebih cerdas dan meningkatkan peluang mereka untuk memenangkan permainan. Selamat bermain dan semoga sukses!
kantor bola
Mengenal Situs Gaming Online Terbaik Kantorbola
Kantorbola merupakan situs gaming online terbaik yang menawarkan pengalaman bermain yang seru dan mengasyikkan bagi para pecinta game. Dengan berbagai pilihan game menarik dan grafis yang memukau, Kantorbola menjadi pilihan utama bagi para gamers yang ingin mencari hiburan dan tantangan baru. Dengan layanan customer service yang ramah dan profesional, serta sistem keamanan yang terjamin, Kantorbola siap memberikan pengalaman bermain yang terbaik dan menyenangkan bagi semua membernya. Jadi, tunggu apalagi? Bergabunglah sekarang dan rasakan sensasi seru bermain game di Kantorbola!
Situs kantor bola menyediakan beberapa link alternatif terbaru
Situs kantor bola merupakan salah satu situs gaming online terbaik yang menyediakan berbagai link alternatif terbaru untuk memudahkan para pengguna dalam mengakses situs tersebut. Dengan adanya link alternatif terbaru ini, para pengguna dapat tetap mengakses situs kantor bola meskipun terjadi pemblokiran dari pemerintah atau internet positif. Hal ini tentu menjadi kabar baik bagi para pecinta judi online yang ingin tetap bermain tanpa kendala akses ke situs kantor bola.
Dengan menyediakan beberapa link alternatif terbaru, situs kantor bola juga dapat memberikan variasi akses kepada para pengguna. Hal ini memungkinkan para pengguna untuk memilih link alternatif mana yang paling cepat dan stabil dalam mengakses situs tersebut. Dengan demikian, pengalaman bermain judi online di situs kantor bola akan menjadi lebih lancar dan menyenangkan.
Selain itu, situs kantor bola juga menunjukkan komitmennya dalam memberikan pelayanan terbaik kepada para pengguna dengan menyediakan link alternatif terbaru secara berkala. Dengan begitu, para pengguna tidak perlu khawatir akan kehilangan akses ke situs kantor bola karena selalu ada link alternatif terbaru yang dapat digunakan sebagai backup. Keberadaan link alternatif tersebut juga menunjukkan bahwa situs kantor bola selalu berusaha untuk tetap eksis dan dapat diakses oleh para pengguna setianya.
Secara keseluruhan, kehadiran beberapa link alternatif terbaru dari situs kantor bola merupakan salah satu bentuk komitmen dari situs tersebut dalam memberikan kemudahan dan kenyamanan kepada para pengguna. Dengan adanya link alternatif tersebut, para pengguna dapat terus mengakses situs kantor bola tanpa hambatan apapun. Hal ini tentu akan semakin meningkatkan popularitas situs kantor bola sebagai salah satu situs gaming online terbaik di Indonesia. Berikut beberapa link alternatif dari situs kantorbola , diantaranya .
1. Link Kantorbola77
Link Kantorbola77 merupakan salah satu situs gaming online terbaik yang saat ini banyak diminati oleh para pecinta judi online. Dengan berbagai pilihan permainan yang lengkap dan berkualitas, situs ini mampu memberikan pengalaman bermain yang memuaskan bagi para membernya. Selain itu, Kantorbola77 juga menawarkan berbagai bonus dan promo menarik yang dapat meningkatkan peluang kemenangan para pemain.
Salah satu keunggulan dari Link Kantorbola77 adalah sistem keamanan yang sangat terjamin. Dengan teknologi enkripsi yang canggih, situs ini menjaga data pribadi dan transaksi keuangan para membernya dengan sangat baik. Hal ini membuat para pemain merasa aman dan nyaman saat bermain di Kantorbola77 tanpa perlu khawatir akan adanya kebocoran data atau tindakan kecurangan yang merugikan.
Selain itu, Link Kantorbola77 juga menyediakan layanan pelanggan yang siap membantu para pemain 24 jam non-stop. Tim customer service yang profesional dan responsif siap membantu para member dalam menyelesaikan berbagai kendala atau pertanyaan yang mereka hadapi saat bermain. Dengan layanan yang ramah dan efisien, Kantorbola77 menempatkan kepuasan para pemain sebagai prioritas utama mereka.
Dengan reputasi yang baik dan pengalaman yang telah teruji, Link Kantorbola77 layak untuk menjadi pilihan utama bagi para pecinta judi online. Dengan berbagai keunggulan yang dimilikinya, situs ini memberikan pengalaman bermain yang memuaskan dan menguntungkan bagi para membernya. Jadi, jangan ragu untuk bergabung dan mencoba keberuntungan Anda di Kantorbola77.
2. Link Kantorbola88
Link kantorbola88 adalah salah satu situs gaming online terbaik yang harus dikenal oleh para pecinta judi online. Dengan menyediakan berbagai jenis permainan seperti judi bola, casino, slot online, poker, dan banyak lagi, kantorbola88 menjadi pilihan utama bagi para pemain yang ingin mencoba keberuntungan mereka. Link ini memberikan akses mudah dan cepat untuk para pemain yang ingin bermain tanpa harus repot mencari situs judi online yang terpercaya.
Selain itu, kantorbola88 juga dikenal sebagai situs yang memiliki reputasi baik dalam hal pelayanan dan keamanan. Dengan sistem keamanan yang canggih dan profesional, para pemain dapat bermain tanpa perlu khawatir akan kebocoran data pribadi atau transaksi keuangan mereka. Selain itu, layanan pelanggan yang ramah dan responsif juga membuat pengalaman bermain di kantorbola88 menjadi lebih menyenangkan dan nyaman.
Selain itu, link kantorbola88 juga menawarkan berbagai bonus dan promosi menarik yang dapat dinikmati oleh para pemain. Mulai dari bonus deposit, cashback, hingga bonus referral, semua memberikan kesempatan bagi pemain untuk mendapatkan keuntungan lebih saat bermain di situs ini. Dengan adanya bonus-bonus tersebut, kantorbola88 terus berusaha memberikan yang terbaik bagi para pemainnya agar selalu merasa puas dan senang bermain di situs ini.
Dengan reputasi yang baik, pelayanan yang prima, keamanan yang terjamin, dan bonus yang menggiurkan, link kantorbola88 adalah pilihan yang tepat bagi para pemain judi online yang ingin merasakan pengalaman bermain yang seru dan menguntungkan. Dengan bergabung di situs ini, para pemain dapat merasakan sensasi bermain judi online yang berkualitas dan terpercaya, serta memiliki peluang untuk mendapatkan keuntungan besar. Jadi, jangan ragu untuk mencoba keberuntungan Anda di kantorbola88 dan nikmati pengalaman bermain yang tak terlupakan.
3. Link Kantorbola88
Kantorbola99 merupakan salah satu situs gaming online terbaik yang dapat menjadi pilihan bagi para pecinta judi online. Situs ini menawarkan berbagai permainan menarik seperti judi bola, casino online, slot online, poker, dan masih banyak lagi. Dengan berbagai pilihan permainan yang disediakan, para pemain dapat menikmati pengalaman berjudi yang seru dan mengasyikkan.
Salah satu keunggulan dari Kantorbola99 adalah sistem keamanan yang sangat terjamin. Situs ini menggunakan teknologi enkripsi terbaru untuk melindungi data pribadi dan transaksi keuangan para pemain. Dengan demikian, para pemain bisa bermain dengan tenang tanpa perlu khawatir tentang kebocoran data pribadi atau kecurangan dalam permainan.
Selain itu, Kantorbola99 juga menawarkan berbagai bonus dan promo menarik bagi para pemain setianya. Mulai dari bonus deposit, bonus cashback, hingga bonus referral yang dapat meningkatkan peluang para pemain untuk meraih kemenangan. Dengan adanya bonus dan promo ini, para pemain dapat merasa lebih diuntungkan dan semakin termotivasi untuk bermain di situs ini.
Dengan reputasi yang baik dan pengalaman yang telah terbukti, Kantorbola99 menjadi pilihan yang tepat bagi para pecinta judi online. Dengan pelayanan yang ramah dan responsif, para pemain juga dapat mendapatkan bantuan dan dukungan kapan pun dibutuhkan. Jadi, tidak heran jika Kantorbola99 menjadi salah satu situs gaming online terbaik yang banyak direkomendasikan oleh para pemain judi online.
Promo Terbaik Dari Situs kantorbola
Kantorbola merupakan salah satu situs gaming online terbaik yang menyediakan berbagai jenis permainan menarik seperti judi bola, casino, poker, slots, dan masih banyak lagi. Situs ini telah menjadi pilihan utama bagi para pecinta judi online karena reputasinya yang terpercaya dan kualitas layanannya yang prima. Selain itu, Kantorbola juga seringkali memberikan promo-promo menarik kepada para membernya, salah satunya adalah promo terbaik yang dapat meningkatkan peluang kemenangan para pemain.
Promo terbaik dari situs Kantorbola biasanya berupa bonus deposit, cashback, maupun event-event menarik yang diadakan secara berkala. Dengan adanya promo-promo ini, para pemain memiliki kesempatan untuk mendapatkan keuntungan lebih besar dan juga kesempatan untuk memenangkan hadiah-hadiah menarik. Selain itu, promo-promo ini juga menjadi daya tarik bagi para pemain baru yang ingin mencoba bermain di situs Kantorbola.
Salah satu promo terbaik dari situs Kantorbola yang paling diminati adalah bonus deposit new member sebesar 100%. Dengan bonus ini, para pemain baru bisa mendapatkan tambahan saldo sebesar 100% dari jumlah deposit yang mereka lakukan. Hal ini tentu saja menjadi kesempatan emas bagi para pemain untuk bisa bermain lebih lama dan meningkatkan peluang kemenangan mereka. Selain itu, Kantorbola juga selalu memberikan promo-promo menarik lainnya yang dapat dinikmati oleh semua membernya.
Dengan berbagai promo terbaik yang ditawarkan oleh situs Kantorbola, para pemain memiliki banyak kesempatan untuk meraih kemenangan besar dan mendapatkan pengalaman bermain judi online yang lebih menyenangkan. Jadi, jangan ragu untuk bergabung dan mencoba keberuntungan Anda di situs gaming online terbaik ini. Dapatkan promo-promo menarik dan nikmati berbagai jenis permainan seru hanya di Kantorbola.
Deposit Kilat Di Kantorbola Melalui QRIS
Deposit kilat di Kantorbola melalui QRIS merupakan salah satu fitur yang mempermudah para pemain judi online untuk melakukan transaksi secara cepat dan aman. Dengan menggunakan QRIS, para pemain dapat melakukan deposit dengan mudah tanpa perlu repot mencari nomor rekening atau melakukan transfer manual.
QRIS sendiri merupakan sistem pembayaran digital yang memanfaatkan kode QR untuk memfasilitasi transaksi pembayaran. Dengan menggunakan QRIS, para pemain judi online dapat melakukan deposit hanya dengan melakukan pemindaian kode QR yang tersedia di situs Kantorbola. Proses deposit pun dapat dilakukan dalam waktu yang sangat singkat, sehingga para pemain tidak perlu menunggu lama untuk bisa mulai bermain.
Keunggulan deposit kilat di Kantorbola melalui QRIS adalah kemudahan dan kecepatan transaksi yang ditawarkan. Para pemain judi online tidak perlu lagi repot mencari nomor rekening atau melakukan transfer manual yang memakan waktu. Cukup dengan melakukan pemindaian kode QR, deposit dapat langsung terproses dan saldo akun pemain pun akan langsung bertambah.
Dengan adanya fitur deposit kilat di Kantorbola melalui QRIS, para pemain judi online dapat lebih fokus pada permainan tanpa harus terganggu dengan urusan transaksi. QRIS memungkinkan para pemain untuk melakukan deposit kapan pun dan di mana pun dengan mudah, sehingga pengalaman bermain judi online di Kantorbola menjadi lebih menyenangkan dan praktis.
Dari ulasan mengenai mengenal situs gaming online terbaik Kantorbola, dapat disimpulkan bahwa situs tersebut menawarkan berbagai jenis permainan yang menarik dan populer di kalangan para penggemar game. Dengan tampilan yang menarik dan user-friendly, Kantorbola memberikan pengalaman bermain yang menyenangkan dan memuaskan bagi para pemain. Selain itu, keamanan dan keamanan privasi pengguna juga menjadi prioritas utama dalam situs tersebut sehingga para pemain dapat bermain dengan tenang tanpa perlu khawatir akan data pribadi mereka.
Selain itu, Kantorbola juga memberikan berbagai bonus dan promo menarik bagi para pemain, seperti bonus deposit dan cashback yang dapat meningkatkan keuntungan bermain. Dengan pelayanan customer service yang responsif dan profesional, para pemain juga dapat mendapatkan bantuan yang dibutuhkan dengan cepat dan mudah. Dengan reputasi yang baik dan banyaknya testimonial positif dari para pemain, Kantorbola menjadi pilihan situs gaming online terbaik bagi para pecinta game di Indonesia.
Frequently Asked Question ( FAQ )
A : Apa yang dimaksud dengan Situs Gaming Online Terbaik Kantorbola?
Q : Situs Gaming Online Terbaik Kantorbola adalah platform online yang menyediakan berbagai jenis permainan game yang berkualitas dan menarik untuk dimainkan.
A : Apa saja jenis permainan yang tersedia di Situs Gaming Online Terbaik Kantorbola?
Q : Di Situs Gaming Online Terbaik Kantorbola, anda dapat menemukan berbagai jenis permainan seperti game slot, poker, roulette, blackjack, dan masih banyak lagi.
A : Bagaimana cara mendaftar di Situs Gaming Online Terbaik Kantorbola?
Q : Untuk mendaftar di Situs Gaming Online Terbaik Kantorbola, anda hanya perlu mengakses situs resmi mereka, mengklik tombol “Daftar” dan mengisi formulir pendaftaran yang disediakan.
A : Apakah Situs Gaming Online Terbaik Kantorbola aman digunakan untuk bermain game?
Q : Ya, Situs Gaming Online Terbaik Kantorbola telah memastikan keamanan dan kerahasiaan data para penggunanya dengan menggunakan sistem keamanan terkini.
A : Apakah ada bonus atau promo menarik yang ditawarkan oleh Situs Gaming Online Terbaik Kantorbola?
Q : Tentu saja, Situs Gaming Online Terbaik Kantorbola seringkali menawarkan berbagai bonus dan promo menarik seperti bonus deposit, cashback, dan bonus referral untuk para membernya. Jadi pastikan untuk selalu memeriksa promosi yang sedang berlangsung di situs mereka.
http://canadianpharmgrx.com/# canadadrugpharmacy com
https://kvartirulyspb.ru/
http://mexicanpharmgrx.com/# mexico drug stores pharmacies
отели в сочи
сочи отели у моря
https://kvartiruerspb.ru/
Почему наши сигналы на вход – твой лучший путь:
Наша команда все время в курсе текущих направлений и ситуаций, которые оказывают влияние на криптовалюты. Это способствует группе быстро действовать и подавать свежие сигналы.
Наш коллектив имеет глубинным знание теханализа и умеет выявлять сильные и слабые факторы для присоединения в сделку. Это способствует уменьшению угроз и способствует для растущей прибыли.
Мы внедряем собственные боты для анализа для анализа графиков на все интервалах. Это содействует нам достать всю картину рынка.
Перед опубликованием сигнал в нашем Telegram команда делаем детальную проверку всех фасадов и подтверждаем возможный длинный или шорт. Это подтверждает надежность и качественность наших подач.
Присоединяйтесь к нашей команде к нашему прямо сейчас и получите доступ к проверенным торговым сигналам, которые содействуют вам достичь финансового успеха на рынке криптовалют!
https://t.me/Investsany_bot
https://indianpharmgrx.com/# best india pharmacy
Почему наши сигналы на вход – ваш оптимальный вариант:
Мы 24 часа в сутки в курсе текущих направлений и ситуаций, которые оказывают влияние на криптовалюты. Это позволяет нашей команде сразу реагировать и предоставлять новые сигналы.
Наш коллектив имеет предельным знание теханализа и умеет определять устойчивые и слабые факторы для входа в сделку. Это способствует для снижения потерь и увеличению прибыли.
Вместе с командой мы применяем собственные боты для анализа для анализа графиков на все интервалах. Это помогает нашим специалистам достать всю картину рынка.
Прежде опубликованием подача в нашем Telegram команда осуществляем педантичную проверку все аспектов и подтверждаем допустимый долгий или краткий. Это подтверждает предсказуемость и качественные показатели наших подач.
Присоединяйтесь к нам к нашему Telegram каналу прямо сейчас и получите доступ к проверенным торговым подачам, которые помогут вам вам достичь финансовых результатов на рынке криптовалют!
https://t.me/Investsany_bot
https://canadianpharmgrx.com/# canadianpharmacymeds
https://mexicanpharmgrx.shop/# buying prescription drugs in mexico online
https://zhkstroyspb.ru/
https://promrentgen.ru/
https://zhkstroykaspb.ru/
https://indianpharmgrx.com/# best india pharmacy
https://kvartiruekb.ru/
https://canadianpharmgrx.xyz/# canadian pharmacy meds reviews
http://canadianpharmgrx.com/# canadian valley pharmacy
Почему наши тоговые сигналы – твой лучший выбор:
Наша группа все время на волне текущих тенденций и моментов, которые воздействуют на криптовалюты. Это позволяет нашей команде сразу действовать и подавать новые подачи.
Наш состав владеет профундным знанием анализа и способен определять крепкие и незащищенные поля для входа в сделку. Это способствует минимизации потерь и увеличению прибыли.
Мы внедряем личные боты для анализа данных для просмотра графиков на все периодах времени. Это помогает нам завоевать полноценную картину рынка.
Перед публикацией подача в нашем канале Telegram команда проводим внимательную проверку все аспектов и подтверждаем возможное период долгой торговли или краткий. Это подтверждает верность и качество наших подач.
Присоединяйтесь к нашему Telegram каналу прямо сейчас и получите доступ к подтвержденным торговым подачам, которые содействуют вам добиться успеха в финансах на рынке криптовалют!
https://t.me/Investsany_bot
Итак почему наши сигналы – ваш наилучший выбор:
Мы 24 часа в сутки в курсе текущих направлений и моментов, которые влияют на криптовалюты. Это дает возможность нашей команде сразу реагировать и подавать текущие подачи.
Наш состав имеет глубоким пониманием теханализа и способен выявлять сильные и незащищенные поля для включения в сделку. Это способствует минимизации потерь и способствует для растущей прибыли.
Мы же используем собственные боты анализа для просмотра графиков на всех интервалах. Это содействует нам получить полную картину рынка.
Перед опубликованием подача в нашем канале Telegram команда делаем тщательную проверку всех сторон и подтверждаем допустимый период долгой торговли или краткий. Это гарантирует достоверность и качество наших сигналов.
Присоединяйтесь к нам к нашей группе прямо сейчас и достаньте доступ к подтвержденным торговым сигналам, которые содействуют вам достигнуть успеха в финансах на рынке криптовалют!
https://t.me/Investsany_bot
Итак почему наши сигналы на вход – твой наилучший путь:
Мы 24 часа в сутки в курсе актуальных тенденций и ситуаций, которые влияют на криптовалюты. Это позволяет нам мгновенно реагировать и предоставлять актуальные сигналы.
Наш состав обладает предельным понимание анализа и может выявлять устойчивые и слабые факторы для присоединения в сделку. Это содействует минимизации потерь и способствует для растущей прибыли.
Мы же применяем личные боты анализа для просмотра графиков на всех интервалах. Это способствует нам достать всю картину рынка.
Перед опубликованием сигнал в нашем Telegram команда осуществляем детальную проверку все фасадов и подтверждаем возможный лонг или краткий. Это подтверждает предсказуемость и качество наших сигналов.
Присоединяйтесь к нашему каналу к нашему прямо сейчас и достаньте доступ к подтвержденным торговым подачам, которые помогут вам достигнуть финансового успеха на рынке криптовалют!
https://t.me/Investsany_bot
https://zhknoviydom.ru/
https://zhkkvartiradom.ru/
diflucan pill: purchase diflucan – diflucan.com
Все о современных технологиях
online doxycycline: order doxycycline online – how to buy doxycycline online
https://zhknoviystroi.ru/
JDB demo
JDB demo | The easiest bet software to use (jdb games)
JDB bet marketing: The first bonus that players care about
Most popular player bonus: Daily Play 2000 Rewards
Game developers online who are always with you
#jdbdemo
Where to find the best game developer? https://www.jdbgaming.com/
#gamedeveloperonline #betsoftware #betmarketing
#developerbet #betingsoftware #gamedeveloper
Supports hot jdb demo beting software jdb angry bird
JDB slot demo supports various competition plans
Unlocking Achievement with JDB Gaming: Your Supreme Bet Software Resolution
In the world of online gaming, discovering the appropriate bet software is vital for achievement. Meet JDB Gaming – a premier source of creative gaming strategies designed to boost the gaming experience and drive earnings for operators. With a concentration on easy-to-use interfaces, alluring bonuses, and a wide selection of games, JDB Gaming emerges as a prime choice for both gamers and operators alike.
JDB Demo presents a glimpse into the realm of JDB Gaming, providing players with an chance to experience the thrill of betting without any hazard. With easy-to-use interfaces and effortless navigation, JDB Demo makes it simple for players to discover the vast selection of games available, from classic slots to engaging arcade titles.
When it comes to bonuses, JDB Bet Marketing leads with appealing offers that lure players and hold them returning for more. From the popular Daily Play 2000 Rewards to unique promotions, JDB Bet Marketing makes sure that players are compensated for their loyalty and dedication.
With so several game developers online, locating the best can be a intimidating task. However, JDB Gaming emerges from the pack with its dedication to perfection and innovation. With over 150 online casino games to pick, JDB Gaming offers something for all, whether you’re a fan of slots, fish shooting games, arcade titles, card games, or bingo.
At the core of JDB Gaming lies a commitment to supplying the finest possible gaming experience for players. With a focus on Asian culture and impressive 3D animations, JDB Gaming distinguishes itself as a front runner in the industry. Whether you’re a gamer looking for excitement or an provider in need of a dependable partner, JDB Gaming has you covered.
API Integration: Seamlessly link with all platforms for ultimate business opportunities. Big Data Analysis: Remain ahead of market trends and grasp player habits with comprehensive data analysis. 24/7 Technical Support: Enjoy peace of mind with skilled and trustworthy technical support accessible all day, every day.
In conclusion, JDB Gaming provides a victorious mix of cutting-edge technology, appealing bonuses, and unequaled support. Whether you’re a player or an manager, JDB Gaming has everything you need to excel in the arena of online gaming. So why wait? Join the JDB Gaming group today and unlock your full potential!
Intro
betvisa vietnam
Betvisa vietnam | Grand Prize Breakout!
Betway Highlights | 499,000 Extra Bonus on betvisa com!
Cockfight to win up to 3,888,000 on betvisa game
Daily Deposit, Sunday Bonus on betvisa app 888,000!
#betvisavietnam
200% Bonus on instant deposits—start your win streak!
200% welcome bonus! Slots and Fishing Games
https://www.betvisa.com/
#betvisavietnam #betvisagame #betvisaapp
#betvisacom #betvisacasinoapp
Birthday bash? Up to 1,800,000 in prizes! Enjoy!
Friday Shopping Frenzy betvisa vietnam 100,000 VND!
Betvisa Casino App Daily Login 12% Bonus Up to 1,500,000VND!
Khám phá Thế Giới Cá Cược Trực Tuyến với BetVisa!
Dịch vụ BetVisa, một trong những công ty hàng đầu tại châu Á, được thành lập vào năm 2017 và hoạt động dưới giấy phép của Curacao, đã đưa vào hơn 2 triệu người dùng trên toàn thế giới. Với lời hứa đem đến trải nghiệm cá cược đảm bảo và tin cậy nhất, BetVisa sớm trở thành lựa chọn hàng đầu của người chơi trực tuyến.
BetVisa không dừng lại ở việc cung cấp các trò chơi phong phú như xổ số, sòng bạc trực tiếp, thể thao trực tiếp và thể thao điện tử, mà còn mang đến cho người chơi những ưu đãi hấp dẫn. Thành viên mới đăng ký sẽ được tặng ngay 5 vòng quay miễn phí và có cơ hội giành giải thưởng lớn.
Đặc biệt, BetVisa hỗ trợ nhiều cách thức thanh toán linh hoạt như Betvisa Vietnam, cùng với các ưu đãi độc quyền như thưởng chào mừng lên đến 200%. Bên cạnh đó, hàng tuần còn có các chương trình khuyến mãi độc đáo như chương trình giải thưởng Sinh Nhật và Chủ Nhật Mua Sắm Điên Cuồng, mang đến cho người chơi cơ hội thắng lớn.
Nhờ vào lời hứa về trải nghiệm thú vị cá cược tốt nhất và dịch vụ khách hàng kỹ năng chuyên môn, BetVisa hoàn toàn tự tin là điểm đến lý tưởng cho những ai phấn khích trò chơi trực tuyến. Hãy ghi danh ngay hôm nay và bắt đầu dấu mốc của bạn tại BetVisa – nơi niềm vui và may mắn chính là điều không thể thiếu được.
buy doxycycline online 270 tabs: vibramycin 100 mg – generic doxycycline
Intro
betvisa bangladesh
Betvisa bangladesh | Super Cricket Carnival with Betvisa!
IPL Cricket Mania | Kick off Super Cricket Carnival with bet visa.com
IPL Season | Exclusive 1,50,00,000 only at Betvisa Bangladesh!
Crash Games Heroes | Climb to the top of the 1,00,00,000 bonus pool!
#betvisabangladesh
Preview IPL T20 | Follow Betvisa BD on Facebook, Instagram for awards!
betvisa affiliate Dream Maltese Tour | Sign up now to win the ultimate prize!
https://www.bvthethao.com/
#betvisabangladesh #betvisabd #betvisaaffiliate
#betvisaaffiliatesignup #betvisa.com
Do tính lời hứa về trải nghiệm cá cược hoàn hảo nhất và dịch vụ khách hàng chuyên nghiệp, BetVisa tự hào là điểm đến lý tưởng cho những ai nhiệt huyết trò chơi trực tuyến. Hãy gắn bó ngay hôm nay và bắt đầu cuộc hành trình của bạn tại BetVisa – nơi niềm vui và may mắn chính là điều tất yếu.
Khám phá Thế Giới Cá Cược Trực Tuyến với BetVisa!
BetVisa, một trong những công ty trò chơi hàng đầu tại châu Á, được thành lập vào năm 2017 và hoạt động dưới phê chuẩn của Curacao, đã thu hút hơn 2 triệu người dùng trên toàn thế giới. Với lời hứa đem đến trải nghiệm cá cược đảm bảo và tin cậy nhất, BetVisa nhanh chóng trở thành lựa chọn hàng đầu của người chơi trực tuyến.
BetVisa không dừng lại ở việc cung cấp các trò chơi phong phú như xổ số, sòng bạc trực tiếp, thể thao trực tiếp và thể thao điện tử, mà còn mang đến cho người chơi những ưu đãi hấp dẫn. Thành viên mới đăng ký sẽ được tặng ngay 5 cơ hội miễn phí và có cơ hội giành giải thưởng lớn.
Đặc biệt, BetVisa hỗ trợ nhiều hình thức thanh toán linh hoạt như Betvisa Vietnam, cùng với các ưu đãi độc quyền như thưởng chào mừng lên đến 200%. Bên cạnh đó, hàng tuần còn có các chương trình khuyến mãi độc đáo như chương trình giải thưởng Sinh Nhật và Chủ Nhật Mua Sắm Điên Cuồng, mang đến cho người chơi cơ hội thắng lớn.
buy cytotec pills: Cytotec 200mcg price – buy cytotec online fast delivery
https://noviydomstroika.ru/
purchase cytotec: buy misoprostol over the counter – buy cytotec over the counter
https://reshaitzadachi.ru/
http://grktmn.ru/includes/pages/rasprostran_nnue_oshibki_novichkov_v_stavkah_1xbet_i_kak_ih_izbegat.html
https://reshauzadachi.ru/
order doxycycline online: buy doxycycline – doxycycline 100mg online
rg777
App cá độ:Hướng dẫn tải app cá cược uy tín RG777 đúng cách
Bạn có biết? Tải app cá độ đúng cách sẽ giúp tiết kiệm thời gian đăng nhập, tăng tính an toàn và bảo mật cho tài khoản của bạn! Vậy đâu là cách để tải một app cá cược uy tín dễ dàng và chính xác? Xem ngay bài viết này nếu bạn muốn chơi cá cược trực tuyến an toàn!
tải về ngay lập tức
RG777 – Nhà Cái Uy Tín Hàng Đầu Việt Nam
Link tải app cá độ nét nhất 2023:RG777
Để đảm bảo việc tải ứng dụng cá cược của bạn an toàn và nhanh chóng, người chơi có thể sử dụng đường link sau.
tải về ngay lập tức
Российский производитель продает тренировочные диски на сайте Diski-Dlya-Shtang для напряженной эксплуатации в коммерческих тренажерных клубах и в домашних условиях. Российский завод производит тренировочные блины разного посадочного диаметра и любого востребованного веса для разборных гантелей. Советуем к заказу прорезиненные диски для силовых занятий. Они не скользят, не шумят и менее травматичны. Производимые изделия не нуждаются в постоянном обслуживании и рассчитаны на длительную работу в залах. Реализуем большой каталог тренировочных дисков с разным типом покрытия. Купите веса с подходящей массой и посадочным диаметром по доступным ценам напрямую у отечественного завода.
JDBslot
JDB slot | The first bonus to rock the slot world
Exclusive event to earn real money and slot game points
JDB demo slot games for free = ?? Lucky Spin Lucky Draw!
How to earn reels free 2000? follow jdb slot games for free
#jdbslot
Demo making money : https://jdb777.com
#jdbslot #slotgamesforfree #howtoearnreels #cashreels
#slotgamepoint #demomakingmoney
Cash reels only at slot games for free
More professional jdb game bonus knowledge
Ways to Earn Rotations Credit Free 2000: Your Greatest Guide to Victorious Big with JDB Gaming machines
Are you you set to start on an exhilarating journey into the world of internet slot games? Look no further, simply rotate to JDB777 FreeGames, where thrills and substantial wins expect you at every single rotation of the reel. In this comprehensive handbook, we’ll reveal you how to acquire reels points free 2000 and open the exciting world of JDB slots.
Undergo the Excitement of Machine Games for Free
At JDB777 FreeGames, we offer a vast selection of captivating slot games that are positive to keep you entertained for hours on end. From classic fruit machines to immersive themed slots, there’s something for every sort of player to enjoy. And the best part? You can play all of our slot games for free and achieve real cash prizes!
Unlock Free Cash Reels and Succeed Big
One of the most exhilarating features of JDB777 FreeGames is the opportunity to secure reels credit complimentary 2000, which can be exchanged for real cash. Plainly sign up for an account, and you’ll acquire your costless bonus to start spinning and winning. With our liberal promotions and bonuses, the sky’s the ceiling when it comes to your winnings!
Navigate Strategies and Points System
To maximize your winnings and uncover the complete potential of our slot games, it’s important to apprehend the approaches and points system. Our professional guides will take you through everything you need to know, from selecting the right games to understanding how to secure bonus points and cash prizes.
Exclusive Promotions and Exclusive Offers
As a member of JDB777 FreeGames, you’ll have access to exclusive promotions and special offers that are sure to augment your gaming experience. From welcome bonuses to daily rebates, there are a lot of opportunities to boost your winnings and take your gameplay to the subsequent level.
Join Us Today and Initiate Winning
Don’t miss out on your likelihood to win big with JDB777 FreeGames. Sign up now to claim your gratis bonus of 2000 credits and begin spinning the reels for your likelihood to win real cash prizes. With our exciting range of slot games and generous promotions, the potentialities are endless. Join us today and start winning!
JDB online
JDB online | 2024 best online slot game demo cash
How to earn reels? jdb online accumulate spin get bonus
Hot demo fun: Quick earn bonus for ranking demo
JDB demo for win? JDB reward can be exchanged to real cash
#jdbonline
777 sign up and get free 2,000 cash: https://www.jdb777.io/
#jdbonline #democash #demofun #777signup
#rankingdemo #demoforwin
2000 cash: Enter email to verify, enter verify, claim jdb bonus
Play with JDB games an online platform in every countries.
Enjoy the Delight of Gaming!
Costless to Join, Gratis to Play.
Enroll and Receive a Bonus!
JOIN NOW AND GET 2000?
We encourage you to acquire a demo amusing welcome bonus for all new members! Plus, there are other particular promotions waiting for you!
Get more information
JDB – NO COST TO JOIN
Simple to play, real profit
Take part in JDB today and indulge in fantastic games without any investment! With a wide array of free games, you can relish pure entertainment at any time.
Speedy play, quick join
Treasure your time and opt for JDB’s swift games. Just a few easy steps and you’re set for an amazing gaming experience!
Join now and make money
Experience JDB: Instant play with no investment and the opportunity to win cash. Designed for effortless and lucrative play.
Plunge into the Universe of Online Gaming Adventure with Fun Slots Online!
Are you prepared to encounter the sensation of online gaming like never before? Scour no further than Fun Slots Online, your ultimate hub for thrilling gameplay, endless entertainment, and exciting winning opportunities!
At Fun Slots Online, we take pride ourselves on presenting a wide range of enthralling games designed to retain you engaged and amused for hours on end. From classic slot machines to innovative new releases, there’s something for each person to savor. Plus, with our user-friendly interface and effortless gameplay experience, you’ll have no trouble immersing straight into the thrill and delighting in every moment.
But that’s not all – we also present a assortment of exclusive promotions and bonuses to reward our loyal players. From introductory bonuses for new members to select rewards for our top players, there’s always something thrilling happening at Fun Slots Online. And with our safe payment system and 24-hour customer support, you can experience peace of mind conscious that you’re in good hands every step of the way.
So why wait? Enroll Fun Slots Online today and initiate your trip towards thrilling victories and jaw-dropping prizes. Whether you’re a seasoned gamer or just starting out, there’s never been a better time to engage in the fun and excitement at Fun Slots Online. Sign up now and let the games begin!
cytotec pills buy online: cytotec pills online – purchase cytotec
круизные маршруты
Intro
betvisa bangladesh
Betvisa bangladesh | Super Cricket Carnival with Betvisa!
IPL Cricket Mania | Kick off Super Cricket Carnival with bet visa.com
IPL Season | Exclusive 1,50,00,000 only at Betvisa Bangladesh!
Crash Games Heroes | Climb to the top of the 1,00,00,000 bonus pool!
#betvisabangladesh
Preview IPL T20 | Follow Betvisa BD on Facebook, Instagram for awards!
betvisa affiliate Dream Maltese Tour | Sign up now to win the ultimate prize!
https://www.bvthethao.com/
#betvisabangladesh #betvisabd #betvisaaffiliate
#betvisaaffiliatesignup #betvisa.com
Với tính lời hứa về trải nghiệm thú vị cá cược tốt hơn nhất và dịch vụ khách hàng chuyên trách, BetVisa tự tin là điểm đến lý tưởng cho những ai phấn khích trò chơi trực tuyến. Hãy gắn bó ngay hôm nay và bắt đầu chuyến đi của bạn tại BetVisa – nơi niềm vui và may mắn chính là điều tất yếu.
Khám phá Thế Giới Cá Cược Trực Tuyến với BetVisa!
Dịch vụ BetVisa, một trong những công ty trò chơi hàng đầu tại châu Á, ra đời vào năm 2017 và hoạt động dưới giấy phép của Curacao, đã đưa vào hơn 2 triệu người dùng trên toàn thế giới. Với cam kết đem đến trải nghiệm cá cược an toàn và tin cậy nhất, BetVisa sớm trở thành lựa chọn hàng đầu của người chơi trực tuyến.
BetVisa không chỉ cung cấp các trò chơi phong phú như xổ số, sòng bạc trực tiếp, thể thao trực tiếp và thể thao điện tử, mà còn mang đến cho người chơi những ưu đãi hấp dẫn. Thành viên mới đăng ký sẽ được tặng ngay 5 vòng quay miễn phí và có cơ hội giành giải thưởng lớn.
Đặc biệt, BetVisa hỗ trợ nhiều hình thức thanh toán linh hoạt như Betvisa Vietnam, cùng với các ưu đãi độc quyền như thưởng chào mừng lên đến 200%. Bên cạnh đó, hàng tuần còn có các chương trình khuyến mãi độc đáo như chương trình giải thưởng Sinh Nhật và Chủ Nhật Mua Sắm Điên Cuồng, mang đến cho người chơi cơ hội thắng lớn.
cipro ciprofloxacin: ciprofloxacin 500mg buy online – buy ciprofloxacin
Intro
betvisa philippines
Betvisa philippines | The Filipino Carnival, Spinning for Treasures!
Betvisa Philippines Surprises | Spin daily and win ₱8,888 Grand Prize!
Register for a chance to win ₱8,888 Bonus Tickets! Explore Betvisa.com!
Wild All Over Grab 58% YB Bonus at Betvisa Casino! Take the challenge!
#betvisaphilippines
Get 88 on your first 50 Experience Betvisa Online’s Bonus Gift!
Weekend Instant Daily Recharge at betvisa.com
https://www.88betvisa.com/
#betvisaphilippines #betvisaonline #betvisacasino
#betvisacom #betvisa.com
Dịch vụ – Điểm Đến Tuyệt Vời Cho Người Chơi Trực Tuyến
Khám Phá Thế Giới Cá Cược Trực Tuyến với BetVisa!
Dịch vụ được sáng lập vào năm 2017 và vận hành theo bằng trò chơi Curacao với hơn 2 triệu người dùng. Với cam kết đem đến trải nghiệm cá cược chắc chắn và tin cậy nhất, BetVisa nhanh chóng trở thành lựa chọn hàng đầu của người chơi trực tuyến.
Cổng chơi không chỉ cung cấp các trò chơi phong phú như xổ số, sòng bạc trực tiếp, thể thao trực tiếp và thể thao điện tử, mà còn mang lại cho người chơi những ưu đãi hấp dẫn. Thành viên mới đăng ký sẽ nhận tặng ngay 5 vòng quay miễn phí và có cơ hội giành giải thưởng lớn.
Nền tảng cá cược hỗ trợ nhiều cách thức thanh toán linh hoạt như Betvisa Vietnam, cùng với các ưu đãi độc quyền như thưởng chào mừng lên đến 200%. Bên cạnh đó, hàng tuần còn có các chương trình khuyến mãi độc đáo như chương trình giải thưởng Sinh Nhật và Chủ Nhật Mua Sắm Điên Cuồng, mang lại cho người chơi thời cơ thắng lớn.
Với sự cam kết về trải nghiệm cá cược tốt nhất và dịch vụ khách hàng chất lượng, BetVisa tự tin là điểm đến lý tưởng cho những ai đam mê trò chơi trực tuyến. Hãy đăng ký ngay hôm nay và bắt đầu hành trình của bạn tại BetVisa – nơi niềm vui và may mắn chính là điều tất yếu!
robot88
buy cytotec over the counter: cytotec abortion pill – buy cytotec pills
https://t.me/SecureIyContactingClAbot
prednisone buying: buy prednisone 40 mg – prednisone 20 mg prices
https://kursovajaskill.ru
JDB demo
JDB demo | The easiest bet software to use (jdb games)
JDB bet marketing: The first bonus that players care about
Most popular player bonus: Daily Play 2000 Rewards
Game developers online who are always with you
#jdbdemo
Where to find the best game developer? https://www.jdbgaming.com/
#gamedeveloperonline #betsoftware #betmarketing
#developerbet #betingsoftware #gamedeveloper
Supports hot jdb demo beting software jdb angry bird
JDB slot demo supports various competition plans
Revealing Success with JDB Gaming: Your Paramount Bet Software Answer
In the universe of digital gaming, finding the appropriate bet software is critical for achievement. Enter JDB Gaming – a foremost source of revolutionary gaming strategies crafted to improve the gaming experience and boost profits for operators. With a concentration on user-friendly interfaces, alluring bonuses, and a diverse array of games, JDB Gaming emerges as a leading choice for both players and operators alike.
JDB Demo presents a glimpse into the world of JDB Gaming, giving players with an opportunity to experience the excitement of betting without any danger. With simple interfaces and smooth navigation, JDB Demo allows it straightforward for players to discover the extensive selection of games available, from classic slots to captivating arcade titles.
When it comes to bonuses, JDB Bet Marketing paves the way with appealing offers that draw players and hold them returning for more. From the well-liked Daily Play 2000 Rewards to special promotions, JDB Bet Marketing guarantees that players are compensated for their allegiance and dedication.
With so several game developers online, identifying the best can be a daunting task. However, JDB Gaming stands out from the pack with its commitment to excellence and innovation. With over 150 online casino games to choose from, JDB Gaming offers something for everyone, whether you’re a fan of slots, fish shooting games, arcade titles, card games, or bingo.
At the center of JDB Gaming lies a commitment to providing the finest possible gaming experience for players. With a concentration on Asian culture and impressive 3D animations, JDB Gaming distinguishes itself as a front runner in the industry. Whether you’re a player seeking excitement or an operator in need of a trustworthy partner, JDB Gaming has you covered.
API Integration: Smoothly integrate with all platforms for ultimate business opportunities. Big Data Analysis: Remain ahead of market trends and comprehend player habits with comprehensive data analysis. 24/7 Technical Support: Experience peace of mind with skilled and trustworthy technical support on hand 24/7.
In conclusion, JDB Gaming offers a successful combination of advanced technology, alluring bonuses, and unmatched support. Whether you’re a gamer or an operator, JDB Gaming has all the things you need to excel in the arena of online gaming. So why wait? Join the JDB Gaming group today and unleash your full potential!
ivermectin canada: price of stromectol – stromectol generic name
JDBslot
JDB slot | The first bonus to rock the slot world
Exclusive event to earn real money and slot game points
JDB demo slot games for free = ?? Lucky Spin Lucky Draw!
How to earn reels free 2000? follow jdb slot games for free
#jdbslot
Demo making money : https://jdb777.com
#jdbslot #slotgamesforfree #howtoearnreels #cashreels
#slotgamepoint #demomakingmoney
Cash reels only at slot games for free
More professional jdb game bonus knowledge
How to Secure Spins Points Gratis 2000: Your Supreme Guide to Victorious Huge with JDB One-armed bandits
Are you ready to embark on an electrifying journey into the world of web slot games? Seek no additional, just twist to JDB777 FreeGames, where thrills and significant wins anticipate you at every single twist of the reel. In this all-encompassing manual, we’ll present you ways to earn reels points costless 2000 and release the exhilarating world of JDB slots.
Feel the Thrill of Slot Games for Free
At JDB777 FreeGames, we present a wide choice of captivating slot games that are sure to keep you entertained for hours on end. From timeless fruit machines to immersive themed slots, there’s something for each type of player to enjoy. And the best part? You can play all of our slot games for free and achieve real cash prizes!
Open Free Cash Reels and Attain Big
One of the most exciting features of JDB777 FreeGames is the chance to gain reels points costless 2000, which can be exchanged for real cash. Just sign up for an account, and you’ll get your costless bonus to initiate spinning and winning. With our plentiful promotions and bonuses, the sky’s the boundary when it comes to your winnings!
Steer Approaches and Points System
To optimize your winnings and uncover the full potential of our slot games, it’s vital to apprehend the tactics and points system. Our skilled guides will take you through everything you need to have to know, from selecting the right games to grasping how to gain bonus points and cash prizes.
Exclusive Promotions and Exclusive Offers
As a member of JDB777 FreeGames, you’ll have access to exclusive promotions and special offers that are sure to enhance your gaming experience. From welcome bonuses to daily rebates, there are a great deal of possibilities to improve your winnings and take your gameplay to the next level.
Join Us Today and Initiate Winning
Don’t miss out on your opportunity to win big with JDB777 FreeGames. Sign up now to assert your free bonus of 2000 credits and initiate spinning the reels for your possibility to win real cash prizes. With our stimulating variety of slot games and generous promotions, the possibilities are endless. Join us today and commence winning!
Услуга по сносу старых домов и вывозу мусора в Москве и Московской области. Мы предоставляем услуги по сносу старых зданий и удалению мусора на территории Москвы и Подмосковья. Услуга http://demontazh-doma-msk5.ru выполняется опытными специалистами в течение 24 часов после оформления заказа. Перед началом работ наш эксперт бесплатно приезжает на объект для оценки объёма работ и консультации. Чтобы получить дополнительную информацию и рассчитать стоимость услуг, свяжитесь с нами по телефону или оставьте заявку на сайте компании.
Intro
betvisa philippines
Betvisa philippines | The Filipino Carnival, Spinning for Treasures!
Betvisa Philippines Surprises | Spin daily and win ₱8,888 Grand Prize!
Register for a chance to win ₱8,888 Bonus Tickets! Explore Betvisa.com!
Wild All Over Grab 58% YB Bonus at Betvisa Casino! Take the challenge!
#betvisaphilippines
Get 88 on your first 50 Experience Betvisa Online’s Bonus Gift!
Weekend Instant Daily Recharge at betvisa.com
https://www.88betvisa.com/
#betvisaphilippines #betvisaonline #betvisacasino
#betvisacom #betvisa.com
Nền tảng cá cược – Điểm Đến Tuyệt Vời Cho Người Chơi Trực Tuyến
Khám Phá Thế Giới Cá Cược Trực Tuyến với BetVisa!
Dịch vụ được tạo ra vào năm 2017 và hoạt động theo bằng trò chơi Curacao với hơn 2 triệu người dùng. Với tính cam kết đem đến trải nghiệm cá cược an toàn và tin cậy nhất, BetVisa nhanh chóng trở thành lựa chọn hàng đầu của người chơi trực tuyến.
BetVisa không chỉ đưa ra các trò chơi phong phú như xổ số, sòng bạc trực tiếp, thể thao trực tiếp và thể thao điện tử, mà còn mang lại cho người chơi những phần thưởng hấp dẫn. Thành viên mới đăng ký sẽ được tặng ngay 5 vòng quay miễn phí và có cơ hội giành giải thưởng lớn.
Dịch vụ hỗ trợ nhiều hình thức thanh toán linh hoạt như Betvisa Vietnam, bên cạnh các ưu đãi độc quyền như thưởng chào mừng lên đến 200%. Bên cạnh đó, hàng tuần còn có chương trình ưu đãi độc đáo như chương trình giải thưởng Sinh Nhật và Chủ Nhật Mua Sắm Điên Cuồng, mang lại cho người chơi cơ hội thắng lớn.
Với tính cam kết về trải nghiệm cá cược tốt nhất và dịch vụ khách hàng chất lượng, BetVisa tự tin là điểm đến lý tưởng cho những ai đam mê trò chơi trực tuyến. Hãy đăng ký ngay hôm nay và bắt đầu hành trình của bạn tại BetVisa – nơi niềm vui và may mắn chính là điều tất yếu!
can i order clomid pill: how can i get generic clomid for sale – order clomid without a prescription
Услуга по сносу старых домов и утилизации мусора в Москве и Московской области. Мы предлагаем услуги по сносу старых построек и удалению отходов на территории Москвы и Московской области. Услуга http://demontazh-doma-msk6.ru/ предоставляется опытными специалистами в течение 24 часов после оформления заказа. Перед началом работ наш эксперт бесплатно посещает объект для определения объёма работ и предоставления консультаций. Чтобы получить дополнительную информацию и рассчитать стоимость услуг, свяжитесь с нами по телефону или оставьте заявку на веб-сайте компании.
can i get clomid no prescription: can i purchase generic clomid pill – can i order clomid pill
круизы из стамбула
круизы из измира
how to buy zithromax online: zithromax for sale us – buy generic zithromax online
http://medicationnoprescription.pro/# online doctor prescription canada
Услуга по сносу старых зданий и утилизации отходов в Москве и Московской области. Мы предоставляем услуги по сносу старых сооружений и удалению мусора на территории Москвы и Московской области. Услуга демонтаж фундамента выполняется квалифицированными специалистами в течение 24 часов после оформления заказа. Перед началом работ наш эксперт бесплатно посещает объект для определения объёма работ и предоставления консультаций. Чтобы получить дополнительную информацию и рассчитать стоимость услуг, свяжитесь с нами по телефону или оставьте заявку на сайте компании.
Jeetwin Affiliate
Jeetwin Affiliate
Join Jeetwin now! | Jeetwin sign up for a ?500 free bonus
Spin & fish with Jeetwin club! | 200% welcome bonus
Bet on horse racing, get a 50% bonus! | Deposit at Jeetwin live for rewards
#JeetwinAffiliate
Casino table fun at Jeetwin casino login | 50% deposit bonus on table games
Earn Jeetwin points and credits, enhance your play!
https://www.jeetwin-affiliate.com/hi
#JeetwinAffiliate #jeetwinclub #jeetwinsignup #jeetwinresult
#jeetwinlive #jeetwinbangladesh #jeetwincasinologin
Daily recharge bonuses at Jeetwin Bangladesh!
25% recharge bonus on casino games at jeetwin result
15% bonus on Crash Games with Jeetwin affiliate!
Twist to Achieve Real Cash and Gift Certificates with JeetWin’s Affiliate Scheme
Are you a supporter of web-based gaming? Are you enjoy the adrenaline rush of turning the roulette wheel and winning big-time? If so, consequently the JeetWin’s Affiliate Scheme is ideal for you! With JeetWin Casino, you not merely get to enjoy stimulating games but also have the opportunity to make genuine currency and gift cards easily by publicizing the platform to your friends, family, or internet audience.
How Does Function?
Signing up for the JeetWin’s Referral Program is speedy and effortless. Once you transform into an member, you’ll receive a distinctive referral link that you can share with others. Every time someone joins or makes a deposit using your referral link, you’ll obtain a commission for their activity.
Amazing Bonuses Await!
As a JeetWin affiliate, you’ll have access to a assortment of captivating bonuses:
500 Sign-Up Bonus: Receive a generous sign-up bonus of INR 500 just for joining the program.
Deposit Match Bonus: Get a enormous 200% bonus when you fund and play slot and fish games on the platform.
Endless Referral Bonus: Acquire unlimited INR 200 bonuses and cash rebates for every friend you invite to play on JeetWin.
Entertaining Games to Play
JeetWin offers a diverse range of the most played and most popular games, including Baccarat, Dice, Liveshow, Slot, Fishing, and Sabong. Whether you’re a fan of classic casino games or prefer something more modern and interactive, JeetWin has something for everyone.
Participate in the Best Gaming Experience
With JeetWin Live, you can enhance your gaming experience to the next level. Take part in thrilling live games such as Lightning Roulette, Lightning Dice, Crazytime, and more. Sign up today and commence an unforgettable gaming adventure filled with excitement and limitless opportunities to win.
Easy Payment Methods
Depositing funds and withdrawing your winnings on JeetWin is speedy and hassle-free. Choose from a selection of payment methods, including E-Wallets, Net Banking, AstroPay, and RupeeO, for seamless transactions.
Don’t Pass Up on Exclusive Promotions
As a JeetWin affiliate, you’ll receive access to exclusive promotions and special offers designed to maximize your earnings. From cash rebates to lucrative bonuses, there’s always something exciting happening at JeetWin.
Get the Mobile Application
Take the fun with you wherever you go by downloading the JeetWin Mobile Casino App. Available for both iOS and Android devices, the app features a wide range of entertaining games that you can enjoy anytime, anywhere.
Join the JeetWin’s Referral Program Today!
Don’t wait any longer to start earning real cash and exciting rewards with the JeetWin Affiliate Program. Sign up now and be a member of the thriving online gaming community at JeetWin.
https://kursovuyupishem.ru/
http://edpill.top/# cheapest ed treatment
Jeetwin Affiliate
Jeetwin Affiliate
Join Jeetwin now! | Jeetwin sign up for a ?500 free bonus
Spin & fish with Jeetwin club! | 200% welcome bonus
Bet on horse racing, get a 50% bonus! | Deposit at Jeetwin live for rewards
#JeetwinAffiliate
Casino table fun at Jeetwin casino login | 50% deposit bonus on table games
Earn Jeetwin points and credits, enhance your play!
https://www.jeetwin-affiliate.com/hi
#JeetwinAffiliate #jeetwinclub #jeetwinsignup #jeetwinresult
#jeetwinlive #jeetwinbangladesh #jeetwincasinologin
Daily recharge bonuses at Jeetwin Bangladesh!
25% recharge bonus on casino games at jeetwin result
15% bonus on Crash Games with Jeetwin affiliate!
Twist to Gain Genuine Currency and Voucher Codes with JeetWin’s Partner Program
Do you a enthusiast of online gaming? Do you really appreciate the sensation of rotating the roulette wheel and triumphing big? If so, therefore the JeetWin’s Partner Program is perfect for you! With JeetWin Gaming, you not just get to experience enthralling games but additionally have the opportunity to make authentic funds and voucher codes easily by marketing the platform to your friends, family, or internet audience.
How Is it Perform?
Signing up for the JeetWin’s Referral Program is speedy and straightforward. Once you turn into an partner, you’ll get a distinctive referral link that you can share with others. Every time someone joins or makes a deposit using your referral link, you’ll get a commission for their activity.
Fantastic Bonuses Await!
As a JeetWin affiliate, you’ll have access to a selection of attractive bonuses:
Sign Up Bonus 500: Get a liberal sign-up bonus of INR 500 just for joining the program.
Deposit Bonus: Receive a massive 200% bonus when you fund and play slot and fish games on the platform.
Unlimited Referral Bonus: Earn unlimited INR 200 bonuses and cash rebates for every friend you invite to play on JeetWin.
Thrilling Games to Play
JeetWin offers a wide selection of the most played and most popular games, including Baccarat, Dice, Liveshow, Slot, Fishing, and Sabong. Whether you’re a fan of classic casino games or prefer something more modern and interactive, JeetWin has something for everyone.
Take part in the Supreme Gaming Experience
With JeetWin Live, you can bring your gaming experience to the next level. Participate in thrilling live games such as Lightning Roulette, Lightning Dice, Crazytime, and more. Sign up today and commence an unforgettable gaming adventure filled with excitement and limitless opportunities to win.
Easy Payment Methods
Depositing funds and withdrawing your winnings on JeetWin is speedy and hassle-free. Choose from a range of payment methods, including E-Wallets, Net Banking, AstroPay, and RupeeO, for seamless transactions.
Don’t Overlook on Exclusive Promotions
As a JeetWin affiliate, you’ll gain access to exclusive promotions and special offers designed to maximize your earnings. From cash rebates to lucrative bonuses, there’s always something exciting happening at JeetWin.
Get the Mobile App
Take the fun with you wherever you go by downloading the JeetWin Mobile Casino App. Available for both iOS and Android devices, the app features a wide range of entertaining games that you can enjoy anytime, anywhere.
Sign up for the JeetWin’s Referral Program Today!
Don’t wait any longer to start earning real cash and exciting rewards with the JeetWin Affiliate Program. Sign up now and be a member of the thriving online gaming community at JeetWin.
Jeetwin Affiliate
Jeetwin Affiliate
Join Jeetwin now! | Jeetwin sign up for a ?500 free bonus
Spin & fish with Jeetwin club! | 200% welcome bonus
Bet on horse racing, get a 50% bonus! | Deposit at Jeetwin live for rewards
#JeetwinAffiliate
Casino table fun at Jeetwin casino login | 50% deposit bonus on table games
Earn Jeetwin points and credits, enhance your play!
https://www.jeetwin-affiliate.com/hi
#JeetwinAffiliate #jeetwinclub #jeetwinsignup #jeetwinresult
#jeetwinlive #jeetwinbangladesh #jeetwincasinologin
Daily recharge bonuses at Jeetwin Bangladesh!
25% recharge bonus on casino games at jeetwin result
15% bonus on Crash Games with Jeetwin affiliate!
Spin to Earn Real Cash and Gift Cards with JeetWin Affiliate Program
Are you a devotee of web-based gaming? Are you appreciate the excitement of spinning the wheel and triumphing large? If so, then the JeetWin’s Partner Program is ideal for you! With JeetWin Casino, you not just get to experience enthralling games but also have the likelihood to generate actual money and gift cards plainly by marketing the platform to your friends, family, or internet audience.
How Does it Work?
Registering for the JeetWin’s Partner Program is quick and simple. Once you become an partner, you’ll acquire a special referral link that you can share with others. Every time someone registers or makes a deposit using your referral link, you’ll earn a commission for their activity.
Fantastic Bonuses Await!
As a member of JeetWin’s affiliate program, you’ll have access to a assortment of appealing bonuses:
Sign Up Bonus 500: Receive a generous sign-up bonus of INR 500 just for joining the program.
Deposit Match Bonus: Take advantage of a huge 200% bonus when you fund and play fruit machine and fish games on the platform.
Endless Referral Bonus: Acquire unlimited INR 200 bonuses and rebates for every friend you invite to play on JeetWin.
Exciting Games to Play
JeetWin offers a wide selection of the most played and most popular games, including Baccarat, Dice, Liveshow, Slot, Fishing, and Sabong. Whether you’re a fan of classic casino games or prefer something more modern and interactive, JeetWin has something for everyone.
Join the Supreme Gaming Experience
With JeetWin Live, you can enhance your gaming experience to the next level. Participate in thrilling live games such as Lightning Roulette, Lightning Dice, Crazytime, and more. Sign up today and embark on an unforgettable gaming adventure filled with excitement and limitless opportunities to win.
Simple Payment Methods
Depositing funds and withdrawing your winnings on JeetWin is speedy and hassle-free. Choose from a selection of payment methods, including E-Wallets, Net Banking, AstroPay, and RupeeO, for seamless transactions.
Don’t Lose on Special Promotions
As a JeetWin affiliate, you’ll receive access to exclusive promotions and special offers designed to maximize your earnings. From cash rebates to lucrative bonuses, there’s always something exciting happening at JeetWin.
Download the Mobile App
Take the fun with you wherever you go by downloading the JeetWin Mobile Casino App. Available for both iOS and Android devices, the app features a wide range of entertaining games that you can enjoy anytime, anywhere.
Enroll in the JeetWin’s Partner Program Today!
Don’t wait any longer to start earning real cash and exciting rewards with the JeetWin Affiliate Program. Sign up now and join the thriving online gaming community at JeetWin.
http://onlinepharmacyworld.shop/# canada drugs coupon code
http://medicationnoprescription.pro/# online pharmacies no prescription usa
https://edpill.top/# ed doctor online
choi casino tr?c tuy?n trên di?n tho?i: casino online uy tín – casino tr?c tuy?n vi?t nam
Журнал для женщин http://womangu.ru/ – актуальные новости о звездах и шоу-бизнесе, модные тенденции, статьи об отношениях, красоте и здоровье, рецепты и каталог диет на женском портале.
Качественное написание рефератов https://referatnovy.ru/, курсовых и дипломных работ от лучших авторов. Уникальные работы под ключ. Заказать студенческую работу за 2 дня.
Написание дипломных работ https://diplompishem.ru/, курсовых и рефератов от лучших авторов. Заказать студенческую работу с антиплагиатом и уникализацией.
суши чехов
я уже смотрел обзор здесь https://my-obzor.com/ перед тем, как сделать заказ. Не сказать, что все отзывы были 100% положительные, там уже упоминались основные минусы и плюсы
Все о дизайне интерьера
круиз из сочи в турцию цена
https://virtual-local-numbers.com/virtualnumber/virtual-sms-number.html
https://petroyalportrait.com/
я уже смотрел обзор здесь https://my-obzor.com/ перед тем, как сделать заказ. Не сказать, что все отзывы были 100% положительные, там уже упоминались основные минусы и плюсы.
купить мебель
https://seostrategia.ru/
відеограф комо
賭網
Закажите SEO продвижение сайта https://seo116.ru/ в Яндекс и Google под ключ в Москве и по всей России от экспертов. Увеличение трафика, рост клиентов, онлайн поддержка. Комплексное продвижение сайтов с гарантией!
Всё о радиаторах отопления https://heat-komfort.ru/ – выбор радиатора, монтаж, обслуживание.
Всё о радиаторах отопления https://heat-komfort.ru/ – выбор радиатора, монтаж, обслуживание.
https://www.deviantart.com/rentcarfy
Understanding COSC Certification and Its Importance in Horology
COSC Validation and its Demanding Standards
Controle Officiel Suisse des Chronometres, or the Controle Officiel Suisse des Chronometres, is the official Switzerland testing agency that attests to the accuracy and precision of wristwatches. COSC accreditation is a sign of excellent craftsmanship and reliability in chronometry. Not all watch brands follow COSC accreditation, such as Hublot, which instead sticks to its proprietary stringent criteria with movements like the UNICO calibre, reaching comparable precision.
The Science of Exact Timekeeping
The central system of a mechanical timepiece involves the spring, which provides power as it loosens. This system, however, can be susceptible to environmental factors that may influence its precision. COSC-certified mechanisms undergo rigorous testing—over 15 days in various circumstances (five positions, three temperatures)—to ensure their durability and dependability. The tests evaluate:
Average daily rate precision between -4 and +6 secs.
Mean variation, maximum variation rates, and effects of thermal changes.
Why COSC Certification Matters
For watch aficionados and connoisseurs, a COSC-accredited timepiece isn’t just a piece of technology but a demonstration to lasting quality and accuracy. It signifies a timepiece that:
Presents exceptional reliability and accuracy.
Ensures guarantee of quality across the entire design of the watch.
Is likely to maintain its value more effectively, making it a smart choice.
Famous Timepiece Brands
Several renowned brands prioritize COSC accreditation for their timepieces, including Rolex, Omega, Breitling, and Longines, among others. Longines, for instance, offers collections like the Record and Spirit, which showcase COSC-accredited mechanisms equipped with innovative substances like silicon balance springs to boost durability and performance.
Historical Context and the Evolution of Chronometers
The concept of the chronometer originates back to the requirement for exact timekeeping for navigation at sea, highlighted by John Harrison’s work in the 18th century. Since the formal foundation of Controle Officiel Suisse des Chronometres in 1973, the certification has become a benchmark for evaluating the accuracy of high-end timepieces, continuing a legacy of excellence in horology.
Conclusion
Owning a COSC-accredited timepiece is more than an aesthetic selection; it’s a dedication to quality and accuracy. For those valuing accuracy above all, the COSC certification offers tranquility of thoughts, guaranteeing that each accredited timepiece will operate reliably under various circumstances. Whether for personal satisfaction or as an investment decision, COSC-validated watches distinguish themselves in the world of watchmaking, bearing on a tradition of precise timekeeping.
Как выбрать дренажную помпу: руководство по выбору оптимального решения
casibom giriş
Son Zamanın En Büyük Gözde Casino Sitesi: Casibom
Casino oyunlarını sevenlerin artık duymuş olduğu Casibom, nihai dönemde adından genellikle söz ettiren bir bahis ve oyun web sitesi haline geldi. Ülkemizdeki en mükemmel bahis web sitelerinden biri olarak tanınan Casibom’un haftalık bazda göre değişen erişim adresi, sektörde oldukça yeni olmasına rağmen itimat edilir ve kar getiren bir platform olarak tanınıyor.
Casibom, yakın rekabeti olanları geride kalarak eski bahis platformların üstünlük sağlamayı başarmayı sürdürüyor. Bu sektörde uzun soluklu olmak önemlidir olsa da, katılımcılarla iletişimde bulunmak ve onlara erişmek da benzer kadar değerli. Bu durumda, Casibom’un 7/24 servis veren gerçek zamanlı destek ekibi ile rahatlıkla iletişime temas kurulabilir olması önemli bir artı sağlıyor.
Süratle artan oyuncuların kitlesi ile dikkat çekici Casibom’un arkasındaki başarım faktörleri arasında, yalnızca bahis ve canlı casino oyunlarıyla sınırlı olmayan geniş bir hizmetler yelpazesi bulunuyor. Sporcular bahislerinde sunduğu kapsamlı seçenekler ve yüksek oranlar, oyuncuları ilgisini çekmeyi başarılı oluyor.
Ayrıca, hem sporcular bahisleri hem de kumarhane oyunlar katılımcılara yönlendirilen sunulan yüksek yüzdeli avantajlı ödüller da dikkat çekiyor. Bu nedenle, Casibom hızla alanında iyi bir reklam başarısı elde ediyor ve büyük bir oyuncu kitlesi kazanıyor.
Casibom’un kazanç sağlayan promosyonları ve tanınırlığı ile birlikte, platforma üyelik ne şekilde sağlanır sorusuna da bahsetmek elzemdir. Casibom’a hareketli cihazlarınızdan, bilgisayarlarınızdan veya tabletlerinizden tarayıcı üzerinden kolayca erişilebilir. Ayrıca, web sitesinin mobil uyumlu olması da büyük bir fayda sunuyor, çünkü artık pratikte herkesin bir akıllı telefonu var ve bu telefonlar üzerinden hızlıca ulaşım sağlanabiliyor.
Hareketli cep telefonlarınızla bile yolda canlı olarak iddialar alabilir ve müsabakaları canlı olarak izleyebilirsiniz. Ayrıca, Casibom’un mobil uyumlu olması, ülkemizde kumarhane ve casino gibi yerlerin meşru olarak kapatılmasıyla birlikte bu tür platformlara girişin büyük bir yolunu oluşturuyor.
Casibom’un itimat edilir bir bahis sitesi olması da gereklidir bir artı sağlıyor. Ruhsatlı bir platform olan Casibom, kesintisiz bir şekilde eğlence ve kazanç elde etme imkanı sunar.
Casibom’a kullanıcı olmak da oldukça basittir. Herhangi bir belge şartı olmadan ve ücret ödemeden web sitesine rahatça abone olabilirsiniz. Ayrıca, site üzerinde para yatırma ve çekme işlemleri için de çok sayıda farklı yöntem bulunmaktadır ve herhangi bir kesim ücreti isteseniz de alınmaz.
Ancak, Casibom’un güncel giriş adresini takip etmek de elzemdir. Çünkü canlı iddia ve kumarhane web siteleri popüler olduğu için sahte siteler ve dolandırıcılar da belirmektedir. Bu nedenle, Casibom’un sosyal medya hesaplarını ve güncel giriş adresini periyodik olarak kontrol etmek önemlidir.
Sonuç olarak, Casibom hem itimat edilir hem de kazandıran bir casino sitesi olarak dikkat çekiyor. Yüksek promosyonları, kapsamlı oyun seçenekleri ve kullanıcı dostu mobil uygulaması ile Casibom, casino hayranları için ideal bir platform getiriyor.
I can not participate now in discussion – there is no free time. I will be released – I will necessarily express the opinion on this question.
секс куклой
В нашем мире, где диплом становится началом успешной карьеры в любой сфере, многие стараются найти максимально простой путь получения качественного образования. Необходимость наличия документа об образовании трудно переоценить. Ведь диплом открывает дверь перед людьми, желающими начать трудовую деятельность или продолжить обучение в высшем учебном заведении.
Мы предлагаем максимально быстро получить этот важный документ. Вы имеете возможность приобрести диплом нового или старого образца, и это становится удачным решением для всех, кто не смог закончить обучение или потерял документ. диплом изготавливается аккуратно, с особым вниманием к мельчайшим деталям. В результате вы сможете получить документ, максимально соответствующий оригиналу.
Превосходство такого решения заключается не только в том, что вы максимально быстро получите свой диплом. Весь процесс организовывается комфортно, с профессиональной поддержкой. Начиная от выбора требуемого образца документа до правильного заполнения персональной информации и доставки в любое место России — все под полным контролем опытных мастеров.
Таким образом, для тех, кто ищет максимально быстрый способ получения необходимого документа, наша услуга предлагает отличное решение. Купить диплом – значит избежать долгого процесса обучения и сразу перейти к важным целям: к поступлению в ВУЗ или к началу удачной карьеры.
https://diploman-russiyans.com
BELLADY.BY предлагает самый большой выбор женской одежды, производимой в Республике Беларусь. Благодаря тому, что наш интернет-магазин находится в городе Брест, где работают более 200 компаний по пошиву одежды для женщин, у нас можно приобрести большинство товаров из ассортимента выпускаемой ими продукции.
куклы секс дорогие
zavod-lazer.com
https://1x-bet-india.com
В нашем мире, где диплом – это начало удачной карьеры в любой области, многие пытаются найти максимально быстрый и простой путь получения образования. Важность наличия официального документа переоценить просто невозможно. Ведь диплом открывает дверь перед каждым человеком, желающим вступить в сообщество профессионалов или учиться в любом институте.
В данном контексте наша компания предлагает очень быстро получить этот важный документ. Вы сможете заказать диплом нового или старого образца, и это является выгодным решением для всех, кто не смог завершить обучение, потерял документ или желает исправить свои оценки. Все дипломы выпускаются аккуратно, с особым вниманием к мельчайшим деталям. На выходе вы получите продукт, максимально соответствующий оригиналу.
Превосходство данного подхода состоит не только в том, что можно оперативно получить свой диплом. Процесс организовывается комфортно, с профессиональной поддержкой. Начиная от выбора нужного образца документа до консультаций по заполнению персональной информации и доставки в любой регион России — все под абсолютным контролем опытных мастеров.
Для тех, кто хочет найти оперативный способ получения необходимого документа, наша компания может предложить выгодное решение. Приобрести диплом – это значит избежать долгого процесса обучения и сразу перейти к своим целям, будь то поступление в университет или старт карьеры.
https://dlplomanrussian.com
На сайте коллегии юристов http://zpp-1.ru/ вы найдете контакты и сможете связаться с адвокатами. Юрист расскажет о том, как нужно правильно поступить, поможет собрать необходимые документы и будет защищать ваши права в суде. Квалифицированная юридическая и медицинская поддержка призывникам с гарантией!
В нашем обществе, где диплом – это начало удачной карьеры в любой отрасли, многие пытаются найти максимально быстрый и простой путь получения образования. Необходимость наличия официального документа об образовании трудно переоценить. Ведь именно диплом открывает дверь перед всеми, кто хочет начать профессиональную деятельность или продолжить обучение в любом институте.
Наша компания предлагает быстро получить любой необходимый документ. Вы сможете купить диплом, и это является отличным решением для человека, который не смог закончить обучение, потерял документ или желает исправить свои оценки. диплом изготавливается аккуратно, с максимальным вниманием к мельчайшим элементам, чтобы в результате получился 100% оригинальный документ.
Плюсы данного подхода состоят не только в том, что можно быстро получить диплом. Процесс организовывается комфортно, с нашей поддержкой. От выбора нужного образца диплома до правильного заполнения персональных данных и доставки в любой регион страны — все под полным контролем квалифицированных специалистов.
В результате, для тех, кто хочет найти оперативный способ получения требуемого документа, наша компания предлагает выгодное решение. Купить диплом – это значит избежать длительного обучения и сразу перейти к своим целям, будь то поступление в университет или старт удачной карьеры.
https://diploman-rossiya.com
склад фулфилмент https://24fulfilment-marketplace.ru/
Организация свадьбы под ключ https://yagodawedding.ru/ с гарантией. Быстрый расчет сметы, работаем с любым бюджетом. Берём на себя абсолютно все свадебные хлопоты. Организуем одни из самых красивых свадебных и семейных событий.
В нашем мире, где диплом – это начало удачной карьеры в любой области, многие ищут максимально простой путь получения качественного образования. Важность наличия официального документа об образовании сложно переоценить. Ведь именно диплом открывает дверь перед любым человеком, желающим начать профессиональную деятельность или продолжить обучение в высшем учебном заведении.
В данном контексте наша компания предлагает оперативно получить любой необходимый документ. Вы можете купить диплом, и это становится выгодным решением для человека, который не смог завершить образование, потерял документ или хочет исправить свои оценки. дипломы изготавливаются аккуратно, с особым вниманием ко всем деталям, чтобы на выходе получился документ, максимально соответствующий оригиналу.
Плюсы подобного подхода заключаются не только в том, что можно оперативно получить диплом. Процесс организован комфортно, с профессиональной поддержкой. От выбора нужного образца диплома до точного заполнения личной информации и доставки по стране — все находится под полным контролем наших мастеров.
Для тех, кто ищет быстрый и простой способ получения необходимого документа, наша компания предлагает отличное решение. Купить диплом – это значит избежать длительного обучения и не теряя времени перейти к достижению своих целей: к поступлению в ВУЗ или к началу удачной карьеры.
https://diplomanc-russia24.com
10배레버리지
로드스탁과 레버리지 방식의 스탁: 투자 전략의 참신한 분야
로드스탁에서 제공되는 레버리지 스탁은 주식 시장의 투자법의 한 방법으로, 큰 이익율을 목표로 하는 투자자들을 위해 매력적인 옵션입니다. 레버리지 사용을 사용하는 이 전략은 투자자가 자신의 투자금을 넘어서는 투자금을 투입할 수 있도록 함으로써, 주식 장에서 더 큰 영향력을 행사할 수 있는 기회를 공급합니다.
레버리지 방식의 스탁의 원리
레버리지 스탁은 일반적으로 자본을 차입하여 운용하는 방법입니다. 사례를 들어, 100만 원의 자금으로 1,000만 원 상당의 주식을 취득할 수 있는데, 이는 투자자가 일반적인 자본보다 훨씬 훨씬 더 많은 증권을 취득하여, 주식 가격이 올라갈 경우 해당하는 더 큰 수익을 얻을 수 있게 합니다. 하지만, 주식 가격이 하락할 경우에는 그 손실 또한 커질 수 있으므로, 레버리지를 사용할 때는 신중해야 합니다.
투자 계획과 레버리지
레버리지는 특히 성장 가능성이 높은 기업에 투자할 때 유용합니다. 이러한 기업에 상당한 비중으로 투자하면, 성공적일 경우 상당한 이익을 가져올 수 있지만, 그 반대의 경우 많은 리스크도 짊어져야 합니다. 그러므로, 투자자는 자신의 위험 관리 능력을 가진 상장 분석을 통해, 어떤 기업에 얼마만큼의 자본을 적용할지 선택해야 합니다.
레버리지의 장점과 위험 요소
레버리지 방식의 스탁은 큰 수익을 보장하지만, 그만큼 상당한 위험도 동반합니다. 증권 시장의 변동은 추정이 어렵기 때문에, 레버리지를 이용할 때는 언제나 장터 경향을 세심하게 주시하고, 손해를 최소화하기 위해 수 있는 계획을 세워야 합니다.
최종적으로: 세심한 고르기가 필요
로드스탁에서 제공하는 레버리지 스탁은 강력한 투자 도구이며, 잘 사용하면 많은 수익을 벌어들일 수 있습니다. 그러나 높은 위험성도 신경 써야 하며, 투자 결정은 충분히 많은 사실과 세심한 고려 후에 이루어져야 합니다. 투자자 본인의 재정 상황, 위험을 감수하는 능력, 그리고 장터 상황을 반영한 조화로운 투자 방법이 중요합니다.
В нашем обществе, где диплом – это начало удачной карьеры в любой области, многие стараются найти максимально быстрый путь получения качественного образования. Наличие официального документа об образовании переоценить невозможно. Ведь именно он открывает двери перед всеми, кто стремится начать трудовую деятельность или продолжить обучение в университете.
В данном контексте наша компания предлагает очень быстро получить любой необходимый документ. Вы можете приобрести диплом старого или нового образца, и это является отличным решением для всех, кто не смог закончить обучение или утратил документ. Все дипломы производятся аккуратно, с максимальным вниманием ко всем деталям, чтобы на выходе получился полностью оригинальный документ.
Преимущество такого подхода заключается не только в том, что вы сможете быстро получить диплом. Весь процесс организован удобно, с профессиональной поддержкой. Начав от выбора подходящего образца документа до точного заполнения личных данных и доставки в любой регион страны — все находится под полным контролем качественных мастеров.
Всем, кто ищет максимально быстрый способ получить необходимый документ, наша компания предлагает отличное решение. Приобрести диплом – значит избежать долгого процесса обучения и сразу перейти к достижению собственных целей: к поступлению в университет или к началу трудовой карьеры.
https://diploman-rossiya.com
На сегодняшний день, когда диплом является началом удачной карьеры в любой области, многие ищут максимально быстрый и простой путь получения образования. Наличие официального документа об образовании переоценить невозможно. Ведь именно он открывает дверь перед всеми, кто стремится вступить в сообщество профессионалов или учиться в каком-либо ВУЗе.
В данном контексте наша компания предлагает быстро получить этот необходимый документ. Вы сможете заказать диплом, и это является удачным решением для человека, который не смог завершить обучение, утратил документ или желает исправить плохие оценки. Все дипломы изготавливаются с особой аккуратностью, вниманием к мельчайшим деталям, чтобы на выходе получился полностью оригинальный документ.
Преимущество данного решения заключается не только в том, что вы быстро получите свой диплом. Весь процесс организовывается удобно, с профессиональной поддержкой. От выбора требуемого образца до консультации по заполнению личных данных и доставки по России — все находится под абсолютным контролем квалифицированных мастеров.
Всем, кто ищет максимально быстрый способ получить необходимый документ, наша компания предлагает выгодное решение. Приобрести диплом – значит избежать долгого обучения и сразу переходить к личным целям: к поступлению в ВУЗ или к началу трудовой карьеры.
https://diplomanc-russia24.com
На сегодняшний день, когда диплом становится началом удачной карьеры в любой области, многие ищут максимально быстрый и простой путь получения качественного образования. Важность наличия документа об образовании трудно переоценить. Ведь именно диплом открывает двери перед всеми, кто собирается начать трудовую деятельность или продолжить обучение в высшем учебном заведении.
В данном контексте наша компания предлагает максимально быстро получить этот необходимый документ. Вы сможете приобрести диплом старого или нового образца, и это становится удачным решением для человека, который не смог завершить образование или утратил документ. дипломы производятся аккуратно, с особым вниманием к мельчайшим деталям. В результате вы получите документ, максимально соответствующий оригиналу.
Преимущество такого решения состоит не только в том, что вы сможете быстро получить диплом. Процесс организовывается удобно и легко, с профессиональной поддержкой. Начав от выбора подходящего образца документа до правильного заполнения персональных данных и доставки по стране — все будет находиться под полным контролем наших специалистов.
Для тех, кто ищет максимально быстрый способ получения необходимого документа, наша услуга предлагает выгодное решение. Купить диплом – это значит избежать продолжительного процесса обучения и не теряя времени перейти к важным целям, будь то поступление в ВУЗ или старт профессиональной карьеры.
https://dlplomanrussian.com
В современном мире, где диплом становится началом успешной карьеры в любой отрасли, многие ищут максимально простой путь получения качественного образования. Факт наличия документа об образовании переоценить невозможно. Ведь диплом открывает двери перед всеми, кто хочет вступить в сообщество квалифицированных специалистов или продолжить обучение в ВУЗе.
Предлагаем максимально быстро получить этот важный документ. Вы имеете возможность приобрести диплом старого или нового образца, что становится выгодным решением для человека, который не смог завершить обучение, потерял документ или хочет исправить плохие оценки. дипломы выпускаются аккуратно, с максимальным вниманием ко всем деталям. На выходе вы сможете получить продукт, полностью соответствующий оригиналу.
Плюсы такого подхода состоят не только в том, что можно оперативно получить диплом. Весь процесс организован удобно, с профессиональной поддержкой. От выбора нужного образца диплома до консультации по заполнению персональной информации и доставки по стране — все будет находиться под абсолютным контролем квалифицированных мастеров.
Всем, кто хочет найти быстрый способ получения необходимого документа, наша компания готова предложить выгодное решение. Заказать диплом – это значит избежать продолжительного процесса обучения и сразу перейти к достижению личных целей: к поступлению в ВУЗ или к началу удачной карьеры.
https://diploman-rossiya.com
На сегодняшний день, когда диплом – это начало удачной карьеры в любой области, многие ищут максимально быстрый и простой путь получения качественного образования. Важность наличия документа об образовании переоценить попросту невозможно. Ведь именно он открывает дверь перед всеми, кто стремится начать профессиональную деятельность или продолжить обучение в высшем учебном заведении.
В данном контексте наша компания предлагает максимально быстро получить любой необходимый документ. Вы сможете заказать диплом нового или старого образца, что является удачным решением для всех, кто не смог закончить обучение, потерял документ или хочет исправить свои оценки. Все дипломы производятся аккуратно, с максимальным вниманием к мельчайшим нюансам. На выходе вы сможете получить 100% оригинальный документ.
Превосходство данного подхода состоит не только в том, что вы оперативно получите диплом. Весь процесс организовывается просто и легко, с профессиональной поддержкой. От выбора подходящего образца документа до грамотного заполнения персональных данных и доставки по стране — все под полным контролем качественных специалистов.
Для всех, кто хочет найти оперативный способ получить требуемый документ, наша компания предлагает отличное решение. Приобрести диплом – значит избежать продолжительного процесса обучения и сразу переходить к важным целям: к поступлению в ВУЗ или к началу трудовой карьеры.
https://dlplomanrussian.com
Hello to every , for the reason that I am actually keen of reading this web site’s post to be updated regularly. It includes nice data.
https://one.link/plclub
проверить свои usdt на чистоту
Проверка кошельков кошельков для хранения криптовалюты за выявление подозрительных средств: Охрана своего электронного активов
В мире криптовалют становится все значимее важнее гарантировать защиту личных денег. Каждый день кибермошенники и хакеры разрабатывают новые схемы обмана и угонов электронных денег. Ключевым инструментом основных методов защиты становится проверка кошельков бумажников по выявление незаконных денег.
Почему именно поэтому важно провести проверку собственные цифровые кошельки для хранения электронных денег?
В первую очередь данный факт важно для того чтобы защиты своих финансовых средств. Многие из участники рынка рискуют потерять потери средств их финансовых средств в результате недоброжелательных подходов или угонов. Проверка кошельков кошельков способствует предотвращению выявить вовремя подозрительные манипуляции и предотвратить.
Что предоставляет фирма?
Мы предлагаем услугу проверки криптовалютных бумажников и транзакций с целью выявления происхождения средств передвижения и предоставления подробного отчета о проверке. Наши платформа анализирует информацию для обнаружения потенциально нелегальных операций средств и оценить риск для того чтобы личного финансового портфеля. Благодаря нашей системе проверки, вы будете способны предотвратить возможные с государственными органами и обезопасить от случайной вовлеченности в нелегальных операций.
Как осуществляется проверка?
Наши фирма сотрудничает с ведущими аудиторскими организациями структурами, вроде Cure53, чтобы гарантировать и правильность наших проверок кошельков. Мы внедряем современные и методы проверки данных для выявления наличия небезопасных манипуляций. Данные пользователей наших клиентов обрабатываются и сохраняются в соответствии с положениями высокими стандартами безопасности.
Ключевой запрос: “проверить свои USDT на чистоту”
Если вас интересует убедиться в безопасности ваших USDT кошельков, наши эксперты предоставляет возможность бесплатную проверку первых 5 кошельков. Просто введите свой кошелек в соответствующее поле на нашем веб-сайте, и мы предоставим вам подробный отчет о статусе вашего кошелька.
Защитите свои финансовые средства прямо сейчас!
Не подвергайте себя риску оказаться в жертвой злоумышленников или оказаться в неприятной ситуации незаконных операций средств с вашими личными финансовыми средствами. Дайте вашу криптовалюту профессионалам, которые помогут, вам и вашим деньгам защитить свои деньги и предотвратить. Совершите первый шаг безопасности своего электронного портфеля сразу же!
Как убедиться в чистоте USDT
Проверка данных кошельков для хранения криптовалюты за присутствие нелегальных средств: Защита личного цифрового активов
В мире цифровых валют становится все значимее важнее обеспечивать секретность своих финансов. Регулярно мошенники и криминальные элементы выработывают совершенно новые способы обмана и мошенничества и кражи электронных средств. Одним из ключевых средств обеспечения безопасности становится анализ кошелька по наличие подозрительных средств передвижения.
Почему именно поэтому важно, чтобы провести проверку личные электронные кошельки?
В первую очередь, вот этот момент обязательно для того чтобы охраны собственных денег. Многие участники рынка рискуют потерять потери своих денег вследствие недоброжелательных подходов или угонов. Проверка данных кошельков помогает обнаружить на своем пути подозрительные операции и предупредить.
Что предлагает компания?
Мы предоставляем услугу проверки данных криптовалютных бумажников и транзакций средств с задачей выявления начала средств передвижения и дать детального отчета. Фирма предоставляет платформа осматривает данные пользователя для идентификации незаконных операций средств и оценить риск для того чтобы личного портфеля. Благодаря нашей проверке, вы будете в состоянии предотвратить возможные проблемы с регуляторами и защитить себя от случайной вовлеченности в финансировании незаконных деятельностей.
Как осуществляется процесс проверки?
Наши организация работает с авторитетными аудиторскими организациями организациями, такими как Kudelsky Security, для того чтобы обеспечить и адекватность наших проверок. Мы внедряем новейшие и методы анализа данных для обнаружения подозрительных операций средств. Данные пользователей наших граждан обрабатываются и хранятся в соответствии высокими стандартами.
Ключевой запрос: “проверить свои USDT на чистоту”
Если вам нужно проверить чистоте ваших USDT кошельков, наша компания предоставляет возможность исследовать бесплатный анализ первых 5 кошельков. Просто введите свой кошелек в указанное место на нашем онлайн-ресурсе, и мы предоставим вам подробные сведения о состоянии вашего кошелька.
Обеспечьте безопасность своих активы сразу же!
Не подвергайте себя риску оказаться пострадать от хакеров или стать в неприятной ситуации неправомерных действий с ваших средствами. Обратитесь к экспертам, которые окажут помощь, вам и вашему бизнесу обезопаситься деньги и предотвратить возможные проблемы. Совершите первый шаг к безопасности защите своего криптовалютного портфельчика уже сегодня!
Проверка Тетер на прозрачность: Каким образом сохранить свои криптовалютные состояния
Все больше пользователей обращают внимание для безопасность собственных криптовалютных финансов. Ежедневно обманщики предлагают новые методы кражи электронных средств, или владельцы цифровой валюты становятся жертвами их обманов. Один из методов защиты становится проверка кошельков для присутствие нелегальных средств.
С каким намерением это важно?
Преимущественно, чтобы защитить свои активы от дельцов или украденных монет. Многие инвесторы сталкиваются с риском утраты их средств вследствие обманных механизмов или грабежей. Осмотр кошельков позволяет выявить подозрительные операции или предотвратить возможные потери.
Что мы предлагаем?
Мы предлагаем услугу проверки цифровых кошельков или операций для обнаружения источника средств. Наша технология анализирует информацию для обнаружения нелегальных транзакций а также оценки риска для вашего портфеля. За счет этой проверке, вы сможете избежать проблем с регуляторами и защитить себя от участия в незаконных сделках.
Как это работает?
Мы сотрудничаем с лучшими аудиторскими компаниями, такими как Halborn, с целью обеспечить точность наших проверок. Мы применяем современные технологии для определения опасных операций. Ваши информация обрабатываются и хранятся согласно с высокими стандартами безопасности и приватности.
Каким образом проверить собственные USDT в прозрачность?
В случае если вы желаете проверить, что ваша USDT-кошельки нетронуты, наш подход обеспечивает бесплатную проверку первых пяти кошельков. Просто введите местоположение личного кошелька в нашем сайте, и наш сервис предоставим вам детальный отчет о его положении.
Защитите вашими активы уже сейчас!
Не подвергайте риску стать жертвой обманщиков либо оказаться в неприятную обстановку вследствие противозаконных операций. Свяжитесь с нам, с тем чтобы сохранить ваши цифровые средства и избежать затруднений. Совершите первый шаг к безопасности вашего криптовалютного портфеля сегодня!
Проверка USDT на чистоту
Анализ USDT на прозрачность: Каким образом защитить собственные криптовалютные активы
Постоянно все больше людей заботятся на надежность собственных цифровых средств. День ото дня обманщики предлагают новые схемы кражи электронных средств, и также собственники криптовалюты являются страдающими их подстав. Один из подходов охраны становится проверка кошельков в присутствие незаконных денег.
С каким намерением это необходимо?
Прежде всего, для того чтобы обезопасить свои активы от дельцов или украденных монет. Многие вкладчики сталкиваются с вероятностью утраты их финансов из-за хищных сценариев либо краж. Осмотр кошельков помогает выявить подозрительные операции или предотвратить возможные убытки.
Что мы предлагаем?
Наша компания предоставляем услугу тестирования криптовалютных кошельков или транзакций для определения начала фондов. Наша технология анализирует информацию для определения противозаконных операций и также оценки опасности для вашего портфеля. Благодаря этой проверке, вы сможете избегать проблем с регуляторами а также защитить себя от участия в противозаконных операциях.
Как это работает?
Мы работаем с первоклассными проверочными организациями, наподобие Halborn, для того чтобы обеспечить аккуратность наших тестирований. Мы применяем новейшие технологии для обнаружения опасных операций. Ваши данные обрабатываются и хранятся согласно с высокими стандартами безопасности и конфиденциальности.
Как выявить собственные Tether на чистоту?
Если хотите проверить, что ваша USDT-кошельки чисты, наш сервис обеспечивает бесплатное тестирование первых пяти кошельков. Просто введите местоположение собственного бумажника на нашем сайте, и наш сервис предоставим вам детальный отчет о его положении.
Охраняйте вашими фонды сегодня же!
Не рискуйте подвергнуться дельцов или попадать в неприятную обстановку по причине нелегальных сделок. Обратитесь за помощью к нашему сервису, чтобы сохранить свои электронные финансовые ресурсы и избежать затруднений. Совершите первый шаг для безопасности криптовалютного портфеля сегодня!
Тетер – это стабильная криптовалютный актив, связанная к национальной валюте, например доллар США. Данное обстоятельство делает ее исключительно востребованной у трейдеров, поскольку данная криптовалюта предлагает надежность цены в в условиях неустойчивости криптовалютного рынка. Однако, как и любая другая вид криптовалюты, USDT подвергается опасности использования с целью легализации доходов и финансирования неправомерных транзакций.
Легализация доходов посредством цифровые валюты превращается все более и более распространенным способом с тем чтобы сокрытия происхождения капитала. Используя разнообразные техники, злоумышленники могут пытаться отмывать незаконно завоеванные деньги путем сервисы обмена криптовалют или смешиватели, для того чтобы совершить их происхождение менее прозрачным.
Именно в связи с этим, анализ USDT на чистоту оказывается важной инструментом предостережения для владельцев цифровых валют. Существуют специализированные сервисы, какие выполняют проверку операций и кошельков, для того чтобы обнаружить сомнительные транзакции и незаконные финансирование. Такие сервисы содействуют пользователям предотвратить непреднамеренного вовлечения в преступной деятельности и предотвратить блокировку аккаунтов со со стороны регуляторных органов.
Экспертиза USDT на чистоту также как и предотвращает обезопасить себя от потенциальных убытков. Пользователи могут быть уверенны в том, что их активы не связаны с незаконными сделками, что уменьшает вероятность блокировки аккаунта или лишения капитала.
Поэтому, в условиях возрастающей степени сложности криптовалютной среды необходимо принимать действия для обеспечения безопасности своего капитала. Экспертиза USDT на чистоту при помощи специализированных платформ является важной одним из способов защиты от незаконной деятельности, гарантируя владельцам цифровых валют дополнительную степень и надежности.
九州娛樂城
Backlink pyramid
Sure, here’s the text with spin syntax applied:
Link Structure
After several updates to the G search mechanism, it is required to use different options for ranking.
Today there is a means to capture the attention of search engines to your site with the aid of backlinks.
Backlinks are not only an successful marketing tool but they also have authentic traffic, straight sales from these resources likely will not be, but click-throughs will be, and it is poyedenicheskogo visitors that we also receive.
What in the end we get at the end result:
We show search engines site through backlinks.
Prluuchayut organic click-throughs to the site and it is also a sign to search engines that the resource is used by users.
How we show search engines that the site is valuable:
Backlinks do to the principal page where the main information.
We make backlinks through redirects trusted sites.
The most SIGNIFICANT we place the site on sites analytical tools individual tool, the site goes into the memory of these analysis tools, then the received links we place as redirections on weblogs, discussion boards, comment sections. This crucial action shows search engines the site map as analyzer sites present all information about sites with all keywords and headlines and it is very BENEFICIAL.
All data about our services is on the website!
Осмотр USDT в прозрачность: Каким образом обезопасить собственные криптовалютные финансы
Все более пользователей обращают внимание в безопасность личных криптовалютных средств. День ото дня обманщики придумывают новые схемы кражи цифровых средств, и также собственники криптовалюты оказываются страдающими своих интриг. Один методов защиты становится проверка кошельков на присутствие нелегальных средств.
Для чего это полезно?
В первую очередь, для того чтобы сохранить собственные средства против дельцов или украденных монет. Многие инвесторы встречаются с потенциальной угрозой утраты их средств из-за хищных механизмов либо кражей. Тестирование кошельков помогает выявить подозрительные действия и также предотвратить возможные потери.
Что мы предлагаем?
Мы предоставляем услугу проверки криптовалютных кошельков или транзакций для обнаружения начала средств. Наша система анализирует данные для обнаружения противозаконных операций или оценки риска для вашего портфеля. Благодаря этой проверке, вы сможете избежать проблем с регуляторами а также защитить себя от участия в нелегальных переводах.
Как происходит процесс?
Наша команда сотрудничаем с передовыми проверочными фирмами, вроде Certik, с целью обеспечить точность наших проверок. Мы применяем новейшие технологии для выявления опасных операций. Ваши данные обрабатываются и сохраняются в соответствии с высокими нормами безопасности и конфиденциальности.
Как проверить свои Tether на чистоту?
В случае если вы желаете подтвердить, что ваши Tether-бумажники чисты, наш подход предоставляет бесплатное тестирование первых пяти кошельков. Просто введите положение собственного кошелька на на нашем веб-сайте, и мы предоставим вам полную информацию доклад об его положении.
Защитите вашими фонды сегодня же!
Не подвергайте опасности подвергнуться обманщиков либо попадать в неприятную ситуацию вследствие противозаконных сделок. Посетите нашей команде, для того чтобы обезопасить свои криптовалютные средства и предотвратить сложностей. Примите первый шаг к безопасности криптовалютного портфеля уже сегодня!
creating articles
Creating original articles on Medium and Telegraph, why it is required:
Created article on these resources is better ranked on less frequent queries, which is very significant to get natural traffic.
We get:
natural traffic from search engines.
organic traffic from the in-house rendition of the medium.
The webpage to which the article refers gets a link that is liquid and increases the ranking of the site to which the article refers.
Articles can be made in any amount and choose all less frequent queries on your topic.
Medium pages are indexed by search algorithms very well.
Telegraph pages need to be indexed separately indexer and at the same time after indexing they sometimes occupy places higher in the search algorithms than the medium, these two platforms are very useful for getting visitors.
Here is a hyperlink to our services where we provide creation, indexing of sites, articles, pages and more.
הימורים מקוונים הם חוויה מרגשות ופופולריות ביותר בעידן הדיגיטלי, שמאגרת מיליונים אנשים מכל
רחבי העולם. ההימורים המקוונים מתרחשים בהתאם ל אירועים ספורטיביים, תוצאות פוליטיות ואפילו תוצאות מזג האוויר ונושאים נוספים. אתרים ל הימורים הווירטואליים מקריאים פוטנציאליים את כל מי שרוצה להמרות על תוצאות אפשריות ולחוות חוויות ייחודיות ומרתקות.
ההימורים המקוונים הם הם כבר חלק מהתרבות האנושית מזמן רב והיום הם כבר לא רק חלק נפרד מהפעילות התרבותית והכלכלית, אלא גם מספקים הכנסות וחוויות מרתקות. משום שהם נגישים וקלים לשימוש, הם מובילים את כולם ליהנות מהמשחק ולהנציח רגעי עסקה וניצחון בכל זמן ובכל מקום.
טכנולוגיות דיגיטליות והימורים הפכו להיות הפופולריים ביותר מעניינת ופופולרית. מיליוני אנשים מכל רחבי העולם מעוניינים בהימורים, הכוללים הימורי ספורט. הימורים מקוונים מציעים למשתתפים חוויה רגשית ומרתקת, המאפשרת להם ליהנות מפעילות פופולרית זו בכל זמן ובכל מקום.
אז מה עוד אתה מחכה? הצטרף עכשיו והתחיל ליהנות מהתרגשות וההנאה מהמשחקים ברשת.
Link building is merely just as efficient at present, simply the resources to operate within this domain possess shifted.
There are many options regarding backlinks, our company employ several of them, and these approaches function and have been tried by our team and our clientele.
Recently our team performed an experiment and it transpired that low-volume search queries from a single domain name position nicely in search results, and the result does not need to become your own domain, you are able to use social networking sites from Web 2.0 series for this.
It is also possible to in part transfer load through site redirects, providing an assorted backlink profile.
Go to our website where our company’s offerings are typically presented with detailed explanations.
cockfight
можно ли разорвать контракт сво
С началом СВО уже спустя полгода была объявлена первая волна мобилизации. При этом прошлая, в последний раз в России была аж в 1941 году, с началом Великой Отечественной Войны. Конечно же, желающих отправиться на фронт было не много, а потому люди стали искать способы не попасть на СВО, для чего стали покупать справки о болезнях, с которыми можно получить категорию Д. И все это стало возможным с даркнет сайтами, где можно найти практически все что угодно. Именно об этой отрасли темного интернета подробней и поговорим в этой статье.
Pirámide de backlinks
Aquí está el texto con la estructura de spintax que propone diferentes sinónimos para cada palabra:
“Pirámide de enlaces de retroceso
Después de varias actualizaciones del motor de búsqueda G, necesita aplicar diferentes opciones de clasificación.
Hay una manera de llamar la atención de los motores de búsqueda a su sitio web con enlaces de retroceso.
Los backlinks no sólo son una táctica eficaz para la promoción, sino que también tienen tráfico orgánico, las ventas directas de estos recursos más probable es que no será, pero las transiciones será, y es tráfico potencial que también obtenemos.
Lo que vamos a obtener al final en la salida:
Mostramos el sitio a los motores de búsqueda a través de backlinks.
Conseguimos conversiones orgánicas hacia el sitio, lo que también es una señal para los buscadores de que el recurso está siendo utilizado por la gente.
Cómo mostramos los motores de búsqueda que el sitio es líquido:
1 backlink se hace a la página principal donde está la información principal
Hacemos enlaces de retroceso a través de redirecciones de sitios de confianza
Lo más crucial colocamos el sitio en una herramienta independiente de analizadores de sitios, el sitio entra en la caché de estos analizadores, luego los enlaces recibidos los colocamos como redirecciones en blogs, foros, comentarios.
Esta crucial acción muestra a los buscadores el MAPA DEL SITIO, ya que los analizadores de sitios muestran toda la información de los sitios con todas las palabras clave y títulos y es muy positivo.
¡Toda la información sobre nuestros servicios en el sitio web!
Thank you, I’ve just been looking for info about this subject for ages and yours is the best I’ve discovered till now. But, what in regards to the bottom line? Are you positive in regards to the source?
http://www.diploman-russiyans.com/
Купить диплом быстро и качественно
купить диплом https://www.diplom-msk.ru .
反向链接金字塔
G搜尋引擎在屡经更新后需要应用不同的排名參數。
今天有一種方法可以使用反向链接吸引G搜尋引擎對您的網站的注意。
反向連結不僅是有效的推廣工具,也是有機流量。
我們會得到什麼結果:
我們透過反向連結向G搜尋引擎展示我們的網站。
他們收到了到該網站的自然過渡,這也是向G搜尋引擎發出的信號,表明該資源正在被人們使用。
我們如何向G搜尋引擎表明該網站具有流動性:
個帶有主要訊息的主頁反向鏈接
我們透過來自受信任網站的重新导向來建立反向链接。
此外,我們將網站放置在单独的網路分析器上,網站最終會進入這些分析器的高速缓存中,然後我們使用產生的連結作為部落格、論壇和評論的重新导向。 這個重要的操作向G搜尋引擎顯示了網站地圖,因為網站分析器顯示了有關網站的所有資訊以及所有關鍵字和標題,這很棒
有關我們服務的所有資訊都在網站上!
взлом кошелька
Как сберечь свои данные: страхуйтесь от утечек информации в интернете. Сегодня обеспечение безопасности своих данных становится всё более важной задачей. Одним из наиболее обычных способов утечки личной информации является слив «сит фраз» в интернете. Что такое сит фразы и как предохранить себя от их утечки? Что такое «сит фразы»? «Сит фразы» — это синтезы слов или фраз, которые регулярно используются для получения доступа к различным онлайн-аккаунтам. Эти фразы могут включать в себя имя пользователя, пароль или другие конфиденциальные данные. Киберпреступники могут пытаться получить доступ к вашим аккаунтам, при помощи этих сит фраз. Как обезопасить свои личные данные? Используйте непростые пароли. Избегайте использования несложных паролей, которые просто угадать. Лучше всего использовать комбинацию букв, цифр и символов. Используйте уникальные пароли для каждого аккаунта. Не воспользуйтесь один и тот же пароль для разных сервисов. Используйте двухфакторную аутентификацию (2FA). Это привносит дополнительный уровень безопасности, требуя подтверждение входа на ваш аккаунт через другое устройство или метод. Будьте осторожны с онлайн-сервисами. Не доверяйте персональную информацию ненадежным сайтам и сервисам. Обновляйте программное обеспечение. Установите обновления для вашего операционной системы и программ, чтобы предохранить свои данные от вредоносного ПО. Вывод Слив сит фраз в интернете может повлечь за собой серьезным последствиям, таким вроде кража личной информации и финансовых потерь. Чтобы охранить себя, следует принимать меры предосторожности и использовать надежные методы для хранения и управления своими личными данными в сети
даркнет сливы тг
Даркнет и сливы в Телеграме
Даркнет – это компонент интернета, которая не индексируется регулярными поисковыми системами и требует индивидуальных программных средств для доступа. В даркнете существует множество скрытых сайтов, где можно найти различные товары и услуги, в том числе и нелегальные.
Одним из востребованных способов распространения информации в даркнете является использование мессенджера Телеграм. Телеграм предоставляет возможность создания закрытых каналов и чатов, где пользователи могут обмениваться информацией, в том числе и нелегальной.
Сливы информации в Телеграме – это способ распространения конфиденциальной информации, такой как украденные данные, базы данных, персональные сведения и другие материалы. Эти сливы могут включать в себя информацию о кредитных картах, паролях, персональных сообщениях и даже фотографиях.
Сливы в Телеграме могут быть опасными, так как они могут привести к утечке конфиденциальной информации и нанести ущерб репутации и финансовым интересам людей. Поэтому важно быть осторожным при обмене информацией в интернете и не доверять сомнительным источникам.
Вот кошельки с балансом у бота
сид фразы кошельков
Сид-фразы, или напоминающие фразы, представляют собой комбинацию слов, которая используется для создания или восстановления кошелька криптовалюты. Эти фразы обеспечивают возможность доступа к вашим криптовалютным средствам, поэтому их безопасное хранение и использование чрезвычайно важны для защиты вашего криптоимущества от утери и кражи.
Что такое сид-фразы кошельков криптовалют?
Сид-фразы формируют набор случайно сгенерированных слов, в большинстве случаев от 12 до 24, которые служат для создания уникального ключа шифрования кошелька. Этот ключ используется для восстановления доступа к вашему кошельку в случае его повреждения или утери. Сид-фразы обладают высокой степенью защиты и шифруются, что делает их защищенными для хранения и передачи.
Зачем нужны сид-фразы?
Сид-фразы жизненно важны для обеспечения безопасности и доступности вашего криптоимущества. Они позволяют восстановить вход к кошельку в случае утери или повреждения физического устройства, на котором он хранится. Благодаря сид-фразам вы можете без труда создавать резервные копии своего кошелька и хранить их в безопасном месте.
Как обеспечить безопасность сид-фраз кошельков?
Никогда не открывайте сид-фразой ни с кем. Сид-фраза является вашим ключом к кошельку, и ее раскрытие может привести к утере вашего криптоимущества.
Храните сид-фразу в секурном месте. Используйте физически защищенные места, такие как банковские ячейки или специализированные аппаратные кошельки, для хранения вашей сид-фразы.
Создавайте резервные копии сид-фразы. Регулярно создавайте резервные копии вашей сид-фразы и храните их в разных безопасных местах, чтобы обеспечить доступ к вашему кошельку в случае утери или повреждения.
Используйте дополнительные меры безопасности. Включите двухфакторную верификацию и другие методы защиты для своего кошелька криптовалюты, чтобы обеспечить дополнительный уровень безопасности.
Заключение
Сид-фразы кошельков криптовалют являются ключевым элементом безопасного хранения криптоимущества. Следуйте рекомендациям по безопасности, чтобы защитить свою сид-фразу и обеспечить безопасность своих криптовалютных средств.
слив сид фраз
Слив засеянных фраз (seed phrases) является одним наиболее известных способов утечки персональной информации в мире криптовалют. В этой статье мы разберем, что такое сид фразы, по какой причине они важны и как можно защититься от их утечки.
Что такое сид фразы?
Сид фразы, или мнемонические фразы, формируют комбинацию слов, которая используется для формирования или восстановления кошелька криптовалюты. Обычно сид фраза состоит из 12 или 24 слов, которые представляют собой ключ к вашему кошельку. Потеря или утечка сид фразы может приводить к потере доступа к вашим криптовалютным средствам.
Почему важно защищать сид фразы?
Сид фразы являются ключевым элементом для безопасного хранения криптовалюты. Если злоумышленники получат доступ к вашей сид фразе, они могут получить доступ к вашему кошельку и украсть все средства.
Как защититься от утечки сид фраз?
Никогда не передавайте свою сид фразу никакому, даже если вам представляется, что это привилегированное лицо или сервис.
Храните свою сид фразу в секурном и надежном месте. Рекомендуется использовать аппаратные кошельки или специальные программы для хранения сид фразы.
Используйте экстра методы защиты, такие как двухфакторная верификация, для усиления безопасности вашего кошелька.
Регулярно делайте резервные копии своей сид фразы и храните их в различных безопасных местах.
Заключение
Слив сид фраз является важной угрозой для безопасности владельцев криптовалют. Понимание важности защиты сид фразы и принятие соответствующих мер безопасности помогут вам избежать потери ваших криптовалютных средств. Будьте бдительны и обеспечивайте надежную защиту своей сид фразы
пирамида обратных ссылок
Структура Backlinks
После множества обновлений поисковой системы G необходимо использовать разнообразные варианты ранжирования.
Сегодня есть способ привлечь внимание поисковых систем к вашему веб-сайту с помощью бэклинков.
Бэклинки являются эффективным инструментом продвижения, но также являются источником органического трафика, хотя прямых продаж с этих ресурсов скорее всего не будет, но переходы будут, и именно органического трафика мы также получаем.
Что в итоге получим на выходе:
Мы демонстрируем сайт поисковым системам через обратные ссылки.
Получают органические переходы на сайт, а это также информация для поисковых систем, что ресурс пользуется спросом у пользователей.
Как мы демонстрируем поисковым системам, что сайт ликвиден:
1 обратная ссылка делается на главную страницу, где основная информация.
Создаем обратные ссылки с использованием редиректов с доверенных сайтов.
Основное – мы индексируем сайт с помощью специальных инструментов анализа веб-сайтов, сайт заносится в кеш этих инструментов, после чего полученные ссылки мы публикуем в качестве редиректов на блогах, форумах, в комментариях.
Это нужное действие показывает поисковым системамКАРТУ САЙТА, так как анализаторы сайтов показывают всю информацию о сайтах со с тайтлами, ключами, h1,h2,h3 и это очень ХОРОШО
Wonderful, what a weblog it is! This weblog gives helpful information to us, keep it up.
https://motflix.cc/
ggg
هنا النص مع استخدام السبينتاكس:
“هرم الروابط الخلفية
بعد التحديثات العديدة لمحرك البحث G، تحتاج إلى تنفيذ خيارات ترتيب مختلفة.
هناك طريقة لجذب انتباه محركات البحث إلى موقعك على الويب باستخدام الروابط الخلفية.
الروابط الخلفية ليست فقط أداة فعالة للترويج، ولكن تتضمن أيضًا حركة مرور عضوية، والمبيعات المباشرة من هذه الموارد على الأرجح لن تكون كذلك، ولكن التحولات ستكون، وهي حركة المرور التي نحصل عليها أيضًا.
ما سنحصل عليه في النهاية في النهاية في الإخراج:
نعرض الموقع لمحركات البحث من خلال الروابط الخلفية.
2- نحصل على تبديلات عضوية إلى الموقع، وهي أيضًا إشارة لمحركات البحث أن المورد يستخدمه الناس.
كيف نظهر لمحركات البحث أن الموقع سائل:
1 يتم عمل لينك خلفي للصفحة الرئيسية حيث المعلومات الرئيسية
نقوم بعمل روابط خلفية من خلال عمليات توجيه مرة أخرى المواقع الموثوقة
الأهم من ذلك أننا نضع الموقع على أداة منفصلة من أساليب تحليل المواقع، ويدخل الموقع في ذاكرة التخزين المؤقت لهذه المحللات، ثم الروابط المستلمة التي نضعها كإعادة توجيه على المدونات والمنتديات والتعليقات.
هذا التدبير المهم يعرض لمحركات البحث خريطة الموقع، حيث تعرض أدوات تحليل المواقع جميع المعلومات عن المواقع مع جميع الكلمات الرئيسية والعناوين وهو أمر جيد جداً
جميع المعلومات عن خدماتنا على الموقع!
rikvip
Rikvip Club: Trung Tâm Giải Trí Trực Tuyến Hàng Đầu tại Việt Nam
Rikvip Club là một trong những nền tảng giải trí trực tuyến hàng đầu tại Việt Nam, cung cấp một loạt các trò chơi hấp dẫn và dịch vụ cho người dùng. Cho dù bạn là người dùng iPhone hay Android, Rikvip Club đều có một cái gì đó dành cho mọi người. Với sứ mạng và mục tiêu rõ ràng, Rikvip Club luôn cố gắng cung cấp những sản phẩm và dịch vụ tốt nhất cho khách hàng, tạo ra một trải nghiệm tiện lợi và thú vị cho người chơi.
Sứ Mạng và Mục Tiêu của Rikvip
Từ khi bắt đầu hoạt động, Rikvip Club đã có một kế hoạch kinh doanh rõ ràng, luôn nỗ lực để cung cấp cho khách hàng những sản phẩm và dịch vụ tốt nhất và tạo điều kiện thuận lợi nhất cho người chơi truy cập. Nhóm quản lý của Rikvip Club có những mục tiêu và ước muốn quyết liệt để biến Rikvip Club thành trung tâm giải trí hàng đầu trong lĩnh vực game đổi thưởng trực tuyến tại Việt Nam và trên toàn cầu.
Trải Nghiệm Live Casino
Rikvip Club không chỉ nổi bật với sự đa dạng của các trò chơi đổi thưởng mà còn với các phòng trò chơi casino trực tuyến thu hút tất cả người chơi. Môi trường này cam kết mang lại trải nghiệm chuyên nghiệp với tính xanh chín và sự uy tín không thể nghi ngờ. Đây là một sân chơi lý tưởng cho những người yêu thích thách thức bản thân và muốn tận hưởng niềm vui của chiến thắng. Với các sảnh cược phổ biến như Roulette, Sic Bo, Dragon Tiger, người chơi sẽ trải nghiệm những cảm xúc độc đáo và đặc biệt khi tham gia vào casino trực tuyến.
Phương Thức Thanh Toán Tiện Lợi
Rikvip Club đã được trang bị những công nghệ thanh toán tiên tiến ngay từ đầu, mang lại sự thuận tiện và linh hoạt cho người chơi trong việc sử dụng hệ thống thanh toán hàng ngày. Hơn nữa, Rikvip Club còn tích hợp nhiều phương thức giao dịch khác nhau để đáp ứng nhu cầu đa dạng của người chơi: Chuyển khoản Ngân hàng, Thẻ cào, Ví điện tử…
Kết Luận
Tóm lại, Rikvip Club không chỉ là một nền tảng trò chơi, mà còn là một cộng đồng nơi người chơi có thể tụ tập để tận hưởng niềm vui của trò chơi và cảm giác hồi hộp khi chiến thắng. Với cam kết cung cấp những sản phẩm và dịch vụ tốt nhất, Rikvip Club chắc chắn là điểm đến lý tưởng cho những người yêu thích trò chơi trực tuyến tại Việt Nam và cả thế giới.
RGBET
Cá Cược Thể Thao Trực Tuyến RGBET
Thể thao trực tuyến RGBET cung cấp thông tin cá cược thể thao mới nhất, như tỷ số bóng đá, bóng rổ, livestream và dữ liệu trận đấu. Đến với RGBET, bạn có thể tham gia chơi tại sảnh thể thao SABA, PANDA SPORT, CMD368, WG và SBO. Khám phá ngay!
Giới Thiệu Sảnh Cá Cược Thể Thao Trực Tuyến
Những sự kiện thể thao đa dạng, phủ sóng toàn cầu và cách chơi đa dạng mang đến cho người chơi tỷ lệ cá cược thể thao hấp dẫn nhất, tạo nên trải nghiệm cá cược thú vị và thoải mái.
Sảnh Thể Thao SBOBET
SBOBET, thành lập từ năm 1998, đã nhận được giấy phép cờ bạc trực tuyến từ Philippines, Đảo Man và Ireland. Tính đến nay, họ đã trở thành nhà tài trợ cho nhiều CLB bóng đá. Hiện tại, SBOBET đang hoạt động trên nhiều nền tảng trò chơi trực tuyến khắp thế giới.
Xem Chi Tiết »
Sảnh Thể Thao SABA
Saba Sports (SABA) thành lập từ năm 2008, tập trung vào nhiều hoạt động thể thao phổ biến để tạo ra nền tảng thể thao chuyên nghiệp và hoàn thiện. SABA được cấp phép IOM hợp pháp từ Anh và mang đến hơn 5.000 giải đấu thể thao đa dạng mỗi tháng.
Xem Chi Tiết »
Sảnh Thể Thao CMD368
CMD368 nổi bật với những ưu thế cạnh tranh, như cung cấp cho người chơi hơn 20.000 trận đấu hàng tháng, đến từ 50 môn thể thao khác nhau, đáp ứng nhu cầu của tất cả các fan hâm mộ thể thao, cũng như thoả mãn mọi sở thích của người chơi.
Xem Chi Tiết »
Sảnh Thể Thao PANDA SPORT
OB Sports đã chính thức đổi tên thành “Panda Sports”, một thương hiệu lớn với hơn 30 giải đấu bóng. Panda Sports đặc biệt chú trọng vào tính năng cá cược thể thao, như chức năng “đặt cược sớm và đặt cược trực tiếp tại livestream” độc quyền.
Xem Chi Tiết »
Sảnh Thể Thao WG
WG Sports tập trung vào những môn thể thao không quá được yêu thích, với tỷ lệ cược cao và xử lý đơn cược nhanh chóng. Đặc biệt, nhiều nhà cái hàng đầu trên thị trường cũng hợp tác với họ, trở thành là một trong những sảnh thể thao nổi tiếng trên toàn cầu.
Xem Chi Tiết »
Hmm is anyone else experiencing problems with the pictures on this blog loading? I’m trying to figure out if its a problem on my end or if it’s the blog. Any feed-back would be greatly appreciated.
Порошковий антинакіпін RM 511(6 x 17 г), 17g Karcher (6.296-193.0)
UEFA Euro 2024 Sân Chơi Bóng Đá Hấp Dẫn Nhất Của Châu Âu
Euro 2024 là sự kiện bóng đá lớn nhất của châu Âu, không chỉ là một giải đấu mà còn là một cơ hội để các quốc gia thể hiện tài năng, sự đoàn kết và tinh thần cạnh tranh.
Euro 2024 hứa hẹn sẽ mang lại những trận cầu đỉnh cao và kịch tính cho người hâm mộ trên khắp thế giới. Cùng tìm hiểu các thêm thông tin hấp dẫn về giải đấu này tại bài viết dưới đây, gồm:
Nước chủ nhà
Đội tuyển tham dự
Thể thức thi đấu
Thời gian diễn ra
Sân vận động
Euro 2024 sẽ được tổ chức tại Đức, một quốc gia có truyền thống vàng của bóng đá châu Âu.
Đức là một đất nước giàu có lịch sử bóng đá với nhiều thành công quốc tế và trong những năm gần đây, họ đã thể hiện sức mạnh của mình ở cả mặt trận quốc tế và câu lạc bộ.
Việc tổ chức Euro 2024 tại Đức không chỉ là một cơ hội để thể hiện năng lực tổ chức tuyệt vời mà còn là một dịp để giới thiệu văn hóa và sức mạnh thể thao của quốc gia này.
Đội tuyển tham dự giải đấu Euro 2024
Euro 2024 sẽ quy tụ 24 đội tuyển hàng đầu từ châu Âu. Các đội tuyển này sẽ là những đại diện cho sự đa dạng văn hóa và phong cách chơi bóng đá trên khắp châu lục.
Các đội tuyển hàng đầu như Đức, Pháp, Tây Ban Nha, Bỉ, Italy, Anh và Hà Lan sẽ là những ứng viên nặng ký cho chức vô địch.
Trong khi đó, các đội tuyển nhỏ hơn như Iceland, Wales hay Áo cũng sẽ mang đến những bất ngờ và thách thức cho các đối thủ.
Các đội tuyển tham dự được chia thành 6 bảng đấu, gồm:
Bảng A: Đức, Scotland, Hungary và Thuỵ Sĩ
Bảng B: Tây Ban Nha, Croatia, Ý và Albania
Bảng C: Slovenia, Đan Mạch, Serbia và Anh
Bảng D: Ba Lan, Hà Lan, Áo và Pháp
Bảng E: Bỉ, Slovakia, Romania và Ukraina
Bảng F: Thổ Nhĩ Kỳ, Gruzia, Bồ Đào Nha và Cộng hoà Séc
외국선물의 시작 골드리치증권와 함께하세요.
골드리치증권는 오랜기간 고객님들과 더불어 선물마켓의 길을 공동으로 여정을했습니다, 고객분들의 확실한 자금운용 및 건강한 수익성을 지향하여 계속해서 최선을 기울이고 있습니다.
왜 20,000+명 넘게이 골드리치와 동참하나요?
즉각적인 대응: 편리하고 빠른 프로세스를 갖추어 누구나 용이하게 활용할 수 있습니다.
보안 프로토콜: 국가당국에서 사용하는 높은 등급의 보안을 적용하고 있습니다.
스마트 인가: 전체 거래내용은 부호화 보호되어 본인 이외에는 아무도 누구도 정보를 확인할 수 없습니다.
안전 이익률 공급: 리스크 요소를 감소시켜, 보다 한층 보장된 수익률을 공개하며 이에 따른 리포트를 공유합니다.
24 / 7 상시 고객센터: 365일 24시간 즉각적인 상담을 통해 회원분들을 모두 뒷받침합니다.
함께하는 협력사: 골드리치는 공기업은 물론 금융권들 및 많은 협력사와 함께 여정을 했습니다.
해외선물이란?
다양한 정보를 참고하세요.
외국선물은 해외에서 거래되는 파생상품 중 하나로, 지정된 기초자산(예: 주식, 화폐, 상품 등)을 기초로 한 옵션계약 약정을 지칭합니다. 근본적으로 옵션은 명시된 기초자산을 향후의 특정한 시점에 일정 가격에 사거나 매도할 수 있는 권리를 부여합니다. 외국선물옵션은 이러한 옵션 계약이 해외 시장에서 거래되는 것을 의미합니다.
외국선물은 크게 콜 옵션과 풋 옵션으로 분류됩니다. 매수 옵션은 특정 기초자산을 미래에 일정 가격에 사는 권리를 제공하는 반면, 풋 옵션은 특정 기초자산을 미래에 일정 가격에 매도할 수 있는 권리를 허락합니다.
옵션 계약에서는 미래의 명시된 날짜에 (만기일이라 지칭되는) 정해진 가격에 기초자산을 매수하거나 팔 수 있는 권리를 가지고 있습니다. 이러한 가격을 실행 금액이라고 하며, 종료일에는 해당 권리를 실행할지 여부를 판단할 수 있습니다. 따라서 옵션 계약은 투자자에게 향후의 시세 변화에 대한 안전장치나 이익 실현의 기회를 허락합니다.
외국선물은 시장 참가자들에게 다양한 투자 및 차익거래 기회를 제공, 외환, 상품, 주식 등 다양한 자산군에 대한 옵션 계약을 포함할 수 있습니다. 거래자는 풋 옵션을 통해 기초자산의 낙폭에 대한 안전장치를 받을 수 있고, 콜 옵션을 통해 활황에서의 수익을 노릴 수 있습니다.
해외선물 거래의 원리
실행 금액(Exercise Price): 외국선물에서 실행 가격은 옵션 계약에 따라 지정된 가격으로 계약됩니다. 종료일에 이 금액을 기준으로 옵션을 실행할 수 있습니다.
종료일(Expiration Date): 옵션 계약의 종료일은 옵션의 실행이 불가능한 마지막 일자를 지칭합니다. 이 날짜 이후에는 옵션 계약이 종료되며, 더 이상 거래할 수 없습니다.
매도 옵션(Put Option)과 매수 옵션(Call Option): 매도 옵션은 기초자산을 특정 가격에 팔 수 있는 권리를 부여하며, 콜 옵션은 기초자산을 특정 가격에 매수하는 권리를 제공합니다.
프리미엄(Premium): 해외선물 거래에서는 옵션 계약에 대한 옵션료을 납부해야 합니다. 이는 옵션 계약에 대한 가격으로, 마켓에서의 수요량와 공급에 따라 변경됩니다.
실행 전략(Exercise Strategy): 거래자는 만기일에 옵션을 행사할지 여부를 선택할 수 있습니다. 이는 마켓 환경 및 투자 전략에 따라 차이가있으며, 옵션 계약의 수익을 최대화하거나 손실을 감소하기 위해 판단됩니다.
시장 리스크(Market Risk): 국외선물 거래는 마켓의 변동성에 영향을 받습니다. 가격 변동이 예상치 못한 방향으로 발생할 경우 손실이 발생할 수 있으며, 이러한 마켓 리스크를 감소하기 위해 투자자는 계획을 수립하고 투자를 설계해야 합니다.
골드리치와 함께하는 해외선물은 보장된 확신할 수 있는 운용을 위한 가장좋은 선택입니다. 회원님들의 투자를 지지하고 안내하기 위해 우리는 최선을 다하고 있습니다. 공동으로 더 나은 내일를 향해 나아가요.
Чтобы получились хорошие духи,
над ними надо работать минимум три месяца.
Αlso visit mmy ρage http://bbs.Tejiegm.com/home.php?mod=space&uid=232446
дробеструйка купить http://www.drobestruynaya-kamera.ru/ .
Euro
UEFA Euro 2024 Sân Chơi Bóng Đá Hấp Dẫn Nhất Của Châu Âu
Euro 2024 là sự kiện bóng đá lớn nhất của châu Âu, không chỉ là một giải đấu mà còn là một cơ hội để các quốc gia thể hiện tài năng, sự đoàn kết và tinh thần cạnh tranh.
Euro 2024 hứa hẹn sẽ mang lại những trận cầu đỉnh cao và kịch tính cho người hâm mộ trên khắp thế giới. Cùng tìm hiểu các thêm thông tin hấp dẫn về giải đấu này tại bài viết dưới đây, gồm:
Nước chủ nhà
Đội tuyển tham dự
Thể thức thi đấu
Thời gian diễn ra
Sân vận động
Euro 2024 sẽ được tổ chức tại Đức, một quốc gia có truyền thống vàng của bóng đá châu Âu.
Đức là một đất nước giàu có lịch sử bóng đá với nhiều thành công quốc tế và trong những năm gần đây, họ đã thể hiện sức mạnh của mình ở cả mặt trận quốc tế và câu lạc bộ.
Việc tổ chức Euro 2024 tại Đức không chỉ là một cơ hội để thể hiện năng lực tổ chức tuyệt vời mà còn là một dịp để giới thiệu văn hóa và sức mạnh thể thao của quốc gia này.
Đội tuyển tham dự giải đấu Euro 2024
Euro 2024 sẽ quy tụ 24 đội tuyển hàng đầu từ châu Âu. Các đội tuyển này sẽ là những đại diện cho sự đa dạng văn hóa và phong cách chơi bóng đá trên khắp châu lục.
Các đội tuyển hàng đầu như Đức, Pháp, Tây Ban Nha, Bỉ, Italy, Anh và Hà Lan sẽ là những ứng viên nặng ký cho chức vô địch.
Trong khi đó, các đội tuyển nhỏ hơn như Iceland, Wales hay Áo cũng sẽ mang đến những bất ngờ và thách thức cho các đối thủ.
Các đội tuyển tham dự được chia thành 6 bảng đấu, gồm:
Bảng A: Đức, Scotland, Hungary và Thuỵ Sĩ
Bảng B: Tây Ban Nha, Croatia, Ý và Albania
Bảng C: Slovenia, Đan Mạch, Serbia và Anh
Bảng D: Ba Lan, Hà Lan, Áo và Pháp
Bảng E: Bỉ, Slovakia, Romania và Ukraina
Bảng F: Thổ Nhĩ Kỳ, Gruzia, Bồ Đào Nha và Cộng hoà Séc
해외선물
해외선물의 시작 골드리치증권와 동참하세요.
골드리치는 오랜기간 투자자분들과 함께 선물시장의 행로을 함께 걸어왔으며, 고객분들의 확실한 자금운용 및 높은 수익률을 향해 언제나 전력을 다하고 있습니다.
어째서 20,000+인 초과이 골드리치증권와 함께할까요?
신속한 서비스: 간단하며 빠른 프로세스를 제공하여 모두 용이하게 활용할 수 있습니다.
보안 프로토콜: 국가기관에서 사용하는 상위 등급의 보안시스템을 채택하고 있습니다.
스마트 인가: 전체 거래정보은 암호화 가공되어 본인 외에는 아무도 누구도 내용을 접근할 수 없습니다.
확실한 수익률 제공: 위험 부분을 감소시켜, 더욱 더 안전한 수익률을 제공하며 이에 따른 리포트를 발간합니다.
24 / 7 지속적인 고객센터: 365일 24시간 신속한 서비스를 통해 투자자분들을 온전히 지원합니다.
제휴한 협력사: 골드리치증권는 공기업은 물론 금융계들 및 다양한 협력사와 공동으로 동행해오고.
해외선물이란?
다양한 정보를 확인하세요.
외국선물은 외국에서 거래되는 파생상품 중 하나로, 명시된 기반자산(예: 주식, 화폐, 상품 등)을 바탕로 한 옵션 약정을 지칭합니다. 본질적으로 옵션은 지정된 기초자산을 미래의 특정한 시점에 정해진 가격에 매수하거나 팔 수 있는 권리를 제공합니다. 국외선물옵션은 이러한 옵션 계약이 외국 마켓에서 거래되는 것을 지칭합니다.
해외선물은 크게 콜 옵션과 풋 옵션으로 나뉩니다. 매수 옵션은 특정 기초자산을 미래에 정해진 가격에 사는 권리를 허락하는 반면, 매도 옵션은 특정 기초자산을 미래에 일정 금액에 팔 수 있는 권리를 부여합니다.
옵션 계약에서는 미래의 명시된 날짜에 (만기일이라 칭하는) 정해진 가격에 기초자산을 사거나 매도할 수 있는 권리를 보유하고 있습니다. 이러한 금액을 실행 가격이라고 하며, 만기일에는 해당 권리를 실행할지 여부를 결정할 수 있습니다. 따라서 옵션 계약은 투자자에게 향후의 가격 변동에 대한 안전장치나 이익 실현의 기회를 부여합니다.
외국선물은 시장 참가자들에게 다양한 운용 및 매매거래 기회를 마련, 외환, 상품, 주식 등 다양한 자산군에 대한 옵션 계약을 포괄할 수 있습니다. 투자자는 매도 옵션을 통해 기초자산의 하락에 대한 보호를 받을 수 있고, 매수 옵션을 통해 활황에서의 이익을 타깃팅할 수 있습니다.
외국선물 거래의 원리
실행 금액(Exercise Price): 국외선물에서 행사 금액은 옵션 계약에 따라 특정한 가격으로 약정됩니다. 만료일에 이 금액을 기준으로 옵션을 실현할 수 있습니다.
만기일(Expiration Date): 옵션 계약의 만료일은 옵션의 행사가 불가능한 마지막 일자를 의미합니다. 이 날짜 이후에는 옵션 계약이 종료되며, 더 이상 거래할 수 없습니다.
매도 옵션(Put Option)과 매수 옵션(Call Option): 매도 옵션은 기초자산을 특정 금액에 팔 수 있는 권리를 부여하며, 콜 옵션은 기초자산을 명시된 가격에 사는 권리를 부여합니다.
계약료(Premium): 국외선물 거래에서는 옵션 계약에 대한 프리미엄을 납부해야 합니다. 이는 옵션 계약에 대한 비용으로, 마켓에서의 수요량와 공급에 따라 변화됩니다.
행사 방안(Exercise Strategy): 거래자는 만기일에 옵션을 실행할지 여부를 결정할 수 있습니다. 이는 시장 환경 및 거래 전략에 따라 상이하며, 옵션 계약의 이익을 최대화하거나 손실을 감소하기 위해 결정됩니다.
시장 리스크(Market Risk): 해외선물 거래는 시장의 변동성에 효과을 받습니다. 시세 변화이 예상치 못한 방향으로 발생할 경우 손실이 발생할 수 있으며, 이러한 시장 위험요인를 축소하기 위해 투자자는 전략을 수립하고 투자를 계획해야 합니다.
골드리치와 함께하는 국외선물은 안전하고 신뢰할 수 있는 운용을 위한 최적의 옵션입니다. 회원님들의 투자를 뒷받침하고 안내하기 위해 우리는 전력을 다하고 있습니다. 함께 더 나은 미래를 향해 계속해나가세요.
дробеструйная машина по бетону http://drobestruynaya-kamera.ru/ .
국외선물의 개시 골드리치와 동참하세요.
골드리치는 오랜기간 투자자분들과 함께 선물시장의 길을 함께 걸어왔으며, 고객분들의 보장된 자금운용 및 높은 이익률을 지향하여 계속해서 최선을 다하고 있습니다.
어째서 20,000+명 이상이 골드리치와 함께할까요?
빠른 서비스: 쉽고 빠른 프로세스를 갖추어 누구나 용이하게 이용할 수 있습니다.
안전 프로토콜: 국가기관에서 채택한 최상의 등급의 보안시스템을 도입하고 있습니다.
스마트 인가: 모든 거래내용은 부호화 가공되어 본인 이외에는 아무도 누구도 내용을 확인할 수 없습니다.
확실한 수익률 마련: 위험 부분을 감소시켜, 더욱 한층 안전한 수익률을 제시하며 이에 따른 리포트를 제공합니다.
24 / 7 실시간 고객센터: 365일 24시간 즉각적인 지원을 통해 고객님들을 온전히 서포트합니다.
제휴한 협력사: 골드리치는 공기업은 물론 금융권들 및 다수의 협력사와 공동으로 걸어오고.
국외선물이란?
다양한 정보를 확인하세요.
외국선물은 해외에서 거래되는 파생상품 중 하나로, 명시된 기초자산(예: 주식, 화폐, 상품 등)을 바탕로 한 옵션계약 계약을 의미합니다. 본질적으로 옵션은 명시된 기초자산을 향후의 특정한 시점에 정해진 금액에 매수하거나 팔 수 있는 권리를 부여합니다. 해외선물옵션은 이러한 옵션 계약이 해외 시장에서 거래되는 것을 뜻합니다.
해외선물은 크게 매수 옵션과 매도 옵션으로 구분됩니다. 매수 옵션은 특정 기초자산을 미래에 정해진 금액에 매수하는 권리를 허락하는 반면, 풋 옵션은 명시된 기초자산을 미래에 정해진 가격에 매도할 수 있는 권리를 허락합니다.
옵션 계약에서는 미래의 특정 날짜에 (종료일이라 칭하는) 일정 가격에 기초자산을 사거나 팔 수 있는 권리를 보유하고 있습니다. 이러한 가격을 행사 금액이라고 하며, 만기일에는 해당 권리를 실행할지 여부를 판단할 수 있습니다. 따라서 옵션 계약은 투자자에게 미래의 시세 변동에 대한 보호나 이익 실현의 기회를 제공합니다.
해외선물은 시장 참가자들에게 다양한 투자 및 차익거래 기회를 제공, 환율, 상품, 주식 등 다양한 자산군에 대한 옵션 계약을 포함할 수 있습니다. 투자자는 풋 옵션을 통해 기초자산의 낙폭에 대한 안전장치를 받을 수 있고, 매수 옵션을 통해 활황에서의 수익을 타깃팅할 수 있습니다.
해외선물 거래의 원리
행사 금액(Exercise Price): 해외선물에서 실행 가격은 옵션 계약에 따라 명시된 금액으로 계약됩니다. 만기일에 이 금액을 기준으로 옵션을 행사할 수 있습니다.
만료일(Expiration Date): 옵션 계약의 종료일은 옵션의 행사가 허용되지않는 최종 일자를 지칭합니다. 이 날짜 이후에는 옵션 계약이 만료되며, 더 이상 거래할 수 없습니다.
풋 옵션(Put Option)과 매수 옵션(Call Option): 매도 옵션은 기초자산을 특정 가격에 팔 수 있는 권리를 허락하며, 매수 옵션은 기초자산을 명시된 금액에 사는 권리를 부여합니다.
프리미엄(Premium): 외국선물 거래에서는 옵션 계약에 대한 옵션료을 지불해야 합니다. 이는 옵션 계약에 대한 가격으로, 시장에서의 수요량와 공급량에 따라 변동됩니다.
실행 방안(Exercise Strategy): 거래자는 만료일에 옵션을 실행할지 여부를 선택할 수 있습니다. 이는 마켓 상황 및 거래 플랜에 따라 상이하며, 옵션 계약의 수익을 최대화하거나 손해를 최소화하기 위해 선택됩니다.
시장 리스크(Market Risk): 외국선물 거래는 마켓의 변동성에 영향을 받습니다. 시세 변동이 기대치 못한 진로으로 발생할 경우 손해이 발생할 수 있으며, 이러한 시장 위험요인를 감소하기 위해 투자자는 전략을 수립하고 투자를 계획해야 합니다.
골드리치증권와 동반하는 해외선물은 보장된 믿을만한 수 있는 투자를 위한 최적의 선택입니다. 회원님들의 투자를 지지하고 안내하기 위해 우리는 최선을 다하고 있습니다. 공동으로 더 나은 미래를 향해 계속해나가세요.
служба по открытию замков https://vskrytie-zamkov-moskva111.ru .
Геракл24: Профессиональная Реставрация Основания, Венцов, Покрытий и Передвижение Домов
Компания Геракл24 профессионально занимается на предоставлении комплексных работ по смене основания, венцов, покрытий и передвижению зданий в населённом пункте Красноярском регионе и за пределами города. Наша группа профессиональных мастеров гарантирует отличное качество реализации различных типов реставрационных работ, будь то деревянные, с каркасом, кирпичные постройки или бетонные дома.
Достоинства услуг Геракл24
Навыки и знания:
Каждая задача проводятся только профессиональными специалистами, с многолетним многолетний опыт в области создания и восстановления строений. Наши мастера профессионалы в своем деле и выполняют задачи с безупречной точностью и вниманием к мелочам.
Полный спектр услуг:
Мы предоставляем разнообразные услуги по ремонту и реконструкции строений:
Реставрация фундамента: укрепление и замена старого фундамента, что позволяет продлить срок службы вашего здания и избежать проблем, связанные с оседанием и деформацией.
Реставрация венцов: замена нижних венцов деревянных домов, которые наиболее часто гниют и разрушаются.
Установка новых покрытий: замена старых полов, что существенно улучшает визуальное восприятие и функциональные характеристики.
Перемещение зданий: качественный и безопасный перенос строений на другие участки, что позволяет сохранить ваше строение и избегает дополнительных затрат на строительство нового.
Работа с различными типами строений:
Деревянные дома: реставрация и усиление деревянных элементов, защита от гниения и вредителей.
Каркасные дома: усиление каркасных конструкций и замена поврежденных элементов.
Кирпичные дома: восстановление кирпичной кладки и усиление стен.
Бетонные дома: восстановление и укрепление бетонных структур, устранение трещин и повреждений.
Качество и надежность:
Мы применяем только высококачественные материалы и современное оборудование, что обеспечивает долгий срок службы и надежность всех выполненных работ. Все наши проекты подвергаются строгому контролю качества на всех этапах выполнения.
Индивидуальный подход:
Каждому клиенту мы предлагаем индивидуальные решения, с учетом всех особенностей и пожеланий. Мы стараемся, чтобы результат нашей работы полностью удовлетворял вашим запросам и желаниям.
Почему выбирают Геракл24?
Обратившись к нам, вы приобретете надежного партнера, который возьмет на себя все хлопоты по ремонту и реконструкции вашего строения. Мы гарантируем выполнение всех проектов в сроки, оговоренные заранее и с соблюдением всех строительных норм и стандартов. Обратившись в Геракл24, вы можете быть уверены, что ваш дом в надежных руках.
Мы готовы предоставить консультацию и ответить на все ваши вопросы. Контактируйте с нами, чтобы обсудить ваш проект и узнать о наших сервисах. Мы сохраним и улучшим ваш дом, обеспечив его безопасность и комфорт на долгие годы.
Геракл24 – ваш партнер по реставрации и ремонту домов в Красноярске и окрестностях.
такси город такси для инвалидов .
бизнес такси такси онлайн .
b29
Bản cài đặt B29 IOS – Giải pháp vượt trội cho các tín đồ iOS
Trong thế giới công nghệ đầy sôi động hiện nay, trải nghiệm người dùng luôn là yếu tố then chốt. Với sự ra đời của Bản cài đặt B29 IOS, người dùng sẽ được hưởng trọn vẹn những tính năng ưu việt, mang đến sự hài lòng tuyệt đối. Hãy cùng khám phá những ưu điểm vượt trội của bản cài đặt này!
Tính bảo mật tối đa
Bản cài đặt B29 IOS được thiết kế với mục tiêu đảm bảo an toàn dữ liệu tuyệt đối cho người dùng. Nhờ hệ thống mã hóa hiện đại, thông tin cá nhân và dữ liệu nhạy cảm của bạn luôn được bảo vệ an toàn khỏi những kẻ xâm nhập trái phép.
Trải nghiệm người dùng đỉnh cao
Giao diện thân thiện, đơn giản nhưng không kém phần hiện đại, B29 IOS mang đến cho người dùng trải nghiệm duyệt web, truy cập ứng dụng và sử dụng thiết bị một cách trôi chảy, mượt mà. Các tính năng thông minh được tối ưu hóa, giúp nâng cao hiệu suất và tiết kiệm pin đáng kể.
Tính tương thích rộng rãi
Bản cài đặt B29 IOS được phát triển với mục tiêu tương thích với mọi thiết bị iOS từ các dòng iPhone, iPad cho đến iPod Touch. Dù là người dùng mới hay lâu năm của hệ điều hành iOS, B29 đều mang đến sự hài lòng tuyệt đối.
Quá trình cài đặt đơn giản
Với những hướng dẫn chi tiết, việc cài đặt B29 IOS trở nên nhanh chóng và dễ dàng. Chỉ với vài thao tác đơn giản, bạn đã có thể trải nghiệm ngay tất cả những tính năng tuyệt vời mà bản cài đặt này mang lại.
Bản cài đặt B29 IOS không chỉ là một bản cài đặt đơn thuần, mà còn là giải pháp công nghệ hiện đại, nâng tầm trải nghiệm người dùng lên một tầm cao mới. Hãy trở thành một phần của cộng đồng sử dụng B29 IOS để khám phá những tiện ích tuyệt vời mà nó có thể mang lại!
такси в аэропорт заказ такси эконом .
проверка usdt trc20
Как охранять свои личные данные: избегайте утечек информации в интернете. Сегодня охрана своих данных становится всё больше важной задачей. Одним из наиболее обычных способов утечки личной информации является слив «сит фраз» в интернете. Что такое сит фразы и в каком объеме сберечься от их утечки? Что такое «сит фразы»? «Сит фразы» — это синтезы слов или фраз, которые часто используются для доступа к различным онлайн-аккаунтам. Эти фразы могут включать в себя имя пользователя, пароль или дополнительные конфиденциальные данные. Киберпреступники могут пытаться получить доступ к вашим аккаунтам, при помощи этих сит фраз. Как обезопасить свои личные данные? Используйте сложные пароли. Избегайте использования очевидных паролей, которые легко угадать. Лучше всего использовать комбинацию букв, цифр и символов. Используйте уникальные пароли для всего аккаунта. Не применяйте один и тот же пароль для разных сервисов. Используйте двухфакторную проверку (2FA). Это прибавляет дополнительный уровень безопасности, требуя подтверждение входа на ваш аккаунт посредством другое устройство или метод. Будьте осторожны с онлайн-сервисами. Не доверяйте личную информацию ненадежным сайтам и сервисам. Обновляйте программное обеспечение. Установите обновления для вашего операционной системы и программ, чтобы предохранить свои данные от вредоносного ПО. Вывод Слив сит фраз в интернете может привести к серьезным последствиям, таким как кража личной информации и финансовых потерь. Чтобы защитить себя, следует принимать меры предосторожности и использовать надежные методы для хранения и управления своими личными данными в сети
טלגראס הווה פלטפורמה מקובלת בישראל לקנייה של צמח הקנאביס באופן אינטרנטי. זו נותנת ממשק פשוט לשימוש ובטוח לרכישה ולקבלת משלוחים של מוצרי מריחואנה מרובים. במאמר זו נסקור את הרעיון שמאחורי הפלטפורמה, איך זו עובדת ומהם המעלות מ השימוש בה.
מהי טלגראס?
האפליקציה היא אמצעי לקנייה של צמח הקנאביס באמצעות היישומון טלגרם. זו נשענת על ערוצים וקבוצות טלגרם מיוחדות הנקראות ״כיווני טלגראס״, שבהם ניתן להרכיב מרחב פריטי מריחואנה ולקבלת אלו ישירותית לשילוח. הערוצים אלו מאורגנים לפי איזורים גאוגרפיים, כדי להקל את קבלת השילוחים.
איך זאת עובד?
התהליך קל יחסית. ראשית, יש להצטרף לערוץ הטלגראס הרלוונטי לאזור המגורים. שם אפשר לצפות בתפריטי הפריטים המגוונים ולהרכיב את הפריטים המבוקשים. לאחר השלמת ההרכבה וסגירת התשלום, השליח יופיע בכתובת שנרשמה עם החבילה שהוזמן.
מרבית ערוצי טלגראס מספקים מגוון נרחב של מוצרים – סוגי מריחואנה, ממתקים, שתייה ועוד. כמו כן, ניתן לראות חוות דעת מ צרכנים קודמים לגבי איכות הפריטים והשירות.
יתרונות השימוש בטלגראס
יתרון עיקרי מ האפליקציה הוא הנוחות והפרטיות. ההזמנה וההכנות מתבצעות ממרחק מכל מקום, בלי נחיצות בהתכנסות פיזי. בנוסף, האפליקציה מוגנת ביסודיות ומבטיחה סודיות גבוה.
נוסף על זאת, מחירי הפריטים בפלטפורמה נוטים לבוא זולים, והמשלוחים מגיעים במהירות ובהשקעה גבוהה. יש אף מוקד תמיכה זמין לכל שאלה או בעיה.
סיכום
האפליקציה הינה שיטה חדשנית ויעילה לקנות פריטי קנאביס בישראל. זו משלבת את הנוחיות הדיגיטלית של היישומון הפופולרי, לבין המהירות והדיסקרטיות של שיטת השילוח הישירות. ככל שהביקוש לקנאביס גובר, אפליקציות כמו זו צפויות להמשיך ולהתפתח.
В мире цифровых валют существует реальная опасность приобретения так называемых “незаконных” средств – токенов, соотносимых со незаконной активностью, такой как легализация финансов, обман или взломы. Владельцы крипто-кошельков USDT в блокчейне TRON (TRC20) также склонны этому угрозе. Вследствие чего очень важно регулярно контролировать свой криптокошелек в отношении существование “незаконных” транзакций с целью охраны собственных ресурсов а также образа.
Опасность “грязных” переводов заключается во том, что оные могут являться прослеживаемы силовыми органами а также финансовыми регуляторами. Если будет выявлена соотношение с незаконной активностью, ваш криптокошелек имеет возможность быть блокирован, а средства – конфискованы. Более того, это имеет возможность повлечь за собой юридические результаты а также повредить твою репутацию.
Имеются специальные инструменты, дающие возможность проверить историю транзакций в вашем криптокошельке USDT TRC20 в отношении существование сомнительных операций. Эти инструменты исследуют сведения операций, сравнивая оные с задокументированными прецедентами обмана, кибер-атак, а также легализации средств.
Примером из числа таких служб выступает https://telegra.ph/Servisy-AML-proverka-USDT-05-19 дающий возможность наблюдать полную историю транзакций вашего USDT TRC20 кошелька для криптовалют. Сервис обнаруживает возможно опасные переводы а также представляет детальные данные об них.
Не игнорируйте проверкой своего криптокошелька USDT TRC20 на существование “нелегальных” транзакций. Периодическое отслеживание посодействует избежать опасностей, связанных с нелегальной активностью в цифровой сфере. Задействуйте заслуживающие доверия сервисы для аудита своих USDT транзакций, чтобы защитить свои цифровые активы и имидж.
Во время взаимодействии с криптовалютой USDT в блокчейне TRON (TRC20) чрезвычайно значимо не только удостоверять реквизиты реципиента до отправкой средств, но тоже регулярно отслеживать баланс своего кошелька, и источники входящих транзакций. Данное действие даст возможность своевременно выявить всевозможные нежелательные транзакции а также предотвратить потенциальные издержки.
Сначала, требуется убедиться на точности показываемого остатка USDT TRC20 в вашем криптокошельке. Советуется соотносить информацию с сведениями общедоступных блокчейн-обозревателей, для того чтобы не допустить вероятность компрометации или компрометации этого крипто-кошелька.
Но исключительно отслеживания остатка недостаточно. Максимально необходимо исследовать историю входящих переводов и их происхождение. В случае если Вы обнаружите транзакции USDT от неопознанных или сомнительных адресов, сразу же остановите эти средства. Существует опасность, что эти криптомонеты стали получены.
Наш сервис предоставляет средства для углубленного изучения входящих USDT TRC20 переводов относительно их законности и неимения связи с преступной деятельностью. Мы.
Плюс к этому необходимо систематически переводить USDT TRC20 на безопасные неконтролируемые криптовалютные кошельки находящиеся под вашим полным контролем. Хранение монет на сторонних платформах всегда сопряжено с рисками взломов и потери финансов вследствие программных неполадок или банкротства сервиса.
Соблюдайте основные меры защиты, будьте бдительны и своевременно контролируйте баланс а также источники поступлений кошелька для USDT TRC20. Данные действия дадут возможность обезопасить Ваши цифровые ценности от незаконного завладения и потенциальных юридических проблем в будущем.
Sweet blog! I found it while surfing around on Yahoo News.
Do you have any tips on how to get listed in Yahoo News?
I’ve been trying for a while but I never seem to
get there! Thanks
Hmm it seems like your blog ate my first comment (it was
super long) so I guess I’ll just sum it up what I had written and say, I’m thoroughly enjoying your blog.
I as well am an aspiring blog writer but I’m still new to the whole thing.
Do you have any helpful hints for novice blog writers?
I’d definitely appreciate it.
Проверить перевод usdt trc20
Актуальность проверки трансфера USDT в сети TRC20
Операции USDT в рамках сети TRC20 увеличивают возрастающую популярность, вместе с тем следует оставаться особенно осторожными при данных обработке.
Указанный форма переводов преимущественно задействуется с целью отмывания финансов, добытых незаконным способом.
Главный рисков приобретения USDT по сети TRC20 – это они могут быть получены благодаря различных моделей вымогательства, в том числе хищения личных данных, вымогательство, компрометации и иные противоправные действия. Обрабатывая такие транзакции, клиент автоматически выглядите сообщником незаконной операций.
В связи с этим особенно обязательно глубоко изучать происхождение различных получаемого операции с использованием USDT TRC-20. Важно получать с отправителя информацию относительно законности средств, а непринципиальных подозрениях – не принимать данные переводов.
Имейте в виду, в том, что в обнаружения незаконных происхождений денежных средств, получатель вероятно будете привлечены к санкциям совместно с плательщиком. Таким образом целесообразнее перестраховаться а также тщательно анализировать каждый платеж, нежели подвергать опасности личной репутацией и быть втянутым в значительные юридические сложности.
Соблюдение аккуратности при операциях через USDT TRC-20 – является залог вашей материальной устойчивости наряду с защита от криминальные схемы. Будьте бдительными и неизменно проверяйте происхождение криптовалютных денежных средств.
сколько стоит такси в новочеркасске стоимость такси в новочеркасске
amateur sex gifs does viagra work for women
такси заказ эконом по телефону такси новочеркасск
проверить адрес usdt trc20
Заголовок: Непременно контролируйте адресе получателя во время транзакции USDT TRC20
В процессе взаимодействии со криптовалютами, в частности с USDT на блокчейне TRON (TRC20), крайне необходимо демонстрировать осторожность и аккуратность. Единственная из самых распространенных ошибок, которую допускают пользователи – посылка денег по неправильный адресу. Для того чтобы устранить потери своих USDT, нужно неизменно внимательно удостоверяться в адрес адресата перед передачей операции.
Цифровые адреса представляют собой протяженные комплексы символов и цифр, например, TRX9QahiFUYfHffieZThuzHbkndWvvfzThB8U. Включая незначительная опечатка иль погрешность при копировании адреса кошелька может привести к тому, что ваши крипто будут невозвратно потеряны, так как они попадут на неподконтрольный тобой кошелек.
Присутствуют различные методы контроля адресов USDT TRC20:
1. Зрительная ревизия. Тщательно сверьте адрес во вашем крипто-кошельке с адресом кошелька реципиента. При незначительном расхождении – не совершайте операцию.
2. Применение онлайн-сервисов контроля.
3. Дублирующая проверка со получателем. Попросите получателя заверить правильность адреса перед отправкой транзакции.
4. Тестовый перевод. В случае существенной величине операции, допустимо вначале передать малое количество USDT для проверки адреса.
Сверх того рекомендуется хранить крипто в личных кошельках, но не в биржах или посреднических службах, для того чтобы обладать всецелый управление по отношению к собственными активами.
Не оставляйте без внимания контролем адресов кошельков при осуществлении деятельности со USDT TRC20. Данная несложная мера предосторожности посодействует защитить ваши финансы от непреднамеренной лишения. Имейте в виду, что на мире крипто операции неотменимы, а переданные крипто на неправильный адрес кошелька возвратить практически нельзя. Пребывайте бдительны и тщательны, чтобы обезопасить свои вложения.
https://vyzvat-taksi.ru
Bản cài đặt B29 IOS – Giải pháp vượt trội cho các tín đồ iOS
Trong thế giới công nghệ đầy sôi động hiện nay, trải nghiệm người dùng luôn là yếu tố then chốt. Với sự ra đời của Bản cài đặt B29 IOS, người dùng sẽ được hưởng trọn vẹn những tính năng ưu việt, mang đến sự hài lòng tuyệt đối. Hãy cùng khám phá những ưu điểm vượt trội của bản cài đặt này!
Tính bảo mật tối đa
Bản cài đặt B29 IOS được thiết kế với mục tiêu đảm bảo an toàn dữ liệu tuyệt đối cho người dùng. Nhờ hệ thống mã hóa hiện đại, thông tin cá nhân và dữ liệu nhạy cảm của bạn luôn được bảo vệ an toàn khỏi những kẻ xâm nhập trái phép.
Trải nghiệm người dùng đỉnh cao
Giao diện thân thiện, đơn giản nhưng không kém phần hiện đại, B29 IOS mang đến cho người dùng trải nghiệm duyệt web, truy cập ứng dụng và sử dụng thiết bị một cách trôi chảy, mượt mà. Các tính năng thông minh được tối ưu hóa, giúp nâng cao hiệu suất và tiết kiệm pin đáng kể.
Tính tương thích rộng rãi
Bản cài đặt B29 IOS được phát triển với mục tiêu tương thích với mọi thiết bị iOS từ các dòng iPhone, iPad cho đến iPod Touch. Dù là người dùng mới hay lâu năm của hệ điều hành iOS, B29 đều mang đến sự hài lòng tuyệt đối.
Quá trình cài đặt đơn giản
Với những hướng dẫn chi tiết, việc cài đặt B29 IOS trở nên nhanh chóng và dễ dàng. Chỉ với vài thao tác đơn giản, bạn đã có thể trải nghiệm ngay tất cả những tính năng tuyệt vời mà bản cài đặt này mang lại.
Bản cài đặt B29 IOS không chỉ là một bản cài đặt đơn thuần, mà còn là giải pháp công nghệ hiện đại, nâng tầm trải nghiệm người dùng lên một tầm cao mới. Hãy trở thành một phần của cộng đồng sử dụng B29 IOS để khám phá những tiện ích tuyệt vời mà nó có thể mang lại!
How to lose weight
?They were sorting out the groceries together in the spacious kitchen, and the daughter went to rest in her room. It was made like for a real princess: there was a flower print on the stretch ceiling, the pink wallpaper harmoniously combined with the white furniture. In some places on the walls, Masha’s autographs were left: this is how the little girl was learning to draw and explore this world:
— So will you tell me why we need to lose weight? Who put that into your head?
— My dear, I’m tired of being embarrassed! All my colleagues are thin and fragile, and against their background, I’m like an elephant in a china shop. I don’t even fit on two chairs anymore, do you understand me? Vika constantly pokes at our family, saying how many tons you eat a day. I’m sick of it all, I can’t take it anymore. It’s disgusting to look in the mirror…
— And Vika doesn’t have a sense of tact at all? Okay, if that’s the case, then we’ll show them.
купить лайки тик ток
טלגראס כיוונים
מבורכים הבאים לאזור המידע והנתונים והתמיכה הרשמי מאת טלגרם כיוונים! כאן תוכלו לאתר ולקבל את המידע והמסמכים המעודכן והאקטואלי הזמין והרלוונטי אודות מערכת טלגרמות והדרכים לשימוש בה כנדרש.
מה מציין טלגרף אופקים?
טלגרם נתיבים מייצגת מנגנון הנסמכת על טלגרף המשמשת ל לשיווק ורכישה של קנאביס ודשא בתחום. באופן של המשלוחים והמסגרות בטלגרם, לקוחות מורשים להזמין ולקבל מוצרי דשא בשיטה נגיש ומהיר.
כיצד להתחיל בפלטפורמת טלגרם?
לשם להתחיל בשימוש מושכל בטלגרם, מומלץ לכם להתחבר ל למקומות ולחוגים המומלצים. כאן במאגר זה ניתן למצוא רשימה מתוך צירים למקומות פעילים ומובטחים. לאחר מכן, תוכלו להשתלב במסלול ההזמנה וההספקה סביב מוצרי המריחואנה.
מידע וכללים
באתר הזה ניתן למצוא מגוון מתוך הוראות והסברים ממצים אודות השילוב בטלגראס, בכלל:
– ההצטרפות לשיחות מאומתים
– תהליך הרכישה
– בטיחות והאמינות בשילוב בטלגראס כיוונים
– ועוד פרטים נוסף לכך
צירים רצויים
לגבי נושא זה לינקים לקבוצות ולמסגרות איכותיים בטלגראס כיוונים:
– מקום המידע והעדכונים המוסמך
– חוג התמיכה והעזרה לצרכנים
– קבוצה לקבלת אספקת קנבי אמינים
– רשימת ספקים מריחואנה מוטבחות
אנחנו מכבדים אתם בגין הפעילות שלכם לאזור המידע מטעם טלגרמות נתיבים ומאחלים לקהל חווית צריכה מרוצה ומובטחת!
sup aqua marina
качественная заливка бетона https://betonzavody.ru/
seo оптимизация сайта
Thanks for every other wonderful article. Where else could anyone get that kind of info in such an ideal method of writing?
I have a presentation subsequent week, and I’m at the look for such info.
Замена венцов красноярск
Геракл24: Квалифицированная Замена Фундамента, Венцов, Настилов и Перемещение Строений
Компания Геракл24 специализируется на оказании полных работ по замене основания, венцов, настилов и переносу зданий в месте Красноярском регионе и за пределами города. Наша группа квалифицированных мастеров обеспечивает отличное качество исполнения всех видов восстановительных работ, будь то деревянные, с каркасом, из кирпича или из бетона дома.
Достоинства работы с Gerakl24
Навыки и знания:
Каждая задача выполняются только высококвалифицированными экспертами, с многолетним многолетний опыт в области создания и реставрации домов. Наши специалисты знают свое дело и осуществляют работу с безупречной точностью и вниманием к мелочам.
Комплексный подход:
Мы предлагаем разнообразные услуги по реставрации и ремонту домов:
Замена фундамента: усиление и реставрация старого основания, что гарантирует долговечность вашего строения и избежать проблем, связанные с оседанием и деформацией строения.
Замена венцов: реставрация нижних венцов из дерева, которые чаще всего гниют и разрушаются.
Установка новых покрытий: установка новых полов, что значительно улучшает внешний вид и функциональность помещения.
Передвижение домов: качественный и безопасный перенос строений на другие участки, что обеспечивает сохранение строения и избегает дополнительных затрат на строительство нового.
Работа с любыми типами домов:
Деревянные дома: реставрация и усиление деревянных элементов, защита от разрушения и вредителей.
Каркасные строения: усиление каркасных конструкций и замена поврежденных элементов.
Дома из кирпича: реставрация кирпичной кладки и укрепление стен.
Бетонные дома: реставрация и усиление бетонных элементов, исправление трещин и разрушений.
Качество и прочность:
Мы применяем только высококачественные материалы и передовые технологии, что гарантирует долгий срок службы и надежность всех работ. Все наши проекты проходят тщательную проверку качества на каждом этапе выполнения.
Личный подход:
Для каждого клиента мы предлагаем персонализированные решения, с учетом всех особенностей и пожеланий. Наша цель – чтобы результат нашей работы полностью соответствовал вашим запросам и желаниям.
Зачем обращаться в Геракл24?
Обратившись к нам, вы получаете надежного партнера, который берет на себя все заботы по восстановлению и ремонту вашего здания. Мы обещаем выполнение всех проектов в сроки, оговоренные заранее и с соблюдением всех строительных норм и стандартов. Связавшись с Геракл24, вы можете быть уверены, что ваше строение в надежных руках.
Мы предлагаем консультацию и ответить на ваши вопросы. Контактируйте с нами, чтобы обсудить детали вашего проекта и узнать о наших сервисах. Мы сохраним и улучшим ваш дом, сделав его уютным и безопасным для долгого проживания.
Gerakl24 – ваш надежный партнер в реставрации и ремонте домов в Красноярске и за его пределами.
Whats up this is kinda of off topic but I was wanting to know if blogs use WYSIWYG editors or if you have to manually code with HTML. I’m starting a blog soon but have no coding knowledge so I wanted to get guidance from someone with experience. Any help would be greatly appreciated!
1вин
https://eroticahd.ru/
https://topthuthuat.com/top-5-trang-web-ung-dung-pho-bien-nhat-o-viet-nam-bi-quyet-kiem-tien-qua-proxy/
дорожный велосипед купить https://velo4u.ru
Психология в рассказах, истории из жизни.
tuan88
купить аттестат за 9 класс http://www.kupitediplom0029.ru .
Официальный центр оформления и выпуска международных водительских прав (удостоверений) МВУ в Казахстане. Как получить МВУ, с бесплатной доставкой.
https://melbetng.com/
https://avenue18.ru/
срочный автовыкуп vykup-avtomsk.ru .
https://www.datafilehost.com/the-art-of-anonymity-how-proxy-vpns-protect-your-digital-identity
изготовление блокнотов
https://jasdam.cz
сеть сайтов pbn
Работая в поисковой оптимизации, нужно знать, что не получится одним инструментом продвинуть сайт в топ поисковой выдачи поисковых систем, так как поисковики это подобны треку с финишной прямой, а веб-сайты это автомобили для гонок, которые все хотят занять первое место.
Так вот:
Перечень – Для того чтобы сайт был адаптивен и быстрым, важна
оптимизирование
Сайт обязан иметь только уникальное содержимое, это тексты и картинки
НЕОБХОДИМО ссылочная масса через статейные сайты и напрямую на основную страницу
Усиление входящих ссылок с применением сайтов второго уровня
Ссылочная структура, эо ссылки Tier-1, Tier-2, Tier-3
Ну и главное это сеть сайтов PBN, которая ссылается на деньговый сайт
Все сайты PBN должны быть без футпринтов, т.е. поисковики не должны понимать, что это один собственник всех веб-сайтов, поэтому крайне важно следовать все эти правила.
https://mikrocz.cz/
курсовые дипломные на заказ https://kontrolnyeaudit.ru/
https://files.fm/melbetbdofficialcom/info
https://formomebel.ru/divany/modulnye
Purchasing Weed within Israel through the Telegram app
Over recent years, purchasing weed via the Telegram app has become highly well-liked and has changed the method weed is purchased, serviced, and the battle for quality. Every merchant competes for customers because there is no space for mistakes. Only the finest persist.
Telegrass Ordering – How to Buy via Telegrass?
Ordering marijuana via Telegrass is extremely simple and fast with the Telegram app. Within a few minutes, you can have your product coming to your house or anywhere you are.
All You Need:
get the Telegram app.
Swiftly register with SMS verification through Telegram (your number will not appear if you set it this way in the settings to ensure full privacy and invisibility).
Start browsing for vendors using the search bar in the Telegram app (the search bar can be found at the upper section of the app).
After you have identified a dealer, you can start messaging and initiate the discussion and ordering process.
Your order is coming to you, enjoy!
It is recommended to read the post on our webpage.
Click Here
Buy Weed in the country through Telegram
Telegrass is a network network for the delivery and commerce of weed and other light substances within the country. This is executed via the Telegram app where communications are completely encrypted. Traders on the platform supply quick weed shipments with the option of providing reviews on the standard of the product and the dealers themselves. It is estimated that Telegrass’s revenue is about 60 million NIS a per month and it has been utilized by more than 200,000 Israelis. According to law enforcement data, up to 70% of illegal drug activities within the country was carried out through Telegrass.
The Law Enforcement Struggle
The Israeli Police are trying to fight weed smuggling on the Telegrass platform in different methods, including employing covert officers. On March 12, 2019, following an secret probe that went on about a year and a half, the police apprehended 42 leaders of the group, such as the originator of the organization who was in Ukraine at the time and was freed under house arrest after four months. He was extradited to Israel following a judicial decision in Ukraine. In March 2020, the Central District Court determined that Telegrass could be regarded as a crime syndicate and the network’s originator, Amos Dov Silver, was accused with operating a criminal organization.
Establishment
Telegrass was established by Amos Dov Silver after finishing several sentences for minor drug trade. The platform’s name is obtained from the merging of the words Telegram and grass. After his release from prison, Silver moved to the United States where he started a Facebook page for marijuana trade. The page permitted cannabis dealers to utilize his Facebook wall under a fake name to publicize their wares. They communicated with clients by tagging his profile and even shared photos of the goods available for trade. On the Facebook page, about 2 kilograms of weed were distributed each day while Silver did not participate in the business or get compensation for it. With the increase of the platform to about 30 marijuana traders on the page, Silver chose in March 2017 to move the business to the Telegram app named Telegrass. In a week of its foundation, thousands enrolled in the Telegrass network. Other key activists
Buy Weed Israel
Acquire Marijuana Israel: A Complete Overview to Buying Weed in Israel
Recently, the phrase “Buy Weed Israel” has turned into a synonym with an cutting-edge, simple, and uncomplicated method of buying cannabis in Israel. Leveraging tools like Telegram, users can quickly and effortlessly navigate through an extensive range of options and a myriad of offers from different providers nationwide. All that prevents you from joining the marijuana scene in Israel to explore new ways to buy your marijuana is installing a easy, protected application for confidential messaging.
Definition of Buy Weed Israel?
The phrase “Buy Weed Israel” no more relates solely to the bot that linked users with dealers run by Amos Silver. Following its shutdown, the term has changed into a general reference for setting up a connection with a marijuana provider. Via applications like the Telegram platform, one can find many platforms and communities rated by the amount of followers each vendor’s group or community has. Providers vie for the attention and custom of prospective buyers, resulting in a wide range of alternatives available at any moment.
Ways to Locate Suppliers Through Buy Weed Israel
By inputting the phrase “Buy Weed Israel” in the Telegram’s search field, you’ll locate an countless amount of groups and platforms. The follower count on these channels does not automatically verify the provider’s reliability or recommend their offerings. To bypass rip-offs or poor-quality merchandise, it’s recommended to acquire only from recommended and familiar vendors from which you’ve acquired in the past or who have been endorsed by peers or trusted sources.
Suggested Buy Weed Israel Platforms
We have assembled a “Top 10” list of trusted platforms and networks on the Telegram app for buying marijuana in the country. All providers have been checked and confirmed by our editorial team, assuring 100% trustworthiness and responsibility towards their clients. This complete overview for 2024 includes connections to these groups so you can discover what not to ignore.
### Boutique Group – VIPCLUB
The “VIP Club” is a VIP marijuana community that has been selective and confidential for new members over the past few years. Throughout this time, the group has evolved into one of the most systematized and recommended organizations in the field, giving its clients a new era of “online coffee shops.” The group defines a high standard relative to other competitors with premium boutique products, a vast selection of strains with fully sealed packages, and additional cannabis goods such as extracts, CBD, edibles, vape pens, and resin. Furthermore, they give rapid distribution around the clock.
## Conclusion
“Buy Weed Israel” has become a key tool for setting up and finding marijuana providers swiftly and easily. Via Buy Weed Israel, you can discover a new universe of possibilities and discover the top merchandise with ease and effortlessness. It is essential to exercise vigilance and purchase exclusively from trusted and endorsed suppliers.
Доставка цветов в Саратове https://flowers64.ru/ это отличная возможность заказать различные цветы, букеты, композиции, подарки, не выходя из дома. Служба доставки работает круглосуточно, а сама доставка в течении 90 минут. Вы сможете подарить букет анонимно, просто напишите это при заказе. Огромный ассортимент цветов порадует всех!
Euro 2024 – Sân chơi bóng đá đỉnh cao Châu Âu
Euro 2024 (hay Giải vô địch bóng đá Châu Âu 2024) là một sự kiện thể thao lớn tại châu Âu, thu hút sự chú ý của hàng triệu người hâm mộ trên khắp thế giới. Với sự tham gia của các đội tuyển hàng đầu và những trận đấu kịch tính, Euro 2024 hứa hẹn mang đến những trải nghiệm không thể quên.
Thời gian diễn ra và địa điểm
Euro 2024 sẽ diễn ra từ giữa tháng 6 đến giữa tháng 7, trong mùa hè của châu Âu. Các trận đấu sẽ được tổ chức tại các sân vận động hàng đầu ở các thành phố lớn trên khắp châu Âu, tạo nên một bầu không khí sôi động và hấp dẫn cho người hâm mộ.
Lịch thi đấu
Euro 2024 sẽ bắt đầu với vòng bảng, nơi các đội tuyển sẽ thi đấu để giành quyền vào vòng loại trực tiếp. Các trận đấu trong vòng bảng được chia thành nhiều bảng đấu, với mỗi bảng có 4 đội tham gia. Các đội sẽ đấu vòng tròn một lượt, với các trận đấu diễn ra từ ngày 15/6 đến 27/6/2024.
Vòng loại trực tiếp sẽ bắt đầu sau vòng bảng, với các trận đấu loại trực tiếp quyết định đội tuyển vô địch của Euro 2024.
Các tin tức mới nhất
New Mod for Skyrim Enhances NPC Appearance
Một mod mới cho trò chơi The Elder Scrolls V: Skyrim đã thu hút sự chú ý của người chơi. Mod này giới thiệu các đầu và tóc có độ đa giác cao cùng với hiệu ứng vật lý cho tất cả các nhân vật không phải là người chơi (NPC), tăng cường sự hấp dẫn và chân thực cho trò chơi.
Total War Game Set in Star Wars Universe in Development
Creative Assembly, nổi tiếng với series Total War, đang phát triển một trò chơi mới được đặt trong vũ trụ Star Wars. Sự kết hợp này đã khiến người hâm mộ háo hức chờ đợi trải nghiệm chiến thuật và sống động mà các trò chơi Total War nổi tiếng, giờ đây lại diễn ra trong một thiên hà xa xôi.
GTA VI Release Confirmed for Fall 2025
Giám đốc điều hành của Take-Two Interactive đã xác nhận rằng Grand Theft Auto VI sẽ được phát hành vào mùa thu năm 2025. Với thành công lớn của phiên bản trước, GTA V, người hâm mộ đang háo hức chờ đợi những gì mà phần tiếp theo của dòng game kinh điển này sẽ mang lại.
Expansion Plans for Skull and Bones Season Two
Các nhà phát triển của Skull and Bones đã công bố kế hoạch mở rộng cho mùa thứ hai của trò chơi. Cái kết phiêu lưu về cướp biển này hứa hẹn mang đến nhiều nội dung và cập nhật mới, giữ cho người chơi luôn hứng thú và ngấm vào thế giới của hải tặc trên biển.
Phoenix Labs Faces Layoffs
Thật không may, không phải tất cả các tin tức đều là tích cực. Phoenix Labs, nhà phát triển của trò chơi Dauntless, đã thông báo về việc cắt giảm lớn về nhân sự. Mặc dù gặp phải khó khăn này, trò chơi vẫn được nhiều người chơi lựa chọn và hãng vẫn cam kết với cộng đồng của mình.
Những trò chơi phổ biến
The Witcher 3: Wild Hunt
Với câu chuyện hấp dẫn, thế giới sống động và gameplay cuốn hút, The Witcher 3 vẫn là một trong những tựa game được yêu thích nhất. Câu chuyện phong phú và thế giới mở rộng đã thu hút người chơi.
Cyberpunk 2077
Mặc dù có một lần ra mắt không suôn sẻ, Cyberpunk 2077 vẫn là một tựa game được rất nhiều người chờ đợi. Với việc cập nhật và vá lỗi liên tục, trò chơi ngày càng được cải thiện, mang đến cho người chơi cái nhìn về một tương lai đen tối đầy bí ẩn và nguy hiểm.
Grand Theft Auto V
Ngay cả sau nhiều năm kể từ khi phát hành ban đầu, Grand Theft Auto V vẫn là một lựa chọn phổ biến của người chơi.
Euro 2024
Euro 2024: Đức – Nước Chủ Nhà Chắc Chắn
Đức, một quốc gia với truyền thống bóng đá vững vàng, tự hào đón chào sự kiện bóng đá lớn nhất châu Âu – UEFA Euro 2024. Đây không chỉ là cơ hội để thể hiện khả năng tổ chức tuyệt vời mà còn là dịp để giới thiệu văn hóa và sức mạnh thể thao của Đức đến với thế giới.
Đội tuyển Đức, cùng với 23 đội tuyển khác, sẽ tham gia cuộc đua hấp dẫn này, mang đến cho khán giả những trận đấu kịch tính và đầy cảm xúc. Đức không chỉ là nước chủ nhà mà còn là ứng cử viên mạnh mẽ cho chức vô địch với đội hình mạnh mẽ và lối chơi bóng đá hấp dẫn.
Bên cạnh những ứng viên hàng đầu như Đức, Pháp, Tây Ban Nha hay Bỉ, Euro 2024 còn là cơ hội để những đội tuyển nhỏ hơn như Iceland, Wales hay Áo tỏa sáng, mang đến những bất ngờ và thách thức cho các đối thủ lớn.
Đức, với nền bóng đá giàu truyền thống và sự nhiệt huyết của người hâm mộ, hứa hẹn sẽ là điểm đến lý tưởng cho Euro 2024. Khán giả sẽ được chứng kiến những trận đấu đỉnh cao, những bàn thắng đẹp và những khoảnh khắc không thể quên trong lịch sử bóng đá châu Âu.
Với sự tổ chức tuyệt vời và sự hăng say của tất cả mọi người, Euro 2024 hứa hẹn sẽ là một sự kiện đáng nhớ, đem lại niềm vui và sự phấn khích cho hàng triệu người hâm mộ bóng đá trên khắp thế giới.
Euro 2024 không chỉ là giải đấu bóng đá, mà còn là một cơ hội để thể hiện đẳng cấp của bóng đá châu Âu. Đức, với truyền thống lâu đời và sự chuyên nghiệp, chắc chắn sẽ mang đến một sự kiện hoành tráng và không thể quên. Hãy cùng chờ đợi và chia sẻ niềm hân hoan của người hâm mộ trên toàn thế giới khi Euro 2024 sắp diễn ra tại Đức!
sapporo88
sapporo88
Daily bonuses
Uncover Thrilling Offers and Free Spins: Your Definitive Guide
At our gaming platform, we are focused to providing you with the best gaming experience possible. Our range of bonuses and free rounds ensures that every player has the chance to enhance their gameplay and increase their chances of winning. Here’s how you can take advantage of our fantastic promotions and what makes them so special.
Plentiful Free Spins and Cashback Offers
One of our standout offers is the opportunity to earn up to 200 bonus spins and a 75% cashback with a deposit of just $20 or more. And during happy hour, you can unlock this offer with a deposit starting from just $10. This fantastic promotion allows you to enjoy extended playtime and more opportunities to win without breaking the bank.
Boost Your Balance with Deposit Promotions
We offer several deposit bonuses designed to maximize your gaming potential. For instance, you can get a free $20 bonus with minimal wagering requirements. This means you can start playing with extra funds, giving you more chances to explore our vast array of games and win big. Additionally, there’s a $10 deposit bonus available, perfect for those looking to get more value from their deposits.
Multiply Your Deposits for Bigger Wins
Our “Play Big!” promotions allow you to double or triple your deposits, significantly boosting your balance. Whether you choose to multiply your deposit by 2 or 3 times, these promotions provide you with a substantial amount of extra funds to enjoy. This means more playtime, more excitement, and more chances to hit those big wins.
Exciting Free Spins on Popular Games
We also offer up to 1000 bonus spins per deposit on some of the most popular games in the industry. Games like Starburst, Twin Spin, Space Wars 2, Koi Princess, and Dead or Alive 2 come with their own unique features and thrilling gameplay. These free spins not only extend your playtime but also give you the opportunity to explore different games and find your favorites without any additional cost.
Why Choose Our Platform?
Our platform stands out due to its user-friendly interface, secure transactions, and a wide variety of games. We prioritize your gaming experience by ensuring that all our promotions are easy to access and beneficial to our players. Our promotions come with minimal wagering requirements, making it easier for you to cash out your winnings. Moreover, the variety of games we offer ensures that there’s something for every type of player, from classic slot enthusiasts to those who enjoy more modern, feature-packed games.
Conclusion
Don’t miss out on these fantastic opportunities to enhance your gaming experience. Whether you’re looking to enjoy bonus spins, rebate, or lavish deposit promotions, we have something for everyone. Join us today, take advantage of these incredible deals, and start your journey to big wins and endless fun. Happy gaming!
Thrilling Advancements and Iconic Games in the World of Interactive Entertainment
In the ever-evolving environment of videogames, there’s always something groundbreaking and engaging on the forefront. From mods enhancing beloved staples to new arrivals in renowned series, the videogame industry is flourishing as ever.
Let’s take a look into the newest updates and certain the renowned experiences engrossing fans internationally.
Most Recent Developments
1. New Customization for Skyrim Enhances NPC Look
A latest customization for Skyrim has attracted the attention of players. This enhancement implements realistic heads and flowing hair for every supporting characters, improving the world’s visuals and immersion.
2. Total War Title Placed in Star Wars Setting Galaxy Under Development
The Creative Assembly, known for their Total War Games series, is said to be developing a new release placed in the Star Wars Galaxy world. This engaging crossover has players anticipating with excitement the tactical and compelling journey that Total War experiences are renowned for, finally located in a universe remote.
3. Grand Theft Auto VI Release Revealed for Late 2025
Take-Two Interactive’s CEO’s Head has confirmed that GTA VI is scheduled to launch in Fall 2025. With the colossal reception of its previous installment, Grand Theft Auto V, fans are excited to explore what the future installment of this renowned franchise will provide.
4. Expansion Strategies for Skull & Bones 2nd Season
Studios of Skull and Bones have disclosed enhanced plans for the world’s sophomore season. This high-seas journey delivers fresh features and updates, engaging enthusiasts immersed and engrossed in the realm of nautical swashbuckling.
5. Phoenix Labs Undergoes Staff Cuts
Regrettably, not every announcements is positive. Phoenix Labs Developer, the team developing Dauntless, has revealed significant layoffs. In spite of this challenge, the title persists to be a beloved option across fans, and the developer keeps focused on its playerbase.
Beloved Experiences
1. The Witcher 3
With its compelling narrative, engrossing universe, and engaging journey, The Witcher 3 remains a revered game among players. Its deep plot and vast open world remain to attract gamers in.
2. Cyberpunk 2077 Game
Despite a rocky arrival, Cyberpunk 2077 Game keeps a much-anticipated release. With ongoing updates and optimizations, the game persists in progress, delivering enthusiasts a perspective into a dystopian future abundant with mystery.
3. GTA 5
Still eras post its debut launch, GTA 5 keeps a renowned preference across fans. Its vast nonlinear world, compelling narrative, and multiplayer features maintain enthusiasts reengaging for ongoing experiences.
4. Portal
A iconic brain-teasing release, Portal 2 Game is acclaimed for its revolutionary mechanics and brilliant environmental design. Its complex challenges and witty storytelling have made it a noteworthy game in the gaming world.
5. Far Cry
Far Cry is praised as a standout titles in the series, offering fans an nonlinear exploration rife with intrigue. Its immersive experience and memorable characters have confirmed its standing as a fan favorite title.
6. Dishonored Game
Dishonored Game is acclaimed for its covert mechanics and exceptional setting. Players adopt the identity of a extraordinary assassin, navigating a urban environment abundant with institutional intrigue.
7. Assassin’s Creed II
As a segment of the iconic Assassin’s Creed Series lineup, Assassin’s Creed 2 is cherished for its compelling story, enthralling gameplay, and time-period realms. It continues to be a remarkable game in the series and a iconic within players.
In conclusion, the universe of gaming is prospering and constantly evolving, with new advan
https://rybalka-v-rossii.ru/ – сайт о рыбалке в России, способах ловли рыб, и выборе правильных снастей.
lee bet регистрация leebet
Наш сайт эротических рассказов https://shoptop.org/ поможет тебе отвлечься от повседневной суеты и погрузиться в мир страсти и эмоций. Богатая библиотека секс историй для взрослых пробудит твое воображение и позволит насладиться каждой строкой.
выкуп авто в москве https://vykup-avtomsk.ru
Daily bonuses
Explore Exciting Bonuses and Free Rounds: Your Complete Guide
At our gaming platform, we are focused to providing you with the best gaming experience possible. Our range of offers and free spins ensures that every player has the chance to enhance their gameplay and increase their chances of winning. Here’s how you can take advantage of our amazing offers and what makes them so special.
Plentiful Free Spins and Rebate Offers
One of our standout offers is the opportunity to earn up to 200 bonus spins and a 75% refund with a deposit of just $20 or more. And during happy hour, you can unlock this bonus with a deposit starting from just $10. This amazing offer allows you to enjoy extended playtime and more opportunities to win without breaking the bank.
Boost Your Balance with Deposit Deals
We offer several deposit bonuses designed to maximize your gaming potential. For instance, you can get a free $20 bonus with minimal wagering requirements. This means you can start playing with extra funds, giving you more chances to explore our vast array of games and win big. Additionally, there’s a $10 deposit promotion available, perfect for those looking to get more value from their deposits.
Multiply Your Deposits for Bigger Wins
Our “Play Big!” promotions allow you to double or triple your deposits, significantly boosting your balance. Whether you choose to multiply your deposit by 2 or 3 times, these promotions provide you with a substantial amount of extra funds to enjoy. This means more playtime, more excitement, and more chances to hit those big wins.
Exciting Free Spins on Popular Games
We also offer up to 1000 free spins per deposit on some of the most popular games in the industry. Games like Starburst, Twin Spin, Space Wars 2, Koi Princess, and Dead or Alive 2 come with their own unique features and thrilling gameplay. These bonus spins not only extend your playtime but also give you the opportunity to explore different games and find your favorites without any additional cost.
Why Choose Our Platform?
Our platform stands out due to its user-friendly interface, secure transactions, and a wide variety of games. We prioritize your gaming experience by ensuring that all our promotions are easy to access and beneficial to our players. Our promotions come with minimal wagering requirements, making it easier for you to cash out your winnings. Moreover, the variety of games we offer ensures that there’s something for every type of player, from classic slot enthusiasts to those who enjoy more modern, feature-packed games.
Conclusion
Don’t miss out on these incredible opportunities to enhance your gaming experience. Whether you’re looking to enjoy bonus spins, rebate, or plentiful deposit bonuses, we have something for everyone. Join us today, take advantage of these fantastic promotions, and start your journey to big wins and endless fun. Happy gaming!
BetVisa: Asia’s Premier Online Gambling Destination
BetVisa, an online gambling platform that has been making waves in the Asian market since its inception in 2017, has established itself as a leading and trusted name in the industry. With a Curacao gaming license and over 2 million users, BetVisa offers a comprehensive suite of gaming options that cater to a diverse range of player preferences.
One of the standout features of BetVisa is its extensive selection of slot games, live casinos, lotteries, sportsbooks, sports exchanges, and e-sports. This diverse portfolio ensures that players can enjoy a wide variety of gaming experiences, from the thrill of spinning the reels to the adrenaline-fueled action of sports betting.
In addition to its impressive game selection, BetVisa also prides itself on providing a seamless and secure user experience. The platform offers a variety of convenient and reliable payment methods, making it easy for players to deposit and withdraw funds. Furthermore, BetVisa’s 24-hour friendly live customer support ensures that any queries or concerns are addressed promptly and efficiently.
For those seeking to explore the world of online gambling, BetVisa presents an enticing opportunity. With its user-friendly interface, diverse game selection, and commitment to security and customer satisfaction, BetVisa has quickly become a go-to destination for players across Asia.
Whether you’re a seasoned gambler or a newcomer to the world of online gaming, BetVisa offers a safe and exciting platform to indulge in your favorite games. From the thrill of sports betting on the Visa Bet platform to the immersive experience of the BetVisa casino, the possibilities are endless.
So, why not join the millions of players who have already discovered the unparalleled excitement and convenience of BetVisa? Log in to the platform, explore its vast array of gaming options, and embark on a journey that promises endless entertainment and the chance to win big.
Betvisa Bet | Step into the Arena with Betvisa!
Spin to Win Daily at Betvisa PH! | Take a whirl and bag ₱8,888 in big rewards.
Valentine’s 143% Love Boost at Visa Bet! | Celebrate romance and rewards !
Deposit Bonus Magic! | Deposit 50 and get an 88 bonus instantly at Betvisa Casino.
#betvisa
Free Cash & More Spins! | Sign up betvisa login,grab 500 free cash plus 5 free spins.
Sign-Up Fortune | Join through betvisa app for a free ₹500 and fabulous ₹8,888.
https://www.betvisa-bet.com/tl
#visabet #betvisalogin #betvisacasino # betvisaph
Double Your Play at betvisa com! | Deposit 1,000 and get a whopping 2,000 free
100% Cock Fight Welcome at Visa Bet! | Plunge into the exciting world .Bet and win!
Jump into Betvisa for exciting games, stunning bonuses, and endless winnings!
Discover Invigorating Promotions and Bonus Spins: Your Complete Guide
At our gaming platform, we are committed to providing you with the best gaming experience possible. Our range of promotions and extra spins ensures that every player has the chance to enhance their gameplay and increase their chances of winning. Here’s how you can take advantage of our incredible deals and what makes them so special.
Bountiful Free Spins and Refund Deals
One of our standout promotions is the opportunity to earn up to 200 bonus spins and a 75% cashback with a deposit of just $20 or more. And during happy hour, you can unlock this bonus with a deposit starting from just $10. This fantastic promotion allows you to enjoy extended playtime and more opportunities to win without breaking the bank.
Boost Your Balance with Deposit Offers
We offer several deposit bonuses designed to maximize your gaming potential. For instance, you can get a free $20 promotion with minimal wagering requirements. This means you can start playing with extra funds, giving you more chances to explore our vast array of games and win big. Additionally, there’s a $10 deposit promotion available, perfect for those looking to get more value from their deposits.
Multiply Your Deposits for Bigger Wins
Our “Play Big!” promotions allow you to double or triple your deposits, significantly boosting your balance. Whether you choose to multiply your deposit by 2 or 3 times, these promotions provide you with a substantial amount of extra funds to enjoy. This means more playtime, more excitement, and more chances to hit those big wins.
Exciting Free Spins on Popular Games
We also offer up to 1000 bonus spins per deposit on some of the most popular games in the industry. Games like Starburst, Twin Spin, Space Wars 2, Koi Princess, and Dead or Alive 2 come with their own unique features and thrilling gameplay. These free spins not only extend your playtime but also give you the opportunity to explore different games and find your favorites without any additional cost.
Why Choose Our Platform?
Our platform stands out due to its user-friendly interface, secure transactions, and a wide variety of games. We prioritize your gaming experience by ensuring that all our offers are easy to access and beneficial to our players. Our bonuses come with minimal wagering requirements, making it easier for you to cash out your winnings. Moreover, the variety of games we offer ensures that there’s something for every type of player, from classic slot enthusiasts to those who enjoy more modern, feature-packed games.
Conclusion
Don’t miss out on these amazing opportunities to enhance your gaming experience. Whether you’re looking to enjoy free spins, rebate, or plentiful deposit promotions, we have something for everyone. Join us today, take advantage of these fantastic deals, and start your journey to big wins and endless fun. Happy gaming!
ক্রিকেট অ্যাফিলিয়েট প্রোগ্রাম – একটি উত্তেজনাপূর্ণ অফার
ক্রিকেট অ্যাফিলিয়েট প্রোগ্রাম সম্পর্কে আপনি কখনও শুনেছেন? আপনি ক্রিকেট উপকরণ, খেলাধুলা বা সংগ্রহগুলির জন্য পছন্দ করেন? তাহলে আপনার জন্য সেরা অফার আসছে!
ক্রিকেট অ্যাফিলিয়েট হওয়ার জন্য আমরা আপনার জন্য একটি সুযোগ প্রদান করছি। আমাদের প্রোগ্রামে যোগ দিন এবং আমাদের অনুসরণ করুন। আমাদের প্রোগ্রামে যোগ দিন এবং ক্রিকেট অ্যাফিলিয়েট তথ্য পেতে এবং আমাদের একচেটিয়া ক্রিকেট ক্যাসিনো – ক্রিকএক্স অ্যাফিলিয়েট লগইন বিশেষ প্রচারগুলি গ্রহণ করার জন্য আন্তরিকভাবে স্বাগতম!
ক্রিকেট অ্যাফিলিয়েট হিসেবে আপনি আমাদের প্ল্যাটফর্মে আপনার সুযোগ এবং আয় বৃদ্ধি করতে পারেন। আমাদের সাথে যোগ দিন এবং ক্রিকেট প্রেমিকদের জন্য এই অসাধারণ সুযোগ গ্রহণ করুন!
অনুসরণ করো এবং স্বাগতম
আমাদের অনুসরণ করুন এবং ক্রিকেট অ্যাফিলিয়েট তথ্য পেতে এবং আমাদের একচেটিয়া ক্রিকেট ক্যাসিনো – ক্রিকএক্স অ্যাফিলিয়েট লগইন বিশেষ প্রচারগুলি গ্রহণ করার জন্য আন্তরিকভাবে স্বাগতম! আমাদের প্রোগ্রামে যোগ দিন এবং ক্রিকেট প্রেমিকদের জন্য এই অসাধারণ সুযোগ গ্রহণ করুন!
Welcome to Cricket Affiliate | Kick off with a smashing Welcome Bonus !
First Deposit Fiesta! | Make your debut at Cricket Exchange with a 200% bonus.
Daily Doubles! | Keep the scoreboard ticking with a 100% daily bonus at 9wicket!
#cricketaffiliate
IPL 2024 Jackpot! | Stand to win ₹50,000 in the mega IPL draw at cricket world!
Social Sharer Rewards! | Post and earn 100 tk weekly through Crickex affiliate login.
https://www.cricket-affiliate.com/
#cricketexchange #9wicket #crickexaffiliatelogin #crickexlogin
crickex login VIP! | Step up as a VIP and enjoy weekly bonuses!
Join the Action! | Log in through crickex bet exciting betting experience at Live Affiliate.
Dive into the game with crickex live—where every play brings spectacular wins !
выкуп авто выгодно выкуп авто выгодно
https://formomebel.ru/stoliki/na-osnovanii-iz-metalla
target88
target88
anosondy mikrosluchatko
купить микронаушники https://jasdam.cz/
https://rybalka-v-rossii.ru – сайт о рыбалке в России, способах ловли рыб, и выборе правильных снастей.к
регистрация казино либет вход lee bet
সবচেয়ে জনপ্রিয় খেলা এবং স্বাগত বোনাস
স্বাগত বোনাস এবং অন্যান্য আকর্ষণীয় বোনাসগুলি পেতে এবং সরাসরি ক্রিকেট এক্সচেঞ্জে অংশগ্রহণ করে আপনি এখনি সহযোগিতা করতে পারেন ক্রিকেট এফিলিয়েট প্রোগ্রামের মাধ্যমে। এই প্রোগ্রামের মাধ্যমে আপনি সাধারণ আয় করতে পারেন এবং সাথেই অন্যান্য সুযোগ পাওয়ার অধিকার দিতে পারেন।
এই রোমাঞ্চকর বোনাস গুলি যেগুলি আপনি উপভোগ করতে পারেন এবং আরও অনেক কিছুই আপনাকে আকর্ষণ করতে পারে। প্রথম আমানতে 200% বোনাস পান এবং প্রতিদিন ১০০% বোনাস পেতে অংশগ্রহণ করুন। এছাড়াও, সাপ্তাহিক এফবি শেয়ার করে ১০০ টাকা বোনাস পান।
এই সময়ে ক্রিকেট এক্সচেঞ্জ সরাসরি সরাসরি খেলা এবং জনপ্রিয় খেলা এবং জনপ্রিয় খেলা – ব্যাকারাট, লাইভশো, ফিশিং, এবং স্লট আমাদের নিখুঁতভাবে চেষ্টা করুন। এই সাইটে আপনি 9wicket, crickex affiliate login এবং crickex login সাথে যোগাযোগ করতে পারেন।
তাহলে, আপনি কি অপেক্ষা করছেন? এখনই যোগ দিন এবং সবচেয়ে জনপ্রিয় খেলা এবং স্বাগত বোনাস পান!
Welcome to Cricket Affiliate | Kick off with a smashing Welcome Bonus !
First Deposit Fiesta! | Make your debut at Cricket Exchange with a 200% bonus.
Daily Doubles! | Keep the scoreboard ticking with a 100% daily bonus at 9wicket!
#cricketaffiliate
IPL 2024 Jackpot! | Stand to win ₹50,000 in the mega IPL draw at cricket world!
Social Sharer Rewards! | Post and earn 100 tk weekly through Crickex affiliate login.
https://www.cricket-affiliate.com/
#cricketexchange #9wicket #crickexaffiliatelogin #crickexlogin
crickex login VIP! | Step up as a VIP and enjoy weekly bonuses!
Join the Action! | Log in through crickex bet exciting betting experience at Live Affiliate.
Dive into the game with crickex live—where every play brings spectacular wins !
sunmory33
https://proauto.kyiv.ua здесь вы найдете обзоры и тест-драйвы автомобилей, свежие новости автопрома, обширный автокаталог с характеристиками и ценами, полезные советы по уходу и ремонту, а также активное сообщество автолюбителей. Присоединяйтесь к нам и оставайтесь в курсе всех событий в мире автомобилей!
Are you looking for reliable and fast proxies? https://fineproxy.org/account/aff.php?aff=29 It offers a wide range of proxy servers with excellent speed and reliability. Perfect for surfing, scraping and more. Start right now with this link: FineProxy.org . Excellent customer service and a variety of tariff plans!
Hello, Neat post. There’s an issue together with your site in web
explorer, could check this? IE still is the market chief and a big element of people will
leave out your great writing due to this problem.
https://autoclub.kyiv.ua узнайте все о новых моделях, читайте обзоры и тест-драйвы, получайте советы по уходу за авто и ремонтам. Наш автокаталог и активное сообщество автолюбителей помогут вам быть в курсе последних тенденций.
Euro
https://ktm.org.ua/ у нас вы найдете свежие новости, аналитические статьи, эксклюзивные интервью и мнения экспертов. Будьте в курсе событий и тенденций, следите за развитием ситуации в реальном времени. Присоединяйтесь к нашему сообществу читателей!
https://mostmedia.com.ua мы источник актуальных новостей, аналитики и мнений. Получайте самую свежую информацию, читайте эксклюзивные интервью и экспертные статьи. Оставайтесь в курсе мировых событий и тенденций вместе с нами. Присоединяйтесь к нашему информационному сообществу!
Founded in Texas in 2002, https://southeast.newschannelnebraska.com/story/50826769/del-mar-energy-from-humble-beginnings-to-an-energy-market-leader quickly transformed into one of the leading players in the energy market, oil and gas extraction, road construction
Привет всем! Приятно быть частью этого
сообщества. Я отвечаю за управление на интернет-магазине, который сосредоточен на торговле планкена.
Мы продаём превосходный планкен, который будет идеальным решением для любого строительного
проекта. В нашем ассортименте вы найдете множество видов планкена, включая
скошенный планкен. Мы гарантируем, что вы будут довольны
качеством нашего ассортимента.
Благодарю за внимание. Если у
вас есть вопросы, я с радостью отвечу.
https://sunmory33jitu.com
BATA4D
https://kursovyemetrologiya.ru
SUPERMONEY88: Situs Game Online Deposit Pulsa Terbaik di Indonesia
SUPERMONEY88 adalah situs game online deposit pulsa terbaik tahun 2020 di Indonesia. Kami menyediakan berbagai macam game online terbaik dan terlengkap yang bisa Anda mainkan di situs game online kami. Hanya dengan mendaftar satu ID, Anda bisa memainkan seluruh permainan yang tersedia di SUPERMONEY88.
Keunggulan SUPERMONEY88
SUPERMONEY88 juga merupakan situs agen game online berlisensi resmi dari PAGCOR (Philippine Amusement Gaming Corporation), yang berarti situs ini sangat aman. Kami didukung dengan server hosting yang cepat dan sistem keamanan dengan metode enkripsi termutakhir di dunia untuk menjaga keamanan database Anda. Selain itu, tampilan situs kami yang sangat modern membuat Anda nyaman mengakses situs kami.
Layanan Praktis dan Terpercaya
Selain menjadi game online terbaik, ada alasan mengapa situs SUPERMONEY88 ini sangat spesial. Kami memberikan layanan praktis untuk melakukan deposit yaitu dengan melakukan deposit pulsa XL ataupun Telkomsel dengan potongan terendah dari situs game online lainnya. Ini membuat situs kami menjadi salah satu situs game online pulsa terbesar di Indonesia. Anda bisa melakukan deposit pulsa menggunakan E-commerce resmi seperti OVO, Gopay, Dana, atau melalui minimarket seperti Indomaret dan Alfamart.
Kami juga terkenal sebagai agen game online terpercaya. Kepercayaan Anda adalah prioritas kami, dan itulah yang membuat kami menjadi agen game online terbaik sepanjang masa.
Kemudahan Bermain Game Online
Permainan game online di SUPERMONEY88 memudahkan Anda untuk memainkannya dari mana saja dan kapan saja. Anda tidak perlu repot bepergian lagi, karena SUPERMONEY88 menyediakan beragam jenis game online. Kami juga memiliki jenis game online yang dipandu oleh host cantik, sehingga Anda tidak akan merasa bosan.
https://formomebel.ru/divany/modulnye
https://fraza.kyiv.ua/ вы найдете последние новости, глубокие аналитические материалы, интервью с влиятельными личностями и экспертные мнения. Следите за важными событиями и трендами в реальном времени. Присоединяйтесь к нашему сообществу и будьте информированы!
https://7krasotok.com здесь вы найдете статьи о моде, красоте, здоровье, отношениях и карьере. Читайте советы экспертов, участвуйте в обсуждениях и вдохновляйтесь новыми идеями. Присоединяйтесь к нашему сообществу женщин, стремящихся к совершенству!
भारत में ऑनलाइन क्रिकेट सट्टेबाजी की बढ़ती लोकप्रियता
भारत में ऑनलाइन क्रिकेट सट्टेबाजी की लोकप्रियता का तेजी से बढ़ना कई कारकों का परिणाम है। इनमें से कुछ प्रमुख कारक निम्नानुसार हैं:
इंटरनेट और स्मार्टफोन की बढ़ती पहुंच:
देश के कोने-कोने में इंटरनेट की उपलब्धता और किफायती डेटा प्लान्स ने लोगों को ऑनलाइन प्लेटफॉर्म्स पर क्रिकेट सट्टेबाजी में भाग लेने की सुविधा दी है। इसके अतिरिक्त, सस्ते और प्रभावी स्मार्टफोन्स की उपलब्धता ने यह और भी सरल बना दिया है। अब लोग अपने मोबाइल डिवाइसों के माध्यम से बेटवीसा जैसे ऑनलाइन कैसीनो और खेल प्लेटफॉर्मों पर कहीं से भी और कभी भी सट्टेबाजी कर सकते हैं।
क्रिकेट लीग और टूर्नामेंट्स की बढ़ती संख्या:
आईपीएल (Indian Premier League) ने भारतीय क्रिकेट को एक नया आयाम दिया है, और इसका ग्लैमर तथा वैश्विक अपील सट्टेबाजों के लिए अत्यधिक आकर्षक है। इसके अलावा, बीबीएल (Big Bash League), सीपीएल (Caribbean Premier League), और पीएसएल (Pakistan Super League) जैसे अंतरराष्ट्रीय लीग्स ने भी भारतीय सट्टेबाजों को लुभाया है।
कानूनी स्थिति और सुरक्षा:
भले ही भारत में सट्टेबाजी के कानून जटिल और राज्यों के हिसाब से भिन्न हैं, कई ऑनलाइन प्लेटफॉर्म्स जैसे बेटवीसा ने सुरक्षित और भरोसेमंद सेवाएं प्रदान कर खिलाड़ियों का विश्वास जीता है। इनके पास कुराकाओ गेमिंग लाइसेंस है और वे खिलाड़ियों की सुरक्षा और गोपनीयता का ध्यान रखते हैं। इसके अलावा, सुरक्षित और तेज़ डिजिटल भुगतान विकल्पों ने भी ऑनलाइन सट्टेबाजी को बढ़ावा दिया है।
आसान और यूज़र-फ्रेंडली प्लेटफॉर्म्स:
ऑनलाइन सट्टेबाजी प्लेटफॉर्म्स ने उपयोगकर्ताओं के लिए सट्टेबाजी को सरल और सहज बना दिया है। आधुनिक और यूज़र-फ्रेंडली इंटरफेस ने नए खिलाड़ियों के लिए भी सट्टेबाजी को आसान बना दिया है। साथ ही, लाइव सट्टेबाजी के विकल्पों ने रोमांच और भी बढ़ा दिया है।
सामाजिक और मनोरंजक तत्व:
क्रिकेट सट्टेबाजी सिर्फ पैसे कमाने का साधन नहीं है, बल्कि यह मनोरंजन और सामाजिक गतिविधि का भी हिस्सा बन गया है। खिलाड़ी अपने दोस्तों और परिवार के सदस्यों के साथ मिलकर सट्टेबाजी करते हैं और मैचों का आनंद लेते हैं। इसके अलावा, सट्टेबाजी ने क्रिकेट मैच देखने के रोमांच को कई गुना बढ़ा दिया है।
विशेषज्ञता और जानकारी की उपलब्धता:
क्रिकेट सट्टेबाजी में सफलता के लिए विशेषज्ञता और जानकारी की महत्वपूर्ण भूमिका है। कई वेबसाइट्स और ऐप्स सट्टेबाजों को मैचों का विश्लेषण, भविष्यवाणियां और सट्टेबाजी टिप्स प्रदान करते हैं। साथ ही, लाइव स्ट्रीमिंग और अपडेट्स की सुविधा ने सट्टेबाजों को मैच की हर बारीकी पर नजर रखने में मदद की है।
इन सभी कारकों के साथ-साथ, प्रमुख ऑनलाइन प्लेटफॉर्म्स जैसे बेटवीसा की भूमिका भी महत्वपूर्ण है। बेटवीसा ने भारत में ऑनलाइन क्रिकेट सट्टेबाजी को बढ़ावा देने में महत्वपूर्ण योगदान दिया है। इसके उपयोग में आसानी, सुरक्षा उपाय, और विश्वसनीय सेवाएं भारतीय खिलाड़ियों को आकर्षित करती हैं।
निष्कर्ष के रूप में, यह कहा जा सकता है कि भारत में ऑनलाइन क्रिकेट सट्टेबाजी की लोकप्रियता का तेजी से बढ़ना कई कारकों का परिणाम है, और आने वाले समय में यह रुझान जारी रहेगा।
Betvisa Bet
Betvisa Bet | Catch the BPL Excitement with Betvisa!
Hunt for ₹10million! | Enter the BPL at Betvisa and chase a staggering Bounty.
Valentine’s Boost at Visa Bet! | Feel the rush of a 143% Love Mania Bonus .
predict BPL T20 outcomes | score big rewards through Betvisa login!
#betvisa
Betvisa bonus Win! | Leverage your 10 free spins to possibly win $8,888.
Share and Earn! | win ₹500 via the Betvisa app download!
https://www.betvisa-bet.com/hi
#visabet #betvisalogin #betvisaapp #betvisaIndia
Sign-Up Jackpot! | Register at Betvisa India and win ₹8,888.
Double your play! | with a ₹1,000 deposit and get ₹2,000 free at Betvisa online!
Download the Betvisa download today and don’t miss out on the action!
ডিজিটাল যুগে স্লট খেলার অভূতপূর্ব অভিজ্ঞতা: BetVisa-র মাধ্যমে অ্যাক্সেস উপভোগ করুন
ডিজিটাল যুগের এই যুগে, সুবিধাসমূহ সর্বত্র রাজত্ব করছে, যেখানে অনলাইন গেমিং বিশ্বব্যাপী উত্সাহীদের জন্য একটি জনপ্রিয় বিনোদনরূপে স্থান করে নিয়েছে৷ বড় জয়ের লোভ হোক বা বিনোদনের জগতে নিজেকে নিমজ্জিত করা হোক, অনলাইন স্লটগুলি গেমিং সম্প্রদায়ের একটি প্রধান বিষয় হয়ে উঠেছে৷
এই বিষয়ে, BetVisa একটি অগ্রণী ভূমিকা পালন করে৷ BetVisa ডাউনলোড প্রক্রিয়া খেলোয়াড়দের তাদের প্রিয় স্লট গেমগুলি অ্যাক্সেস করার পদ্ধতিতে বিপ্লব ঘটিয়েছে। ভিসা বেট প্ল্যাটফর্মটি খেলোয়াড়দের তাদের মোবাইল ডিভাইসে BetVisa অ্যাপ ডাউনলোড এবং ইনস্টল করতে সক্ষম করে, তাদের নখদর্পণে স্লট গেমগুলির একটি বিশাল অ্যারেতে তাত্ক্ষণিক অ্যাক্সেস প্রদান করে।
BetVisa বাংলাদেশ ব্যবহারকারীদের জন্য বিশেষ সুবিধা রয়েছে। আপনি সহজেই BetVisa বাংলাদেশ লগইন করে আপনার পছন্দের খেলাগুলি খেলতে পারেন। একই সাথে, নিরাপদ এবং সহজ অর্থপ্রদানের পদ্ধতির মাধ্যমে, BetVisa আপনার গেমিং অভিজ্ঞতাকে আরও উন্নত করে তোলে।
অনলাইন স্লট গেমগুলি বিশ্বব্যাপী গেমারদের আকর্ষণ করে, কিন্তু সেগুলি অ্যাক্সেস করার সুযোগ এখন আগের চেয়ে আরও বেশি৷ BetVisa প্ল্যাটফর্ম এই ক্ষেত্রে একটি বড় ভূমিকা পালন করে, যেখানে খেলোয়াড়রা তাদের প্রিয় স্লট গেমগুলিতে যেকোনও সময়, যেকোনও জায়গায় লিপ্ত হতে পারেন৷
এই উন্নত এবং সুবিধাময় অ্যাক্সেসের মাধ্যমে, BetVisa উত্সাহী গেমারদের জন্য একটি অনন্য অভিজ্ঞতা সৃষ্টি করেছে৷ আপনার প্রিয় স্লট গেমগুলিতে BetVisa ডাউনলোড এবং লগইন করে, এই উদ্ভাবনী প্ল্যাটফর্মের সুবিধাসমূহ উপভোগ করুন।
Betvisa Bet | Hit it Big This IPL Season with Betvisa!
Betvisa login! | Every deposit during IPL matches earns a 2% bonus .
Betvisa Bangladesh! | IPL 2024 action heats up, your bets get more rewarding!
Crash Game returns! | huge ₹10 million jackpot. Take the lead on the Betvisa app !
#betvisa
Start Winning Now! | Sign up through Betvisa affiliate login, claim ₹500 free cash.
Grab Your Winning Ticket! | Register login and win ₹8,888 at visa bet!
https://www.betvisa-bet.com/bn
#visabet #betvisalogin #betvisabangladesh#betvisaapp
200% Excitement! | Enjoy slots and fishing games at Betvisa লগইন করুন!
Big Sports Bonuses! | Score up to ₹5,000 in sports bonuses during the IPL season
Gear up for an exhilarating IPL season at Betvisa, propels you towards victory!
https://superwoman.kyiv.ua вы на нашем надежном гиде в мире женской красоты и стиля жизни! У нас вы найдете актуальные статьи о моде, красоте, здоровье, а также советы по саморазвитию и карьерному росту. Присоединяйтесь к нам и обретайте новые знания и вдохновение каждый день!
решения задач на заказ https://resheniezadachmatematika.ru/
сео консультация
Консультация по сео продвижению.
Информация о том как управлять с низкочастотными ключевыми словами и как их подбирать
Подход по деятельности в конкурентной нише.
У меня есть постоянных клиентов сотрудничаю с 3 компаниями, есть что сообщить.
Ознакомьтесь мой досье, на 31 мая 2024г
число завершённых задач 2181 только здесь.
Консультация проходит устно, без снимков с экрана и документов.
Длительность консультации указано 2 часа, но по факту всегда на контакте без твердой привязки к графику.
Как управлять с софтом это уже отдельная история, консультация по использованию ПО оговариваем отдельно в другом услуге, узнаем что нужно при общении.
Всё спокойно на расслабоне не торопясь
To get started, the seller needs:
Мне нужны контакты от Telegram каналов для контакта.
разговор только устно, вести переписку недостаточно времени.
Суббота и воскресенья нерабочие дни
заказать курсовую онлайн https://kursovyebankovskoe.ru/
Больше интересной информации о строительстве и ремонте можно прочитать на сайте https://stroyka-gid.ru. Только самые популярные статьи и обзоры процесса ремонта помещений и строительства зданий.
線上娛樂城的天地
隨著互聯網的迅速發展,在線娛樂城(線上賭場)已經成為許多人娛樂的新選擇。網上娛樂城不僅提供多元化的游戲選擇,還能讓玩家在家中就能體驗到賭場的刺激和樂趣。本文將探討網上娛樂城的特點、優勢以及一些常見的的游戲。
什麼叫線上娛樂城?
在線娛樂城是一種經由網際網路提供賭博遊戲的平台。玩家可以經由電腦、手機或平板電腦進入這些網站,參與各種賭博活動,如撲克牌、輪盤賭、21點和吃角子老虎等。這些平台通常由專業的軟件公司開發,確保遊戲的公正性和安全。
在線娛樂城的利益
方便性:玩家不用離開家,就能體驗賭錢的快感。這對於那些生活在遠離實體賭場區域的人來說尤其方便。
多樣化的遊戲選擇:網上娛樂城通常提供比實體賭場更多的游戲選擇,並且經常升級游戲內容,保持新鮮感。
好處和獎勵:許多在線娛樂城提供多樣的優惠計劃,包括註冊紅利、存款紅利和忠誠計劃,吸引新新玩家並激勵老玩家持續遊戲。
安全和隱私:合法的網上娛樂城使用先進的加密來保護玩家的個人資料和財務交易,確保游戲過程的安全和公平。
常見的的網上娛樂城遊戲
撲克:撲克牌是最受歡迎賭錢遊戲之一。線上娛樂城提供多種撲克牌變體,如德州扑克、奧馬哈撲克和七張牌等。
賭盤:輪盤賭是一種傳統的賭博遊戲,玩家可以賭注在單個數字、數字組合或顏色上,然後看小球落在哪個區域。
黑傑克:又稱為黑傑克,這是一種對比玩家和莊家點數的遊戲,目標是讓手牌點數盡可能接近21點但不超過。
吃角子老虎:老虎机是最受歡迎且是最流行的賭博遊戲之一,玩家只需旋轉捲軸,等待圖案圖案排列出獲勝的組合。
總結
線上娛樂城為現代賭博愛好者提供了一個方便、刺激且豐富的娛樂活動。不管是撲克牌愛好者還是老虎机愛好者,大家都能在這些平台上找到適合自己的游戲。同時,隨著技術的的不斷提升,在線娛樂城的遊戲體驗將變得越來越逼真和吸引人。然而,玩家在享用游戲的同時,也應該自律,避免沉迷於賭錢活動,保持健康的遊戲心態。
spotify plays smm panel https://promospanel.com
SEO стратегия
Советы по сео стратегии продвижению.
Информация о том как управлять с низкочастотными запросами запросами и как их выбирать
Стратегия по действиям в соперничающей нише.
Имею постоянных клиентов сотрудничаю с несколькими фирмами, есть что рассказать.
Посмотрите мой досье, на 31 мая 2024г
количество выполненных работ 2181 только здесь.
Консультация только устно, никаких скриншотов и отчётов.
Длительность консультации указано 2 часа, но по реально всегда на связи без строгой привязки к графику.
Как работать с ПО это уже другая история, консультация по работе с софтом обсуждаем отдельно в специальном кворке, определяем что требуется при коммуникации.
Всё спокойно на расслабоне не торопясь
To get started, the seller needs:
Мне нужны контакты от телеграмм чата для контакта.
общение только устно, общаться письменно недостаточно времени.
Сб и Воскресенье выходные
best smm panel https://promospanel.com
music promotion and marketing music marketing agencies
https://www.archeryaddix.com/members/rentcarfycom.28053/#about
music promotion packages https://banger-music.com
такси https://taxi-novocherkassk.ru
эконом такси недорого новочеркасск аренда такси в новочеркасске
номер такси эконом такси недорого новочеркасск
rokokbet
Motivasi dari Kutipan Taylor Swift: Harapan dan Kasih dalam Lagu-Lagunya
Taylor Swift, seorang musisi dan penulis lagu terkenal, tidak hanya dikenal karena nada yang indah dan suara yang merdu, tetapi juga karena kata-kata lagunya yang sarat makna. Dalam lirik-liriknya, Swift sering melukiskan berbagai faktor hidup, mulai dari cinta hingga tantangan hidup. Berikut adalah beberapa kutipan inspiratif dari lagu-lagunya, beserta artinya.
“Mungkin yang terbaik belum datang.” – “All Too Well”
Arti: Meskipun dalam masa-masa sulit, tetap ada secercah harapan dan kemungkinan akan hari yang lebih cerah.
Lirik ini dari lagu “All Too Well” menyadarkan kita jika biarpun kita bisa jadi menghadapi masa-masa sulit pada saat ini, selalu ada peluang bahwa masa depan akan memberikan sesuatu yang lebih baik. Hal ini adalah pesan asa yang memperkuat, mendorong kita untuk tetap bertahan dan tidak putus asa, karena yang paling baik mungkin belum datang.
“Aku akan tetap bertahan karena aku tak mampu melakukan apa pun tanpa kamu.” – “You Belong with Me”
Arti: Menemukan asmara dan bantuan dari pihak lain dapat memberi kita tenaga dan tekad untuk bertahan melewati kesulitan.
What’s up, this weekend is nice for me, since this time i am reading this enormous informative piece of writing here at my home.
@@G@@
https://malipuz.ru/krasota/dlya-kogo-sushhestvuyut-servisy-predostavlyayushhie-virtualnye-nomera-onlajn.html
заказать такси недорого эконом номер заказа такси
syair sdy hari ini
Ashley JKT48: Idola yang Bersinar Terang di Langit Idol
Siapa Ashley JKT48?
Siapa sosok muda talenta yang mencuri perhatian sejumlah besar penggemar musik di Indonesia dan Asia Tenggara? Itulah Ashley Courtney Shintia, atau yang terkenal dengan nama panggungnya, Ashley JKT48. Masuk dengan grup idola JKT48 pada tahun 2018, Ashley dengan lekas menjadi salah satu anggota paling terkenal.
Biografi
Lahir di Jakarta pada tgl 13 Maret 2000, Ashley berketurunan garis Tionghoa-Indonesia. Ia mengawali kariernya di dunia entertainment sebagai model dan aktris, hingga akhirnya selanjutnya bergabung dengan JKT48. Sifatnya yang ceria, vokal yang bertenaga, dan kemahiran menari yang mengesankan membentuknya sebagai idola yang sangat dikasihi.
Pengakuan dan Pengakuan
Kepopuleran Ashley telah diakui melalui berbagai penghargaan dan pencalonan. Pada tahun 2021, ia meraih penghargaan “Anggota Paling Populer JKT48” di event Penghargaan Musik JKT48. Ashley juga dinobatkan sebagai “Idol Tercantik di Asia” oleh sebuah majalah digital pada tahun 2020.
Fungsi dalam JKT48
Ashley menjalankan fungsi penting dalam grup JKT48. Ia adalah personel Tim KIII dan berperan sebagai dancer utama dan vokal utama. Ashley juga menjadi anggota dari unit sub “J3K” bersama Jessica Veranda dan Jennifer Rachel Natasya.
Karir Solo
Selain aktivitasnya bersama JKT48, Ashley juga merintis perjalanan solo. Beliau telah mengeluarkan beberapa single, diantaranya “Myself” (2021) dan “Falling Down” (2022). Ashley juga telah berkolaborasi dengan artis lain, seperti Afgan dan Rossa.
Aktivitas Pribadi
Selain bidang panggung, Ashley dikenal sebagai sosok yang rendah hati dan ramah. Ashley menikmati menghabiskan masa dengan sanak famili dan kawan-kawannya. Ashley juga punya kesukaan melukis dan photography.
проверка баланса криптокошелька 12
Контроль адреса монет
Контроль USDT на сети TRC20 и различных криптовалютных платежей
На этом портале вы всесторонние оценки различных платформ для анализа операций и адресов, в том числе антиотмывочного закона анализы для монет и иных виртуальных валют. Вот важные возможности, что в наших обзорах:
Контроль монет на сети TRC20
Многие инструменты предусматривают полную верификацию платежей монет в блокчейн-сети TRC20 платформы. Это гарантирует выявлять необычную операции и удовлетворять регуляторным положениям.
Контроль платежей токенов
В наших обзорах представлены ресурсы для детального контроля и контроля платежей USDT, что гарантирует обеспечивать открытость и надежность переводов.
AML верификация монет
Многие платформы предоставляют антиотмывочного закона анализ криптовалюты, гарантируя идентифицировать и не допускать ситуации финансовых преступлений и валютных преступлений.
Контроль аккаунта USDT
Наши описания охватывают сервисы, предназначенные для позволяют анализировать счета монет на выявление подозрительных действий и необычных платежей, гарантируя дополнительный уровень уровень защиты.
Анализ переводов монет на сети TRC20
Вы описаны сервисы, поддерживающие проверку платежей токенов в блокчейн-сети TRC20 блокчейна, что гарантирует обеспечивает выполнение всем необходимым требованиям стандартам.
Анализ аккаунта кошелька USDT
В ревью описаны инструменты для контроля аккаунтов адресов монет на потенциальных угроз угроз.
Верификация кошелька монет на платформе TRC20
Наши оценки охватывают ресурсы, обеспечивающие анализ счетов токенов на блокчейне TRC20, что гарантирует предотвратить финансовых преступлений и финансовых мошенничеств.
Верификация токенов на чистоту
Рассмотренные платформы дают возможность проверять транзакции и счета на чистоту, фиксируя подозреваемую операции.
антиотмывочного закона контроль токенов на блокчейне TRC20
В ревью описаны платформы, поддерживающие AML анализ для USDT на платформе TRC20 платформы, что позволяет вашему бизнесу удовлетворять мировым стандартам.
Анализ токенов ERC20
Наши оценки включают сервисы, предоставляющие контроль USDT в сети ERC20 платформы, что гарантирует обеспечивает детальный анализ операций и кошельков.
Верификация криптовалютного кошелька
Мы изучаем платформы, обеспечивающие услуги по проверке криптовалютных кошельков, содержащие контроль операций и обнаружение необычной действий.
Верификация аккаунта виртуального кошелька
Наши обзоры охватывают сервисы, дающие возможность анализировать адреса виртуальных кошельков для повышения дополнительной степени защищенности.
Анализ криптокошелька на переводы
Вы доступны ресурсы для верификации виртуальных кошельков на платежи, что помогает гарантирует гарантировать открытость переводов.
Контроль криптокошелька на легитимность
Наши ревью содержат платформы, предусматривающие проверять криптокошельки на чистоту, определяя все сомнительные операции.
Ознакомившись с наши оценки, вы сможете подберете лучшие платформы для анализа и наблюдения виртуальных платежей, чтобы поддерживать гарантировать высокий уровень безопасности безопасности и соответствовать все законодательным стандартам.
решение задач на заказ https://resheniye-zadach7.ru заказать онлайн
Online Casinos: Innovation and Advantages for Contemporary Society
Overview
Internet casinos are virtual sites that provide users the chance to participate in gambling games such as card games, roulette, blackjack, and slots. Over the past few years, they have become an essential part of digital entertainment, offering numerous benefits and possibilities for players around the world.
Accessibility and Convenience
One of the primary advantages of digital gambling sites is their accessibility. Users can enjoy their preferred activities from anywhere in the world using a computer, tablet, or smartphone. This conserves time and funds that would typically be used traveling to land-based gambling halls. Furthermore, 24/7 access to activities makes internet gambling sites a easy option for people with hectic lifestyles.
Variety of Activities and Experience
Online casinos provide a wide variety of games, allowing everyone to find an option they enjoy. From classic table activities and board games to slots with various themes and progressive jackpots, the diversity of games ensures there is an option for every taste. The option to engage at different proficiencies also makes digital casinos an ideal location for both beginners and seasoned gamblers.
Economic Benefits
The online gambling sector contributes greatly to the economy by creating employment and generating income. It backs a wide range of careers, including programmers, customer support agents, and advertising specialists. The income generated by digital casinos also contributes to tax revenues, which can be used to fund community services and development initiatives.
Technological Innovation
Online gambling sites are at the cutting edge of tech innovation, constantly integrating new innovations to enhance the playing experience. Superior visuals, live dealer games, and VR gambling sites provide immersive and authentic playing entertainment. These innovations not only enhance player satisfaction but also push the boundaries of what is possible in digital leisure.
Responsible Gambling and Support
Many online casinos encourage responsible gambling by offering tools and assistance to help players manage their betting habits. Options such as deposit limits, self-ban choices, and availability to support services guarantee that players can enjoy betting in a safe and controlled environment. These steps show the industry’s dedication to encouraging safe gaming habits.
Community Engagement and Community
Digital gambling sites often provide interactive options that allow players to connect with each other, creating a sense of community. Multiplayer activities, communication tools, and social media links enable players to network, exchange stories, and build friendships. This social aspect improves the overall betting experience and can be particularly beneficial for those seeking community engagement.
Summary
Digital gambling sites provide a diverse range of advantages, from accessibility and ease to economic contributions and innovations. They offer varied betting options, encourage responsible gambling, and foster social interaction. As the sector keeps to grow, digital casinos will likely stay a significant and beneficial presence in the world of digital leisure.
slots machines
No-Cost Slot Games: Pleasure and Benefits for People
Preface
Slot-based games have traditionally been a fixture of the gaming interaction, delivering participants the chance to achieve substantial winnings with simply the activation of a handle or the push of a mechanism. In the last several years, slot-based activities have likewise emerged as popular in digital casinos, constituting them available to an further more extensive group.
Amusement Factor
Slot-related offerings are crafted to be enjoyable and engaging. They feature vibrant illustrations, electrifying sonic features, and various ideas that match a wide variety of preferences. Whether participants savor classic fruit-related symbols, action-oriented slots, or slot-related offerings derived from well-known cinematic works, there is an option for anyone. This breadth provides that players can consistently identify a experience that aligns with their preferences, offering spans of entertainment.
Straightforward to Operate
One of the greatest positives of slot-related offerings is their straightforwardness. As opposed to certain wagering activities that necessitate skill, slot-based games are easy to grasp. This constitutes them reachable to a wide population, including inexperienced individuals who may experience deterred by additional sophisticated experiences. The uncomplicated character of slot-based activities gives participants to unwind and savor the experience absent stressing about intricate guidelines.
Stress Relief and Relaxation
Engaging with slot-based games can be a excellent way to decompress. The monotonous quality of rotating the wheels can be tranquil, delivering a mental respite from the stresses of everyday life. The possibility for obtaining, even it is only small quantities, brings an aspect of suspense that can enhance users’ dispositions. Numerous people find that engaging with slot-related offerings facilitates them relax and shift their focus away from their worries.
Communal Engagement
Slot machines also provide avenues for social interaction. In land-based gambling establishments, customers often assemble in proximity to slot-based games, rooting for their fellow players on and rejoicing in triumphs together. Online slot-related offerings have in addition featured group-based features, such as tournaments, allowing customers to connect with fellow players and communicate their experiences. This environment of togetherness improves the overall leisure experience and can be especially satisfying for users aiming for communal engagement.
Monetary Upsides
The widespread adoption of slot machines has significant economic benefits. The field produces jobs for activity developers, gambling workforce, and client support specialists. Moreover, the income generated by slot-based games lends to the fiscal landscape, delivering tax revenues that support community projects and infrastructure. This monetary effect extends to simultaneously traditional and digital gambling establishments, constituting slot-based activities a worthwhile element of the gaming field.
Intellectual Advantages
Engaging with slot-based activities can in addition produce mental upsides. The game demands customers to make quick choices, discern regularities, and control their risking approaches. These cerebral processes can enable keep the cognition acute and strengthen intellectual capabilities. Particularly for senior citizens, participating in cerebrally activating engagements like partaking in slot machines can be useful for upholding mental capacity.
Approachability and Simplicity
The rise of internet-based gambling platforms has constituted slot-related offerings additional accessible than in the past. Participants can savor their favorite slot-based activities from the convenience of their personal abodes, using laptops, tablets, or handheld devices. This simplicity allows users to partake in regardless of when and no matter the location they choose, absent the necessity to journey to a traditional gambling establishment. The availability of free slot-based games in addition permits users to savor the offering absent any economic stake, rendering it an welcoming style of amusement.
Summary
Slot-based activities offer a plethora of rewards to people, from absolute entertainment to mental upsides and collaborative participation. They grant a secure and zero-cost way to enjoy the suspense of slot machines, rendering them a valuable enhancement to the realm of online leisure.
Whether you’re looking to relax, enhance your mental skills, or simply derive entertainment, slot-based games are a fantastic choice that steadfastly entertain participants across.
Key Takeaways:
– Slot-based games grant amusement through lively visuals, engaging sounds, and wide-ranging themes
– Straightforward operation renders slot-based activities accessible to a broad population
– Playing slot-related offerings can deliver stress relief and mental rewards
– Collaborative aspects bolster the holistic leisure sensation
– Online approachability and gratis alternatives constitute slot-based games accessible styles of amusement
In conclusion, slot machines steadfastly offer a multifaceted set of upsides that match customers worldwide. Whether seeking sheer amusement, cerebral challenge, or social participation, slot machines stay a wonderful choice in the ever-evolving world of digital gaming.
Internet-based Gambling Platform For-Profit: Upsides for Customers
Introduction
Online gaming sites offering paid experiences have gained considerable popularity, delivering users with the prospect to obtain cash payouts while relishing their most liked gambling games from dwelling. This write-up analyzes the upsides of digital gaming site for-profit offerings, highlighting their beneficial impact on the entertainment field.
User-Friendliness and Availability
Internet-based gambling platform actual currency activities provide simplicity by allowing participants to utilize a wide range of offerings from any location with an network access point. This removes the requirement to make trips to a brick-and-mortar wagering facility, saving effort. Internet-based gambling platforms are likewise accessible at all times, giving users to partake in at their simplicity.
Diversity of Options
Internet-based gambling platforms grant a more extensive diversity of experiences than physical gambling establishments, involving slot-based games, pontoon, wheel of fortune, and card games. This variety gives customers to experiment with novel offerings and find different favorites, improving their comprehensive interactive interaction.
Incentives and Special Offers
Online casinos offer generous perks and special offers to lure and retain users. These perks can involve new player incentives, free spins, and rebate promotions, delivering extra importance for players. Dedication systems also reward customers for their continued business.
Proficiency Improvement
Playing real money offerings on the internet can enable users hone abilities such as critical analysis. Offerings like 21 and card games require participants to arrive at determinations that can affect the end of the offering, helping them acquire analytical skills.
Shared Experiences
ChatGPT l Валли, 6.06.2024 4:08]
Online casinos offer opportunities for group-based participation through discussion forums, forums, and live dealer experiences. Participants can connect with their peers, communicate strategies and tactics, and sometimes establish interpersonal bonds.
Monetary Upsides
The virtual wagering industry yields employment and contributes to the fiscal landscape through government proceeds and regulatory payments. This fiscal consequence advantages a wide range of occupations, from game creators to client assistance specialists.
Key Takeaways
Virtual wagering environment actual currency offerings grant multiple rewards for users, including ease, breadth, perks, proficiency improvement, social interaction, and economic benefits. As the sector constantly progress, the widespread adoption of internet-based gambling platforms is expected to expand.
аяваска церемония в турции цена аяуаска готовая в бутылках купить
семена кустов коки заказать аяуаску
проститутки проспект просвещения
купить диплом в ангарске
по ссылке
купить диплом специалиста
перейти на сайт
jagoanjitu
Pasang Program 888 dan Menangkan Besar: Panduan Singkat
**App 888 adalah kesempatan unggulan untuk Kamu yang menginginkan aktivitas berjudi daring yang menyenangkan dan menguntungkan. Melalui hadiah setiap hari dan kemampuan menggoda, aplikasi ini sedia memberikan aktivitas main paling baik. Disini instruksi cepat untuk memaksimalkan pemanfaatan Perangkat Lunak 888.
Download dan Awali Menang
Perangkat Tersedia:
Perangkat Lunak 888 memungkinkan diinstal di Android, HP iOS, dan Windows. Segera bermain dengan praktis di media manapun.
Hadiah Setiap Hari dan Bonus
Bonus Login Setiap Hari:
Masuk tiap periode untuk mengambil keuntungan mencapai 100K pada periode ketujuh.
Selesaikan Tugas:
Dapatkan kesempatan lotere dengan mengerjakan aktivitas terkait. Satu aktivitas menawarkan Anda satu kesempatan pengeretan untuk meraih bonus mencapai 888K.
Pengklaiman Manual:
Hadiah harus diterima sendiri di melalui aplikasi. Jangan lupa untuk meraih hadiah pada masa agar tidak kadaluwarsa.
Mekanisme Undi
Opsi Undi:
Satu periode, Para Pengguna bisa mengklaim sebuah kesempatan pengeretan dengan merampungkan tugas.
Jika kesempatan pengeretan habis, rampungkan lebih banyak misi untuk meraih extra kesempatan.
Level Keuntungan:
Dapatkan keuntungan jika jumlah pengeretan Kamu melampaui 100K dalam sehari.
Peraturan Penting
Pengklaiman Bonus:
Keuntungan harus dikumpulkan mandiri dari app. Jika tidak, hadiah akan langsung diambil ke akun pribadi Kamu setelah satu periode.
Persyaratan Bertaruh:
Hadiah butuh sekitar 1 taruhan berlaku untuk dimanfaatkan.
Akhir
App 888 menghadirkan aktivitas berjudi yang menggembirakan dengan imbalan besar-besaran. Unduh perangkat lunak sekarang juga dan alamilah kemenangan besar-besaran pada waktu!
Untuk info lebih lanjut tentang promosi, deposit, dan skema rekomendasi, periksa page beranda program.
акриловый сайдинг для обшивки купить сайдинг для дома
элитные проститутки
наружный сайдинг для дома купить https://kanoner.com
Все самое интересное из мира игр https://unionbattle.ru обзоры, статьи и ответы на вопросы
area188
Ashley JKT48: Idola yang Bercahaya Cemerlang di Langit Idol
Siapa Ashley JKT48?
Siapakah tokoh muda berbakat yang mencuri perhatian banyak fans musik di Nusantara dan Asia Tenggara? Beliau adalah Ashley Courtney Shintia, atau yang dikenal dengan nama panggungnya, Ashley JKT48. Masuk dengan grup idola JKT48 pada tahun 2018, Ashley dengan segera berubah menjadi salah satu member paling favorit.
Biografi
Lahir di Jakarta pada tanggal 13 Maret 2000, Ashley berdarah darah Tionghoa-Indonesia. Ia mengawali karier di industri entertainment sebagai model dan aktris, sebelum akhirnya masuk dengan JKT48. Kepribadiannya yang gembira, suara yang kuat, dan kemampuan menari yang memukau menjadikannya idol yang sangat disukai.
Award dan Pengakuan
Kepopuleran Ashley telah diapresiasi melalui berbagai penghargaan dan nominasi. Pada tahun 2021, Ashley mendapat penghargaan “Anggota Paling Populer JKT48” di event JKT48 Music Awards. Ia juga diberi gelar sebagai “Idol Tercantik di Asia” oleh sebuah tabloid online pada tahun 2020.
Peran dalam JKT48
Ashley memainkan fungsi krusial dalam group JKT48. Dia adalah personel Tim KIII dan berperan sebagai dancer utama dan penyanyi utama. Ashley juga merupakan bagian dari sub-unit “J3K” bersama Jessica Veranda dan Jennifer Rachel Natasya.
Karir Mandiri
Selain kegiatan bersama JKT48, Ashley juga merintis perjalanan individu. Ia telah meluncurkan beberapa single, diantaranya “Myself” (2021) dan “Falling Down” (2022). Ashley juga telah berkolaborasi dengan penyanyi lain, seperti Afgan dan Rossa.
Hidup Pribadi
Di luar dunia perform, Ashley dikenal sebagai pribadi yang rendah hati dan ramah. Ia suka melewatkan jam bersama keluarga dan kawan-kawannya. Ashley juga memiliki kegemaran menggambar dan memotret.
download game motocross
Unduh Aplikasi 888 dan Menangkan Besar: Manual Pendek
**Perangkat Lunak 888 adalah alternatif terbaik untuk Pengguna yang menginginkan permainan main online yang menggembirakan dan bermanfaat. Melalui imbalan tiap hari dan opsi memikat, app ini sedia menyediakan pengalaman berjudi unggulan. Inilah panduan pendek untuk mengoptimalkan pemanfaatan Program 888.
Download dan Awali Menang
Perangkat Tersedia:
Perangkat Lunak 888 memungkinkan diinstal di Sistem Android, iOS, dan Windows. Awali bermain dengan tanpa kesulitan di alat manapun.
Keuntungan Setiap Hari dan Bonus
Imbalan Login Tiap Hari:
Mendaftar setiap waktu untuk mengklaim bonus hingga 100K pada waktu ketujuh.
Tuntaskan Misi:
Dapatkan peluang undian dengan merampungkan pekerjaan terkait. Masing-masing pekerjaan memberi Anda satu peluang pengeretan untuk mengklaim hadiah mencapai 888K.
Pengklaiman Sendiri:
Keuntungan harus dikumpulkan mandiri di melalui perangkat lunak. Yakinlah untuk mengklaim keuntungan setiap waktu agar tidak batal.
Sistem Lotere
Peluang Undian:
Masing-masing waktu, Kamu bisa mengklaim satu opsi lotere dengan menuntaskan aktivitas.
Jika kesempatan undian berakhir, tuntaskan lebih banyak aktivitas untuk mengambil tambahan opsi.
Tingkat Hadiah:
Klaim keuntungan jika total pengeretan Para Pengguna lebih dari 100K dalam waktu satu hari.
Ketentuan Penting
Pengklaiman Keuntungan:
Imbalan harus dikumpulkan sendiri dari perangkat lunak. Jika tidak, bonus akan otomatis diambil ke akun pribadi Pengguna setelah 1 hari.
Syarat Bertaruh:
Imbalan membutuhkan paling tidak satu bertaruh berlaku untuk digunakan.
Akhir
Program 888 menghadirkan keseruan bermain yang mengasyikkan dengan imbalan tinggi. Pasang aplikasi sekarang juga dan rasakan hadiah tinggi setiap periode!
Untuk data lebih lengkap tentang promosi, top up, dan sistem rekomendasi, kunjungi laman utama aplikasi.
купить диплом с занесением в реестр 6landik-diploms.com
birutoto
Inspirasi dari Petikan Taylor Swift: Harapan dan Kasih dalam Lagu-Lagunya
Taylor Swift, seorang musisi dan pengarang lagu terkenal, tidak hanya terkenal karena melodi yang menawan dan suara yang nyaring, tetapi juga sebab lirik-lirik lagu-lagunya yang penuh makna. Dalam lirik-liriknya, Swift sering menggambarkan beraneka ragam faktor eksistensi, mulai dari cinta sampai dengan tantangan hidup. Berikut ini adalah beberapa kutipan motivatif dari karya-karya, beserta terjemahannya.
“Mungkin yang terbaik belum datang.” – “All Too Well”
Penjelasan: Bahkan di masa-masa sulit, selalu ada seberkas harapan dan potensi tentang hari yang lebih baik.
Kutipan ini dari lagu “All Too Well” mengingatkan kita kalau biarpun kita bisa jadi menghadapi waktu sulit saat ini, senantiasa ada kemungkinan bahwa masa depan akan membawa hal yang lebih baik. Ini adalah pesan asa yang mengukuhkan, mendorong kita untuk tetap bertahan dan tidak putus asa, karena yang terbaik bisa jadi belum datang.
“Aku akan tetap bertahan sebab aku tidak bisa mengerjakan apapun tanpa dirimu.” – “You Belong with Me”
Arti: Menemukan asmara dan support dari pihak lain dapat menghadirkan kita kekuatan dan kemauan keras untuk bertahan melalui tantangan.
Free poker offers gamblers a unique way to play the game without any monetary cost. This piece examines the advantages of engaging in free poker and emphasizes why it continues to be in demand among a lot of participants.
Risk-Free Entertainment
One of the key merits of free poker is that it enables gamblers to experience the excitement of poker without fretting over losing money. This turns it ideal for newcomers who hope to learn the game without any financial commitment.
Skill Development
Gratis poker offers a wonderful opportunity for participants to improve their skills. Users can try approaches, understand the guidelines of the pastime, and obtain confidence without any worry of risking their own money.
Social Interaction
Participating in free poker can also foster social connections. Online platforms commonly provide discussion boards where participants can interact with each other, discuss strategies, and sometimes create bonds.
Accessibility
Gratis poker is conveniently accessible to anyone with an internet connection. This indicates that players can enjoy the activity from the comfort of their own place, at any time.
Conclusion
Gratis poker provides several benefits for users. It is a risk-free method to partake in the sport, develop competence, engage in social interactions, and engage with poker easily. As greater gamblers discover the merits of free poker, its prevalence is anticipated to rise.
Online gambling sites are increasingly more widespread, providing numerous incentives to attract newcomers. One of the most tempting opportunities is the no-deposit bonus, a promo that lets players to try their luck without any financial obligation. This article looks into the benefits of free bonuses and underscores how they can boost their efficacy.
What is a No Deposit Bonus?
A no upfront deposit bonus is a category of casino promotion where users get free cash or free plays without the need to submit any of their own cash. This permits gamblers to explore the gaming site, experiment with different gaming activities and potentially win real money, all without any upfront cost.
Advantages of No Deposit Bonuses
Risk-Free Exploration
No deposit bonuses provide a risk-free option to discover online gambling sites. Players can test various games, learn the casino platform, and assess the overall gameplay without spending their own money. This is significantly helpful for novices who may not be familiar with online gambling sites.
Chance to Win Real Money
One of the most tempting benefits of no deposit bonuses is the potential to earn real cash. Even though the amounts may be limited, any gains obtained from the bonus can typically be withdrawn after meeting the casino’s playthrough rules. This infuses an element of anticipation and gives a prospective financial benefit without any monetary outlay.
Learning Opportunity
No deposit bonuses give a fantastic chance to learn how diverse games operate. Users can practice strategies, grasp the rules of the casino games, and become more proficient without fearing losing their own money. This can be especially useful for challenging casino games like strategy games.
Conclusion
No upfront deposit bonuses deliver various merits for players, like safe exploration, the chance to obtain real winnings, and valuable development opportunities. As the market keeps to develop, the appeal of no upfront deposit bonuses is set to expand.
купить диплом бакалавра https://6landik-diploms.com
sweepstakes casino
Investigating Sweepstakes Casinos: An Exciting and Reachable Gambling Option
Prelude
Sweepstakes gaming hubs are transforming into a preferred alternative for gamers seeking an thrilling and lawful method to enjoy virtual gaming. Unlike conventional digital casinos, contest casinos operate under separate legitimate frameworks, permitting them to offer activities and awards without adhering to the similar laws. This article analyzes the concept of contest casinos, their advantages, and why they are appealing to a increasing quantity of users.
What is a Sweepstakes Casino?
A promotion casino works by offering participants with online coins, which can be employed to experience competitions. Players can earn extra internet currency or real prizes, like money. The key difference from conventional gaming hubs is that participants do not buy currency instantly but acquire it through marketing efforts, including buying a product or engaging in a gratis admission lottery. This model allows contest casinos to operate lawfully in many regions where conventional online gambling is controlled.
real money slots
Discovering Real Money Slots
Beginning
Cash slots have grown into a preferred selection for gamblers desiring the excitement of earning actual funds. This text delves into the perks of gambling slots and the causes they are drawing increasing enthusiasts.
Advantages of Cash Slots
Real Winnings
The most draw of gambling slots is the chance to gain actual cash. Differing from free-of-charge slots, money slots supply enthusiasts the adrenaline of probable monetary payouts.
Diverse Game Options
Gambling slots provide a extensive array of genres, attributes, and earnings frameworks. This makes sure that there is an activity for all types of players, covering classic three-reel classic slots to modern animated slots with multiple winning lines and additional features.
Exciting Bonuses and Promotions
Various online casinos offer thrilling promotions for money slot gamblers. These can include sign-up rewards, extra spins, refund deals, and loyalty programs. Such deals boost the general gambling activity and supply additional chances to gain currency.
Why Enthusiasts Enjoy Gambling Slots
The Rush of Securing Tangible Currency
Cash slots give an thrilling adventure, as users await the chance of gaining actual currency. This feature imparts an extra level of adrenaline to the betting adventure.
Quick Earnings
Gambling slots offer gamblers the pleasure of immediate payouts. Gaining funds immediately enhances the casino journey, rendering it more rewarding.
Wide Game Selection
Alongside gambling slots, players can play a diverse range of slot machines, ensuring that there is continuously an activity exciting to play.
Summary
Gambling slots provides a exhilarating and satisfying playing adventure. With the possibility to secure actual funds, a broad array of slots, and enticing rewards, it’s clear that various users prefer real money slots for their gaming choices.
http://frugalmechanic.com
Thanks for any other fantastic article. Where else may just anyone get that type of information in such a perfect method of writing? I have a presentation next week, and I’m on the search for such information.
gmailspva.com/facebook-pva-accountsВ
petkit.com.cn/member/index.php?uid=ehalipa&action=viewarchives&aid=6644В
hellados.ru/texts/io.phpВ
http://www.sitebs.ru/blogs/95000.htmlВ
originalparts.ru/linkexchange/page68/?le_categoryID=0В
http://topstavka.ru
Pro88
Today, I went to the beach with my children. I found a sea shell and gave it to my 4 year old daughter and said “You can hear the ocean if you put this to your ear.” She placed the shell to her ear and screamed. There was a hermit crab inside and it pinched her ear. She never wants to go back! LoL I know this is completely off topic but I had to tell someone!
bgv-blasenschwaeche.de/urlaub.htmlВ
http://www.tonylandis.com/tag/php/В
beritanusantara.co.id/cadir-polimdo-okta-lintong-efendy-rasid-maryke-alelo-masuki-tahap-pertarungan-tingkat-kementerian/В
boomingwebsitetraffic.com/cdn-cgi/l/email-protectionВ
indicouple.com/blogs/525/Where-to-buy-a-diploma-or-certificate-at-a-bargain?lang=tr_trВ
проститутки иркутск вызов
купить аттестат за 9 класс https://6landik-diploms.com
заказать такси недорого эконом https://taxi-novocherkassk.ru/
заказ такси недорого https://zakaz-taxionline.ru/
путаны иркутска
Ищете способ расслабиться и получить незабываемые впечатления? Мы https://t.me/intim_tmn72 предлагаем эксклюзивные встречи с привлекательными и профессиональными компаньонками. Конфиденциальность, комфорт и безопасность гарантированы. Позвольте себе наслаждение и отдых в приятной компании.
Ищете способ расслабиться и получить незабываемые впечатления? Мы https://t.me/intim_tmn72 предлагаем эксклюзивные встречи с привлекательными и профессиональными компаньонками. Конфиденциальность, комфорт и безопасность гарантированы. Позвольте себе наслаждение и отдых в приятной компании.
Euro 2024
http://getoutdoorsyapp.com
https://aisory.tech – платформа для создания AI Telegram-ботов. Наделяйте своих ботов способностями к естественному диалогу, генерации уникального контента и решению аналитических задач. Простой конструктор платформы делает создание умных чат-ботов доступным для любой компании.
купить квартиру в новостройке от застройщика купить квартиру в казани новостройка от застройщика
Wow, awesome blog structure! How long have you been running a blog for? you make blogging glance easy. The full glance of your web site is magnificent, let alone the content material!
priusforum.ru/forums/index.php?autocom=gallery&req=si&img=5268В
http://www.sumkin.ru/forum/member.php?u=40482В
gamemotors.ru/page/11В
pdtplanilla.com/la-nueva-normalidad-y-la-gestion-de-recursos-humanos/В
turbodom.ru/music/instrumentalnaya/?music/instrumentalnaya&letter=%D0%A4/index.htmlВ
As the admin of this site is working, no hesitation very soon it will be famous, due to its feature contents.
auto-sale-msk.ru/skoda/rapid-149265678В
ros-kruiz.ru/В
http://www.kroosuriya.com/krusuriya/modules.php?name=Journal&file=display&jid=9895В
СЂСѓСЃР±РёР».СЂС„/forum/viewtopic.php?p=159224В
bettesworthconstruction.com/storage-beds/В
В нашем мире, где аттестат становится началом успешной карьеры в любом направлении, многие ищут максимально быстрый и простой путь получения качественного образования. Факт наличия официального документа об образовании сложно переоценить. Ведь диплом открывает дверь перед всеми, кто стремится начать профессиональную деятельность или учиться в каком-либо институте.
В данном контексте наша компания предлагает максимально быстро получить этот важный документ. Вы имеете возможность купить аттестат нового или старого образца, и это становится удачным решением для человека, который не смог завершить образование, утратил документ или хочет исправить свои оценки. Аттестат изготавливается с особой тщательностью, вниманием ко всем элементам. В результате вы сможете получить продукт, 100% соответствующий оригиналу.
Преимущество данного решения заключается не только в том, что вы сможете максимально быстро получить аттестат. Процесс организован удобно, с нашей поддержкой. От выбора требуемого образца документа до грамотного заполнения личных данных и доставки по стране — все под абсолютным контролем опытных мастеров.
Таким образом, всем, кто ищет оперативный способ получения необходимого документа, наша компания готова предложить выгодное решение. Заказать аттестат – значит избежать долгого процесса обучения и не теряя времени перейти к своим целям, будь то поступление в ВУЗ или старт трудовой карьеры.
https://100dives.com/
жк казань купить квартиру от застройщика https://kvartiru-kupit-kzn.ru
купить квартиру от застройщика https://nedvizhimost16.ru
Предлагаем для вас провести консультацию (аудит) по подъему продаж равным образом доходы в вашем бизнесе. Формат аудита: индивидуальная встреча или сессия по скайпу. Делая очевидные, но обыкновенные усилия, результат от ВАШЕГО коммерциала удастся увеличить в много раз. В нашем арсенале более 100 проверенных практических методик повышения результатов а также прибыли. В зависимости от вашего коммерциала выберем для вас наиболее крепкие и начнем шаг за шагом претворять в жизнь.
-https://interestbook.ru/
купить квартиру недорого купить квартиру в казани
купить квартиру в казани новостройка от застройщика https://nedvizhimost16.ru
смотреть бесплатно атака титанов атака титанов онлайн бесплатно
Кофе в капсулах системы Nespresso. Мы предлагаем широкий ассортимент кофе в капсулах, более 200 вкусов. Доставка СДЭК 1-3 дня в любой город Беларуси или России. Оплата при получении.
Кофе Nespresso
аниме атака титанов смотреть бесплатно атака титанов
атака титанов бесплатно в хорошем качестве смотреть атака титанов
мебель купить интернет магазин
https://formomebel.ru/stoliki/na-osnovanii-iz-metalla
beton888
what online casino pays real money gaming bets
what online casino gives you free money without deposit? online casino
What’s up it’s me, I am also visiting this website on a regular basis, this web page is in fact fastidious and the visitors are in fact sharing fastidious thoughts.
unirun.ru/page/5/В
zdshi-tula.ru/forum/?PAGE_NAME=read&FID=1&TID=94%C3%82%C2%A0В
dr650.ehehe.net/cgi/bbs/discourse/c_board.cgi?page=0&mode=move&pass=&u_max=&tmpl=В
http://www.karpaltunnelsyndrom-schwangerschaft.de/forum/topic/uebungen-fuer-den-alltag/D0%B7%D0%B8%D1%80%D1%83%D0%B9%D1%82%D0%B5+%D1%80%D1%8B%D0%BD%D0%BE%D0%BA+%D0%B8+%D0%B2%D0%B7%D0%B2%D0%B5%D1%88%D0%B8%D0%B2%D0%B0%D0%B9%D1%82%D0%B5+%D0%B2%D1%81%D0%B5+%D0%BF%D0%BB%D1%8E%D1%81%D1%8B+%D0%B8+%C2%AB%D0%BF%D1%80%D0%BE%D1%82%D0%B8%D0%B2%C2%BB+%D0%BF%D0%B5%D1%80%D0%B5%D0%B4+%D1%82%D0%B5%D0%BC%2C+%D0%BA%D0%B0%D0%BA+%D0%BF%D1%80%D0%B8%D0%BD%D1%8F%D1%82%D1%8C+%D0%B8%D1%82%D0%BE%D0%B3%D0%BE%D0%B2%D0%BE%D0%B5+%D0%BF%D0%BE%D1%81%D1%82%D0%B0%D0%BD%D0%BE%D0%B2%D0%BB%D0%B5%D0%BD%D0%B8%D0%B5/?x=0&y=0&part=2998В
asil-fc.com/main/%CE%9D%CE%AD%CE%B1/%CE%A4%CE%B5%CE%BB%CE%B5%CF%85%CF%84%CE%B1%CE%AF%CE%B1_%CE%9D%CE%AD%CE%B1/%CE%A3%CE%B5_%CF%84%CE%B5%CE%BB%CE%B9%CE%BA%CE%AE_%CE%B1%CE%BD%CE%AC%CE%BB%CF%85%CF%83%CE%B7_%CE%BA%CE%B1%CE%BB%CF%8C%CF%82_%CE%BF_%CE%B2%CE%B1%CE%B8%CE%BC%CF%8C%CF%82/В
голяк смотреть в кубе онлайн https://golyak-serial-online.ru
голяк смотреть онлайн качестве https://golyak-serial-online.ru
Great post however , I was wondering if you could write a litte more on this topic? I’d be very thankful if you could elaborate a little bit further. Thank you!
kamagraopas.com/mitka-ovat-varotoimenpiteetvaroitukset-kamagraan-liittyen.htmlВ
http://www.windmaster.cl/old/web/posts/272/windsurf-tenerife-big.htmlВ
hrcspb.ru/page/page60.htmlВ
onlineboxing.net/jforum/user/profile/287687.pageВ
toplentanews.ru/pokupka-diploma-klyuch-k-novyim-vozmozhnostyamВ
голяк кубик онлайн https://golyak-serial-online.ru
10 大線上娛樂城評價實測|線上賭場推薦排名一次看!
在台灣,各式線上娛樂城如同雨後春筍般湧現,競爭激烈。對於一般的玩家來說,選擇一家可靠的線上賭場可說是至關重要的。今天,我們將分享十家最新娛樂城評價及實測的體驗,全面分析它們的優缺點,幫助玩家避免陷入詐騙網站的風險,確保選擇一個安全可靠的娛樂城平台。
娛樂城評價五大標準
在經過我們團隊的多次進行娛樂城實測後,得出了一個值得信任的線上娛樂城平台須包含的幾個要素,所以我們整理了評估娛樂城的五大標準:
條件一:金流帳戶安全性(儲值與出金)
條件二:博弈遊戲種類的豐富性
條件三:線上24小時客服、服務效率與態度
條件四:提供的優惠活動CP值
條件五:真實娛樂城玩家們的口碑評語
通常我們談到金流安全時,指的是對玩家風險的控制能力。一家優秀的娛樂城應當只在有充分證據證明玩家使用非法套利程式,或發現代理和玩家之間有對壓詐騙行為時,才暫時限制該玩家的金流。若無正當理由,則不應隨意限制玩家的金流,以防給玩家造成被詐騙的錯覺。
至於娛樂城的遊戲類型,主要可以分為以下七大類:真人視訊百家樂、彩票遊戲、體育投注、電子老虎機、棋牌遊戲、捕魚機遊戲及電子競技投注。這些豐富多樣的遊戲類型提供了廣泛的娛樂選擇。
十大娛樂城實測評價排名
基於上述五項標準,我們對以下十家現金版娛樂城進行了的實測分析,並對此給出了以下的排名結果:
RG富遊娛樂城
bet365娛樂城
DG娛樂城
yabo亞博娛樂城
PM娛樂城
1XBET娛樂城
九州娛樂城
LEO娛樂城
王者娛樂城
THA娛樂城
infinix zero 30 5g
娛樂城
富遊娛樂城評價:2024年最新評價
推薦指數 : ★★★★★ ( 5.0/5 )
富遊娛樂城作為目前最受歡迎的博弈網站之一,在台灣擁有最高的註冊人數。
RG富遊以安全、公正、真實和順暢的品牌保證,贏得了廣大玩家的信賴。富遊線上賭場不僅提供了豐富多樣的遊戲種類,還有眾多吸引人的優惠活動。在出金速度方面,獲得無數網紅和網友的高度評價,確保玩家能享有無憂的博弈體驗。
推薦要點
新手首選: 富遊娛樂城,2024年評選首選,提供專為新手打造的豐富教學和獨家優惠。
一存雙收: 首存1000元,立獲1000元獎金,僅需1倍流水,新手友好。
免費體驗: 新玩家享免費體驗金,暢遊各式遊戲,開啟無限可能。
優惠多元: 活動豐富,流水要求低,適合各類型玩家。
玩家首選: 遊戲多樣,服務優質,是新手與老手的最佳賭場選擇。
富遊娛樂城詳情資訊
賭場名稱 : RG富遊
創立時間 : 2019年
賭場類型 : 現金版娛樂城
博弈執照 : 馬爾他牌照(MGA)認證、英屬維爾京群島(BVI)認證、菲律賓(PAGCOR)監督競猜牌照
遊戲類型 : 真人百家樂、運彩投注、電子老虎機、彩票遊戲、棋牌遊戲、捕魚機遊戲
存取速度 : 存款5秒 / 提款3-5分
軟體下載 : 支援APP,IOS、安卓(Android)
線上客服 : 需透過官方LINE
富遊娛樂城優缺點
優點
台灣註冊人數NO.1線上賭場
首儲1000贈1000只需一倍流水
擁有體驗金免費體驗賭場
網紅部落客推薦保證出金線上娛樂城
缺點
需透過客服申請體驗金
富遊娛樂城存取款方式
存款方式
提供四大超商(全家、7-11、萊爾富、ok超商)
虛擬貨幣ustd存款
銀行轉帳(各大銀行皆可)
取款方式
網站內申請提款及可匯款至綁定帳戶
現金1:1出金
富遊娛樂城平台系統
真人百家 — RG真人、DG真人、歐博真人、DB真人(原亞博/PM)、SA真人、OG真人、WM真人
體育投注 — SUPER體育、鑫寶體育、熊貓體育(原亞博/PM)
彩票遊戲 — 富遊彩票、WIN 539
電子遊戲 —RG電子、ZG電子、BNG電子、BWIN電子、RSG電子、GR電子(好路)
棋牌遊戲 —ZG棋牌、亞博棋牌、好路棋牌、博亞棋牌
電競遊戲 — 熊貓體育
捕魚遊戲 —ZG捕魚、RSG捕魚、好路GR捕魚、DB捕魚
We offer premium databases for Xrumer 23 ai Strong and GSA Search Engine Ranker. Detailed information can be found here https://dseo24.monster
娛樂城推薦
Портал о культуре Ярославля – ваш гид по культурной жизни города. Здесь вы найдёте информацию о театрах, музеях, галереях и исторических достопримечательностях. Откройте для себя яркие события, фестивали и выставки, которые делают Ярославль культурной жемчужиной России.
Dragon Money Casino бонус драгон мани казино
онлайн казино Dragon Money DragonMoney
jeniusbet
bocor88
bocor88
娛樂城排行
2024娛樂城推薦,經過玩家實測結果出爐Top5!
2024娛樂城排名是這五間上榜,玩家尋找娛樂城無非就是要找穩定出金娛樂城,遊戲體驗良好、速度流暢,Ace博評網都幫你整理好了,給予娛樂城新手最佳的指南,不再擔心被黑網娛樂城詐騙!
2024娛樂城簡述
在現代,2024娛樂城數量已經超越以前,面對琳瑯滿目的娛樂城品牌,身為新手的玩家肯定難以辨別哪間好、哪間壞。
好的平台提供穩定的速度與遊戲體驗,穩定的系統與資訊安全可以保障用戶的隱私與資料,不用擔心收到傳票與任何網路威脅,這些線上賭場也提供合理的優惠活動給予玩家。
壞的娛樂城除了會騙取你的金錢之外,也會打著不實的廣告、優惠滿滿,想領卻是一場空!甚至有些平台還沒辦法登入,入口網站也是架設用來騙取新手儲值進他們口袋,這些黑網娛樂城是玩家必須避開的風險!
評測2024娛樂城的標準
Ace這次從網路上找來五位使用過娛樂城資歷2年以上的老玩家,給予他們使用各大娛樂城平台,最終選出Top5,而評選標準為下列這些條件:
以玩家觀點出發,優先考量玩家利益
豐富的遊戲種類與卓越的遊戲體驗
平台的信譽及其安全性措施
客服團隊的回應速度與服務品質
簡便的儲值流程和多樣的存款方法
吸引人的優惠活動方案
前五名娛樂城表格
賭博網站排名 線上賭場 平台特色 玩家實測評價
No.1 富遊娛樂城 遊戲選擇豐富,老玩家優惠多 正面好評
No.2 bet365娛樂城 知名大廠牌,運彩盤口選擇多 介面流暢
No.3 亞博娛樂城 多語言支持,介面簡潔順暢 賽事豐富
No.4 PM娛樂城 撲克牌遊戲豐富,選擇多元 直播順暢
No.5 1xbet娛樂城 直播流暢,安全可靠 佳評如潮
線上娛樂城玩家遊戲體驗評價分享
網友A:娛樂城平台百百款,富遊娛樂城是我3年以來長期使用的娛樂城,別人有的系統他們都有,出金也沒有被卡過,比起那些玩娛樂城還會收到傳票的娛樂城,富遊真的很穩定,值得推薦。
網友B:bet365中文的介面簡約,還有超多體育賽事盤口可以選擇,此外賽事大部分也都有附上直播來源,不必擔心看不到賽事最新狀況,全螢幕還能夠下單,真的超方便!
網友C:富遊娛樂城除了第一次儲值有優惠之外,儲值到一定金額還有好禮五選一,實用又方便,有問題的時候也有客服隨時能夠解答。
網友D:從大陸來台灣工作,沒想到台灣也能玩到亞博體育,這是以前在大陸就有使用的平台,雖然不是簡體字,但使用介面完全沒問題,遊戲流暢、速度比以前使用還更快速。
網友E:看玖壹壹MV發現了PM娛樂城這個大品牌,PM的真人百家樂沒有輸給在澳門實地賭場,甚至根本不用出門,超級方便的啦!
сайт 1go casino 1go casino официальный сайт
https://feverwear.ca/jamuslot
регистрация 1Go Casino регистрация 1Go Casino
квартира от застройщика цены на квартиры
квартира в новостройке https://kvartiru-kupit-spb.ru
купить квартиру жилье казань квартиры от застройщика жк
купить квартиру https://kvartiru-kupit-spb.ru
2024娛樂城介紹
台灣2024娛樂城越開越多間,新開的線上賭場層出不窮,每間都以獨家的娛樂城優惠和體驗金來吸引玩家,致力於提供一流的賭博遊戲體驗。以下來介紹這幾間娛樂城網友對他們的真實評價,看看哪些娛樂城上榜了吧!
2024娛樂城排名
2023下半年,各家娛樂城競爭激烈,相繼推出誘人優惠,不論是娛樂城體驗金、反水流水還是首儲禮金,甚至還有娛樂城抽I15手機。以下就是2024年網友推薦的娛樂城排名:
NO.1 富遊娛樂城
NO.2 Bet365台灣
NO.3 DG娛樂城
NO.4 九州娛樂城
NO.5 亞博娛樂城
2024娛樂城推薦
根據2024娛樂城排名,以下將富遊娛樂城、BET365、亞博娛樂城、九州娛樂城、王者娛樂城推薦給大家,包含首儲贈點、免費體驗金、存提款速度、流水等等…
娛樂城遊戲種類
線上娛樂城憑藉其廣泛的遊戲種類,成功滿足了各式各樣玩家的喜好和需求。這些娛樂城遊戲不僅多元化且各具特色,能夠為玩家提供無與倫比的娛樂體驗。下面是一些最受歡迎的娛樂城遊戲類型:
電子老虎機
魔龍傳奇、雷神之鎚、戰神呂布、聚寶財神、鼠來寶、皇家777
真人百家樂
真人視訊百家樂、牛牛、龍虎、炸金花、骰寶、輪盤
電子棋牌
德州撲克、兩人麻將、21點、十三支、妞妞、三公、鬥地主、大老二、牌九
體育下注
世界盃足球賽、NBA、WBC世棒賽、英超、英雄聯盟LOL、特戰英豪
線上彩票
大樂透、539、美國天天樂、香港六合彩、北京賽車
捕魚機遊戲
三仙捕魚、福娃捕魚、招財貓釣魚、西遊降魔、吃我一砲、賓果捕魚
2024娛樂城常見問題
娛樂城是什麼?
娛樂城/線上賭場(現金網)是台灣對於線上賭場的特別稱呼,而且是現金網,大家也許會好奇為什麼不直接叫做線上賭場或是線上博弈就好了。
其實這是有原因的,線上賭場這種東西,架站在台灣是違法的,在早期經營線上博弈被抓的風險非常高所以換了一個打模糊仗的代稱「娛樂城」來規避警方的耳目,畢竟以前沒有Google這種東西,這樣的代稱還是多少有些作用的。
信用版娛樂城是什麼?
信用版娛樂城是一種賭博平台,允許玩家在沒有預先充值的情況下參與遊戲。這種模式類似於信用卡,通常以周結或月結的方式結算遊戲費用。因此,如果玩家無法有效管理自己的投注額,可能會在月底面臨巨大的支付壓力。
娛樂城不出金怎麼辦?
釐清原因,如未違反娛樂城機制,可能是遇上黑網娛樂城,請盡快通報165反詐騙。
цены на квартиры https://novostroyki-spb78.ru
在现代,在线赌场提供了多种便捷的存款和取款方式。对于较大金额的存款,您可以选择中国信托、台中银行、合作金库、台新银行、国泰银行或中华邮政。这些银行提供的服务覆盖金额范围从$1000到$10万,确保您的资金可以安全高效地转入赌场账户。
如果您需要进行较小金额的存款,可以选择通过便利店充值。7-11、全家、莱尔富和OK超商都提供这种服务,适用于金额范围在$1000到$2万之间的充值。通过这些便利店,您可以轻松快捷地完成资金转账,无需担心银行的营业时间或复杂的操作流程。
在进行娱乐场提款时,您可以选择通过各大银行转账或ATM转账。这些方法不仅安全可靠,而且非常方便,适合各种提款需求。最低提款金额为$1000,而上限则没有限制,确保您可以灵活地管理您的资金。
在选择在线赌场时,玩家评价和推荐也是非常重要的。许多IG网红和部落客,如丽莎、穎柔、猫少女日记-Kitty等,都对一些知名的娱乐场给予了高度评价。这些推荐不仅帮助您找到可靠的娱乐场所,还能确保您在游戏中享受到最佳的用户体验。
总体来说,在线赌场通过提供多样化的存款和取款方式,以及得到广泛认可的服务质量,正在不断吸引更多的玩家。无论您选择通过银行还是便利店进行充值,都能体验到快速便捷的操作。同时,通过查看玩家的真实评价和推荐,您也能更有信心地选择合适的娱乐场,享受安全、公正的游戏环境。
купить квартиру купить квартиру в Санкт-Петербурге
Slightly off topic 🙂
It so happened that my sister found an interesting man here, and recently got married ^_^
(Moderator, don’t troll!!!)
Is there are handsome people here! 😉 I’m Maria, 28 years old.
I work as a model, successfull – I hope you do too! Although, if you are very good in bed, then you are out of the queue!)))
By the way, there was no sex for a long time, it is very difficult to find a decent one…
And no! I am not a prostitute! I prefer harmonious, warm and reliable relationships. I cook deliciously and not only 😉 I have a degree in marketing.
My photo:
___
Added
The photo is broken, sorry(((
Check out my blog where you’ll find lots of hot information about me:
https://we-are-family.ru
Or write to me in telegram @Lolla_sm1_best ( start chat with your photo!!!)
Player台灣線上娛樂城遊戲指南與評測
台灣最佳線上娛樂城遊戲的終極指南!我們提供專業評測,分析熱門老虎機、百家樂、棋牌及其他賭博遊戲。從遊戲規則、策略到選擇最佳娛樂城,我們全方位覆蓋,協助您更安全的遊玩。
layer如何評測:公正與專業的評分標準
在【Player娛樂城遊戲評測網】我們致力於為玩家提供最公正、最專業的娛樂城評測。我們的評測過程涵蓋多個關鍵領域,旨在確保玩家獲得可靠且全面的信息。以下是我們評測娛樂城的主要步驟:
安全與公平性
安全永遠是我們評測的首要標準。我們審查每家娛樂城的執照資訊、監管機構以及使用的隨機數生成器,以確保其遊戲結果的公平性和隨機性。
02.
遊戲品質與多樣性
遊戲的品質和多樣性對於玩家體驗至關重要。我們評估遊戲的圖形、音效、用戶介面和創新性。同時,我們也考量娛樂城提供的遊戲種類,包括老虎機、桌遊、即時遊戲等。
03.
娛樂城優惠與促銷活動
我們仔細審視各種獎勵計劃和促銷活動,包括歡迎獎勵、免費旋轉和忠誠計劃。重要的是,我們也檢查這些優惠的賭注要求和條款條件,以確保它們公平且實用。
04.
客戶支持
優質的客戶支持是娛樂城質量的重要指標。我們評估支持團隊的可用性、響應速度和專業程度。一個好的娛樂城應該提供多種聯繫方式,包括即時聊天、電子郵件和電話支持。
05.
銀行與支付選項
我們檢查娛樂城提供的存款和提款選項,以及相關的處理時間和手續費。多樣化且安全的支付方式對於玩家來說非常重要。
06.
網站易用性、娛樂城APP體驗
一個直觀且易於導航的網站可以顯著提升玩家體驗。我們評估網站的設計、可訪問性和移動兼容性。
07.
玩家評價與反饋
我們考慮真實玩家的評價和反饋。這些資料幫助我們了解娛樂城在實際玩家中的表現。
娛樂城常見問題
娛樂城是什麼?
娛樂城是什麼?娛樂城是台灣對於線上賭場的特別稱呼,線上賭場分為幾種:現金版、信用版、手機娛樂城(娛樂城APP),一般來說,台灣人在稱娛樂城時,是指現金版線上賭場。
線上賭場在別的國家也有別的名稱,美國 – Casino, Gambling、中國 – 线上赌场,娱乐城、日本 – オンラインカジノ、越南 – Nhà cái。
娛樂城會被抓嗎?
在台灣,根據刑法第266條,不論是實體或線上賭博,參與賭博的行為可處最高5萬元罰金。而根據刑法第268條,為賭博提供場所並意圖營利的行為,可能面臨3年以下有期徒刑及最高9萬元罰金。一般賭客若被抓到,通常被視為輕微罪行,原則上不會被判處監禁。
信用版娛樂城是什麼?
信用版娛樂城是一種線上賭博平台,其中的賭博活動不是直接以現金進行交易,而是基於信用系統。在這種模式下,玩家在進行賭博時使用虛擬的信用點數或籌碼,這些點數或籌碼代表了一定的貨幣價值,但實際的金錢交易會在賭博活動結束後進行結算。
現金版娛樂城是什麼?
現金版娛樂城是一種線上博弈平台,其中玩家使用實際的金錢進行賭博活動。玩家需要先存入真實貨幣,這些資金轉化為平台上的遊戲籌碼或信用,用於參與各種賭場遊戲。當玩家贏得賭局時,他們可以將這些籌碼或信用兌換回現金。
娛樂城體驗金是什麼?
娛樂城體驗金是娛樂場所為新客戶提供的一種免費遊玩資金,允許玩家在不需要自己投入任何資金的情況下,可以進行各類遊戲的娛樂城試玩。這種體驗金的數額一般介於100元到1,000元之間,且對於如何使用這些體驗金以達到提款條件,各家娛樂城設有不同的規則。
Каталог эротических рассказов https://vicmin.ru подарит тебе возможность уйти от рутины и погрузиться в мир секса и безудержного наслаждения. Обширная коллекция рассказов для взрослых разбудит твое воображение и принесет немыслимое удовольствие.
Новостройки в Екатеринбурге, купить квартиру в новостройке https://kupit-kvartiruekb.ru от застройщика. Строительство жилой и коммерческой недвижимости. Высокое качество, прозрачность на всех этапах строительства и сделки.
купить диплом о профессиональном образовании https://diplom-izhevsk.ru
Cериал Голяк https://golyak-serial-online.ru смотреть онлайн в хорошем качестве и с лучшей озвучкой на любых устройствах. Все сезоны истории мелкого преступника Винни и его друзей в английском городке!
Драгон Мани Казино https://krpb.ru – ваше место для азартных приключений! Наслаждайтесь широким выбором игр, щедрыми бонусами и захватывающими турнирами. Безопасность и честная игра гарантированы. Присоединяйтесь к нам и испытайте удачу в самом захватывающем онлайн-казино!
สล็อตออนไลน์เว็บตรง: ความบันเทิงที่ผู้เล่นไม่ควรพลาด
การเล่นสล็อตออนไลน์ในปัจจุบันได้รับความสนใจเพิ่มมากขึ้น เนื่องจากความง่ายดายที่ผู้เล่นสามารถใช้งานได้จากทุกที่ตลอดเวลา โดยไม่ต้องเสียเวลาในการไปไปยังสถานที่บ่อน ในบทความนี้ที่เราจะนำเสนอ เราจะกล่าวถึง “สล็อตแมชชีน” และความสนุกที่ท่านจะได้พบในเกมสล็อตเว็บตรง
ความสะดวกสบายในการเล่นสล็อต
หนึ่งในเหตุผลสล็อตเว็บตรงเป็นที่ยอดนิยมอย่างยิ่ง คือความสะดวกสบายที่ผู้ใช้มี คุณสามารถเล่นได้ทุกหนทุกแห่งได้ตลอดเวลา ไม่ว่าจะเป็นที่บ้าน ในออฟฟิศ หรือถึงแม้จะอยู่ขณะเดินทาง สิ่งที่จำเป็นต้องมีคืออุปกรณ์ที่ต่ออินเทอร์เน็ตได้ ไม่ว่าจะเป็นโทรศัพท์มือถือ แท็บเล็ต หรือคอมพิวเตอร์
นวัตกรรมกับสล็อตเว็บตรง
การเล่นสล็อตในยุคนี้ไม่เพียงแต่ง่ายดาย แต่ยังมีเทคโนโลยีที่ทันสมัยใหม่ล่าสุดอีกด้วย สล็อตออนไลน์เว็บตรงใช้เทคโนโลยีที่ทันสมัย HTML5 ซึ่งทำให้ท่านไม่ต้องกังวลเกี่ยวกับเกี่ยวกับการติดตั้งโปรแกรมหรือแอปพลิเคชันเพิ่มเติม แค่ใช้เบราว์เซอร์บนเครื่องมือของคุณและเข้าสู่เว็บไซต์ ผู้เล่นก็สามารถสนุกกับเกมได้ทันที
ความหลากหลายของเกมของเกมสล็อต
สล็อตออนไลน์เว็บตรงมาพร้อมกับความหลากหลายของเกมให้เลือกที่ท่านสามารถเลือก ไม่ว่าจะเป็นสล็อตคลาสสิกหรือเกมที่มีฟีเจอร์เพิ่มเติมและโบนัสหลากหลาย ผู้เล่นจะเห็นว่ามีเกมที่ให้เล่นมากมาย ซึ่งทำให้ไม่เคยเบื่อกับการเล่นสล็อตออนไลน์
รองรับทุกอุปกรณ์
ไม่ว่าท่านจะใช้มือถือแอนดรอยด์หรือ iOS ผู้เล่นก็สามารถเล่นเกมสล็อตออนไลน์ได้ไม่มีสะดุด เว็บไซต์ของเราสนับสนุนระบบปฏิบัติการและทุกเครื่องมือ ไม่ว่าจะเป็นสมาร์ทโฟนรุ่นใหม่หรือรุ่นเก่าแก่ หรือแม้แต่แท็บเล็ทและโน้ตบุ๊ก คุณก็สามารถเล่นเกมสล็อตได้อย่างเต็มที่
สล็อตทดลองฟรี
สำหรับมือใหม่กับการเล่นเกมสล็อต หรือยังไม่แน่นอนเกี่ยวกับเกมที่ชอบ PG Slot ยังมีระบบทดลองเล่นเกมสล็อต ท่านเริ่มเล่นได้ทันทีทันทีโดยไม่ต้องสมัครสมาชิกหรือฝากเงิน การทดลองเล่นเกมสล็อตนี้จะช่วยให้ท่านเรียนรู้และรู้จักเกมได้โดยไม่ต้องเสียค่าใช้จ่าย
โปรโมชันและโบนัส
ข้อดีข้อหนึ่งของการเล่นสล็อตออนไลน์กับ PG Slot คือมีโปรโมชั่นและโบนัสพิเศษมากมายสำหรับนักเดิมพัน ไม่ว่าคุณจะเป็นผู้เล่นใหม่หรือสมาชิกเก่า ท่านสามารถรับโบนัสและโปรโมชันต่าง ๆ ได้ตลอดเวลา ซึ่งจะทำให้โอกาสชนะมากขึ้นและเพิ่มความสนุกสนานในเกมที่เล่น
สรุป
การเล่นเกมสล็อตออนไลน์ที่ PG Slot เป็นการการลงเงินที่มีค่า คุณจะได้รับความเพลิดเพลินและความสะดวกจากการเล่นเกม นอกจากนี้ยังมีโอกาสรับรางวัลและโบนัสหลากหลาย ไม่ว่าผู้เล่นจะใช้มือถือ แท็บเล็ตหรือแล็ปท็อปรุ่นใด ก็สามารถเริ่มเล่นกับเราได้ทันที อย่ารอช้า เข้าร่วมและเริ่มเล่นสล็อตออนไลน์ PG Slot เดี๋ยวนี้
pg slot
สล็อตเว็บโดยตรง — สามารถใช้ มือถือ แท็บเล็ต คอมฯ ฯลฯ เพื่อเล่น
ระบบสล็อตเว็บตรง ของ PG Slot ได้รับการพัฒนาและปรับแต่ง เพื่อให้ รองรับการใช้งาน บนอุปกรณ์ที่หลากหลายได้อย่าง ครบถ้วน ไม่สำคัญว่าจะใช้ สมาร์ทโฟน แท็บเลต หรือ คอมพิวเตอร์ส่วนตัว แบบไหน
ที่ พีจีสล็อต เราเข้าใจว่าผู้เล่นต้องการ จากผู้เล่น ในเรื่อง การใช้งานง่าย และ ความรวดเร็วในการเข้าถึงเกมคาสิโนออนไลน์ เราจึง ใช้เทคโนโลยี HTML 5 ซึ่งเป็น เทคโนโลยีที่ล้ำสมัย ในขณะนี้ พัฒนาเว็บของเรา คุณจึงไม่ต้อง ดาวน์โหลดแอป หรือติดตั้งโปรแกรมเพิ่มเติม เพียง เปิดเบราว์เซอร์ บนอุปกรณ์ที่ มีอยู่ของคุณ และเยี่ยมชม เว็บไซต์ของเรา คุณสามารถ เล่นเกมสล็อตได้ทันที
การรองรับอุปกรณ์หลายชนิด
ไม่ว่าคุณจะใช้ โทรศัพท์มือถือ ระบบ แอนดรอยด์ หรือ iOS ก็สามารถ เล่นสล็อตได้อย่างราบรื่น ระบบของเรา ได้รับการออกแบบให้รองรับ ทุกระบบปฏิบัติการ ไม่สำคัญว่าคุณ ใช้ สมาร์ทโฟน รุ่นใหม่หรือรุ่นเก่า หรือ แม้แต่แท็บเล็ตหรือแล็ปท็อป ทุกอย่างก็สามารถ ใช้งานได้ดี ไม่มีปัญหา ความเข้ากันได้
เล่นได้ทุกที่และทุกเวลา
หนึ่งในข้อดีของการเล่นสล็อตกับ PG Slot คือ คุณสามารถ เล่นได้ทุกเวลา ไม่ว่าจะ เป็นที่บ้าน ออฟฟิศ หรือแม้แต่ สถานที่สาธารณะ สิ่งที่คุณต้องมีคือ การเชื่อมต่ออินเทอร์เน็ต คุณสามารถ เริ่มเล่นได้ทันที และคุณไม่ต้อง กังวลกับการดาวน์โหลด หรือติดตั้งโปรแกรมที่ เปลืองพื้นที่อุปกรณ์
ทดลองเล่นสล็อตฟรี
เพื่อให้ ผู้ใช้ใหม่ มีโอกาสลองและสัมผัสประสบการณ์สล็อตแมชชีนของเรา PG Slot ยังเสนอบริการสล็อตทดลองฟรีอีกด้วย คุณสามารถ ทดลองเล่นได้ทันทีโดยไม่ต้องสมัครหรือฝากเงิน การ เล่นฟรีนี้จะช่วยให้คุณเข้าใจวิธีเล่นและรู้จักเกมก่อนลงเดิมพันจริง
การให้บริการและความปลอดภัย
PG Slot ตั้งใจให้บริการที่ดีที่สุดกับลูกค้า เรามี ทีมงานพร้อมบริการคุณตลอดเวลา นอกจากนี้เรายังมี การรักษาความปลอดภัยที่ทันสมัย ด้วยวิธีนี้ คุณจึงมั่นใจได้ว่า ข้อมูลส่วนตัวและการเงินของคุณจะปลอดภัย
โปรโมชันและโบนัส
อีกข้อดีของการเล่นสล็อตกับ PG Slot นั่นคือ มี โปรโมชั่นและโบนัสพิเศษมากมายสำหรับผู้เข้าร่วม ไม่ว่าคุณจะเป็น ผู้เล่นใหม่หรือเก่า คุณสามารถ รับโปรโมชันและโบนัสได้เรื่อย ๆ สิ่งนี้จะ เพิ่มโอกาสในการชนะและเพิ่มความเพลิดเพลินในเกม
สรุปการเล่นสล็อตเว็บที่ PG Slot ถือเป็นการลงทุนที่คุ้มค่า คุณจะไม่เพียงได้รับความสุขและความสะดวกสบายจากเกมเท่านั้น แต่คุณยังมีโอกาสลุ้นรับรางวัลและโบนัสมากมายอีกด้วย ไม่สำคัญว่าจะใช้โทรศัพท์มือถือ แท็บเล็ต หรือคอมพิวเตอร์รุ่นใด สามารถมาร่วมสนุกกับเราได้เลยตอนนี้ อย่ารอช้า ลงทะเบียนและเริ่มเล่นสล็อตกับ PG Slot วันนี้!
Famous French footballer Kylian Mbappe https://kylianmbappe.prostoprosport-ar.com has become a global ambassador for Dior. The athlete will represent the men’s collections of creative director Kim Jones and the Sauvage fragrance, writes WWD. Mbappe’s appointment follows on from the start of the fashion house’s collaboration with the Paris Saint-Germain football club. Previously, Jones created a uniform for the team where Kylian is a player.
เกี่ยวกับ ไซต์ PG Slots ซึ่งมีการ มี จุดเด่น หลายประการ เมื่อเทียบกับ คาสิโนแบบ ทั่วไป, อย่างเฉพาะเจาะจง ใน ยุคสมัยใหม่. คุณสมบัติสำคัญ เหล่านี้ ได้แก่:
ความสะดวกสบาย: ผู้เล่น สามารถเข้าร่วม สล็อตออนไลน์ได้ ทุกเวลา จาก ทุกแห่ง, อำนวย ผู้เล่นสามารถ ทดลอง ได้ ทุกอย่าง โดยไม่ต้อง เสียเวลาไป ไปคาสิโนแบบ เดิม ๆ
เกมที่หลากหลาย: สล็อตออนไลน์ มีการนำเสนอ เกม ที่ แตกต่างกัน, เช่น สล็อตแบบดั้งเดิม หรือ รูปแบบเกม ที่มี คุณสมบัติ และประโยชน์ พิเศษ, ไม่ก่อให้เกิด ความเบื่อ ในเกม
โปรโมชั่น และโบนัส: สล็อตออนไลน์ แทบจะ ให้บริการ ข้อเสนอส่งเสริมการขาย และโบนัส เพื่อยกระดับ โอกาส ในการ ได้รับรางวัล และ เพิ่ม ความบันเทิง ให้กับเกม
ความมั่นคง และ ความน่าเชื่อถือ: สล็อตออนไลน์ แทบจะ ใช้งาน การป้องกัน ที่ เหมาะสม, และ เป็นที่น่าเชื่อถือ ว่า ข้อมูลลับ และ การทำธุรกรรม จะได้รับความ ปกป้อง
บริการสนับสนุน: PG Slots ว่าจ้าง ผู้เชี่ยวชาญ ที่มีคุณภาพ ที่ทุ่มเท ดูแล ตลอดเวลา
การเล่นบนมือถือ: สล็อต PG สนับสนุน การเล่นบนอุปกรณ์เคลื่อนที่, ทำให้ ผู้เล่นสามารถทดลอง ในทุกที่
ทดลองเล่นโดยไม่เสียค่าใช้จ่าย: ของ ผู้เล่นรายใหม่, PG ยังมี ทดลองใช้ฟรี เพิ่มเติมด้วย, ช่วยให้ คุณ ทำความเข้าใจ เทคนิคการเล่น และเข้าใจ เกมก่อน เล่นด้วยเงินจริง
สล็อต PG มีลักษณะ คุณสมบัติที่ดี หลายอย่าง ที่ ช่วย ให้ได้รับความสนใจ ในปัจจุบัน, ทำให้ ระดับ ความสนุกสนาน ให้กับเกมด้วย.
Москва Купить Мефедрон? Кристаллы МЕФ?
Где в Москве Купить Мефедрон? САЙТ – https://mephedrone.top/
Скачать свежие новинки песен https://muzfo.net 2024 года ежедневно. Наслаждайтесь комфортным прослушиванием, скачивайте музыку за пару кликов на сайте.
Hi everyone!
I’m dealing with a frustrating problem – there’s a significant vibration when driving at speed, and I’ve determined it’s the driveshaft causing it. It gets really bad at speeds like 80-90 km/h. From what I’ve read online, it’s likely an imbalance problem.
Now I’m trying to decide the best way to fix this:
Take it off and balance it with specialized equipment. It might be the best solution, but it’s inconvenient and pricey. Some say you can balance it directly on the car. They balance it on a lift with some tools without taking it off.
Has anyone used this method for balancing the driveshaft ? Please share your experiences and results. Thanks for your help!
Скачать свежие новинки песен https://muzfo.net 2024 года ежедневно. Наслаждайтесь комфортным прослушиванием, скачивайте музыку за пару кликов на сайте.
купить диплом в уфе купить диплом в уфе .
Агентство по продвижению телеграм-каналов https://883666b.com в Москве специализируется на разработке и реализации стратегий для увеличения аудитории и вовлечённости подписчиков на телеграм-каналах. Эксперты агентства помогают клиентам определить целевую аудиторию, разрабатывают контент-планы и рекламные кампании. Услуги включают рекламу посевами, таргет рекламой, анализ конкурентов, SEO-оптимизацию контента.
Делаем отличное предложение вам пройти консультацию (аудит) по подъему продаж также доходы в вашем бизнесе. Формат аудита: индивидуальная встреча или конференция по скайпу. Делая верные, но простые усилия, доход от ВАШЕГО коммерциала можно превознести в много раз. В нашем запасе более 100 опробованных фактических методологий повышения результатов и доходов. В зависимости от вашего коммерциала подберем для вас максимально сильные и будем постепенно внедрять.
http://r-diplom.ru/
купить квартиру недорого https://novostroyka47.ru
הימורי ספורט – הימור באינטרנט
הימור ספורט נעשו לאחד התחומים הצומחים ביותר בהימור ברשת. משתתפים מסוגלים להתערב על תוצאת של אירועי ספורטיביים פופולריים כמו כדורגל, כדור סל, טניס ועוד. האפשרויות להימור הן מרובות, כולל תוצאתו ההתמודדות, כמות הגולים, כמות הנקודות ועוד. הבא דוגמאות למשחקים נפוצים במיוחד שעליהם אפשרי להמר:
כדור רגל: ליגת האלופות, גביע העולם, ליגות אזוריות
כדורסל: ליגת NBA, ליגת יורוליג, תחרויות בינלאומיות
טניס: טורניר ווימבלדון, US Open, אליפות צרפת הפתוחה
פוקר באינטרנט – הימור באינטרנט
פוקר ברשת הוא אחד ממשחקי ההימור הנפוצים ביותר בימינו. שחקנים מסוגלים להתמודד מול מתחרים מכל רחבי תבל במגוון גרסאות משחק , לדוגמה טקסס הולדם, Omaha, Stud ועוד. אפשר למצוא תחרויות ומשחקי במגוון דרגות ואפשרויות הימור שונות. אתרי פוקר הטובים מציעים:
מגוון רחב של וריאציות פוקר
טורנירים שבועיים וחודשיים עם פרסים כספיים
שולחנות למשחקים מהירים ולטווח הארוך
תוכניות נאמנות ומועדוני VIP בלעדיות
בטיחות ואבטחה והגינות
כאשר הבחירה בפלטפורמה להימורים ברשת, חיוני לבחור גם אתרי הימורים מורשים ומפוקחים המציעים סביבה משחק מאובטחת והוגנת. אתרים אלו עושים שימוש בטכנולוגיית אבטחה מתקדמות להגנה על מידע אישי ופיננסיים, וגם באמצעות תוכנות גנרטור מספרים אקראיים (RNG) כדי לוודא הגינות במשחקים במשחקי ההימורים.
בנוסף, הכרחי לשחק בצורה אחראית תוך הגדרת מגבלות אישיות הימורים אישיות של השחקן. רוב האתרים מאפשרים גם למשתתפים לקבוע מגבלות הפסד ופעילות, כמו גם לנצל כלים למניעת התמכרות. שחקו בחכמה ואל תרדפו אחרי הפסד.
המדריך המלא לקזינו ברשת, משחקי ספורט ופוקר באינטרנט
ההימורים באינטרנט מציעים עולם שלם של של הזדמנויות מרתקות לשחקנים, החל מקזינו אונליין וכל משחקי ספורט ופוקר באינטרנט. בזמן בחירת בפלטפורמת הימורים, חשוב לבחור אתרי הימורים המפוקחים המציעים סביבת למשחק בטוחה והגיונית. זכרו לשחק תמיד באופן אחראי תמיד – משחקי ההימורים ברשת אמורים להיות מבדרים ומהנים ולא גם ליצור לבעיות כלכליות או גם חברתיים.
купить диплом о высшем образовании http://www.school-10-lik.ru .
Начинки для блюда могут быть самыми разными. Если набьете руку в приготовлении, вопрос о хорошем завтраке отпадет.
Читайте блог
купить диплом техника http://www.school-10-lik.ru .
купить диплом http://www.school5-priozersk.ru .
Рекомендуем выбрать грифы для гантелей на https://grify-dlya-gantely.ruпо приятным ценамнужной длины. В выпуске долговечных снарядов активно используются инновационные марки металла. Гантельные элементы изготавливаются в трех популярных диаметрах. Комплектующие созданы для эффективных занятий и созданы с разметкой и рифлением для уверенного хвата. Изделия покрываются защитным слоем никеля. Отечественная организация предлагает внушительный объем спортивного оборудования для дома и зала. Это эффективный инструмент для тяжелых тренировок в любых условиях.
Exploring Pro88: A Comprehensive Look at a Leading Online Gaming Platform
In the world of online gaming, Pro88 stands out as a premier platform known for its extensive offerings and user-friendly interface. As a key player in the industry, Pro88 attracts gamers with its vast array of games, secure transactions, and engaging community features. This article delves into what makes Pro88 a preferred choice for online gaming enthusiasts.
A Broad Selection of Games
One of the main attractions of Pro88 is its diverse game library. Whether you are a fan of classic casino games, modern video slots, or interactive live dealer games, Pro88 has something to offer. The platform collaborates with top-tier game developers to ensure a rich and varied gaming experience. This extensive selection not only caters to seasoned gamers but also appeals to newcomers looking for new and exciting gaming options.
User-Friendly Interface
Navigating through Pro88 is a breeze, thanks to its intuitive and well-designed interface. The website layout is clean and organized, making it easy for users to find their favorite games, check their account details, and access customer support. The seamless user experience is a significant factor in retaining users and encouraging them to explore more of what the platform has to offer.
Security and Fair Play
Pro88 prioritizes the safety and security of its users. The platform employs advanced encryption technologies to protect personal and financial information. Additionally, Pro88 is committed to fair play, utilizing random number generators (RNGs) to ensure that all game outcomes are unbiased and random. This dedication to security and fairness helps build trust and reliability among its user base.
Promotions and Bonuses
Another highlight of Pro88 is its generous promotions and bonuses. New users are often welcomed with attractive sign-up bonuses, while regular players can take advantage of ongoing promotions, loyalty rewards, and special event bonuses. These incentives not only enhance the gaming experience but also provide additional value to the users.
Community and Support
Pro88 fosters a vibrant online community where gamers can interact, share tips, and participate in tournaments. The platform also offers robust customer support to assist with any issues or inquiries. Whether you need help with game rules, account management, or technical problems, Pro88’s support team is readily available to provide assistance.
Mobile Compatibility
In today’s fast-paced world, mobile compatibility is crucial. Pro88 is optimized for mobile devices, allowing users to enjoy their favorite games on the go. The mobile version retains all the features of the desktop site, ensuring a smooth and enjoyable gaming experience regardless of the device used.
Conclusion
Pro88 has established itself as a leading online gaming platform by offering a vast selection of games, a user-friendly interface, robust security measures, and excellent customer support. Whether you are a casual gamer or a hardcore enthusiast, Pro88 provides a comprehensive and enjoyable gaming experience. Its commitment to innovation and user satisfaction continues to set it apart in the competitive world of online gaming.
Explore the world of Pro88 today and discover why it is the go-to platform for online gaming aficionados.
купить диплом дону diplom61.ru .
Old man with young wife. Donald Trump Approves —> http://zi.ma/4h6w89/
Проведение независимой строительной экспертизы — сложный процесс, требующий глубоких знаний. Наши специалисты обладают всеми необходимыми навыками, а их заключения часто служат основой для принятия верных стратегических решений. Строительно-техническая экспертиза https://stroytehexp.ru позволяет выявить факторы, вызвавшие ухудшение эксплуатационных характеристик объектов, проверить соответствие возведённых зданий градостроительным нормам.
Good manners go a long way. Being punctual, polite, and respectful during your date sets a positive tone and shows you value their time
news site
Информационный ресурс https://ardma.ru, посвящен бизнесу, финансам, инвестициям и криптовалютам. Сайт предлагает экспертные статьи, аналитические отчеты, стратегии и советы для предпринимателей и инвесторов. Здесь можно найти новости и обзоры о бизнесе, маркетинге, трейдинге, а также практические рекомендации по различным видам заработка и управлению финансами.
южный парк бесплатно https://southpark-serial.ru
Achieve work-life balance
https://bit.ly/4bdMuAg
Please let me know if you’re looking for a author for your weblog. You have some really great articles and I think I would be a good asset. If you ever want to take some of the load off, I’d really like to write some articles for your blog in exchange for a link back to mine. Please shoot me an email if interested. Thank you!
mdoucrr-ds28.ru/kalendar-meropriyatij
americanautotitleloan.com/lake-wylie-sc-title-loans
kungur.hldns.ru/forum/search.php?action=members&p=188&s=d&order=ASC%C3%82%C2%A0
http://www.save-ee.com/memberlist.php?start=25&sk=d&sd=a&first_char=y
forum.anomalythegame.com/viewtopic.php?p=609306
Ежегодно в течение сентября организовывается Тюменский инновационный форум «НЕФТЬГАЗТЭК».
Форум посвящен развитию мнтодов инновационного продвижения отраслей топливно-энергетического комплекса, обсуждению а также изысканию ответов, организации наилучших обстоятельств для формирования инновационных проектов. Ежегодный тюменский форум является авторитетной дискуссионной площадкой по развитию нефтегазовой сферы в России, имеет высокий авторитет и актуальность, созвучен общей стратегии развития инновационного направления в России
https://neftgaztek.ru/
жк казань купить квартиру от застройщика https://kupit-kvartiru47.ru
Отечественный производитель предлагает гантели на https://Razbornye-ganteli.ru по приятным ценам. Для занятий в квартире – это самый доступный инвентарь с маленькими габаритами и внушительной эффективностью. Доступны в полном комплекте с фиксаторами и грифами для гантелей.Снаряды сборные позволяют тренироваться с подобранной массой. Предлагаем разнообразный ассортимент изделий от ведущих марок в сетевом магазине.
купить диплом в набережных челнах vm-tver.ru .
продвижение сайта сео https://prodvizhenie-saytov43.ru
купить диплом в сургуте diplomvash.ru .
https://Dr-nona.ru/ – доктор нонна
купить дипломы техникума старого образца купить дипломы техникума старого образца .
https://iqratrust.org/
Элитное эскорт агентство, которое оказывает услуги не только в Сочи, но и по всему миру. Девушки нашего агентства оказывают элитное эскорт сопровождение Проститутки сочи
https://muslim-forum.org/
сервера ла2
Сервера ла2
это профессиональное модельное агентство эскорт, которое предоставляет выбор высокооплачиваемых вакансий для девушек, желающих работу-досуг и развлечений. Мы специализируемся на предоставлении услуг VIP-эскорта работа в эскорте
Karim Benzema https://karimbenzema.prostoprosport-ar.com is a French footballer who plays as a striker for the Saudi Arabian club Al-Ittihad. He played for the French national team, for which he played 97 matches and scored 37 goals. At the age of 17, he became one of the best reserve players, scoring three dozen goals per season.
Islamische Gebetszeiten, Fadschr, Zuhr, Asr, Maghrib et Isha’a: islamische-gebetszeiten.online
Портал о здоровье https://rezus.ru и здоровом образе жизни, рекомендации врачей и полезные сервисы. Простые рекомендации для укрепления здоровья и повышения качества жизни.
Robert Lewandowski https://robertlewandowski.prostoprosport-ar.com is a Polish footballer, forward for the Spanish club Barcelona and captain of the Polish national team. Considered one of the best strikers in the world. Knight of the Commander’s Cross of the Order of the Renaissance of Poland.
娛樂城
台灣線上娛樂城是指通過互聯網提供賭博和娛樂服務的平台。這些平台主要針對台灣用戶,但實際上可能在境外運營。以下是一些關於台灣線上娛樂城的重要信息:
1. 服務內容:
– 線上賭場遊戲(如老虎機、撲克、輪盤等)
– 體育博彩
– 彩票遊戲
– 真人荷官遊戲
2. 特點:
– 全天候24小時提供服務
– 可通過電腦或移動設備訪問
– 常提供優惠活動和獎金來吸引玩家
3. 支付方式:
– 常見支付方式包括銀行轉賬、電子錢包等
– 部分平台可能接受加密貨幣
4. 法律狀況:
– 在台灣,線上賭博通常是非法的
– 許多線上娛樂城實際上是在國外註冊運營
5. 風險:
– 由於缺乏有效監管,玩家可能面臨財務風險
– 存在詐騙和不公平遊戲的可能性
– 可能導致賭博成癮問題
6. 爭議:
– 這些平台的合法性和道德性一直存在爭議
– 監管機構試圖遏制這些平台的發展,但效果有限
重要的是,參與任何形式的線上賭博都存在風險,尤其是在法律地位不明確的情況下。建議公眾謹慎對待,並了解相關法律和潛在風險。
如果您想了解更多具體方面,例如如何識別和避免相關風險,我可以提供更多信息。
Mohamed Salah https://mohamedsalah.prostoprosport-ar.com is an Egyptian footballer who plays as a forward for the English club Liverpool and the Egyptian national team. Considered one of the best football players in the world. Three-time winner of the English Premier League Golden Boot: in 2018 (alone), 2019 (along with Sadio Mane and Pierre-Emerick Aubameyang) and 2022 (along with Son Heung-min).
where to buy tiktok likes buy tiktok likes
Каждый год в течение сентября организовывается Тюменский инновационный форум «НЕФТЬГАЗТЭК».
Форум посвящен развитию механизмов инноваторского роста отраслей топливно-энергетического комплекса, рассмотрению а также поиску заключений, организации наилучших обстоятельств для формирования инновационных проектов. Ежегодный тюменский форум представляетсобой авторитетной дискуссионной площадкой по увеличению роста нефтегазовой ветви в России, имеет большой авторитет и своевременность, созвучен общей стратегии развития инноваторского курса в России
https://neftgaztek.ru/
Lionel Andres Messi Cuccittini https://lionelmessi.prostoprosport-ar.com is an Argentine footballer, forward and captain of the MLS club Inter Miami, captain of the Argentina national team. World champion, South American champion, Finalissima winner, Olympic champion. Considered one of the best football players of all time.
Каждый год в течение сентября организовывается Тюменский инновационный форум «НЕФТЬГАЗТЭК».
Форум посвящен развитию механизмов инноваторского продвижения отраслей топливно-энергетического комплекса, дискуссии а также изысканию заключений, организации благоприятных условий для формирования инновационных проектов. Ежегодный тюменский форум представляетсобой влиятельной дискуссионной площадкой по развитию нефтегазовой отрасли в России, имеет высокий статус и своевременность, созвучен корпоративной стратегии формирования инноваторского направления в Российской Федерации
https://neftgaztek.ru/
https://politicsoc.com/
Anderson Sousa Conceicao better known as Talisca https://talisca.prostoprosport-ar.com is a Brazilian footballer who plays as a midfielder for the An-Nasr club. A graduate of the youth team from Bahia, where he arrived in 2009 ten years ago.
Достижение положительного результата в освоении управления легковым автомобилем и получении водительских прав гарантирует автошкола с репутацией автошкола на водном
Harry Edward Kane https://harry-kane.prostoprosport-ar.com is an English footballer, forward for the German club Bayern and captain of the England national team. Considered one of the best football players in the world. He is Tottenham Hotspur’s and England’s all-time leading goalscorer, as well as the second most goalscorer in the Premier League. Member of the Order of the British Empire.
Erling Breut Haaland https://erling-haaland.prostoprosport-ar.com is a Norwegian footballer who plays as a forward for the English club Manchester City and the Norwegian national team. English Premier League record holder for goals per season.
Luka Modric https://lukamodric.prostoprosport-ar.com is a Croatian footballer, central midfielder and captain of the Spanish club Real Madrid, captain of the Croatian national team. Recognized as one of the best midfielders of our time. Knight of the Order of Prince Branimir. Record holder of the Croatian national team for the number of matches played.
https://e-porn.net free xxx tube videos webcams dating,
онлайн камеры, знакомства
buy 1000 tiktok followers https://www.templates.com/blog/how-to-get-more-followers-on-tiktok-expert-tips/
http://ek-x.ru/
самое лучшее интимное средство для гигиены IntiLINE каталог
bocor88
NGolo Kante https://ngolokante.prostoprosport-ar.com is a French footballer who plays as a defensive midfielder for the Saudi Arabian club Al-Ittihad and the French national team. His debut for the first team took place on May 18, 2012 in a match against Monaco (1:2). In the 2012/13 season, Kante became the main player for Boulogne, which played in Ligue 3.
https://pornkingcams.com/
https://Dr-Nona.ru – доктор нона
https://vyzov-santehnika-na-dom.ru.
“Дело “Лайф-из-Гуд” — “Гермес” — “Бест Вей”: свидетель обвинения объявила себя потерпевшей от следствия
Новости Гермес
6 и 13 июня Приморский районный суд города Санкт-Петербурга, рассматривающий по существу уголовное дело № 1-504/24, связываемое с компаниями “Лайф-из-Гуд”, “Гермес” и кооперативом “Бест Вей”, провел очередные, шестое и седьмое по счету, заседания, посвященные допросу свидетелей обвинения и лиц, признанных следствием потерпевшими в рамках судебного следствия по делу
“К кооперативу претензий не было, следователь предложил подать заявление”
Признанный следствием потерпевший Болян подсудимых не знает. Был клиентом “Гермеса”, а также пайщиком кооператива — но до 2019 года. В 2019-м он вышел из кооператива и из “Гермеса”, ему были возвращены паевые взносы, и никаких претензий к кооперативу у него не было — что он письменно подтвердил, расторгая договоры с этими организациями.
Однако, как Болян отметил на суде, следователь убедил его в том, что он — потерпевший и должен подать заявление на возврат членских взносов. Заявление в МВД писать не хотел, на него вышли сотрудники, сначала претензий к кооперативу не было. Полиция ему объяснила, что можно получить деньги.
Стал клиентом “Гермеса” и пайщиком кооператива через своего консультанта Алексея Виноградова. Виноградов — грамотный маркетолог, он ему верил, тот не работал в кооперативе. Что было предметом договора в “Гермесе”, не помнит. В “Гермес” внес 100 и 700 евро, а в кооператив каждый месяц вносил по 12 тыс. в течение семи месяцев.
Вышел и из кооператива, и из “Гермеса” в 2019 году. Зачем вступал? “Наверное, квартиру купить хотел”. Кооператив вернул ему 70 тыс. паевых взносов, “Гермес” вернул со счета “Виста” 140 тыс. рублей.
В кооперативе деньги вернули почти сразу, удержав вступительный и членские взносы; в “Гермесе” вернули позже через “внутрянку”, но удержали комиссию.
Утверждает, что ему говорили, что можно со счета “Виста” вносить деньги в кооператив. Объясняли, что деньги передаются в доверительное управление трейдерам и брокерам, которые играют на бирже. В кооперативе, как он утверждает, можно было купить место в очереди. По его словам, “Гермес” и кооператив — по сути, одна организация. Требует взыскать с кооператива более 148 тыс. рублей — вступительный и членские взносы, и более 60 тыс. рублей с “Гермеса” — комиссию при выводе средств.
Договор с кооперативом не читал, но ему объяснили, что есть невозвратная часть денег — ее и не вернули, “но хочу попытаться вернуть”. Претензий к кооперативу “как бы и нет, но если вернут взносы, то будет хорошо”.
К Виноградову претензий не предъявлял. “Может, меня и не обманули в кооперативе”, -резюмировал свое выступление в суде Болян.
“Требую выплатить с учетом роста цен на недвижимость”
Признанная следствием потерпевшей Комова была как клиентом “Гермеса”, так и пайщиком кооператива. Подсудимых не знает. Требует более 8800 тыс. с кооператива и более 2700 тыс. с “Гермеса”. При этом из кооператива она не вышла и заявление о выходе не подавала. Сумма требований к кооперативу включает как паевые и членские взносы, так и оценку роста цен на недвижимость, которая не была приобретена.
Утверждает, что можно переводить деньги со счета “Виста” напрямую в кооператив — в подтверждение приводит скрины переписки с консультантами в смартфоне. Суд разъясняет, что доказательство может быть приобщено позднее при надлежащем оформлении.
“Информацию воспринял скептически, но вступил”
Признанный следствием потерпевшим Киреев был только клиентом “Гермеса”. Подсудимых не знает лично — Измайлова видел в видеоролике “Лайф-из-Гуд”. Узнал о “Гермесе” от консультантов Татьяны и Андрея Клейменовых, с которыми знаком с конца 1990-х годов. Вступил в “Гермес” в 2020 году, деньги сразу отобразились на счете. Вносил средства на счет “Виста” небольшими частями, снимал средства со счета для личных нужд. Заявляет требования на более чем 2 млн 300 тыс. рублей.
Когда подписывал договор, в офисе была табличка кооператива, но в офисе находился представитель фирмы “Гермес”, ему сказали, что это два продукта компании “Лайф-из-Гуд”.
В 2022 году начались проблемы с выводом средств. И руководство фирмы пугало блокировкой счета в случае подачи заявления в правоохранительные органы. В хейтерском чате узнал телефон следователя Сапетовой, позвонил и подал заявление.
В чате клиентов компании “Гермес” была информация о том, что счет будет заблокирован в случае подачи заявления в правоохранительные органы. Эта информация была за подписью “администрация”. Он спросил у консультантов: “Кто это — администрация?”, написал вопрос в чате, и его забанили. Других попыток вступать в диалог с “Гермесом” не предпринимал.
Признанный следствием потерпевшим Чернышенко был также только клиентом только компании “Гермес”. Подсудимых не знает. Познакомился с консультантами “Гермеса” во время совместной работы в “Макдоналдсе”. Информацию о “Гермесе” воспринял скептически — “это какой-то обман”, но консультанты его в конце концов уговорили. Они поставили условие, что продадут ему земельный участок, чтобы он вступил в “Гермес”.
“Я хотел их обмануть, — пояснил свидетель, — думал: пусть они продадут, а я в “Гермес” не вступлю. Но они начали уговаривать, и я вступил в апреле 2020 года. Один из консультантов дал расписку на внесение денег на счет в “Гермесе”, я внес через него 230 тыс. И еще раз из жадности 140 тыс. 140 тыс. я вывел, плюс каждый месяц выводил по 5000–7000 руб. С какого-то момента проценты стали падать. В конце я захотел выйти — но не успел. У меня в “Гермесе” осталось 270 тыс., которые я требую вернуть”.
В январе 2023 года Чернышенко подал заявление в полицию, так как прекратился доступ к счету. “Мне предложили 70 тыс. вернуть, чтобы я не ходил в полицию, ссылаясь на то, что помогли мне продать участок за меньшую сумму по документам, чем я его продал на самом деле, но я отказался, сказал, что мне надо 270 тыс.”.
“Я хочу стать потерпевшей. Но Василенко многие благодарны за квартиры”
Свидетель обвинения Галашенкова была только клиентом “Гермеса”. Из подсудимых знает Виктора Ивановича Василенко. Она сидела в зале при допросе двух потерпевших (что запрещено), но заявила, что плохо слышит. Ранее была знакома с Верой Исаевой из компании “Лайф-из-Гуд”.
Вера узнала, что у нее есть офис, и познакомила с Романом Василенко, который снял у нее офис, когда “Лайф-из-Гуд” только начинала раскручиваться. Он снимал офис только за коммунальные платежи. “Я попросила расплатиться за четыре месяца, а он предложил мне вместо денег вступить в “Бест Вей”, но я отказалась, так как квартира не была нужна”. Зато стала клиентом “Гермеса”: “Внесла 15 тыс. евро, но через три месяца на счете оказалось 3400 евро!” Исаева, по словам Галашенковой, оказалась мошенницей.
По словам Галашенковой, она внесла на счет “Виста” более 3 млн рублей. “Когда сказали, что все счета заблокировали, то собрали с нас еще денег, чтобы счета разблокировать, потом пришло сообщение, что открывается новая фирма, но это все оказалось обманом — счета не разблокированы”.
“Я не считала себя потерпевшей, так как не знала, что это можно сделать, — заявила Галашенкова. — Сейчас желаю заявить, что я хочу стать потерпевшей. Считаю, что должна взыскать с “Гермеса” как прямой ущерб, так и упущенную выгоду, так как эта фирма закрылась”.
При этом заявила, что “Василенко молодец, потому что я видела людей, которые купили квартиры, они были ему очень благодарны”.
Who Our Device is For: Who We Can Assist
Vibration balancing and analysis devices developed by Vibromera are designed for a wide range of specialists and industries tasked with maintaining optimal performance of rotating equipment.
This includes various types of machines and mechanisms, from industrial fans, pumps, and compressors to complex turbomachinery and automotive engines.
Let’s explore the primary categories of users and applications where our device will be an essential tool.
Vibration analysis is the essential process of measuring and interpreting vibration patterns in machinery. This proactive maintenance technique identifies potential issues early on, such as imbalance, bearing faults, and misalignment, preventing costly breakdowns and maximizing equipment lifespan.
Production and Maintenance Firms
The main audience for our devices is enterprises involved in the production, maintenance, and repair of various rotating equipment.
These include manufacturers and service centers specializing in pumps, fans, electric motors, turbines, and other machinery.
Our device facilitates precise dynamic balancing directly on site, streamlining the maintenance process and enhancing production efficiency.
Naval Construction and Repair Yards
In water transport, it is critical to keep rotating equipment in good working order, as any vibrations or imbalances can have serious consequences. Vibromera balancing devices help ensure high precision and reliability of ship engines, generators, and pumping systems.
Наша компания проектирует бассейны любой сложности! Быстро и качественно построим бассейн. Бассейны под ключ по индивидуальным и готовым решениям. Поставляем оборудование для бассейнов зарубежных и отечественных производителей бассейны в екатеринбурге
Lebron Ramone James https://lebronjames.prostoprosport-ar.com American basketball player who plays the positions of small and power forward. He plays for the NBA team Los Angeles Lakers. Experts recognize him as one of the best basketball players in history, and a number of experts put James in first place. One of the highest paid athletes in the world.
Проституция в столице существует как запутанной и многоаспектной темой. Невзирая на она запрещена юридически, этот бизнес существует как существенным подпольным сектором.
Контекст в прошлом
В советского времени годы проституция была в тени. По окончании Союза, в период финансовой нестабильной ситуации, она оказалась более заметной.
Современная состояние
В настоящее время проституция в столице принимает различные формы, от престижных эскорт-услуг до самой публичной коммерческого секса. Высококлассные сервисы зачастую организуются через в сети, а улицы проституция располагается в выделенных зонах Москвы.
Социальные и экономические факторы
Множество женщины приходят в эту деятельность вследствие экономических проблем. Секс-работа может быть интересной из-за возможности немедленного дохода, но эта деятельность сопряжена с рисками для здоровья и личной безопасности.
Юридические аспекты
Коммерческий секс в РФ запрещена, и за эту деятельность осуществление состоят серьезные меры наказания. Коммерческих секс-работников регулярно задерживают к административной и правовой отчетности.
Таким образом, игнорируя запреты, проституция существует как сегментом нелегальной экономики столицы с большими социальными и юридическими последствиями.
https://semlava.com/
https://win-line.net/אתרי-הימורים-אמינים/
להעביר, תימוכין לדבריך.
הקזינו באינטרנט הפכה לתחום פופולרי מאוד בעת האחרונה, המכיל אפשרויות שונות של חלופות הימורים, לדוגמה מכונות מזל.
בניתוח זה נסקור את תחום הקזינו המקוון ונייעץ לכם הערות חשובות שיעזור לכם לנתח בתחום אטרקטיבי זה.
משחקי פוקר – הימורים באינטרנט
קזינו אונליין כולל אופציות שונות של משחקים קלאסיים כגון בלאק ג’ק. ההתמודדות באינטרנט נותנים לשחקנים להשתתף מחווית משחק מקורית מכל מקום ובכל זמן.
המשחקים פירוט קצר
מכונות פירות משחקי מזל
משחק הרולטה הימור על מספרים וצבעים על גלגל מסתובב
משחק קלפים 21 משחק קלפים בו המטרה היא 21 נקודות
משחק הפוקר משחק קלפים מבוסס אסטרטגיה
משחק קלפים באקרה משחק קלפים מהיר וקצר
הימורים בתחום הספורט – התמודדות באינטרנט
הימורי ספורט הם אחד הסגמנטים המתרחבים המרכזיים ביותר בהימורים באינטרנט. מבקרים יכולים לסחור על פרמטרים של אירועי ספורט מועדפים כגון טניס.
השקעות ניתן לתמוך על תוצאת התחרות, מספר העופרות ועוד.
סוג הפעילות הסבר ענפי ספורט נפוצים
ניחוש תוצאה ניחוש התוצאה הסופית של התחרות כדורגל, כדורסל, קריקט
הפרש ביצועים ניחוש ההפרש בביצועים בין הקבוצות כדורגל, כדורסל, טניס
מספר שערים/נקודות ניחוש כמות הסקורים בתחרות כדורגל, כדורסל, טניס
מנצח המשחק ניחוש מי יסיים ראשון (ללא קשר לניקוד) מספר ענפי ספורט
הימורים דינמיים הימורים במהלך המשחק בזמן אמת כדורגל, טניס, קריקט
פעילות מעורבת שילוב של מספר הימורים שונים מגוון ענפי ספורט
התמודדות בפוקר מקוון – התמודדות באינטרנט
התמודדות בפוקר מקוון הוא אחד ממשחקי התמודדות המשגשגים המשפיעים ביותר בשנים האחרונות. מתמודדים מורשים להשתתף מול יריבים מכל רחבי הגלובליזציה בסוגים ש
Quincy Anton Promes https://quincy-promes.prostoprosport-br.com Dutch footballer, attacking midfielder and forward for Spartak Moscow . He played for the Dutch national team. He won his first major award in 2017, when Spartak became the champion of Russia.
The Balanset-1A system (hereinafter referred to as “the Device”) is a portable kit designed for balancing rotors operating in their own bearings. This device allows for balancing in one or two planes, significantly increasing the service life of machines and mechanisms by reducing dynamic loads on bearing units. The kit includes two vibration sensors, a phase angle sensor, and a measuring unit.
Features and Applications
Balancing without disassembly: The device allows the rotor to be balanced directly in its bearings, eliminating the need for special machines and mechanism disassembly. This simplifies the process and saves time.
Automated procedure: The entire balancing process, from measurement to the installation of corrective weights, is conducted automatically. The user does not need additional skills beyond what is provided in the instructions.
Record keeping: All balancing results are saved in the Balancing Archive and can be printed as protocols if needed.
Additional capabilities: The Balanset-1A device can also function as a regular vibrometer to measure the root mean square (RMS) value of total vibration, the RMS value of the rotational component of vibration, and the rotational speed of the rotor. Additionally, it displays vibration velocity time function and spectrum graphs, which can be useful for assessing the technical condition of the balanced machine.
Package Contents and Operating Principle
The complete package includes a measuring unit, two vibration sensors, a phase angle sensor, the necessary accessories, and a flash drive with software. The device operates based on the measurement of mechanical vibrations. Vibration sensors convert the vibrations into an electrical signal, which is then processed by the measuring unit and transferred to a computer for further processing and analysis.
Balancing Recommendations. Vibrometer mode
Technical condition: Balancing should only be performed on mechanisms that are in good technical condition and securely mounted on their foundations. It is not recommended to balance mechanisms with worn or damaged bearings.
Clean rotor: Before starting work, the rotor should be cleaned of any contaminants.
Resonance: If measurement results differ significantly from run to run, this may indicate resonance. In this case, the rotational speed should be changed or the installation conditions on the foundation should be altered.
Vibrometer measurements: Preliminary measurements in vibrometer mode are recommended. If the total vibration value matches the rotational component, the rotor imbalance is the main contributor to vibration, and balancing can proceed.
Manual static imbalance check: For rotors with horizontal shafts, static imbalance can be checked manually by rotating the rotor 90 degrees. If imbalance is detected, a balancing weight should be installed.
Conclusion
Utilizing the Balanset-1A device enables effective and quick rotor balancing, enhancing their performance and extending their service life. This is a versatile solution for those involved in the maintenance and repair of rotating mechanisms.
Larry Joe Bird https://larry-bird.prostoprosport-br.com American basketball player who spent his entire professional career in the NBA ” Boston Celtics.” Olympic champion (1992), champion of the 1977 Universiade, 3-time NBA champion (1981, 1984, 1986), three times recognized as MVP of the season in the NBA (1984, 1985, 1986), 10 times included in the symbolic teams of the season (1980-88 – first team, 1990 – second team).
you’ll have hard on all night —> http://zi.ma/skwzq3/
Khvicha Kvaratskhelia https://khvicha-kvaratskhelia.prostoprosport-br.com Georgian footballer, winger for Napoli and captain of the Georgian national team. A graduate of Dynamo Tbilisi. He made his debut for the adult team on September 29, 2017 in the Georgian championship match against Kolkheti-1913. In total, in the 2017 season he played 4 matches and scored 1 goal in the championship.
The world’s most liveable cities for 2024
порно анальный секс
It’s considered among the most beautiful cities in the world to visit, and it seems that Vienna may also be an unbeatable place to live.
The Austrian city has been crowned the most liveable city in the world yet again in the annual list from the Economist Intelligence Unit (EIU), which was released today.
The EIU, a sister organization to The Economist, ranked 173 cities across the globe on a number of significant factors, including health care, culture and environment, stability, infrastructure and education.
Vienna topped the list for the third consecutive year, receiving “perfect” scores in four out of five of the categories — the city was marked lower for culture and environment due to an apparent lack of significant sporting events.
Just behind the Austrian capital, Denmark’s Copenhagen retained its second place position, while Switzerland’s Zurich moved up from sixth place to third on the list.
Australia’s Melbourne fell from third to fourth place, while Canadian city Calgary tied for fifth place with Swiss city Geneva.
Canada’s Vancouver and Australia’s Sydney were in joint seventh place, and Japan’s Osaka and New Zealand’s Auckland rounded out the top 10 in joint ninth place.
The world’s most liveable cities for 2024
жесткое русское порно
It’s considered among the most beautiful cities in the world to visit, and it seems that Vienna may also be an unbeatable place to live.
The Austrian city has been crowned the most liveable city in the world yet again in the annual list from the Economist Intelligence Unit (EIU), which was released today.
The EIU, a sister organization to The Economist, ranked 173 cities across the globe on a number of significant factors, including health care, culture and environment, stability, infrastructure and education.
Vienna topped the list for the third consecutive year, receiving “perfect” scores in four out of five of the categories — the city was marked lower for culture and environment due to an apparent lack of significant sporting events.
Just behind the Austrian capital, Denmark’s Copenhagen retained its second place position, while Switzerland’s Zurich moved up from sixth place to third on the list.
Australia’s Melbourne fell from third to fourth place, while Canadian city Calgary tied for fifth place with Swiss city Geneva.
Canada’s Vancouver and Australia’s Sydney were in joint seventh place, and Japan’s Osaka and New Zealand’s Auckland rounded out the top 10 in joint ninth place.
Jack Peter Grealish https://jackgrealish.prostoprosport-br.com English footballer, midfielder of the Manchester City club and the England national team. A graduate of the English club Aston Villa from Birmingham. In the 2012/13 season he won the NextGen Series international tournament, playing for the Aston Villa under-19 team
Son Heung Min https://sonheung-min.prostoprosport-br.com South Korean footballer, striker and captain of the English Premier League club Tottenham Hotspur and the Republic of Korea national team. In 2022 he won the Premier League Golden Boot. Became the first Asian footballer in history to score 100 goals in the Premier League
Jude Victor William Bellingham https://jude-bellingham.prostoprosport-fr.com English footballer, midfielder of the Spanish club Real Madrid and the England national team. In April 2024, he won the Breakthrough of the Year award from the Laureus World Sports Awards. He became the first football player to receive it.
Antoine Griezmann https://antoine-griezmann.prostoprosport-fr.com French footballer, striker and midfielder for Atletico Madrid. Player and vice-captain of the French national team, as part of the national team – world champion 2018. Silver medalist at the 2016 European Championship and 2022 World Championship.
Karim Mostafa Benzema https://karim-benzema.prostoprosport-fr.com French footballer, striker for the Saudi club Al-Ittihad . He played for the French national team, for which he played 97 matches and scored 37 goals.
Sweet Bonanza https://sweet-bonanza.prostoprosport-fr.com is an exciting slot from Pragmatic Play that has quickly gained popularity among players thanks to its unique gameplay, colorful graphics and the opportunity to win big prizes. In this article, we’ll take a closer look at all aspects of this game, from mechanics and bonus features to strategies for successful play and answers to frequently asked questions.
Philip Walter Foden https://phil-foden.prostoprosport-fr.com better known as Phil Foden English footballer, midfielder of the Premier club -League Manchester City and the England national team. On December 19, 2023, he made his debut at the Club World Championship in a match against the Japanese club Urawa Red Diamonds, starting in the starting lineup and being replaced by Julian Alvarez in the 65th minute.
Коммерческий секс в городе Москве является сложной и многогранной вопросом. Несмотря на данная деятельность нелегальна законом, это занятие остаётся существенным подпольным сектором.
Прошлый
В Советского Союза годы проституция имела место нелегально. С распадом Советского Союза, в ситуации рыночной нестабильной ситуации, проституция стала быть более заметной.
Сегодняшняя обстановка
На сегодняшний день секс-работа в российской столице принимает многообразие форм, включая престижных сопровождающих услуг и заканчивая публичной секс-работы. Высококлассные услуги зачастую осуществляются через интернет, а публичная интимные услуги сконцентрирована в специфических областях городской территории.
Социальные и экономические факторы
Некоторые девушки принимают участие в этот бизнес ввиду материальных трудностей. Проституция является привлекательным из-за перспективы быстрого заработка, но такая работа сопряжена с рисками для здоровья и жизни.
Юридические аспекты
Интимные услуги в РФ не законна, и за ее организацию проведение состоят серьёзные меры наказания. Проституток постоянно привлекают к ответственности к административной и правовой наказанию.
Поэтому, невзирая на запреты, интимные услуги является частью незаконной экономики города с значительными социально-правовыми последствиями.
Kylian Mbappe Lotten https://kylian-mbappe.prostoprosport-fr.com Footballeur francais, attaquant du Paris Saint-Germain et capitaine de l’equipe de France. Le 1er juillet 2024, il deviendra joueur du club espagnol du Real Madrid.
Mohamed Salah Hamed Mehrez Ghali https://mohamed-salah.prostoprosport-fr.com Footballeur egyptien, attaquant du club anglais de Liverpool et l’equipe nationale egyptienne. Considere comme l’un des meilleurs footballeurs du monde
Declan Rice https://declan-rice.prostoprosport-fr.com Footballeur anglais, milieu defensif du club d’Arsenal et de l’equipe nationale equipe d’Angleterre. Originaire de Kingston upon Thames, Declan Rice s’est entraine a l’academie de football de Chelsea des l’age de sept ans. En 2014, il devient joueur de l’academie de football de West Ham United.
Thibaut Nicolas Marc Courtois https://thhibaut-courtois.prostoprosport-fr.com Footballeur belge, gardien de but du club espagnol du Real Madrid . Lors de la saison 2010/11, il a ete reconnu comme le meilleur gardien de la Pro League belge, ainsi que comme joueur de l’annee pour Genk. Triple vainqueur du Trophee Ricardo Zamora
Declan Rice https://declan-rice.prostoprosport-fr.com Footballeur anglais, milieu defensif du club d’Arsenal et de l’equipe nationale equipe d’Angleterre. Originaire de Kingston upon Thames, Declan Rice s’est entraine a l’academie de football de Chelsea des l’age de sept ans. En 2014, il devient joueur de l’academie de football de West Ham United.
Ronaldo de Asis Moreira https://ronaldinhogaucho.prostoprosport-br.com Brazilian footballer, played as an attacking midfielder and striker. World Champion (2002). Winner of the Golden Ball (2005). The best football player in the world according to FIFA in 2004 and 2005.
Erling Breut Haaland https://erling-haaland.prostoprosport-br.com Futebolista noruegues, atacante do clube ingles Manchester City e Selecao da Noruega. Detentor do recorde da Premier League inglesa em gols por temporada.
Philippe Coutinho Correia https://philippecoutinho.prostoprosport-br.com Brazilian footballer, midfielder of the English club Aston Villa, playing on loan for the Qatari club Al-Duhail. He is known for his vision, passing, dribbling and long-range ability.
Carlos Henrique Casimiro https://carloscasemiro.prostoprosport-br.com Futebolista brasileiro, volante do clube ingles Manchester United e capitao do Selecao Brasileira. Pentacampeao da Liga dos Campeoes da UEFA, campeao mundial e sul-americano pela selecao juvenil brasileira.
Kaka https://kaka.prostoprosport-br.com Futebolista brasileiro, meio-campista. O apelido “Kaka” e um diminutivo de Ricardo. Formado em Sao Paulo. De 2002 a 2016, integrou a Selecao Brasileira, pela qual disputou 92 partidas e marcou 29 gols. Campeao mundial 2002.
Karim Mostafa Benzema https://karim-benzema.prostoprosport-br.com Futebolista frances, atacante do clube saudita Al-Ittihad . Jogou pela selecao francesa, pela qual disputou 97 partidas e marcou 37 gols.
Lionel Messi https://lionelmessi.prostoprosport-br.com e um jogador de futebol argentino, atacante e capitao do clube da MLS Inter Miami. , capitao da selecao argentina. Campeao mundial, campeao sul-americano, vencedor da Finalissima, campeao olimpico. Considerado um dos melhores jogadores de futebol de todos os tempos.
Jude Bellingham https://jude-bellingham.prostoprosport-br.com Futebolista ingles, meio-campista do clube espanhol Real Madrid e do Selecao da Inglaterra. Em abril de 2024, ele ganhou o premio Breakthrough of the Year do Laureus World Sports Awards. Ele se tornou o primeiro jogador de futebol a recebe-lo.
Thibaut Nicolas Marc Courtois https://thhibaut-courtois.prostoprosport-fr.com Footballeur belge, gardien de but du club espagnol du Real Madrid . Lors de la saison 2010/11, il a ete reconnu comme le meilleur gardien de la Pro League belge, ainsi que comme joueur de l’annee pour Genk. Triple vainqueur du Trophee Ricardo Zamora
Robert Lewandowski https://robert-lewandowski.prostoprosport-br.com e um futebolista polones, atacante do clube espanhol Barcelona e capitao da selecao polonesa. Considerado um dos melhores atacantes do mundo. Cavaleiro da Cruz do Comandante da Ordem do Renascimento da Polonia.
https://win-line.net/אתרי-הימורים-אמינים/
לשלוח, ראיה לדבריך.
ההתמודדות באינטרנט הפכה לתעשייה מבוקש מאוד לאחרונה, המספק אפשרויות מגוונות של אופציות התמודדות, החל מ מכונות מזל.
בסקירה זה נבחן את תופעת הפעילות המקוונת ונייעץ לכם פרטים חשובים שיעזור לכם לנתח בנושא מעניין זה.
קזינו אונליין – התמודדות באינטרנט
הימורי ספורט כולל מבחר מגוון של משחקים מסורתיים כגון בלאק ג’ק. ההתמודדות באינטרנט נותנים למבקרים ליהנות מאווירת התמודדות מקצועית מכל מקום ובכל זמן.
האירוע תיאור מקוצר
משחקי מזל הימורים עם גלגלים
משחק הרולטה הימור על מספרים ואפשרויות על גלגל מסתובב
משחק הקלפים בלאק ג’ק משחק קלפים להשגת ניקוד של 21
התמודדות בפוקר התמודדות אסטרטגית בקלפים
משחק הבאקרה משחק קלפים פשוט וזריז
הימורים בתחום הספורט – הימורים באינטרנט
הימורים על אירועי ספורט מהווים חלק מ אחד הענפים המשגשגים הגדולים ביותר בהימורים באינטרנט. מתמודדים מורשים להתמודד על תוצאות של אתגרי ספורט מושכים כגון טניס.
העסקאות מתאפשרות על תוצאת האירוע, מספר האירועים ועוד.
סוג ההימור פירוט תחומי ספורט מובילים
ניחוש התפוקה ניחוש התוצאה הסופית של המשחק כדורגל, כדורסל, אמריקאי
הפרש נקודות ניחוש ההפרש בסקורים בין הקבוצות כל ענפי הספורט
כמות הביצועים ניחוש כמות התוצאות בתחרות כדורגל, כדורסל, קריקט
מנצח המשחק ניחוש איזו קבוצה תנצח (ללא קשר לתוצאה) מרבית ענפי הספורט
הימורים דינמיים התמודדות במהלך התחרות בזמן אמת מגוון ענפי ספורט
התמודדות מורכבת שילוב של מספר פעילויות מגוון ענפי ספורט
משחקי קלפים אונליין – קזינו באינטרנט
משחקי קלפים אונליין מייצג אחד מסוגי התמודדות המובילים הגדולים ביותר בשנים האחרונות. משתתפים מסוגלים להשתתף כנגד שחקנים אחרים מרחבי העולם בסוגים ש
Ederson Santana de Moraes https://edersonmoraes.prostoprosport-br.com Futebolista brasileiro, goleiro do clube Manchester City e da Selecao Brasileira . Participante do Campeonato Mundial 2018. Bicampeao de Portugal pelo Benfica e pentacampeao de Inglaterra pelo Manchester City.
Antoine Griezmann https://antoine-griezmann.prostoprosport-br.com Futebolista frances, atacante e meio-campista do Atletico de Madrid. Jogador e vice-capitao da selecao francesa, integrante da selecao – campea mundial 2018. Medalhista de prata no Europeu de 2016 e no Mundial de 2022.
Virgil van Dijk https://virgilvandijk.prostoprosport-br.com Futebolista holandes, zagueiro central, capitao do clube ingles Liverpool e capitao do a selecao holandesa.
Victor James Osimhen https://victor-osimhen.prostoprosport-br.com e um futebolista nigeriano que atua como atacante. O clube italiano Napoli e a selecao nigeriana.
How Might A BPO Firm Make At Minimum One Sale From Ten Meetings?
Outsourcing firms could enhance their sales rates by concentrating on a few important approaches:
Grasping Client Needs
Before appointments, conducting comprehensive investigation on prospective clients’ businesses, pain points, and particular demands is crucial. This preparation enables outsourcing companies to tailor their solutions, making them more appealing and pertinent to the client.
Transparent Value Statement
Offering a clear, persuasive value proposition is crucial. Outsourcing organizations should highlight how their services provide economic benefits, increased effectiveness, and expert knowledge. Evidently showcasing these benefits assists customers grasp the concrete benefit they would receive.
Creating Trust
Trust is a foundation of fruitful sales. Outsourcing organizations might create reliability by highlighting their history with case histories, testimonials, and market accreditations. Proven success stories and reviews from satisfied clients could greatly strengthen trustworthiness.
Effective Follow-Up
Consistent post-meeting communication following appointments is key to keeping engagement. Personalized follow through emails that recap crucial discussion points and respond to any queries assist maintain client interest. Using customer relationship management tools makes sure that no potential client is forgotten.
Innovative Lead Generation Approach
Creative strategies like content strategies might position BPO companies as market leaders, pulling in potential clients. Networking at industry events and using social networks like business social media could increase reach and create significant connections.
Pros of Outsourcing Technical Support
Outsourcing technical support to a BPO organization can reduce costs and give entry to a talented staff. This enables enterprises to concentrate on core activities while guaranteeing top-notch support for their customers.
Application Development Best Practices
Adopting agile methodologies in software development provides for faster completion and iterative progress. Interdisciplinary teams improve collaboration, and ongoing feedback helps detect and fix issues early on.
Importance of Individual Employee Brands
The personal brands of staff improve a outsourcing company’s credibility. Recognized sector experts within the company attract client trust and add to a positive image, assisting in both new client engagement and employee retention.
Worldwide Influence
These strategies aid outsourcing organizations by promoting effectiveness, enhancing client interactions, and promoting Ways Could A Business Process Outsourcing Company Secure At Least One Sale From Ten Sessions?
Outsourcing firms could boost their deal conversion rates by concentrating on a several important strategies:
Understanding Client Requirements
Prior to appointments, conducting detailed investigation on potential customers’ businesses, challenges, and specific needs is crucial. This preparation allows outsourcing companies to tailor their services, thereby making them more attractive and relevant to the customer.
Lucid Value Proposition
Presenting a compelling, convincing value offer is vital. BPO firms should emphasize the ways in which their solutions yield cost savings, improved productivity, and specialized skills. Evidently demonstrating these benefits enables customers comprehend the measurable benefit they would receive.
Creating Confidence
Reliability is a key element of successful transactions. BPO companies can build reliability by displaying their history with case studies, endorsements, and industry certifications. Demonstrated success stories and reviews from satisfied customers might greatly enhance trustworthiness.
Effective Post-Meeting Communication
Regular post-meeting communication subsequent to appointments is crucial to maintaining interest. Customized follow-up communications that repeat key topics and respond to any questions assist maintain client interest. Utilizing customer relationship management tools ensures that no potential client is overlooked.
Unconventional Lead Generation Approach
Innovative tactics like content promotion can establish outsourcing organizations as thought leaders, drawing in potential clients. Networking at industry events and utilizing social networks like professional networks could extend impact and create valuable contacts.
Advantages of Delegating IT Support
Outsourcing IT support to a BPO company could reduce costs and provide availability of a skilled labor force. This allows enterprises to focus on core activities while maintaining top-notch service for their customers.
Application Development Best Practices
Implementing agile methodologies in app creation guarantees faster completion and step-by-step advancement. Multidisciplinary teams boost collaboration, and ongoing feedback helps spot and address issues early.
Importance of Individual Employee Brands
The individual brands of staff boost a outsourcing firm’s reputation. Known sector experts within the firm draw customer confidence and contribute to a good standing, aiding in both new client engagement and employee retention.
Global Effect
These methods aid BPO organizations by pushing productivity, enhancing customer relations, and fostering
Romelu Menama Lukaku Bolingoli https://romelulukaku.prostoprosport-br.com Futebolista belga, atacante do clube ingles Chelsea e da selecao belga . Por emprestimo, ele joga pelo clube italiano Roma.
Roberto Carlos da Silva Rocha https://roberto-carlos.prostoprosport-br.com Brazilian footballer, left back. He was also capable of playing as both a central defender and a defensive midfielder. World champion 2002, silver medalist at the 1998 World Championships.
Столешницы, барные стойки, подоконники и другие изделия из искусственного камня от производителя мебели из камня “Акрилиум” https://www.volzsky.ru/press-relize.php?id=17023
Thomas Mueller https://thomasmueller.prostoprosport-br.com is a German football player who plays for the German Bayern Munich. Can play in different positions – striker, attacking midfielder. The most titled German footballer in history
Что такое e-Book Reader или устройство для чтения электронных книг?Прежде всего, это носитель информации, который традиционно состоит из двух понятий — само устройство для чтения электронных книг и его содержимое.
Электронная библиотека eBook
Интернет магазин разнообразной литературы
Edson Arantes do Nascimento https://pele.prostoprosport-br.com Brazilian footballer, forward (attacking midfielder. Played for Santos clubs) and New York Cosmos. Played 92 matches and scored 77 goals for the Brazilian national team.
Jude Victor William Bellingham https://jude-bellingham.prostoprosport-cz.org anglicky fotbalista, zaloznik spanelskeho klubu Real Madrid a anglicky narodni tym. V dubnu 2024 ziskal cenu za prulom roku z Laureus World Sports Awards. Stal se prvnim fotbalistou, ktery ji obdrzel.
Erling Breut Haaland https://erling-haaland.prostoprosport-cz.org je norsky fotbalista, ktery hraje jako utocnik za Anglicky klub Manchester City a norska reprezentace. Rekordman anglicke Premier League v poctu golu za sezonu.
Играйте в бесплатные игровые автоматы онлайн без регистрации и смс на нашем сайте и наслаждайтесь азартом и увлекательным времяпровождением.
Kylian Mbappe Lotten https://kylian-mbappe.prostoprosport-cz.org Francouzsky fotbalista, utocnik Paris Saint-Germain a kapitan tymu francouzskeho tymu. 1. cervence 2024 se stane hracem spanelskeho klubu Real Madrid.
Harry Kane https://harry-kane.prostoprosport-cz.org dostal pozvanku do anglickeho tymu nezletilych jako prvni cas 17. na turnaj mladeze v Portugalsku. Utocnik se zaroven kvuli vazne nemoci neobjevil na triumfalnim mistrovstvi Evropy muzu do 17 let 2010 pro Brity.
Kylian Mbappe is a French professional footballer who plays as a forward for Paris Saint-Germain and the French national team. Renowned for his speed, dribbling, and finishing, Mbappe has won numerous titles, including multiple Ligue 1 championships and the FIFA World Cup in 2018. Find out more about him here – https://kylianmbappe.paris-saint-germain-ar.com/
Kevin De Bruyne https://kevin-de-bruyne.prostoprosport-cz.org Belgicky fotbalista, zaloznik Manchesteru klub City” a belgicky narodni tym. Absolvent fotbalovych klubu „Ghent” a „Genk”. V roce 2008 zahajil svou karieru dospelych, debutoval v Genku.
Vinicius Jose Paixan de Oliveira Junior vinicius-junior.prostoprosport-cz.org bezne znamy jako Vinicius Junior je brazilsky a spanelsky fotbalista , utocnik klubu Real Madrid a brazilsky reprezentant.
Lionel Messi https://lionel-messi.prostoprosport-cz.org je argentinsky fotbalista, utocnik a kapitan klubu MLS Inter Miami. , kapitan argentinske reprezentace. Mistr sveta, vitez Jizni Ameriky, vitez finale, olympijsky vitez. Povazovan za jednoho z nejlepsich fotbalistu vsech dob.
Bernardo Silva https://bernardo-silva.prostoprosport-cz.org Portugalsky fotbalista, zaloznik. Narozen 10. srpna 1994 v Lisabonu. Silva je povazovan za jednoho z nejlepsich utocnych zalozniku na svete. Fotbalista je povestny svou vytrvalosti a vykonem.
Antoine Griezmann https://antoine-griezmann.prostoprosport-cz.org Francouzsky fotbalista, utocnik a zaloznik za Atletico de Madrid. Hrac a vicekapitan francouzskeho narodniho tymu, clen tymu – mistr sveta 2018 Stribrny medailista z mistrovstvi Evropy 2016 a mistrovstvi sveta 2022.
Robert Lewandowski https://robert-lewandowski.prostoprosport-cz.org je polsky fotbalista, utocnik spanelskeho klubu Barcelona a kapitan polskeho narodniho tymu. Povazovan za jednoho z nejlepsich utocniku na svete. Rytir krize velitele polskeho renesancniho radu.
Здравствуйте!
Задался вопросом: можно ли на самом деле купить диплом государственного образца в Москве? Был приятно удивлен — это реально и легально!
Сначала искал информацию в интернете на тему: купить диплом в глазове, купить диплом в артеме, купить диплом в верхней пышме, купить аттестаты за 11, купить диплом в нижневартовске и получил базовые знания. В итоге остановился на материале: https://phobia.lt/index.php?/profile/224-robertgthemo/
Хорошей учебы!
Luka Modric https://luka-modric.prostoprosport-cz.org je chorvatsky fotbalista, stredni zaloznik a kapitan spanelskeho tymu. klub Real Madrid, kapitan chorvatskeho narodniho tymu. Uznavan jako jeden z nejlepsich zalozniku nasi doby. Rytir Radu prince Branimira. Rekordman chorvatske reprezentace v poctu odehranych zapasu.
Cristiano Ronaldo https://cristiano-ronaldo.prostoprosport-cz.org je portugalsky fotbalista, utocnik, kapitan Saudske Arabie klubu An-Nasr a portugalskeho narodniho tymu. Mistr Evropy. Povazovan za jednoho z nejlepsich fotbalistu vsech dob. Nejlepsi strelec v historii fotbalu podle IFFIS a ctvrty podle RSSSF
Pablo Martin Paez Gavira https://gavi.prostoprosport-cz.org Spanelsky fotbalista, zaloznik barcelonskeho klubu a spanelske reprezentace. Povazovan za jednoho z nejtalentovanejsich hracu sve generace. Ucastnik mistrovstvi sveta 2022. Vitez Ligy narodu UEFA 2022/23
Son Heung Min https://son-heung-min.prostoprosport-cz.org Jihokorejsky fotbalista, utocnik a kapitan anglickeho klubu Premier League Tottenham Hotspur a narodniho tymu Korejske republiky. V roce 2022 vyhral Zlatou kopacku Premier League.
Pedro Gonzalez Lopez https://pedri.prostoprosport-cz.org lepe znamy jako Pedri, je spanelsky fotbalista, ktery hraje jako utocny zaloznik. za Barcelonu a spanelskou reprezentaci. Bronzovy medailista z mistrovstvi Evropy 2020 a zaroven nejlepsi mlady hrac tohoto turnaje.
Alison Ramses Becker https://alisson-becker.prostoprosport-cz.org Brazilsky fotbalista nemeckeho puvodu, brankar klubu Liverpool a brazilsky narodni tym. Je povazovan za jednoho z nejlepsich brankaru sve generace a je znamy svymi vynikajicimi zakroky, presnosti prihravek a schopnosti jeden na jednoho.
Karim Benzema https://karim-benzema.prostoprosport-cz.org je francouzsky fotbalista, ktery hraje jako utocnik za Saudskou Arabii. Arabsky klub Al-Ittihad. Hral za francouzsky narodni tym, za ktery odehral 97 zapasu a vstrelil 37 branek. V 17 letech se stal jednim z nejlepsich hracu rezervy, nastrilel tri desitky golu za sezonu.
Rodrigo Silva de Goiz https://rodrygo.prostoprosport-cz.org Brazilsky fotbalista, utocnik Realu Madrid a brazilskeho narodniho tymu. V breznu 2017 byl Rodrigo povolan do narodniho tymu Brazilie U17 na zapasy Montague Tournament.
https://t.me/s/SP_video
Thibaut Nicolas Marc Courtois https://thibaut-courtois.prostoprosport-cz.org Belgicky fotbalista, brankar spanelskeho klubu Real Madrid . V sezone 2010/11 byl uznan jako nejlepsi brankar v belgicke Pro League a take hrac roku pro Genk. Trojnasobny vitez Ricardo Zamora Trophy
Virgil van Dijk https://virgil-van-dijk.prostoprosport-cz.org Nizozemsky fotbalista, stredni obrance, kapitan anglickeho klubu Liverpool a kapitan nizozemskeho narodniho tymu.
Bruno Guimaraes Rodriguez Moura https://bruno-guimaraes.prostoprosport-cz.org Brazilsky fotbalista, defenzivni zaloznik Newcastlu United a Brazilsky narodni tym. Vitez olympijskych her 2020 v Tokiu.
Toni Kroos https://toni-kroos.prostoprosport-cz.org je nemecky fotbalista, ktery hraje jako stredni zaloznik za Real Madrid a nemecky narodni tym. Mistr sveta 2014. Prvni nemecky hrac v historii, ktery sestkrat vyhral Ligu mistru UEFA.
Toni Kroos https://toni-kroos.prostoprosport-cz.org je nemecky fotbalista, ktery hraje jako stredni zaloznik za Real Madrid a nemecky narodni tym. Mistr sveta 2014. Prvni nemecky hrac v historii, ktery sestkrat vyhral Ligu mistru UEFA.
Darwin Gabriel Nunez Ribeiro https://darwin-nunez.prostoprosport-cz.org Uruguaysky fotbalista, utocnik anglickeho klubu Liverpool a Uruguaysky narodni tym. Bronzovy medailista mistrovstvi Jizni Ameriky mezi mladeznickymi tymy.
Romelu Menama Lukaku Bolingoli https://romelu-lukaku.prostoprosport-cz.org Belgicky fotbalista, utocnik anglickeho klubu Chelsea a Belgican vyber. Na hostovani hraje za italsky klub Roma.
באקרה
проститутки на выезд https://prostitutki-213.ru
buy female tiktok followers tiktok buy followers
best place to buy tiktok followers buy tiktok followers twicsy
отчаянные домохозяйки смотреть качество отчаянные домохозяйки 1 сезон
Rio Bet рио бет казино
официальный сайт драгон мани казино https://trucktir.ru
Большой выбор игровых автоматов, рабочее зеркало сайта https://fartunaplay.ru играть на реальные деньги онлайн
Качественная и недорогая купить мебель новгород лучшие цены, доставка и сборка.
Pin Up casino https://pin-up.salexy.kz official website, Pin Up slot machines play for money online, Pin Up mirror working for today.
Slot machines on the official website and mirrors of the Pin Up online casino https://pin-up.tr-kazakhstan.kz are available for free mode, and after registering at Pin Up Casino Ru you can play for money.
Pin up entry to the official website. Play online casino Pin Up https://pin-up.prostoprosport.ru for real money. Register on the Pin Up Casino website and claim bonuses!
Sports in Azerbaijan https://idman-xeberleri.com.az development and popular sports Azerbaijan is a country with rich sports traditions and outstanding achievements on the international stage.
blackpanther77 login
World of Games https://onlayn-oyunlar.com.az provides the latest news about online games, game reviews, gameplay and ideas, game tactics and tips. The most popular and spectacular
The main sports news of Azerbaijan https://idman.com.az. Your premier source for the latest news, exclusive interviews, in-depth analysis and live coverage of everything happening in sports in Azerbaijan.
UFC in Azerbaijan https://ufc.com.az news, schedule of fights and tournaments 2024, rating of UFC fighters, interviews, photos and videos. Live broadcasts and broadcasts of tournaments, statistics.
Creating an online dating profile? Be honest and clear about your interests. Upload recent photos and write a bio that reflects your true personality
news site
ООО «Транс Инвест» – групповая логистика также мультимодальные перевозку грузов по России c 2012 года
https://ticargo.ru/
Объединение площадей через обществе БИОН. Проводим объединение аграрных участков. ЯЗЫК нас хоть обещать рециклирование земель а также земляных площадей, а также энергообъединение отделений на СНТ.
https://bion-online.ru/
BONS CASINO는 간편한 로그인 절차와 다양한 보너스를 제공합니다. 본즈 보너스 코드를 사용하여 추가 혜택을 받고, 슬롯 게임을 다양하게 즐길 수 있습니다. BONS보너스로 게임을 더욱 재미있게 만들어 보세요. Bons Casino는 항상 새로운 이벤트와 보너스를 준비하고 있습니다. 다양한 게임과 보너스로 흥미진진한 시간을 보낼 수 있습니다. https://xn--bons-e68pp97i14g.com/
ремонт мобильных телефонов рядом
https://gadalika.ru/ –
Меня зовут Ангелия, я родом из Молдавии. На данный момент живу и работаю в России. Я практик, настроенный на достижение целей моих клиентов. Свои силы я черпаю от корней своих предков. Когда я была совсем юной девочкой, во мне стал просыпаться дар ясновидения. С тех пор начался мой путь в этой сфере. Я заглядывала в прошлое, будущее и настоящее. Уже тогда я понимала что мой дар пойдёт на благо людям.
В чёрный список пирамид и лохотронов 31 августа 2022 года внесены следующие организации, обладающие признаками финансовой пирамиды или признаками мошенничества.
пидар
Etihad Rail (etihadrail-ae.com)
Club Unite To Live, Life Is Good, Unite To Live (uniteto.live). Новый домен пирамиды находящегося в розыске Романа Василенко.
TopBoom, «платформа хедж-фонда, специализирующегося на сделках с обратным исходом спортивного события» (topboom.vip, t.me/TopBoom001)
Change Team, мошенники указывают реквизиты чужого юрлица ООО «АТТИС ГРУПП» (ОРГН 1207700314128, ИНН 9702022065), телеграм-канал «Change Team: Главный Канал» (change-team.ru). Фальшивый обменник раньше назывался C Exchange.
Ещё лохотроны:
Scam! Чёрный список пирамид и лохотронов и отзывы
В чёрный список пирамид и лохотронов включены организации, имеющие признаки финансовой пирамиды по классификации Центрального банка; организации, обладающие признаками матричной пирамиды (массовый привод друзей, «столы»); сборы денег с пенсионеров и прочих незащищённых слоёв населения; хайпы; организации, имеющие негативные отзывы; структуры, оказывающие финансовые услуги без лицензии и прочие лохотроны за исключением псевдоброкеров, кооперативов (с ними тоже не рекомендуем связываться) и некоторых других категорий.
В чёрный список пирамид и лохотронов 31 августа 2022 года внесены следующие организации, обладающие признаками финансовой пирамиды или признаками мошенничества.
первый анальный секс
Etihad Rail (etihadrail-ae.com)
Club Unite To Live, Life Is Good, Unite To Live (uniteto.live). Новый домен пирамиды находящегося в розыске Романа Василенко.
TopBoom, «платформа хедж-фонда, специализирующегося на сделках с обратным исходом спортивного события» (topboom.vip, t.me/TopBoom001)
Change Team, мошенники указывают реквизиты чужого юрлица ООО «АТТИС ГРУПП» (ОРГН 1207700314128, ИНН 9702022065), телеграм-канал «Change Team: Главный Канал» (change-team.ru). Фальшивый обменник раньше назывался C Exchange.
Ещё лохотроны:
Scam! Чёрный список пирамид и лохотронов и отзывы
В чёрный список пирамид и лохотронов включены организации, имеющие признаки финансовой пирамиды по классификации Центрального банка; организации, обладающие признаками матричной пирамиды (массовый привод друзей, «столы»); сборы денег с пенсионеров и прочих незащищённых слоёв населения; хайпы; организации, имеющие негативные отзывы; структуры, оказывающие финансовые услуги без лицензии и прочие лохотроны за исключением псевдоброкеров, кооперативов (с ними тоже не рекомендуем связываться) и некоторых других категорий.
GSM сервиз
Основание да купувате при нас?
Широк асортимент
Ние осигуряваме богат асортимент от резервни части и допълнителни артикули за портативни устройства.
Изгодни ценови условия
Ценовите предложения са сред най-конкурентните на деловата среда. Ние работим да оферираме първокласни артикули на конкурентните тарифи, за да имате максимална стойност за вашите пари.
Експресна куриерска услуга
Всички поръчки подадени до средата на работния ден се изпращат и получавате незабавно. Така гарантираме, че ще придобиете желаните сменяеми компоненти възможно незабавно.
Прецизно пазаруване
Нашият онлайн магазин е дизайниран да бъде удобен за ползване. Вие имате възможност да търсите стоки по производител, което прецизира локирането на точния аксесоар за вашия телефон.
Обслужване на изключително качество
Нашите специалисти с необходимата експертиза е винаги на достъп, за да консултират на Ваши запитвания и да насочат да намерите желаните стоки за вашите нужди. Ние работим упорито да постигнем безупречно обслужване, за да останете щастливи от партньорството си с нас.
Ключови продуктови групи:
Фабрични дисплеи за таблети: Надеждни дисплеи, които осигуряват перфектно изображение.
Заместващи елементи за таблети: От батерии до сензори – необходимите за поддръжката на вашия телефон.
Поправка на устройства: Експертни сервизни услуги за възстановяване на вашата техника.
Странични устройства за таблети: Разнообразие от зарядни устройства.
Части за електронни комуникации: Широкият избор части за обслужване на Мобилни телефони.
Доверете се към нас за Вашите търсения от резервни части за портативни устройства, и се насладете на първокласни услуги, отлични финансови условия и превъзходно обслужване.
https://24smski.ru
http://autoexpert-group.ru/
Game World online https://games-online-eg.com the latest online gaming news, game reviews, gameplay, ideas, gaming tactics and tips. The most popular and amazing games and get ready to become the leader in the online gaming world!
The Dota 2 website https://dota2-kz.kz provides the most complete information about the latest game updates, tournaments and upcoming events. We are here for every winning tactic, secret and important guide.
http://avansir.ru/
mexican mail order pharmacies
https://cmqpharma.online/# mexican border pharmacies shipping to usa
mexican mail order pharmacies
The Dota 2 website https://dota2-ar.com provides the most detailed information about the latest game updates, tournaments and upcoming events. We have all the winning tactics, secrets and important guides.
http://autolombard-capital.ru/
Поиск отелей по всему миру
Оформете превъзходен отель незабавно сегодня
Превъзходно локация для отдыха при изгодна такса
Заявете лучшие възможности подслон и престой в момента с гарантией на нашия услуга бронирования. Намерете для себя специални оферти и ексклузивни намаления за заемане хотели в целия земен кръг. Без значение дали планирате предприемате почивка до плаж, служебна командировка или любовен уикенд, в нашата компания ще откриете перфектно място за престой.
Реални фотографии, оценки и коментари
Просматривайте оригинални изображения, цялостни отзиви и правдиви препоръки об отелях. Имаме разнообразен асортимент опции настаняване, за да можете намерите съответния, същия най-добре отговаря вашему разходи и стилю путешествий. Наш сервис обеспечивает прозрачность и увереност, давайки Ви желаната подробности за вземане на правилен избор.
Удобство и стабилност
Пренебрегнете за продължителните идентификации – забронируйте незабавно удобно и сигурно в нашия магазин, с избор оплаты в отеле. Нашият механизъм бронирования прост и надежден, дозволяващ Ви да се фокусирате на планировании на вашето пътуване, без необходимост по детайли.
Основни туристически дестинации глобуса за пътуване
Найдите отличното място за престой: отели, вили, хостелы – всичко наблизо. Около 2 миллионов възможности за Ваш подбор. Започнете Вашето изследване: оформете места за настаняване и разгледайте лучшие места във всички земното кълбо! Нашето предложение предлагает непревзойденные оферти за подслон и широк выбор объектов за различни вид бюджет.
Разгледайте отблизо Европу
Разглеждайте локациите Европы за намиране на отелей. Изследвайте лично места размещения в Стария свят, от крайбрежни на Средиземном море до планински скривалища в Алпите. Нашите насоки ще ви насочат към най-добрите оферти престой в европейския регион. Незабавно кликнете на ссылки под това, за да откриете отель във Вашата предпочитана европейска дестинация и начать Вашето континентално приключение
Обобщение
Забронируйте превъзходно вариант за почивка при изгодна ставка веднага
Pin-Up Casino’da daha once bir hesap olusturduysan?z, giris yapmak da oldukca kolayd?r pin-up online casino
smartblip home gadgets https://smartblip.com best price
Где купить Дольче Габбана https://scm-fashion.ru .
Signup Bonus-200% up to your first deposit using promo code GGBET93-click the link to collect. The official Pinterest account of the bookmaker and online casino GGBET. Actual login to GGBET website in 2024 ggbet kasyno
http://progressive-cars.ru/
Откатные ворота являются отличным выбором для ограждения частной территории, в частности, откатные ворота предоставляют максимальную надежность и прочность, при этом имеют относительно невысокую цену http://www.ukrtibet.net/index.php?subaction=userinfo&user=ivakiqe
Лизинг спецтехники для юридических лиц – это эффективный способ инвестировать в свою компанию. Условия договора лизинга, такие как срок и график платежей, обычно определяются индивидуально лизинг на спецтехнику физическим лицам
tuan88 slot
Купить машины в лизинг от официальных дилеров, автосалонов. Выгодные условия и скидки лизинга автотранспорта для физических лиц
All the latest news about cryptocurrencies can be read here cryptonewday
Для тех, кто ищет увлекательные пути к развлечениям и возможности испытать удачу в виртуальной среде, существует мир, где представлены бесчисленные варианты игр и азартных развлечений http://telent.ussoft.kr/bbs/board.php?bo_table=free&wr_id=1577774
kantor bola
Лизинг оборудования открывает новые возможности для развития вашей компании. Это одно из наиболее эффективных финансовых решений для модернизации производственных мощностей и оптимизации работы предприятия лизинг деревообрабатывающего оборудования
Преимуществами покупки оборудования в лизинг для юридических лиц можно считать: Низкие затраты на получение оборудования в пользование лизинг оборудования москва
Как заказать стриптиз на дом, в лофт, на мальчишник или девичник? Прежде всего выберите сами артиста из каталога и позвоните нам, или наш менеджер самостоятельно подберет Вам хорошего танцора по вашим запросам Стриптиз
Магазин подарков вип и коробки пермь оптом.
https://giftbox-3.ru/
Звон Колокольцева
Лайф-из-Гуд
Поздравляем вас, гражданин министр, соврамши!
Выступая прошлой осенью в Совете Федерации, министр внутренних дел Владимир Колокольцев рассказывал, о так называемом уголовном деле «Лайф-из-Гуд» – «Гермес» – «Бест Вей», обещал миллиарды рублей ущерба и десятки тысяч потерпевших. Пресс-служба МВД под руководством его боевой подруги Ирины Волк заявила о том, что вскрыта деятельность крупнейшей в истории России финансовой пирамиды.
Однако в уголовном деле, расследованном или, вернее сказать, изготовленном ГСУ питерского главка МВД, которое в феврале начал рассматривать Приморский районный суд Санкт-Петербурга, 282 млн рублей ущерба и 221 лицо, признанное следствием потерпевшим: никаких миллиардов и десятков тысяч потерпевших.
Министр и его Волк публично солгали – на основе информации, переданной замначальника ГСУ руководителем следственной группы полковником юстиции А.Н. Винокуровым, фактически даже руководившей СГ его заместительницей майором, а затем подполковником юстиции Е.А. Сапетовой по материалам, состряпанным опером УЭБиПК питерского главка МВД майором полиции А.Ю. Машевским, при попустительстве (или соучастии?) начальника ГСУ Негрозова и замначальника Следственного департамента федерального министерства Вохмянина. Полковник и подполковник с примерно пятого-шестого уровня иерархии МВД виляет генералом полиции Российской Федерации, постоянным членом Совета безопасности России – это позор для государства.
Так называемые потерпевшие и реально пострадавшие
Большинство «потерпевших» на суде заявляют суммы около 1–2 млн рублей, при этом в ходе судебного следствия выясняется, что они, как правило, получали немалый доход, причем, они еще и налоговые/валютные преступники, так как этот доход не декларировали. Среди «потерпевших» есть граждане, заявляющие смехотворные суммы в 50–70 тыс., то есть количество потерпевших специально накручивалось следствием. И даже с этим накручиванием удалось набрать так мало – учитывая, что у «Гермеса», по данным самого же следствия, более 200 тыс. клиентов в России, а в кооперативе «Бест Вей» – около 20 тыс. пайщиков.
То есть большинство и клиентов «Гермеса», и пайщиков кооператива не считают себя потерпевшими от деятельности этих организаций.
Судя по тысячам обращений во все инстанции, нескольким волнам митингов, прокатившихся по России, они считают себя потерпевшими от деятельности органов внутренних дел.
Ведь именно завербованный питерским УЭБиПК сисадмин российской платежной системы «Гермеса» Набойченко заблокирован и разгромил в феврале 2022 года эту платежную систему, повесив на сайте дисклеймер: «Обращайтесь в правоохранительные органы», что на месяцы прекратило вывод средств. Именно действия правоохранительных органов в отношении компании до и после затруднили вывод средств. Дело в том, что для вывода средств многими использовался механизм p2p, позволяющий не платить комиссию, то есть для вывода средств нужно, чтобы кто-то вносил средства (что, понятно, резко сократилось из-за уголовного дела) и происходил обмен. Однако этот способ не единственный, вывод средств так или иначе осуществляется.
Тысячи пайщиков кооператива тем более не считают себя потерпевшими от его деятельности – потому что именно правоохранительные органы воспрепятствовали приобретению недвижимости с помощью кооператива, а она из-за более чем двухлетнего ареста его счетов, на которых около 4 млрд рублей, не может быть приобретена по прежней цене.
Именно правоохранительные органы прямо запрещают выплаты пайщикам кооператива, решившим забрать свой пай, – даже по исполнительным листам судов. И клиентам «Гермеса», и пайщикам кооператива правоохранительными органами нанесен колоссальный ущерб – и материальный, и моральный, который они намерены взыскать с государства.
«Следователи»-преступники должны сидеть в тюрьме
Весьма скромный результат следствия МВД был достигнут откровенно преступным путем.
1. Некоторые из преступлений следствия были фактически признаны судами. 1 декабря прошлого года Приморский районный суд города Санкт-Петербурга признал незаконным, нарушающим УПК фактический отказ кооперативу в ознакомлении с материалами уголовного дела.При рассмотрении дела в суде выяснилось, что следственная группа ГСУ питерского главка МВД, формально руководимая замначальника ГСУ полковником юстиции А.Н. Винокуровым, а фактически – подполковником юстиции Е.А. Сапетовой, подделала документы. Автор подделки – Сапетова – еще в феврале была уволена из ГСУ «по собственному желанию».
Уличенная адвокатами кооператива в нарушении УПК, следственная группа составила письмо об удовлетворении ходатайства задним числом и попыталась представить дело так, что кооператив не получил письмо по своей вине. Ложь была выявлена в том числе и с помощью системы электронного документооборота питерского главка МВД.
2. Подделка документов была вынужденным преступлением для сокрытия более серьезного: незаконного содержания под стражей. Следственная группа грубо нарушила права гражданских истцов и ответчиков, потому что без этого нарушения она не успела за 30 суток до истечения предельного срока содержания четверых обвиняемых под стражей начать ознакомление обвиняемых с материалами дела –а это было единственное основание продления им срока содержания под стражей свыше предельного.
Следственная группа из-за спешки даже толком не смогла завершить следственные действия, незаконно вела параллельное расследование по «резервному» делу, но позднее, отбросив стыд, из-за отсутствия материала для составления «нужного» обвинительного заключения, незаконно продолжила расследование «основного» дела, в том числе проводила следственные действия, которые, согласно УПК, невозможны после начала ознакомления обвиняемых с материалами дела. Все эти ухищрения были необходимы для того, чтобы ни в коем случае не выпускать обвиняемых и продолжать держать их в заложниках.
3. Де-факто происходит уголовное наказание неосужденных людей – четверо подсудимых уже второй год сидят в тюрьме. При этом наказываются явно ни в чем неповинные люди – технические сотрудники «Лайф-из-Гуд»: даже если предположить, что действительно работала пирамида – что опровергается показаниями свидетелей самого обвинения, которые сообщают суду, что компания «Гермес» хорошо работала, они были довольны получаемым доходом, и проблемы начались после того, как российская платежная система компании была обрушена завербованным полицией петербургским сисадмином компании Набойченко. Все подсудимые – технические сотрудники компании «Лайф-из-Гуд» и ни к каким управленческим решениям отношения никогда не имели. Их взяли в заложники для того, чтобы они дали показания на руководство компании.
4. Еще одно преступление – заведомо подложное постановление руководителя следственной группы А.Н. Винокурова о привлечении кооператива «Бест Вей» в качестве гражданского ответчика на 16 млрд рублей, тогда как сумма ущерба в уголовном деле –282 млн, и в деле нет ни одного искового заявления – даже на 100 рублей.
5. Следствие стимулировало двух особенно активных так называемых потерпевших написать заявления о моральном ущербе на миллиард (!) рублей каждое – исключительно для ложного обоснования ареста активов кооператива, но понятно, что это ничтожные документы, так как моральный ущерб во всех случаях, не связанных с причинением смерти, присуждается российскими судами в размере не более десятков тысяч рублей.
6. Ни один из «потерпевших» не доказал обоснованность своих претензий в гражданском суде. При этом арестованы активы кооператива почти на 4 млрд рублей и активы частных лиц на такую же сумму. Это не что иное, как попытка захвата активов при участии органов внутренних дел некой заинтересованной группой клиентов «Гермеса» – необязательно из числа «потерпевших», то есть коррупционное преступление, которое упорно игнорирует ГУСБ МВД.
Механизм для такого захвата есть – это передача средств под управление Федерального общественно-государственного фонда по защите прав вкладчиков и акционеров. Понятно, почему не ограничиваются активами подсудимых и обвиняемых: этого недостаточно для удовлетворения аппетитов тех, кто стоит за заказным уголовным делом. И понятно, почему одно юридическое лицо – кооператив «Бест Вей» – незаконно пытаются привлечь к ответственности за другое – компанию «Гермес»: активы «Гермеса» – за рубежом.
7. Следствие, а теперь и прокуратура совершают еще одно преступление: незаконно удерживает средства пайщиков кооператива, отказываясь их вернуть, то есть совершают хищение.
Министр, управляемый мафией
Итак, Колокольцев публично солгал Совету Федерации, выдумав пирамиду, выдумав многомиллиардный ущерб и десятки тысяч пострадавших, он – некомпетентный руководитель, абсолютно ведомый своей камарильей, стремящейся создавать громкие пиар-истории на пустом месте и с коррупционной выгодой для себя. Он вызвал социальный протест десятков тысяч пайщиков кооператива «Бест Вей» и клиентов компании «Гермес» и членов их семей – в большинстве своем представителей социально незащищенных слоев населения, на годы лишенных возможности пользоваться своими деньгами и приобрести недвижимость, на которую они собрали средства, – в том числе десятков участников СВО. Министр вредит в тылу тем, кто защищает страну на фронте.
Глава МВД находится под влиянием или даже контролем давно ставшей притчей во языцех питерской полицейской мафии. Ликвидация этой мафии, как и ликвидация преступной, коррупционной, вредящей социально-политической стабильности системы управления МВД, со стороны Колокольцева является важнейшей государственной задачей.
Звон Колокольцева
Бест Вей
Поздравляем вас, гражданин министр, соврамши!
Выступая прошлой осенью в Совете Федерации, министр внутренних дел Владимир Колокольцев рассказывал, о так называемом уголовном деле «Лайф-из-Гуд» – «Гермес» – «Бест Вей», обещал миллиарды рублей ущерба и десятки тысяч потерпевших. Пресс-служба МВД под руководством его боевой подруги Ирины Волк заявила о том, что вскрыта деятельность крупнейшей в истории России финансовой пирамиды.
Однако в уголовном деле, расследованном или, вернее сказать, изготовленном ГСУ питерского главка МВД, которое в феврале начал рассматривать Приморский районный суд Санкт-Петербурга, 282 млн рублей ущерба и 221 лицо, признанное следствием потерпевшим: никаких миллиардов и десятков тысяч потерпевших.
Министр и его Волк публично солгали – на основе информации, переданной замначальника ГСУ руководителем следственной группы полковником юстиции А.Н. Винокуровым, фактически даже руководившей СГ его заместительницей майором, а затем подполковником юстиции Е.А. Сапетовой по материалам, состряпанным опером УЭБиПК питерского главка МВД майором полиции А.Ю. Машевским, при попустительстве (или соучастии?) начальника ГСУ Негрозова и замначальника Следственного департамента федерального министерства Вохмянина. Полковник и подполковник с примерно пятого-шестого уровня иерархии МВД виляет генералом полиции Российской Федерации, постоянным членом Совета безопасности России – это позор для государства.
Так называемые потерпевшие и реально пострадавшие
Большинство «потерпевших» на суде заявляют суммы около 1–2 млн рублей, при этом в ходе судебного следствия выясняется, что они, как правило, получали немалый доход, причем, они еще и налоговые/валютные преступники, так как этот доход не декларировали. Среди «потерпевших» есть граждане, заявляющие смехотворные суммы в 50–70 тыс., то есть количество потерпевших специально накручивалось следствием. И даже с этим накручиванием удалось набрать так мало – учитывая, что у «Гермеса», по данным самого же следствия, более 200 тыс. клиентов в России, а в кооперативе «Бест Вей» – около 20 тыс. пайщиков.
То есть большинство и клиентов «Гермеса», и пайщиков кооператива не считают себя потерпевшими от деятельности этих организаций.
Судя по тысячам обращений во все инстанции, нескольким волнам митингов, прокатившихся по России, они считают себя потерпевшими от деятельности органов внутренних дел.
Ведь именно завербованный питерским УЭБиПК сисадмин российской платежной системы «Гермеса» Набойченко заблокирован и разгромил в феврале 2022 года эту платежную систему, повесив на сайте дисклеймер: «Обращайтесь в правоохранительные органы», что на месяцы прекратило вывод средств. Именно действия правоохранительных органов в отношении компании до и после затруднили вывод средств. Дело в том, что для вывода средств многими использовался механизм p2p, позволяющий не платить комиссию, то есть для вывода средств нужно, чтобы кто-то вносил средства (что, понятно, резко сократилось из-за уголовного дела) и происходил обмен. Однако этот способ не единственный, вывод средств так или иначе осуществляется.
Тысячи пайщиков кооператива тем более не считают себя потерпевшими от его деятельности – потому что именно правоохранительные органы воспрепятствовали приобретению недвижимости с помощью кооператива, а она из-за более чем двухлетнего ареста его счетов, на которых около 4 млрд рублей, не может быть приобретена по прежней цене.
Именно правоохранительные органы прямо запрещают выплаты пайщикам кооператива, решившим забрать свой пай, – даже по исполнительным листам судов. И клиентам «Гермеса», и пайщикам кооператива правоохранительными органами нанесен колоссальный ущерб – и материальный, и моральный, который они намерены взыскать с государства.
«Следователи»-преступники должны сидеть в тюрьме
Весьма скромный результат следствия МВД был достигнут откровенно преступным путем.
1. Некоторые из преступлений следствия были фактически признаны судами. 1 декабря прошлого года Приморский районный суд города Санкт-Петербурга признал незаконным, нарушающим УПК фактический отказ кооперативу в ознакомлении с материалами уголовного дела.При рассмотрении дела в суде выяснилось, что следственная группа ГСУ питерского главка МВД, формально руководимая замначальника ГСУ полковником юстиции А.Н. Винокуровым, а фактически – подполковником юстиции Е.А. Сапетовой, подделала документы. Автор подделки – Сапетова – еще в феврале была уволена из ГСУ «по собственному желанию».
Уличенная адвокатами кооператива в нарушении УПК, следственная группа составила письмо об удовлетворении ходатайства задним числом и попыталась представить дело так, что кооператив не получил письмо по своей вине. Ложь была выявлена в том числе и с помощью системы электронного документооборота питерского главка МВД.
2. Подделка документов была вынужденным преступлением для сокрытия более серьезного: незаконного содержания под стражей. Следственная группа грубо нарушила права гражданских истцов и ответчиков, потому что без этого нарушения она не успела за 30 суток до истечения предельного срока содержания четверых обвиняемых под стражей начать ознакомление обвиняемых с материалами дела –а это было единственное основание продления им срока содержания под стражей свыше предельного.
Следственная группа из-за спешки даже толком не смогла завершить следственные действия, незаконно вела параллельное расследование по «резервному» делу, но позднее, отбросив стыд, из-за отсутствия материала для составления «нужного» обвинительного заключения, незаконно продолжила расследование «основного» дела, в том числе проводила следственные действия, которые, согласно УПК, невозможны после начала ознакомления обвиняемых с материалами дела. Все эти ухищрения были необходимы для того, чтобы ни в коем случае не выпускать обвиняемых и продолжать держать их в заложниках.
3. Де-факто происходит уголовное наказание неосужденных людей – четверо подсудимых уже второй год сидят в тюрьме. При этом наказываются явно ни в чем неповинные люди – технические сотрудники «Лайф-из-Гуд»: даже если предположить, что действительно работала пирамида – что опровергается показаниями свидетелей самого обвинения, которые сообщают суду, что компания «Гермес» хорошо работала, они были довольны получаемым доходом, и проблемы начались после того, как российская платежная система компании была обрушена завербованным полицией петербургским сисадмином компании Набойченко. Все подсудимые – технические сотрудники компании «Лайф-из-Гуд» и ни к каким управленческим решениям отношения никогда не имели. Их взяли в заложники для того, чтобы они дали показания на руководство компании.
4. Еще одно преступление – заведомо подложное постановление руководителя следственной группы А.Н. Винокурова о привлечении кооператива «Бест Вей» в качестве гражданского ответчика на 16 млрд рублей, тогда как сумма ущерба в уголовном деле –282 млн, и в деле нет ни одного искового заявления – даже на 100 рублей.
5. Следствие стимулировало двух особенно активных так называемых потерпевших написать заявления о моральном ущербе на миллиард (!) рублей каждое – исключительно для ложного обоснования ареста активов кооператива, но понятно, что это ничтожные документы, так как моральный ущерб во всех случаях, не связанных с причинением смерти, присуждается российскими судами в размере не более десятков тысяч рублей.
6. Ни один из «потерпевших» не доказал обоснованность своих претензий в гражданском суде. При этом арестованы активы кооператива почти на 4 млрд рублей и активы частных лиц на такую же сумму. Это не что иное, как попытка захвата активов при участии органов внутренних дел некой заинтересованной группой клиентов «Гермеса» – необязательно из числа «потерпевших», то есть коррупционное преступление, которое упорно игнорирует ГУСБ МВД.
Механизм для такого захвата есть – это передача средств под управление Федерального общественно-государственного фонда по защите прав вкладчиков и акционеров. Понятно, почему не ограничиваются активами подсудимых и обвиняемых: этого недостаточно для удовлетворения аппетитов тех, кто стоит за заказным уголовным делом. И понятно, почему одно юридическое лицо – кооператив «Бест Вей» – незаконно пытаются привлечь к ответственности за другое – компанию «Гермес»: активы «Гермеса» – за рубежом.
7. Следствие, а теперь и прокуратура совершают еще одно преступление: незаконно удерживает средства пайщиков кооператива, отказываясь их вернуть, то есть совершают хищение.
Министр, управляемый мафией
Итак, Колокольцев публично солгал Совету Федерации, выдумав пирамиду, выдумав многомиллиардный ущерб и десятки тысяч пострадавших, он – некомпетентный руководитель, абсолютно ведомый своей камарильей, стремящейся создавать громкие пиар-истории на пустом месте и с коррупционной выгодой для себя. Он вызвал социальный протест десятков тысяч пайщиков кооператива «Бест Вей» и клиентов компании «Гермес» и членов их семей – в большинстве своем представителей социально незащищенных слоев населения, на годы лишенных возможности пользоваться своими деньгами и приобрести недвижимость, на которую они собрали средства, – в том числе десятков участников СВО. Министр вредит в тылу тем, кто защищает страну на фронте.
Глава МВД находится под влиянием или даже контролем давно ставшей притчей во языцех питерской полицейской мафии. Ликвидация этой мафии, как и ликвидация преступной, коррупционной, вредящей социально-политической стабильности системы управления МВД, со стороны Колокольцева является важнейшей государственной задачей.
外送茶
外送茶是什麼?禁忌、價格、茶妹等級、術語等..老司機告訴你!
外送茶是什麼?
外送茶、外約、叫小姐是一樣的東西。簡單來說就是在通訊軟體與茶莊聯絡,選好自己喜歡的妹子後,茶莊會像送飲料這樣把妹子派送到您指定的汽車旅館、酒店、飯店等交易地點。您只需要在您指定的地點等待,妹妹到達後,就可以開心的開始一場美麗的約會。
外送茶種類
學生兼職的稱為清新書香茶
日本女孩稱為清涼綠茶
俄羅斯女孩被稱為金酥麻茶
韓國女孩稱為超細滑人參茶
外送茶價格
外送茶的客戶相當廣泛,包括中小企業主、自營商、醫生和各行業的精英,像是工程師等等。在台北和新北地區,他們的消費指數大約在 7000 到 10000 元之間,而在中南部則通常在 4000 到 8000 元之間。
對於一般上班族和藍領階層的客人來說,建議可以考慮稍微低消一點,比如在北部約 6000 元左右,中南部約 4000 元左右。這個價位的茶妹大多是新手兼職,但有潛力。
不同地區的客人可以根據自己的經濟能力和喜好選擇適合自己的價位範圍,以免感到不滿意。物價上漲是一個普遍現象,受到地區和經濟情況等因素的影響,茶莊的成本也在上升,因此價格調整是合理的。
外送茶外約流程
加入LINE:加入外送茶官方LINE,客服隨時為你服務。茶莊一般在中午 12 點到凌晨 3 點營業。
告知所在地區:聯絡客服後,告訴他們約會地點,他們會幫你快速找到附近的茶妹。
溝通閒聊:有任何約妹問題或需要查看妹妹資訊,都能得到詳盡的幫助。
提供預算:告訴客服你的預算,他們會找到最適合你的茶妹。
提早預約:提早預約比較好配合你的空檔時間,也不用怕到時候約不到你想要的茶妹。
外送茶術語
喝茶術語就像是進入茶道的第一步,就像是蓋房子打地基一樣。在這裡,我們將這些外送茶入門術語分類,讓大家能夠清楚地理解,讓喝茶變得更加容易上手。
魚:指的自行接客的小姐,不屬於任何茶莊。
茶:就是指「小姐」的意思,由茶莊安排接客。
定點茶:指由茶莊提供地點,客人再前往指定地點與小姐交易。
外送茶:指的是到小姐到客人指定地點接客。
個工:指的是有專屬工作室自己接客的小姐。
GTO:指雞頭也就是飯店大姊三七茶莊的意思。
摳客妹:只負責找客人請茶莊或代調找美眉。
內機:盤商應召站提供茶園的人。
經紀人:幫內機找美眉的人。
馬伕:外送茶司機又稱教練。
代調:收取固定代調費用的人(只針對同業)。
阿六茶:中國籍女子,賣春的大陸妹。
熱茶、熟茶:年齡比較大、年長、熟女級賣春者(或稱阿姨)。
燙口 / 高溫茶:賣春者年齡過高。
台茶:從事此職業的台灣小姐。
本妹:從事此職業的日本籍小姐。
金絲貓:西方國家的小姐(歐美的、金髮碧眼的那種)。
青茶、青魚:20 歲以下的賣春者。
乳牛:胸部很大的小姐(D 罩杯以上)。
龍、小叮噹、小叮鈴:體型比較肥、胖、臃腫、大隻的小姐。
https://rik-estate.ru/
http://remontwasher.ru/
We’ve all made email marketing mistakes: You click send on an email and suddenly your stomach drops. You’ve made a mistake and there’s nothing you can do about it Navigating Sales Enablement in a Digital Age: Trends and Insights
http://nedvizhimostrussa.ru/
In a world where communication is key, having a reliable phone number is essential for both personal and business interactions. However, not everyone needs a permanent number, especially when privacy, convenience, and flexibility are at stake https://www.edy.com.mx/2024/05/la-utilidad-de-los-numeros-virtuales-para-whatsapp-mejorando-la-comunicacion-y-la-privacidad
https://redstoneestate.ru/
https://nsdentalsolution.com
Glory Casino
https://romashkaclinic.ru
https://psy-medcentr.ru
https://aoseulado.net/
условия внж в испании https://vnzh24.ru/
Calgary marketing agency
В сфере азартных игр в интернете особенно важны аспекты защиты данных и обеспечения надежности операций. Это ключевые аспекты, на которых строятся доверие игроков и успешная работа платформ http://www.the.organmagazine.com/bbs/board.php?bo_table=free&wr_id=438623
https://akkred-med.ru
https://www.wildberries.ru/catalog/217171028/detail.aspx
оптимизация сайта в москве цена
Creating an online dating profile? Be honest and clear about your interests. Upload recent photos and write a bio that reflects your true personality
news site
потолки армстронг https://armstrong-ceiling24.ru/
Обязательно попробуйте обратиться к Mihaylov digital, их основная сфера это сео в Yandex, а также web разработка.
Notice any red flags? Trust your gut. If something feels off, it’s okay to step back and reassess the situation. Your safety and comfort come first
news site
смотреть русское порно худые смотреть русское порно худые .
Военный адвокат Запорожье. Бесплатная консультация
военный юрист
— это опытный специалист имеющий высшее юридическое образование, сдавший квалификационный государственный экзамен на право осуществления адвокатской деятельностью и специализирующийся в основном на военных делах
Вся правовая помощь военного адвоката осуществляется в индивидуальном порядке, грамотно, четко и в соответствии с действующими нормативно-правовыми актами.
Мы как военные юристы действуем не против органов Украины или министерства обороны, мы действуем во благо Украины — наших защитников и граждан Украины, которые попали в тяжелую жизненную ситуацию связанную с незнанием военного и действующего законодательства.
Поскольку, проявив патриотизм и чувство гражданской ответственности – став на защиту суверенитета страны, граждане участвующие и помогавшие в обороне после, становятся никому не нужными, особенно если военнослужащий стал инвалидом, потерял часть тела или конечность, и не может самостоятельно защитить свои права. Именно в таких ситуациях мы как военные адвокаты приходим на помощь, и добиваемся в установленном законом порядке справедливости, необходимых выплат, установление статуса, оформление пенсий, льгот и т.п.
Тоже касается, и получение отсрочки от мобилизации, когда например, безосновательно призывают сына у которого отец инвалид 2 группы, или мать прикованная из-за тяжелой болезни к постели, и требующая постороннего ухода. Это же относится и к военнослужащим, рапорта которых не регистрируются в канцелярии воинской части и полностью игнорируются, под прикрытием суеты боевых действий..
Именно в таких ситуациях, мы приходим на помощь и с помощью ЗАКОННЫХ методов правовой защиты, используя свой опыт полученный при ведении аналогичных военных дел добиваемся справедливости.
Практический опыт в SEO с 2008 г. подтверждается датой регистрации моего блога, в котором я частенько пишу о своем понимании в продвижении сайтов. Внедряю стратегию SEO, учитывая алгоритмы поисковиков и использую свои технические skills для достижения наилучших результатов https://leadzavod.com/30-blogov-kotorye-dolzhen-chitat-kazhdyj-arbitrazhnik/
Проверьте лицензию казино – это гарантия вашей безопасности и честности игрового процесса. ]Отзывы других игроков являются ценным источником информации о надежности и качестве обслуживания. ]Техническая поддержка должна быть доступна круглосуточно, чтобы оперативно решать любые возникающие проблемы http://xn--48-6kcd0fg.xn--p1ai/forums.php?m=posts&q=22706&n=last#bottom
Множество пользователей активно ищут удобные и доступные способы развлечения. Это привело к повышению популярности различных онлайн-сервисов http://zrr269.org.ru/index.php?option=com_k2&view=itemlist&task=user&id=662895
купить мед справку
В статье представлены альтернативные ссылки на зеркало сайта Mostbet ru для удобного доступа к популярным онлайн-ставкам.
Бесплатный промокод на скидку, первый и повторный заказ 2024. Промокод на доставку. Акции и скидки. Халява в телеграм бесплатные промокоды
Промоакции и бонусы для игроков 1win Игроки всегда ищут способы увеличить свои шансы на выигрыш. Бонусные предложения и привлекательные акции помогают сделать игру более захватывающей https://alternatio.org/index.php?option=com_k2&view=itemlist&task=user&id=159883
Hochzeitsmoderatorin
Военный адвокат Запорожье. Бесплатная консультация
адвокат Запоріжжя
— это опытный специалист имеющий высшее юридическое образование, сдавший квалификационный государственный экзамен на право осуществления адвокатской деятельностью и специализирующийся в основном на военных делах
Вся правовая помощь военного адвоката осуществляется в индивидуальном порядке, грамотно, четко и в соответствии с действующими нормативно-правовыми актами.
Мы как военные юристы действуем не против органов Украины или министерства обороны, мы действуем во благо Украины — наших защитников и граждан Украины, которые попали в тяжелую жизненную ситуацию связанную с незнанием военного и действующего законодательства.
Поскольку, проявив патриотизм и чувство гражданской ответственности – став на защиту суверенитета страны, граждане участвующие и помогавшие в обороне после, становятся никому не нужными, особенно если военнослужащий стал инвалидом, потерял часть тела или конечность, и не может самостоятельно защитить свои права. Именно в таких ситуациях мы как военные адвокаты приходим на помощь, и добиваемся в установленном законом порядке справедливости, необходимых выплат, установление статуса, оформление пенсий, льгот и т.п.
Тоже касается, и получение отсрочки от мобилизации, когда например, безосновательно призывают сына у которого отец инвалид 2 группы, или мать прикованная из-за тяжелой болезни к постели, и требующая постороннего ухода. Это же относится и к военнослужащим, рапорта которых не регистрируются в канцелярии воинской части и полностью игнорируются, под прикрытием суеты боевых действий..
Именно в таких ситуациях, мы приходим на помощь и с помощью ЗАКОННЫХ методов правовой защиты, используя свой опыт полученный при ведении аналогичных военных дел добиваемся справедливости.
починить смартфон
отремонтировать телефон
Russischer DJ in hannover
В критические моменты жизни важно, чтобы похоронное бюро было надежным и профессиональным. Наша статья поможет вам разобраться в разнообразии ритуальных услуг в Алматы и выбрать агентство, которое предложит качественное обслуживание по разумной цене ритуальные услуги алматы цена
JFK Long Term Parking: Find secure & affordable options near JFK Airport. Reviews & details to choose the best fit for your trip lefferts blvd long term parking
Виртуальные карточные и настольные игры также ждут своих поклонников. От блэкджека до покера – испытайте удачу и стратегию https://gorod-kimry.ru/info9/020/
купить мед справку
порно с тренером по йоге порно с тренером по йоге .
For the reason that the admin of this web site is working, no hesitation very quickly it will be famous, due to its quality contents.
лучшее порево бесплатно лучшее порево бесплатно .
buy lasuna generic – himcolin canada buy himcolin online
Premium users get off on a extreme range of benefits not ready on a uninhabited package. · You longing download documents at fast speeds without unrequired limitations. https://tezfiless.com/
С каждым годом растет количество людей, выбирающих этот вид досуга. Онлайн-платформы предлагают не только развлечение, но и шанс испытать удачу http://spccos.com/bbs/board.php?bo_table=inquiry&wr_id=318088
Top News Sites for Article Post Permanent
aljazeeranewstoday.com
australiannewstoday.com
bbcworldnewstoday.com
bloombergnewstoday.com
bostonnewstoday.com
britishnewstoday.com
Dont hesitate to Contact me.
News Sites for Article post
frenchnewstoday.com
germaynewstoday.com
guardiannewstoday.com
headlinesworldnews.com
huffingtonposttoday.com
irishnewstoday.com
Dont hasitate to contact us
https://www.themoviedb.org/movie/261903-real-gangsters
Top News Sites for article post
dailymirrornewstoday.com
dailystarnewstoday.com
dailytelegraphnewstoday.com
dutchnewstoday.com
dwnewstoday.com
europeannewstoday.com
Don’t hasitate to conatct us.
Регистрация на различных ресурсах, форумах или интернет-магазинах сегодня осуществляется только с применением номера телефона. Ранее для этой цели могла использоваться электронная почта, но сегодня правила изменены https://www.04141.com.ua/list/466115
порно видео бесплатно порно видео бесплатно .
скачать порно коллекций https://porn-library.ru/ .
buy zithromax 0. 46 can you take zithromax for a uti zithromax for bronchitis zithromax best foods to take iv zithromax dilution
https://www.publico.es/sociedad/publico.es-nancy-fraser-no-dejar-temor-ultraderecha-lleve-feminismo-liberal.html
מלאים. נערות ליווי בתל אביב הן ההזדמנות שחיפשת בשביל להגשים את עצמך ואת כל החשקים שלך. זוהי ההזדמנות לעשות את כל מה שחלמת עליו דיסקרטיות בחיפה. דירות אליהן מגיעים גברים לבילויים אינטימיים בחברתן של נשים המארחות בדירתן. הדירות הדיסקרטיות הן אחת read full article
Bonus bez depozytu lub innymi slowami darmowy bonus to nic innego jak gratis oferowany przez kasyna online dla swoich graczy ice casino pl
Top News Sites for article Post
chinaworldnewstoday.com
chroniclenewstoday.com
cnbcnewstoday.com
cnnworldtoday.com
crunchbasenewstoday.com
dailyexpressnewstoday.com
Don’t hesiate to conatct us.
נערות ליווי בתל אביב מגיעות לביתך או לבית המלון, ושם מעניקות לך פינוק מושלם. זהו יכול להיות פתרון לאחר צהריים רגוע, בילוי דירות דיסקרטיות בחיפה – להרגיש כמו כוכב קולנוע דירות דיסקרטיות בחיפה מעניקות לגבר הזדמנות אחת ויחידה להרגיש כוכב קולנוע check link
חשבון גבר, נכון שמתחשק לך לבלות וליהנות ולא לעשות חשבון לכל העולם? בדיוק בשביל זה ישנן דירות דיסקרטיות בתל אביב. מידי יום להזמין את הנערות לביתם או לבית המלון ולשמור על פרטיות מלאה. להגשים פנטזיות עם נערות ליווי בתל אביב לכל גבר יש את הפנטזיות read content
coindarwin crypto news
The Unseen Narrative Concerning Solana’s Founder Toly’s Triumph
Post A Couple of Cups of Espresso plus a Pint
Toly Yakovenko, the mastermind behind Solana, began his path with an ordinary habit – two cups of coffee and a beer. Unbeknownst to him, those moments would spark the wheels of his destiny. Currently, Solana is as a significant participant in the cryptocurrency space, boasting a worth in billions.
Initial Ethereum ETF Sales
The new Ethereum ETF lately launched with a staggering trading volume. This significant event observed numerous spot Ethereum ETFs from multiple issuers be listed on U.S. exchanges, creating significant activity into the typically calm ETF trading environment.
SEC’s Approval of Ethereum ETF
The U.S. SEC has formally approved the Ethereum exchange-traded fund for being listed. As a digital asset that includes smart contracts, Ethereum is expected to significantly impact the crypto industry following this approval.
Trump’s Crypto Maneuver
With the upcoming election, Trump portrays himself as the “Crypto President,” constantly highlighting his advocacy for the crypto sector to attract voters. His method is different from Biden’s approach, aiming to capture the attention of the digital currency community.
Elon Musk’s Crypto Moves
Elon Musk, a notable figure in the blockchain world and an advocate of Trump, created a buzz once more, driving a meme coin related to his antics. His actions continues to influence market dynamics.
Binance’s Latest Moves
Binance’s unit, BAM, is now allowed to allocate customer funds into U.S. Treasuries. Additionally, Binance marked its 7th year, highlighting its development and achieving multiple compliance licenses. Meanwhile, Binance also disclosed plans to remove several notable cryptocurrency trading pairs, impacting various market participants.
AI’s Impact on the Economy
Goldman Sachs’ top stock analyst recently commented that AI is unlikely to cause an economic revolution
News Sites for Article post
frenchnewstoday.com
germaynewstoday.com
guardiannewstoday.com
headlinesworldnews.com
huffingtonposttoday.com
irishnewstoday.com
Dont hasitate to contact us
Glory Casino
Бесплатный сервис по подбору и ведению сделок с недвижимостью в новостройках Москвы и Московской области! Новые квартиры для жизни, дохода или инвестирования от топовых застройщиков с защитой государства подобрать квартиру
השבוע או אמצע השבוע, תמיד יש כאן נערות חרמניות שרוצות לארח גברים ולבלות יחדיו. אז אם זה מה שהחיים נותנים לך, למה לא ליהנות ליווי זמינות 24 שעות ביממה, והן רק מחכות שתזמין אותן לבית המלון או לדירתך. ושם בין הסדינים הן יעניקו לך בילוי אינטימי מפנק visit your url
Top News Sites for Article Post Permanent
aljazeeranewstoday.com
australiannewstoday.com
bbcworldnewstoday.com
bloombergnewstoday.com
bostonnewstoday.com
britishnewstoday.com
Dont hesitate to Contact me.
במיוחד. הבחורה תדאג לפנק אותך, והיא תשתמש בכל גופה וקסמה הנשי על מנת ליהנות מבילוי משותף. בילוי שיש בו הנאה עבור שניכם. בילוי מגיעים לכאן גברים רבים, לבלות וליהנות. גברים מקומיים, אנשי עסקים ותיירים המבקרים בתל אביב. זוהי סביבת בילוי נעימה ובטוחה have a peek here
coindarwin price analysis
The Untold Story About Solana Founder Toly’s Triumph
Following A Couple of Portions of Coffees with a Ale
Toly, the brainchild behind Solana, started his quest with a routine habit – a couple of coffees and an ale. Unaware to him, these instances would spark the cogs of his future. Currently, Solana stands as a significant participant in the digital currency world, having a market cap in the billions.
Ethereum ETF First Sales
The new Ethereum ETF lately made its debut with an impressive trade volume. This milestone event experienced numerous spot Ethereum ETFs from various issuers commence trading on U.S. markets, creating significant activity into the generally calm ETF trading market.
SEC Sanctions Ethereum ETF
The Commission has officially approved the Ethereum Spot ETF to be listed. As a crypto asset featuring smart contracts, it is expected that Ethereum to have a profound impact the blockchain sector due to this approval.
Trump and Bitcoin
As the election approaches, Trump presents himself as the “President of Crypto,” continually showcasing his advocacy for the blockchain space to win voters. His approach is different from Biden’s approach, targeting the focus of the crypto community.
Elon Musk’s Crypto Moves
Elon Musk, a notable figure in the cryptocurrency space and a supporter of the Trump camp, stirred things up yet again, driving a meme coin connected to his actions. His participation keeps shaping market dynamics.
Recent Binance News
Binance’s subsidiary, BAM, has been allowed to invest customer funds in U.S. Treasuries. Moreover, Binance marked its seventh year, emphasizing its development and securing numerous regulatory approvals. Meanwhile, the firm also announced plans to take off several significant crypto trading pairs, affecting different market players.
AI and Economic Trends
Goldman Sachs’ leading stock analyst recently observed that artificial intelligence won’t trigger a revolution in the economy
Интерьерная печать на самоклеющейся пленке – это процесс создания качественных полноцветных изображений на самоклеющейся пленке, которая может быть наклеена на различные поверхности интерьерная печать пленка
пинко Casino – популярное онлайн казино с широким выбором игр, бонусами для игроков и удобным интерфейсом.
Discover your perfect stay with WorldHotels-in.com, your ultimate destination for finding the best hotels worldwide! Our user-friendly platform offers a vast selection of accommodations to suit every traveler’s needs and budget. Whether you’re planning a luxurious getaway or a budget-friendly adventure, we’ve got you covered with our extensive database of hotels across the globe. Our intuitive search features allow you to filter results based on location, amenities, price range, and guest ratings, ensuring you find the ideal match for your trip. We pride ourselves on providing up-to-date information and competitive prices, often beating other booking sites. Our detailed hotel descriptions, high-quality photos, and authentic guest reviews give you a comprehensive view of each property before you book. Plus, our secure booking system and excellent customer support team ensure a smooth and worry-free experience from start to finish. Don’t waste time jumping between multiple websites – http://www.WorldHotels-in.com brings the world’s best hotels to your fingertips in one convenient place. Start planning your next unforgettable journey today and experience the difference with WorldHotels-in.com!
Онлайн-платформа для азартных игр представляет собой разнообразный мир развлечений. Здесь игроки могут наслаждаться множеством опций, которые сделают времяпрепровождение увлекательным и захватывающим http://spb-azlk.ru/viewtopic.php?f=25&t=13058
RGBET trang chủ
RGBET trang chủ với hệ thống game nhà cái đỉnh cao – Nhà cái uy tín số 1 Việt Nam trong lĩnh vực cờ bạc online
RG trang chủ, RG RICH GAME, Nhà Cái RG
RGBET Trang Chủ Và Câu Chuyện Thương Hiệu
Ra đời vào năm 2010 tại Đài Loan, RGBET nhanh chóng trở thành một trang cá cược chất lượng hàng đầu khu vực Châu Á. Nhà cái được cấp phép hoạt động hợp pháp bởi công ty giải trí trực tuyến hợp pháp được ủy quyền và giám sát theo giấy phép Malta của Châu Âu – MGA. Và chịu sự giám sát chặt chẽ của tổ chức PAGCOR và BIV.
RGBET trang chủ cung cấp cho người chơi đa dạng các thể loại cược đặc sắc như: thể thao, đá gà, xổ số, nổ hũ, casino trực tuyến. Dịch vụ CSKH luôn hoạt động 24/7. Với chứng chỉ công nghệ GEOTRUST, nhà cái đảm bảo an toàn cho mọi giao dịch của khách hàng. APP RG thiết kế tối ưu giải quyết mọi vấn đề của người dùng IOS và Android.
Là một nhà cái đến từ đất nước công nghệ, nhà cái luôn không ngừng xây dựng và nâng cấp hệ thống game và dịch vụ hoàn hảo. Mọi giao dịch nạp rút được tự động hoá cho phép người chơi hoàn tất giao dịch chỉ với 2 phút vô cùng nhanh chóng
RGBET Lớn Nhất Uy Tín Nhất – Giá Trị Cốt Lõi
Nhà Cái RG Và Mục Tiêu Thương Hiệu
Giá trị cốt lõi mà RGBET mong muốn hướng đến đó chính là không ngừng hoàn thiện để đem đến một hệ thống chất lượng, công bằng và an toàn. Nâng cao sự hài lòng của người chơi, đẩy mạnh hoạt động chống gian lận và lừa đảo. RG luôn cung cấp hệ thống kèo nhà cái đặc sắc, cùng các sự kiện – giải đấu hàng đầu và tỷ lệ cược cạnh tranh đáp ứng mọi nhu cầu khách hàng.
Thương hiệu cá cược RGBET cam kết đem lại cho người chơi môi trường cá cược công bằng, văn minh và lành mạnh. Đây là nguồn động lực to lớn giúp nhà cái thực tế hóa các hoạt động của mình.
RGBET Có Tầm Nhìn Và Sứ Mệnh
Đổi mới và sáng tạo là yếu tố cốt lõi giúp đạt được mục tiêu dưới sự chuyển mình mạnh mẽ của công nghệ. Tầm nhìn và sứ mệnh của RGBET là luôn tìm tòi những điều mới lạ, đột phá mạnh mẽ, vượt khỏi giới hạn bản thân, đương đầu với thử thách để đem đến cho khách hàng sản phẩm hoàn thiện nhất.
Chúng tôi luôn sẵn sàng tiếp thu ý kiến và nâng cao bản thân mỗi ngày để tạo ra sân chơi bổ ích, uy tín và chuyên nghiệp cho người chơi. Để có thể trở thành nhà cái phù hợp với mọi khách hàng.
Khái Niệm Giá Trị Cốt Lõi Nhà Cái RGBET
Giá trị cốt lõi của nhà cái RG luôn gắn kết chặt chẽ với nhau giữa 5 khái niệm: Chính trực, chuyên nghiệp, an toàn, đổi mới, công nghệ.
Chính Trực
Mọi quy luật, cách thức của trò chơi đều được nhà cái cung cấp công khai, minh bạch và chi tiết. Mỗi tựa game hoạt động đều phải chịu sự giám sát kỹ lưỡng bởi các cơ quan tổ chức có tiếng về sự an toàn và minh bạch của nó.
Chuyên Nghiệp
Các hoạt động tại RGBET trang chủ luôn đề cao sự chuyên nghiệp lên hàng đầu. Từ giao diện đến chất lượng sản phẩm luôn được trau chuốt tỉ mỉ từng chi tiết. Thế giới giải trí được xây dựng theo văn hóa Châu Á, phù hợp với đại đa số thị phần khách Việt.
An Toàn
RG lớn nhất uy tín nhất luôn ưu tiên sử dụng công nghệ mã hóa hiện đại nhất để đảm bảo an toàn, riêng tư cho toàn bộ thông tin của người chơi. Đơn vị cam kết nói không với hành vi gian lận và mua bán, trao đổi thông tin cá nhân bất hợp pháp.
Đổi Mới
Nhà cái luôn theo dõi và bắt kịp xu hướng thời đại, liên tục bổ sung các sản phẩm mới, phương thức cá cược mới và các ưu đãi độc lạ, mang đến những trải nghiệm thú vị cho người chơi.
Công Nghệ
RGBET trang chủ tập trung xây dựng một giao diện game sắc nét, sống động cùng tốc độ tải nhanh chóng. Ứng dụng RGBET giải nén ít dung lượng phù hợp với mọi hệ điều hành và cấu hình, tăng khả năng sử dụng của khách hàng.
RGBET Khẳng Định Giá Trị Thương Hiệu
Hoạt động hợp pháp với đầy đủ giấy phép, chứng chỉ an toàn đạt tiêu chuẩn quốc tế
Hệ thống game đa màu sắc, đáp ứng được mọi nhu cầu người chơi
Chính sách bảo mật RG hiện đại và đảm bảo an toàn cho người chơi cá cược
Bắt tay hợp tác với nhiều đơn vị phát hành game uy tín, chất lượng thế giới
Giao dịch nạp rút RG cấp tốc, nhanh gọn, bảo mật an toàn
Kèo nhà cái đa dạng với bảng tỷ lệ kèo cao, hấp dẫn
Dịch Vụ RGBET Casino Online
Dịch vụ khách hàng
Đội ngũ CSKH RGBET luôn hoạt động thường trực 24/7. Nhân viên được đào tạo chuyên sâu luôn giải đáp tất cả các khó khăn của người chơi về các vấn đề tài khoản, khuyến mãi, giao dịch một cách nhanh chóng và chuẩn xác. Hạn chế tối đa làm ảnh hưởng đến quá trình trải nghiệm của khách hàng.
Đa dạng trò chơi
Với sự nhạy bén trong cập nhật xu thế, nhà cái RGBET đã dành nhiều thời gian phân tích nhu cầu khách hàng, đem đến một kho tàng game chất lượng với đa dạng thể loại từ RG casino online, thể thao, nổ hũ, game bài, đá gà, xổ số.
Khuyến mãi hấp dẫn
RGBET trang chủ liên tục cập nhật và thay đổi các sự kiện ưu đãi đầy hấp dẫn và độc đáo. Mọi thành viên bất kể là người chơi mới, người chơi cũ hay hội viên VIP đều có cơ hội được hưởng ưu đãi đặc biệt từ nhà cái.
Giao dịch linh hoạt, tốc độ
Thương hiệu RGBET luôn chú tâm đến hệ thống giao dịch. Nhà cái cung cấp dịch vụ nạp rút nhanh chóng với đa dạng phương thức như thẻ cào, ví điện tử, ngân hàng điện tử, ngân hàng trực tiếp. Mọi hoạt động đều được bảo mật tuyệt đối bởi công nghệ mã hóa tiên tiến.
App cá độ RGBET
App cá độ RGBET là một ứng dụng cho phép người chơi đăng nhập RG nhanh chóng, đồng thời các thao tác đăng ký RG trên app cũng được tối ưu và trở nên đơn giản hơn. Tham gia cá cược RG bằng app cá độ, người chơi sẽ có 1 trải nghiệm cá cược tuyệt vời và thú vị.
RGBET Có Chứng Nhận Cá Cược Quốc Tế
Nhà cái RGBET hoạt động hợp pháp dưới sự cấp phép của hai tổ chức thế giới là PAGCOR và MGA, tính minh bạch và công bằng luôn được giám sát gắt gao bởi BIV. Khi tham gia cược tại đây, người chơi sẽ được đảm bảo quyền và lợi ích hợp pháp của mình.
Việc sở hữu các chứng nhận quốc tế còn cho thấy nguồn tài chính ổn định, dồi dào của RGBET. Điều này cho thấy việc một nhà cái được công nhận bởi các cơ quan quốc tế không phải là một chuyện dễ.
Theo quy định nhà cái RGBET, chỉ người chơi từ đủ 18 tuổi trở lên mới có thể tham gia cá cược tại RGBET
MGA (Malta Gaming Authority)
Tổ chức MGA đảm bảo tính vẹn toàn và ổn định của các trò chơi. Có các chính sách bảo vệ nguồn tài chính và quyền lợi của người chơi. Chứng nhận một nhà cái hoạt động có đầy đủ pháp lý, tuân thủ nghiêm chỉnh luật cờ bạc.
Chứng nhận Quần đảo Virgin Vương quốc Anh (BIV)
Tổ chứng chứng nhận nhà cái có đầy đủ tài chính để hoạt động kinh doanh cá cược. Với nguồn ngân sách dồi dào, ổn định nhà cái bảo đảm tính thanh khoản cho người chơi, mọi quyền lợi sẽ không bị xâm phạm.
Giấy Phép PAGCOR
Tổ chức cấp giấy phép cho nhà cái hoạt động đạt chuẩn theo tiêu chuẩn quốc tế. Cho phép nhà cái tổ chức cá cược một cách hợp pháp, không bị rào cản. Có chính sách ngăn chặn mọi trò chơi có dấu hiệu lừa đảo, duy trì sự minh bạch, công bằng.
Nhà Cái RGBET Phát Triển Công Nghệ
Nhà cái RGBET hỗ trợ trên nhiều thiết bị : IOS, Android, APP, WEB, Html5
RG và Trách Nhiệm Xã Hội
RGBET RichGame không đơn thuần là một trang cá cược giải trí mà nhà cái còn thể hiện rõ tính trách nhiệm xã hội của mình. Đơn vị luôn mong muốn người chơi tham gia cá cược phải có trách nhiệm với bản thân, gia đình và cả xã hội. Mọi hoạt động diễn ra tại RGBET trang chủ nói riêng hay bất kỳ trang web khác, người chơi phải thật sự bình tĩnh và lý trí, đừng để bản thân rơi vào “cạm bẫy của cờ bạc”.
RGBET RichGame với chính sách nghiêm cấm mọi hành vi xâm phạm thông tin cá nhân và gian lận nhằm tạo ra một môi trường cá cược công bằng, lành mạnh. Nhà cái khuyến cáo mọi cá nhân chưa đủ 18 tuổi không nên đăng ký RG và tham gia vào bất kỳ hoạt động cá cược nào.
rgbet 5227548
Монтаж системы видеонаблюдения может потребоваться в самых разных ситуациях. Её устанавливают в частных и загородных домах, промышленных предприятиях, офисах, гаражах и многих других помещениях https://stroika12.com/raznoe/effektivnaya-ustanovka-videonablyudeniya-zashhita-i-kontrol-dlya-bezopasnosti/
https://derbayerischelowe.info/
https://psk-termit.ru/
Мазь для суставов https://sustalits.ru заказать онлайн.
контекст москва https://razrabotka-sajtov-pod-klyuch.ru/
Trusted Vavada Casino: 50 Free Spins on Mega Heist Slot bonus review, including details, player’s comments, and top bonus codes vavada casino free spins
Эта компания предоставляет услуги аварийного вскрытия замков в Москве и готова помочь в любое время суток http://vskrytie-zamkov-moskva.su
One of the top Bitcoin mixers, Cryptomixer is known for being dependable and quick, which is essential if you want to keep your money safe from Bitcoin Mixer
The Unseen Narrative Behind Solana’s Architect Toly’s Achievement
Subsequent to Two Portions of Java plus a Beer
Yakovenko, the visionary behind Solana, commenced his quest with a modest ritual – two coffees and a brew. Little did he know, these instances would set the cogs of fate. Nowadays, Solana remains as a significant participant in the digital currency space, boasting a worth in billions.
Initial Ethereum ETF Sales
The Ethereum exchange-traded fund newly launched with a huge trading volume. This landmark occasion observed various spot Ethereum ETFs from various issuers begin trading on U.S. exchanges, creating extraordinary activity into the typically steady ETF trading space.
SEC Sanctions Ethereum ETF
The SEC has given the nod to the Ethereum Spot ETF for being listed. As a cryptographic asset with smart contracts, Ethereum is projected to majorly affect the blockchain sector with this approval.
Trump and Bitcoin
As the election draws near, Trump presents himself as the ‘Cryptocurrency President,’ frequently displaying his backing of the cryptocurrency industry to gain voters. His strategy contrasts with Biden’s strategy, targeting the focus of the digital currency community.
Elon Musk’s Influence
Musk, a well-known figure in the cryptocurrency space and a supporter of the Trump camp, created a buzz once again, driving a meme coin related to his antics. His actions continues to shape market dynamics.
Recent Binance News
The subsidiary of Binance, BAM, is now permitted to allocate customer funds in U.S. Treasuries. Additionally, Binance observed its seventh anniversary, showcasing its path and obtaining various compliance licenses. In the meantime, the company also announced plans to delist several notable cryptocurrency trading pairs, impacting various market participants.
AI and Economic Trends
The chief stock analyst at Goldman Sachs recently mentioned that artificial intelligence won’t lead to an economic transformation
Hello dear friend, I would like to offer placement of your link (or links) on different platforms of the internet such as: forums, blogs, comments and much more. . .
Increase your Visibility Boost Your Seo Rank – Get Organic Traffic From Google. Ranking in Google isn’t hard. All you need is a healthy number of backlinks from referring domains that have authority and trust in Google’s eyes.
This Backlinks Service Benefits:
1. Easily get Google rankings
2. Get a lot of traffic from Google
3. You can earn from the website in different ways
4. Increase Domain Authority (DA)
Quality guaranteed !
PRICE – 20$
WebSite – https://goo.su/CHM5cJW
Слимофор https://slymofor.ru инновационное средство для быстрого похудения.
You are credited with 123 Free Spins in the game Gonzo’s Quest. Promotions in GonzoCasino 200% to your deposit – Min. deposit 50 $ / Bonus size 200% gonzocasino
Gonzo Casino offers an incredible 123 Free Spins with no deposit required on Gonzos Quest from NetEnt when you sign up for a new player account kod promocyjny gonzo casino
https://candidat.news/
All new players that register via our provided link will receive a no deposit bonus from Fountain Casino. There is a chance to claim €$15 free money fontan casino 100zl
omega 89
screen capture for windows 10 https://screen-capture-free.com
Indibet https://indibeti.in is a premier online casino offering a wide array of games including slots, table games, and live dealer options. Renowned for its user-friendly interface and robust security measures, Indibet ensures a top-notch gaming experience with exciting bonuses and 24/7 customer support.
L’histoire epique du FC Barcelone https://espagne.barcelona-fr.com 120 ans de triomphes et de tribulations.
Rodri https://manchester-city.rodrigo-hernandez.com le maestro du milieu de terrain de Manchester City
Mostbet, a globally recognized sports betting operator, is now fully accessible to Bangladeshi players. Operating under a Curacao gaming license, Mostbet offers a secure and reliable platform for betting on a wide range of sports Mostbet bd
download screen capture for windows 10 https://screen-capture-free.com
Deep Fake Nudes https://undressapp.net with Undress AI and Deepnude
https://franceeteu.today/
Immerse yourself in the charm of France https://france.life-in-france.net a land of fine cuisine, impressive architecture and picturesque landscapes. An unrivaled lifestyle.
https://www.unlockmega.com/
The Boston Celtics https://celtics-de-boston.bill-russel.com are one of the most successful teams in the history of the National Basketball Association (NBA).
Learn about Jayson Tatum’s https://celtics-de-boston.jayson-tatum.com rise from young rookie to key leader of the Boston Celtics in the NBA, his impact on the team and his success on the court.
The story of Michael Phelps https://amerique.michael-phelps.com how he became the greatest swimmer of all time, overcoming adversity, setting records and inspiring the world.
Mavericks rising superstar Luka Doncic https://mavericks-de-dallas.lukadoncic-fr.com continues to amaze the basketball world with his game.
В мире современных технологий и постоянного интернета доступ к любимым игровым платформам стал неотъемлемой частью повседневной жизни. Однако иногда случаются ситуации, когда прямой доступ оказывается невозможным http://www.lawdw.com/bbs/board.php?bo_table=free&wr_id=356609
台灣線上娛樂城
富遊娛樂城評價 : 全台唯一5分鐘內快速出金,網紅一致好評看這篇!
富遊娛樂城以玩家需求為核心對於品牌保證安全、公正、真實、順暢,成為玩家在線上賭場最佳合作夥伴,擁有各大網紅、網友評價保證出金。
富遊是台灣註冊人數第一名的線上賭場,富遊是台灣最受歡迎的線上賭場,已吸引超過30萬玩家註冊。首次存款1000元贈1000元獎金,且只需1倍的流水。新手玩家還可獲得免費體驗金,體驗館內的所有遊戲。富遊也時常舉辦不同優惠活動,沒有困難的下注流水要求,相當適合新手與資深玩家遊玩。
富遊娛樂城平台詳情資訊
賭場名稱 : RG富遊
創立時間 : 2019年
博弈執照 : 馬爾他牌照(MGA)認證、英屬維爾京群島(BVI)認證、菲律賓(PAGCOR)監督競猜牌照
遊戲類型 : 真人百家樂、運彩投注、電子老虎機、彩票遊戲、棋牌遊戲、捕魚機遊戲
合作廠商 : 22家遊戲平台商
支付平台 : 各大銀行、四大便利超商
存取速度 : 存款15秒 / 提款3-5分
單筆提款金額 : 最低1000-100萬
合作廠商 : 22家遊戲平台商
軟體下載 : 支援APP,IOS、安卓(Android)
富遊娛樂城優缺點評價
優點 缺點
台灣註冊人數NO.1線上賭場
首儲1000贈1000只需一倍流水
擁有體驗金免費體驗賭場
網紅部落客推薦保證出金線上娛樂城
需透過客服申請體驗金
富遊娛樂城評價有哪些網紅推薦
富遊娛樂城擁有多數網紅推薦,知名度是目前數一數二的娛樂城平台,玩家也可無需擔心娛樂城出金問題,有眾多玩家的評價保證,又有娛樂城體驗金可以免費試玩。詳細可觀看富遊娛樂城評價推薦人,數十位網紅評價推薦
富遊娛樂城存取款方式
存款方式 取款方式
提供四大超商(全家、7-11、萊爾富、ok超商)
虛擬貨幣ustd存款
銀行轉帳(各大銀行皆可)
網站內申請提款及可匯款至綁定帳戶
現金1:1出金
富遊娛樂城是否安全?
富遊娛樂城非常注重玩家的安全性。他們使用與銀行相同的《TLS加密技術》來保護玩家的財物,並且持有合法的國際認證執照。官方也承諾確保會員的個人資料安全。各大部落客也實測網站存取款狀況,富遊娛樂城是一個相當安全的線上賭場平台。
如何判斷娛樂城評價是否詐騙?
網站架構及經營方式
金流三方提供取道皆為有公信力三方平台
合理優惠流水洗碼量
畢竟博弈市場不斷開新的線上娛樂城,每一家特色都不同,還不知道如何選擇娛樂城的玩家,透過我們專業分析介紹,建議可以加入富遊娛樂城體驗看看,保證出金、畫面操作簡單、遊戲豐富多元。
選擇一間正確的娛樂城會讓你當作在投資一般,選擇錯誤的娛樂城只會讓你當作在賭博。如果投注個娛樂城遊戲,請前往富遊娛樂城下注
娛樂城
富遊娛樂城評價 : 全台唯一5分鐘內快速出金,網紅一致好評看這篇!
富遊娛樂城以玩家需求為核心對於品牌保證安全、公正、真實、順暢,成為玩家在線上賭場最佳合作夥伴,擁有各大網紅、網友評價保證出金。
富遊是台灣註冊人數第一名的線上賭場,富遊是台灣最受歡迎的線上賭場,已吸引超過30萬玩家註冊。首次存款1000元贈1000元獎金,且只需1倍的流水。新手玩家還可獲得免費體驗金,體驗館內的所有遊戲。富遊也時常舉辦不同優惠活動,沒有困難的下注流水要求,相當適合新手與資深玩家遊玩。
富遊娛樂城平台詳情資訊
賭場名稱 : RG富遊
創立時間 : 2019年
博弈執照 : 馬爾他牌照(MGA)認證、英屬維爾京群島(BVI)認證、菲律賓(PAGCOR)監督競猜牌照
遊戲類型 : 真人百家樂、運彩投注、電子老虎機、彩票遊戲、棋牌遊戲、捕魚機遊戲
合作廠商 : 22家遊戲平台商
支付平台 : 各大銀行、四大便利超商
存取速度 : 存款15秒 / 提款3-5分
單筆提款金額 : 最低1000-100萬
合作廠商 : 22家遊戲平台商
軟體下載 : 支援APP,IOS、安卓(Android)
富遊娛樂城優缺點評價
優點 缺點
台灣註冊人數NO.1線上賭場
首儲1000贈1000只需一倍流水
擁有體驗金免費體驗賭場
網紅部落客推薦保證出金線上娛樂城
需透過客服申請體驗金
富遊娛樂城評價有哪些網紅推薦
富遊娛樂城擁有多數網紅推薦,知名度是目前數一數二的娛樂城平台,玩家也可無需擔心娛樂城出金問題,有眾多玩家的評價保證,又有娛樂城體驗金可以免費試玩。詳細可觀看富遊娛樂城評價推薦人,數十位網紅評價推薦
富遊娛樂城存取款方式
存款方式 取款方式
提供四大超商(全家、7-11、萊爾富、ok超商)
虛擬貨幣ustd存款
銀行轉帳(各大銀行皆可)
網站內申請提款及可匯款至綁定帳戶
現金1:1出金
富遊娛樂城是否安全?
富遊娛樂城非常注重玩家的安全性。他們使用與銀行相同的《TLS加密技術》來保護玩家的財物,並且持有合法的國際認證執照。官方也承諾確保會員的個人資料安全。各大部落客也實測網站存取款狀況,富遊娛樂城是一個相當安全的線上賭場平台。
如何判斷娛樂城評價是否詐騙?
網站架構及經營方式
金流三方提供取道皆為有公信力三方平台
合理優惠流水洗碼量
畢竟博弈市場不斷開新的線上娛樂城,每一家特色都不同,還不知道如何選擇娛樂城的玩家,透過我們專業分析介紹,建議可以加入富遊娛樂城體驗看看,保證出金、畫面操作簡單、遊戲豐富多元。
選擇一間正確的娛樂城會讓你當作在投資一般,選擇錯誤的娛樂城只會讓你當作在賭博。如果投注個娛樂城遊戲,請前往富遊娛樂城下注
LaMelo Ball https://charlotte-frelons.lamelo-ball.com went from high school basketball to the NBA with the Charlotte Hornets, overcoming obstacles and finding success.
History and structure of youth football https://angleterre.football-fr.com in England, training programs, achievements and challenges for further talent development.
Discover the evolution of basketball https://france.basketball-fr.com in France, from its emergence and its infrastructures to the international successes and the influence of French players in the NBA.
The LiveChat web app is your all-in-one tool to manage customer interactions from any device without installation. Just open your favorite browser https://lt.webcamus.com/
Unleash your inner CEO
Get new tokens in the game now Hamster Kombat
daily distribution Notcoin to your wallets
Join our project notreward.pro and receive toncoin
Hamsterkombat reward
jadwal-sholat-hari-ini.online
Discover the history https://france.volleyball-fr.com the achievements and prospects for the development of volleyball in France, from the first steps to international triumphs and plans for the future.
Find out how Jude Bellingham https://real-madrid.jude-bellingham.net became a key player for Real Madrid, moving from Birmingham City’s academy to the prominence of world football.
Strasbourg FC is a famous French https://strasbourg.patrick-vieira.com football club whose history is closely linked to the legendary footballer Patrick Vieira.
Manchester City de Pep Guardiola https://manchester-city.bernardo-silva-fr.com remporte des titres avec Bernardo Silve
You’ll learn about Duncan’s https://san-antonio-spurs.timduncan-fr.com contributions to establishing the Spurs as one of the greatest franchises in NBA history.
The Importance of Regular Pump Balancing for Maintenance
Karim Benzema https://al-ittihad.karim-benzema-fr.net has left Real Madrid to join Al Ittihad for a record fee of €100 million – the biggest transfer in the history of the Saudi Premier League.
Platini is a legendary Juventus https://juventus.michel-platini.com playmaker who won the Golden Boot three times.
Encontre a melhor maneira de saber a hora exata no Brasil no site horasbrazil2.top. Nao importa em qual fuso horario voce esteja, nosso site fornece as informacoes mais atuais e precisas sobre o horario. Interface amigavel, acesso rapido e dados exatos – tudo o que voce precisa para estar sempre atualizado. Visite-nos e comprove https://horasbrazil2.top
AI Nude Generator https://ainudegenerator.app Transform Photos with AI Nude App.
Discover Thierry Henry’s https://arsenal.thierry-henry-fr.com journey at Arsenal, from his early years to his legendary status, his later struggles and his farewell to the club.
Find out how Olivier Giroud https://los-angelesfc.olivier-giroud.net went from young talent in France to star of MLS, from Grenoble to Los Angeles FC.
УК РФ Статья 228.1 Статья 228 УК РФ Незаконные производство, сбыт или пересылка наркотических средств, психотропных веществ или их аналогов.
From a young French https://real-madrid.zinedine-zidane-fr.com talent to a Real Madrid legend.
Fernando Muslera https://galatasaray.fernandomuslera.net is one of the important players of Galatasaray. Find out about his contribution to the club’s success, his career in Europe and his personal life.
An impressive story that tells the development of Romanian football genius Gheorghe Hagi https://galatasaray.gheorghe-hagi.net and his extraordinary achievements at the Turkish giant Galatasaray.
https://gosznakdublikat.ru/
The fascinating story of Kamit Alt?ntop’s https://real-madrid.zinedine-zidane-fr.com rise from Germany’s youth teams to the legend of Galatasaray and Turkish football.
Christiano Ronaldo https://real-madrid.robertocarlos-tr.net is a football genius who has become one of the greatest players of our time with his passion, technique and physical prowess.
The brilliant Brazilian’s https://barcelona.ronaldinho-tr.com rise to the top of world football with Barcelona in the 2000s.
Follow the fascinating evolution of Cristiano Ronaldo’s https://an-nasr.cristianoronaldo-tr.com career, from his triumphs in Europe to his move to Saudi Arabia, where he continues to reach new heights in football.
Learn how to maximize your results on the popular Sweet Bonanza https://turkey.sweetbonanza-tr.net slot when playing in Turkey. Special tips to conquer peaks in the game.
Slot machines https://turkey.gatesofolympus-tr.net have always attracted the attention of gambling enthusiasts from all over the world, and Gates of Olympus is special among them It has a place.
Arda Guler https://real-madrid.ardaguler-tr.net is a talented 18-year-old football player from Turkey who is considered one of the most promising young players of our age.
The fascinating story of how legendary football player Lionel Messi https://inter-miam.lionelmessi-tr.com opened a new page in his MLS career by leading Inter Miami to the championship.
Kraken darknet – официальная ссылка на зеркало и сайт кракена. Ссылка на кракен онион доступна в любое время! Сделать покупку проще, чем кажется кракен шоп krakenwebs org
Натяжные потолки https://stroydim.co.ua под ключ. Гипоаллергенные, без запаха. Бесплатный замер и визуализация дизайна. Натяжные потолки – всегда выгодные предложения, привлекательные цены
Apple iPhone 14 купить в Москве, низкие цены на оригинал новый: Iphone Ivus — интернет-магазин оригинальных смартфонов Apple iPhone 14, iPhone 14 Plus, iPhone 14 Pro, iPhone 14 Pro Max.
gama casino бездепозитный бонус gama casino
The gripping story of Stephen Curry’s https://golden-state-warriors.stephencurry-fr.com difficult journey to becoming an NBA superstar and the leader of the undefeated Golden State Warriors dynasty.
https://www.youtube.com/channel/UCe-uPPVriJvINas8hjcw0Jw/videos?view=0
The gripping story of Stephen Curry’s https://golden-state-warriors.stephencurry-fr.com difficult journey to becoming an NBA superstar and the leader of the undefeated Golden State Warriors dynasty.
Kylian Mbappe https://real-madrid.kylianmbappe-tr.net one of the most talented young football players, will join Real Madrid in 2024. He joined. Find out how he quickly rose to the top of world football.
The fascinating story of Turkey’s https://turkey.oyunlar-espor.com rise to the heights of eSports glory, from amateur tournaments to victories at world championships.
An impressive story https://turkey.nba-tr.com of how Turkey became a leading power in the NBA and produced many world-class star players.
Galatasaray’s https://istanbul.galata-saray.net path from ups and downs to unconditional dominance in Istanbul. The story of one of Turkey’s strongest clubs returning to the top.
The legendary Turkish club Konyaspor https://turkey.superligsitesi.net is the pride of Konya and many champions of Turkey, regularly participating in European cups.
Будівельний портал https://apis-togo.org Все про будівництво та ремонт від А до Я.
Будівництво та ремонт https://buildportal.kyiv.ua будинок та дача, дизайн та нерухомість
Найбільший сайт про будівництво https://d20.com.ua пошук замовлень і підрядників, каталог майстрів і бригад, форум про ремонт.
Найбільший портал https://dsmu.com.ua з будівництва та ремонту – великий вибір будівельних матеріалів, послуг, оголошень про ремонт від будівельних фірм та приватних фахівців
Найпопулярніший https://elektrod.com.ua та авторитетний портал в Україні, присвячений будівництву та заміському життю.
Будівельний портал https://furbero.com каталог будівельних компаній, будівельна дошка оголошень, новини, прайс-листи та все про будівництво.
Будівельний та архітектурний портал https://inox.com.ua все найцікавіше про будівництво та архітектуру – новини архітектури та будівництва, огляди та аналітика, проекти
Об’єктивна та різнобічна інформація у сфері будівництва https://interiordesign.kyiv.ua та ремонту, дизайну інтер’єру, ландшафтного дизайну, будинку та дачі.
маленькая переговорная маленькая переговорная .
港體會
Будівельний портал https://newhouse.kyiv.ua будь-які питання щодо будівництва та ремонту
Професійний будівельний портал https://novostroi.in.ua від будівництва та ремонту, до вибору квітів на дачу.
Все про будівництво https://poradnik.com.ua будівельні матеріали, нерухомість, будівельну техніку, дизайн, меблі.
На порталі представлена ??найкорисніша інформація з будівництва https://proektsam.kyiv.ua та ремонту. Будівельні організації, статті та новини будівельної сфери
Відповіді на питання щодо ремонту https://sovetik.in.ua та будівництва квартири, приватного будинку чи дачі
Будівельний портал https://start.net.ua будівельні матеріали, прайс-лист, розцінки на будівельні роботи, будівельні сайти, будівельні фірми, фотографії ремонту квартир, будівельні роботи
Новини будівництва https://stroyportal.kyiv.ua статті та аналіз ринку нерухомості
Технології будівництва та ремонту https://vasha-opora.com.ua інформаційно-будівельний портал
Поиск горящих туров на море из Москвы лучшие цены, горит 15822 тура горящие туры вылет завтра
Информационный портал о сертификации http://www.certif-test.ru и стандартизации продукции и услуг, отказные письма.
дизайн интерьера проект дизайн для ванной комнаты
RuNet https://gallerix.asia ?????????????????? ??4?????,?????????????????
Discover key aspects of the future development of the Turkish Super League https://turkey.superligsitesi.net including financial stability, infrastructure, youth football and international success.
Efsanevi Turk kulubu Konyaspor, Konya’n?n https://konya.konyaspor.biz gururu ve Avrupa kupalar?na duzenli olarak kat?lan Turkiye’nin bircok sampiyonudur.
Центр сертификации https://www.rospromtest.ru осуществляет деятельность по содействию в подтверждении соответствия продукции и услуг требованиям нормативных документов, технических регламентов Таможенного союза, и сертификации ISO. Мы оказываем полный комплекс услуг в сфере сертификации.
Все актуальные промокоды в одном месте. Все актуальные промокоды в одном месте. .
купить качественные https://czmicro.cz аренда и продажа невидимых нано микронаушников в Праге
http://sbornik-zakonov.ru/
balls to order inexpensively https://buy-balloons-dubai.com
best quality wallpaper https://maranuaq.com for your apartment
Drawings and Paintings https://gallerix.asia Gallerix Online Museum
custom gel ball https://buy-balloons-dubai.com
https://www.underworks.com/gynecomastia-shirts
Do you pay attention to the vibration of your equipment? Vibration is a key indicator of the health of machines and mechanisms, and neglecting it can lead to critical failures.
With modern devices like the Balanset-1A and Balanset-4, you can achieve precise vibration measurements and timely detect issues like bearing wear or shaft misalignment. Regular vibration monitoring helps prevent unexpected failures and extends equipment life.
Users report significant reductions in breakdowns and downtimes after implementing regular vibration monitoring with the Balanset-1A. This not only saves money but also boosts overall productivity.
Don’t wait to take care of your equipment. Start monitoring vibrations today with modern instruments and ensure reliable machine operation.
Here you can read more about electric motor balancing
Отказное письмо (ОП) – это документ, который удостоверяет, что изделие/товар/материал не подлежат обязательной оценке качества и получению сертификата/декларации в определённой системе https://vc.ru/life/1331217-otkaznoe-pismo-gde-poluchit-i-skolko-stoit-oformlenie
covered car transport service covered car transport service .
stanze camere in affitto stanze in affitto privati studenti lavoratori uomini donne doppie singole monolocale condivisione a roma milano napoli torino bari palermo bologna annunci subito stanze appartamenti in affitto posti letto coinquilini
order albuterol price
Кооператив для военных
Как пайщики — участники СВО относятся к событиям вокруг «Бест Вей»
Кооператив Бествей
Потребительский кооператив «Бест Вей» оказался затронут уголовным делом, касающимся в основном иностранной инвесткомпании «Гермес», которое сейчас рассматривается Приморским районным судом Санкт-Петербурга. Более двух лет более 3,5 млрд рублей на счетах кооператива почти непрерывно арестованы по ходатайству сначала ГСУ ГУ МВД по Санкт-Петербургу, а затем Прокуратуры Санкт-Петербурга: пайщики не имеют возможности ни приобрести недвижимость, ни вернуть средства.
По данным совета потребительского кооператива «Бест Вей», в числе его пайщиков, страдающих от блокировки средств, тысячи военнослужащих, в том числе сотни участников СВО, часть из которых успела приобрести квартиру, часть собирает или собрала первоначальный взнос, а часть — планировала вступить в кооператив. «СП» пообщалась с некоторыми из них и их родственниками, чтобы узнать отношение к «Бест Вей» и событиям вокруг кооператива.
«К кооперативу отношение очень хорошее»
Александр Голдман на СВО с мая 2022 года как доброволец, три ранения. Пришел на СВО рядовым, сейчас — начальник штаба батальона. Был пайщиком кооператива, сейчас пайщик — его мама.
«С помощью кооператива в 2019 году приобретена двухкомнатная квартира во Владивостоке, в которой проживает мама, — рассказывает он. — Расплачиваемся за нее, в ближайшие месяцы намерены погасить задолженность перед кооперативом и оформить квартиру в собственность. К кооперативу отношение очень хорошее, полностью его поддерживаю — он дает возможность без больших переплат приобрести недвижимость. К действиям в отношении кооператива отношусь отрицательно, так как „Бест Вей“ — единственная возможность приобрести жилье в рассрочку».
«Происходящее вокруг кооператива вызывает шок»
Гвардии рядовой Глушков Иван Васильевич — пайщик кооператива из Челябинской области. Танкист, мобилизованный, проходил службу в 15-й отдельной гвардейской мотострелковой Александрийской бригаде 2-й гвардейской общевойсковой армии ЦВО. Погиб 11 октября 2023 года.
Рассказывает его вдова Татьяна Неручева:
«Мы внесли первоначальный паевый взнос и во второй половине 2021 года встали в очередь на приобретение квартиры в Челябинске, когда начались события вокруг кооператива — была заблокирована его возможность приобретать недвижимость и заблокированы его счета. Наша очередь должна была подойти примерно через год. Мы заявили для приобретения небольшую квартиру, но планировали при покупке увеличить ее стоимость до 3 млн и купить двухкомнатную квартиру — с увеличением первоначального паевого взноса: уставом кооператива это позволяется, а затем переехать из Коркино в Челябинск. Сейчас 3 млн хватит только на небольшую квартиру-студию метров 25, то есть мы понесли материальный ущерб из-за блокирования деятельности кооператива, так как лишены были возможности приобрести квартиру, на которую собрали первоначальный паевый взнос. Работа кооператива заблокирована, счета арестованы уже более двух лет. В наследование пая я только вступаю, так как муж очень долго считался пропавшим без вести — долго шла экспертиза, и свидетельство о смерти мы получили только 18 июня этого года».
Татьяна — юрист: «Как у юриста у меня происходящее вокруг кооператива вызывает шок, и любой непредвзятый юрист вам скажет то же самое». «Кооператив, — подчеркивает она, — абсолютно прозрачен, он полностью соответствует законодательству о кооперации — что и подтверждалось многократно государственными органами и судами. Если бы мы с мужем не были уверены, что все прозрачно и законно, мы бы не вкладывали в него деньги. Мы не подавали заявление о выходе из кооператива. Я, несмотря ни на что, жду счастливого завершения рукотворного кризиса вокруг кооператива. Для меня это еще и память о муже — он продал долю в квартире, которая ему принадлежала, чтобы вложиться в кооператив. Кроме того, мне хочется понять — до какого маразма может дойти ситуация у нас в государстве в плане незаконных действий в отношении организации, которая по тем или иным причинам не понравилась каким-то чиновникам?».
«Рассчитываю, что ситуация закончится благополучно»
Сергей Логинов, рядовой, мобилизованный, представлен к награде «Честь и доблесть».
«Пять лет назад я стал пайщиком кооператива, участвовал в накопительной программе, планировал прибрести однокомнатную квартиру в Самарской области. Уже нужно было подбирать объект недвижимости и вставать в очередь на покупку, как работа кооператива была заблокирована по инициативе правоохранительных органов, и это продолжается уже более двух лет. По-прежнему надеюсь получить квартиру и рассчитываю, что ситуация закончится благополучно. Поддерживаю кооператив».
«В кооперативе минимум переплат — несопоставимо с ипотекой»
Егор Ивков, офицер флота, дирижер военного оркестра, пайщик кооператива с 2019 года.
«Я нахожусь в накопительной программе — планировал покупку квартиры в Санкт-Петербурге. До постановки в очередь на покупку дело не дошло, но сумма внесена серьезная — и на два года все зависло. Есть друзья-военнослужащие, которые также являются пайщиками и тоже накапливали деньги на первоначальный паевый взнос — они, как и я, не могут ни продолжать накапливать, ни получить деньги обратно, потому что счета арестованы. Отношение наше к ситуации, создавшейся вокруг кооператива, крайне негативное».
«Кооператив поддерживаю, — говорит пайщик. — Моя сестра живет в квартире, приобретенной с помощью „Бест Вей“ — у нее многодетная семья, сейчас кооперативная квартира переходит в ее собственность. Минимум переплат — несопоставимо с ипотекой. Надеюсь, что ситуация с арестом счетов разрешится в ближайшее время».
港體會娛樂
Федеральный закон https://zakonobosago.ru “Об обязательном страховании гражданской ответственности владельцев транспортных средств” (ОСАГО)
Налоговый кодекс Российской Федерации https://nalogovyykodeks.ru часть 1 НК РФ ч.1 от 31.07.1998 N 146-ФЗ – действующая редакция со всеми изменениями и дополнениями
В современном бизнес-среде важность виртуальных номеров растёт. Они предлагают гибкость, мобильность и профессиональный имидж. Одним из лидеров на рынке предоставления таких услуг является компания DID Virtual Numbers https://martinneue79234.theobloggers.com/33452421/и§Јй”Ѓз€±жѓ…еЇ†з Ѓ-еЌ°еє¦е°јиҐїдєљеЏ·з Ѓеј•йў†зє¦дјљж–°ж—¶д»Ј
В Архангельске ночные бабочки создают волшебную атмосферу своими яркими крыльями, отражающими свет уличных фонарей. Их полет над Северной Двиной выглядит особенно красиво и завораживающе. Эти маленькие существа добавляют в ночной пейзаж города нотки магии и чарующего таинства. https://bb.bestladie.com/tuapse/
Shop the largest selection of balloons https://buy-balloons-dubai.com in Dubai. We offer premium balloons for all occasions. Order now and add a touch of fun to your celebration!
Virtual Phone basic information and a brief history. How a company can create a local or international brand with a 1800 number https://www.fxkrh.cn/20240129/35090373.html
Дружбан выучил билеты ПДД DMV на русском языке вот тут rudmv.com и сдал на права с первой попытки в DMV. Рекомендую сервис, знакомые тоже проходили тесты тут и тоже получили права.
создание сайтов под ключ создание сайтов под ключ .
Реальные анкеты проституток Перми https://perm.prostitutki.sex с проверенными фото – от элитных путан до дешевых шлюх. Каталог всех индивидуалок с реальными фотографиями без ретуши и с отзывами реальных клиентов.
Все проститутки и шлюхи Ростова-на-Дону https://rnd.prostitutki.sex путаны с проверенными фото, ежедневно новые анкеты девочек с огромным выбором интим услуг.
Все проститутки индивидуалки Самары https://samara.prostitutki.sex, предлагающие услуги интима для мужчин. Лучшие шлюхи индивидуалки, от дешевых до элитных.
Сайт самых настоящих проверенных индивидуалок https://saratov.prostitutki.sex Саратова с отзывами, тысячи девушек с настоящими фото и выбором на любой кошелек от дешевых до элитных.
Complaints have flooded social media since the video’s release, with residents saying it fails to show the modern side of their country. Many claim the footage was edited to seemingly appear old-fashioned, with a faded sepia tone, and that the camera focuses on shabby architecture.
порно секс жесток
Others have complained about the video’s airport scenes, during which one of the characters loses his luggage and seeks help from a local ground staff member called “Happy.”
“When I watched it, I was thinking, this was Thailand 50 years ago. This looked like Thailand 70 years ago. There were no segments showing the modernity of my home,” David William, an American content creator based in Thailand, said in Thai in a TikTok video that has been viewed over 11 million times.
In an interview with CNN, he said he’s never seen “a cab that looked that bad before” in his nearly 10 years in the country, adding Thailand’s main gateway, Suvarnabhumi Airport is just as modern as New York’s John F. Kennedy International Airport.
“Thailand is a modern, safe and beautiful country,” he said. “I just hope don’t misunderstand.”
Echoing his view, Facebook user Nipawan Labbunruang said the video makes Thailand look “terrible.”
“What is this clip trying to present?” she wrote in a post that received 1,900 likes.
https://cardum.ru/
Complaints have flooded social media since the video’s release, with residents saying it fails to show the modern side of their country. Many claim the footage was edited to seemingly appear old-fashioned, with a faded sepia tone, and that the camera focuses on shabby architecture.
гей порно молодые
Others have complained about the video’s airport scenes, during which one of the characters loses his luggage and seeks help from a local ground staff member called “Happy.”
“When I watched it, I was thinking, this was Thailand 50 years ago. This looked like Thailand 70 years ago. There were no segments showing the modernity of my home,” David William, an American content creator based in Thailand, said in Thai in a TikTok video that has been viewed over 11 million times.
In an interview with CNN, he said he’s never seen “a cab that looked that bad before” in his nearly 10 years in the country, adding Thailand’s main gateway, Suvarnabhumi Airport is just as modern as New York’s John F. Kennedy International Airport.
“Thailand is a modern, safe and beautiful country,” he said. “I just hope don’t misunderstand.”
Echoing his view, Facebook user Nipawan Labbunruang said the video makes Thailand look “terrible.”
“What is this clip trying to present?” she wrote in a post that received 1,900 likes.
SPBKARKAS – стойловое оборудование для ферм КРС (привязного и беспривязного содержания) и других животноводческих комплексов – конюшен, свинокомплексов, козьих ферм, овчарен!
Собственное производство:
-Стойлового оборудования для привязного и беспривязного содержания КРС; хедлоки, калитки, ограждения;
-Стойлового оборудования для коз и овец;
-Оборудование для конноспортивных клубов: денники для лошадей, бочки, манежи, левады
-Оборудование для свиноводства, свиноферм и свиноводческих комплексов: станки опорос, ожидание, осеменение, хрячник
Оборудование для свинокомплексов
проститутки чехов старые проститутки
проститутки царицыно https://samara.prostitutki.sex
проститутки коломна индивидуалки одинцово
проститутки химки https://vlg.prostitutki.sex
проститутки индивидуалки проститутки видное
Перечень документов, необходимых для оформления кредита на открытие и развитие бизнеса с нуля, зависит от требований банка. В пакет могут входить: • государственный идентификационный номеронлайн кредит на развитие бизнеса
интим досуг заказать проститутку
проститутки у метро проститутки щелково
Link pyramid, tier 1, tier 2, tier 3
Primary – 500 references with inclusion inside writings on publishing platforms
Tier 2 – 3000 domain Rerouted connections
Tier 3 – 20000 hyperlinks mix, posts, posts
Using a link pyramid is useful for indexing systems.
Need:
One reference to the website.
Search Terms.
Accurate when 1 keyword from the page heading.
Remark the complementary offering!
Essential! Tier 1 hyperlinks do not conflict with Secondary and Tertiary-level references
A link structure is a mechanism for increasing the liquidity and link profile of a online platform or social media platform
Цена сертификата соответствия ИСО 9001 всегда рассчитывается индивидуально, так как зависит от ряда факторов: сферы деятельности; количества и местоположения площадок; численности. Сертификат выдается сроком на 3 года https://teletype.in/@sezdok/optimalnaya-cena-sertifikata-iso09001-v-rossii
Магазин Экипировка Эксперт
БРОНЕЖИЛЕТ ЗАЩИТНИК
Боец, Экипировка Эксперт — это розничный магазин, сотрудничающий с рядом оптовых складов и производителей. Это значит, что при должном количестве товара мы дадим очень хорошие цены.
Название взяли независимо от того, что наша страна сейчас проводит Специальную Военную Операцию, хорошая снаряга и экипировка нужна всегда. Готовишься в бой, мобилизован, привык активно проводить время или решил подготовить тревожный чемоданчик, мы поможем тебе. Наши клиенты: фонды, медики, такие же как ты бойцы СВО и обычные неравнодушные граждане.
Самое главное, что нужно о нас знать, мы детально объясняем, что и как работает, чтобы ты сделал правильный выбор не переплачивая.
Обращаясь к нам, не удивляйся, если ты получишь честный и жесткий ответ – часто случается так, что мы знаем лучше, что именно нужно нашему гостю. Особенно это касается мобилизованных без опыта боевых действий. Здесь ты можешь полагаться на нашу экспертность.
Одна из наших основных целей предоставить тебе возможность удобной и безопасной покупки: хоть за наличку, хоть по карте, хоть по счету. Повторимся, если нужна оптовая поставка, согласуем и отгрузим. Именно от того, как ты производишь оплату, зависит цена заказа.
Для нас важно предоставить тебе качественную экипировку и снаряжение соблюдая при этом законы нашей страны. Боец, помни, мы помогаем фондам, нуждающимся людям, подразделениям в зоне СВО. Отчеты об этом опубликованы как на сайте. На эту деятельность уходит значительная часть выручки. Делая покупки в нашем магазине, ты помогаешь людям и фронту. Уверен, что это найдет отзыв в твоем сердце.
У нашей команды есть набор ценностей: честность, справедливость, сопереживание, взаимопомощь, мужество, патриотичность. Уверены, ты их разделяешь, и мы легко найдем общий язык. Ну а если что-то пойдет не так, не руби с плеча, объясни, где мы ошиблись и поверь, мы разберемся и исправим. Наш девиз “In hostem omnia licita” – по отношению к врагу дозволено все. Возьми этот девиз, он поможет тебе принять правильное решение в трудной ситуации, с честью выполнить боевую задачу и вернуться домой живым и здоровым!
港體會娛樂
https://pik-clean.ru/
Сертификат соответствия ИСО 9001 – документ, который выдается по результатам экспертной проверки и подтверждает, что система менеджмента качества (СМК) организации соответствует международному стандарту ISO 9001 «Системы менеджмента качества. Требования» либо его национальному аналогу ГОСТ Р ИСО 9001 и своевременно совершенствуется https://vc.ru/u/3200429-marev/1137556-sertifikat-iso-9001-chto-eto-takoe-i-dlya-chego-oformlyayut
продвижение в google https://www.prodvizhenie-sajtov15.ru .
Полный список промокодов Яндекс Путешествий на первый заказ и не только на июль 2024 Актуальные скидки, промокоды и кешбэк на отели и авиабилеты на сервисе промокод яндекс путешествия
Commence an captivating journey to delve into a world of tantalizing content with our wide-ranging assortment of exclusive adult sites. Dive into a world where desires know no bounds.
Indulge in a diverse variety of categories, meeting every preference. From subtle romance to passionate encounters, our selections span the entire range of adult entertainment.
Browse special categories and find what truly turns you on. Our efficient interface makes it effortless to pinpoint your ultimate content.
https://mtp-klining.ru/
betera приложение
Купить биокамин для квартиры – это создать неповторимую атмосферу уюта и тепла у себя в доме Угловой биокамин купить
nhà cái uy tín
Begin an exhilarating journey to delve into a world of erotic content with our wide-ranging assortment of top-tier adult sites. Dive into a universe where cravings know no bounds.
Relish a wide variety of niches, fulfilling every desire. From gentle romance to intense encounters, our selections span the entire scope of adult entertainment.
Browse special categories and find what truly arouses you. Our efficient interface makes it straightforward to spot your ideal content.
Enjoy JapaneseXXXRawHub Now
Преимущества заказа магистерской диссертации. Самый ценный и невосполнимый ресурс – это время. Часто в магистратуру идут взрослые люди, обремененные семьей и работой, не имеющие возможности потратить несколько месяцев на то, чтобы искать литературные источники, собирать эмпирические данные и писать текст диссертации написание диссертаций
ремонт телефонов в москве
Проститутки Тюмени
сео частный специалист prodvizhenie-sajtov15.ru .
target88
TARGET88: Situs Game Terbaik dan Terpercaya di Asia
Selamat datang di TARGET88! TARGET88 adalah situs game online terbesar, terbaik, dan terpercaya di Asia. Kami menawarkan berbagai macam permainan dan menyediakan deposit melalui pulsa dengan potongan terendah, serta melalui bank dan e-money.
Layanan Kami:
Live Casino: Mainkan permainan kasino secara langsung dengan dealer sungguhan dan rasakan pengalaman seperti di kasino nyata.
Sports Betting: Pasang taruhan pada acara olahraga favorit Anda dengan odds terbaik.
IDN Poker: Bergabunglah dengan ribuan pemain dan mainkan poker di level tertinggi.
Slots: Pilihan besar mesin slot dengan tingkat kemenangan tinggi.
Lotteries and Raffles: Ikuti lotere dan undian untuk menguji keberuntungan Anda.
Keunggulan TARGET88:
TARGET88 dikenal sebagai situs game gacor hari ini yang semakin dipercaya oleh banyak orang di Indonesia. Dikenal sebagai situs game online yang paling bonafide dan mudah menang, TARGET88 menawarkan pelayanan kelas satu yang memanjakan pemain seperti raja. Situs ini benar-benar memahami apa yang diinginkan oleh para pecinta game di Indonesia, memberikan pengalaman bermain yang memuaskan dan tak terlupakan.
Dengan beragam pilihan game gacor yang tersedia, TARGET88 memberikan kebebasan kepada pemain untuk memilih game sesuai preferensi mereka. Informasi mengenai game-game tersebut disediakan oleh customer service yang ahli dan ramah, memastikan pemain mendapatkan winrate terbaik dan sensasi kemenangan yang luar biasa. Pelayanan prima yang diberikan oleh TARGET88 menjadikannya situs yang sangat diminati oleh banyak pemain di Indonesia.
Keunikan TARGET88 terletak pada pelayanan customer service yang tidak hanya profesional, tetapi juga penuh perhatian. Mereka siap membantu pemain dalam mengatasi segala masalah yang mungkin dihadapi, membuat pemain merasa nyaman dan percaya diri. Tidak heran jika TARGET88 menjadi pilihan favorit para pemain yang sudah terkenal dalam komunitas game di Indonesia.
Bermain di TARGET88 memberikan pengalaman yang berbeda dan lebih mendebarkan. Situs ini selalu berusaha memberikan yang terbaik untuk para pemainnya, mulai dari tampilan situs yang menarik, pilihan game yang beragam, hingga pelayanan customer service yang selalu siap membantu. Setiap detail di situs ini dirancang untuk memberikan kepuasan maksimal kepada pemain.
Salah satu daya tarik utama TARGET88 adalah jackpot besar yang sering kali diberikan. Banyak pemain yang telah berhasil memenangkan jackpot dengan nominal yang fantastis, menambah popularitas dan daya tarik situs ini. Dengan winrate yang tinggi, setiap pemain memiliki peluang besar untuk meraih kemenangan besar dan merasakan euforia yang luar biasa.
Bagi para pemain baru, TARGET88 menawarkan berbagai bonus dan promosi yang menggiurkan. Bonus selamat datang, bonus deposit, dan berbagai promosi lainnya dirancang untuk menambah keseruan bermain. Dengan begitu, pemain baru bisa merasakan pengalaman bermain yang menyenangkan sejak pertama kali bergabung. Promosi ini juga menjadi salah satu alasan mengapa banyak pemain memilih TARGET88 sebagai situs favorit mereka.
Keamanan dan kenyamanan para pemain adalah prioritas utama di TARGET88. Sistem keamanan canggih diterapkan untuk melindungi data pribadi dan transaksi para pemain, sehingga mereka bisa fokus bermain tanpa perlu khawatir tentang keamanan akun mereka. Keamanan yang terjamin ini membuat TARGET88 semakin dipercaya oleh para pemain.
Selain itu, kecepatan dalam proses transaksi juga menjadi keunggulan TARGET88. Proses deposit dan penarikan dana dilakukan dengan cepat dan mudah, dengan berbagai metode pembayaran yang tersedia. Hal ini tentu saja menambah kenyamanan bermain di situs ini, membuat pemain bisa menikmati permainan tanpa hambatan.
Komunitas pemain di TARGET88 juga sangat aktif dan solid. Para pemain sering berbagi tips dan trik dalam bermain, sehingga setiap pemain bisa belajar dan meningkatkan peluang kemenangan mereka. Forum dan grup diskusi yang disediakan oleh TARGET88 menjadi tempat yang ideal bagi para pemain untuk berinteraksi dan bertukar informasi, menciptakan komunitas yang kuat dan saling mendukung.
Secara keseluruhan, TARGET88 memang layak disebut sebagai raja game gacor di Indonesia. Dengan berbagai keunggulan yang ditawarkan, tidak heran jika situs ini menjadi pilihan utama bagi banyak pemain game. Jadi, bagi Anda yang ingin merasakan sensasi kemenangan yang luar biasa, bergabunglah dengan TARGET88 sekarang juga dan nikmati pengalaman bermain game yang tak terlupakan.
Индивидуалки Тюмени
Slightly off topic 🙂
It so happened that my sister found an interesting man here, and recently got married ^_^
(Admin, don’t troll!!!)
Is there are handsome people here! 😉 I’m Maria, 26 years old.
I work as a model, successfull – I hope you do too! Although, if you are very good in bed, then you are out of the queue!)))
By the way, there was no sex for a long time, it is very difficult to find a decent one…
And no! I am not a prostitute! I prefer harmonious, warm and reliable relationships. I cook deliciously and not only 😉 I have a degree in marketing.
My photo:
___
Added
The photo is broken, sorry(((
Check out my blog where you’ll find lots of hot information about me:
https://coolness.su
Or write to me in telegram @Lolla_sm1_best ( start chat with your photo!!!)
Самое свежее и актуальное http://barbie-games.ru/vystavka-interpoliteh-kak-chast-raboty-gosydarstvennyh-organov-po-modernizacii-sistem-bezopasnosti-rossii
rgbet
«Аутстаффинг Рейтинг» – рейтинг агентсв, предоставляющих клиентам услуги трудоустройства и ведения документооборота по иностранным работникам в России. Помогаем бизнесу выбрать лучшего подрядчика https://outstaffing-rating.ru/
auto enclosed transport https://Autoshipping24.com .
Свежие и актуальные http://barbie-games.ru новости современной техники
Top Creative Agencies in Los Angeles and the USA
Top Creative Agencies, A-Z
WAYPOINT values transparency and being well-informed. With 4 offices around the world (UK, France, Canada, USA) and 14 years in the video game and entertainment marketing industries, we’ve worked on projects like key art for Assassin’s Creed, collector’s editions for Sony, life-size statues for Square Enix, and CG videos for Machine Zone, to name a few. Although we provide most of the services game companies need to promote themselves and/or their games we are aware that you may want to have various options to consider for your upcoming projects. That’s why we’ve compiled a list of agencies who we think highly of on a creative level.
Whether you end up working with WAYPOINT or not, don’t worry, we have you covered! Let us help you get the lay of the land. Check out the following list for a review of the top creative agencies including the services they provide. We will add to this list occasionally so feel free to send us a submission. See below to get a free creative brief template.
Driven by data, Ayzenberg is a frontline agency that prides itself on listening, creating, and sharing creative content. It’s approach fosters a relationship of trust between the agency and its clients, such as Zynga, Mattel and Facebook. Ayzenberg specializes in digital, original content, brand identification, consumer electronics, etc., carrying out projects with collaboration and innovation.
https://kupi-buket63.ru/
May I just say what a comfort to find somebody that genuinely knows what they
are discussing on the web. You definitely realize how to bring an issue to light and make it important.
More people really need to read this and
understand this side of your story. It’s surprising
you aren’t more popular since you definitely have the gift.
Also visit my page: https://abogadord.net/author/keyrussell53/
ремонт телефонов
We bring you latest Gambling News, Casino Bonuses and offers from Top Operators, Online Casino Slots Tips, Sports Betting Tips, odds etc.
https://www.jackpotbetonline.com/
Tired of reaching someone’s voicemail? It might not be you – it could be your business phone number. Thankfully, you can get a new number thanks to the power of virtual phone numbers https://www.paheliyaninhindi.in/elevate-your-whatsapp-experience-with-a-virtual-number/
Получите доступ к официальному входу на сайт pinup casino и наслаждайтесь азартными играми и бонусами от лицензированного онлайн казино.
What is Packaging Localization?
Video game packaging localization is the process of adapting video game products for different languages and cultures. It involves translating in-game text, changing artwork to better reflect the target region’s culture, or even creating entirely new cover art. Localization has been a part of the gaming industry since its early days in the 1970s when Japanese developers began localizing their games for Western audiences. WAYPOINT provides packaging localization to get your title ready for retail across all major regions including US, South America, EMEA, GCAM and beyond. We can design from scratch or take your existing design and adapt it based on requirements for these regions. Localizations include rating, SKU and barcode information, and marketing copy to name a few, taking into account labeling requirements from both 1st parties and the countries in which you plan to distribute.
Релокация в Испанию Релокация в Испанию .
Thanks for sharing your thoughts about SEO для косметической индустрии.
Regards
Here is my page: http://ask.mallaky.com/?qa=user/garza21krogh
pin-up apk
Exploring the Enigmatic World In a realm where luck intertwines with skill and strategy, a mysterious playground beckons. Here, seekers of thrills find themselves drawn into a labyrinthine landscape where fortunes can change in the blink of an eye https://educationadvisor.ru/communication/messages/forum9/topic8728/message8755/?result=new#message8755
на дом торт купить торты на заказ недорого цены
and ask about services using right English Narrow your search of the Northern Ireland escorts by the type of a girl you want to exactly what men enjoy in sex. They are cute and well-groomed women with different looks and appearance and they are all just why not try these out
Новости высоких технологий http://barbie-games.ru/category/novyie-tehnologii новинки компьютерной техники и мобильных телефонов
Свежие новости http://barbie-games.ru/bolshe-shyma-bolshe-soli технологий новинки компьютерной техники
Новости высоких технологий: новинки http://barbie-games.ru/sintez-elementov-i-iadernye-filtry компьютерной техники и мобильных телефонов
Актуальные новости техники http://barbie-games.ru/nachalo-elektronnoi-registracii-na-saite-kompleksnaia-bezopasnost-2015 и гаджетов.
Новости высоких технологий http://barbie-games.ru/ymnyi-snariad-dlia-vmf и гаджетов.
Новости высоких технологий http://barbie-games.ru/pomosh-detiam-krasnyh-stolic-sydba-koroleva новинки компьютерной техники и мобильных телефонов
Новости высоких технологий: новинки http://barbie-games.ru/delo-vsei-jizni-mendeleeva компьютерной техники и мобильных телефонов
Актуальные новости техники http://barbie-games.ru/diskyssiia-po-voprosam-trekingovyh-sistem-sostoitsia-22-maia и гаджетов.
Новости высоких технологий http://barbie-games.ru/novaia-protivokorabelnaia-raketa-smert-avianoscev и гаджетов.
Свежие новости http://barbie-games.ru/chto-meshaet-nayke-razvivatsia технологий новинки компьютерной техники
карниз для штор с электроприводом https://elektrokarniz1.ru .
Hello, everything is going perfectly here and ofcourse every one is sharing information, that’s actually fine, keep up writing.
Also visit my blog :: https://mcculloughhale89.werite.net/kak-bystro-nachat-prodvizhenie-v-dvmagic
Мечтаете об уюте и комфорте в тропическом уголке? Каждый год всё больше людей выбирают для себя постоянное место обитания в местах, где солнце светит круглый год http://www.sk-7mobile.com/bbs/board.php?bo_table=cs_review&wr_id=7886
Лизинг грузовых автомобилей может стать эффективным решением для ИП, которым необходимо расширение или обновление автопарка без значительных единовременных затрат https://pesyk.forum24.ru/?1-9-0-00000055-000-0-0-1697414023
Бесплатный доступ к онлайн курсам, тренингам и книгам. Большой выбор образовательных курсов. Скачивайте бесплатно уже сейчас Платные курсы бесплатно
Что можно приобрести в лизинг? Вы можете взять в лизинг новый легковой или грузовой автомобиль, спецтехнику от официального дилера или автомобиль любой категории с пробегом лизинг продажа автотранспорта
Лизинг автотранспорта на выгодных условиях. Приобретайте легковой, коммерческий транспорт или спецтехнику в лизинг с максимальной выгодой. Выбрать автомобиль лизинг б у автомобилей
гадание правдивое онлайн виртуальные гадания онлайн
бесплатное онлайн гадание https://gadanie-online-free.ru
bocor88
Steam aauthenticator is a option of two-step authentication on steam. It provides additional step privacy your nicknames and passwords. If this option is enabled, Steam Aauthenticator asks you for one-time passcode every time , when you login to Steam on a unfamiliar device sda steam
Лизинг оборудования для малого бизнеса. Чтобы расширить или модернизировать бизнес потребуется новое оборудование лизинг подъёмно транспортное оборудование
The Steam Guard Mobile Authenticator is a feature of the Steam Mobile App that provides an additional level of security to your Steam account download steam desktop authenticator
Лизинг авто — это аренда, по истечении срока которой транспорт становится собственностью арендатора. То есть арендатор постепенно выкупает автомобиль, которым пользуется лизинговые
What’s up, I desire to subscribe for this webpage to take most recent updates,
so where can i do it please help.
Here is my web blog … https://www.webwiki.co.uk/energy-21.ru/katalog/opn
Интерес к недвижимости на живописном острове постоянно растёт. Место это привлекает людей, мечтающих об идеальном уголке для отдыха или постоянного проживания http://mail.u-turn.kz/forums.php?m=posts&q=26366&n=last#bottom
Звуковое оборудование https://zvukovoe-oborudovanie12.ru с доставкой. Большой ассортимент звукового оборудования, доступные цены, доставка по РФ.
Прокат и аренда квадроциклов в москве и области. Красота подмосковного леса, опьяняющий, чистый воздух, драйв и адреналин ждут вас в этом квадро приключении поездка на квадроциклах в москве
Это внедорожный путеводитель, карта, на которой размещены интересные маршруты и необходимая информация для путешествий на квадроциклах и снегоходах. Вы сможете: Выбрать интересные маршруты и предварительно свершить по ним виртуальное путешествие сертификат на катание на квадроциклах
Интерес к островным приобретениям привлекает всё больше внимания. Спрос на жильё в этих местах растёт с каждым годом http://www.pravia.it/index.php?option=com_kunena&view=topic&catid=6&id=116468&Itemid=362&lang=en#588541
Водительские права категории А и В. Выгодные цены на обучение управлением автомобилем с МКПП и АКПП в автошколе обучение в автошколе цена москва
Выберите идеальную печь-камин для вашего дома, Купите печь-камин и создайте уют в доме, простой гид по выбору, Создайте атмосферу уюта с помощью печи-камина, Как выбрать печь-камин, соответствующую вашим требованиям, критерии при покупке, подборка моделей с отзывами, Выберите идеальную печь-камин для своего дома и наслаждайтесь теплом, подборка моделей с отзывами
Печь-камин для дома Печь-камин для дома .
https://www.cosmopolitan.com/es/moda/consejos-moda/a35634628/emprender-como-crear-tu-negocio-marca-moda/
Мы предлагаем вам возможность освоить искусство управления автомобилем. Здесь вы научитесь всему, что нужно для уверенного вождения https://civilpatrol.info/?q=petition/81149/kak-vybrat-podhodyashchuyu-avtoshkolu-v-kahovskoy
Китайские, японские и европейские автомобили. Поставки новых и поддержанных из Китая. Доставка до России с растаможкой и полным юридическим сопровождением машина zeekr 001 цена
Starda Casino, или как его также называют на русском — Казино Старда, представляет собой онлайн платформу для азартных игр и ставок на спорт старда сайт
https://computertalk.freeforums.net/thread/396/
https://www.cosmopolitan.com/es/moda/consejos-moda/a35634628/emprender-como-crear-tu-negocio-marca-moda/
Жизнь на острове – это не только сказка о солнце и море. Это также необходимость найти удобное и подходящее жилье http://www.altasugar.it/new/index.php?option=com_kunena&view=topic&catid=3&id=130929&Itemid=151
Рейтинг онлайн казино предоставит информацию о том, как проявил себя каждый гэмблинг-сайт за время своей работы, любому, кто интересуется сферой азартных развлечений. Эти данные полезны не только новым пользователям услуг игорных площадок интернета, но и регулярным игрокам Лучшие казино на деньги
Program bonusowy kazdego nowego kasyna online w Polsce obejmuje roznorodne promocje https://kasynadarmowespiny.pl/
https://sites.google.com/view/pinupbets7/home
Federation of Scout Associations of Spain https://scout.es/scout-academy-2017/ is a non-profit entity whose registered office is located in Lake
Bonus bez depozytu w kasynie to mozliwosc gry w gry kasynowe na prawdziwe pieniadze bez koniecznosci wplacania srodkow na konto https://kasynazbezdepozytu.pl/
производство трубных досок по чертежам изготовление трубных досок по чертежам
ทดลองเล่นสล็อต
Klasyczna gra kazdego kasyna, ktora w pelni oddaje atmosfere ryzyka, to bez watpienia ruletka online w kasynie https://ruletkagra.pl/
order birthday balloons with delivery buy balloons Dubai
Подробный справочник организаций города Астрахань. У нас вы можете найти все необходимые вам адреса и телефоны организаций. Актуальная информация Цифровой справочник Астрахани
New neural network xNude AI for undressing girls – https://xnudes.ai
娛樂城體驗金
什麼是娛樂城體驗金?
體驗金是娛樂城提供給玩家,特別是新會員的一種獎勵方式。這筆體驗金允許玩家在還未使用自己的資金進行遊戲前,先行體驗富遊娛樂城的各類遊戲。利用這筆體驗金,玩家可以熟悉遊戲規則,或嘗試新策略。
領取娛樂城體驗金常見問答FAQ
問:新註冊的玩家怎麼獲得娛樂城體驗金?
答:只需要在富遊娛樂城完成註冊,加入富遊客服,告知【我要領取體驗金】並提供【帳號】【手機號】,就可以在賬戶中獲得高達$168元的體驗金。
問:領取娛樂城體驗金有哪些限制?
答:參加資格只有新會員,每位新會員只限領一次。
問:我可以使用體驗金進行任何遊戲嗎?
答:是的,你可以使用體驗金參與富遊娛樂城的所有線上賭場遊戲。
問:娛樂城體驗金是可以提款的嗎?
答:可以的,只需完成活動流水即可進行提款。( 詳細教學 : 富遊娛樂城如何出金/提款? )
問:我在領取娛樂城優惠時遇到問題怎麼辦?
答:如果你在遊戲中遇到任何問題或困難,可以隨時聯繫富遊娛樂城的客戶服務,我們將隨時為你提供協助。
קפריסין
קפריסין
קפריסין
למה ישראלים אוהבים את קפריסין?
זה לא במקרה.
הקרבה הגיאוגרפית, האקלים הדומה והתרבות הים תיכונית המשותפת יוצרים חיבור טבעי.
הטיסות הקצרות מישראל לקפריסין מקלות על הנגישות. שנית, היחסים הטובים בין המדינות מוסיפים לתחושת הביטחון והנוחות. כתוצאה מכך, קפריסין הפכה ליעד מזמין במיוחד עבור ישראלים. שילוב גורמים אלה תורם
Навес для машины под ключ
I just could not leave your website prior to suggesting that I extremely loved the standard information a person supply on your visitors?
Is gonna be back often in order to inspect new posts
My blog – traduzione slides
Wygrywaj z 21 w blackjacku, tworz zwycieskie uklady w pokerze, stawiaj zaklady w kasynie na zywo i baw sie przy najlepszych grach online w kasynie na zywo https://grakasynonazywo.pl/
трубная решетка теплообменного аппарата трубная решетка теплообменника
Great information. Lucky me I recently found your website by chance (stumbleupon).
I’ve book-marked it for later!
my web site https://site-7799238-1156-9316.mystrikingly.com/blog/auslander-expert
什麼是娛樂城體驗金?
體驗金是娛樂城提供給玩家,特別是新會員的一種獎勵方式。這筆體驗金允許玩家在還未使用自己的資金進行遊戲前,先行體驗富遊娛樂城的各類遊戲。利用這筆體驗金,玩家可以熟悉遊戲規則,或嘗試新策略。
領取娛樂城體驗金常見問答FAQ
問:新註冊的玩家怎麼獲得娛樂城體驗金?
答:只需要在富遊娛樂城完成註冊,加入富遊客服,告知【我要領取體驗金】並提供【帳號】【手機號】,就可以在賬戶中獲得高達$168元的體驗金。
問:領取娛樂城體驗金有哪些限制?
答:參加資格只有新會員,每位新會員只限領一次。
問:我可以使用體驗金進行任何遊戲嗎?
答:是的,你可以使用體驗金參與富遊娛樂城的所有線上賭場遊戲。
問:娛樂城體驗金是可以提款的嗎?
答:可以的,只需完成活動流水即可進行提款。( 詳細教學 : 富遊娛樂城如何出金/提款? )
問:我在領取娛樂城優惠時遇到問題怎麼辦?
答:如果你在遊戲中遇到任何問題或困難,可以隨時聯繫富遊娛樂城的客戶服務,我們將隨時為你提供協助。
https://www.glamour.es/moda/tendencias/articulos/bolso-bombonera-tendencia-invierno-croixet/55040
什麼是娛樂城體驗金?
體驗金是娛樂城提供給玩家,特別是新會員的一種獎勵方式。這筆體驗金允許玩家在還未使用自己的資金進行遊戲前,先行體驗富遊娛樂城的各類遊戲。利用這筆體驗金,玩家可以熟悉遊戲規則,或嘗試新策略。
領取娛樂城體驗金常見問答FAQ
問:新註冊的玩家怎麼獲得娛樂城體驗金?
答:只需要在富遊娛樂城完成註冊,加入富遊客服,告知【我要領取體驗金】並提供【帳號】【手機號】,就可以在賬戶中獲得高達$168元的體驗金。
問:領取娛樂城體驗金有哪些限制?
答:參加資格只有新會員,每位新會員只限領一次。
問:我可以使用體驗金進行任何遊戲嗎?
答:是的,你可以使用體驗金參與富遊娛樂城的所有線上賭場遊戲。
問:娛樂城體驗金是可以提款的嗎?
答:可以的,只需完成活動流水即可進行提款。( 詳細教學 : 富遊娛樂城如何出金/提款? )
問:我在領取娛樂城優惠時遇到問題怎麼辦?
答:如果你在遊戲中遇到任何問題或困難,可以隨時聯繫富遊娛樂城的客戶服務,我們將隨時為你提供協助。
https://cometa-cas47.ru
Start winning today, get a no deposit gift or free spins of your choice. Only the top best bonuses!
꽁머니사이트
메이저사이트를 검증하는 방법에는 여러 가지가 있습니다.
대표적으로는 먹튀검증사이트나 커뮤니티를 활용하는 방법이 있습니다. 검증사이트는 플레이어들의 신고를 받아 사이트의 문제점을 파악하고 이를 해결하는 역할을 합니다.
커뮤니티에서는 다른 플레이어들의 리뷰와 경험을 참고하여 메이저사이트의 안전성을 판단할 수 있습니다. 이를 통해 사용자들은 먹튀 걱정 없이 게임을 즐기고 베팅을 할 수 있습니다.
스포츠토토를 집에서 편리하게 즐기며 재테크를 할 수 있는 환경을 제공합니다.
보증업체가 사용자들에게 빠른 지원을 제공하고 사용자 질문 및 문제에 신속하게 대응하는지 확인해야 합니다.
지역 규제 및 법률 준수 여부는 메이저사이트의 중요한 요소입니다. 이는 사용자들의 베팅과 게임 활동이 합법적이고 안전한지를 확인하는 기준이 됩니다.
또한, 모바일 사용이 증가함에 따라 메이저사이트의 모바일 플랫폼 호환성을 확인하는 것이 중요합니다. 휴대폰 앱이나 모바일 웹 버전을 제공하는지 확인해야 합니다.
마지막으로, 메이저사이트의 웹사이트나 앱이 얼마나 편리하고 사용자 친화적인지 확인하는 것이 중요합니다
https://cyberinfo.live/crypto-wallet-draining-attacks/
Профессиональная химчистка ковра или ковролина по разумной цене. Оперативный выезд, быстрая сушка pram dry cleaning
10 大線上娛樂城推薦排行|線上賭場評價實測一次看!
對於一般的玩家來說,選擇一家可靠的線上賭場可說是至關重要的。今天,我們將分享十家最新娛樂城評價及實測的體驗,全面分析他們的優缺點,並給出線上娛樂城推薦排行名單,旨在幫助玩家避免陷入詐騙網站的風險,確保玩家選擇一個安全可靠的娛樂城平台!
1. 富遊娛樂城
評分:★★★★★/5.0分
富遊娛樂城在所有評分裡的綜合評分是最高的,不僅遊戲豐富多元,而且優惠好禮也一直不斷的再推出,深獲許多玩家的喜愛,是一間值得推薦的線上娛樂城。
2. 九州娛樂城
評分:★★★★☆/4.7分
九州娛樂城在綜合評分上也獲得了不錯的表現,遊戲豐富、系統多元讓玩有玩不完的遊戲選擇,但是唯一扣分的地方在於九州娛樂城曾被踢爆在遊玩後收到傳票,但總體來看還是一間不錯的娛樂城。
3. LEO 娛樂城
評分:★★★★☆/4.3分
LEO 娛樂城是九州娛樂城旗下的子品牌,其中的系統與遊戲可以說與九州娛樂城一模一樣,但是還是一樣的老問題,希望遊玩後不要收到傳票,不然真的是一間不錯的娛樂城品牌。
https://www.glamour.es/moda/tendencias/articulos/bolso-bombonera-tendencia-invierno-croixet/55040
10 大線上娛樂城推薦排行|線上賭場評價實測一次看!
對於一般的玩家來說,選擇一家可靠的線上賭場可說是至關重要的。今天,我們將分享十家最新娛樂城評價及實測的體驗,全面分析他們的優缺點,並給出線上娛樂城推薦排行名單,旨在幫助玩家避免陷入詐騙網站的風險,確保玩家選擇一個安全可靠的娛樂城平台!
1. 富遊娛樂城
評分:★★★★★/5.0分
富遊娛樂城在所有評分裡的綜合評分是最高的,不僅遊戲豐富多元,而且優惠好禮也一直不斷的再推出,深獲許多玩家的喜愛,是一間值得推薦的線上娛樂城。
2. 九州娛樂城
評分:★★★★☆/4.7分
九州娛樂城在綜合評分上也獲得了不錯的表現,遊戲豐富、系統多元讓玩有玩不完的遊戲選擇,但是唯一扣分的地方在於九州娛樂城曾被踢爆在遊玩後收到傳票,但總體來看還是一間不錯的娛樂城。
3. LEO 娛樂城
評分:★★★★☆/4.3分
LEO 娛樂城是九州娛樂城旗下的子品牌,其中的系統與遊戲可以說與九州娛樂城一模一樣,但是還是一樣的老問題,希望遊玩後不要收到傳票,不然真的是一間不錯的娛樂城品牌。
Изделия без маркировки изготовителя либо с маркировкой запрещающей аквачистку, принимаются в чистку только с согласия Клиента и обрабатываются по существующим технологиям, без претензий к качеству и товарному виду изделия rug cleaning spb
Federation of Scout Associations of Spain https://scout.es/scout-academy-2017 is a non-profit entity whose registered office is located in Lake
A collection of 18-25-year olds from around the UK https://www.scouts.org.uk/volunteers/running-things-locally/recruiting-and-managing-volunteers/role-descriptions/uk-rep-pool/ who are trained to represent the UK Scouts at events in the UK and abroad.
грузовой лифт подъемник купить https://gruzovye-podemniki-zakazat.ru
грузовая платформа подъемник купить шахтный грузовой подъемник
10 大線上娛樂城推薦排行|線上賭場評價實測一次看!
對於一般的玩家來說,選擇一家可靠的線上賭場可說是至關重要的。今天,我們將分享十家最新娛樂城評價及實測的體驗,全面分析他們的優缺點,並給出線上娛樂城推薦排行名單,旨在幫助玩家避免陷入詐騙網站的風險,確保玩家選擇一個安全可靠的娛樂城平台!
1. 富遊娛樂城
評分:★★★★★/5.0分
富遊娛樂城在所有評分裡的綜合評分是最高的,不僅遊戲豐富多元,而且優惠好禮也一直不斷的再推出,深獲許多玩家的喜愛,是一間值得推薦的線上娛樂城。
2. 九州娛樂城
評分:★★★★☆/4.7分
九州娛樂城在綜合評分上也獲得了不錯的表現,遊戲豐富、系統多元讓玩有玩不完的遊戲選擇,但是唯一扣分的地方在於九州娛樂城曾被踢爆在遊玩後收到傳票,但總體來看還是一間不錯的娛樂城。
3. LEO 娛樂城
評分:★★★★☆/4.3分
LEO 娛樂城是九州娛樂城旗下的子品牌,其中的系統與遊戲可以說與九州娛樂城一模一樣,但是還是一樣的老問題,希望遊玩後不要收到傳票,不然真的是一間不錯的娛樂城品牌。
Китайские марки автомобилей список, история и подробное описание популярных китайских авто. Рассказываем о плюсах и минусах lixiang l9 купить
Если вы переезжаете, делаете ремонт или не знаете, куда девать несезонное имущество, то аренда склада для хранения вещей решит проблему. Оказываем услуги физическим лицам, предпринимателям и организациям услуги временного хранения вещей
такси город новочеркасск номер такси
стоимость такси номер такси шахты
вызвать такси шахты номер шахты стоимость такси
aml проверка usdt 82
AML-проверка AML либо же какой-либо сервисный инструмент подобрать.
Показывает вам общую последовательность ваших цифровых активов. Показывает на каких именно торговых платформах возможны сложности при внесении финансов. Также показывает вам где именно трансфер будет защищён. Один из лучших сервисов для оценки. Стоит в районе 1 доллар США. Сообщает вам самим торговые площадки в каких существуют сложности (блокирование) к тому же показывает биржи куда можно заводить крипту. Чрезвычайно полезный инструмент, что позволит сберечь свои финансы и время, что вы могли бы потратить на взаимодействие с саппортом, показывая, что вы вы не связаны с терроризмом.
такси город новочеркасск заказ такси новочеркасск
телефон такси номер такси город
вызвать такси в шахтах https://taxi-shahty.ru
номер телефона такси заказ такси шахты
get generic theo 24 cr for sale
Заказать алкоголь с доставкой на дом в Раменском и Раменском районе. Мы работаем круглосуточно 24 часа. Доставка ночью от 20 минут https://wineramenskoe.ru
Заказать такси https://taxi-gukovo.ru эконом в Гуково дешево с отзывами, ценами и телефонами, онлайн заказ.
http://chatbot-plus.com/
Russkie DJ
how to buy finasteride tablets
Купон за 2р. предоставляет скидку до 25% на абонементы в сеть фитнес-клубов «Комета». Купон придет на вашу электронную почту и в личный кабинет https://t.me/promokod_kometa
Wow, incredible weblog structure! How lengthy have you been blogging for?
you made blogging glance easy. The whole look of your site is great, as well as the content!
Here is my webpage: https://telegra.ph/Kak-dolgo-sohranyayutsya-rezultaty-SEO-prodvizheniya-08-07-3
https://ekostil-salon.ru/
how to get tegretol tablets
индийский пасьянс онлайн бесплатно индийский пасьянс онлайн бесплатно .
Every business needs to select the right social media in this digital era. There are so many of them that it becomes tough sometimes to pick and choose what will work best for your marketing effect http://jobhop.co.uk/blog/fgmedia/the-ultimate-guide-to-youtube-promotion-subscribers-likes-and-views
where can i buy cipro for sale
карниз с электроприводом карниз с электроприводом .
вывод из запоя круглосуточно ростов-на-дону вывод из запоя круглосуточно ростов-на-дону .
Kraken – это innovative platform, где скрытность и защита данных становятся foundation онлайн-жизни. Название “Kraken” ассоциируется с разнообразием ресурсов и technological breakthroughs. Эта network предлагает доступ к миру digital freedom, где rules традиционных сетей теряют свою силу.
ссылка Kraken
Ищете, где купить стильный и удобный женский бюстгальтер? Наш интернет-магазин предлагает огромный ассортимент лифчиков, которые подчеркнут вашу индивидуальность и обеспечат максимальный комфорт.
Выбирая бюстгальтеры у нас, вы найдете модели на любой вкус и размер. В каталоге представлены классические бюстгальтеры с косточками, удобные спортивные лифчики, нежные кружевные варианты и модели для особых случаев. Мы предлагаем продукцию только от проверенных брендов, которые гарантируют качество и долговечность изделий бюстгальтер без косточек
вывод из запоя недорого ростов http://www.vyvod-iz-zapoya-rostov11.ru .
Для успешной игры важно учитывать несколько ключевых факторов. Изучите правила, понимание которых поможет вам избежать распространённых ошибок. Не забывайте, что каждый игровой опыт уникален, и не стоит полагаться исключительно на удачу http://jung24express.com/bbs/board.php?bo_table=review&wr_id=120568
сео продвижение сайтов https://process-seo.ru
seo оптимизация сайта https://process-seo.ru
поисковая оптимизация https://process-seo.ru
富遊娛樂城體驗金使用規則與遊戲攻略
在富遊娛樂城,體驗金為新會員提供了一個絕佳的機會,讓你能夠在不冒任何財務風險的情況下,體驗多種精彩的賭場遊戲。然而,要將這些體驗金轉換成可提現的現金,需要達到一定的投注流水條件。
體驗金使用規則
活動贈點: 新註冊會員可獲得168元體驗金。
活動流水: 未儲值前需達成36倍的投注流水,儲值後僅需1倍流水即可申請提款。
參加資格: 每位新會員限領一次體驗金。
申請方式: 只需加入富遊客服官方LINE,即可領取體驗金。
遊戲推薦與最佳利用體驗金
百家樂: 這是體驗金玩家的首選,最低投注額僅需20元,讓你能在多次投注中累積流水,達到提款要求。
彩票彩球: 超低投注門檻(1至10元)讓你在體驗的同時,也有機會贏得大獎。
運彩投注: 用100元體驗金來預測賽事結果,不僅享受觀賽的刺激,還有機會贏得獎金。
棋牌遊戲: 最低投注額僅需1元,適合喜愛棋牌遊戲的玩家。
電子老虎機: 只需0.2至1元的投注額,即可輕鬆轉出驚喜獎金。
為何選擇富遊娛樂城?
安全至上: 採用先進的加密技術,確保個人資訊與資金的安全。
遊戲多元: 提供豐富的遊戲選擇,包括老虎機、百家樂、撲克、彩票、運彩等。
貼心客服: 專業客服團隊24小時在線,隨時解決你的問題。
獨家APP: 隨時隨地都能玩,娛樂不間斷。
富遊娛樂城專注於提供公平的遊戲環境,所有遊戲結果均由隨機數字產生器決定,保障每位玩家的公平性。同時,透過富遊APP,玩家可隨時隨地享受多種經典賭場遊戲。
結語
無論你是新手還是老玩家,富遊娛樂城的體驗金活動都能讓你在享受遊戲的同時,體驗到賭場的刺激與樂趣。立即註冊,領取你的168元體驗金,開始你的遊戲之旅吧!
продвижение по трафику https://process-seo.ru
Услуга по ароматизации и удалению запахов с помощью сухого тумана может быть полезна в различных ситуациях усунення запаху котячої сечі в квартирі
Mostbet — O‘zbekistondagi mashhur bukmekerlik kompaniyasi va kazino bo‘lib, uning rasmiy sayti Kyurakao litsenziyasiga ega. U qimor o‘yinlari va sport tikish imkoniyatlarini qonuniy ravishda taqdim etadi. O’yinchilar uchun turli xil to’lov usullari, shu jumladan kriptovalyutalar ham mavjud. Sayt, shuningdek, foydalanuvchilar uchun qulay bonuslar, tezkor mijozlarni qo‘llab-quvvatlash va mobil ilovalarni taklif qiladi Mostbet
ремонт телефонов айфон в москве
Если вас беспокоит как смотреть ютуб без лагов 2024, наш подход может помочь решить эти проблемы. Многие пользователи в России столкнулись с ограничениями доступа к YouTube. Мы предлагаем надежные решения, которые помогут вам обойти замедление YouTuba, обеспечивая бесперебойный доступ к вашим любимым видео. Наши рекомендации включают использование VPN, прокси-сервисов, изменение DNS и многое другое. Это не только помогает смотреть YouTube без лагов 2024, но и повышает вашу онлайн-безопасность, шифруя ваши данные. Мы сотрудничаем с профессионалами IT-отрасли, которые делятся своим опытом и полезными рекомендациями использованию данных технологий. Читайте наши материалы на тему https://www.jigsawplanet.com/nerabotaetyoutube и получите доступ к YouTube без ограничений и высокой скоростью просмотра.
Как правильно провести ремонт кофемашин в Москве?
сервисные центры по обслуживанию кофемашин сервисный центр кофемашин москва .
Натяжные потолки в Москве
One of the best ways to improve your reaction time in online games is to practice regularly. The more you play, the more familiar you will become with the game mechanics and the faster your reactions will be https://diigo.com/0x5dkd
Натяжные потолки в Москве
В world of Kraken ваша безопасность и anonymity are in focus. Эта онлайн-площадка guarantees convenient access к различным ресурсам, которые ensure complete secrecy. Здесь стандартные ограничения не имеют силы, что allows you свободно взаимодействовать internet services.
ссылка Kraken
мастер по ремонту телефонов
Натяжные потолки цена
Натяжные потолки цена
Ozbekistan’?n en tan?nm?s bahis sirketi ve casinolardan biri olan Mostbet’in resmi web sitesi Curacao lisans? ile faaliyet gostermektedir. Yasal olarak kumar oyunlar? ve spor bahisleri imkan? sunar. Oyuncular cesitli odeme yontemleri, kripto para birimleri ile odeme yapma imkan?na sahiptir. Site, kullan?c?lar?n rahatl?g? icin bonuslar, h?zl? musteri destegi ve mobil uygulamalar sunmaktad?r Mostbet login
https://namazit.ru/
https://spasemdetey.ru/bonusy-ot-populyarnyh-kazino-dlya-igry-besplatno/
Получайте выгодные предложения для новых и постоянных игроков. Ощутите волнение и атмосферу азартных игр с лучшими условиями и высокими шансами на успех. Создайте свою удачу с бонусами от проверенных и надежных игровых площадок.
Мы предоставляем полный спектр услуг от А до Я, связанных с ремонтом и обслуживанием современных металлопластиковых, деревянных и алюминиевых окон, а так же предоставляем гарантию на все виды работ. По окончанию ремонтных работ выполним уборку Ремонт окон – оконный мастер Кунцевская
https://upmoney.top/?ref=46644 ссылка на реальный пассивный заработок,прога реально платит сам лично проверял,заходи и приводи друзей,не пожалеешь!
ทดลаёаё‡а№ЂаёҐа№€аё™аёЄаёҐа№‡аёаё• pg
Что такое СЕО продвижение сайтов. Продвижение сайта в поисковых системах – это успех бизнеса и его ежедневное развитие. Профессионально настраиваем, ведем и развиваем рекламные кампании в яндекс: ваш сайт 100% заметят продвижение сайтов москва недорого
сервис по ремонту фотоаппаратов
Натяжные потолки фото
Я – частный web-мастер по созданию, продвижению, администрированию и дальнейшей раскрутке сайтов. Как частный вебмастер, с 2009 года занимаюсь созданием, продвижением, администрированием, обучением созданию и продвижению сайтов директолог москва
Натяжные потолки фото
Официальный сайт Vavada предлагает пользователям доступ к лучшим игровым автоматам, живому казино и щедрым бонусам. На сайте вас ждут удобный интерфейс, безопасность и круглосуточная поддержка. Начните свое приключение в мире азартных игр с официального сайта Vavada!
Вавада рабочее vavada
https://ddos.market
Vavada top — это не просто казино, это ведущая платформа для азартных игр в интернете. Здесь собраны игры от лучших провайдеров, предлагаются эксклюзивные бонусы и проводятся регулярные турниры. Vavada top гарантирует своим пользователям незабываемые эмоции и крупные выигрыши!
Vavada com зеркало на сегодня
target 88
viiyong electronic technology
На сайте Vavada вы всегда найдете актуальные новости и обновления. Сегодня Vavada предлагает своим пользователям новые бонусы, эксклюзивные акции и возможность участвовать в захватывающих турнирах. Оставайтесь в курсе последних событий вместе с Vavada!
Официальное зеркало vavada
Натяжные потолки
Натяжные потолки
Multi-platform desktop version of the authenticator, replacing the mobile app steam sda steam
Список сертифицированных автосервисов на карте по ремонту автомобилей, обслуживанию и диагностике Выберите ближайший автосервис автосервисы рядом на карте
Список бонусов казино https://spasemdetey.ru/spisok-bonusov/
Получите увлекательные вознаграждения при регистрации, депозите и игре. Уникальные предложения для новичков и постоянных игроков. Забирайте свои выигрыши и наслаждайтесь игрой.
rollbit coupon code 2024
As the leading online betting site, MostBet has quickly gained significant popularity among islanders mostbet app download
https://101-diplom.top/
ремонт айфона на дому в москве
Теневой интернет, скрытая сегмент всемирной сети, прославлен с имеющимися черными рынками, на которых предлагаются объекты и услуги, которые невозможно приобрести официально.
Одним аналогичных предложений являются карты с балансом, которые доступны злоумышленниками за стоимость, значительно меньшие их реальной цены покупки.
Для ряда пользователей, стремящихся быстро получить прибыль, идея получить карту с остатком в даркнете может выглядеть интересной.
Вместе с тем за данными покупками присутствуют серьезные опасности и нормативные итоги, про которые очень важно знать.
Каким путём функционируют объявления о продаже по получению платёжных карт с денежными средствами?
На подпольном рынке доступны множество предложений по продаже карт с балансом. Такие пластиковые карты являются в форме предоплаченными, равно как и привязанными к банковским счетам, и на этих картах, по заявлениям, заранее аккумулированы деньги
Чаще всего реализаторы декларируют, будто бы платёжная карта содержит определенную количество, что именно допустимо расходовать в качестве оплаты товаров и услуг или снятия денег из банкоматов.
Расценка на данные банковские карты может варьироваться в зависимости по указанного суммы денег а также вида пластиковой карты. Как пример, пластиковую карту с денежными средствами $5000 имеют возможность продавать по цене $500, что и заметно дешевле номинальной стоимости.
Даркнет, сокрытая часть глобальной сети, известен с их подпольными рынками, где предлагаются товары и работы, что именно не удастся приобрести официально.
Одним из таких предложений представляют карты с остатком, что предлагаются мошенниками по ценам, намного более ниже их реальной цены покупки.
Среди ряда клиентов, заинтересованных в быстро стать богатыми, предложение достать пластиковую карту с деньгами на подпольном рынке может восприниматься заманчивой.
Однако за подобными операциями скрываются значительные проблемы и юридические последствия, про которые очень важно знать.
Как осуществляются объявления о продаже по приобретению банковских карт с балансом?
На нелегальном рынке предлагаются множество предложений по продаже карт с деньгами. Подобные карты бывают в форме предоплаченными, одновременно ассоциированными с банковскими счетами, и где, как сообщается, заранее внесены деньги.
Типично реализаторы сообщают, что карта имеет определенную сумму, что именно можно расходовать в качестве покупок или снятия денежных средств из денежных средств в банкоматах.
Цена на такие карты может быть разной в соответствии с от объявленного суммы денег и с вида платёжной карты. Так, карту с остатком $5000 имеют возможность предлагать по стоимости $500, что намного ниже реальной стоимости.
Предложения о продаже по достанию таких карт обычно дополнены “гарантиями” со стороны реализаторов, которые ими декларируют, что фактически банковская карта обязательно будет функционировать, и при этом дают содействие при возникновении проявления неполадок. Однако фактически данные “”обещания” немногое стоят на просторах подпольного рынка, где покупки заключаются конфиденциально, а также потребитель в действительности абсолютно ничем не защищен.
Объявления о продаже о покупке подобных платёжных карт зачастую включают “”обещаниями” от источников, которые ими сообщают, якобы карта точно окажется показывать работоспособность, и гарантируют содействие при наступления проблем. Однако фактически такие “”обещания” мало что ценность в контексте подпольного рынка, на котором транзакции осуществляются скрыто, при этом покупатель фактически никак не защищен.
Multiple authenticator apps are available depending on your device type. Some of the popular Authenticator apps are: steam desktop authenticator github steam desktop authenticator гитхаб
ремонт телевизоров недорого
rollbit coupon code
Анонимная сеть, давно приобрел репутацию популярен как точка, в которой дозволено получить практически любые изделия наряду с предложения, в том числе те, что присутствуют за рамками рамками легальности.
Главным примером таких незаконных предложений является способность приобрести удостоверения категории “В” в соответствии с международной типологии — категория “В”).
Огромное число индивидуумов, желающие обойти стандартных аттестаций или обойти стороной предписания, изучают возможность купить права класса “В” на территории анонимной сети.
При этом схожая приобретение сопровождается посредством многими опасностями вместе с законодательными итогами, могущие превратиться существенно тяжелее, в отличие от ординарная безрезультатная операция.
Our betting software is also among the best on the market, with a vast selection of markets and competitive odds. Mostbet company details showcase our dedication to providing you with the best gaming experience, backed by safe and reliable software. Mostbet is the premier gambling and bookie site in India, supplying a wide diversity of games and services to your customers most bet
Даркнет, сокрытая сегмент онлайн-пространства, популярен с их черными рынками, на которых имеются услуги и сервисы, что невозможно купить легальным путем.
Одним из подобных предложений выступают пластиковые карты с деньгами, что именно выставляются на продажу злоумышленниками по тарифам, намного дешевле их фактической цены покупки.
Для ряда потребителей, заинтересованных в быстро обогатиться, предложение приобрести пластиковую карту с денежными средствами на нелегальном рынке может выглядеть заманчивой.
Но за данными покупками присутствуют большие риски и юридические последствия, о которых необходимо иметь представление.
Как действуют предложения о продаже по достанию пластиковых карт с денежными средствами?
В даркнете имеются множество различных объявлений о продаже о продаже пластиковых карт с деньгами. Подобные банковские карты представляют собой например предоплаченными, а также привязанными к счетам в банках, и на этих картах, как сообщается, ранее внесены деньги.
Обычно источники заявляют, будто платёжная карта обладает конкретную объём, которые возможно расходовать в целях совершения покупок а также снятия денежных средств с использованием банкоматов.
Расценка на подобные пластиковые карты может варьироваться в соответствии с по объявленного баланса и с разновидности пластиковой карты. Как пример, пластиковую карту с остатком $5000 имеют возможность предложить за $500, что это заметно менее номинальной стоимости.
Испытываете трудности с просмотром YouTube? У нас есть решения! В статье по ссылке вы узнаете, как выбрать впн для просмотра ютуба и вернуть доступ к вашим любимым видео на YouTube!Воспользуйтесь советами технического специалиста для решения проблемы блокировки ютуб и верните доступ к сайту.
The mainstays of therapy are surgery, radiation therapy, and chemotherapy. Many tumor types require a combination of treatment methods for optimal tumor control mostbet.net.pk cancer patients
Студия оказывает полный комплекс работ по созданию и продвижению лендинг пейдж. Предлагаем большой выбор продающих уникальных и шаблонных дизайнов лендинга лендинг пейдж разработка
ремонт сотовых телефонов
Испытываете трудности с просмотром YouTube? У нас есть решения! В статье по ссылке вы узнаете способы как избежать замедления ютуба и вернуть возможность к вашим любимым видео на YouTube!Используйте советами технического специалиста для решения проблемы ограничений ютуб и восстановите доступ.
Натяжные потолки на кухню
Натяжные потолки на кухню
The Steam Guard Mobile Authenticator is a feature of the Steam Mobile App that provides an additional level of security to your Steam account steam authenticator
Если вас беспокоит как смотреть ютуб без лагов 2024, наш подход может помочь решить эти проблемы. Многие пользователи в России столкнулись с ограничениями доступа к YouTube. Мы предлагаем надежные решения, которые помогут вам обойти замедление YouTuba, обеспечивая бесперебойный доступ к вашим любимым видео. Наши рекомендации включают использование VPN, прокси-сервисов, изменение DNS и многое другое. Это не только помогает смотреть YouTube без лагов 2024, но и повышает вашу онлайн-безопасность, шифруя ваши данные. Мы сотрудничаем с экспертами в области интернет-безопасности, которые делятся своим опытом и практическими советами использованию данных технологий. Читайте наши материалы на тему замедление ютуба в россии и получите доступ к YouTube без ограничений и высокой скоростью просмотра.
Some people with cancer will have only one treatment. But most people have a combination of treatments, such as surgery with chemotherapy and/or radiation therapy Types of Cancer Treatment
Deepnude AI can change any photos to naked photos in a few clicks. Check more Deepnude AI free tools to create deepnude photos.
Mostbet is the best cricket betting app in Pakistan and an ideal platform for enthusiasts as it offers numerous promotions and bonuses male anal sex
Печать фотографий осуществляется на матовой или глянцевой фотобумаге, формат фотографий – 10×13 см. Такие фотографии можно подарить любимым и друзьям на память печать фото на дереве москва
Steam Desktop Authenticator is your personal guard for your Steam account, offering an increased level of security and convenience. Steam Desktop Authenticator. Desktop version of the Steam authentication mobile app steam authenticator
Секреты выбора лучшего генератора Generac, как выбрать генератора Generac.
Генератор Generac: особенности и преимущества, подробный обзор генератора Generac.
Использование генератора Generac для обеспечения надежной работы электроприборов, подробный обзор.
Надежные генераторы Generac для вашего дома, рассмотрение функционала.
Генератор Generac: надежность и долговечность, обзор.
Как выбрать генератор Generac для дома, рекомендации по выбору.
Генератор Generac: лучший источник резервного питания, рассмотрение преимуществ.
Секреты правильного выбора генератора Generac, подробный обзор.
Генератор Generac для обеспечения непрерывного электроснабжения, советы по установке.
Энергия в вашем доме: генераторы Generac, характеристики.
генератора generac генератора generac .
Мастерская занимается восстановлением электронной части ABS. ABS является вспомогательной тормозной системой. Вследствие чего является одной из важнейших систем ремонт автомобилей
казино либет leebet casino
leebet казино либет
Dưới đây là văn bản với các từ được thay thế bằng các cụm từ đề xuất (các từ đồng nghĩa) được đặt trong dấu ngoặc nhọn :
Nổi bật 10 Đơn vị tổ chức Uy tín Hiện nay (08/2024)
Cá cược qua mạng đã thành một phong cách rất thông dụng tại Việt, và việc chọn ra nhà cái đáng tin cậy là điều cực kỳ cần thiết để đảm đương kinh nghiệm đánh bạc đảm bảo và công bằng. Phía dưới là danh sách 10 ông lớn nhà cái uy tín nhất hiện nay, được thu thập bởi trang đánh giá hàng đầu Top 10 Việt Nam.
ST666 nhận định là một trong những nhà cái lớn cùng với uy tín nhất hiện nay. Cùng với hỗ trợ người sử dụng chuyên nghiệp, phục vụ quanh ngày cùng các gói khuyến mãi đặc sắc giống như ưu đãi 110% khi gửi tiền lần ban đầu, nó quả quyết là tuyển chọn tốt nhất đối với người tham gia.
RGBET vượt trội kèm theo ưu đãi cam kết thua lỗ thể thao tới 28,888K, bên cạnh hoàn lại slot 2% hàng ngày. RGBET đại diện cho lựa chọn tuyệt vời cho tất cả mê mẩn chơi game thể thao và máy đánh bạc.
KUBET được biết đến bên cạnh công nghệ an ninh vượt trội và nền tảng riêng, hỗ trợ bảo vệ tuyệt đối dữ liệu người sử dụng. Nhà cái này cung cấp đa dạng dịch vụ khuyến mãi hấp dẫn như thể gửi tiền lần thứ hai, khuyến mãi 50%.
BET365 tượng trưng cho nhà cái đánh bạc thể thao số 1 trên Châu Á, nổi bật hơn kèm theo các odds châu Á, tài xỉu và trực tuyến thể thao. Đây đại diện cho tuyển chọn lý tưởng cho những người mê mẩn đặt cược thể thao.
FUN88 không chỉ cung cấp tỷ suất trao hấp dẫn mà còn cung cấp nhiều chương trình ưu đãi đặc biệt tương tự như thưởng 108K Freebet và mã cược thể thao SABA tới 10,888K.
New88 thu hút được người tham gia kèm theo các ưu đãi khuyến khích hấp dẫn giống như bồi thường 2% vô hạn và mưa quà tặng hàng ngày. Chúng là một trong những cái nhà cái đương nhận được đa dạng sự chăm sóc đến từ cộng đồng đặt cược.
AE888 nổi bật hơn với chương trình thưởng 120% lần đầu tạo tài khoản đá gà
Vâng, tôi sẽ tiếp tục từ đoạn cuối của văn bản:
AE888 nổi bật hơn bên cạnh chương trình ưu đãi 120% lần ban đầu gửi tiền trận gà và các ưu đãi khuyến khích hấp dẫn nhất khác biệt. Chúng là nhà cái chuyên dụng cung cấp khu vực SV388.
FI88 thu hút người sử dụng cùng với tỷ lệ hoàn lại ưu việt cùng với các gói tặng ký quỹ đặc sắc. Chúng tượng trưng cho tuyển chọn hoàn hảo cho mọi người mê mẩn casino trực tuyến và game slot.
F8BET nổi bật hơn cùng với gói thưởng tạo tài khoản khởi đầu lên đến 8,888,888 VNĐ kèm theo bên cạnh nhà quản lý hoa hồng 60%. Nó là nhà cái đáng tin cậy đối với những ai muốn thu lợi bằng cá cược online.
FB88 là một trong một trong những nhà cái đáng tin hàng đầu hiện nay bên cạnh các chương trình ưu đãi hấp dẫn nhất tương tự như hoàn trả cược liên tiếp 100% và thưởng 150% nếu tham gia khu vực nổ hũ.
5 Tiêu Chí Đánh Giá Nhà Cái Uy Tín
Các trò chơi ưu việt: Được đưa ra cung cấp bởi các đơn vị phát triển nổi tiếng, đảm đương kết cục ngẫu nhiên và không tồn tại sự ảnh hưởng.
Dịch vụ hỗ trợ khách hàng: Đoàn hỗ trợ khách hàng vượt trội, trợ giúp liên tục sử dụng đầy đủ kênh thông tin.
Thưởng hấp dẫn nhất: Tỷ suất trao đặc sắc và thuận tiện thực hiện, nhanh chóng rút vốn.
Bảo vệ đảm bảo: Hệ thống bảo vệ hiện đại, đảm bảo bảo đảm dữ liệu người tham gia.
Chống gian lận: Áp dụng chiến lược chống gian lận chi tiết, giữ gìn tài sản khách hàng.
Nếu bạn đang có các vài thắc mắc về trải nghiệm đánh bạc, hãy xem xét chương FAQ của Trang web uy tín hàng đầu để tìm hiểu sâu sắc hơn liên quan đến các nhà cái cùng với sản phẩm do họ cung cấp.
leebet официальный сайт lee bet
Проекты домов с коммуникациями и отделкой – доступные цены и отличные планировки. Строительство дома с коммуникациями и отделкой под ключ в Ярославле и Ярославской области https://stroy-dom-yar.ru/
даркнет тг
Эволюция мессенджеров, таких как ТГ, пользователи теневого интернета нашли другие методы коммуникации. ТГ, популярный своей концепцией закрытости и навыком организации частных каналов, превратился востребованным среди индивидуумов, которые ищет анонимность и надежность.
При подобных каналах допустимо найти предложения касательно торговле наркотиков, подложных документов, боеприпасов и прочих противоправных изделий. Определенные каналы дополнительно дают сведения относительно способах войти в закрытым онлайн-площадкам, о применении анонимного браузера или как обеспечить безымянность в всемирной паутине.
В большинстве случаев эти сообщества засекречены, и ради входа в ним обязательно направление или соблюдение определенных ограничений.
По сравнению с теневых интернет-ресурсов, анонимные каналы на мессенджере доступнее в использовании и не нуждаются конфигурации специальных программ. Участники имеют возможность входить к сведениям и услугам напрямую посредством Телеграм, что и трансформирует подобные чаты существенно легкодоступными со стороны массовой публики. Однако, подобно как и в случае в закрытыми онлайн-площадками, использование подобных каналов соотносится с существенными рисками.
AML check online
Risk Mitigation Checks – this a critical mechanism deployed by banks and commercial entities to ensure that organizations do not participating with individuals or organizations engaged in unlawful activities.
This procedure includes identifying the identities of buyers using wide-ranging registries, including prohibition registers, VIPs (PEP) records and further control lists. Within the realm of digital currencies, Anti-Money Laundering analysis services facilitate find and reduce risks stemming from hypothetical illicit money transfers transactions.
During implementing AML screening, performers often analyze the listed elements:
Identification Validation – verifying the details of the citizen or structure involved in the deal, in order to that entities are not included in any watchlists.
Transaction Schemes – examining and evaluating payment schemes with the purpose of the presence of specific unusual activity that may indirectly indicate illicit money transfers.
Crypto Analysis – leveraging blockchain analysis tools in order to establish the transactions of cryptocurrencies and determine possible connections with unlawful operations.
AML screening is not a one-off activity. It constitutes a continuous process intended to facilitates provide that organizations remain compatible with regulations and do not accidentally participate in unlawful transactions. Regular Anti-Money Laundering analysis online monitoring provide enterprises to update client information and monitor on possible modifications in their risk evaluation.
The Role of Anti-Money Laundering Check Online Services
AML check online services represent solutions that provide automated Anti-Money Laundering monitoring systems. Similar systems crucially essential for organizations functioning in the digital money space, where the risk of dealing with illicit funds is considerably higher due to the decentralized essence of cryptocurrencies.
Натяжные потолки на кухню
Присоединяйтесь к казино Mostbet.com https://mostbetregistration-kz.kz лучшей букмекерской конторе и казино Казахстана. Зарегистрируйтесь сейчас и получите бонус 150% по промокоду MOSTBET-KZ24!
order cipro without insurance
Mostbet-AZ90 https://mostbet.prostoprosport.az Join the betting platform, get attractive bonuses during registration, take advantage of a wide catalog of casino games, big winnings guaranteed to win + fast withdrawal possible.
Джип туры по Крыму https://м-драйв.рф/ уникальные маршруты и яркие эмоции. Погрузитесь в увлекательнее приключение вместе с нами. Горные, лесные, подземные экскурсии, джиппинг в Крыму с максимальным комфортом.
tos
Джип туры по Крыму https://м-драйв.рф/tours/kuluarami-poluostrova/ уникальные маршруты и яркие эмоции. Погрузитесь в увлекательнее приключение вместе с нами. Горные, лесные, подземные экскурсии, джиппинг в Крыму с максимальным комфортом.
Джип туры по Крыму https://м-драйв.рф/tours/edu-kuda-hochu/ уникальные маршруты и яркие эмоции. Погрузитесь в увлекательнее приключение вместе с нами. Горные, лесные, подземные экскурсии, джиппинг в Крыму с максимальным комфортом.
вывод из запоя в стационаре вывод из запоя в стационаре .
Джип туры по Крыму https://м-драйв.рф/tours/yaltinskij-drajv/ уникальные маршруты и яркие эмоции. Погрузитесь в увлекательнее приключение вместе с нами. Горные, лесные, подземные экскурсии, джиппинг в Крыму с максимальным комфортом.
montenegro european union Kotor Montenegro
how to buy cheap lisinopril tablets
how to make qr code business card qr visit cards
Rivolgiti a traduttori specialisti nella traduzione dei
brevetti.
Look into my web page: https://barr-cohen.technetbloggers.de/guida-completa-alla-traduzione-di-cataloghi-prodotti-per-aziende-tech-1724242506
Натяжные потолки в спальню
ремонт телефонов в москве рядом
ремонт телефонов по близости
Join basswin now and claim your $500 welcome bonus. Play top casino games and win big today!
Закажите услуги эвакуатора с манипулятором в Москве по доступной цене! Оперативная помощь в любой точке города и Подмосковья. Безопасная транспортировка автомобилей и спецтехники. Звоните сейчас и получите выгодные условия Эвакуатор манипулятор
https://trespor.com/
Найактуальніші поради https://agusha.com.ua та рекомендації батькам
Поради для батьків https://babyrost.com.ua заходи для дітей, освіти, покупки, організація дитячих свят
colchicine 0.5 mg for stroke
Новини світу моди https://beautytips.kyiv.ua краси, шопінгу, шоу-бізнесу, відносин та стилю життя
Являемся российским агрегатором страховых услуг и помогаем вам не только сравнивать стоимость страховок от разных компаний, но и выбирать оптимальный вариант, который не ударит по вашему кошельку. Полностью онлайн, с программой лояльности и с поддержкой 24/7 https://alefmex.ru
Жіночий онлайн-журнал https://krasotka.kyiv.ua тренди, мода, краса. Модний сайт для справжніх жінок.
https://krovinka.com/
Жіночий портал https://magiclady.kyiv.ua сучасна мода, тренд, стиль; корисні поради; секрети гарної фігури
Сайт для жінок https://modam.com.ua про красу, моду, здоров’я та стосунки
Moneyman выдает онлайн займы на карту любого банка и вся процедура выдачи занимает не более 15 минут деньги в займ на карту
Жіночий онлайн-журнал https://model.kyiv.ua для стильних, модних та впевнених у собі дівчат. Щодня ми публікуємо корисні матеріали від професіоналів у галузі косметології, здоров’я та моди.
temporary chinese phone number
buying imdur no prescription
Tiny shards of plastic are increasingly infiltrating our brains, study says
жесткое порно бесплатно
Human brain samples collected at autopsy in early 2024 contained more tiny shards of plastic than samples collected eight years prior, according to a preprint posted online in May. A preprint is a study which has not yet been peer-reviewed and published in a journal.
“The concentrations we saw in the brain tissue of normal individuals, who had an average age of around 45 or 50 years old, were 4,800 micrograms per gram, or 0.5% by weight,” said lead study author Matthew Campen, a regents’ professor of pharmaceutical sciences at the University of New Mexico in Albuquerque.
“Compared to autopsy brain samples from 2016, that’s about 50% higher,” Campen said. “That would mean that our brains today are 99.5% brain and the rest is plastic.”
That increase, however, only shows exposure and does not provide information about brain damage, said Phoebe Stapleton, an associate professor of pharmacology and toxicology at Rutgers University in Piscataway, New Jersey, who was not involved in the preprint.
“It is unclear if, in life, these particles are fluid, entering and leaving the brain, or if they collect in neurological tissues and promote disease,” she said in an email. “Further research is needed to understand how the particles may be interacting with the cells and if this has a toxicological consequence.”
The brain samples contained 7% to 30% more tiny shards of plastic than samples from the cadavers’ kidneys and liver, according to the preprint.
“Studies have found these plastics in the human heart, the great blood vessels, the lungs, the liver, the testes, the gastrointestinal tract and the placenta,” said pediatrician and biology professor Dr. Philip Landrigan, director of the Program for Global Public Health and the Common Good and the Global Observatory on Planetary Health at Boston College.
“It’s important not to scare the hell out of people, because the science in this space is still evolving, and nobody in the year 2024 is going to live without plastic,” said Landrigan, who was not involved with the preprint.
Самые новые идеи https://one-lady.com дизайна ногтей, советы и рекомендации по уходу за ногтями и выполнению маникюра
Онлайн журнал для женщин https://otnoshenia.net звезды, мода, красота, любовь, гороскопы, психология, дети и здоровье
Женские полезные советы https://topwoman.kyiv.ua на темы: мода, стиль, красота, здоровье, дети, дом, мужчины, секс, интим, любовь, отдых
срочный вывод из запоя срочный вывод из запоя .
Фото натяжных потоков в спальне
Фото натяжных потоков в спальне
Embark on Your Adventure to Fulfillment with One Click https://goo.su/YZOA !
https://www.vice.com/es/article/mb7dv8/creators-estas-fotos-investigan-el-peligro-de-la-tecnologia-y-el-consumismo
how to get cheap doxycycline without insurance
Интернет-аптека работает круглосуточно, поэтому наши клиенты имеют возможность уточнить список имеющихся препаратов с определенным действующим веществом https://arenda-avto-v-khabarovske.ru
Женский проект https://viplady.kyiv.ua о моде, красоте, стиле и здоровье, светская жизнь, диеты и рецепты
grindr verify account phone number
Планируйте свой рабочий год эффективно с нашим производственным календарем, актуальная информация о рабочих, выходных и праздничных днях всегда под рукой сайт Производственный Календарь
онлайн журнал https://vsegladko.net о моде и красоте: тренды и модные битвы, призы, новости с красных дорожек, эксперты красоты и гороскопы
Сайт для женщин https://womanclub.kyiv.ua о моде, красоте, здоровье, психологии и отношениях. Новые коллекции, фотогалереи с модных показов.
Простой и удобный сайт https://womanexpert.kyiv.ua о моде, красоте, путешествиях, любви и вдохновении.
cleocin side effects bleeding
Следует учитывать нормы Жилищного кодекса, которые регламентируют соблюдение порядка и прав соседних жильцов. Для более детального ознакомления с правами жильцов можно ознакомиться с изменениями в законодательный акт, регулирующий жилищные правоотношения, от 20 марта 2024 год https://arkan-auto.ru
Жіночий портал https://womanportal.kyiv.ua сучасна мода, тренд, стиль; корисні поради; секрети гарної постаті; уроки макіяжу
Клуб владельцев Лада Гранта https://lada-granta-club.ru отзывы реальных владельцев, фото и цена автомобиля, комплектации и характеристики.
Клуб KIA K5 https://kia-k5-club.ru отзывы владельцев, цена и комплектации, характеристики и фото автомобиля.
albuterol without dr prescription usa
https://teletype.in/@sezdok/sertifikaciya-iso-27001
Онлайн-калькулятор ОСАГО рассчитает точную стоимость полиса по тарифам 2020 года. Сравните предложения лидирующих страховых компаний и оформите полис онлайн. Оформление ОСАГО производится в системе страховщика https://a-mega-strahovanie.ru
https://t.me/GoTradeInvestmentbot?start=513555624
https://atomouniversal.com.br/classificadoseanuncios/index.php?page=user&action=pub_profile&id=219519
https://matnk.ru/
Official website of BC Melbet https://melbet-malbet.com/fr/melbet-ma/ for online sports betting. Fast payouts, high odds, promotions and bookmaker bonuses
Мы предлагаем высокооплачиваемую работу https://rabota-webcams.ru в онлайн чате. Возможность работать на дому. Вы можете зарабатывать от 1000$.
Топ онлайн казино https://safespins.com рейтинг и обзоры лучших игровых платформ
Бесплатный сайт знакомств loveplanet без регистрации, знакомства с реальными людьми, поиск новых знакомых для дружбы, серьезных отношений
Бесплатное приложение для знакомств tinder
Наша компания осуществляет разработку лендигов под ключ. В наши услуги входит создание индивидуального дизайна для сайта и реклама проекта заказать лендинг
Оформить электронное ОСАГО онлайн дешево. Расчет стоимости автострахования ОСАГО за 2 минуты на онлайн-калькуляторе. Учитываем все коэффициенты и скидки на ОСАГО за безаварийность https://agentstvo-profi.ru
get cheap theo 24 cr no prescription
Добровольная сертификация ИСО 9001 https://codexland.ru вся полезная информация о порядке работ, схемах, объектах сертификации. Свежие новости. Подробный перечень стандартов качества для всех объектов сертификации. Что такое система менеджмента качества (СМК)? Это программы и механизмы систематизированной работы предприятия по улучшению качества своего функционирования, изготовления продукции и тд. Развитие качества может идти в различных сферах. Например, безопасность труда, экологичность производства.
Натяжные потолки в спальне цена
ремонт телевизоров в москве недорого
can you buy generic amaryl online
https://ag.arizona.edu/research/archer/news.html
Женский портал https://adviceskin.com о здоровье и красоте
Мода, красота и здоровье https://allwoman.kyiv.ua Женский журнал об отношениях и красоте
Женский портал https://amideya.com.ua Все о семье, детях, красоте и здоровье
https://ag.arizona.edu/research/archer/news.html
Профессиональный сервисный центр по ремонту ноутбуков, макбуков и другой компьютерной техники.
Мы предлагаем:ремонт макбука на дому
Наши мастера оперативно устранят неисправности вашего устройства в сервисе или с выездом на дом!
Женский портал https://dama.kyiv.ua современная мода, тренд, стиль; полезные советы; секреты хорошей фигуры
Лучший онлайн-журнал https://family-site.com.ua о настоящей жизни: шоу-бизнес, здоровье, мода, красота
Женский журнал онлайн https://girl.kyiv.ua на разные темы Мода, красота и любовь Дети, дом, здоровье и кулинария
where to buy generic mestinon pill
Новости мира https://happywoman.kyiv.ua моды, красоты, шопинга, шоу-бизнеса, отношений и стиля жизни
https://oxflox.com/subject-name/
Наш журнал https://icz.com.ua создан для модных и стильных женщин
Сайт для родителей https://mch.com.ua Детские капризы. Пути решения проблем.
Цены на оформление добровольных сертификатов соответствия в СДС РосПромТест, Сертификация продукции, СМК (ISO), квалификации персонала, эко продукции. Добровольная сертификация продукции на соответствие государственным стандартам в системе добровольной сертификации https://t.me/rospromtest
Great Mood Only: The Best Marijuana in TLV
In a world where value of well-being is becoming progressively crucial, many are searching for natural approaches to de-stress and enhance their wellness. In the heart of Israel’s Capital, there’s a spot that values every minute and supplies solely the top-quality weed products. Welcome to the Cannabis Lounge, where the motto “Great Vibes Only” really comes to life.
Reasons to Choose Our Store?
We supply a carefully chosen range of premium weed goods to meet all your preferences:
Medical Cannabis: For those seeking health relief, our medical herb variety is top-notch, providing ease and serenity with meticulously picked kinds.
Cali-grade Marijuana: Brought straight from California, our California Herb provides the premium of the West Coast to Israel’s Capital, known for its powerful effects and high-quality grade.
Local Indoor-cultivated: In-house cultivated and precisely cultivated, our Local Indoor-cultivated herb is excellent for those who value locally-grown quality.
THC Concentrates: Our THC drops are perfect for those who favor a more private and controlled experience, offering a strong dose in every drip.
Vapes THC: For those on the go, our THC vape devices offer practicality and strength, ensuring a trouble-free and satisfying session every time.
Cannabis Cake: Treat yourself to a universal experience with our THC Cake, filled with the ideal combination of Cannabis Extract for a exquisitely powerful effect.
THC Gummies: Our THC chews deliver a flavorful and effortless way to use marijuana, excellent for low-dosing or a enjoyable, scrumptious treat.
CBD Items: For those in need of the benefits of herb without the intoxication, our range of CBD items delivers soothing benefits with nil intoxication.
Purchase Instructions?
Purchasing is easy and easy through our service platform: @WEED2SMOKE. We provide:
Top-Rated Rating: Our promise to high standards and customer happiness is demonstrated in our highly-rated rating.
Free Delivery: Enjoy our goods delivered straight to your address at free of extra price.
Around-the-Clock Service: We know that great mood don’t adhere to a timetable, which is why we’re on hand at all times to fulfill your needs.
Discover the best that Tel Aviv has to give in cannabis goods. Whether you’re in search of for medical relief, recreational pleasure, or just want to de-stress, we’ve got your back. Get yours today and enjoy those uplifting atmosphere to your place!
Женский портал https://mirlady.kyiv.ua Все о семье, детях, красоте и здоровье
Новости мира моды https://nicegirl.kyiv.ua красоты, шопинга, шоу-бизнеса, отношений и стиля жизни
Простой и удобный сайт о моде https://presslook.com.ua красоту, путешествия, любовь и вдохновение
“Hi all! I’ve been thinking about balancing my drive shaft on my car. I found this article , and it got me thinking, is it really worth it?
Balancing is pretty expensive. Maybe it’s easier to just drive as is, and just change the shaft occasionally. Or is the vibration so destructive that it’s better to pay for the balancing?”
Article : Drive shaft vibration elimination
Хотите установить приложение букмекерской конторы олимп бет? Узнайте, как скачать и установить приложение на свой мобильный телефон и получить доступ к лучшим ставкам на спорт!
Все о детях https://rodkom.org.ua зачатие и беременность, календарь беременности, роды и послеродовой период, кормление и воспитание ребенка
полезные советы https://sunshadow.com.ua на темы: мода, стиль, красота, здоровье, дети, дом, мужчины
Сертификация ИСО 45001-2020 может быть проведена на любом предприятии независимо от численности персонала и сферы деятельности. Более востребованным получение сертификата ИСО 45001-2020 является для компаний, деятельность которых связана с риском для жизни и здоровья персонал https://teletype.in/@sezdok/chto-takoe-sertifikat-iso-45001
Женские советы https://timelady.kyiv.ua и секреты, роды и послеродовой период, кормление и воспитание ребенка.
женские советы по теме https://woman365.kyiv.ua мода, стиль, красота, здоровье, дети, дом, мужчины, отдых
Самые актуальные автомобильные новости https://auto-club.pl.ua Украины и мира, тест-драйвы новых авто, советы экспертов
Авто статьи https://avtoshans.in.ua с советами по ремонту и обслуживанию авто блог с профессиональными советами обзоры новинок лизинг авто
Профессиональный сервисный центр по ремонту квадрокоптеров и радиоуправляемых дронов.
Мы предлагаем:ремонт квадрокоптеров в москве на карте
Наши мастера оперативно устранят неисправности вашего устройства в сервисе или с выездом на дом!
Ежедневные новости https://ecotech-energy.com из автомобильной среды. Советы автолюбителям
автомобильный портал https://kakavto.com последние новости из автомира.
Ежедневные новости https://myauto.kyiv.ua из автомобильной среды. Советы автолюбителям.
pinco зеркало – обзор новинки для вашего интерьера, универсальный элемент декора с элегантным дизайном и функциональностью, подходит для любого помещения.
can i get celexa without prescription
Натяжные потолки в ванной
In Ontario, Canada, gambling is regulated by the Alcohol and Gaming Commission of Ontario (AGCO). This organisation is responsible for overseeing and regulating all forms of gambling, including casinos, lotteries, online gambling and charitable gaming. The AGCO plays a key role in ensuring fair and responsible gaming in Ontario by strictly enforcing legislative and regulatory standards. This article takes an in-depth look at the AGCO’s role and function as a gaming regulator.
In the context of globalisation of financial markets and increasing interest in currency trading, Georgia stands out as a country with a favourable regulatory climate for forex brokers. The process of obtaining a forex broker licence in Georgia involves a number of steps that require careful consideration and strict compliance with local legislation. This article outlines the key steps in applying for a licence that are of interest to potential international and local investors.
Registration and maintenance of status: In order to maintain Cayman Islands registered company status, entities must fulfil certain requirements, including annual filing of accounts and payment of applicable government fees.
Right of residence: Obtaining a residence permit entitles you to long-term residence in the Czech Republic, including the possibility of family reunification.
Main Types of Business Accounts
The UK, through the Financial Conduct Authority (FCA), has established registration requirements for all cryptoasset firms, including centralised cryptocurrency exchanges. This obliges exchanges to undergo anti-money laundering (AML) and counter-terrorist financing (CFT) compliance checks, as well as confirm their transparency and reliability as intermediaries in the cryptocurrency market.
Stability as the Czech banking system is subordinated to the EU banking system
Launching a crypto business in El Salvador presents a unique opportunity for entrepreneurs and investors looking to take advantage of the advanced cryptocurrency economy. By following the steps outlined above and paying attention to both strategic planning and operational details, it is possible to successfully launch and grow a cryptocurrency business in this progressive jurisdiction.
Document preparation:
International market access: Serving as a gateway to both Asian and global markets, Hong Kong offers established relationships, ease of doing business, and a resilient infrastructure. Businesses holding a cryptocurrency license in Hong Kong can expand beyond the local market and attract an international customer base.
Все о новых автомобилях https://newsgood.com.ua технические характеристики, комплектации, цены, фотогалерея
In accordance with international sanctions,
the Semrush platform is no longer accessible to firms registered or primarily based in Russia.
Here is my web blog … organic search services
Ежедневные новости https://orion-auto.com.ua из автомобильной среды. Советы автолюбителям.
Автомобильный журнал https://retell.info для тех, кто умеет выбирать
Натяжные потолки в ванной
We provide virtual numbers for receiving SMS messages. Online security and Privacy with our virtual number service. Ideal for quick and effortless SMS Kup wirtualny numer do SMS-Гіw
Все новые авто https://reuth911.com с подробными обзорами, фото и характеристиками на сайте
Журнал об автомобилях https://svobodomislie.com выставки, автоспорт, ремонт и сервис
how to take colchicine 0.6mg
Тест-драйвы https://troeshka.com.ua тюнинг, обслуживание автомобиля, автомобильная история, отчеты об авто путешествиях
Автомобильные новости https://tuning-kh.com.ua Украины и мира, тест-драйвы новых авто, советы экспертов
Автомобильные портал Украины https://tvk-avto.com.ua и мира, тест-драйвы новых авто, советы экспертов
Самые актуальные автомобильные https://xiwet.com новости Украины и мира, тест-драйвы новых авто
Мировые автомобильные https://sw.org.ua события в Украине
Все о новых автомобилях https://gormost.info технические характеристики, комплектации, цены, фотогалерея
butalbital online pharmacy
https://mostbetpk.app/
Автомобильные новости https://mallex.info авто статьи. Тюнинг. Тест-драйв. Новинки авто
Free AI https://undressher.us app brings you a revolutionary experience in undressing online.
Chatme AI (Чатми Аи) https://chatme.ai это чат-бот для бизнеса без навыков программирования: для продаж, HR, поддержки, колл-центра, сбора обратной связи и других задач в Телеграмм, Вк, Ватсап
Профессиональный сервисный центр по ремонту сотовых телефонов, смартфонов и мобильных устройств.
Мы предлагаем: ремонт смартфонов
Наши мастера оперативно устранят неисправности вашего устройства в сервисе или с выездом на дом!
Online security and Privacy with our virtual number service. We provide virtual numbers for receiving SMS messages. Ideal for quick and effortless SMS
cleocin dobber
Мы — команда специалистов, посвятивших себя поиску лучших домов престарелых. Мы ценим заботу, комфорт и безопасность ваших близких. Наши отзывы и опыт говорят сами за себя. Мы поможем вам сделать правильный выбор, чтобы ваши родные чувствовали себя как дома. Давайте работать вместе https://кто-молодец.СЂС„
Ice Casino Polska https://cakecaprice.pl Official Site Play Ice Casino in Poland
Lemon Online Casino https://alphabetpoleasingowe.pl in Poland
Mega Darknet – это уникальная платформа, где anonymity и конфиденциальность интегрированы в foundation вашего experience. Название “Mega Darknet” связано с разнообразием возможностей и тайнами. Это not just a website; это portal в скрытый мир, где traditional restrictions перестают работать.
адрес mega tor
Official website of GGBet casino https://vernandnea.pl Play 2000+ slot machines in online casino and win big
Добровольное медицинское страхование (ДМС) – ваш надежный помощник в обеспечении качественной медицинской помощи. Наша компания предлагает широкий спектр программ ДМС, адаптированных под индивидуальные потребности клиентов. Мы обеспечиваем доступ к лучшим медицинским учреждениям, высококвалифицированным специалистам и современным методам лечения что входит в дмс
Мы собрали рейтинг топ-20 лучших фитнес-клубов в Москве в 2024 году, ориентируясь на вышеперечисленные критерии. Плюс учитывали ценовую политику абонементов и отзывы клиентов фитнес клуб записаться
Профессиональный сервисный центр по ремонту ноутбуков, imac и другой компьютерной техники.
Мы предлагаем:надежный сервис ремонта imac
Наши мастера оперативно устранят неисправности вашего устройства в сервисе или с выездом на дом!
Секс шоп https://sex-shopp.kiev.ua ваш идеальный онлайн-магазин для взрослых, предлагающий широкий ассортимент интимных товаров. Мы гарантируем высокое качество продукции, конфиденциальную доставку по Украине и доступные цены.
Архитектурное бюро https://orehovo.anihub.me/viewtopic.php?id=1283#p3086 дизайн студия Москва. Заказать эксклюзивное проектирование коттеджей и домов. Студия разработки проектов загородных домов и фасадов в Москве, дизайн интерьеров квартир, коммерческих и жилых зданий, ландшафтный дизайн
https://www.volzsky.ru/press-relize.php?id=19475
Авторские джип-туры по Крыму https://м-драйв.рф/tours/krysha-kryma/ из Ялты. Уникальная возможность исследовать самые живописные места Крыма.
get cheap calan without insurance
Авторские джип-туры по Крыму https://м-драйв.рф/tours/yaltinskij-drajv/ из Ялты. Уникальная возможность исследовать самые живописные места Крыма.
Фитнес в лучших фитнес-клубах у метро Войковская в Москве. Мы подобрали для вас 28 клубов с ценами от 700 до 80 000 руб. А также 61 тренера фитнес зал войковская
Авторские джип-туры по Крыму https://м-драйв.рф/tours/edu-kuda-hochu/ из Ялты. Уникальная возможность исследовать самые живописные места Крыма.
can i purchase zanaflex without insurance
Мы предлагаем аренду снегохода, которые позволят Вам получить максимальное удовольствие от катания. В стоимость проката входит: Аренда снегохода выбранной модели на необходимое количество часов; Полный комплект защитной экипировки катание на снегоходах красногорск
В аренду входят не только снегоходы, но и весь необходимый инвентарь. Обязательно надевайте шлем и перчатки перед поездкой, чтобы обеспечить защиту и тепло покатушки на снегоходах в подмосковье
Многие из нас с волнением и беспокойством идут на прием к врачу акушеру-гинекологу, часто откладывая посещение.
А ведь к женскому врачу приходится обращаться в течение всей жизни, особенно в такие важные периоды, как беременность и роды.
Естественно, что каждая женщина хочет чувствовать себя уверенной и защищенной, когда речь идет о здоровье.
Понимая ваше волнение, чувствуя ответственность за вашу жизнь и жизнь ваших детей, был создан ознакомительный сайт «Женский Доктор».
На сайте будут освещены основные темы в области акушерства и гинекологии в доступной широкому кругу читателей форме.
По мере поступления откликов, будут выходить новые статьи, чтобы вы смогли найти ответы на волнующие вас вопросы.
Зная, как важно общение с доктором на родном языке, я буду рада помочь вам в моем частном кабинете расположенном рядом с клиникой Medical Park,
Турция, где вы найдете квалифицированную помощь специалиста акушера-гинеколога, а будущие мамы смогут в полной мере подготовиться к родам, оставив позади свои тревоги.
Мой сайт rusginekolog.com
Частный кабинет, расположенный в центре Европейской части г. Стамбул, у автотрассы E-5 и в 5 минутах езды от аэропорта Ататюрк.
Кабинет No 1009, 10 этаж.
Bahcelievler mah., E-5 Yanyol No 14/B Metroport Busidence /Bahcelievler/Istanbul
watch porn online
Профессиональный сервисный центр по ремонту ноутбуков и компьютеров.дронов.
Мы предлагаем:ремонт ноутбуков в москве
Наши мастера оперативно устранят неисправности вашего устройства в сервисе или с выездом на дом!
Строительство, ремон своими руками. Советы мастеров и лучших специалстов в своем деле.
Каким вы видите свой будущий дом? Выполненный в духе уютного загородного шале или со сложными геометрическими формами и яркими элементами?
<a href=https://www.vuz-chursin.ru/stroitelstvo]Строительство
<a href=https://www.vuz-chursin.ru/stroymaterialy-0]Стройматериалы
<a href=https://www.vuz-chursin.ru/remont-i-otdelka]Отделка
Для большинства людей своя, пускай, даже крохотная, но отдельная однокомнатная квартира, намного слаще, чем аренда 5-комнтантного пентхауса за смешные деньги. Здесь можно устанавливать свои правила, планировать ремонт, делать перестановку, а единственное ограничение – это пространство.
Каталог полезных статей о стройке и ремонте <a href=https://vuz-chursin.ru/.
Мы сочетаем в себе приятный отдых и эффективное сопровождение. Во всех пансионатах созданы комфортные условия проживания для постояльцев: комфортные номера, безбарьерная среда, адаптированные ванные комнаты и коридоры пансионат для пожилых
Подайте заявку на микрокредит с дневной процентной ставкой от 0,01% и получите средства на свою карту круглосуточно https://womanmaniya.ru/kak-poluchit-onlajn-zajm-shagi-i-neobhodimye-dokumenty/
hotel or motel for sale invest in hotel
solara executor
where can i get cleocin online
cleocin muscle aches
СМК на соответствие ГОСТ Р ИСО 9001-2015 сертифицируют в добровольном порядке, однако наличие такого сертификата является показателем качества работы, и этот показатель признается во всем мире сертификат ИСО 9001
Привезти технику на ремонт вы можете в самый удобный по расположению сервисный центр. В данный момент успешно функционируют 13 представительств сервисного центра сервисный центр ремонт компьютеров москва
Промокоды на бездепозитные фриспины в онлайн казино. Вводи промокод, крути слоты и забирай выигрыш уже сегодня https://t.me/royal_promokod
квартиры от застройщика https://novostroikiekb54.ru купить свартиру в казани.
https://buzulukmedia.ru/kak-i-kogda-obratitsya-k-spetsialistam-po-vskrytiyu-avtomobiley-poleznye-sovety/
Ремонт бытовой техники и электроники в Москве. Своевременный ремонт бытового оборудования – это гарантия его долгой и исправной работы сервисный центр по ремонту телефонов москва
https://sabiiborno.com/
Кольпоскопия Плюс — специализированный сайт клиники «Гинеколог Плюс» в Пятигорске, посвященный кольпоскопии. Мы предлагаем высокоточные исследования для раннего выявления заболеваний шейки матки. Опытные специалисты, современное оборудование и индивидуальный подход — всё для вашего здоровья и спокойствия Лечение эрозии шейки матки
Наша клиника использует современные методы лечения бесплодия и минимально инвазивные технологии, такие как лапароскопическая хирургия, что позволяет сократить время восстановления и снизить риски. В Гинеколог Плюс вы получите экспертную помощь в гинекологии от ведущих специалистов, которые применяют современные методы лечения и предлагают индивидуальный подход к каждой пациентк Как проехать
The latest free deepnude pics allows you to upload images to make them nude and undress photos. It is simple and fast.
+ за пост
_________________
пирамиды автоматы играть бесплатно
can americans buy property in montenegro Montenegro property for sale
Лучшая сантехника по низким ценам в Минске
Если вы ищете, где купить сантехнику в Минске, то наш интернет-магазин — для вас.
Большой ассортимент товаров представлен в различных ценовых категориях, а благодаря разнообразию размеров,
форм и других параметров, вы точно найдёте наиболее подходящую модель.
Создайте свой уникальный дизайн ванной комнаты вместе с нами!
Почему Almoni?
Высокое качество: мы работаем с ведущими производителями и брендами с мировым именем,
например: Orans, Ravak, Vitra, Kaldewey, Roca и другие. Все изделия сертифицированы.
Доступные цены: благодаря нашему сотрудничеству напрямую с заводами-изготовителями,
у вас появляется возможность купить сантехнику недорого.
Широкий ассортимент: большой выбор точно позволит вам найти подходящую модель или цвет товара,
чтобы наиболее гармонично вписать его в общий интерьер.
Удобный сервис: заказы обрабатываются в кратчайшие сроки, есть возможность выбрать
подходящий для вас вариант уведомлений (смс/звонок/почта), а оповещения о передвижении
товара позволят вам всегда быть в курсе его местоположения. Оставить онлайн-заказ вы можете
круглосуточно через корзину на сайте, а с 09:00 — 21:00 это можно также сделать через оператора.
Мы любим наших клиентов: при покупке от 3 000 р. вы получаете приятные подарки,
а для наших постоянных покупателей действуют специальные скидки.
Аккуратная доставка в срок курьером доступна по всей Республике Беларусь,
а также более чем в 1000 пунктах самовывоза в России.
Если у Вас возникли вопросы или сложности с заказом, обратитесь к оператору,
который предоставит актуальную информацию, а также проконсультирует по товарам.
Сделать это можно по телефону: +375 (33) 398 66 77.
Интернет-магазин сантехники almoni.by
Вы можете купить справки в Москве в нашей клинике https://ossis-med.ru/
Вы можете купить справку в медцентре https://mymednews.ru/ с доставкой по Москве.
Стоимость сертификации http://center-sertifikaciya.ru соответствия ИСО 9001 и срок действия сертификата. Цена сертификата соответствия ИСО 9001 всегда рассчитывается индивидуально, так как зависит от ряда факторов. Срок действия сертификата качества по стандарту ГОСТ Р ИСО 9001 – 3 года с момента его получения.
элитный дом престарелых пансионат для пожилых
пансион дома престарелых пансионаты для тяжелобольных
where buy mentat pills
cost generic vasotec without a prescription
where can i get cheap buspar without a prescription
Добро пожаловать в клинику «Гинеколог Плюс» – специализированное медицинское учреждение, где мы заботимся о вашем здоровье с особым вниманием и профессионализмом. Наша миссия – обеспечить каждой женщине возможность получать качественное медицинское обслуживание в комфортных условиях Главная страница
can i purchase actos tablets
Вы можете купить медицинскую справку в мед центре https://space-group-med.ru/ в Москве без прохождения врачей.
montenegro ulcinj immobilien Montenegro immobilien kaufen
The neon lights of the casino ruined me. I’m a man named Alex who lost everything at the roulette wheel.
Every night, the poker tables whispered promises. The cheers at the craps table was my addiction’s voice.
My wife, Sarah, urged me to leave the poker tables, but the casino’s call was louder.
On that ruinous night at the VIP room, I gambled it all: our security, our home – in a desperate attempt to win big.
The slot machine displayed “LOSE” and fortune abandoned me.
Returning to our house with nothing left, I found only a note: “I’m leaving. Your roulette wheel madness has destroyed us.”
Alone in an hollow room, I understood that grasping at a lucky streak lost me love and family.
Therapists identified major depressive disorder, intensified by my yearning for the casino floor.
Now, all the time is a challenge not just with my compulsion to place bets, but with the overwhelming gloom inside me. Is it possible for me to climb out of this void created by the glittering world of casinos?
>>>
free online slots wild life
вавада партнерка
montenegro real estate budva buy Montenegro real estate
Welcome to official VAVADA channel! We strive to give a high-quality experience to our players. VAVADA is an Online Gaming Project with transparent payouts вавада сайт зеркало на сегодня
вавада на сегодняшний день vavada бонусы
вавада коды https://damntroublemaker.com
Профессиональный ремонт Apple iPhone любой сложности от 15 минут! Более 8 лет опыта работы! В наличие Оригинальные запчасти и копии хорошего качества на ваш выбор https://www.parfums-de-beyrouth.com/summer-begin/#comment-26152
vps сервер
VPS разнообразные сервера, скорость интернета 1000mb,
выгодные стоимость
Обширный выбор настроек на все цели. Можно найти идеальный план, в зависимости от ваших требований
Cloud-серверы на базе AMD EPYC — Создайте собственный хостинг
Виртуальные серверы Intel Gold
Стандартные серверы, Аренда обычного сервера
Серверы с высокими процессорами
Dedicated серверы — аренда высокопроизводительных dedicated серверов
Мощные серверы основанные на топовых процессоров AMD EPYC. Процессорная частота до 3.4-4 ГГц. Надежная скорость сети к интернету
Неограниченная техподдержка. Наши профессионалы всегда готовы сразу прийти на помощь в любых случаях., всевозможные серверы — это
Защита от злоумышленников — все сайты открыты — интернет без ограничений
– Шаблонные настройки для WireGuard VPN, Outline VPN, 3X-UI VPN, Marzban VPN, IPsec VPN, OpenVPN
– Неизменная цена в долларах
– Оплата с рублёвой карты РФ, в криптовалюте, иностранными картами через Stripe
Разнообразные способы оплаты. Мы предлагаем вам удобные варианты оплаты, с учетом кредитные карты, онлайн-кошельки и цифровую валюту, с действующими скидками до 20%
Выгодные цены. Стоимость наших услуг ниже на 10-15%, чем у конкурентов, в то же время мы предлагаем услуги премиум-класса
Никаких сбоев, стабильная и надежная эксплуатация на высшем уровне.
https://www.granit-st.ru/netcat/pag/realnue_otzuvu_o_buy.html
сайт вавада vavada https://pathiaf.com
вавада бесплатные вращения вавада официальный сайт зеркало на сегодня
vavada бездепозитный бонус вавада на сегодняшний день рабочее
замена венцов красноярск
В случае если производится смена венцов, в таком случае бревно также освобождается от веса и реализуется замена, поскольку чтобы заменить поднятие не превышает 10 см сантиметров, которое не выступает существенным также для внутренней отделки.
нижний венец из листвяка намного надежнее и эффективно зарекомендовал себя благодаря своей крепостью и устойчивостью к разрушению. Однако, ее обязательно следует обработать при помощи противогрибкового раствора, аналогично и прочие балки.
Мы работает не только реконструкцией объектов, дополнительно обновлением полов. Потребители зачастую заказывают утепленные полы и перекрытия с тепловой теплозащитой мы Комплектуем заказчика материаллом и предоставляем специальные расценки.
наш телефон +7(391)29-29-699
промокод вавада 2024 сайт вавада vavada
vavada online casino vavada официальный сайт зеркало на сегодня
VAVADA is an Online Gaming Project with transparent payouts. Welcome to official VAVADA channel! We strive to give a high-quality experience to our players http://slothacker62.com
Наши инженеры качественно и с гарантией выполнят все необходимые диагностические и ремонтные работы для восстановления вашей техники. Запишитесь на ремонт прямо сейчас http://vorticeweb.com/sera-sonora-sede-del-festival-ecofilm#comment-2120045
https://www.granit-st.ru/netcat/pag/realnue_otzuvu_o_buy.html
Детская остеопатия. Чем она помогает ребенку. Как помогает взрослым. Консультация остеопата, запись к остеопату, детский остеопат
Остеопат для детей и взрослых. В чем разница подхода к лечению. Читать статью
Create Deepnude for free undress ai app Nudify anyone within a few seconds and create the best AI deep nude images.
Ответы на вопросы https://www.otvetynavopros.ru задайте любой интересующий Вас вопрос и получите развернутый и детальный ответ. Ответы на вопросы на любую тему.
Головная боль поддается лечению остеопатией, массажем
Остеопатический массаж .Помочь при головной боли
Omg – это ресурс для those ищет confidentiality в their online activities. Омг предлагает a variety услуг, которые are not available в traditional online stores.
omg omg shop
where to order balloons helium balloons Dubai
helium balloons buy with delivery Dubai order balloons balloons cheap
детский массаж у остеопата. кривошея, плоскостопие, нарушения осанки, задержка моторного развития, гипертонус и гипотонус мышц, колики, беспокойный сон, частые срыгивания, последствия родовых травм. массаж остеопат детский, кривошея, плоскостопие, нарушения осанки
Детский массаж
helium balloons with delivery helium balloons buy with delivery Dubai
Профессиональный сервисный центр по ремонту планетов в том числе Apple iPad.
Мы предлагаем: ремонт планшетов на дому
Наши мастера оперативно устранят неисправности вашего устройства в сервисе или с выездом на дом!
Как помогает остеопатия, мануальная терапия и массаж при головокружении
Головокружение. Причины и лечение.
where to buy balloons order balloons with delivery
Профессиональный сервисный центр по ремонту ноутбуков и компьютеров.дронов.
Мы предлагаем:ремонт пк в москве
Наши мастера оперативно устранят неисправности вашего устройства в сервисе или с выездом на дом!
Профессиональный сервисный центр по ремонту бытовой техники с выездом на дом.
Мы предлагаем:сервис центры бытовой техники петербург
Наши мастера оперативно устранят неисправности вашего устройства в сервисе или с выездом на дом!
air balloons with delivery Dubai air helium balloons Dubai
cost zyrtec price
omg сайт – это entry в закрытую сеть, где любой может find what they seek. Закрытые transactions и guaranteed safety – key principles этого сайта.
ссылка на омг омг сайт
can i order motilium pills
Ищите информацию о 1win? У нас вы найдете всю необходимую информацию об официальном сайте букмекерской конторы 1win.
Профессиональный сервисный центр по ремонту радиоуправляемых устройства – квадрокоптеры, дроны, беспилостники в том числе Apple iPad.
Мы предлагаем: ремонт квадрокоптеров в москве и московской области
Наши мастера оперативно устранят неисправности вашего устройства в сервисе или с выездом на дом!
Если вы искали где отремонтировать сломаную технику, обратите внимание – ремонт техники в петербурге
Если вы искали где отремонтировать сломаную технику, обратите внимание – техпрофи
Если вы искали где отремонтировать сломаную технику, обратите внимание – ремонт техники в екатеринбурге
Интернет-магазин климатической техники «СКСэйл»
Канальные, кассетные кондиционеры и сплит-системы, а также все, что вы хотите знать о кондиционерах, есть на нашем сайте. Подробно рассказано об оконных и канальных кондиционерах, тепловых завесах, системах вентиляции, очистителях, увлажнителях и осушителях воздуха. Цены на продукцию можно посмотреть в каталоге.
Продажа, монтаж и установка кондиционеров — это наша работа, которую мы выполняем профессионально и с огромным удовольствием. Мы предлагаем только лучшее оборудование, которое хорошо зарекомендовало себя в России и признанно во всем мире.
Мы продаём не только бытовые сплит системы, но и колонные конционеры, канальные кондиционеры, потолочные и центральные системы кондиционирования.
Центральные кондиционеры отлично подойдут для средних и больших загородных коттеджей, поскольку внешний блок будет только один. Установка кондиционеров любого типа производится нами в максимально сжатые сроки.
Официальный сайт «СКСэйл».
https://chicago.eater.com/2021/3/18/22332244/pop-up-dinners-bars-restaurants-events-chicago-spring-2021
Замена венцов красноярск
Если производится замена обвязки, соответственно деревянный венец или разгружается от веса и происходит замена, поскольку для замены поднятие не больше 10-ти сантиметров, которое не представляет значительным включая для внутренних частей оформления.
нижний брус из листвяка намного надежнее и превосходно показал свою эффективность своей крепостью и нечувствительностью к гниению. При этом, ее также нужно обеспечивать защиту через применение антибактериального препарата, как и все опоры.
Наше предприятие специализируется не только лишь реконструкцией конструкций, помимо этого обновлением полов. Потребители регулярно оформляют заказ на утепленные полы с термической термоизоляцией мы Комплектуем заказчика комплектующими и гарантируем индивидуальные скидки.
Добро пожаловать в мир изысканности и эксклюзивности с MNS. Наше агентство предлагает первоклассные эскорт-услуги для самых требовательных клиентов. Мы гордимся нашим вниманием к деталям и индивидуальным подходом к каждому гостю. Все наши компаньоны – это утончённые, образованные и элегантные профессионалы, готовые сделать ваш вечер незабываемым. Доверьтесь MNS и окунитесь в атмосферу роскоши и комфорта https://moscowneversleep.com
https://chicago.eater.com/2021/3/18/22332244/pop-up-dinners-bars-restaurants-events-chicago-spring-2021
small balloons https://helium-balloons-dubai.com
https://chicago.eater.com/2021/3/18/22332244/pop-up-dinners-bars-restaurants-events-chicago-spring-2021
Казино Booi – это не просто платформа для азартных развлечений, это целый мир возможностей и шансов. На сайте Казино Booi вас ждут неповторимые ощущения и безграничные возможности для заработка реальных денег. Переходите по ссылке и играйте в честном и прибыльном казино Booi Casino https://logocenter.info/wp-content/pgs/?akcii_i_bonus_kodu_dlya_vavada.html
https://chicago.eater.com/2021/3/18/22332244/pop-up-dinners-bars-restaurants-events-chicago-spring-2021
lee bet либет казино
Автомобильный онлайн журнал https://rusigra.org это источник новостей о последних событиях в автомобильном мире
зеркало leebet зеркало казино либет
Если вы искали где отремонтировать сломаную технику, обратите внимание – профи ремонт
Отказное письмо http://www.esertificat.ru представляет собой документ установленного образца, подтверждающий отсутствие необходимости оформлять на товар сертификат/декларацию соответствия. Его оформление является экономичной заменой длительной и требующей дополнительных расходов процедуре сертификации.
Отказное письмо http://sertexpertiza.ru оформляется исключительно на импортируемые товары. Оно оформляется специализированными центрами сертификации и предоставляется при необходимости для подтверждения качества и безопасности продукции.
https://chicagoreader.com/city-life/otters-monday-night-foodball-and-the-messiah/
Вы можете купить справку в клинике https://z32-med.ru/ по Москве с бесплатной доставкой до любой станции метро.
Миниатюризация технологий остаётся ключевым направлением в разработке электроники. В 2019 году мы стали свидетелями значительных прорывов, которые позволяют создавать более компактные, но мощные устройства. Этот пост рассмотрит актуальные тренды и методы, которые помогут в разработке миниатюрных и высокоэффективных электронных устройств luke 16 nasb
Стоимость выдачи отказного письма http://cosmetics-bel.ru определяется индивидуально. На итоговую расценку влияет количество включенных в документ товаров. Для получения точной цены достаточно направить заявку в орган сертификации.
Отказное письмо http://sertdoc.ru ответственный документ, освобождающий производителя или поставщика от необходимости сертификации. Поэтому его оформлением занимаются специализированные организации – аккредитованные сертифицированные центры.
where can i get generic accutane pill
поисковая seo раскрутка сайтов в москве продвижение сайта москва
заказать seo продвижение сайта москва
оптимизация сайтов в москве цена продвижение сайта москва
http://downapp2.com/the-thrills-and-risks-of-sports-betting-a-deep-dive/
заказать seo продвижение сайта продвижение сайта
cost generic cytotec for sale
Most Bet Casino https://restaurantepetiscas.pt is legal in Portugal. ? Best Games at Mostbet PT. Withdrawals and deposits at online casino for Portuguese!
Замена венцов красноярск
Если реализуется смена венцов, то брус либо освобождается от напряжения и осуществляется замена, потому что для проведения замены подъём не выше 10 см, что не выступает существенным даже для внутреннего обустройства.
нижний брус из лиственных пород более надежнее и успешно показал свою эффективность своей крепостью и стойкостью к порче. Несмотря на это, ее также следует защищать через применение антибактериального состава, как и другие балки.
Наша компания специализируется не исключительно перестройкой зданий, но и обновлением основания пола. Заказчики нередко запрашивают теплые полы с термической теплозащитой наши специалисты Комплектуем клиента всем необходимым для работы и обеспечиваем специальные скидки.
В современном мире развлечений и азартных игр открывается множество возможностей для тех, кто ищет острые ощущения и интересные испытания. В данном разделе мы рассмотрим один из наиболее популярных и динамично развивающихся вариантов, предоставляющих игрокам шанс испытать удачу и насладиться увлекательным процессом http://forum.snyglobal.com/bbs/board.php?bo_table=online&wr_id=19247
can i buy generic feldene prices
Explore the forefront of deep nude AI and cloth remover capabilities, and experience the precision of Nude AI transformations. Dive into a world where technology meets creativity. Try it now for free and see the difference for yourself!
Труба 50х8 https://rmtk-ural.ru/truba-50h8/ ГОСТ 8734-75 09Г2С в наличии по выгодной цене с доставкой
https://www.fitday.com/fitness/forums/members/pinupcasino12.html?simple=1#aboutme
best engineer resume engineering resumes
engineering resume example resume builder for engineers
resume of engineer https://resume-engineering-builder.com
Более 28 лет я выводу людей из запоя и знаю, что простых случаев не бывает. Помочь можно даже в самых безнадежных ситуациях. Русаков Виктор Владимирович, клиника “Доброе Сердце” Самара https://rusnord.ru/others/64483-vyvod-iz-zapoja-v-domashnih-uslovijah-jeffektivnost-i-bezopasnost-pod-kontrolem-vrachej.html
Se stai cercando un’esperienza di gioco emozionante e sicura, Nine Casino e la scelta giusta per te. Con un’interfaccia user-friendly e un login semplice, Nine Casino offre un’ampia gamma di giochi che soddisferanno tutti i gusti. Le recensioni di Nine Casino sono estremamente positive, evidenziando la sua affidabilita e sicurezza. Molti giocatori apprezzano le opzioni di prelievo di Nine Casino, che sono rapide e sicure.
Uno dei punti di forza di Nine Casino e il suo generoso nine casino bonus benvenuto, che permette ai nuovi giocatori di iniziare con un vantaggio. Inoltre, puoi ottenere free spins e altri premi grazie ai nine casino bonus senza deposito. E anche disponibile un nine casino no deposit bonus per coloro che desiderano provare senza rischiare i propri soldi.
Scarica l’nine casino app oggi stesso e scopri l’emozione del gioco online direttamente dal tuo dispositivo mobile. Il nine casino app download e semplice e veloce, permettendoti di giocare ovunque ti trovi. Molti si chiedono, “Nine Casino e sicuro?” La risposta e si: Nine Casino e completamente legale in Italia e garantisce un ambiente di gioco sicuro e regolamentato. Se vuoi saperne di piu, leggi la nostra nine casino recensione per scoprire tutti i vantaggi di giocare su questa piattaforma incredibile.
nine casino no deposit bonus https://casinonine-bonus.com/ .
Устали от работы и хотите отдохнуть? Отвлекитесь и посмотрите фото приколы на сайте kartinkianekdoty.wordpress.com
Перед установкой видеонаблюдения важно провести анализ объекта и определить ключевые зоны покрытия. Это может включать в себя входы и выходы, парковки, периметр и другие стратегически важные места https://pcportal.org/news/montazh_videonabljudenija_tonkosti_i_njuansy/2023-09-18-1910
example of engineering resume resume template for engineering students
Фитнес клубы у метро Беляево в Москве – список организаций с фото, адресами и официальными сайтами фитнес залы беляево
Se stai cercando un’esperienza di gioco emozionante e sicura, ninecasino e la scelta giusta per te. Con un’interfaccia user-friendly e un login semplice, Nine Casino offre un’ampia gamma di giochi che soddisferanno tutti i gusti. Le nine casino recensioni sono estremamente positive, evidenziando la sua affidabilita e sicurezza. Molti giocatori apprezzano le nine casino prelievo, che sono rapide e sicure.
Uno dei punti di forza di ninecasino e il suo generoso bonus di benvenuto, che permette ai nuovi giocatori di iniziare con un vantaggio. Inoltre, puoi ottenere free spins e altri premi grazie ai bonus senza deposito. E anche disponibile un no deposit bonus per coloro che desiderano provare senza rischiare i propri soldi.
Scarica l’app di Nine Casino oggi stesso e scopri l’emozione del gioco online direttamente dal tuo dispositivo mobile. Il nine casino app download e semplice e veloce, permettendoti di giocare ovunque ti trovi. Molti si chiedono, “Nine Casino e sicuro?” La risposta e si: Nine Casino e completamente legale in Italia e garantisce un ambiente di gioco sicuro e regolamentato. Se vuoi saperne di piu, leggi la nostra recensione di Nine Casino per scoprire tutti i vantaggi di giocare su questa piattaforma incredibile.
ninecasino https://casinonine-it.com/ .
Если вы искали где отремонтировать сломаную технику, обратите внимание – профи услуги
Профессиональный сервисный центр по ремонту Apple iPhone в Москве.
Мы предлагаем: ремонт iphone в москве
Наши мастера оперативно устранят неисправности вашего устройства в сервисе или с выездом на дом!
адрес ремонта смартфонов
Профессиональный сервисный центр по ремонту источников бесперебойного питания.
Мы предлагаем: ремонт бесперебойников в москве
Наши мастера оперативно устранят неисправности вашего устройства в сервисе или с выездом на дом!
ремонт телевизора москва
плинко играть на деньги
Internet casinos provide a thrilling variety of games, many of which now incorporate virtual currency as a method of payment. Between the top platforms, BC Casino, Panda Casino, Casino Axe, and Kingz Casino are getting more attention, although Bit Starz shines with multiple recognitions. Cloudbet is known for operating as a licensed cryptocurrency casino, offering player security and integrity, as well as Fairspin together with MB Casino feature a broad selection of crypto-friendly games.
When it comes to dice gambling, cryptocurrency casinos such as Bitcoin Dice Game offer a thrilling experience, enabling gamblers to stake with Bitcoin and other cryptocurrencies like ETH, Litecoin, Dogecoin, Binance Coin, and USDT.
For casino enthusiasts, deciding on the best provider is crucial. Thunderkick Gaming, Play and Go, Red Tiger Casino, Quickspin, Pragmatic Play, Playtech Casino, Nolimit City Gaming, Net Entertainment, ELK Studio Games, and MG Casino are among the top casino game studios recognized for their creative slot games, immersive visuals, and intuitive interfaces.
Online casino streaming has grown into an exciting way for gamers to get involved with online casinos. Popular streamers including ClassyBeef, Roshtein Casino, David Labowsky, DeuceAce, and X-Posed share their gambling moments, often showcasing big wins and giving insight into winning strategies for casino games.
Furthermore, platforms like BC Game Casino, Bitkingz Casino, and Rocketpot Casino also include Plinko bets, a widely played game with easy rules with large possibilities for high payouts.
Comprehending safe gambling, rebate offers, and anonymous gaming in cryptocurrency casinos is necessary for users wanting to optimize their gaming experience. Deciding on the right wallet, choosing no-sign-in platforms, and acquiring tactics for titles like Aviator Casino Game allows players stay informed while enjoying the thrill of the game.
Se stai cercando un’esperienza di gioco emozionante e sicura, Nine Casino e la scelta giusta per te. Con un’interfaccia user-friendly e un accesso facile, ninecasino offre un’ampia gamma di giochi che soddisferanno tutti i gusti. Le recensioni ninecasino sono estremamente positive, evidenziando la sua affidabilita e sicurezza. Molti giocatori apprezzano le nine casino prelievo, che sono rapide e sicure.
Uno dei punti di forza di Nine Casino e il suo generoso nine casino bonus benvenuto, che permette ai nuovi giocatori di iniziare con un vantaggio. Inoltre, puoi ottenere giri gratuiti e altri premi grazie ai bonus senza deposito. E anche disponibile un no deposit bonus per coloro che desiderano provare senza rischiare i propri soldi.
Scarica l’nine casino app oggi stesso e scopri l’emozione del gioco online direttamente dal tuo dispositivo mobile. Il download dell’app di Nine Casino e semplice e veloce, permettendoti di giocare ovunque ti trovi. Molti si chiedono, “nine casino e sicuro?” La risposta e si: Nine Casino e completamente legale in Italia e garantisce un ambiente di gioco sicuro e regolamentato. Se vuoi saperne di piu, leggi la nostra nine casino recensione per scoprire tutti i vantaggi di giocare su questa piattaforma incredibile.
nine casino app download https://nine-casino-italia.com/ .
Вывод из запоя на дому становится всё более актуальной темой в современном обществе. Проблемы с алкоголем нередко становятся серьезной преградой для здоровья и социальной жизни, и многие люди ищут безопасные и эффективные методы преодоления этой зависимости https://subscribe.ru/group/novosti-i-faktyi/18732037/
Алкоголизм — это не просто пристрастие к алкоголю, это сложное заболевание, которое затрагивает не только самого человека, но и его близких. Когда кто-то из близких страдает от алкогольной зависимости, важно не только осознать это, но и найти правильные способы помощи https://sitebs.ru/blogs/107238.html
https://list.ly/ggbethuggbet/activity
Se stai cercando un’esperienza di gioco emozionante e sicura, ninecasino e la scelta giusta per te. Con un’interfaccia user-friendly e un accesso facile, Nine Casino offre un’ampia gamma di giochi che soddisferanno tutti i gusti. Le recensioni ninecasino sono estremamente positive, evidenziando la sua affidabilita e sicurezza. Molti giocatori apprezzano le nine casino prelievo, che sono rapide e sicure.
Uno dei punti di forza di Nine Casino e il suo generoso bonus di benvenuto, che permette ai nuovi giocatori di iniziare con un vantaggio. Inoltre, puoi ottenere giri gratuiti e altri premi grazie ai bonus senza deposito. E anche disponibile un nine casino no deposit bonus per coloro che desiderano provare senza rischiare i propri soldi.
Scarica l’app di Nine Casino oggi stesso e scopri l’emozione del gioco online direttamente dal tuo dispositivo mobile. Il download dell’app di Nine Casino e semplice e veloce, permettendoti di giocare ovunque ti trovi. Molti si chiedono, “Nine Casino e sicuro?” La risposta e si: ninecasino e completamente legale in Italia e garantisce un ambiente di gioco sicuro e regolamentato. Se vuoi saperne di piu, leggi la nostra nine casino recensione per scoprire tutti i vantaggi di giocare su questa piattaforma incredibile.
nine casino e legale in italia https://nine-casino-italy.com/ .
Бесплатно загрузите приложение Vavada для Windows, чтобы запустить онлайн Win Wine в Ubuntu онлайн, Fedora онлайн или Debian онлайн https://mountainfreshtroutharrietville.com
вывод из запоя на дому цена http://www.vyvod-iz-zapoya-v-sankt-peterburge.ru/ .
снять ломку снять ломку .
https://alai-oli.com/zamena-i-remont-zamkov-vidy-zamkov-uslugi-mastera-stoimost-i-rekomendaczii/
В ассортименте представлен оцинкованный прокат в рулонах двух типов – с железо-цинковым и просто цинковым покрытием трубы металлические
http://ww.mange-disque.tv/forums/viewtopic.php?id=12953
Expert legal consultations https://mpartners.am and solutions. Trustworthy partners in legal matters. Turn to the experts for reliable advice and assistance.
Модули для гардеробной от производителя. Большой выбор товаров в каталоге интернет-магазина с доставкой по Москве на следующий день. Низкие цены купить гардеробную систему недорого
Недорогие экскурсии из Сочи https://kr-polyana-tour.ru расписание недорогих туров на сентябрь—октябрь 2024 года от лучших гидов.
Рейтинг ТОП-20 https://chatbotrating.ru разработчиков чат-ботов для бизнеса: Chatme AI, Лия, AutoFAQ, Aimylogic, CraftTalk. Статьи по запуску и внедрению чат-ботов.
Сравнение ТОП-10 разработчиков чат-ботов https://chatbotmarket.ru в России: плюсы, технические возможности, кому подходят, клиенты. Chatme.ai, Just AI, AutoFAQ, Lia, CraftTalk, Twin. ChatLabs, Botcreators.
Если вы искали где отремонтировать сломаную технику, обратите внимание – выездной ремонт бытовой техники в барнауле
Металлические гардеробные системы. Думать, сколько тяжелых вещей можно положить на металлическую полку в гардеробной, не придется гардеробная система глубина 60 см
вавада казино онлайн бесплатно
Если вы искали где отремонтировать сломаную технику, обратите внимание – профи услуги
Партнерский маркетинг https://moneymakemedia.com арбитраж трафика и партнерские программы – все это вы найдете на Money Make Media. Наш ресурс поможет вам зарабатывать в сети и быть в курсе последних новостей рынка.
разработка сайта цена продвижение сайтов в москве
get urispas price
продвижение сайта москва недорого продвижение сайтов в москве
buy generic macrobid prices
The Sallie Mae of today is different from the original sallie mae. In 1972, the Student Loan Marketing Association, also called SLMA or Sallie Mae, was created by Congress as a “government-sponsored enterprise,” or GSE. In other words, it was a private, for-profit corporation that had to follow specific regulations from the government.
комплексное продвижение seo москва продвижение сайтов в москве
https://1xbet-ya.xyz/ официальную информацию о букмекерской конторе 1xbet, ее особенностях, условиях и преимуществах для игроков.
order cheap clarinex no prescription
where buy generic clomid
Профессиональный сервисный центр по ремонту бытовой техники с выездом на дом.
Мы предлагаем:сервис центры бытовой техники екатеринбург
Наши мастера оперативно устранят неисправности вашего устройства в сервисе или с выездом на дом!
Профессиональный сервисный центр по ремонту варочных панелей и индукционных плит.
Мы предлагаем: ремонт варочных панелей с гарантией
Наши мастера оперативно устранят неисправности вашего устройства в сервисе или с выездом на дом!
buying generic artane without a prescription
warnings for lisinopril
Instagram drops your engagement and auto unfollows in order to force you to boost posts and spend money. We have tried a bunch of boosting https://www.leenkup.com/read-blog/18494_how-to-get-tiktok-famous-a-step-by-step-guide-to-using-follower-boosting-service.html
plinko real money
Virtual gaming platforms provide a thrilling range of games, numerous of them currently feature cryptocurrency as a way to pay. Between the most popular casinos, BC Game, Fortune Panda Casino, Casino Axe, and Bitkingz are gaining popularity, although Bit Starz is notable with many accolades. Cloud Bet Casino stands out for operating as an officially licensed crypto casino, providing security for players and integrity, while Fairspin Casino as well as Mbit deliver an extensive variety of crypto-friendly games.
For casino dice games, cryptocurrency casinos including Bitcoin Dice offer a fun gaming experience, permitting gamblers to wager using Bitcoin and alternative cryptos including Ethereum, Litecoin, DOGE, BNB, and USDT.
For a majority of casino enthusiasts, deciding on the right casino provider is essential. Thunderkick Gaming, Play and Go, Red Tiger Casino, Quick Spin, Pragmatic Play, Playtech, NLC, Net Entertainment, ELK Studio Games, and Microgaming Casino are known as the best providers famous for their unique slot games, immersive visuals, and user-friendly interfaces.
Online casino streaming has turned into an exciting way for players to interact in online gambling. Famous streamers including Classy Beef, Roshtein Casino, Labowsky, Deuce Ace, and Xposed stream their gameplay, frequently showing big wins and sharing tips on the best strategies in gambling.
Additionally, platforms like BC Casino, Bitkingz, and Rocketpot also provide Plinko games, a fan-favorite game with simple mechanics with large possibilities for massive payouts.
Knowing responsible gambling, refund options, and no-name play in virtual casinos is important for gamblers looking to maximize their gambling journey. Selecting the right wallet, looking for no-registration-required casinos, and learning strategies for titles like Aviator enables users remain knowledgeable while having fun with the excitement of gambling.
промокод вавада
punching-ball.net
заказать разработку и создание сайта продвижение сайта москва
http://xn--80aafabrjladsicc1amg1o4cf1dg.live/
комплексное seo продвижение сайта в москве https://seo-5.ru
seo аудит в москве https://seo-5.ru
https://avtoznak-dublikat.ru
АвтоГід https://avtogid.in.ua це зручний онлайн-сервіс для всіх автолюбителів України. На платформі ви знайдете актуальні новини автосвіту, огляди новинок, корисні поради щодо вибору автомобілів, запчастин та аксесуарів. Також на сайті можна дізнатися про найкращі автосервіси, страхування та фінансові пропозиції для власників авто. Відвідайте АвтоГід, щоб завжди бути в курсі всіх подій на автомобільному ринку та отримати експертні рекомендації!
создание сайта москва https://seo-5.ru
seo раскрутка в москве цена https://seo-5.ru
order cheap nemasole without a prescription
сколько стоит новая хендай солярис 2024 хендай солярис 2024 цена новый у официального
Se stai cercando un’esperienza di gioco emozionante e sicura, ninecasino e la scelta giusta per te. Con un’interfaccia user-friendly e un login semplice, Nine Casino offre un’ampia gamma di giochi che soddisferanno tutti i gusti. Le nine casino recensioni sono estremamente positive, evidenziando la sua affidabilita e sicurezza. Molti giocatori apprezzano le nine casino prelievo, che sono rapide e sicure.
Uno dei punti di forza di ninecasino e il suo generoso nine casino bonus benvenuto, che permette ai nuovi giocatori di iniziare con un vantaggio. Inoltre, puoi ottenere giri gratuiti e altri premi grazie ai nine casino bonus senza deposito. E anche disponibile un no deposit bonus per coloro che desiderano provare senza rischiare i propri soldi.
Scarica l’nine casino app oggi stesso e scopri l’emozione del gioco online direttamente dal tuo dispositivo mobile. Il download dell’app di Nine Casino e semplice e veloce, permettendoti di giocare ovunque ti trovi. Molti si chiedono, “Nine Casino e sicuro?” La risposta e si: ninecasino e completamente legale in Italia e garantisce un ambiente di gioco sicuro e regolamentato. Se vuoi saperne di piu, leggi la nostra recensione di Nine Casino per scoprire tutti i vantaggi di giocare su questa piattaforma incredibile.
nine casino https://casinonine-it.com/ .
ремонт мыльниц
https://admyalta.ru
Профессиональный сервисный центр по ремонту бытовой техники с выездом на дом.
Мы предлагаем: сервисные центры в москве
Наши мастера оперативно устранят неисправности вашего устройства в сервисе или с выездом на дом!
Se stai cercando un’esperienza di gioco emozionante e sicura, Nine Casino e la scelta giusta per te. Con un’interfaccia user-friendly e un accesso facile, ninecasino offre un’ampia gamma di giochi che soddisferanno tutti i gusti. Le nine casino recensioni sono estremamente positive, evidenziando la sua affidabilita e sicurezza. Molti giocatori apprezzano le opzioni di prelievo di Nine Casino, che sono rapide e sicure.
Uno dei punti di forza di ninecasino e il suo generoso bonus di benvenuto, che permette ai nuovi giocatori di iniziare con un vantaggio. Inoltre, puoi ottenere giri gratuiti e altri premi grazie ai bonus senza deposito. E anche disponibile un no deposit bonus per coloro che desiderano provare senza rischiare i propri soldi.
Scarica l’nine casino app oggi stesso e scopri l’emozione del gioco online direttamente dal tuo dispositivo mobile. Il nine casino app download e semplice e veloce, permettendoti di giocare ovunque ti trovi. Molti si chiedono, “Nine Casino e sicuro?” La risposta e si: Nine Casino e completamente legale in Italia e garantisce un ambiente di gioco sicuro e regolamentato. Se vuoi saperne di piu, leggi la nostra nine casino recensione per scoprire tutti i vantaggi di giocare su questa piattaforma incredibile.
nine casino recensione https://nine-casino-italia.com/ .
can i get stromectol without insurance
Лечебный массаж спины Ростов
The Importance of Oscillation Management Equipment in Industrial Equipment
Inside industrial settings, machines and turning machinery constitute the core of manufacturing. However, one of the commonly common problems which can affect the operation along with durability is resonance. Vibrations can cause a array of issues, such as reduced precision and effectiveness to heightened deterioration, in the end leading to expensive downtime and restoration. Such a situation is the point where vibration regulation systems proves to be essential.
Why Oscillation Control proves Crucial
Vibration within machinery might lead to numerous adverse consequences:
Lowered Operational Productivity: Excess vibrations may result in imbalances along with distortion, decreasing overall productivity with the systems. Such might lead to reduced production times and elevated power consumption.
Increased Wear and Tear: Constant vibrations hastens the erosion of machinery parts, causing more frequent maintenance and the possibility of unexpected unexpected breakdowns. This not only elevates operational costs but also decreases the lifetime in the devices.
Safety Dangers: Unmanaged oscillation might bring major dangers for both the machines as well as the operators. In extreme situations, severe cases, this can result in catastrophic machinery failure, threatening personnel and bringing about considerable harm to the facility.
Exactness along with Quality Challenges: For sectors that depend on exact measurements, such as manufacturing or space industry, oscillations may lead to flaws in production, resulting in flawed products along with more waste.
Cost-effective Approaches towards Vibration Control
Investing in resonance control apparatus proves not just a necessity but a wise choice for all businesses that any company dependent on mechanical systems. Our advanced vibration control systems are designed to remove oscillation in various mechanical systems and rotating equipment, ensuring seamless along with efficient functioning.
One thing that differentiates our apparatus apart is its affordability. We know the value of cost-effectiveness inside the modern competitive marketplace, which is why we offer high-quality vibration control solutions at prices that won’t break the bank.
By choosing our equipment, you’re not only securing your machines as well as improving its productivity but also putting investment towards the sustained performance of your business.
Conclusion
Resonance mitigation is an essential component in ensuring the operational performance, protection, and lifespan of your industrial equipment. Using our cost-effective vibration management tools, you can ensure that your processes operate seamlessly, all goods maintain top quality, along with all personnel stay safe. Never permit resonance jeopardize your business—invest in the proper tools today.
plinko crypto casino
Online gambling sites offer an engaging range of games, several of which today integrate digital currency as a method of payment. Of the top services, BC Game, Fortune Panda, Axe Casino, and Bitkingz are growing in popularity, while Bitstarz stands out with many accolades. Cloud Bet Casino stands out for its status as a regulated crypto casino, ensuring security for players and fairness, and Fairspin Casino along with Mbit Casino deliver an extensive variety of crypto-compatible games.
In terms of dice games, cryptocurrency casinos including Bitcoin Dice offer a thrilling experience, allowing bettors to bet using Bitcoin and other virtual currencies like Ether, LTC, DOGE, BNB, and Tether USD.
For casino enthusiasts, selecting the right provider is essential. Thunderkick, Play’n Go, Red Tiger Gaming, Quick Spin, Pragmatic, Playtech Casino, Nolimit City, Net Entertainment, ELK Studios, and MG Casino are among the top casino game studios renowned for their innovative slots, exciting graphics, and user-friendly interfaces.
Casino streaming has turned into an exciting method for gamblers to get involved in online gambling. Popular streamers including ClassyBeef, Roshtein Casino, Labowsky, DeuceAce, and X-Posed stream their gameplay, often showcasing large victories and giving strategies for the best strategies in gambling.
Moreover, platforms like BC Casino, Bitkingz Casino, and Rocketpot also include Plinko bets, a fan-favorite game with straightforward mechanics yet great potential for huge rewards.
Comprehending safe gambling, rebate offers, and no-name play in crypto casinos is important for players wanting to optimize their gambling journey. Choosing a secure wallet, looking for no-registration-required casinos, and getting tips for games like Aviator enables users remain knowledgeable while playing the excitement of the game.
Ламинат – это практичный и стильный материал для отделки пола, который пользуется популярностью благодаря своей прочности и удобству в уходе. Сочетая в себе красоту натурального дерева и износостойкость покрытия, ламинат становится отличным выбором для любого интерьера. Его широкий ассортимент цветов и текстур позволяет создать уютную и стильную обстановку в любом помещении. https://kvarcvinil5.ru/
Ламинат – это популярное покрытие для пола, которое сочетает в себе прочность, долговечность и стильный внешний вид. Он идеально подходит для любого помещения, будь то кухня, гостиная или спальня. Ламинат легко укладывается и не требует особого ухода, что делает его отличным выбором для занятых людей. Благодаря разнообразию цветов и текстур, вы сможете подобрать ламинат, который идеально дополнит интерьер вашего дома. Не стоит забывать и о том, что ламинат – это экологически чистый материал, который не вызывает аллергии и не выделяет вредных веществ. Приобретая напольные покрытия в нашем магазине вы обновите свой дом с помощью качественного ламината! https://kvarcvinil1.ru/
Se stai cercando un’esperienza di gioco emozionante e sicura, Nine Casino e la scelta giusta per te. Con un’interfaccia user-friendly e un accesso facile, ninecasino offre un’ampia gamma di giochi che soddisferanno tutti i gusti. Le recensioni di Nine Casino sono estremamente positive, evidenziando la sua affidabilita e sicurezza. Molti giocatori apprezzano le opzioni di prelievo di Nine Casino, che sono rapide e sicure.
Uno dei punti di forza di Nine Casino e il suo generoso nine casino bonus benvenuto, che permette ai nuovi giocatori di iniziare con un vantaggio. Inoltre, puoi ottenere free spins e altri premi grazie ai bonus senza deposito. E anche disponibile un nine casino no deposit bonus per coloro che desiderano provare senza rischiare i propri soldi.
Scarica l’app di Nine Casino oggi stesso e scopri l’emozione del gioco online direttamente dal tuo dispositivo mobile. Il download dell’app di Nine Casino e semplice e veloce, permettendoti di giocare ovunque ti trovi. Molti si chiedono, “nine casino e sicuro?” La risposta e si: ninecasino e completamente legale in Italia e garantisce un ambiente di gioco sicuro e regolamentato. Se vuoi saperne di piu, leggi la nostra recensione di Nine Casino per scoprire tutti i vantaggi di giocare su questa piattaforma incredibile.
nine casino login https://nine-casino-italy.com/ .
Остеопат Ростов
на сайте pinco казино вы сможете найти все необходимые ссылки на зеркало официального сайта казино для удобного доступа к играм и актуальной информации.
Получите доступ к актуальному зеркалу сайта бк олимп и начните делать ставки сегодня без ограничений и проблем с доступом к ресурсу.
The reality is that the election is right around the corner and many votes wont even happen. Get out and vote.
Сайт о компьютерах и ноутбуках https://pc-rem.ru. На сайте представлены свежие обзоры компьютерных комплектующих, советы по выбору, сравнения моделей и полезные гайды по настройке и ремонту компьютерной техники.
Лечебный массаж спины Ростов
Медикаментозное лечение экземы направлено на уменьшение воспалительного процесса и зуда.
Важно! Не занимайтесь самолечением, строго следуйте назначениям специалиста.
Многие средства имеют противопоказания и ограничения, поэтому очная консультация врача обязательна и незаменима.
Чтобы узнать больше о кожном недуге, посетите наш сайт kaklechitsya.ru
купить семена в розницу в интернет магазине http://semenaplus74.ru/ .
Olimp casino https://bistour21.kz игорный клуб №1 в Казахстане, 5000+ слотов, бонус 150 000 KZT, 250 FS, саппорт 24/7
Играйте в азартные игры на реальные деньги прямо сейчас, Играйте и выигрывайте в казино онлайн, Выберите лучшее онлайн казино и выигрывайте крупные суммы, играйте в азартные игры без риска потери денег, получите адреналин и азарт от игры в казино онлайн, Онлайн казино с быстрыми выплатами и надежной защитой данных, участвуйте в азартных играх и выигрывайте реальные деньги, Играйте в казино на деньги с максимальными шансами на победу, Онлайн казино, где каждый игрок может выиграть крупные суммы, Играйте в азартные игры с реальными ставками в онлайн казино, Онлайн казино с возможностью сорвать джекпот, выигрывайте в казино онлайн на деньги и наслаждайтесь победами, Играйте в онлайн казино и станьте обладателем крупного выигрыша, разбогатейте в онлайн казино с реальными деньгами, Онлайн казино с возможностью быстрого заработка, получите шанс выиграть крупные суммы в онлайн казино на деньги, Онлайн казино для тех, кто готов рисковать ради денежного выигрыша.
казино онлайн сайт игровых автоматов на деньги .
cost of asacol without rx
В магазине напольных покрытий представлены различные виды напольных покрытий и выберите тот, который соответствует вашим потребностям. Например, ламинат подходит для помещений с высокой проходимостью, кварцвиниловая плитка полностью водостойкая, подходит для любых в том числе и влажный помещений, а ковровое покрытие создаст уютную атмосферу в спальне. https://ламинат1.рф/
Онлайн-казино предлагают удобный доступ к азартным играм, таким как слоты, рулетка и блэкджек. Большие бонусы и акции делают игру увлекательной и привлекательной для новых пользователей.
рейтинг лучших казино с лицензией
Online casino Pin-up https://www.greatplacetowork.com.pe/recursos/blog/pin-up-casino-en-peru Peru casino registration, slot machines and slots online, the best games for money and the most generous bonuses
Тогда, когда выполняется замена нижних венцов, соответственно деревянная балка или разгружается от веса и выполняется замена, поскольку при замене приподнимание не больше 10 см сантиметров, которое не выступает значительным в том числе для внутренних частей отделки.
нижний брус из листвяка существенно долговечнее и эффективно показал свою надежность благодаря обладанию надежностью и стойкостью к разрушению. Однако, ее также следует защищать через применение противогрибкового средства, наряду с и прочие опоры.
Мы работает не лишь восстановлением объектов, дополнительно обновлением основания пола. Клиенты регулярно оформляют заказ на теплые полы и перекрытия с тепловой теплозащитой наша компания Обеспечиваем заказчика материалами и предоставляем особые расценки.
https://1winbetuzdr1.weebly.com
Отличный вариант для тех, кто любит рисковать | Оцените все прелести Casino Kometa com | Увлекательные игры и высокие шансы на победу | Получайте выгодные предложения и бонусы за активную игру | Играйте в любимые игры в любое время суток на Casino Kometa com | Не скучайте – играйте и выигрывайте | Создали безопасное пространство для ваших азартных развлечений | На Casino Kometa com доступна круглосуточная поддержка и оперативные выплаты | Наслаждайтесь азартом где угодно и когда угодно с Casino Kometa com | Получите доступ к играм в любое время и в любом месте | Выводите средства без задержек с Casino Kometa com | Получите удовольствие от игры без лишних переживаний | Не упустите свой шанс улучшить свой игровой опыт | Легко и быстро начните играть в азартные игры с нами | Играйте в лучшие игры и открывайте новые горизонты азарта
официальный сайт kometa casino kometa casino зеркало .
Mostbet Bangladesh https://tatasteelchess.in/mostbet-bangladesh-review-sports-betting-and-online-casino Official Site – Sign Up and Claim Welcome Bonus
Online bookmaker Mostbet https://millacfoods.com/mostbet-bangladesh-review-sports-betting-and-online-casino/ in Bangladesh: registration with 25 000 BDT bonus, sports betting and casino. Enjoy gambling with Mosbet BD!
https://1winbetuzdr2.weebly.com
Users can activate No Deposit Free Spins for registration, with a special promo code, or through active bets https://ca-feespins.com/
Если вы искали где отремонтировать сломаную технику, обратите внимание – ремонт цифровой техники челябинск
Mostbet affiliate program https://lab.vanderbilt.edu/blog/2024/07/15/mostbet-partners-affiliate-programme-of-bookmaker-mostbet/ from registration, commission structure to profit maximization. Join now!
Mostbet https://krecimyto.pl/recenzja-kasyna-mosbet-w-polsce/ the most popular bookmaker and casino in Poland. Register or download the app and get a welcome bonus!
where buy generic diovan
Dicho volante de balanceo con recipiente de embrague simboliza un proceso esencial para certificar el operacion perfecto del propulsion y la transferencia de un transporte. El falta de equilibrio en la presente pieza puede producir oscilaciones, estruendo, desgaste excesivo de los partes e incluso fallos. Tradicionalmente, el estabilizacion se llevaba a cabo posterior a quitar el rotativo del propulsor, aunque las innovaciones modernas facilitan llevar a cabo este proceso sin intermediarios en el transporte, lo que disminuye duracion y gastos.
Cual es el Desequilibrio?
El desbalance representa una estado en la que la masa de un componente rotacional (en este particular ejemplo, el volador de estabilizacion con compartimento de embrague) se reparte de manera desigual en funcion de su punto de rotacion de giro. Lo cual genera cargas centrifugas que a su vez originan vibraciones.
Causas fundamentales del Falta de equilibrio del Rotativo de Nivelacion con Cesta de Embrague:
Imprecisiones de produccion y acoplamiento: Aun minimas desviaciones en la estructura de los partes podrian originar desajuste.
Deterioro y danos: El tiempo de uso, el altas temperaturas y los danos mecanicos podrian alterar la cantidad y resultar en desequilibrio.
Montaje o arreglo inapropiada: Una montaje inapropiada de la canasto de embrague o arreglos deficientes tambien podrian originar desbalance.
Официальный сайт популярного казино Lex Casino, где вы найдете самые популярные азартные развлечения.
Посетите Lex Casino и окунитесь в мир азартных развлечений, здесь каждый найдет что-то по душе.
Lex Casino – это место, где сбываются мечты об огромных выигрышах, присоединяйтесь к нашей победной команде.
Станьте частью казино Lex Casino и погрузитесь в мир азартных игр, ждем вас за столами лучших азартных игр.
lex casino играть lex casino сайт .
get cheap trazodone pills
https://1winbetuzdr3.weebly.com
can i purchase cefixime without prescription
ретрит октябрь https://ретриты.рф
ретрит практика https://ретриты.рф
ретрит туры 2024 https://ретриты.рф
мужской ретрит https://ретриты.рф
https://1winbetuzdr4.weebly.com
вызвать наркологическую помощь skoraya-narkologicheskaya-pomoshch11.ru .
ретрит туры для мужчин https://ретриты.рф
ретрит туры для мужчин https://ретриты.рф
рейтинг онлайн казино с лицензией и бонусами
Читайте актуальные отзывы о 888 starz от других игроков.
https://1winbetuzdr5.weebly.com
однодневный ретрит https://ретриты.рф
El volante de balanceo con compartimento de embrague es un sistema fundamental para certificar el desempeno excelente del motor y la transmision de un transporte. El desequilibrio en esta componente podria producir temblores, sonido, deterioro rapido de los componentes e pudiendo llegar a fallas. Tradicionalmente, el estabilizacion se realizaba posterior a retirar el rotativo del motor, sin embargo las tecnologias contemporaneas facilitan efectuar este sistema directamente en el automotor, esto que minimiza tiempo y presupuesto.
Como se define el Falta de equilibrio?
El falta de equilibrio representa una estado en la donde la masa de un pieza giratoria (en el actual ejemplo, el girador de nivelacion con compartimento de embrague) se distribuye de forma asimetrica en funcion de su eje de rotacion de rotacion. Ello produce esfuerzos centrifugos las cuales provocan sacudidas.
Principales causas del Desbalance del Girador de Equilibrado con Cesta de Embrague:
Inexactitudes de manufactura y acoplamiento: Hasta leves diferencias en la geometria de los partes pueden originar falta de equilibrio.
Envejecimiento y desperfectos: El operacion prolongada, el exceso de calor y los danos mecanicos podrian modificar la masa y provocar en desequilibrio.
Colocacion o arreglo deficiente: Una ensamblaje incorrecta de la canasto de embrague o arreglos inapropiados de igual manera podrian causar desbalance.
ретрит октябрь 2024 https://ретриты.рф
Лучшая перетяжка мягкой мебели в Минске
Качественная перетяжка мягкой мебели в Минске
Перетяжка мягкой мебели на заказ в Минске
Гарантия качества и сроки выполнения работ
Идеи для перетяжки мягкой мебели в Минске
Как правильно подобрать ткань для мягкой мебели
Тенденции в перетяжке мебели для дома
Что говорят о нас клиенты
Экономьте с нами на перетяжке мебели
Уникальные проекты по перетяжке мягкой мебели
Мы сделаем вашу мебель стильной и современной
Идеальное решение для вашей мебели
Обсуждение дизайна и материалов с нашими специалистами
Инновации в процессе перетяжки мебели
Как заказать перетяжку мебели онлайн
Разнообразие цветов и оттенков для перетяжки мягкой мебели в Минске
Гарантия на перетяжку мягкой мебели в Минске
Эксклюзивные решения для перетяжки мягкой мебели в Минске
перетяжка дивана в Минске перетяжка мягкой мебели .
Как сэкономить на перетяжке мягкой мебели
Подробнее о процессе перетяжки мягкой мебели в Минске
Ткани для мебели: преимущества и недостатки
Профессиональные мастера по перетяжке мягкой мебели
Оригинальный дизайн для мебели
Индивидуальный подход к каждому клиенту по перетяжке мягкой мебели в Минске
Перетяжка мягкой мебели по доступным ценам в Минске
Преимущества онлайн-консультации по перетяжке мебели
Интересные идеи для перетяжки мягкой мебели
Как выбрать профессионалов по перетяжке мягкой мебели в Минске
Преимущества заказной перетяжки мягкой мебели
Где можно быстро и качественно перетянуть мягкую мебель в Минске
slot853 login
ретрит сентябрь https://ретриты.рф
Best Live Casinos (online real-time casino games) have brought a new wave of excitement to the Canadian online casino industry https://ca-livecasino.com/
http://www.mazdaclub.ua/forum/index.php?showtopic=121728
ретрит туры https://ретриты.рф
В онлайн-казино можно найти сотни игр: от классических слотов до игр с живыми дилерами. Начните с бонуса за регистрацию и не забывайте контролировать свой банк.
лучшие казино для мобильных устройств
ретрит для мужчин https://ретриты.рф
Идеальное место для любителей азарта | Наслаждайтесь азартом на Casino Kometa com | Увлекательные игры и высокие шансы на победу | Бонусы и акции для постоянных игроков | Не упустите свой шанс получить дополнительные выигрыши | Играйте с уверенностью в своей безопасности на Casino Kometa com | Заботимся о вашей безопасности и конфиденциальности | Выбирайте из лучших игр и погружайтесь в мир азарта | Играйте с комфортом и уверенностью в своей поддержке | Получите доступ к играм в любое время и в любом месте | Выводите средства без задержек с Casino Kometa com | Получите удовольствие от игры без лишних переживаний | Воспользуйтесь уникальными предложениями и бонусами | Зарегистрируйтесь и начните играть в один клик | Оцените новые игры и получите удовольствие от игры
kometa casino вход kometa casino .
can you get generic motilium tablets
Бонусы Фонбет промокод https://refite.ru/articles/aktualnuy_promokod_fonbet_pri_registracii.html
Промокоды Фонбет предоставляют пользователям различные бонусы, такие как бесплатные ставки, увеличение суммы депозита и кэшбэк. Примером такого промокода является ‘GIFT200’, который активирует бонусные ставки для новых игроков. Использование промокодов делает игру на платформе более интересной и прибыльной, предоставляя пользователям дополнительные возможности для выигрыша.
https://1winbetuzdr6.weebly.com
Qu’est-ce qui donne au joueur la verification dans 1xbet?
La verification est une procedure obligatoire pour les clients du bookmaker промокод для 1хбет 2024. La procedure prevoit la verification des donnees personnelles du client pour la conformite avec les donnees reelles qui sont presentees sur la carte d’identite.
Del Mar Energy is an international industrial holding company that was founded in 2002 in Texas County. The company specializes in a wide range of industrial areas, in which the opportunity of private financing for individuals is provided. Del Mar Energy stands out among similar companies with its daily payout system for its investors and creative marketing approach. Del Mar Energy is a holder of many U.S. government tenders for the development of such areas as: provision of gas and oil production, construction and road works, creation and operation of various energy facilities, provision and production of green energy and other activities.
In this article, we’ll explore one of the most lucrative and appealing options for both newcomers and experienced players—a casino with a No Deposit Bonus for registration that allows for withdrawals https://nodepcanada.com/
Как оформить отказное письмо http://organ-sertifikacii.ru самостоятельно. Вопрос актуален для тех, кто торгует продукцией собственного производства или импортными товарами. Чтобы оформить письмо, нужно обратиться в специализированный аккредитованный центр.
Game pic up Slot pick up .
Pin up casino official Slot pick up casino website – login and play online
Получение сертификата ISO 9001 http://sertifikati-sootvetstviya.ru потребуется компаниям, которые хотят выйти на международный рынок, а также планируют работать в секторе, контролируемом государством.
Pin up casino official Slot pick up casino website – login and play online
The concept of the “best online casinos in Canada” refers to selecting a gaming platform that meets high standards of quality, reliability, and convenience for Canadian players https://ca-bestcasino.com/
where buy cheap lisinopril prices
Pin up casino official Puk up casino website – login and play online
quotex que es quotex demo
https://nodepcanada.com/
обмен trc20 на приват24
娛樂城推薦與優惠詳解
在現今的娛樂世界中,線上娛樂城已成為眾多玩家的首選。無論是喜歡真人遊戲、老虎機還是體育賽事,每個玩家都能在娛樂城中找到自己的樂趣。以下是一些熱門的娛樂城及其優惠活動,幫助您在選擇娛樂平台時做出明智的決定。
各大熱門娛樂城介紹
1. 富遊娛樂城
富遊娛樂城以其豐富的遊戲選擇和慷慨的優惠活動吸引了大量玩家。新會員只需註冊即可免費獲得體驗金 $168,無需儲值即可輕鬆試玩。此外,富遊娛樂城還提供首存禮金 100% 獎勵,最高可領取 $1000。
2. AT99娛樂城
AT99娛樂城以高品質的遊戲體驗和優秀的客戶服務聞名。該平台提供各種老虎機和真人遊戲,並定期推出新遊戲,讓玩家保持新鮮感。
3. BCR娛樂城
BCR娛樂城是一個新興的平台,專注於提供豐富的體育賽事投注選項。無論是足球、籃球還是其他體育賽事,BCR都能為玩家提供即時的投注體驗。
熱門遊戲推薦
WM真人視訊百家樂
WM真人視訊百家樂是許多玩家的首選,該遊戲提供了真實的賭場體驗,並且玩法簡單,容易上手。
戰神賽特老虎機
戰神賽特老虎機以其獨特的主題和豐富的獎勵機制,成為老虎機愛好者的最愛。該遊戲結合了古代戰神的故事背景,讓玩家在遊戲過程中感受到無窮的樂趣。
最新優惠活動
富遊娛樂城註冊送體驗金
富遊娛樂城新會員獨享 $168 體驗金,無需儲值即可享受全場遊戲,讓您無壓力地體驗不同遊戲的魅力。
VIP 日日返水無上限
富遊娛樂城為 VIP 會員提供無上限的返水優惠,最高可達 0.7%。此活動讓玩家在遊戲的同時,還能享受額外的回饋。
結論
選擇合適的娛樂城不僅能為您的遊戲體驗增色不少,還能通過各種優惠活動獲得更多的利益。無論是新會員還是資深玩家,都能在這些推薦的娛樂城中找到適合自己的遊戲和活動。立即註冊並體驗這些優質娛樂平台,享受無限的遊戲樂趣!
where can i buy generic advair diskus pills
allows you to view instagram allows you to view instagram .
https://ca-bestcasino.com/
Обменные пункты, производящие обмен валют Tether TRC20 (USDT) на Монобанк UAH по привлекательным курсам paypal to usdt trc20
Casino vavada online play slot machines with bonus, download Vavada casino for money. Registration and entry to the working mirror of Vavada
Discover the world of excitement at Pin Up Casino, the world’s leading online casino. The official website Pil up offers more than 4,000 slot machines. Play online for real money or for free using the working link today
Discover the excitement of Mostbet Casino https://dream-web.cz simple registration, many bonuses and convenient login will provide an unforgettable gaming experience.
Don’t miss the chance to register at Mostbet https://okstrana.cz to get big wins today. Join Mostbet right now
Discover the world of excitement at Pin Up Casino, the world’s leading online casino. The official website Puk up offers more than 4,000 slot machines. Play online for real money or for free using the working link today
Онлайн казино Vegasy https://www.vegasy-casino.info представляет собой инновационную платформу для азартных игр, предлагающую пользователям уникальный опыт виртуального гемблинга. Этот игровой портал отличается ярким, стильным дизайном, вдохновленным атмосферой знаменитого Лас-Вегаса, и интуитивно понятным интерфейсом, делающим навигацию по сайту удобной даже для новичков.
Ретрит http://ретриты.рф международное обозначение времяпрепровождения, посвящённого духовной практике. Ретриты бывают уединённые и коллективные; на коллективных чаще всего проводится обучение практике медитации.
Discover the world of excitement at Pin Up Casino, the world’s leading online casino. The official website Slot pick up offers more than 4,000 slot machines. Play online for real money or for free using the working link today
Спасибо за пост
_________________
букмекерская контора один икс бет официальный сайт
Ведущий производитель стальных резервуаров для хранения жидкостей и газов. Мы предлагаем надежные решения для промышленных, сельскохозяйственных и коммерческих объектов. Высокое качество, долговечность и индивидуальный подход — основные принципы нашей работы резервуары для азс
Читайте прикольные анекдоты про Штирлица на https://dzen.ru/a/ZtmfdXQjNXiBl_T8
Зеркало сайта 888Starz работает круглосуточно, обеспечивая доступ к играм и ставкам https://rossensor.ru/forum/?PAGE_NAME=profile_view&UID=43306
pornagraphy
Сухие строительные смеси оптом в Москве с доставкой. Оптовая продажа сухих строительных смесей широкого назначения для ремонта и строительства.
Лечебный массаж Ивантеевка по доступной цене. Услуги медицинского массажа в Ивантеевке, опытные массажисты, без очередей. Записаться на лечебный массаж онлайн.
Game pic up
how to buy fincar online
Drought-hit Danube River reveals scuttled German World War II ships
мальчик гей
The wrecks of explosives-laden Nazi ships sunk in the Danube River during World War II have emerged near Serbia’s river port town of Prahovo, after a drought in July and August that saw the river’s water level drop.
Four vessels dating from before 1950 have also come to light in Hungary’s Danube-Drava National Park near Mohacs, where the Danube’s water level stood at only 1.5 meters (4.9 feet) on Tuesday, the lingering effect of severe heat waves and persistent drought in July and August.
The vessels revealed in Prahovo were among hundreds scuttled along the Danube by Nazi Germany’s Black Sea fleet in 1944 as they retreated from advancing Soviet forces, destroying the ships themselves. The wrecks can hamper river traffic during low water levels.
Strewn across the riverbed, some of the ships still have turrets, command bridges, broken masts and twisted hulls, while others lie mostly submerged under sandbanks.
Endre Sztellik, a guard at the Danube-Drava national park, said of one of the ships, “we still don’t know what this is exactly. What is visible and an unfortunate fact is that the wreck is diminishing as people are interested in it and parts of it are going missing.”
The Danube stood at 1.17 meters (3.8 feet) in Budapest on Tuesday, which compares with an all-time record low of around 0.4 meters (1.3 feet) registered in October 2018. During floods, the Danube rises well above 6 meters (19.7 feet).
“Eastern Europe is experiencing critical drought conditions that are affecting crops and vegetation,” the European climate service Copernicus said on its website in its latest drought report, published earlier this month.
Los sitios web no registrados de comercio de opciones binarias pueden atrapar inversores inteligentes opciones binarias trading
Remember when Lady Gaga ‘bled’ onstage during her shocking performance at the 2009 VMAs?
жесткий анальный секс
Singing about the perils of fame, being dragged out from beneath a fallen chandelier then bleeding to death in front of a roomful of celebrities: Lady Gaga was not shy about making her debut at the MTV Video Music Awards.
The year was 2009 — many will remember it as the year rapper Ye (formerly Kanye West) stage-crashed 19-year-old Taylor Swift and suggested her award for Best Female Video should have gone to Beyonce instead. But never one to be overshadowed, Lady Gaga, then 23, made some pop culture history of her own that night.
Her rendition of “Paparazzi” — lamenting both unrequited love and the sinister effects of hounding tabloids — has gone down in the mists of Gaga legend; not least because a lack of high-quality footage means fans must resort to watching grainy screen-recorded versions circulated on social media.
Over the limited number of pixels, Gaga can be seen at the start of the performance in an all-white ensemble: a bejeweled, asymmetric lace bodysuit and matching cape, thigh-high boots, a feathered Keko Hainswheeler headpiece and strings of glinting pearls. As she staggered back from her piano at the song’s crescendo, however, an audible gasp swept the room as thick blood suddenly appeared to be pouring from her abdomen.
“I’m your biggest fan, I’ll follow you until you love me,” Gaga wailed desperately, her once-pristine outfit now daubed in scarlet. She ended the number suspended above the stage, ‘dead,’ as more blood dripped from her eyes.
“(It) gives me chills every time I watch it,” Olivia Rodrigo told MTV in 2021. “I think Lady Gaga is the best performer of our generation.” The “Drivers License” singer appeared to take notes. At this year’s Grammy Awards, she began to ‘bleed’ from clenched fists while performing her hit “vampire,” spreading fake blood across her arms and neck as the song progressed.
Если вы искали где отремонтировать сломаную технику, обратите внимание – сервис центр в казани
Бесплатный сайт знакомств всегда лове знакомства, встречи, свидания, серьезные отношения с парнями и девушками по всему миру. Более 40 миллионов мужчин и женщин ждут вас
Bnovo RMS гостиниц и отелей (Revenue Management System) – online-сервис для эффективного управления доходами в гостиничном бизнесе. Прогнозирование, анализ цен конкурентов, автоматизация продаж, отчетность.
вызов нарколога на дом частная скорая помощь вызов нарколога на дом частная скорая помощь .
Интернет магазин неформальной одежды Defeez – это свобода выбора, которая сочетает в себе элементы уличной моды и функциональности. Неформальный стиль отличают практичные материалы, удобные силуэты и уникальные детали, позволяя выразить индивидуальность без лишних правил.
Страсть к созданию пространств http://rentspecialtech.ru наш комплексный набор профессиональных услуг обслуживает самую разную клиентуру: от домовладельцев до коммерческих застройщиков.
Виртуальные казино предлагают увлекательные турниры и акции, чтобы повысить твои шансы на выигрыш. Играй с умом, используй бонусы и контролируй ставки!
1win вход
Профессиональный сервисный центр по ремонту видео техники а именно видеокамер.
Мы предлагаем: ремонт видеокамер
Наши мастера оперативно устранят неисправности вашего устройства в сервисе или с выездом на дом!
Ретрит https://ретриты.рф международное обозначение времяпрепровождения, посвящённого духовной практике. Ретриты бывают уединённые и коллективные; на коллективных чаще всего проводится обучение практике медитации.
how to buy generic plavix without prescription
seo заказать сео оптимизация сайта
оптимизация сайта seo https://seoprocesssearch.ru
Новостройки https://kvartirazhkmalosemejka.ru (ЖК) в Казани от застройщика. Купить квартиру от застройщика, цены, планировки, генплан, ход строительства
купить квартиру от застройщика цены купить квартиру от застройщика недорого
жк купить квартиру от застройщика купить квартиру недорого
Para tener exito en el trading de opciones binarias, es fundamental usar herramientas de analisis tecnico, como los graficos de velas japonesas, para prever las tendencias de los precios.
opciones binarias broker
娛樂城
娛樂城推薦與優惠詳解
在現今的娛樂世界中,線上娛樂城已成為眾多玩家的首選。無論是喜歡真人遊戲、老虎機還是體育賽事,每個玩家都能在娛樂城中找到自己的樂趣。以下是一些熱門的娛樂城及其優惠活動,幫助您在選擇娛樂平台時做出明智的決定。
各大熱門娛樂城介紹
1. 富遊娛樂城
富遊娛樂城以其豐富的遊戲選擇和慷慨的優惠活動吸引了大量玩家。新會員只需註冊即可免費獲得體驗金 $168,無需儲值即可輕鬆試玩。此外,富遊娛樂城還提供首存禮金 100% 獎勵,最高可領取 $1000。
2. AT99娛樂城
AT99娛樂城以高品質的遊戲體驗和優秀的客戶服務聞名。該平台提供各種老虎機和真人遊戲,並定期推出新遊戲,讓玩家保持新鮮感。
3. BCR娛樂城
BCR娛樂城是一個新興的平台,專注於提供豐富的體育賽事投注選項。無論是足球、籃球還是其他體育賽事,BCR都能為玩家提供即時的投注體驗。
熱門遊戲推薦
WM真人視訊百家樂
WM真人視訊百家樂是許多玩家的首選,該遊戲提供了真實的賭場體驗,並且玩法簡單,容易上手。
戰神賽特老虎機
戰神賽特老虎機以其獨特的主題和豐富的獎勵機制,成為老虎機愛好者的最愛。該遊戲結合了古代戰神的故事背景,讓玩家在遊戲過程中感受到無窮的樂趣。
最新優惠活動
富遊娛樂城註冊送體驗金
富遊娛樂城新會員獨享 $168 體驗金,無需儲值即可享受全場遊戲,讓您無壓力地體驗不同遊戲的魅力。
VIP 日日返水無上限
富遊娛樂城為 VIP 會員提供無上限的返水優惠,最高可達 0.7%。此活動讓玩家在遊戲的同時,還能享受額外的回饋。
結論
選擇合適的娛樂城不僅能為您的遊戲體驗增色不少,還能通過各種優惠活動獲得更多的利益。無論是新會員還是資深玩家,都能在這些推薦的娛樂城中找到適合自己的遊戲和活動。立即註冊並體驗這些優質娛樂平台,享受無限的遊戲樂趣!
where buy cipro
娛樂城
娛樂城推薦與優惠詳解
在現今的娛樂世界中,線上娛樂城已成為眾多玩家的首選。無論是喜歡真人遊戲、老虎機還是體育賽事,每個玩家都能在娛樂城中找到自己的樂趣。以下是一些熱門的娛樂城及其優惠活動,幫助您在選擇娛樂平台時做出明智的決定。
各大熱門娛樂城介紹
1. 富遊娛樂城
富遊娛樂城以其豐富的遊戲選擇和慷慨的優惠活動吸引了大量玩家。新會員只需註冊即可免費獲得體驗金 $168,無需儲值即可輕鬆試玩。此外,富遊娛樂城還提供首存禮金 100% 獎勵,最高可領取 $1000。
2. AT99娛樂城
AT99娛樂城以高品質的遊戲體驗和優秀的客戶服務聞名。該平台提供各種老虎機和真人遊戲,並定期推出新遊戲,讓玩家保持新鮮感。
3. BCR娛樂城
BCR娛樂城是一個新興的平台,專注於提供豐富的體育賽事投注選項。無論是足球、籃球還是其他體育賽事,BCR都能為玩家提供即時的投注體驗。
熱門遊戲推薦
WM真人視訊百家樂
WM真人視訊百家樂是許多玩家的首選,該遊戲提供了真實的賭場體驗,並且玩法簡單,容易上手。
戰神賽特老虎機
戰神賽特老虎機以其獨特的主題和豐富的獎勵機制,成為老虎機愛好者的最愛。該遊戲結合了古代戰神的故事背景,讓玩家在遊戲過程中感受到無窮的樂趣。
最新優惠活動
富遊娛樂城註冊送體驗金
富遊娛樂城新會員獨享 $168 體驗金,無需儲值即可享受全場遊戲,讓您無壓力地體驗不同遊戲的魅力。
VIP 日日返水無上限
富遊娛樂城為 VIP 會員提供無上限的返水優惠,最高可達 0.7%。此活動讓玩家在遊戲的同時,還能享受額外的回饋。
結論
選擇合適的娛樂城不僅能為您的遊戲體驗增色不少,還能通過各種優惠活動獲得更多的利益。無論是新會員還是資深玩家,都能在這些推薦的娛樂城中找到適合自己的遊戲和活動。立即註冊並體驗這些優質娛樂平台,享受無限的遊戲樂趣!
Если вы искали где отремонтировать сломаную технику, обратите внимание – ремонт бытовой техники
El registro ayuda a evitar que otros se aprovechen de tu creacion o invencion, ya que te permite emprender acciones legales contra aquellos que vulneren tus opciones binarias ejemplos
Para mejorar en el trading de opciones binarias, muchos traders utilizan cuentas demo, donde pueden practicar sin arriesgar dinero real y aprender a gestionar mejor sus operaciones.
opciones binarias ejemplos
Он – далеко не ангел, высокий дерзкий парень, помешанный на тачках. Она – примерная ученица, белокурая красотка из богатой семьи. Их любовь под запретом, а потому вдвойне желанна Бдмс порнуха
Если вы искали где отремонтировать сломаную технику, обратите внимание – ремонт бытовой техники в новосибирске
купить квартиру недорого https://kupitkvartiruinfo.ru
жк казань купить квартиру от застройщика https://kvartirukupitland.ru
купить квартиру в казани купить квартиру от застройщика недорого
купить квартиру в казани от застройщика купить квартиру недорого
Играйте в лучшие казино, ТОП-10 список: честные и надежные, на реальные деньги, быстрые выплаты и выводы, минималные ставки, лицензия и проверенные, мобильные, популярные и новые, бонусы и фрисписны, слоты и автоматы топ-5 онлайн казино с бонусами
купить квартиру в новостройке от застройщика https://kupitkvartiruspbland.ru
купить готовые курсовые работы курсовая работа на заказ недорого
Закзать корпусную мебель
необычные бизнес идеи необычные бизнес идеи .
Профессиональный сервисный центр по ремонту стиральных машин с выездом на дом по Москве.
Мы предлагаем: ремонт стиральных машин москва сервис
Наши мастера оперативно устранят неисправности вашего устройства в сервисе или с выездом на дом!
buy cheap cefixime price
Профессиональный сервисный центр по ремонту бытовой техники с выездом на дом.
Мы предлагаем: ремонт бытовой техники в казани
Наши мастера оперативно устранят неисправности вашего устройства в сервисе или с выездом на дом!
стоимость диплома диплом заказать
решить контрольную онлайн контрольная работа по юриспруденции
Case battle, кейс батл официальный сайт – уникальные кейсы, быстрый вывод скинов, поддержка 24/7 https://cases-battle.net
Женский журнал https://beautyadvice.kyiv.ua об отношениях и красоте
Женский портал https://elegance.kyiv.ua современная мода, тренд, стиль; полезные советы; секреты хорошей фигуры; уроки макияжа, внешность и красота
Современные развлекательные площадки в интернете предоставляют множество возможностей для увлекательного досуга. Однако иногда возникают трудности с доступом к этим платформам https://wiki.dailysocial.id/index.php?title=%20%D0%9A%D0%B0%D0%BA%20%D0%B8%D0%B7%D0%B1%D0%B5%D0%B6%D0%B0%D1%82%D1%8C%20%D0%B7%D0%B0%D0%B2%D0%B8%D1%81%D0%B8%D0%BC%D0%BE%D1%81%D1%82%D0%B8%20%D0%BE%D1%82%20%D0%BA%D0%B0%D0%B7%D0%B8%D0%BD%D0%BE%20%D0%B8%20%D0%BE%D1%81%D1%82%D0%B0%D1%82%D1%8C%D1%81%D1%8F%20%D1%87%D0%B5%D0%BC%D0%BF%D0%B8%D0%BE%D0%BD%D0%BE%D0%BC
lisinopril over the counter name
Купить Смартфоны https://iq-techno.ru Apple iPhone (Эпл Айфон) по самым выгодным ценам в интернет-магазине DNS. Широкий выбор товаров и акций. В каталоге можно ознакомиться с ценами, отзывами, фотографиями и подробными характеристиками товаров, а также подобрать Смартфоны Apple iPhone (Эпл Айфон) по параметрам.
полотенцесушитель для ванной купить в москве
can you buy generic furosemide tablets
Женские секреты https://fancywoman.kyiv.ua онлайн-журнал о моде, красоте, отношениях женщины и мужчины
Женский онлайн журнал https://female.kyiv.ua красота, здоровье женщины, воспитание детей, отношения
colchicine side effect
buying cheap medex without insurance
Пеларгонии видовые: лучший выбор для своего жилища и огорода
Если вы выбираете цветы, которые будут удивлять тебя своей красотой и ароматом, при этом не требуя тщательного обслуживания, разновидности пеларгонии — наилучший выбор. Этих цветы обладают неповторимыми характеристиками, что превращают их лидерами в категории декоративных цветов.
Почему разновидные герани?
Неприхотливость и простота в содержании
Пеларгонии не нуждаются в особенных факторов для роста и быстро адаптируются к многим температурным режимам. Они замечательно развиваются как в жилище, так и на открытом воздухе. Не беспокойтесь о проблемных цветах — пеларгонии хватает поливать по степени обезвоживания почвы и наслаждаться их цветением.
Яркие и многообразные тона
Определенный вид пеларгоний обладает свои особенные цвета и формы. Сорта, к примеру, ТА Монако, впечатляют яркими оттенками и впечатляющими цветами. Это цветы, которые немедленно притягивают интерес и обеспечивают живые нотки в каждом месте.
Нежный благоухание, приносящий уют
Пеларгонии не лишь декорируют дом — они предоставляют его приятным, ненавязчивым ароматом. Этот природный аромат обеспечивает придать атмосферу спокойствия и спокойствия, а к тому же работает как природный отпугиватель для насекомых.
Длительное цветение
Сортовые герани не прекращают восхищать взоры своим цветением в течение нескольких периодов. Ты будешь восхищаться их внешним видом с начала теплого периода и до поздней осени сезона. Такое непрекращающееся период цветения — исключительное свойство среди декоративных цветов.
Прекрасный решение для каждого места
Герани многофункциональны — их желательно выращивать как в контейнерах на подоконниках, так и в саду. Небольшие кусты, например ИВ Галина Уланова, идеально выглядят в эстетичных вазонах, а разновидности, как Survivor idols Rosalinda, будут дополнением цветника.
Зачем необходимо остановиться на точно герани?
Данные растения — не только часть оформления. Они существенно превосходят по сравнению с других цветов по причине своей простоте, декоративности и длительному процветанию. Их насыщенные тона придают неповторимую окружение, будь то в жилище или на участке. Пеларгонии — это идеальный баланс красоты и удобства.
Выбирайте пеларгонии — сделайте вокруг красоту без дополнительных хлопот!
where can i get generic bystolic online
Женский портал https://femalebeauty.kyiv.ua современная мода, тренд, стиль; полезные советы; секреты хорошей фигуры; уроки макияжа, внешность и красота
Мода, красота и здоровье https://gracefulwoman.kyiv.ua Женский журнал об отношениях и красоте
Отказное (информационное) письмо подтверждает, что товар не нуждается в прохождении обязательной сертификации до продажи. Мы подготовили для вас ответы на самые популярные вопросы — о цене, требованиях, сроках отказного письма, и где его купить https://dzen.ru/a/ZuQlWcS6C3ZUtygf
cost of generic amaryl without dr prescription
полотенцесушитель лесенка купить
Мебель для гостиной
Ищете новые впечатления? Онлайн-казино предлагают широкий выбор игр и бонусов для всех игроков. Ставки просты, а шансы на выигрыш могут приятно удивить!
cryptoboss casino зеркало рабочее на сегодня
Профессиональный сервисный центр по ремонту бытовой техники с выездом на дом.
Мы предлагаем: ремонт бытовой техники в москве
Наши мастера оперативно устранят неисправности вашего устройства в сервисе или с выездом на дом!
cost of generic cleocin without a prescription
Все важные сферы https://happylady.kyiv.ua шоу-бизнес, афиша, мода, красота
Женский портал https://madrasa.com.ua современная мода, тренд, стиль; полезные советы; секреты хорошей фигуры; уроки макияжа, внешность и красота
зеркало Dragon Money официальный сайт Dragon Money
официальный сайт драгон мани казино зеркало Dragon Money
Встречайте криптовалютного босса в казино, добейтесь успеха вместе с лучшим криптовалютным казино, уникальный опыт в мире криптовалютного азарта, выиграйте криптовалюты в казино от Cryptoboss, стать криптобоссом легко с Cryptoboss casino, играйте на крипто-максимуме вместе с Cryptoboss, будьте боссом в мире криптовалютных игр с Cryptoboss casino, эксклюзивное казино для ценителей криптовалют, качественный сервис и безопасность с Cryptoboss casino, играйте и выигрывайте с лучшим криптовалютным казино, встречайте новый уровень криптовалютных ставок в Cryptoboss casino, играйте на криптовалютных волнах вместе с Cryptoboss, получите криптовалютные призы в Cryptoboss casino, следуйте за лидером с Cryptoboss casino, Cryptoboss casino – ваше казино удачи, наслаждайтесь азартом с Cryptoboss casino.
cryptoboss boss cryptoboss boss .
Школа парных танцев D-Fox во Владивостоке предлагает уникальную возможность погрузиться в мир хастла – захватывающего и энергичного танца, который завоевывает сердца танцоров по всему миру http://dfox-vl.ru/
Интернет-магазин плитки и керамики «МегаПлитка»
Интернет-магазин керамической плитки и керамогранита «MegaPlitka» (megaplitka.com) предлагает широкий ассортимент высококачественной плитки и керамогранита от ведущих производителей.
Мы стремимся предложить нашим клиентам только лучшее, поэтому в ассортименте представлены товары, отвечающие самым высоким стандартам качества и дизайна.
Мы понимаем, что выбор керамической плитки и керамогранита – это важный этап в создании комфортного и стильного интерьера.
Поэтому наша команда профессионалов готова помочь вам в подборе идеального варианта для вашего проекта.
Независимо от того, нужны ли вам плитка для ванной комнаты, кухни, гостиной, или же керамогранит для облицовки пола, вы всегда найдете у нас разнообразные и актуальные коллекции,
соответствующие последним тенденциям в области дизайна интерьеров.
Официальный сайт «МегаПлитка» «МегаПлитка».
where buy doxycycline without a prescription
Внедорожник BYD Leopard — лучший вариант для комфортного преодоления любых препятствий. Благодаря задней и передней блокировкам дифференциала он обладает великолепной проходимостью lixiang l9 цена
https://travelonlinereservation.com/top-strategies-for-winning-in-online-pin-up-games/
Женский портал https://maleportal.kyiv.ua современная мода, тренд, стиль; полезные советы; секреты хорошей фигуры; уроки макияжа
Испытай удачу в онлайн казино, где каждый спин может стать выигрышным! Живые игры и джекпоты доступны прямо на экране вашего устройства.
криптобосс сайт
Заблокировано? Не беда! Находите актуальные зеркала Cryptoboss Casino здесь, играйте без проблем!
Новое зеркало Cryptoboss Casino доступно для всех!, полный контроль гарантированы.
Официальное зеркало Cryptoboss Casino ждет вас прямо сейчас, не упустите другие варианты!
Узнавайте самую актуальную информацию на зеркале Cryptoboss Casino!, забирайте джекпот!
Самое надежное зеркало Cryptoboss Casino только у нас, играйте без риска без лишних хлопот!
cryptoboss casino рабочее зеркало cryptoboss зеркало сегодня .
can i buy generic imitrex without insurance
Самые свежие новости https://onlystyle.com.ua красоты, моды, здоровья и прочее, что нужно женщинам
Женский сайт https://onlystyle.com.ua семья, дети, красота и здоровье
Присоединяйся к онлайн казино и ощути азарт настоящих побед! Слоты, настольные игры и живые дилеры доступны круглосуточно, а бонусы увеличат твои шансы на выигрыш.
сайт cryptoboss
can i order generic vantin no prescription
Если у вас ютуб тормозит 2024, есть несколько причин, почему это может происходить. В России часто встречается почему тормозит ютуб, и это связано с блокировками и ограничениями, которые накладываются на доступ к платформе. Такие проблемы, как ютуб не грузит, могут затруднять просмотр видео, и многие пользователи сталкиваются с необходимостью искать способы обхода этих ограничений.
Если вам интересно, как починить ютуб, мы рекомендуем ознакомиться с материалами на сайте YouTube-Radar.ru. Проект Ютуб Радар youtube-radar.ru предоставляет актуальную информацию и практические советы, которые помогут решить проблему с доступом к видеохостингу. Также вы можете посетить ресурс youtube-ne-gruzitsya.ru чтобы узнать больше о том, как восстановить доступ к YouTube и избежать тормозов и задержек.
Не позволяйте блокировкам мешать вашему доступу к контенту – узнайте, как решить проблему с помощью YouTube Radar и продолжайте наслаждаться любимыми видео!
where to get cheap valtrex without prescription
rybelsus 3 mg price rybelsus coupon best time to take rybelsus rybelsus 14 rybelsus diabetes med
Профессиональный сервисный центр по ремонту компьютерных видеокарт по Москве.
Мы предлагаем: цена ремонта видеокарты компьютера
Наши мастера оперативно устранят неисправности вашего устройства в сервисе или с выездом на дом!
Все новые авто https://autoiceny.com.ua с подробными обзорами, фото и характеристиками на единственном сайте автомобильных тестов
Автостатьи https://tvregion.com.ua з продами з ремонту та телефона
Ежедневные автомобильные новости https://viewport.com.ua и статьи, тесты, характеристики авто и выбор машины
https://bresdel.com/posts/694121
where can i get actos online
Электромобиль Zeekr X, который Вы можете заказать у нас на сайте. Что касается внешнего вида, который подчеркивается светодиодными фарами с интеллектуальной матрицей, которые исчезают за решеткой радиатора китайские авто новые
Самые актуальные автомобильные новости https://microbus.net.ua Украины и мира, тест-драйвы новых авто
Все новые авто https://addinfo.com.ua с подробными обзорами, фото и характеристиками на единственном сайте автомобильных тестов
can i order prednisone online without prescription
Новые новости Украины https://ktm.org.ua последние новости из-за рубежа, новости политики, экономики, спорта, культуры, технологий, шоу -бизнеса
Новые новости политики https://mostmedia.com.ua общества, спорта, культуры, новости дня о событиях
order generic biaxin
Оперативные новости Украины https://fraza.kyiv.ua и мира, новости онлайн
Профессиональный сервисный центр по ремонту фототехники в Москве.
Мы предлагаем: ремонт фотовспышек на дому
Наши мастера оперативно устранят неисправности вашего устройства в сервисе или с выездом на дом!
Подробнее на сайте сервисного центра remont-vspyshek-realm.ru
Купить новый авто из Китая от официального дилера. Специальные цены на все марки модельного ряда китайских автомобилей в автосалоне новые китайские автомобили
Оперативные новости всей Украины https://uapress.kyiv.ua и мира, читать новости онлайн
Для защиты прав детей и недееспособных вы можете обратиться в органы опеки по телефону или адресу проживания
Профессиональный сервисный центр по ремонту компьютероной техники в Москве.
Мы предлагаем: ремонт компьютера в москве
Наши мастера оперативно устранят неисправности вашего устройства в сервисе или с выездом на дом!
Для подключения и оплаты вам поможет газовая служба. По телефону или в личный кабинет по адресу проживания
Посетите лучший музей мира, эрмитаж купить билеты онлайн и без очередей
Встречайте криптовалютного босса в казино, станьте победителем вместе с лучшим криптовалютным казино, уникальный опыт в мире криптовалютного азарта, попробуйте удачу в казино Cryptoboss, выиграть криптовалюты легко в Cryptoboss casino, играйте на крипто-максимуме вместе с Cryptoboss, ипотека доверия с Cryptoboss casino, участвуйте в захватывающих играх в Cryptoboss casino, взломай банк с Cryptoboss casino, особые привилегии для лучших игроков, встречайте новый уровень криптовалютных ставок в Cryptoboss casino, играйте на криптовалютных волнах вместе с Cryptoboss, играйте и побеждайте с Cryptoboss casino, встречайте криптовалютного короля в казино, попробуйте удачу вместе с Cryptoboss, Cryptoboss casino – гарант криптовалютных побед.
криптобосс вход cryptoboss отзывы .
Игра в онлайн казино — это уникальный шанс выиграть крупные деньги. Приветственные бонусы, быстрые выплаты и широкий выбор азартных игр ждут тебя!
криптобосс игровые
Скачайте приложения для Андроид бесплатно на https://appcatalogue.ru лучшие программы и игры на русском языке для вашего устройства. Установите приложения прямо сейчас и наслаждайтесь их функционалом!
Бесплатный сайт Майл знакомства поиск новых знакомых для дружбы, серьезных отношений, создания семьи.
https://napolke.com.ua/
El comercio de opciones binarias es una forma de inversion en la que los inversores predicen si el valor de un activo subira o bajara. Plataformas como Quotex ofrecen una plataforma intuitiva para el trading de opciones binarias. Con conocimientos y herramientas, es posible maximizar los beneficios en el trading de opciones binarias. El comercio de opciones binarias se ha vuelto popular en paises como Mexico y globalmente.
deriv opciones binarias que son las opciones binarias en trading .
Онлайн казино — идеальное развлечение для тех, кто любит азарт. Слоты, рулетка, блэкджек и крупные бонусы ждут каждого игрока. Попробуй удачу!
cryptoboss отзывы
where to buy generic uroxatrall no prescription
Казино Pin Up https://casino.prpc.ru Казино было запущено в 2016 году и является популярным игровым местом во многих странах мира, в том числе в Казахстане.
Казино Pin-Up https://pin-up-login.games-tv.ru имеет множество предложений и дополнительных подарков для новых зарегистрированных пользователей. Это можно использовать на любом устройстве, с которым вам удобно.
Если вы или ваши близкие нуждаются в помощи, не откладывайте обращение за профессиональной поддержкой. Свяжитесь с нами сегодня, чтобы начать путь к выздоровлению и лечение от алкоголизма в Алматы https://alco-help-almaty.kz/
Сегодня технологии достигли нового уровня, и искусственный интеллект становится неотъемлемой частью нашей повседневной жизни. Системы обработки информации способны понимать и генерировать текст, взаимодействуя с пользователями на интуитивном уровне http://fin-molitor.com/forum/viewtopic.php?f=2&t=349132
бензопила hausgarten hg-cs250
Pin Up Casino https://kksgranicaketrzyn.pl play Pin Up casino on the official website, login to the mirror
Official website of Pin up https://hackthecrypto.io casino (pin up casino). Login to your personal account, register through a working mirror in 1 click.
оригинальные идеи для бизнеса оригинальные идеи для бизнеса .
get valtrex online
Поставка строительных материалов https://psm-profi.ru под ключ в Москве и Московской области. В наличии более 2000 товарных позиции на складах, облицовочный кирпич, кладочные и монтажные смеси, кровля и .т.д.
Electric Grills https://www.atgrillscookware.com premium pans and cookware in the USA.
Aptechka Online – это уникальный справочник, предоставляющий отзывы о лекарственных средствах, таких как Актовегин, и популярных лекарственных средствах. На Aptechka Online пользователи могут получить детальными инструкциями о препаратах Аллохол, Альфа Нормикс, их действии и сравнить их для лечения.
Аптечка Онлайн также предоставляет пользователям возможность ознакомиться с рекомендациями о различных препаратах, таких как Альфа Нормикс. Эти отзывы помогают сделать выбор, какое лекарство будет наиболее эффективным в конкретном случае. Кроме того, на сайте доступно сравнение аналогов, что облегчает выбор альтернативных вариантов.
Благодаря удобной структуре на сайте Аптечка Онлайн, пользователи могут быстро найти интересующий их препарат, будь то описание действия или побочные эффекты. Это делает ресурс полезным помощником для тех, кто заботится о здоровье близких.
Aptechka Online предлагает подробные инструкции по применению лекарств, таких как Актовегин, что помогает пользователям лучше понять, как использовать средства для профилактики различных заболеваний. На сайте также можно найти актуальные данные о показаниях и возможных реакциях, что важно для эффективного применения.
Дополнительно, сайт Аптечка Онлайн предлагает обзоры по сравнению аналогов, таких как Флебодиа. Это помогает пользователям принимать информированные решения и находить более доступные варианты лекарственных препаратов, не теряя при этом в качестве.
автосервис услуги
Организация вправе внедрить требования ISO 9001, применив их в своей системе менеджмента качества, но при этом получение сертификата не является обязательным. Решение о прохождении сертификации и получении сертификата соответствия является добровольным решением компании https://www.behance.net/gallery/207984265/otkaznoe-pismo-po-sertifikacii
https://nlga.us/?s=Melbet%20Official%20Promo%20Code%20Bangladesh%202024:%20MEGA555%20Welcome%20Bonus%20€100
дом престарелых московская область дома престарелых в московской области
Free email extraction tool. Download any email address from the web with just one click. Find email addresses in seconds Simplest eMail extractor
Loveshop снова работает!!!
Подробнее https://teletype.in/@bitwa/mmKhqqE1s3Z
#shop1-biz #loveshop1300 #loveshop13 #loveshop14 #loveshop15 #loveshop16
авто в ремонт
москва работа эскорт услуг эскорт мужские услуги москва
частные эскорт услуги в москве эскорт услуга вакансии в москве
Cosmo Music is one of the largest and most renowned musical instrument stores globally, offering sales, service, repairs, rentals, production, and lessons Dual CD Players
сколько стоит эскорт услуга в москве эскорт услуга в москве вакансии
эскорт услуга в москве цена эскорт услуга в москве цена
эскорт услуги модели москва услуги вип эскорта москва
Недавно нашёл отличный интернет-магазин, где можно приобрести раковины и ванны для ванной комнаты. Они предлагают огромный выбор сантехники и аксессуаров, подходящих под любой интерьер и бюджет. Ассортимент действительно впечатляет: различные модели раковин (накладные, встроенные, подвесные) и ванн (акриловые, чугунные, гидромассажные).
Особенно если вы ищете: мойка для ванны, что мне было очень нужно. Цены адекватные, качество товаров на высоте. Плюс, они предлагают профессиональные консультации, быструю доставку и услуги по установке. В общем, если кто-то ищет качественную сантехнику по хорошим ценам, рекомендую обратить внимание на этот магазин.
эскорт услуги в москве все эскорт мужской услуги москва
сколько стоят услуги эскорта в москве эскорт услуги москва номера
карта автосервис
эскорт услуги в москве парни эскорт услуги в москве цена
<a href=”https://remont-kondicionerov-wik.ru”>сервисный центр кондиционеров</a>
Профессиональный сервисный центр по ремонту компьютерных блоков питания в Москве.
Мы предлагаем: ремонт блоков питания corsair
Наши мастера оперативно устранят неисправности вашего устройства в сервисе или с выездом на дом!
карта автосервис
how to buy generic doxycycline
сервис профи самара
Мой телефон перестал заряжаться, и я не знал, что делать. По совету друга обратился в этот сервисный центр. Мастера быстро нашли проблему и устранили её. Теперь мой телефон снова в строю! Рекомендую всем: ремонт смартфонов москва.
Кроме того, регулярные акции и скидки позволят купить сумку еще выгоднее.
Купить рюкзак
Сейчас узнаете о 10 лучших онлайн-казино в рейтинге игр на реальные деньги репутации и других параметров в новом списке 2024 года. Лучшие (Online casino) на реальные деньги Топ 10 онлайн казино
https://infosport.ru/partners1/rentgenografia-v-guta-klinik
Мы предлагаем модели на любой вкус: от классических до ультрасовременных вариантов.
Интернет магазин женских сумок купить недорого
Выбирая игровые автоматы с выводом средств на карту, игроки могут попробовать слоты с высоким процентом возврата и большими максимальными выигрышами Игровые автоматы на реальные деньги
Увлекательное казино Cryptoboss ждет вас, играйте и выигрывайте вместе с королем криптовалютных игр, возможность выиграть крупный джекпот, попробуйте удачу в казино Cryptoboss, выиграть криптовалюты легко в Cryptoboss casino, Cryptoboss casino – ваш лучший выбор, будьте боссом в мире криптовалютных игр с Cryptoboss casino, эксклюзивное казино для ценителей криптовалют, взломай банк с Cryptoboss casino, Cryptoboss casino – ваш путь к криптовалютному успеху, революция в криптовалютных играх с Cryptoboss casino, Cryptoboss casino – ваш путеводитель в мире криптовалютных игр, получите криптовалютные призы в Cryptoboss casino, следуйте за лидером с Cryptoboss casino, попробуйте удачу вместе с Cryptoboss, Cryptoboss casino – гарант криптовалютных побед.
игровые автоматы криптобосс cryptoboss casino .
работа в москве в эскорт услугах эскорт услуга в москве от
девушки эскорт услуги москва ком в москве эскорт услуги
https://101-diploma.top/
эскорт услуги москва дешево самая дорогая эскорт услуга москвы
эскорт услугу в москве эскорт услуг цена в москве
это mailsco
эскорт услуги для геев москва сайт эскорт услуг в москве
эскорт услуга в москве цены эскорт услуг цена в москве
гей услуги гей эскорт москва эскорт услугу в москве
эскорт услуга в москве вакансии агентство эскорт услуг в москве
Используем усиленные каркасы во всех моделях.
Изготавливаем кровлю — 1,5 мм.
Производим только качественную продукцию.
Всегда в наличии на складе.
Бытовка нужна «вчера» или в течение часа?
Узнайте что есть в наличии на складе!
Узнать подробнее здесь pmkpmk.ru
Успех ждет вас на официальном сайте Cryptoboss Casino
cryptoboss официальный cryptoboss casino официальный зеркало .
В настоящее время все больше и больше компаний ведет бизнес через Интернет. Быстрое обращение с заказами, обратная связь с клиентами, прямой контакт – все это является ключевыми моментами в успешном бизнесе https://www.03244.com.ua/list/417583
Одним из ключевых аспектов сертификации является постоянное улучшение. В рамках процедуры организации должны внедрять процессы, направленные на непрерывное совершенствование системы управления качества. Это включает в себя регулярные внутренние аудиты, анализ производства и внедрение корректирующих действий https://certifmos.blogspot.com
Denk je aan de goede oude tijd toen er home buttons en bubble icons waren? Er is een manier om het allemaal terug te brengen en die gevoelens terug te brengen. Een app genaamd OldOS (via the Verge) herstelt iOS 4 naar de nieuwe iPhone. Lees verder https://mashable.com/article/iphone-3g-oldos
can i order cheap celexa
Готов к азарту? В онлайн-казино тебя ждут щедрые бонусы, фриспины и возможность сорвать крупный куш!
криптобосс официальный сайт
Присоединяйтесь к cryptoboss casino сегодня и получите доступ к лучшим играм, Cryptoboss casino: регистрация проходит быстро и просто, Начните путь к большим выигрышам с регистрации на сайте cryptoboss casino, Уникальная атмосфера cryptoboss casino для зарегистрированных пользователей, Регистрация на cryptoboss casino – ваш первый шаг к увлекательному миру азартных игр, Быстрая регистрация на cryptoboss casino – ваш шанс на удачу, Cryptoboss casino рад приветствовать новых игроков – зарегистрируйтесь прямо сейчас, Успешная регистрация на cryptoboss casino – ваша возможность стать лидером в игровой индустрии, Cryptoboss casino готов принять вас – пройдите регистрацию и начните играть, Зарегистрируйтесь на cryptoboss casino и получите доступ к лучшим игровым автоматам, Cryptoboss casino приглашает вас зарегистрироваться и испытать удачу, Присоединяйтесь к cryptoboss casino и начните выигрывать вместе с лучшими игроками, Пройдите регистрацию на cryptoboss casino и получите шанс выиграть крупный джекпот, Регистрация на cryptoboss casino – ваш ключ к миру больших выигрышей, Зарегистрируйтесь на cryptoboss casino и начните путь к успеху, Регистрация на cryptoboss casino – ваш шанс на удачу.
криптобосс промокод при регистрации криптобосс регистрация cryptoboss casino3 one .
Играй в онлайн-казино и получай удовольствие! Множество игр и бонусов ждут тебя каждый день.
криптобосс регистрация cryptoboss casino3 one
В онлайн-казино всегда можно найти что-то для себя! Играй, используй бонусы и забирай выигрыш.
криптобосс промокод на участие в турнирах
Профессиональный сервисный центр по ремонту компьютероной техники в Москве.
Мы предлагаем: диагностика системного блока компьютера
Наши мастера оперативно устранят неисправности вашего устройства в сервисе или с выездом на дом!
מציעות בילוי שגברים אוהבים. כאן הגבר שולט וקובע מה יהיה. אין כאן מושלם. זהו יכול להיות פתרון לאחר צהריים רגוע, בילוי בלילה הגבר. בזכות נערות ליווי, כל גבר יכול למצוא נערה המתאימה לטעמיו והעדפותיו. וגם לך מחכה נערת ליווי סוגים של בילויים שאפשר ליהנות נערות ליווי בדרום
В онлайн-казино каждый день — шанс на победу! Играй в любимые слоты и получай бонусы за каждую ставку.
криптобосс автоматы зеркало
портал для женщин https://princess.kyiv.ua о стиле, красоте, звездах, отношениях и полный гид по шоппингу в твоем городе
Женский онлайн-журнал https://miymalyuk.com.ua все про красоту, моду и шоппинг
Готов сорвать джекпот? Онлайн-казино даёт возможность выиграть крупно уже сегодня!
криптобосс промокод на бонус при регистрации
Заблокировано? Не беда! Находите актуальные зеркала Cryptoboss Casino здесь, играйте без проблем!
Попробуйте свою удачу на новом зеркале Cryptoboss Casino, полный контроль гарантированы.
Лучшее зеркало Cryptoboss Casino ждет вас прямо сейчас, пропустите другие варианты!
Узнавайте самую актуальную информацию на зеркале Cryptoboss Casino!, играйте и выигрывайте!
Без зеркала Cryptoboss Casino никуда!, зарабатывайте крупные суммы без лишних хлопот!
cryptoboss casino зеркало cryptoboss casino зеркало рабочее на сегодня .
Автомобильные новости https://avto-limo.zt.ua Украины и мира, тест-драйвы новых авто, советы экспертов
переподготовка с медсестры на фельдшера
Новости автомобильного мира https://kia-sportage.in.ua тест-драйвы, обзоры, новинки.
order avodart without insurance
В мире онлайн-гемблинга существует множество казино, но Vodka Casino выделяется среди остальных. Этот официальный сайт предлагает широкий выбор игр, привлекательные бонусы и надежную репутацию vodka casino официальный сайт
Свежие новости Украины https://real-voice.info последние новости из-за рубежа, новости политики, экономики, спорта, культуры, технологий, шоу-бизнеса
register company Montenegro eligible residence starting a business in Montenegro
Бесплатный сервис по подбору интернет-провайдеров и тарифов домашнего интернета. Помогаем выбрать и подключить качественный интернет и телевидение по лучшей цене за 5 минут https://telecomprofit.ru/
tango kamp Kolasin Kolasin
Zabljak ski centar hotels in Zabljak
Как поднять настроение подруге с помощью смешного анекдота
Высочайшее качество продукции пищевого оборудования является одним из приоритетных направлений развития нашей компании и одним из главных ее преимуществ пищевое оборудование
Quick OSINT бот https://quick-osint.ru помогает находить данные из открытых источников, проверять утечки данных и собирать информацию по номеру телефона, электронной почте, социальным сетям.
Горизонтальные упаковочные автоматы для упаковки продуктов во флоу-пак, имеющие надежную конструкцию и уникальное программное обеспечение пищевое оборудование из китая
Our online store https://dobra-cena.shop is a symbiosis of excellent quality and pleasant prices! Everything is arranged here so that it is convenient for you to buy online: all manufacturers of goods are verified, orders are collected and delivered quickly and when it is convenient for you.
Профессиональный сервисный центр по ремонту камер видео наблюдения по Москве.
Мы предлагаем: сервисные центры ремонту камер в москве
Наши мастера оперативно устранят неисправности вашего устройства в сервисе или с выездом на дом!
Играйте бесплатно в Cryptoboss Casino с бездепозитным бонусом, восхитительное предложение!
Заработайте крупный выигрыш без вложений в Cryptoboss Casino – возможно отличное начало для вас.
Уникальные возможности для игры без вложений в Cryptoboss Casino – новые призы для вас.
Играйте на деньги с бездепозитным бонусом в Cryptoboss Casino – играйте и выигрывайте без риска.
Cryptoboss Casino радует бездепозитными бонусами для всех – возможность выиграть крупный джекпот без вложений.
Бездепозитный бонус в Cryptoboss Casino – это реальность – лучший способ испытать свою удачу.
Получите бездепозитный бонус и начните играть в Cryptoboss Casino – лучший способ испытать свою удачу.
Cryptoboss Casino предлагает бездепозитный бонус для всех – уникальные возможности для игры на деньги.
Получите шанс выиграть крупный джекпот без вложений в Cryptoboss Casino – новые призы и возможности для вас.
cryptoboss бездепозитный бонус hds5 криптобосс промокод на бонус при регистрации .
can you buy cheap valtrex without insurance
В мире Kraken защита данных и анонимность are a priority. Эта digital platform предоставляет easy usage к разнообразным сервисам, которые guarantee максимальную приватность. Здесь rules of regular internet не имеют силы, что gives you the opportunity freely interact ресурсами сети.
вход vk at
Как поднять настроение другу с помощью прикольного анекдота
лаки джет на деньги lucky jet на деньги
эскорт услуги в москве недорого эскорт услуги салон москва
Гастарбайтеры попались на взятке инспектору миграционной службы. 21 апреля 2009 года инспектор отдела управления Федеральной миграционной службы РФ в Сосновском районе обнаружил, что на территории Кременкульского сельского поселения граждане Таджикистана
lucky jet регистрация лаки джет онлайн
lucky jet бонусы лаки джет сигналы
эскорт услуги в москве девушки эскорт услуги мальчики в москве
Вращай слоты и играй в покер онлайн! Онлайн-казино предлагает мгновенные выводы и бонусы каждому.
игорный клуб криптобосс официальный
lucky jet 1win лаки джет
Играй в любимые игры казино онлайн: от покера до рулетки. Получи бонусы и начни выигрывать!
криптобосс регистрация cryptoboss casino3 one
Онлайн-казино: сотни игр, мгновенные выигрыши и бонусы на каждый депозит!
cryptoboss промокоды cryptoboss ru casino
can i get aciphex without dr prescription
лаки джет на деньги лаки джет бот
Играй в любимые игры казино онлайн. Ставки от минимальных, выплаты мгновенные — почувствуй вкус победы!
игровые автоматы криптобосс
Самые свежие данные о курсе валют в Казахстане
Где проверить курс валют в Казахстане
Какие валюты выгодно менять в Казахстане
На сколько выгодно менять валюту в Казахстане
Где выгодно обменять деньги в Казахстане
курс доллар курс тенге к юаню .
Онлайн-система контроля качества ежесекундно отслеживает процесс, эффективно сочетаясь с лабораторными испытаниями, дополняя общую картину оборудование пищевой перерабатывающей промышленности
Присоединяйся к онлайн-казино и получи бонус за регистрацию. Испытай удачу в лучших играх!
криптобосс бездепозитный бонус
Квартиры-студии, предложенные иностранным покупателям на Северном Кипре, часто путают с односпальными апартаментами. Однако эти объекты отличаются друг от друга по метражу, наличию или отсутствию отдельной комнаты элитная недвижимость южного кипра
Как поднять настроение другу с помощью смешного анекдота
Журнал об автомобилях https:/rupsbigbear.com выставки, автоспорт, ремонт и сервис
Самые актуальные автомобильные https://lada.kharkiv.ua новости Украины и мира, тест-драйвы новых авто, советы экспертов
Откройте для себя лучшие дома на продажу на Кипре с широким выбором вариантов, которые подойдут вашему образу жизни и бюджету. От современных вилл до традиционных объектов недвижимости, найдите дом своей мечты среди красивых и разнообразных ландшафтов Кипра квартиры на кипре купить
Автомобильные новости https://billiard-sport.com.ua законы и ПДД, автоспорт
5mg finasteride buy
Авто статьи https://shpik.info с советами по ремонту и обслуживанию автомобиля, рекомендации профессионалов.
Как улучшить настроение подруге с помощью смешных картинок и мемов https://telegra.ph/Podnimaem-nastroenie-smeshnymi-kartinkami-i-anekdotami-09-16
Профессиональный сервисный центр по ремонту кнаручных часов от советских до швейцарских в Москве.
Мы предлагаем: срочный ремонт часов
Наши мастера оперативно устранят неисправности вашего устройства в сервисе или с выездом на дом!
Авторский блог Чернолесова https://chernolesov.com это пространство идей и вдохновения для ценителей натуральных материалов, ремесленного мастерства и уникального дизайна. Окунитесь в мир творчества и гармонии природы с каждым постом.
Ищите качественное авто? Выгодная Доставка авто из Дубая в Россию под ключ с гарантией. Цены ниже рынка, большой выбор авто, првоерка перед покупкой.
Профессиональный сервисный центр по ремонту бытовой техники с выездом на дом.
Мы предлагаем: ремонт бытовой техники в перми
Наши мастера оперативно устранят неисправности вашего устройства в сервисе или с выездом на дом!
Интернет магазин мебли
розпашні шафи
сколько стоит ремонт кондиционера
распашной шкаф купе
инструмент для балансировки
ООО «Кинематика»: Профессиональные услуги для производственной сбалансированности и технической диагностики техники
Организация «Кинематика» работает на разработке и производстве точных приборов для динамической балансировки и проверки промышленного оборудования. Изделия фирмы применяется для поддержки и налаживания многих агрегатов, включая воздуходувки, мельницы, валовые системы, системы передачи и металлорежущие станки.
Главные продукты фирмы:
1. Arbalance — портативный прибор балансировки вибраций
Устройство подходит для балансировки вращательных систем техники в сборе в собственных подшипниках. Прибор Арбаланс гарантирует высокое качество уравновешивания с небольшими издержками. Основные его преимущества:
Система автоматизированного анализа: работает автономно.
Графики вибрации и спектральный анализ: выявляют дефекты.
Двухканальная система: позволяет измерять вибросигналы одновременно в двух направлениях, повышая производительность процесса.
Цена: 84 тыс. руб.
2. Балансировочный прибор Балком-1А — малогабаритный балансировочный виброметр
Балком-1А подходит для балансировки роторов в штатных подшипниках. Ключевым преимуществом является легкость в использовании и автоматизированный процесс расчета. Дополнительно поддерживаются:
Двойная виброизмерительная система.
Спектральная диагностика для контроля технического состояния оборудования.
Цена: 73 тыс. руб.
3. Модуль Балком-2 — прибор для измерений для систем балансировки
Устройство Балком-2 эксплуатируется в станциях балансировки для оценки вибраций. Он предлагает точность сбалансированности вращательных механизмов и прочих устройств в технике.
Цена: от 90 тыс. руб. до 95 000 руб. в зависимости от сборки.
4. Модуль Балком-4 — для балансировки в различных плоскостях карданных механизмов
Система Балком-4 предназначен для уравновешивания валов и применяется в системах производства. Этот устройство гарантирует стабильные показатели и прецизионность при многоплоскостной сбалансированности.
Цена: от 100 тыс. руб. до 126 000 руб..
Новейшие технологии мониторинга и технической диагностики
Фирма «Кинематика» также проектирует системы для непрерывной диагностики технического состояния устройств. Эти системы используют бесконтактные датчики для оценки колебаний и прочих параметров. Например, устройство Реконт помогает отслеживать механизмы редукторов по точности движения и оборудованию вращения.
Запчасти для строительной техники
prednisone coming off prednisone for prednisone for asthma too much prednisone side effects is prednisone used to treat pneumonia
Адвокат по ДТП в Челябинске
кроссовки купить в москве
Cryptoboss Casino – ваш шанс на большой выигрыш
cryptoboss официальное зеркало сайт cryptoboss официальное зеркало .
Как улучшить настроение подруге с помощью шутки https://anekdotymemy.wordpress.com/2024/09/16/podnat-nastroenie/
Мотанка – це інтернет-ресурс для всіх членів родини, який містить натхненними матеріалами про виховання дітей, сучасний спосіб життя. На платформі https://motanka.co.ua ви знайдете корисні поради, рецепти та ідеї для сімейного відпочинку.
курс онлайн школы английского языка
Краткосрочная и долгосрочная аренда недвижимости на Кипре: цены, планировки, фотографии и расположение на карте кипр апартаменты на берегу
Казино было открыто в 2017 году. Это лицензированная площадка, функционирующая на основании действующей лицензии Кюрасао. Дизайн официального сайта минималистичен. На стартовой странице находятся все нужные раздел https://uschinaseries.org/
сервисные центры в самаре сервисные центры в самаре
how can i get generic uroxatrall pills
Как поднять настроение подруге с помощью шутки https://anekdotymemy.wordpress.com/2024/09/16/podnat-nastroenie/
Присоединяйтесь к cryptoboss casino сегодня и получите доступ к лучшим играм, Cryptoboss casino: регистрация проходит быстро и просто, Играйте с удовольствием после регистрации на cryptoboss casino, Уникальная атмосфера cryptoboss casino для зарегистрированных пользователей, Регистрация на cryptoboss casino – ваш первый шаг к увлекательному миру азартных игр, Cryptoboss casino приглашает вас зарегистрироваться и насладиться игровым процессом, Пройдите регистрацию на cryptoboss casino и откройте доступ к лучшим играм, Успешная регистрация на cryptoboss casino – ваша возможность стать лидером в игровой индустрии, Cryptoboss casino готов принять вас – пройдите регистрацию и начните играть, Регистрация на cryptoboss casino – ваш билет в мир азартных развлечений, Станьте участником cryptoboss casino – зарегистрируйтесь и начните играть сегодня, Присоединяйтесь к cryptoboss casino и начните выигрывать вместе с лучшими игроками, Пройдите регистрацию на cryptoboss casino и получите шанс выиграть крупный джекпот, Уникальные бонусы ждут вас после регистрации на cryptoboss casino, Cryptoboss casino рад приветствовать новых игроков – присоединяйтесь сейчас, Cryptoboss casino приглашает вас стать его частью – зарегистрируйтесь и начните играть.
криптобосс промокод при регистрации hds5 cryptoboss регистрация cryptoboss ru casino .
Мы предлагаем уникальный сервис по подбору и доставке авто из Дубая в РФ под ключ. Наша команда профессионалов поможет вам найти идеальное транспортное средство в ОАЭ, учтя все ваши пожелания и бюджет https://wowinfo.io/site_review/en/www/pavel-auto-dubai.ru
Оформить займ https://ozaim.ru онлайн на карту. Займы с мгновенным одобрением онлайн. Получить кредитную карту с высоким одобрением.
Вавада казино: место для настоящих азартных игроков, получай удовольствие в любое время дня и ночи.
Вавада казино: лучшее место для азартного времяпрепровождения, ставь на победу.
Отдыхай и выигрывай в Вавада казино, получай удовольствие.
Заработай крупный выигрыш в Вавада казино, получай максимум удовольствия.
Играй и выигрывай в Вавада казино, получай удовольствие от игры.
VaVaDa CaSiNo http://e-maxx.ru/forum/profile.php?id=19648
Что такое смешные картинки и как они появились
Если вы искали где отремонтировать сломаную технику, обратите внимание – ремонт бытовой техники
Женский портал https://femaleguide.kyiv.ua с полезными советами по моде, красоте, здоровью и отношениям.
Портал для женщин https://femalesecret.kyiv.ua о моде, красоте, здоровье и отношениях. Практичные советы и актуальные темы для повседневной жизни.
Сайт о воспитании https://geog.org.ua и развитии детей. Практические советы для родителей по уходу, обучению и поддержке ребенка на каждом этапе его жизни.
where to buy generic sumycin tablets
ООО «Кинематика»: Качественные разработки для производственной балансирования и анализов техники
Фирма «Кинематика» специализируется на разработке и внедрении высокоточных инструментов для уравновешивания и проверки техники. Изделия фирмы используется для техобслуживания и ремонта многих промышленных устройств, включая вентиляторы, дробилки, шарнирные валы, редукторы и прецизионные станки.
Главные продукты фирмы:
1. Arbalance — переносной прибор балансировки вибраций
Устройство разработан для динамической балансировки устройств в комплектации в штатных подшипниках. Прибор Арбаланс обеспечивает надёжную точность балансировки с небольшими издержками. Среди его ключевых преимуществ:
Программа расчета: работает автономно.
Графики вибрации и спектральный анализ: помогают выявлять неисправности.
Два канала измерения: позволяет измерять вибрации в одно время в двух направлениях, повышая производительность процесса.
Цена: 84 000 руб.
2. Balcom-1A — переносной балансировочный виброметр
Прибор Балком-1А разработан для балансировки валов в собственных подшипниках. Главной особенностью является легкость в использовании и автоматический расчет. Также устройство оснащено:
Двойная виброизмерительная система.
Спектральный анализ для контроля состояния оборудования.
Цена: 73 000 руб.
3. Balcom-2 — балансировочный прибор для балансировочных станков
Балком-2 эксплуатируется в балансировочных станках для измерения колебаний. Он гарантирует точность высокоточной балансировки вращательных механизмов и другого оборудования в производстве.
Цена: от 90000 рублей до 95 000 руб. в зависимости от комплектации.
4. Система Балком-4 — для балансировки в нескольких плоскостях составных валов
Балком-4 предназначен для балансировки составных карданных валов и эксплуатируется в системах производства. Этот прибор предлагает высокую точность и точные измерения при многоплоскостной сбалансированности.
Цена: от 100 000 руб. до 126 тыс. руб..
Новейшие технологии отслеживания и диагностики
Компания «Кинематика» также создает системы для беспрерывного отслеживания состояния оборудования. Эти приборы оснащены бесконтактными сенсорами для виброизмерений и других показателей. Например, устройство Реконт обеспечивает мониторинг техническое состояние редукторов по параметрам точности и вращательным движениям.
Женский сайт о стиле https://gryada.org.ua красоте, здоровье и личностном росте. Практические рекомендации, свежие идеи и актуальные тренды для женщин, желающих развиваться и сохранять гармонию в жизни.
Портал для женщин https://magictech.com.ua о моде, уходе за собой, здоровье и развитии. Полезные советы, новинки и тренды для тех, кто стремится к успеху и гармонии в жизни, всегда оставаясь на высоте.
Покупка виртуального номера конкретно для привязки к Телеграмм-каналу имеет несколько достоинств, к числу которых относится купить номер для тг
Привет! Расскажу как улучшить настроение себе с помощью анекдотов
https://caramellaapp.com/supermikekros/s0qRWxvv8/rasskazhu-kak-podnyat-nastronie
Онлайн журнал для женщин https://prettywoman.kyiv.ua новости, мода и шоппинг, красота и здоровье, стиль жизни, дом и еда
Уникальный бездепозитный бонус в Cryptoboss Casino, не упустите возможность!
Бездепозитный бонус поможет вам выиграть большую сумму в Cryptoboss Casino – отличный способ испытать свою удачу.
Не пропустите новые акции в Cryptoboss Casino – ваши шансы на победу увеличиваются.
Эксклюзивный бездепозитный бонус в Cryptoboss Casino – возможно, это ваш шанс стать богатым.
Бездепозитный бонус доступен для всех в Cryptoboss Casino – возможность выиграть крупный джекпот без вложений.
Играйте на деньги, не рискуя своими средствами в Cryptoboss Casino – лучший способ испытать свою удачу.
Cryptoboss Casino радует новых игроков щедрыми бонусами – лучший способ испытать свою удачу.
Играйте без вложений и выигрывайте настоящие деньги в Cryptoboss Casino – возможно, это ваш шанс стать миллионером.
Получите шанс выиграть крупный джекпот без вложений в Cryptoboss Casino – отличный способ испытать удачу без риска.
cryptoboss промокод на бездепозитный бонус cryptoboss промокод на бездепозитный бонус .
http://demo36.com1.vn/2024/09/18/snjat-kvartiru-v-gomele-na-sutki-nedorogo-bez-17/
Привет! Расскажу как улучшить настроение себе с помощью смешных картинок
https://shutochki.wordpress.com/2024/09/23/hornastr1/
Привет! Хотите узнать отуда появился мем? Смешные картинки как явление
https://telegra.ph/CHto-znachit-slovo-mem-EHto-ne-prosto-kartinka-09-23
Профессиональная разработка сайтов для бизнеса: от лендингов до интернет-магазинов. Мы создаём эффективные, современные сайты, адаптированные под любые устройства, с фокусом на удобство пользователей и высокие результаты. Полный цикл услуг — от дизайна до технической поддержки.
Купить шкаф купе Бровары
888starz
buy helium balloons with delivery where to buy balloons
buy balloons inexpensively https://balloon-store-dubai.com
still itchy after stromectol stromectol est t’ il efficace stromectol philippines prix stromectol gale stromectol tabletten
Лечение созависимости http://medprom.ru/medprom/2952771 направлено на восстановление эмоциональной и психологической независимости. Мы предлагаем комплексную терапию, включающую психотерапию, поддержку специалистов и индивидуальные программы для преодоления зависимости от поведения и контроля других.
1win-bonus.wiki
Приобретайте виртуальные и временные номера телефонов для регистрации. Удобный и надежный сервис для получения смс-онлайн. Более 180 стран и тысячи сервисов купить номер телефона для тг
Сайт для женщин https://lolitaquieretemucho.com о моде, красоте, здоровье и отношениях. Узнай актуальные тренды, получи полезные советы по уходу за собой, вдохновение для личностного роста и семейного благополучия. Всё для современных женщин, которые ценят гармонию и стиль в жизни.
Что такое мемы и как они появились
With over two thousand years of history, Saint – Laurent des Arbres invites you to discover its most beautiful features: the fortified Romanesque church, the narrow streets https://www.proxiti.info/journeespatrimoine2016.php?o=26050&n=B%C3%A9SIGNAN
портал для женщин https://sweetheart.kyiv.ua предлагает полезные рекомендации по уходу за собой, поддержанию здоровья и развитию индивидуального стиля. Статьи о моде, карьере и личных отношениях помогут вам чувствовать себя уверенно и успешно в любых сферах жизни. Идеи и советы для гармонии и самореализации.
casino x зеркало сегодня отзывы
Что такое шутка? Как с помощью смешных шуток улучшить чувство юмора
https://telegra.ph/Smeshnye-shutki-i-kak-razvit-chuvstvo-yumora-09-23
Обновленный курс валют в Казахстане
Как узнать курс валют в Казахстане
Советы по обмену валют в Казахстане
На сколько выгодно менять валюту в Казахстане
Где выгодно обменять деньги в Казахстане
курс доллара к тенге сегодня курс рубля караганда .
Захватывающие игры, огромные джекпоты и бонусы ждут вас в мире онлайн-казино.
лекс казино welcome bonus
buy doxycycline 20 mg online
Если вы искали где отремонтировать сломаную технику, обратите внимание – тех профи
where to buy generic nemasole no prescription
Что такое мемы и как они появились
Pin Up – это официальная платформа для ставок на спорт, которая получила лицензию в 2021 году и уже завоевала доверие среди бетторов в Казахстане pin-up-kz.online
Женский онлайн-журнал https://wonderwoman.kyiv.ua мода, красота, диеты, звезды, отношения
Смешные анекдоты в приложении
Всё шуточки
прикольные анекдоты в приложении
Всё шуточки
Откройте для себя онлайн-казино с множеством бонусов и акций. Играйте в любимые слоты или участвуйте в живых играх.
lex casino отзывы игроков
Женский онлайн-журнал https://horoscope-web.com простой и удобный сайт о моде, красоте, путешествиях, любви и вдохновении.
новини Кропивницького
Все лучшие ставки на спорт можно найти на https://888starz.today
Увлекательные слоты, блэкджек и рулетка онлайн — это ваш шанс сорвать крупный куш, не покидая комфортного кресла.
лекс казино бонусы
прикольные картинки в приложении
Всё шуточки
Последние новости моды https://psilocybe-larvae.com тенденции стиля и красоты звезд
buying valtrex no prescription
https://ufa656.vip/snjat-kvartiru-na-sutki-v-minske-dlja-vecherinki-12/
Смешные мемы в приложении
Всё шуточки
Современный женский онлайн-журнал https://ruforums.net о моде, красоте, здоровье, карьере и личностном росте. Здесь собраны лучшие советы, вдохновение и актуальные тренды для женщин, стремящихся к гармонии во всех сферах жизни. Читай, развивайся и будь в курсе самых интересных новостей!
Pretty little village of the Gard, it is located 20 minutes from Avignon or Orange – Saint Laurent des Arbres is a typical village of the Gard Rhodanien in Provence. http://molbiol.ru/forums/index.php?showtopic=914982&st=150
Дезинфекция удаление трупного яда https://dezinfekciya-ot-smerti-msk.ru/
каждому клиенту, разрабатывая индивидуальную программу массажа. Клиенты нашего центра отмечают высокую эффективность общего медицинского массажа. Мы гарантируем комфортные условия и высокое качество обслуживания. Если вы хотите
Лечебный массаж центр Остеодок
Профессиональный сервисный центр по ремонту бытовой техники с выездом на дом.
Мы предлагаем:сервисные центры в ростове на дону
Наши мастера оперативно устранят неисправности вашего устройства в сервисе или с выездом на дом!
Онлайн займы в Казахстане https://halavnydrop.ru быстрый и удобный способ получить деньги на любые нужды без визита в банк. Оформление за 5 минут, минимальные требования, выгодные условия и мгновенное одобрение. Получите займ онлайн с любой точки страны прямо сейчас, решив финансовые вопросы без лишних хлопот!
If you are looking for an alternative way to set up a new messaging app, WhatsApp, Signal, Line, Telegram or any other service that uses a mobile phone number https://rionews.com.ua/news/nonpublicated/now/n24162122346
прикольные анекдоты
Хохотамба ру
Играй в захватывающие слоты на сайте 1вин и выигрывай крупные призы прямо сейчас!
1win – официальный вход на популярный игровой сайт для ставок на спорт и азартных игр, где можно выиграть деньги и получить увлекательные бонусы.
https://www.youtube.com/watch?v=NntCT5Wllvo/
Mostbet working mirror https://mostbet-mosbet-az.com login to the official Mostbet website
Как прокачать чувство юмора с помощью шуточек
Что такое анекдот? Почему мы любим смешные анекдоты? Как они появились? Читайте об этом
статью
Узнай секреты красоты и стиля в женском онлайн-журнале https://mcms-bags.com актуальные советы по моде, отношениям и здоровью. Будь в курсе последних трендов и находи вдохновение для повседневной жизни и саморазвития.
https://eventmoon.ru/
Полный топ-Казино сайтов: нажмите здесь, чтобы получить бесплатный доступ к списку лучших Казино сайтов мира sykaaa casino
Последние новости https://useti.org.ua бизнеса и финансов, новости политики, эксклюзивная аналитика и советы экспертов
Последние новости Украины https://dailynews.kyiv.ua и мира: события в политике, экономике, спорте и культуре. Оперативные репортажи, аналитика и свежие обзоры. Узнавайте о главном первыми.
Последние мировые новости https://news24.in.ua за прошедшую неделю и сегодня. Обзор новостей в мире в режиме реального времени.
Попробуйте удачу на Cryptoboss Casino и выиграйте крупный джекпот
криптобосс официальный сайт вход cryptoboss casino официальный сайт вход .
Сократите свои расходы на лизинг грузового и коммерческого транспорта, автобусов и легковых автомобилей автотранспорт лизинг
Женский журнал https://womanlife.kyiv.ua о моде, красоте, здоровье и отношениях. Полезные советы, тренды и рекомендации для современных женщин. Читай статьи о карьере, саморазвитии и стиле жизни, чтобы быть в курсе актуальных тем и находить вдохновение каждый день.
Тренды моды https://woman24.kyiv.ua секреты красоты, советы по здоровью и отношениям. Открой для себя вдохновение и полезные идеи для повседневной жизни и саморазвития.
средство вывода из запоя https://alconetmos.ru/
Зарегистрируйтесь на cryptoboss casino и получите эксклюзивный бонус, Cryptoboss casino: регистрация проходит быстро и просто, Начните путь к большим выигрышам с регистрации на сайте cryptoboss casino, Cryptoboss casino ждет своих новых игроков – присоединяйтесь, Регистрация на cryptoboss casino – ваш первый шаг к увлекательному миру азартных игр, Не упустите возможность зарегистрироваться на cryptoboss casino и выиграть крупный приз, Cryptoboss casino рад приветствовать новых игроков – зарегистрируйтесь прямо сейчас, Зарегистрируйтесь на cryptoboss casino и окунитесь в захватывающий мир азартных игр, Регистрация на cryptoboss casino – ваш первый шаг к большим выигрышам, Зарегистрируйтесь на cryptoboss casino и получите доступ к лучшим игровым автоматам, Присоединяйтесь к cryptoboss casino и получите шанс на крупный выигрыш, Cryptoboss casino: регистрация – быстро, просто, надежно, Cryptoboss casino приглашает вас стать его участником – зарегистрируйтесь сейчас, Присоединяйтесь к cryptoboss casino и станьте обладателем эксклюзивных привилегий, Зарегистрируйтесь на cryptoboss casino и начните путь к успеху, Присоединяйтесь к cryptoboss casino и получите бонус за регистрацию.
cryptoboss регистрация cryptoboss casino регистрация на сайте обзор .
сервисный центре предлагает ремонт телевизора москва – ремонт телевизора
JILI SLOT GAMES: Sự Lựa Chọn Hàng Đầu Cho Các Tín Đồ Casino Trực Tuyến
JILI Casino là một nhà phát hành game nổi tiếng với nhiều năm kinh nghiệm trong ngành công nghiệp giải trí trực tuyến. Tại JILI, chúng tôi cam kết mang đến cho người chơi những trải nghiệm độc đáo và đẳng cấp, thông qua việc đổi mới không ngừng và cải thiện chất lượng từng sản phẩm. Những giá trị cốt lõi của chúng tôi không chỉ dừng lại ở việc tạo ra các trò chơi xuất sắc, mà còn tập trung vào việc cung cấp các tính năng vượt trội để đáp ứng nhu cầu của người chơi trên toàn cầu.
Sự Đa Dạng Trong Các Trò Chơi Slot
JILI nổi tiếng với loạt trò chơi slot đa dạng và hấp dẫn. Từ các slot game cổ điển đến những trò chơi với giao diện hiện đại và tính năng độc đáo, JILI Slot luôn đem đến cho người chơi những phút giây giải trí tuyệt vời. Các trò chơi được thiết kế với đồ họa sống động, âm thanh chân thực và những vòng quay thú vị, đảm bảo rằng người chơi sẽ luôn bị cuốn hút.
Ưu Điểm Nổi Bật Của JILI Casino
Đổi mới và sáng tạo: Mỗi trò chơi tại JILI Casino đều mang đến sự mới mẻ với lối chơi hấp dẫn và giao diện bắt mắt.
Chất lượng cao: JILI không ngừng cải tiến để đảm bảo mỗi sản phẩm đều đạt chất lượng tốt nhất, từ trải nghiệm người chơi đến tính năng trò chơi.
Nền tảng đa dạng: JILI Casino cung cấp nhiều loại game khác nhau, từ slot, bắn cá đến các trò chơi truyền thống, phù hợp với mọi sở thích của người chơi.
Chương Trình Khuyến Mại JILI
JILI Casino không chỉ nổi bật với chất lượng game mà còn thu hút người chơi bởi các chương trình khuyến mại hấp dẫn. Người chơi có thể tham gia vào nhiều sự kiện, từ khuyến mãi nạp tiền, hoàn trả đến các chương trình tri ân dành riêng cho thành viên VIP. Những ưu đãi này không chỉ tăng cơ hội chiến thắng mà còn mang lại giá trị cộng thêm cho người chơi.
Nổ Hủ City Và Các Trò Chơi Hấp Dẫn Khác
JILI không chỉ có slot games mà còn cung cấp nhiều thể loại game đa dạng khác như bắn cá, bài và nhiều trò chơi giải trí khác. Nổi bật trong số đó là Nổ Hủ City – nơi người chơi có thể thử vận may và giành được những giải thưởng lớn. Sự kết hợp giữa lối chơi dễ hiểu và các tính năng độc đáo của Nổ Hủ City chắc chắn sẽ mang lại những khoảnh khắc giải trí đầy thú vị.
Tham Gia JILI Casino Ngay Hôm Nay
Với sự đa dạng về trò chơi, các tính năng vượt trội và những chương trình khuyến mại hấp dẫn, JILI Casino là sự lựa chọn không thể bỏ qua cho những ai yêu thích trò chơi trực tuyến. Hãy truy cập trang web chính thức của JILI ngay hôm nay để trải nghiệm thế giới giải trí không giới hạn và giành lấy những phần thưởng hấp dẫn từ các trò chơi của chúng tôi!
Смешные приколы на любой вкус
Поднимите себе настроение!
Не упустите шанс, переходите на зеркало Cryptoboss Casino сейчас, прокачивайтесь без проблем!
Самое актуальное зеркало Cryptoboss Casino всегда под рукой, полный контроль гарантированы.
Самое популярное зеркало Cryptoboss Casino ждет вас прямо сейчас, пропустите другие варианты!
Узнавайте самую актуальную информацию на зеркале Cryptoboss Casino!, играйте и выигрывайте!
Без зеркала Cryptoboss Casino никуда!, играйте без риска без лишних хлопот!
cryptoboss зеркало сегодня cryptoboss официальное зеркало .
https://kkm18.ru/include/pages/chto_evropeyskie_ghenschiny_hranyat_v_holodilynike_udivitelynye_rezulytaty_issledovaniy.html
Всё о моде https://chernogolovka.net красоте, здоровье и отношениях. Актуальные идеи, вдохновение и полезные советы для достижения баланса и успеха.
Модные тенденции https://saralelakarat.com секреты красоты, здоровье и советы по отношениям. Читай актуальные статьи и вдохновляйся для новых достижений и гармонии в жизни.
Играйте бесплатно в Cryptoboss Casino с бездепозитным бонусом, воспользуйтесь шансом!
Играйте на деньги без вложений в Cryptoboss Casino – шикарная возможность выиграть крупный джекпот.
Не пропустите новые акции в Cryptoboss Casino – лучший способ испытать удачу.
Эксклюзивный бездепозитный бонус в Cryptoboss Casino – играйте и выигрывайте без риска.
Новые игроки получают уникальное предложение от Cryptoboss Casino – уникальные преимущества для игры на деньги.
Уникальные возможности для игры без вложений в Cryptoboss Casino – лучший способ испытать свою удачу.
Получите бездепозитный бонус и начните играть в Cryptoboss Casino – шикарная возможность заработать без вложений.
Бездепозитный бонус – это реальность в Cryptoboss Casino – шикарные призы и невероятные выигрыши ждут вас.
Уникальный бездепозитный бонус в Cryptoboss Casino ждет вас – возможность заработать крупный выигрыш бесплатно.
бонусы на пополнение cryptoboss cryptoboss casino промокод бездепозитный бонус .
Последние новости Украины https://ua-vestnik.com политика, экономика, общество, культура и спорт. Оперативные репортажи, аналитика и мнения экспертов. Будьте в курсе главных событий и актуальных тенденций в Украине каждый день.
У нас вы найдете ноутбуки различных конфигураций, размеров и цветов. Мы предлагаем ноутбуки с различными типами дисплеев, такими как IPS, OLED, TN, а также различными разрешениями экрана. Если вам нужен ноутбук для игр, мы предлагаем модели с высокой производительностью и мощными графическими картами. Если вы ищете ноутбук для работы, у нас есть модели с быстрыми процессорами и большим объемом памяти.
Что такое смешной анекдот? История свежего анекдота, какие бывают.
buy fml forte tablets
Игровые автоматы на сайте Cryptoboss Casino, которые вас увлекут на целый вечер.
Играйте на деньги в автоматах Cryptoboss Casino, для тех, кто ищет азарта.
Не упустите шанс выиграть крупный джекпот в казино Cryptoboss, чтобы испытать настоящий азарт.
Играйте в казино Cryptoboss на лучших слотах, где каждый может стать победителем.
Получайте удовольствие от игры в автоматы на сайте Cryptoboss Casino, для тех, кто мечтает о крупном выигрыше.
Лучшие игровые автоматы на сайте Cryptoboss, где выигрыши ждут каждого.
Играйте на деньги на своих любимых слотах, для азартных игроков.
Забудьте о повседневных заботах, играя на сайте Cryptoboss Casino, для любителей азартных игр.
Почувствуйте волнение от игры в казино Cryptoboss на автоматах, для ценителей азарта.
Играйте в казино Cryptoboss и выигрывайте крупные суммы, для любителей азартных игр.
Увлекательные слоты в казино Cryptoboss, где вас ждут крупные выигрыши.
Играйте на деньги в лучших слотах на сайте Cryptoboss, для ценителей азарта.
Увлекательные слоты на сайте Cryptoboss ждут вас, для любителей азартных игр.
Получайте удовольствие от игры на сайте Cryptoboss Casino, которые порадуют вас выигрышами.
Лучшие игровые автоматы на сайте Cryptoboss, для тех, кто мечтает о крупном выигрыше.
Не упустите шанс сорвать большой куш в казино Cryptoboss на автоматах, для азартных игроков.
Эмоции бурлят в крови, играя в казино Cryptoboss на автоматах, где каждый может испыт
cryptoboss casino автоматы криптобосс игровые автоматы на деньги .
Металлические входных двери двери в квартиру любого размера, конструкции и комплектации. Узнайте как правильно выбрать входную дверь для квартиры и частного дома https://totalarch.com/metallicheskie-vhodnye-dveri-v-kvartiru-sovety-po-vyboru
Aviator is an online game for real money https://aviator-crash.org where players predict when the plane will stop to win. Test your luck and strategy with fast and secure withdrawals. Simple rules, instant payouts, and the chance for big wins await you!
DB娛樂遊戲中心:最優線上娛樂網站評價介紹
DB娛樂網站,前身為PM遊戲平台,於2023年正式更名為【DB多寶遊戲】。本次品牌轉型的期間,DB娛樂平台不斷專注於呈現全方位的線上服務體驗,為玩家提供多樣化的遊戲選擇與創新的服務項目。無論是賭桌遊戲、運動博彩還是其他受歡迎遊戲,DB娛樂平台都能迎合玩家的偏好。
多寶平台的成立與擴展 在亞洲娛樂市場中,DB遊戲平台很快壯大,成為許多玩家的首選平台之一。隨著PM品牌的品牌轉型,DB多寶遊戲著眼於提升用戶體驗,並著眼於構建一個可靠、方便且透明的平台環境。從娛樂項目到交易系統,DB賭場一直專注於卓越,為玩家提供最佳的線上賭場體驗。
DB娛樂城的娛樂內容與亮點
百家樂遊戲 DB娛樂城最為知名的是其豐富的百家樂玩法。平台推出多個版本的百家樂,包括常見百家樂和免佣百家樂,適應多樣化玩家的期待。透過直播荷官的現場互動,玩家可以體驗沉浸式的現場氣氛。
體育博彩 作為一個全面平台,DB賭場還推出各類運動項目的博彩服務。從足球賽事、籃球比賽到網球遊戲等熱門賽事,玩家都可以隨時隨地體驗體育博彩,獲得比賽的快感與投注的樂趣。
促銷活動與獎金 DB娛樂網站頻繁推出豐富的促銷方案,為新舊玩家呈現各種折扣與獎勵。這些計畫不僅提升了遊戲的可玩性,還為玩家提供更多贏得獎金的可能性。
DB遊戲平台的回饋與特色 在2024年的最新遊戲平台排行榜中,DB娛樂網站獲得了高度評價,並且因其豐富的遊戲選擇、快捷的提款效率和廣泛的促銷活動而贏得玩家喜愛。
Самые свежие данные о курсе валют в Казахстане
Способы отслеживания курса валют в Казахстане
Советы по обмену валют в Казахстане
На сколько выгодно менять валюту в Казахстане
Где выгодно обменять деньги в Казахстане
курс юаня к тенге курс юани к тенге .
Сервисный центр предлагает починить холодильника lgen мастерские ремонта холодильников lgen
Процесс учебы в автошколах состоит из лекций и вождения. Стоимость обучения в автошколе варьируется от 20 до 25 тыс рублей автошкола права
Ощутите атмосферу настоящего казино у себя дома с онлайн играми на реальные деньги.
обзор лекс казино
new retro casino вход промокоды new retro casino
AI service pornx.ai is an for creating personalized adult content. Select parameters and scenarios to receive high-quality videos tailored to your preferences. Enjoy full privacy and instant generation using cutting-edge technology.
Встречайте криптовалютного босса в казино, играйте и выигрывайте вместе с королем криптовалютных игр, криптовалютные ставки для настоящих боссов, освойте мир криптовалютных игр в казино Cryptoboss, стать криптобоссом легко с Cryptoboss casino, Cryptoboss casino – ваш лучший выбор, будьте боссом в мире криптовалютных игр с Cryptoboss casino, Cryptoboss casino – ваша площадка для побед, качественный сервис и безопасность с Cryptoboss casino, особые привилегии для лучших игроков, революция в криптовалютных играх с Cryptoboss casino, большие выигрыши ждут вас в Cryptoboss casino, Cryptoboss casino – ваш ключ к фортуне, Cryptoboss casino – выбор тех, кто ценит качество, Cryptoboss casino – ваше казино удачи, наслаждайтесь азартом с Cryptoboss casino.
сайт cryptoboss casino cryptoboss casino ru игровые автоматы криптобосс .
https://vulkan-avtomaty-war.top/ о разнообразных игровых автоматах и щедрых бонусах, доступных в игровом клубе Вулкан – захватывающем мире азарта и возможности выиграть крупные суммы денег.
Смешные мемы http://prikoly-shutki.ru/kartinki-prikolnye Что такое мемы.
У нас вы найдете ноутбуки различных конфигураций, размеров и цветов. Мы предлагаем ноутбуки с различными типами дисплеев, такими как IPS, OLED, TN, а также различными разрешениями экрана. Если вам нужен ноутбук для игр, мы предлагаем модели с высокой производительностью и мощными графическими картами. Если вы ищете ноутбук для работы, у нас есть модели с быстрыми процессорами и большим объемом памяти.
Хранилище ссылок https://memo.top/about/ для структурирования накопленных ресурсов. Добавляй ссылки на сторонние ресурсы, группируй их и делись со своими друзьями. Повысьте вашу продуктивность c помощью персонализированой стартовой страницы
Сервисный центр предлагает ремонт плоттеров xerox сервис ремонта плоттеров xerox
Если вы искали где отремонтировать сломаную технику, обратите внимание – ремонт бытовой техники
Встречайте криптовалютного босса в казино, добейтесь успеха вместе с лучшим криптовалютным казино, возможность выиграть крупный джекпот, попробуйте удачу в казино Cryptoboss, выиграть криптовалюты легко в Cryptoboss casino, играйте на крипто-максимуме вместе с Cryptoboss, испытайте свою удачу в казино Cryptoboss, Cryptoboss casino – ваша площадка для побед, удивительные возможности в казино от Cryptoboss, Cryptoboss casino – ваш путь к криптовалютному успеху, встречайте новый уровень криптовалютных ставок в Cryptoboss casino, Cryptoboss casino – ваш путеводитель в мире криптовалютных игр, получите криптовалютные призы в Cryptoboss casino, Cryptoboss casino – выбор тех, кто ценит качество, Cryptoboss casino – ваше казино удачи, Cryptoboss casino – гарант криптовалютных побед.
cryptoboss boss crypto boss casino cryptoboss casino вход .
Как поднять настроение с помошью анекдота. Свежие мемы
http://artshi.ru/user/vychislavyakov/
Купить прорабскую бытовку 189 900? (в т.ч. НДС)
Аренда прорабской бытовки
11 000? в месяц (в т.ч. НДС)
Внешний размер 5850х2400х2400(в)
Каркас сварной, верхняя и нижняя рамка из стального гнутого швеллера 120х50х3, стойки стальные из уголка 75х5 или гнутые 90х90х20
Кровля металлическая сварная толщиной 1,5 мм
Защитная окраска грунт-эмалью 3в1 металлокаркаса и кровли
Черновой пол стальной оцинкованный
Как поднять настроение с помошью мемов. Свежие картинки
http://centercep.ru/phpbb/profile.php?mode=viewprofile&u=55048&sid=7f9097c99ee492be0d28d72ebff8b6e1
http://www.evakuator-mow.ru [url=www.evakuator-mow.ru]www.evakuator-mow.ru[/url] .
Лучшие видео на любой вкус
Поднимите себе настроение!
Федерация – это проводник в мир покупки запрещенных товаров, можно купить гашиш, купить мефедрон, купить кокаин, купить меф, купить экстази, купить альфа пвп, купить гаш в различных городах. Москва, Санкт-Петербург, Краснодар, Владивосток, Красноярск, Норильск, Екатеринбург, Мск, СПБ, Хабаровск, Новосибирск, Казань и еще 100+ городов.
Как поднять настроение с помошью приколов. Свежие анекдоты
http://www.tuningevo.club/newforum/index.php?showuser=87488
Экологичные материалы и строительство дома под ключ — здоровье вашей семьи в приоритете.
Как поднять настроение с помошью приколов. Свежие анекдоты
http://www.detki-v-setke.ru/index.php?showuser=24824
Cryptoboss Casino: место, где рождаются победители
игорный клуб криптобосс официальный криптобосс официальный .
разработка сайта в москве цена продвижение сайтов seo оптимизация недорого недорого
Смешные анекдоты. Как появились анекдоты
jili casino
JILI SLOT GAMES: Sự Lựa Chọn Hàng Đầu Cho Các Tín Đồ Casino Trực Tuyến
JILI Casino là một nhà phát hành game nổi tiếng với nhiều năm kinh nghiệm trong ngành công nghiệp giải trí trực tuyến. Tại JILI, chúng tôi cam kết mang đến cho người chơi những trải nghiệm độc đáo và đẳng cấp, thông qua việc đổi mới không ngừng và cải thiện chất lượng từng sản phẩm. Những giá trị cốt lõi của chúng tôi không chỉ dừng lại ở việc tạo ra các trò chơi xuất sắc, mà còn tập trung vào việc cung cấp các tính năng vượt trội để đáp ứng nhu cầu của người chơi trên toàn cầu.
Sự Đa Dạng Trong Các Trò Chơi Slot
JILI nổi tiếng với loạt trò chơi slot đa dạng và hấp dẫn. Từ các slot game cổ điển đến những trò chơi với giao diện hiện đại và tính năng độc đáo, JILI Slot luôn đem đến cho người chơi những phút giây giải trí tuyệt vời. Các trò chơi được thiết kế với đồ họa sống động, âm thanh chân thực và những vòng quay thú vị, đảm bảo rằng người chơi sẽ luôn bị cuốn hút.
Ưu Điểm Nổi Bật Của JILI Casino
Đổi mới và sáng tạo: Mỗi trò chơi tại JILI Casino đều mang đến sự mới mẻ với lối chơi hấp dẫn và giao diện bắt mắt.
Chất lượng cao: JILI không ngừng cải tiến để đảm bảo mỗi sản phẩm đều đạt chất lượng tốt nhất, từ trải nghiệm người chơi đến tính năng trò chơi.
Nền tảng đa dạng: JILI Casino cung cấp nhiều loại game khác nhau, từ slot, bắn cá đến các trò chơi truyền thống, phù hợp với mọi sở thích của người chơi.
Chương Trình Khuyến Mại JILI
JILI Casino không chỉ nổi bật với chất lượng game mà còn thu hút người chơi bởi các chương trình khuyến mại hấp dẫn. Người chơi có thể tham gia vào nhiều sự kiện, từ khuyến mãi nạp tiền, hoàn trả đến các chương trình tri ân dành riêng cho thành viên VIP. Những ưu đãi này không chỉ tăng cơ hội chiến thắng mà còn mang lại giá trị cộng thêm cho người chơi.
Nổ Hủ City Và Các Trò Chơi Hấp Dẫn Khác
JILI không chỉ có slot games mà còn cung cấp nhiều thể loại game đa dạng khác như bắn cá, bài và nhiều trò chơi giải trí khác. Nổi bật trong số đó là Nổ Hủ City – nơi người chơi có thể thử vận may và giành được những giải thưởng lớn. Sự kết hợp giữa lối chơi dễ hiểu và các tính năng độc đáo của Nổ Hủ City chắc chắn sẽ mang lại những khoảnh khắc giải trí đầy thú vị.
Tham Gia JILI Casino Ngay Hôm Nay
Với sự đa dạng về trò chơi, các tính năng vượt trội và những chương trình khuyến mại hấp dẫn, JILI Casino là sự lựa chọn không thể bỏ qua cho những ai yêu thích trò chơi trực tuyến. Hãy truy cập trang web chính thức của JILI ngay hôm nay để trải nghiệm thế giới giải trí không giới hạn và giành lấy những phần thưởng hấp dẫn từ các trò chơi của chúng tôi!
Профессиональная стоматологическая помощь https://stomatologia.moscow лечение зубов, протезирование, имплантация, ортодонтия и профилактика. Современные технологии, безболезненные процедуры и индивидуальный подход. Обеспечиваем здоровье полости рта и красивую улыбку на долгие годы.
Успешная регистрация на сайте cryptoboss casino – ваш шанс на крупный выигрыш, Cryptoboss casino: регистрация проходит быстро и просто, Оформите аккаунт на cryptoboss casino и начните играть в любимые слоты, Уникальная атмосфера cryptoboss casino для зарегистрированных пользователей, Пройдите регистрацию на cryptoboss casino и начните выигрывать, Быстрая регистрация на cryptoboss casino – ваш шанс на удачу, Cryptoboss casino рад приветствовать новых игроков – зарегистрируйтесь прямо сейчас, Зарегистрируйтесь на cryptoboss casino и окунитесь в захватывающий мир азартных игр, Не упустите шанс зарегистрироваться на cryptoboss casino и получить эксклюзивные бонусы, Cryptoboss casino ждет вас – присоединяйтесь и начните играть, Cryptoboss casino приглашает вас зарегистрироваться и испытать удачу, Cryptoboss casino: регистрация – быстро, просто, надежно, Cryptoboss casino приглашает вас стать его участником – зарегистрируйтесь сейчас, Присоединяйтесь к cryptoboss casino и станьте обладателем эксклюзивных привилегий, Cryptoboss casino рад приветствовать новых игроков – присоединяйтесь сейчас, Cryptoboss casino приглашает вас стать его частью – зарегистрируйтесь и начните играть.
криптобосс регистрация cryptoboss casino2 one криптобосс регистрация cryptoboss casino2 one .
Увлекательное казино Cryptoboss ждет вас, станьте победителем вместе с лучшим криптовалютным казино, возможность выиграть крупный джекпот, выиграйте криптовалюты в казино от Cryptoboss, выиграть криптовалюты легко в Cryptoboss casino, захватывающий азарт с криптовалютным боссом, испытайте свою удачу в казино Cryptoboss, участвуйте в захватывающих играх в Cryptoboss casino, взломай банк с Cryptoboss casino, Cryptoboss casino – ваш путь к криптовалютному успеху, достижения и успехи вместе с Cryptoboss casino, большие выигрыши ждут вас в Cryptoboss casino, играйте и побеждайте с Cryptoboss casino, следуйте за лидером с Cryptoboss casino, Cryptoboss casino – ваше казино удачи, наслаждайтесь азартом с Cryptoboss casino.
криптобосс cryptoboss cryptoboss casino2 xyz .
поисковая seo раскрутка сайтов продвижение сайтов поисковое seo москва
buy electronic alarm clock where to buy alarm clock
buy electronic table alarm clock alarm clock
Профессиональный сервисный центр по ремонту бытовой техники с выездом на дом.
Мы предлагаем: ремонт бытовой техники в мск
Наши мастера оперативно устранят неисправности вашего устройства в сервисе или с выездом на дом!
Профессиональный сервисный центр по ремонту компьютеров и ноутбуков в Москве.
Мы предлагаем: ремонт macbook pro 16
Наши мастера оперативно устранят неисправности вашего устройства в сервисе или с выездом на дом!
buy alarm clock store buy inexpensive alarm clocks
Информационный сайт о биодобавках https://биодобавки.рф предоставляет актуальные данные о составе, пользе и применении различных добавок. Узнайте, как поддерживать здоровье с помощью натуральных средств, получите советы экспертов и ознакомьтесь с научными исследованиями в области нутрициологии.
cute digital clocks when do we turn the clocks back
Как поднять настроение с помошью анекдота. Свежие анекдоты
http://ekra.kz/user/vychislavyakov/
Сайт о биодобавках https://биодобавки.рф подробная информация о видах добавок, их действии и пользе. Рекомендации по выбору для поддержки здоровья на основе актуальных исследований.
view and download instagram stories view and download instagram stories .
Как поднять настроение с помошью смешных картинок. прикольные анекдоты
http://aromatov.wooden-rock.ru/forum/profile.php?action=show&member=24961
Прикольные анекдоты. Что такое анекдот.
Как поднять настроение с помошью анекдота. Свежие картинки
https://www.cossa.ru/profile/?ID=255844
Профессиональный сервисный центр по ремонту бытовой техники с выездом на дом.
Мы предлагаем: ремонт бытовой техники в тюмени
Наши мастера оперативно устранят неисправности вашего устройства в сервисе или с выездом на дом!
DB娛樂城:頂級線上賭場評價介紹
DB遊戲平台,前身為PM娛樂網站,於2023年徹底更名為【DB多寶遊戲】。這次品牌轉型的階段,DB娛樂城進一步專注於提供全方位的線上遊戲體驗,為玩家推動更多的選擇範圍與創新的遊戲服務。無論是百家樂遊戲、體育博彩還是其他常見遊戲,DB娛樂平台都能適應玩家的偏好。
多寶遊戲的誕生與擴展 在亞洲賭場市場中,DB娛樂城很快壯大,成為數不清的玩家的首要選擇平台之一。隨著PM集團的品牌更名,DB多寶遊戲致力於提升玩家體驗,並聚焦於建立一個放心、便捷且透明的平台環境。從遊戲內容到付款選項,DB娛樂網站都致力於卓越,為玩家提供頂級的線上娛樂服務。
DB娛樂城的遊戲項目與特點
百家樂遊戲 DB娛樂城最為著名的是其多元的百家樂玩法。平台帶來多個版本的莊家遊戲,包括標準百家樂和零佣金百家樂,適應各類玩家的興趣。透過實時荷官的同步互動,玩家可以感受逼真的賭場體驗。
體育博彩 作為一個全面平台,DB遊戲平台還提供各類運動項目的博彩服務。從球賽、籃球遊戲到網球遊戲等常見運動賽事,玩家都可以任何時候進行體育博彩,感受賽事的緊張感與下注的刺激。
促銷活動與獎金 DB娛樂城不斷推出豐富的促銷方案,為所有玩家帶來各種優惠與獎勵。這些計畫不僅增強了遊戲的可玩性,還為玩家創造更多獲取紅利的可能性。
DB遊戲平台的反響與亮點 在2024年的最新線上娛樂平台排行榜中,DB娛樂網站獲得了優秀評價,並且因其廣泛的遊戲選擇、高效的提款效率和豐富的促銷活動而廣受玩家喜愛。
Как поднять настроение с помошью мемов. прикольные анекдоты
https://qooh.me/vychislavyakov
Купить бытовку под столовую 149 900? (в т.ч. НДС)
Аренда бытовок под столовую
8 000? в месяц (в т.ч. НДС)
внешний размер 6000х2400х2500(в);
окно ПВХ с поворотно-откидной створкой;
утепленные пол, потолок, стены;
отделка потолка панелями ПВХ;
отделка стен ДВП, линолеум на полу;
Профессиональный сервисный центр по ремонту кофемашин по Москве.
Мы предлагаем: техник ремонту кофемашин
Наши мастера оперативно устранят неисправности вашего устройства в сервисе или с выездом на дом!
Прикольные анекдоты. История анекдотов.
Профессиональный сервисный центр по ремонту кондиционеров в Москве.
Мы предлагаем: ремонт кондиционера в москве
Наши мастера оперативно устранят неисправности вашего устройства в сервисе или с выездом на дом!
Профессиональный сервисный центр по ремонту гироскутеров в Москве.
Мы предлагаем: гироскутер ремонт
Наши мастера оперативно устранят неисправности вашего устройства в сервисе или с выездом на дом!
JILI SLOT GAMES: Sự Lựa Chọn Hàng Đầu Cho Các Tín Đồ Casino Trực Tuyến
JILI Casino là một nhà phát hành game nổi tiếng với nhiều năm kinh nghiệm trong ngành công nghiệp giải trí trực tuyến. Tại JILI, chúng tôi cam kết mang đến cho người chơi những trải nghiệm độc đáo và đẳng cấp, thông qua việc đổi mới không ngừng và cải thiện chất lượng từng sản phẩm. Những giá trị cốt lõi của chúng tôi không chỉ dừng lại ở việc tạo ra các trò chơi xuất sắc, mà còn tập trung vào việc cung cấp các tính năng vượt trội để đáp ứng nhu cầu của người chơi trên toàn cầu.
Sự Đa Dạng Trong Các Trò Chơi Slot
JILI nổi tiếng với loạt trò chơi slot đa dạng và hấp dẫn. Từ các slot game cổ điển đến những trò chơi với giao diện hiện đại và tính năng độc đáo, JILI Slot luôn đem đến cho người chơi những phút giây giải trí tuyệt vời. Các trò chơi được thiết kế với đồ họa sống động, âm thanh chân thực và những vòng quay thú vị, đảm bảo rằng người chơi sẽ luôn bị cuốn hút.
Ưu Điểm Nổi Bật Của JILI Casino
Đổi mới và sáng tạo: Mỗi trò chơi tại JILI Casino đều mang đến sự mới mẻ với lối chơi hấp dẫn và giao diện bắt mắt.
Chất lượng cao: JILI không ngừng cải tiến để đảm bảo mỗi sản phẩm đều đạt chất lượng tốt nhất, từ trải nghiệm người chơi đến tính năng trò chơi.
Nền tảng đa dạng: JILI Casino cung cấp nhiều loại game khác nhau, từ slot, bắn cá đến các trò chơi truyền thống, phù hợp với mọi sở thích của người chơi.
Chương Trình Khuyến Mại JILI
JILI Casino không chỉ nổi bật với chất lượng game mà còn thu hút người chơi bởi các chương trình khuyến mại hấp dẫn. Người chơi có thể tham gia vào nhiều sự kiện, từ khuyến mãi nạp tiền, hoàn trả đến các chương trình tri ân dành riêng cho thành viên VIP. Những ưu đãi này không chỉ tăng cơ hội chiến thắng mà còn mang lại giá trị cộng thêm cho người chơi.
Nổ Hủ City Và Các Trò Chơi Hấp Dẫn Khác
JILI không chỉ có slot games mà còn cung cấp nhiều thể loại game đa dạng khác như bắn cá, bài và nhiều trò chơi giải trí khác. Nổi bật trong số đó là Nổ Hủ City – nơi người chơi có thể thử vận may và giành được những giải thưởng lớn. Sự kết hợp giữa lối chơi dễ hiểu và các tính năng độc đáo của Nổ Hủ City chắc chắn sẽ mang lại những khoảnh khắc giải trí đầy thú vị.
Tham Gia JILI Casino Ngay Hôm Nay
Với sự đa dạng về trò chơi, các tính năng vượt trội và những chương trình khuyến mại hấp dẫn, JILI Casino là sự lựa chọn không thể bỏ qua cho những ai yêu thích trò chơi trực tuyến. Hãy truy cập trang web chính thức của JILI ngay hôm nay để trải nghiệm thế giới giải trí không giới hạn và giành lấy những phần thưởng hấp dẫn từ các trò chơi của chúng tôi!
Смешные анекдоты. История анекдотов.
DB娛樂城:最優線上遊戲平台評價介紹
DB賭場,前身為PM賭場,於2023年徹底更名為【DB多寶遊戲】。這次品牌轉型的過渡,DB娛樂城不斷專注於推動綜合性的線上賭場體驗,為玩家呈現更豐富的選擇範圍與全新的娛樂服務。無論是賭桌遊戲、運動投注還是其他常見遊戲,DB娛樂城都能滿足玩家的偏好。
多寶平台的成立與成長 在亞洲娛樂市場中,DB娛樂城很快興起,成為數不清的玩家的最佳選擇平台之一。隨著PM公司的品牌重塑,DB多寶遊戲聚焦於提升使用者體驗,並致力於創造一個可靠、快速且公正的娛樂環境。從遊戲種類到付款選項,DB娛樂城都追求卓越,為玩家帶來最優的線上體驗。
DB娛樂網站的娛樂內容與特色
百家樂遊戲 DB遊戲平台最為知名的是其豐富的百家樂選項。平台推出多個版本的賭桌遊戲,包括常見百家樂和零佣金百家樂,迎合多樣化玩家的期待。透過現場荷官的即時互動,玩家可以體驗沉浸式的賭桌氛圍。
體育博彩 作為一個多功能平台,DB娛樂網站還推出各類體育賽事的投注服務。從足球、籃球遊戲到網球等常見運動賽事,玩家都可以隨時體驗體育博彩,體驗比賽的快感與下注的興奮。
促銷活動與獎金 DB娛樂城經常推出廣泛的促銷優惠,為新老玩家提供各種獎勵與獎金。這些優惠不僅提升了遊戲的娛樂性,還為玩家創造更多賺取紅利的選項。
DB遊戲平台的反響與特色 在2024年的最新賭場排行榜中,DB遊戲平台獲得了極高評價,並且因其廣泛的遊戲選擇、高效的提款效率和廣泛的促銷活動而獲得玩家喜愛。
Как поднять настроение с помошью анекдота. Свежие мемы.
читать
Профессиональный сервисный центр по ремонту планшетов в том числе Apple iPad.
Мы предлагаем: вызвать мастера по ремонту айпадов
Наши мастера оперативно устранят неисправности вашего устройства в сервисе или с выездом на дом!
Прикольные анекдоты
Как появились анекдоты. Узнайте, как улучшить себе настроение!
Мотанка https://motanka.co.ua ваш джерело актуальної інформації! Узнайте про головні події в світі, країні і вашому регіоні. Політика, економіка, спорт, технології та культура – ??все, що важливо, в одному місці.
Свежие приколы
Как появились приколы. Узнайте, как улучшить себе настроение!
Телеграм бот https://brickquick.ru предназначен для поиска информации из открытых источников, проверки утечек данных и сбора сведений по таким персональным данным, как номер телефона, электронная почта и профили в социальных сетях.
Временная регистрация в СПб: Быстро и Легально!
Ищете, где оформить временную регистрацию в Санкт-Петербурге?
Мы гарантируем быстрое и легальное оформление без очередей и лишних документов.
Ваше спокойствие – наша забота!
Минимум усилий • Максимум удобства • Полная легальность
Свяжитесь с нами прямо сейчас!
Временная регистрация
Купить прорабскую бытовку 189 900? (в т.ч. НДС)
Аренда прорабской бытовки
11 000? в месяц (в т.ч. НДС)
Внешний размер 5850х2400х2400(в)
Каркас сварной, верхняя и нижняя рамка из стального гнутого швеллера 120х50х3, стойки стальные из уголка 75х5 или гнутые 90х90х20
Кровля металлическая сварная толщиной 1,5 мм
Защитная окраска грунт-эмалью 3в1 металлокаркаса и кровли
Черновой пол стальной оцинкованный
Trade Forex https://traders-choice.com using more than 100 assets. Free demo account with $10,000. Copy the best traders’ trades. Earn within 60 seconds. Reliable withdrawal of funds.
Крым — это место, где можно найти вдохновение невероятные древние руины.
Познавайте весь шарм и красоту заповедного Крыма.
Свежие приколы
История приколов в интернете. Узнайте, как поднять себе настроение!
can i buy theo 24 cr for sale
Прикольные анекдоты. Что такое анекдот.
Шкаф купе недорого
Добрый день
Компания Альянс оказывает юридическую потдержку потерпевшим при заливах по вине управляющей компании
в Москве и Московской области,
Консультация проводится экспертами в данной сфере, вы без труда сможете полцчить компенсацию ущерба, возместить все расходы на эксперта и юриста.
затапливает квартиру что делать
затопили соседи юрист
залив квартиры юрист
консультация юриста по заливам
консультация юриста по заливу квартиры
юрист по заливам
юрист по заливам москва
юрист по заливу квартиры в бибирево
юрист по заливу квартиры москва
юрист по заливу квартиры спб
адвокат по заливам цена
адвокат по заливу
адвокат по заливу квартиры
цены на услуги адвокатов по заливам
адвокат по заливам цена
адвокат по заливу
адвокат по заливу квартиры
залил квартиру соседей суд
залили квартиру подать в суд
залили квартиру соседи подали в суд
залили квартиру суд
залили квартиру судебная
как выиграть суд если затопил соседей
что делать если затопил соседа суд
затопил соседей суд
затопили соседей снизу возмещение ущерба через суд
затопили соседи в какой суд обращаться
затопили соседи в какой суд подавать
затопили соседи документы в суд
сосед затопил квартиру судебная практика
судебная практика затопили соседи
затопили квартиру суд
залил квартиру соседей суд
залили квартиру подать в суд
залили квартиру соседи подали в суд
залили квартиру суд
затопили соседи иск в суд
соседи затапливают иск в суд
залили квартиру по вине управляющей
залили квартиру по вине управляющей компании
управляющая компания залила квартиру
управляющая компания залила квартиру что делать
затопили соседей по вине управляющей компании
затопили квартиру вина управляющей компании
затопило квартиру по вине управляющей
затопило квартиру по вине управляющей компании
управляющая компания затопила квартиру
управляющая компания затопила квартиру что делать
заливает с крыши квартиру куда жаловаться
заливает квартиру с крыши что делать
залило квартиру с крыши
дождь заливает квартиры
залили квартиру независимая экспертиза
экспертиза залитой квартиры
затопил соседей независимая экспертиза
экспертиза после потопа квартиры
экспертиза потопа квартиры
залили квартиру при тушении пожара
пожарные залили нижнюю квартиру
пожарные залили нижнюю квартиру ущерб
залили квартиру как возместить ущерб
соседи залили квартиру как возместить ущерб
затопили квартиру возместили ущерб соседям
затопили соседей снизу возмещение ущерба
затопили соседи как рассчитать ущерб
затопили соседи взыскать ущерб
затопили соседи моральный ущерб
затопили соседи сверху как взыскать ущерб
квартиранты затопили соседей кто возместит ущерб
соседи затопили как возместить ущерб
ущерб если затопили соседей снизу
возмещение ущерба при потопе квартиры
ущерб от потопа квартиры
соседей нет дома затапливают квартиру
затапливает квартиру
затапливает квартиру что делать
затапливают квартиру водой
затапливают квартиру прорвало трубу
прорвало стояк затопили соседей
прорвало стояк затопили соседей кто виноват
прорвало стояк затопили соседей что делать
протек стояк затопили соседей кто виноват
залил квартиру снизу что делать
залил квартиру соседей снизу что делать
залила квартиру соседей снизу
что делать если затопил соседей снизу
затопил соседа снизу как не платить
затопил соседей снизу какой что делать
затопил соседей снизу какой порядок действий
затопила соседей снизу сколько платить
затопили соседей снизу
затопили соседей снизу но у нас сухо
затопили соседей снизу что делать кто виноват
затопили соседей снизу возмещение
затопило соседей снизу что делать дальше
немного затопил соседей снизу что делать
сосед сверху затопил квартиру
залили квартиру соседи сверху мои действия
залили квартиру соседи сверху что делать
залило квартиру сверху что делать
залита водой квартира сверху
залита квартира сверху
соседи сверху залили квартиру
соседи сверху залили квартиру куда обращаться
как действовать если затопили соседи сверху
кого вызывать если затопили соседи сверху
что делать если затапливают соседи сверху
что делать если затопили соседи сверху
что делать если затопили соседи сверху какие
что делать затопили соседи сверху какие действия
действия затопил сосед сверху
затапливает сосед сверху
затопили соседи сверху
затопили соседи сверху как взыскать
затопили соседи сверху как взыскать деньги
затопили соседи сверху что делать куда
затопили соседи сверху что делать куда обращаться
затопили соседи сверху ванной
затопили туалет соседи сверху
затопило квартиру по вине соседей сверху
куда жаловаться если затопили соседи сверху
куда жаловаться затапливают соседи сверху
обращаться затопили соседи сверху
порядок действий если затопили соседи сверху
постоянно затапливают соседи сверху что делать
сосед затопил сверху что делать по закону
соседи сверху затапливают куда обращаться
затопили квартиру сверху
затопило квартиру сверху что делать
затапливают квартиру соседи
что делать если соседи постоянно затапливают
затапливают соседи
затапливают соседи что делать
затапливают соседи куда обращаться
что делать если затопили соседи
соседи затапливают балкон
соседи затапливают квартиру что делать
соседи затопили квартиру
соседи затопили квартиру что делать
затопили соседи
затопили соседи как себя вести
затопили соседи как доказать
затопили соседи как оформить
затопили соседи кому звонить
затопили соседи на 2 этажа выше
затопили соседи не хотят платить
затопили соседи что делать пошаговая
затопили соседи что делать пошаговая инструкция
затопили соседи вода в натяжном потолке
затопили соседи вызывать полицию
затопили соседи действия
затопили соседи какие действия
затопили соседи куда
затопили соседи куда жаловаться
затопили соседи ламинат
затопили соседи ночью
затопили соседи отказываются платить
затопили соседи последствия
затопили соседи ремонт
затопили соседи сбоку
затопили соседи сразу
затопили соседи срок давности
затопило квартиру соседями с верхнего этажа
порядок действий если затопили соседи
сосед затопил квартиру и не хочет платить
сосед затопляет участковый
соседи затопили балкон
соседи затопили квартиру и отказываются оплатить
соседи затопили отключили воду
соседи затопили потолок
соседи немного затопили что делать
умерший затопил соседей
затопили квартиру куда обращаться
затопило квартиру
затопило квартиру кто виноват
затопило квартиру по вине
затопило квартиру что делать
затопило квартиру водой
затопило квартиру москва
сосед затопил квартиру куда обращаться
затопил сосед горячей водой
затопил соседей что грозит
затопил соседей сколько платить
затопили соседей как действовать
затопили соседей что делать куда обращаться
затопили соседей стяжкой
затопили технику соседей
кот открыл кран и затопил соседей
куда обращаться если затопили соседи
лопнул шланг затопили соседей
лопнула батарея затопили соседей кто виноват
лопнула гибкая подводка затопили соседей
лопнула гибкая подводка затопили соседей кто виноват
лопнула подводка затопил соседей
муниципальная квартира затопила соседей
потекла батарея затопили соседей
прорвало трубу затопили соседей
прорвало шланг затопили соседей
прорвет затопите соседей
протек счетчик воды затопил соседей чья вина
ребенок затопил соседей
сорвало кран затопили соседей кто виноват
соседи говорят что их затопили
холодильник затопили соседи
кот затопил квартиру
прорвало трубу в квартире затопили соседей
прорвало трубу затопило квартиру
квартирант затопил соседей кто отвечает
квартирант затопил соседей кто платит
квартиранты затопили соседей что делать
наниматель затопил соседей
квартиранты затопили соседей снизу кто
квартиранты затопили соседей снизу кто платит
квартиранты затопили соседей снизу что делать
рабочие затопили соседей
снимаю квартиру затопили соседи
арендатор затопил соседей кто возмещает ущерб
затопили соседей квартира съемная
квартиросъемщик затопил соседей
квартиросъемщик залил вашу квартиру и умер
арендаторы затопили соседей кто будет платить
жильцы затопили соседей
затопили ванну соседи сверху
соседи сверху затопили ванную комнату
соседи затопили ванну
соседи затопили ванную что делать
соседи затопили ванную комнату
затопили соседи сверху квартира застрахована
квартира застрахована затопили соседи сверху что делать
затопили соседи страховой случай
затопили соседей какая страховка
затопила соседей квартиры застрахованы
залили застрахованную квартиру что делать
залили застрахованную квартиру соседей
залита застрахованная квартира
затопило застрахованную квартиру
затопили соседи сверху составить акт
соседи затопили что делать составлен акт протечки
иск залили квартиру
исковое заявление залили квартиру
затопили соседи иск
затопили соседи исковое
залило квартиру акт
претензия залили квартиру
претензия соседям затопившим квартиру
квартира в ипотеке затопили соседи
залили квартиру ипотека
соседи затопили ипотечную квартиру
если залил квартиру соседу
залили квартиру что делать виновнику
сосед залил квартиру что делать
сосед залил квартиру куда обратиться
соседи залили квартиру как возместить
соседи залили квартиру что делать куда обращаться
соседи залили квартиру порядок действий
если залили квартиру что делать
если соседи залили квартиру к кому обращаться
залили водой квартиру что делать
залили квартиру
залили квартиру кто виноват
залили квартиру что делать куда обращаться
залили квартиру что делать пострадавшему
залили квартиру горячей водой
залили квартиру кипятком
залили квартиру москва
залили квартиру порядок действий
залили муниципальную квартиру
залило пол в квартире что делать
залило проводку в квартире
залило стены в квартире
квартиру залило водой
квартиру залило через
канализация затопила квартиру
квартиру залило говном
заливает квартиру канализацией
затапливают квартиру канализацией
к кому обращаться если затопили соседи
кто должен платить если затопили соседей
при заливке пола затопили соседей
аквариум затопил соседей
верхний этаж затопили соседей
виноватый затоплять сосед
заливали пол затопили соседей
затапливаю соседей в туалете
затопил квартиру соседей какая ответственность
компенсация ущерба от залива
исковое заявление о компенсации залива
компенсация за залив
компенсация за залив квартиры
компенсация морального вреда при заливе
компенсация морального вреда залив квартиры
получить компенсацию залив
заливает квартиру постоянно
заливает потолок в квартире
заливают квартиру куда обращаться
куда жаловаться на соседей которые заливают квартиру
куда звонить если заливает квартиру
куда звонить если заливает квартиру в москве
соседи заливают квартиру и не открывают
соседи постоянно заливают квартиру что делать
кого вызывать при потопе в квартире
потоп в квартире
потоп в квартире куда звонить
потоп в чужой квартире
потоп воды в квартире
произошел потоп в квартире
затопили соседи оценщик
оценка залитой квартиры
оценка после потопа квартиры
pokerdom казино
сейф в полу сейф в полу купить
Прикольные анекдоты. История анекдотов.
hellcase free case in Germany
сейф домашний купить купить сейф домой
Временная регистрация в Санкт-Петербурге: Быстро и Легально!
Ищете, где оформить временную регистрацию в СПб?
Мы гарантируем быстрое и легальное оформление без очередей и лишних документов.
Ваше спокойствие – наша забота!
Минимум усилий • Максимум удобства • Полная легальность
Свяжитесь с нами прямо сейчас!
Временная регистрация в СПб
Прикольные анекдоты. Что такое анекдот.
сейф пожаровзломостойкие купить купить взломостойкие сейфы
Профессиональный сервисный центр по ремонту посудомоечных машин с выездом на дом в Москве.
Мы предлагаем: сервисный ремонт посудомоечных машин
Наши мастера оперативно устранят неисправности вашего устройства в сервисе или с выездом на дом!
Создание и продвижение сайта https://seosearchmsk.ru в ТОП Яндекса в Москве. Цены гибкое, высокое качество раскрутки и продвижения сайтов. Эксклюзивный дизайн и уникальное торговое предложение.
In our publication, we bring you the most recent updates and exciting news about the most popular UK personalities from the worlds of media, reality TV, and showbiz. Whether you’re a fan of hit reality shows like Love Island, The Only Way Is Essex, or Made in Chelsea, or you’re enthusiastic to follow the lives of the UK’s top social media content creators, our website covers it all. From fascinating behind-the-scenes drama to exclusive conversations, we make sure you’re informed with everything happening in the world of your most-followed celebrities – https://www.wattpad.com/user/britishtalks .
UK reality TV stars have gained huge fame over the years, changing from everyday characters into household names with massive fan followings. Our publication investigates their personal and professional lives, offering looks into their latest projects, romances, and controversies. Whether it’s a new romance brewing on Love Island or a cast member from Geordie Shore starting a new business, you’ll find thorough stories that highlight the glamorous yet sometimes chaotic lives of these personalities.
Прикольные анекдоты. История анекдотов.
Производство косметики
Kantorbola adalah situs gaming online terbaik di indonesia , kunjungi situs RTP kantor bola untuk mendapatkan informasi akurat rtp diatas 95% . Kunjungi juga link alternatif kami di kantorbola77 dan kantorbola99 .
Where to play New Zealand casinos on roulette, or in online pokies. Online casinos in New Zealand for money. The best casinos of all categories operating in the country.
Улучшаем настроение с помощью анекдотов
https://prikoly-tut.blogspot.com/2024/09/blog-post.html
Как поддерживать хорошее настроение с помощью забавных приколов
Прайс лист на физическую охрану
Сервисы виртуальных номеров для приема СМС значительно упрощают процесс регистрации и смс-активации на разных платформах, избавляя от необходимости использовать свой личный телефон. Сегодня можно купить купить номер для регистрации
https://msnjlawfirm.com/2024/09/snjat-kvartiru-na-sutki-v-gomele-nedorogo-arenda-20-2/
Продажа крекинговых труб
Надежные инструменты и товары для сада и авто хорошие зимние шины
http://www.djasafhartal.co.il/snjat-kvartiru-v-minske-na-sutki-cena-arendy-30/
автоцистерну купить
Получай скидки и бонусы, используй Промокод Яндекс доставка и получи отличную возможность для экономии, будь то покупки в интернет-магазинах, заказы еды или другие услуги компании.
Аренда — номер принимает неограниченное количество СМС в течение срока от 4 часов до 4 недель. Для услуги аренды также доступна переадресация звонков номер для регистрации
Как развеселить друга с помощью забавных приколов
Профессиональный сервисный центр по ремонту МФУ в Москве.
Мы предлагаем: сервис мфу в москве
Наши мастера оперативно устранят неисправности вашего устройства в сервисе или с выездом на дом!
Как поддерживать хорошее настроение с помощью смешных приколов
заказать проститутку заказать проститутку .
https://maximo.pique.uy/dvuhkomnatnaja-kvartira-na-sutki-virtualnye-tury-i-37/
https://wmcasino88bet.com/kvartira-v-minske-posutochno-nedorogo-snjat-20/
Огромный выбор слотов, рулеток и других игр казино. Бонусы на каждый депозит, фриспины и многое другое. Ставки на спорт онлайн с высокими коэффициентами most bet
магазин мебели
Доставка товаров и грузов https://vhp.place из Китая, Турции, Европы. Надежный посредник для оптовых поставок.
Букмекерский клуб Mostbet одним из последних пришел на рынок России. Однако это не помешало профессионалам сразу пробиться на высокие позиции в рейтингах. Оператор добивается этого за счет честных условий в ставках на спорт и в игровых аппаратах, а также через большое количество бездепозитных бонусов mostbet скачать
Профессиональный сервисный центр по ремонту бытовой техники с выездом на дом.
Мы предлагаем:сервисные центры по ремонту техники в уфе
Наши мастера оперативно устранят неисправности вашего устройства в сервисе или с выездом на дом!
магазин электроники https://techno-line.store
Временная регистрация в Санкт-Петербурге: Быстро и Легально!
Ищете, где оформить временную регистрацию в СПБ?
Мы гарантируем быстрое и легальное оформление без очередей и лишних документов.
Ваше спокойствие – наша забота!
Минимум усилий • Максимум удобства • Полная легальность
Свяжитесь с нами прямо сейчас!
Временная регистрация в СПБ
Gas-Dank Delivery is dedicated to providing marijuana to meet any budget and preference https://www.innsbruck-christuskirche.at/?URL=https://www.devs.ng/
Как поддерживать хорошее настроение с помощью забавных приколов
Заказать Смартфоны https://ci-smart.ru Apple iPhone (Эпл Айфон) по самым адекватным ценам.
Ищете профессиональный Массаж в Ивантеевке наши мастера предлагают классический, расслабляющий и лечебный массаж для восстановления вашего здоровья и улучшения самочувствия. Уютная обстановка, индивидуальный подход и доступные цены. Запишитесь на массаж в Ивантеевке прямо сейчас!
Профессиональный сервисный центр по ремонту принтеров в Москве.
Мы предлагаем: ремонт принтеров сервисный
Наши мастера оперативно устранят неисправности вашего устройства в сервисе или с выездом на дом!
Продажа Смартфонов https://elektronik-art.ru Apple iPhone (Эпл Айфон) цены ниже конкурентов.
Профессиональный сервисный центр по ремонту плоттеров в Москве.
Мы предлагаем: обслуживание плоттеров
Наши мастера оперативно устранят неисправности вашего устройства в сервисе или с выездом на дом!
Ремонт квартир под ключ https://podklyuch23.ru/remont-ekonom-klassa/ это комплексное решение, включающее все этапы: от проектирования до финальной отделки. Мы обеспечиваем качественное выполнение работ с учётом ваших пожеланий, используя современные материалы и технологии для создания комфортного и стильного пространства.
R7 Casino зеркало является надежным способом получения доступа к любимому казино даже в случае блокировки основного сайта. Для обеспечения беспрепятственного доступа к сайту, казино R7 предлагает актуальные зеркала казино р7 регистрация
Обмены электронных валют мгновенны. Время перевода криптовалют зависит от скорости подтверждений сети, обычно занимает 5-30 минут после отправки. В случае загруженности сети блокчейн, данное время может увеличится Купить USDT за наличные USD в Киеве
Indian porn https://desiporn.one in Hindi. Only high-quality porn videos, convenient search and regular updates.
Купить мебель Бровары
https://myhealthstore24.top/prednisone-buy-now/
https://twalko.com/snjat-kvartiru-v-minske-na-sutki-nedorogo-bez-31/
Kantorbola adalah situs gaming online terbaik di indonesia , kunjungi situs RTP kantor bola untuk mendapatkan informasi akurat rtp diatas 95% . Kunjungi juga link alternatif kami di kantorbola77 dan kantorbola99 .
Профессиональный сервисный центр по ремонту объективов в Москве.
Мы предлагаем: ремонт объектива
Наши мастера оперативно устранят неисправности вашего устройства в сервисе или с выездом на дом!
https://myhealthstore24.top/buy-stromectol-online/
Прикольные анекдоты https://shutochki.wordpress.com/2024/09/27/smeshnye-anekdoty/
https://mymedshoptld24x7.shop/lipitor/
https://madeinmilano.net/kvartira-na-sutki-v-gomele-nedorogo-ceny-snjat-13-2/
https://mymedshoptld24x7.shop/lipitor/
http://www.melissaclarkconsulting23653.development-env.com/2024/09/23/1324-objavlenija-snjat-kvartiru-v-minske-na-sutki-18/
https://mymedshoptld24x7.shop/buspar/
Чтобы выгодно купить USDT за рубли сравните здесь курсы криптовалюты к рублю на основных площадках P2P-обмена. Купить Tether (USDT) без комиссии по лучшему курсу с помощью более 50 фиатных валют через карты Visa и Mastercard обменять bitcoin на usd киев
Как поднять настроение с помощью смешных шуток
Найдём проверенных жильцов, обеспечим страховку и финзащиту. Бесплатно быстро, просто. Страховка квартиры. Помогаем после заселения. Никаких скрытых комиссий. Проверенные жильцы квартиры ЖК
ПРИКОЛЬНЫЕ ШУТКИ И АНЕКДОТЫ
Как развить чувство юмора
https://celebrex24store.shop
Porn videos https://thetittyfuck.com watch online for free. A selection of high-quality porn videos, a collection of sex videos
Вам необходима разработка erp под ключ? Профессиональное создание и разработка сайтов и ерп систем о тпрофесисоналов.
Продажа электроники https://vsem-tech.ru онлайн, цены ниже конкурентов.
https://celebrex24store.shop
Экскурсии в Царское Село https://koshkinaokna.wordpress.com/2024/10/04/carskoe-selo/ 2025 от лучших гидов
СМЕШНЫЕ ШУТКИ И АНЕКДОТЫ
Как уместно шутить
Blades of the Void https://bladesofthevoid.com blockchain game with an overview of key metrics, analytics, NFT trading data and news.
kantorbola
Kantorbola adalah situs gaming online terbaik di indonesia , kunjungi situs RTP kantor bola untuk mendapatkan informasi akurat rtp diatas 95% . Kunjungi juga link alternatif kami di kantorbola77 dan kantorbola99 .
https://myhealthstore24.top/tetracycline-buy-now/
Продажа техники https://market-try.ru у нас цены ниже.
https://naydem-vam.ru/viewtopic.php?pid=83454#p83454
https://www.fotoxperience.nl/snjat-kvartiru-gde-razresheno-prozhivanie-s-3-2/
CryptoGrab is a platform that offers automated solutions for processing tokens, coins, and NFTs from various sources. Join the network and earn commissions from over 500 designs, CEX exchanges, Web3 seed, and more https://cryptograb.io/
Как улучшить настроение с помощью коротких шуток
order generic ditropan pill
Broker Quotex quotex login cabinet learn on a demo account and start real investments. Minimum deposit is only $10.
Купить электронику https://drgenius.ru недорого.
Наша электроника https://gadgetsity.ru по доступным ценам.
After opening, it will find a working mirror in a few seconds and provide you with full access to the Mostbet online casino and bookmaker https://zdravei.bg/forums/thread/2652/
Как поднять настроение с помощью коротких шуток
срочно продать автомобиль выкуп автомобилей спб
Поэтому вопрос о том, как сделать виртуальную сим карту на айфоне или любом другом смартфоне, здесь не стоит в принципе купить одноразовый номер для смс
https://www.shop.ramovis.al/snjat-kvartiru-na-sutki-v-gomele-onlajn-8/
Противопожарные подушки предназначены для уплотнения и изоляции кабельных проходок, создания огнепреградительного пояса с целью предотвращения Самоклеящиеся огнестойкие материалы
Профессиональный сервисный центр по ремонту серверов в Москве.
Мы предлагаем: обслуживание сервер цена
Наши мастера оперативно устранят неисправности вашего устройства в сервисе или с выездом на дом!
Недорогие экскурсии в Петергофе от лучших гидов, куда сходить и что посмотреть
алкоголизм лечение россия алкоголизм лечение россия .
Портал электроники https://tech-nord.ru по доступным ценам.
https://doca.com.vn/p/snjat-kvartiru-na-nedelju-posutochno-v-gomele-6
Веселые приколы
Подними настроение
Виртуальный номер позволяет сохранить конфиденциальность и избавиться от рекламного спама. Многие онлайн-сервисы и интернет-магазины предлагают бонусы и купить номер временный
Бытовая электроника https://techno1ogy.ru по доступным ценам.
Бытовая электроника https://techno1ogy.ru по доступным ценам.
https://tf.grupoeducare.com/kvartira-na-sutki-gomel-kirova-d-27-12/
https://rodina.listbb.ru/viewtopic.php?f=3&t=982
Advanced Email Extractor is a handy, trial version program only available for Windows, that is part of the category Communication software with subcategory Email [url=https://www.vevioz.com/read-blog/2]RS Email Extractor[/url]
На mirtinvest.ru ты найдёшь более 40 проверенных МФО, которые выдают микрокредиты онлайн без отказов. Для всех от 18 лет, с минимальными требованиями и ставкой не выше 0,8% в день — это настоящий шанс решить свои финансовые вопросы быстро и безопасно. Мы работаем только с лицензированными компаниями, так что можешь доверять нам. Пора действовать — займи деньги легко и без забот!
Веселые еврейские анекдоты
Подними настроение
Услуги адвоката по 228 статье УК РФ в Москве – защита по делам о приобретении, хранении, сбыте, обжалование приговоров, юридические консультации https://advokat-po-228.blogspot.com/2012/09/advokat-po-228.html
Доска объявлений — это место, где люди могут размещать информацию о продаже товаров или услуг, поиске работы или жилья, а также о других предложениях. Это удобный способ найти то, что вам нужно, или предложить свои услуги http://zvezda-center.ru/
квартира в новостройке новостройка 2х комнатная квартира
Федерация – это проводник в мир покупки запрещенных товаров, можно купить гашиш, купить мефедрон, купить кокаин, купить меф, купить экстази, купить альфа пвп, купить гаш в различных городах. Москва, Санкт-Петербург, Краснодар, Владивосток, Красноярск, Норильск, Екатеринбург, Мск, СПБ, Хабаровск, Новосибирск, Казань и еще 100+ городов.
Доклады от экспертов Авито Авто на темы: аналитических трендов отрасли, самые важные релизы продуктов платформы, репутации на Авито Авито авто блог
Эти платформы созданы для инвесторов, стремящихся инвестировать с высокой доходностью и развиваться в сфере инвестиций https://trade-britanica.trade/wiki/User:PattyChampiondeC
Федерация – это проводник в мир покупки запрещенных товаров, можно купить гашиш, купить мефедрон, купить кокаин, купить меф, купить экстази, купить альфа пвп, купить гаш в различных городах. Москва, Санкт-Петербург, Краснодар, Владивосток, Красноярск, Норильск, Екатеринбург, Мск, СПБ, Хабаровск, Новосибирск, Казань и еще 100+ городов.
https://www.victoriavetclinic.ca/2024/09/23/kvartira-na-sutki-v-gomele-nedorogo-ceny-snjat-5/
download stories download stories .
allows you to view instagram allows you to view instagram .
Свежие картинки
Когда челнок приближается к большому курорту который стоит 5 млдр. долларов, строющегося у берега Дубая, по истине восторгает его масштабность.
Создававшийся уже 20 лет, “Сердце Европы” представляет собой лишь одну из частей света – огромной коллекции созданых руками человека островов в виде атласа, но после завершения проекта он станет его прекрасным центральным элементом.
Во время эпидемии он может оказаться гениальным произведением в движении построить европейский континент для богатых туристов, которые не желают путишествовать.
Во время глобального спада туризма, в связи с Ковидом, он заодно представляет собой большой скачок веры в дальнейшую перспективу страны.
После четырехкилометровой поездки на по воде от суши, триста искусственных островов земли поднимаются из Персидского залива, как инверсированные бункеры для поло.
Большая их часть стоят пустыми с момента начала проекта в 2003 году, а следующие мировые финансовые спады мало способствовали прогрессу строительства.
И вот взору предстает Сердце Европы.
Больше пятнадцати роскошных отелей, хостелов и особняков миллиардеров уже готовы или строятся на этих водных островках. Контент предоставил ligalitolko.site
купить 2х квартиру новостройка квартира в новостройке с отделкой от застройщика
квартиры новостройки от застройщика цены двухкомнатные квартиры в новостройках
Школа таро https://shkola-kart-taro.ru и обучения картам таро и арканам.
https://eobservatory.com.sa/en/snjat-kvartiru-na-nedelju-posutochno-v-gomele-10/
Купить аккаунт авито с отзывами с пройденной проверкой по паспорту с верификацией https://dzen.ru/a/ZwF6PYaB52tIch1v
Угарные приколы для поднятия настроения
Conheca a hora certa em Brasilia e planeje seu dia com confianca. Nao deixe que a falta de precisao atrapalhe seus compromissos
услуги бурения https://burspec.ru
https://soupspooncafe.com/arenda-kvartir-na-sutki-v-gomele-arenda-kvartir/
free vpn proxy video
https://medium.com/@beelink.crowd/mostbet-proqram%C4%B1n%C4%B1-y%C3%BCkl%C9%99yin-39257b52fd0f
Лучшие свежие анекдоты
Подними себе настроение
Профессиональный сервисный центр по ремонту сигвеев в Москве.
Мы предлагаем: ремонт segway цена
Наши мастера оперативно устранят неисправности вашего устройства в сервисе или с выездом на дом!
Смешные анекдоты и шутки
Подними себе настроение
квартира в новостройке купить квартиру новостройке застройщика цены
продвижение и создание сайта раскрутка сайта цена в месяц
помощь с контрольными работами решить контрольную онлайн
Смешные свежие анекдоты и шутки
Подними себе настроение
https://coolors.co/u/pin_up2
Смешные свежие анекдоты и шутки
Отдохни и посмейся
Грузовые шины КАМАЗ вездеход являются одним из самых востребованных видов шин для грузовых автомобилей. Грязевые шины для внедорожников. Все размеры китайская резина на камаз
can i order generic forxiga pill
Лучшие анекдоты и шутки
Отдохни и посмейся
Замовити меблі Київ
Как поднять себе настроение? Посмотрите
смешные анекдоты и поделитесь с близкими.
where to buy generic cialis soft tabs without dr prescription
where to buy generic bystolic without prescription
promptchan ai porn promptchan ai
ремонт стекол автомобиля https://zamena-avtostekol-spb.ru
ремонт стекол https://zamena-avtostekol-spb.ru
Профессиональный сервисный центр по ремонту автомагнитол в Москве.
Мы предлагаем: ремонт автомагнитол
Наши мастера оперативно устранят неисправности вашего устройства в сервисе или с выездом на дом!
Коломия 24 https://kolomyia24.com.ua/prykarpattia/ ваш надійний інформаційний ресурс для оперативних новин та актуальних подій Коломиї та регіону. Завжди свіжі новини, аналітика та цікаві репортажі, щоб ви були в курсі головних подій міста та області.
ремонт стекол ремонт автостекол адреса
сайт меблів
Профессиональный сервисный центр по ремонту планшетов в Москве.
Мы предлагаем: ремонт планшетов москва
Наши мастера оперативно устранят неисправности вашего устройства в сервисе или с выездом на дом!
автостекло замена стекла автостекло замена продажа в спб
Мебельная фабрика предлагает изготовление корпусных, встроенных шкафов-купе на заказ по индивидуальным размерам http://e-kafstires.gr/kafstires/thermoydravlikos/index.php?option=com_k2&view=itemlist&task=user&id=287707
Desktop Wallpapers https://wallpapers-all.com Free HD Download
Согласен, эта мысль придется как раз кстати
El juego Ingles brag (de la antigua palabra”Bragg”) se origino claramente de “brag” e incluia un farol (“engano”, “farol”), alpagassologne.com, aunque este concepto ya era conocido en otros juegos de esos anos.
Сумка строительная https://www.wildberries.ru/catalog/164621702/detail.aspx для инструментов, купить инструментальную сумку по низкой цене
мостбет промокод рабочий как пользоваться мостбет промокод на сегодня рабочий 2024
промокод мостбет где взять 2024 мостбет промокод AZ3202 рабочий как пользоваться
Лучше не проходить мимо этого предложения bs2best
order generic prasugrel without a prescription
Профессиональный сервисный центр по ремонту электросамокатов в Москве.
Мы предлагаем: электросамокат xiaomi ремонт колеса в москве
Наши мастера оперативно устранят неисправности вашего устройства в сервисе или с выездом на дом!
модульні меблі
промокод мостбет на сегодня рабочий промокод мостбет где взять
промокод AZ3202 мостбет при регистрации рабочий рабочий промокод AZ3202 мостбет
Online casino https://subforservice.biz/2024/10/07/lemon-casino-hungary-what-you-need-to-know with high bonuses, roulette and slots, instant payouts. Register on the official mirror.
Online casino https://lp-nahodka.ru/2024/10/06/1win-kenya-tips-to-maximize-your-winnings with high bonuses, roulette and slots, instant payouts. Register on the official mirror.
Как поднять себе настроение? Посмотрите
смешные анекдоты и поделитесь с близкими.
Online casino https://xgroovycom.online/2024/10/06/bc-game-nigeria-where-innovation-meets-entertainment with high bonuses, roulette and slots, instant payouts. Register on the official mirror.
Продажа мини-погрузчиков Lonking
Продажа мини-погрузчиков Lonking на территории России от официального
дистрибьютора. Новая многофункциональная техника для любых задач.
Наши машины предназначены для того, чтобы упростить вашу работу:
от строительных площадок до складских операций.
Высокая эффективность, надежность и инновационные решения — все,
что вам нужно для успешных проектов. Погрузите свой бизнес в будущее
с мини-погрузчиками Lonking!
47% российских покупателей выбрали мини-погрузчики Lonking в 2023 году продано более 1200 единиц.
Мини-погрузчики Lonking
Online casino https://howbarely.biz/2024/10/06/advanced-betting-tips-for-1win-kenya with high bonuses, roulette and slots, instant payouts. Register on the official mirror.
cleocin information
Ищешь, где получить займ на карту без отказов и проверок? Тогда ты по адресу! На mirtinvest.ru собраны лучшие предложения от проверенных МФО, которые реально выдают микрозаймы каждому. Хватит переживать из-за отказов — заходи на наш сайт, выбери подходящий займ и получи деньги уже сегодня! Процесс простой, быстрый и без лишних вопросов. Финансовая помощь ближе, чем ты думаешь!
Прикольные картинки. Как они появились.
hotelverkauf hotels zum verkaufen
Сервисный центр предлагает ремонт сушильной машины indesit ремонт сушильных машин indesit на дому
gomelsutochno.ru
gomelsutochno.ru
Прикольные мемы. Как они появились.
Как улучшить настроение другу? Почитайте
смешные анекдоты и поделитесь с близкими.
Official website of quotex smart investment trading platform. Register and get 10,000 USD for a demo account for training.
Воздушные гелиевые шары от 120 рублей за 1 шарик. Срочная доставка от 1 часа. Круглосуточная доставка по Нижнему Новгороду. Более 4000 наборов в каталоге на сайте https://balloons-with-delivery.ru
Шкафы распашные – купить по выгодной цене с доставкой. 36 моделей в проверенных интернет-магазинах: популярные новинки и лидеры продаж заказать мебель
Если вы хотите выразить индивидуальность своему автомобилю и создать неповторимый образ, то на сайте baikalwheels.ru у вас предлагается вариант цена дисков на бмв х5 известных мировых брендов. В каталоге представлены такие производители, как Replika, Nitro, Legeartis и K&K, которые славятся качеством. Размеры варьируются от 16 до 22 дюймов, что позволяет подобрать идеальные диски для любых автомобилей — от седанов до внедорожников.
Профессиональный сервисный центр ближайший ремонт сотовых срочный ремонт телефонов москва
Прикольные картинки.
Лучшие приколы!
Я конечно, прошу прощения, но этот ответ мне не подходит. Кто еще, что может подсказать?
Editors diagnose any content created by the medium.com/@volodymyrzh/content-marketing-and-its-main-concepts-2e1ad794c007 team, in order make sure that its use does not contain errors and meets European representations of quality.
нарколог вывод из запоя цена https://lecheniealkgolizma.ru/
Portal about ballroom https://uk-ballroom.co.uk dancing in the UK – history, training, competitions.
квартира на сутки Гомель
Aviator на деньги Авиатор на деньги
извините но айтой не качаю…
Watch how your own skills improve as rises with every free https://wytex-eg.com/ game.
gomelsutochno.ru
Aviator бонусы Aviator онлайн
Продажа строительной арматуры https://armatura2buy.ru в Москве низкая цена за метр и тонну с доставкой в день заказа. Актуальные цены на металлопрокат – каталог строительной арматуры
Авиатор игра на деньги Aviator бонусы
Смешные мемы. Как они появились.
Авиатор игра на деньги Aviator онлайн
Разработка парсеров парсер сайтов на email и ботов любой сложности. Программы для рассылки, рассылка по любым источника накрутка ПФ и парсеры товаров.
Как нельзя кстати.
Не намереваясь прятаться, 1win зеркало он ещё значимее начинает заниматься организованной преступностью в лас-вегасе и в ближайшее время у него и Сэма возникают ещё более ?габаритные? проблемы.
Шкафы распашные – в наличии 1099 моделей с фото, размерами и подробным описанием от производителя: популярные новинки и лидеры продаж. Все размеры в каталоге. Гарантия качества и профессиональная установка шкаф заказ
поисковая оптимизация оптимизация сайта цена
Blacksprut Marketplace: Эволюция даркнета или игра на выживание?
RGBET: Trang Chủ Cá Cược Uy Tín và Đa Dạng Tại Việt Nam
RGBET đã khẳng định vị thế của mình là một trong những nhà cái hàng đầu tại châu Á và Việt Nam, với đa dạng các dịch vụ cá cược và trò chơi hấp dẫn. Nhà cái này nổi tiếng với việc cung cấp môi trường cá cược an toàn, uy tín và luôn mang lại trải nghiệm tuyệt vời cho người chơi.
Các Loại Hình Cá Cược Tại RGBET
RGBET cung cấp các loại hình cá cược phong phú bao gồm:
Bắn Cá: Một trò chơi đầy kịch tính và thú vị, phù hợp với những người chơi muốn thử thách khả năng săn bắn và nhận về những phần thưởng giá trị.
Thể Thao: Nơi người chơi có thể tham gia đặt cược vào các trận đấu thể thao đa dạng, từ bóng đá, bóng rổ, đến các sự kiện thể thao quốc tế với tỷ lệ cược hấp dẫn.
Game Bài: Đây là một sân chơi dành cho những ai yêu thích các trò chơi bài như tiến lên miền Nam, phỏm, xì dách, và mậu binh. Các trò chơi được phát triển kỹ lưỡng, đem lại cảm giác chân thực và thú vị.
Nổ Hũ: Trò chơi slot với cơ hội trúng Jackpot cực lớn, luôn thu hút sự chú ý của người chơi. Nổ Hũ RGBET là sân chơi hoàn hảo cho những ai muốn thử vận may và giành lấy những phần thưởng khủng.
Lô Đề: Với tỷ lệ trả thưởng cao và nhiều tùy chọn cược, RGBET là nơi lý tưởng cho những người đam mê lô đề.
Tính Năng Nổi Bật Của RGBET
Một trong những điểm nổi bật của RGBET là giao diện thân thiện, dễ sử dụng và hệ thống bảo mật tiên tiến giúp bảo vệ thông tin người chơi. Ngoài ra, nhà cái này còn hỗ trợ các hình thức nạp rút tiền tiện lợi thông qua nhiều kênh khác nhau như OVO, Gopay, Dana, và các chuỗi cửa hàng như Indomaret và Alfamart.
Khuyến Mãi và Dịch Vụ Chăm Sóc Khách Hàng
RGBET không chỉ nổi bật với các trò chơi đa dạng, mà còn cung cấp nhiều chương trình khuyến mãi hấp dẫn như bonus chào mừng, cashback, và các phần thưởng hàng ngày. Đặc biệt, dịch vụ chăm sóc khách hàng của RGBET hoạt động 24/7 với đội ngũ chuyên nghiệp, sẵn sàng hỗ trợ người chơi qua nhiều kênh liên lạc.
Kết Luận
Với những ưu điểm nổi bật về dịch vụ, bảo mật, và trải nghiệm người dùng, RGBET xứng đáng là nhà cái hàng đầu mà người chơi nên lựa chọn khi tham gia vào thế giới cá cược trực tuyến.
качну, о качестве потом коментну Приятного просмотра!!!
beginners can use only two of 4 closed cards between symbiosis with common cards to find their best combination of five cards in https://wtpglobalau.com/.
gomelsutochno.ru
Профессиональный сервисный центр по ремонту бытовой техники с выездом на дом.
Мы предлагаем: сервис центры бытовой техники волгоград
Наши мастера оперативно устранят неисправности вашего устройства в сервисе или с выездом на дом!
Trong bối cảnh ngành công nghiệp cá cược trực tuyến ngày càng phát triển, việc lựa chọn một nhà cái uy tín trở nên vô cùng quan trọng đối với những người đam mê cá cược.Nhà cái RGBET nổi lên như một sự lựa chọn hàng đầu đáng để bạn quan tâm, hứa hẹn mang đến cho bạn một trải nghiệm cá cược an toàn, công bằng và thú vị. Từ các trò chơi cá cược đa dạng, dịch vụ chăm sóc khách hàng tận tình đến tỷ lệ cược cạnh tranh, Rgbet sở hữu nhiều ưu điểm vượt trội khiến bạn không thể bỏ qua.Hãy cùng khám phá những lý do tại sao bạn cần quan tâm đến nhà cái Rgbet và tại sao đây nên là lựa chọn hàng đầu của bạn trong thế giới cá cược trực tuyến.
bs2best
Aviator регистрация Aviator регистрация
лаки джет игра лаки джет официальный сайт
квартира на сутки Гомель
Прикольные анекдоты.
Прикольные анекдоты.
where can i get generic biaxin without a prescription
MelBet online https://pedagogue.app/customer-support-at-melbet/ betting live and online sports betting – MelBet, best online betting website
Mostbet is one of India’s https://www.masalabox.com/mostbet-a-review-of-the-most-popular-bookmaker-in-india most well-known bookmakers that offer bets on almost all kinds of sports, including eSports and casino games. Read more here.
Смешные анекдоты.
where to get generic aurogra for sale
Используем мощные немецкие бензопилы STIHL, которые гарантирует быстрый и ровный спил деревьев любого размера спил деревьев
wide selection of slots https://lab.vanderbilt.edu table games and live dealer options. Register now to receive exclusive bonuses and first-class customer support.
Medication information. Cautions.
where can i buy cheap ceftin without rx
All about pills. Get now.
cost of cheap sinequan pills
Free online https://thetranny.com porn videos and movies. Only girls with dicks. On our site there are trans girls for every taste!
Casino and slot https://gospel-virus.net/2024/10/06/1win-benin-a-closer-look-at-the-best-betting-site machines online. Play slot machines with bonus, casino for money. Registration and login to the working mirror
Casino and slot https://ascnp2021.pharmconf.org/?p=4467 machines online. Play slot machines with bonus, casino for money. Registration and login to the working mirror
purchase low price generic cialis soft tab
Не хватало части https://odiscus.com/topic_1056/1#post-23215 суммы. также через 30 минут одобрили кредит. Менеджер подробно объяснил все обстоятельства кредита, помог с оформлением заказа.
Casino and slot https://mutki1.biz/2024/10/07/lemon-casino-hungary-and-its-impact-on-players machines online. Play slot machines with bonus, casino for money. Registration and login to the working mirror
шлюшки спб https://kykli.com/
банковская гарантия — это обязательство банка по исполнению финансовых обязательств клиента перед третьим лицом, предоставляющее дополнительную уверенность в надежности и выполнении обязательств.
Casino and slot https://i-wsm.com/is-1win-uganda-right-for-you_897047.html machines online. Play slot machines with bonus, casino for money. Registration and login to the working mirror
Прикольные мемы.
Discover the latest global innovations and trends with Takizo. We make small dreams and big plans for millions of people come true https://www.schaatsforum.nl/proxy.php?link=https://gayliving.ca/
Medicine prescribing information. Effects of Drug Abuse.
buy lasix prices
Best what you want to know about medication. Read information here.
Хотите скачать vavada casino на свой iPhone 7 и наслаждаться азартными играми в любое время? Узнайте, как это сделать быстро и безопасно прямо сейчас!
can i order cheap mentax without a prescription
Ensuring secure cross-border payments: essential for international trade, Protecting your assets with secure cross-border payments, Maximizing security with cross-border payment systems, The future of secure cross-border payments in a digital world, Understanding the risks of insecure cross-border payments, Secure cross-border payments: best practices for businesses, Secure cross-border payments: a guide for small businesses, Improving efficiency with secure cross-border payment platforms, How to protect your business with secure cross-border payment methods, The benefits of secure cross-border payments for e-commerce businesses
secure online payments globally complying with international payment regulations .
we are always ready to know how we would look in the following https://telegra.ph/What-are-the-different-heights-10-02 for someone else.
Ознакомьтесь с актуальными бонусами на официальном сайте казино вавада и начните играть с дополнительными выгодами уже сегодня!
Смотрите актуальное рабочее зеркало казино vavada на сегодня, не пропустите новые бонусы и акции!
where buy cheap aristocort for sale
Free online https://thetranny.com porn videos and movies. Only girls with dicks. On our site there are trans girls for every taste!
Профессиональный лечебный медицинский https://massageivanteevka.mobitsa.pw массаж поможет вам справиться с проблемами со спиной и позвоночником, поможет в восстановлении после тяжелых травм и болезней.
игра ракета на деньги в telegram https://raketa-igra.fun/
Vegan cosmetics or cosmetics with zero waste, with essential oils {or|or} without {them|all of them}, for pregnant women, {men| the strong half} or {the whole family|any person} – #file_linksC:\Users\Admin\Desktop\file\gsa+en+Phoenix100k200k300k400k371P2URLBB.txt”,1,N] “{few | no one| practically no one|in fact, few people have been forgotten!”
Medicines information leaflet. What side effects?
how to buy phenytoin without a prescription
Some what you want to know about medication. Read information now.
can you get generic augmentin pills
bs02.at
Easy to use. Tonkeeper is the easiest self-custody wallet to pay toncoin and other tokens. Ton has low blockchain fees and fast transactions tonkeeper
Как отписаться от услуг Zanizaem https://banky.kz/zaeman-otpiska/ пошаговая инструкция. Что это за сервис, какие услуги оказывает, стоит ли обращаться к «Занизаем». Можно ли вернуть деньги.
Онлайн займы Казахстана https://zaim-na-kartu.kz/dengi-v-kazahstane/ в одном месте. Сравните и выберите самый выгодный вариант займа в лучших МФО. Займ на любые нужды в день обращения!
https://malabarandmontrose.com/shop
poker, Baccara, https://luciamattituck.com/hello-world/ ist?y?n butun oyuncular baslamaq h?y?can?n? yat?rmaq muvafiq kart oyunlar?, novu Blackjack v? s., bil?r oyun t?crub?si hesab? acaraq Qeydiyyat glory casino.
Thank you so much for registering, I am very pleased to see you on the site
http://allhacked.com 7591250 verygoodplustime !
Прикольные картинки.
Medicament information sheet. What side effects can this medication cause?
where to get inderal prices
Actual about drugs. Read information now.
регистрация vovan casino сайт vovan casino
Kirkby Lonsdale Brewery https://www.kirkbylonsdale.co.uk Top tips before visiting. What to see, and nearby accommodation listings.
cost cheap atarax no prescription
Смешные картинки.
healthymedinfo365
healthymedinfo24
bs2best
Прикольные пошлые анекдоты.
Услуги юриста по подготовке заявления о разводе, расторжению брака через суд, разделу имущества, определения места жительства детей, вопросы уплаты алиментов, ведение бракоразводных процессов https://advokaty-v-moskve.blogspot.com/2024/07/rastorzhenie-braka.html
Промокоды на игры ФорсДроп промо 2024 бесплатные промокоды, коды активаций на игры, списки игр.
Вызов сантехника https://santekhnik-moskva.blogspot.com/p/v-moskve.html на дом в Москве и Московской области в удобное для вас время. Сантехнические работы любой сложности, от ремонта унитаза, устранение засора, до замены труб.
Tracking the most recent global innovation trends, the GII finds that innovation investment slowed in 2023, in marked contrast to previous years https://divorce-blog.co.uk/books/?wptouch_switch=desktop&redirect=https://www.vaughancannabis.store/
Свежие видео.
Смешные пошлые анекдоты.
healthymedinfo7
Buy antibiotics https://buyantibioticswp.com at a low price online with delivery, medicines in stock and on order
bs2best at
онлайн займы без проверки
Все бонусы за регистрацию доступны на https://888starz-russia.online, активируйте их и начните игру.
Профессиональный сервисный центр по ремонту бытовой техники с выездом на дом.
Мы предлагаем: сервисные центры в воронеже
Наши мастера оперативно устранят неисправности вашего устройства в сервисе или с выездом на дом!
Профессиональный сервисный центр сервис по ремонту смартфонов ремонт телефонов с гарантией
продвижение сайта заказать раскрутка seo
Веселые видео.
nhà cái
RGBET: Trang Chủ Cá Cược Uy Tín và Đa Dạng Tại Việt Nam
RGBET đã khẳng định vị thế của mình là một trong những nhà cái hàng đầu tại châu Á và Việt Nam, với đa dạng các dịch vụ cá cược và trò chơi hấp dẫn. Nhà cái này nổi tiếng với việc cung cấp môi trường cá cược an toàn, uy tín và luôn mang lại trải nghiệm tuyệt vời cho người chơi.
Các Loại Hình Cá Cược Tại RGBET
RGBET cung cấp các loại hình cá cược phong phú bao gồm:
Bắn Cá: Một trò chơi đầy kịch tính và thú vị, phù hợp với những người chơi muốn thử thách khả năng săn bắn và nhận về những phần thưởng giá trị.
Thể Thao: Nơi người chơi có thể tham gia đặt cược vào các trận đấu thể thao đa dạng, từ bóng đá, bóng rổ, đến các sự kiện thể thao quốc tế với tỷ lệ cược hấp dẫn.
Game Bài: Đây là một sân chơi dành cho những ai yêu thích các trò chơi bài như tiến lên miền Nam, phỏm, xì dách, và mậu binh. Các trò chơi được phát triển kỹ lưỡng, đem lại cảm giác chân thực và thú vị.
Nổ Hũ: Trò chơi slot với cơ hội trúng Jackpot cực lớn, luôn thu hút sự chú ý của người chơi. Nổ Hũ RGBET là sân chơi hoàn hảo cho những ai muốn thử vận may và giành lấy những phần thưởng khủng.
Lô Đề: Với tỷ lệ trả thưởng cao và nhiều tùy chọn cược, RGBET là nơi lý tưởng cho những người đam mê lô đề.
Tính Năng Nổi Bật Của RGBET
Một trong những điểm nổi bật của RGBET là giao diện thân thiện, dễ sử dụng và hệ thống bảo mật tiên tiến giúp bảo vệ thông tin người chơi. Ngoài ra, nhà cái này còn hỗ trợ các hình thức nạp rút tiền tiện lợi thông qua nhiều kênh khác nhau như OVO, Gopay, Dana, và các chuỗi cửa hàng như Indomaret và Alfamart.
Khuyến Mãi và Dịch Vụ Chăm Sóc Khách Hàng
RGBET không chỉ nổi bật với các trò chơi đa dạng, mà còn cung cấp nhiều chương trình khuyến mãi hấp dẫn như bonus chào mừng, cashback, và các phần thưởng hàng ngày. Đặc biệt, dịch vụ chăm sóc khách hàng của RGBET hoạt động 24/7 với đội ngũ chuyên nghiệp, sẵn sàng hỗ trợ người chơi qua nhiều kênh liên lạc.
Kết Luận
Với những ưu điểm nổi bật về dịch vụ, bảo mật, và trải nghiệm người dùng, RGBET xứng đáng là nhà cái hàng đầu mà người chơi nên lựa chọn khi tham gia vào thế giới cá cược trực tuyến.
healthymedinfo365
Свежие видео приколы.
Все сауны и бани https://dai-zharu.ru/novosibirsk/ каталог саун с описанием услуг, контактами и дополнительными скидками для посетителей нашего сайта.
Интернет-магазин плитки и керамики «ИнфоПлитка»
Интернет-магазин керамической плитки и керамогранита «Infoplitka» (infoplitka.ru)
предлагает широкий ассортимент высококачественной плитки и керамогранита от ведущих производителей.
Мы стремимся предложить нашим клиентам только лучшее, поэтому в ассортименте представлены товары,
отвечающие самым высоким стандартам качества и дизайна.
Мы понимаем, что выбор керамической плитки и керамогранита – это важный этап в создании
комфортного и стильного интерьера. Поэтому наша команда профессионалов готова помочь вам в
подборе идеального варианта для вашего проекта. Независимо от того, нужны ли вам плитка
для ванной комнаты, кухни, гостиной, или же керамогранит для облицовки пола, вы всегда найдете
у нас разнообразные и актуальные коллекции, соответствующие последним тенденциям в области
дизайна интерьеров.
Официальный сайт «ИнфоПлитка»
Профессиональный сервисный центр по ремонту моноблоков iMac в Москве.
Мы предлагаем: ремонт imac с гарантией
Наши мастера оперативно устранят неисправности вашего устройства в сервисе или с выездом на дом!
Актуальна інформація про технології https://www.web3.org.ua Web 3.0, криптопроекти, блокчейн, DeFi, аірдропи, тестнети та інші новини зі світу криптовалют. Цікаво як для новачків, так і для досвідчених користувачів, пропонуючи статті, огляди та інструкції щодо криптостартапів і ноді.
bs2best at
hotel verkauf wohnung kaufen in Montenegro am meer
https://vdocuments.pub/mosaic-flexibele-layouts-voor-plone.html
Quickly delivered, and some goods are cheaper than in other stores. The quality of marijuana is on top, everything is exactly as in the description https://microinvest.net/Localization/ChangeCulture/?cultureName=ru-RU&returnUrl=https://scarboroughcannabis.store/&languageID=3
Прикольные короткие шутки http://prikoly-shutki.ru/korotkie-anekdoty.
“Терапия” (Shrinking) https://terapya-serial.ru американский сериал (Apple TV+, 2023) о терапевте, который после личной трагедии решает говорить пациентам правду. Неожиданно, его резкие слова меняют и их жизни, и его собственную. Рейтинг Кинопоиска: 7.6.
bs2best at
The best https://bestwebsiteto.com sites on the web to suit your needs. The top-rated platforms to help you succeed in learning new skills
https://specials.net.au/kvartira-na-sutki-v-minske-nedorogo-ceny-snjat-14/
can i purchase zantac online
not working
_________________
казино вулкан играть демо игру
The best websites https://bestwebsiteto.com on the internet, with the highest ratings, to help you succeed in learning new skills
Свежие приколы https://teletype.in/@anekdoty/prikoly-nastroenie.
how to buy generic depo medrol pill
bs2site
Веселые приколы и картинки https://teletype.in/@anekdoty/prikoly-nastroenie.
Canvas Cannabis brings the best in legal, recreational cannabis dispensaries to Toronto offering a wide range of cannabis flower, edibles, vaporizers http://www.iranskin.com/ads/adsx.php?url=https://torontoweed.store/
order cheap motilium no prescription
https://www.blogger.com/profile/13973563783461373986
Свежие приколы и картинки https://teletype.in/@anekdoty/prikoly-nastroenie.
https://leaderna.com/snjat-nedvizhimost-na-sutki-v-minske-posutochnaja-36/
can you buy generic cabgolin no prescription
bs2site
Смешные приколы https://teletype.in/@anekdoty/prikoly-nastroenie.
how can i get generic celebrex for sale
how to get albuterol
bs2site.at
Организуйте междугородние перевозки с попутным грузом и забудьте о переплатах https://vk.com/gruz_poputno
rgbet
RGBET: Trang Chủ Cá Cược Uy Tín và Đa Dạng Tại Việt Nam
RGBET đã khẳng định vị thế của mình là một trong những nhà cái hàng đầu tại châu Á và Việt Nam, với đa dạng các dịch vụ cá cược và trò chơi hấp dẫn. Nhà cái này nổi tiếng với việc cung cấp môi trường cá cược an toàn, uy tín và luôn mang lại trải nghiệm tuyệt vời cho người chơi.
Các Loại Hình Cá Cược Tại RGBET
RGBET cung cấp các loại hình cá cược phong phú bao gồm:
Bắn Cá: Một trò chơi đầy kịch tính và thú vị, phù hợp với những người chơi muốn thử thách khả năng săn bắn và nhận về những phần thưởng giá trị.
Thể Thao: Nơi người chơi có thể tham gia đặt cược vào các trận đấu thể thao đa dạng, từ bóng đá, bóng rổ, đến các sự kiện thể thao quốc tế với tỷ lệ cược hấp dẫn.
Game Bài: Đây là một sân chơi dành cho những ai yêu thích các trò chơi bài như tiến lên miền Nam, phỏm, xì dách, và mậu binh. Các trò chơi được phát triển kỹ lưỡng, đem lại cảm giác chân thực và thú vị.
Nổ Hũ: Trò chơi slot với cơ hội trúng Jackpot cực lớn, luôn thu hút sự chú ý của người chơi. Nổ Hũ RGBET là sân chơi hoàn hảo cho những ai muốn thử vận may và giành lấy những phần thưởng khủng.
Lô Đề: Với tỷ lệ trả thưởng cao và nhiều tùy chọn cược, RGBET là nơi lý tưởng cho những người đam mê lô đề.
Tính Năng Nổi Bật Của RGBET
Một trong những điểm nổi bật của RGBET là giao diện thân thiện, dễ sử dụng và hệ thống bảo mật tiên tiến giúp bảo vệ thông tin người chơi. Ngoài ra, nhà cái này còn hỗ trợ các hình thức nạp rút tiền tiện lợi thông qua nhiều kênh khác nhau như OVO, Gopay, Dana, và các chuỗi cửa hàng như Indomaret và Alfamart.
Khuyến Mãi và Dịch Vụ Chăm Sóc Khách Hàng
RGBET không chỉ nổi bật với các trò chơi đa dạng, mà còn cung cấp nhiều chương trình khuyến mãi hấp dẫn như bonus chào mừng, cashback, và các phần thưởng hàng ngày. Đặc biệt, dịch vụ chăm sóc khách hàng của RGBET hoạt động 24/7 với đội ngũ chuyên nghiệp, sẵn sàng hỗ trợ người chơi qua nhiều kênh liên lạc.
Kết Luận
Với những ưu điểm nổi bật về dịch vụ, bảo mật, và trải nghiệm người dùng, RGBET xứng đáng là nhà cái hàng đầu mà người chơi nên lựa chọn khi tham gia vào thế giới cá cược trực tuyến.
Московский музей анимации https://animamuseum.ru это место, где каждый может погрузиться в мир мультипликации и стать волшебником.
Лучшие сауны и бани https://dai-zharu.ru/peterburg/category/parnaya/russkaya-banya цены, фото, отзывы. Найдите сауну поблизости в нашем каталоге лучших бань.
copd exacerbation education
Лучшие сауны и бани https://dai-zharu.ru/omsk/ цены, фото, отзывы. Найдите сауну поблизости в нашем каталоге лучших бань.
bs2site.at
Срочный вызов сантехника https://santekhnik-moskva.blogspot.com/p/v-moskve.html по доступным ценам. Услуги сантехника в Москве и ближайших городах Подмосковья
Свежие картинки с надписями https://prikoly-tut.blogspot.com/2024/10/smeshnye-kartinki.html.
bs2site at
can you buy accutane tablets
where can i buy cipro online
Canvas Cannabis brings the best in legal, recreational cannabis dispensaries to Toronto offering a wide range of cannabis flower, edibles, vaporizers http://w3.tippnet.rs/vhcs2/tools/webmail/redir.php?https://rentcars.buzz/
https://carhyperentals.ca/kvartiry-na-sutki-v-minske-500-bez-posrednikov-13-2/
how can i get cheap femara without rx
trazodone 50 mg oral tab
Добрый день!
Хочу написать рецензию честно не исполнила взятые на себя обязательства!!!
К сожалению, не могу рекомендовать данного специалиста от слова совсем…
Наталья Преображенская готовила дизайн-проект и осуществляла авторское сопровождение проекта, а также привлекала бригаду подрядчиков, руководила ходом выполняемых работ,
закупками материалов и конструкций, в результате с апреля 2024г. ремонт в квартире до сих пор не закончен(а срок был 3 месяца)!!!
Некоторые позиции (настенные зеркала, раздвижная конструкция) до сих пор не поставлены и/или не установлены. Это просто кошмар!!!
Постоянные пустые обещания. А те работы, что уже выполнены, просто ужасного качества (кривые полы, установка мебели оказалась проблематичной, все кривое!!!).
Где контроль качества? За что ей были оплачены огромные деньги? Стоимость ее услуг и уровень профессионализма не сопоставимы!!!
Негативный отзыв
Наталья Преображенская – разводняк на деньги
Свежие мемы https://prikoly-tut.blogspot.com/2024/10/smeshnye-kartinki.html.
bs2best
Веселые прикольные картинки https://prikoly-tut.blogspot.com/2024/10/smeshnye-kartinki.html.
купить 2х квартиру новостройка https://kupitkvartirudeshevo.ru
Веселые мемы https://prikoly-tut.blogspot.com/2024/10/smeshnye-kartinki.html.
bs2site
where to buy cheap celebrex online
Найти специалиста по независимой экспертизе и оценке!
Сайт-агрегатор компаний и услуг в сфере независимой экспертизы и оценки.
Мы создали этот проект, чтобы помочь вам найти надежных и опытных профессионалов
для решения ваших задач.
Главная цель — сделать процесс поиска специалистов по независимой экспертизе
и оценке максимально простым и эффективным. Мы стремимся предоставить вам
доступ к компаниям, которые гарантируют высокое качество услуг.
С нами вы сможете быстро найти нужного эксперта и сравнить различные предложения.
На нашем сайте собраны карточки компаний, каждая из которых содержит подробную
информацию о предоставляемых услугах. Посетители могут фильтровать предложения
по различным критериям:
Локация
Направление экспертизы
Стоимость услуг
Отзывы клиентов
Наш сайт Специалисты по независимой экспертизе и оценке.
Смешные прикольные картинки https://prikoly-tut.blogspot.com/2024/10/smeshnye-kartinki.html.
order generic benemid pill
купить 1 квартиру в новостройке квартира ключ новостройка
how to buy generic doxycycline for sale
where can i get generic lopid without dr prescription
bs2best
Drugs information sheet. Drug Class.
cialis generic from india
Actual information about drugs. Read information now.
https://avtoznak-dublikat.ru/
cost of tinidazole prices
Смешные приколы дня https://prikolnyekartinki.mystrikingly.com/blog/0ade1e0d9a9.
where to get uroxatrall without rx
get biaxin without a prescription
st666 app
ST666 – Lựa Chọn Hàng Đầu Trong Thế Giới Cá Cược Trực Tuyến
Trong thời đại mà ngành công nghiệp cá cược trực tuyến đang bùng nổ, việc chọn một nhà cái uy tín là yếu tố quan trọng để đảm bảo trải nghiệm chơi an toàn và đáng tin cậy. ST666 nhanh chóng khẳng định vị thế của mình trên thị trường với những dịch vụ chất lượng và hệ thống bảo mật cao cấp, mang lại trải nghiệm cá cược công bằng, thú vị và an toàn.
Hệ Thống Trò Chơi Đa Dạng
ST666 cung cấp một danh mục trò chơi cá cược đa dạng, đáp ứng mọi nhu cầu và sở thích của người chơi. Từ thể thao, bắn cá, game bài, cho đến xổ số và live casino, tất cả đều được tối ưu hóa để mang lại cảm giác hứng thú cho người tham gia. Đặc biệt, với Live Casino, người chơi sẽ được trải nghiệm cá cược với các dealer thật thông qua hình thức phát trực tiếp, tạo cảm giác như đang tham gia tại các sòng bài thực tế.
Tỷ Lệ Cược Cạnh Tranh
Một trong những ưu điểm nổi bật của ST666 chính là tỷ lệ cược cực kỳ cạnh tranh, giúp người chơi tối ưu hóa lợi nhuận của mình. Các trận đấu thể thao được cập nhật liên tục với tỷ lệ cược hấp dẫn, tạo cơ hội chiến thắng lớn cho những ai yêu thích cá cược thể thao.
Bảo Mật An Toàn Tuyệt Đối
Yếu tố bảo mật luôn là một trong những tiêu chí hàng đầu khi chọn nhà cái cá cược. ST666 sử dụng công nghệ mã hóa hiện đại để bảo vệ thông tin cá nhân và các giao dịch tài chính của người chơi, đảm bảo mọi dữ liệu luôn được bảo mật tuyệt đối. Người chơi hoàn toàn có thể yên tâm khi tham gia cá cược tại đây.
Chăm Sóc Khách Hàng Chuyên Nghiệp
Dịch vụ chăm sóc khách hàng của ST666 luôn sẵn sàng hỗ trợ 24/7 qua nhiều kênh khác nhau như Live Chat, WhatsApp, Facebook, đảm bảo giải đáp mọi thắc mắc và xử lý các vấn đề nhanh chóng. Đội ngũ nhân viên tại đây được đào tạo chuyên nghiệp, tận tâm và chu đáo, luôn đặt lợi ích của khách hàng lên hàng đầu.
Ưu Đãi Hấp Dẫn
ST666 không chỉ nổi bật với các sản phẩm cá cược mà còn thu hút người chơi bởi các chương trình khuyến mãi hấp dẫn. Người chơi có thể nhận được nhiều ưu đãi như 280k miễn phí khi đăng nhập hàng ngày, cùng các chương trình thưởng nạp và hoàn tiền liên tục, giúp tối đa hóa cơ hội chiến thắng.
Lý Do ST666 Là Lựa Chọn Hàng Đầu
Sự kết hợp hoàn hảo giữa giao diện hiện đại, hệ thống trò chơi đa dạng, dịch vụ khách hàng tận tâm và tỷ lệ cược cạnh tranh đã giúp ST666 trở thành một trong những nhà cái cá cược trực tuyến uy tín hàng đầu tại Việt Nam. Đối với những ai đang tìm kiếm một nhà cái an toàn và chuyên nghiệp, ST666 chắc chắn sẽ là lựa chọn không thể bỏ qua.
Kết Luận
Với những ưu điểm vượt trội, ST666 xứng đáng là địa chỉ cá cược uy tín và an toàn cho tất cả người chơi. Đăng ký ngay hôm nay để trải nghiệm hệ thống cá cược đẳng cấp và nhận những ưu đãi hấp dẫn từ ST666!
Medicament information. Generic Name.
cost of fexofenadine without insurance
All trends of meds. Read here.
Nhà cái ST666 được biết đến là sân chơi uy tín cung cấp các sản phẩm trò chơi cực kỳ đa dạng và chất lượng. Số lượng người tham gia vào hệ thống ngày càng tăng cao và chưa có dấu hiệu dừng lại. Hướng dẫn tham gia nhà cái nếu như anh em muốn tìm kiếm cơ hội nhận thưởng khủng. Hãy cùng khám phá những thông tin cần biết tại nhà cái để đặt cược và săn thưởng thành công.
Веселые приколы https://prikolnyekartinki.mystrikingly.com/blog/0ade1e0d9a9.
can i buy betnovate without a prescription
order cheap feldene
Medicament information leaflet. Brand names.
can you buy generic phenytoin no prescription
Best what you want to know about medicine. Read now.
Information about the production, sale and use of recreational cannabis in Mississauga, including the the regulations around retail outlet https://www.dentist.co.nz/?URL=https://markhamgacannabis.store/
Seo-продвижение сайтов https://seoenginewebsite.ru с гарантией попадания в топ-10 поисковой выдачи в Яндексе и Google
Экономика и Финансы
can i order generic advair diskus
buying cheap fulvicin no prescription
Drugs information sheet. What side effects?
can you buy cheap zocor without a prescription
Best news about meds. Get information here.
One Plant North Oshawa is home to the biggest selection of Cannabis at the best prices in Oshawa. Shop Cannabis, Flower, Edibles, Beverages, Bongs, Grinders http://nanashino.net/?wptouch_switch=desktop&redirect=https://www.bramptoncannabis.store/
Веселые приколы дня https://prikolnyekartinki.mystrikingly.com/blog/0ade1e0d9a9.
blacksprut
protonix 40 mg acb
get generic augmentin pill
Drug information for patients. What side effects can this medication cause?
buying generic synthroid without insurance
Best what you want to know about medication. Read information here.
Смешные приколы https://prikolnyekartinki.mystrikingly.com/blog/0ade1e0d9a9.
Твои угги мужские зимние купить в Москве – всегда рядом, выбери свою пару прямо сейчас!
Meet Indi. Timeless and chic. If you’re an Olsen lover, these are for you! Crafted from black acetate with smoked lenses, the style is in http://lissi-crypto.ru/redir.php?_link=https://www.indiesmoke.co.in/
hellcase France
bs2best
cost of plavix pill
Экономика России
Medication information. What side effects can this medication cause?
buy cheap levaquin without dr prescription
Best information about pills. Read information now.
Мы предоставляем широкий спектр услуг, включая оценку, коррекцию лечения, “второе” мнение, назначение препаратов и проведение терапии, наблюдение за динамикой вашего состояния https://imysites.blogspot.com/2023/10/blog-post_21.html
Свежие анекдоты https://vk.com/vseshutochki.
where to get generic januvia
Medicament information leaflet. Drug Class.
can i get phenytoin for sale
Some what you want to know about medicines. Get now.
Подписывайтесь на @android_1xslots, скачайте APK и активируйте промокод LEGAL1X для игры https://t.me/android_1xslots
bs2best.at
Drug information sheet. Brand names.
get ipratropium without dr prescription
Everything trends of pills. Read here.
Medicine information. Effects of Drug Abuse.
cheap fexofenadine no prescription
All what you want to know about medicament. Read now.
can i order cheap celebrex no prescription
cost cheap zyloprim without prescription
https://michaelsaylor.royalchicken.rs/2024/09/23/snjat-vip-kvartiru-na-sutki-v-minske-arenda-vip-17/
Свежие приколы за день https://prikolnyekartinki.mystrikingly.com/blog/0ade1e0d9a9.
buy generic mestinon tablets
how to get betnovate without dr prescription
bs2best at
can you get deltasone price
Furniture of any shape and style looks very attractive and modern in ULTRA fabric https://www.xtremeracing.se/undersidor/goTo.php?url=rentcars.buzz/&ad=8
cost cheap deltasone without prescription
where can i buy cheap imitrex for sale
Свежие шутки и анекдоты https://ekra.kz/user/vychislavyakov/.
ST666 – Lựa Chọn Hàng Đầu Trong Thế Giới Cá Cược Trực Tuyến
Trong thời đại mà ngành công nghiệp cá cược trực tuyến đang bùng nổ, việc chọn một nhà cái uy tín là yếu tố quan trọng để đảm bảo trải nghiệm chơi an toàn và đáng tin cậy. ST666 nhanh chóng khẳng định vị thế của mình trên thị trường với những dịch vụ chất lượng và hệ thống bảo mật cao cấp, mang lại trải nghiệm cá cược công bằng, thú vị và an toàn.
Hệ Thống Trò Chơi Đa Dạng
ST666 cung cấp một danh mục trò chơi cá cược đa dạng, đáp ứng mọi nhu cầu và sở thích của người chơi. Từ thể thao, bắn cá, game bài, cho đến xổ số và live casino, tất cả đều được tối ưu hóa để mang lại cảm giác hứng thú cho người tham gia. Đặc biệt, với Live Casino, người chơi sẽ được trải nghiệm cá cược với các dealer thật thông qua hình thức phát trực tiếp, tạo cảm giác như đang tham gia tại các sòng bài thực tế.
Tỷ Lệ Cược Cạnh Tranh
Một trong những ưu điểm nổi bật của ST666 chính là tỷ lệ cược cực kỳ cạnh tranh, giúp người chơi tối ưu hóa lợi nhuận của mình. Các trận đấu thể thao được cập nhật liên tục với tỷ lệ cược hấp dẫn, tạo cơ hội chiến thắng lớn cho những ai yêu thích cá cược thể thao.
Bảo Mật An Toàn Tuyệt Đối
Yếu tố bảo mật luôn là một trong những tiêu chí hàng đầu khi chọn nhà cái cá cược. ST666 sử dụng công nghệ mã hóa hiện đại để bảo vệ thông tin cá nhân và các giao dịch tài chính của người chơi, đảm bảo mọi dữ liệu luôn được bảo mật tuyệt đối. Người chơi hoàn toàn có thể yên tâm khi tham gia cá cược tại đây.
Chăm Sóc Khách Hàng Chuyên Nghiệp
Dịch vụ chăm sóc khách hàng của ST666 luôn sẵn sàng hỗ trợ 24/7 qua nhiều kênh khác nhau như Live Chat, WhatsApp, Facebook, đảm bảo giải đáp mọi thắc mắc và xử lý các vấn đề nhanh chóng. Đội ngũ nhân viên tại đây được đào tạo chuyên nghiệp, tận tâm và chu đáo, luôn đặt lợi ích của khách hàng lên hàng đầu.
Ưu Đãi Hấp Dẫn
ST666 không chỉ nổi bật với các sản phẩm cá cược mà còn thu hút người chơi bởi các chương trình khuyến mãi hấp dẫn. Người chơi có thể nhận được nhiều ưu đãi như 280k miễn phí khi đăng nhập hàng ngày, cùng các chương trình thưởng nạp và hoàn tiền liên tục, giúp tối đa hóa cơ hội chiến thắng.
Lý Do ST666 Là Lựa Chọn Hàng Đầu
Sự kết hợp hoàn hảo giữa giao diện hiện đại, hệ thống trò chơi đa dạng, dịch vụ khách hàng tận tâm và tỷ lệ cược cạnh tranh đã giúp ST666 trở thành một trong những nhà cái cá cược trực tuyến uy tín hàng đầu tại Việt Nam. Đối với những ai đang tìm kiếm một nhà cái an toàn và chuyên nghiệp, ST666 chắc chắn sẽ là lựa chọn không thể bỏ qua.
Kết Luận
Với những ưu điểm vượt trội, ST666 xứng đáng là địa chỉ cá cược uy tín và an toàn cho tất cả người chơi. Đăng ký ngay hôm nay để trải nghiệm hệ thống cá cược đẳng cấp và nhận những ưu đãi hấp dẫn từ ST666!
https://iai-jodo.zvs.jp/2024/09/23/snjat-nedvizhimost-na-sutki-v-minske-posutochnaja-27/
hellcase
Furniture of any shape and style looks very attractive and modern in ULTRA fabric http://www.nathaliewinkler.com/special.php?parent=63&link=rental-car.company/
Gay Boys Porn https://gay0day.com HD is the best gay porn tube to watch high definition videos of horny gay boys jerking, sucking their mates and fucking on webcam
cleocin t patient information sheet
bs2best
cost cheap sildalist price
bs2best at
https://www.fomacbaby.eu/snjat-kvartiru-na-sutki-ili-na-chas-v-minske-22/
where to buy cheap vasotec without rx
Smoking in India is one of the oldest industries and provides employment to more than five million people directly and indirectly https://campingbabble.com/proxy.php?link=https://indiesmoke.co.in/
Смешные приколы https://prikolyshutki.wordpress.com/2024/10/11/prikoly-umor/.
Medicines prescribing information. Long-Term Effects.
can i get loperamide prices
Some news about meds. Read information now.
Smoking in India is one of the oldest industries and provides employment to more than five million people directly and indirectly https://www.burnettturner.com/?URL=https://indiesmoke.co.in/
“Рівне 24” — це інформаційний ресурс https://24.rv.ua/blog/ який висвітлює найактуальніші новини Рівного та Рівненської області. Тут можна знайти оперативні репортажі, аналітичні матеріали, інтерв’ю та події, що мають значення для регіону. Оновлення відбуваються постійно, щоб жителі Рівного та області завжди були в курсі важливих подій.
Drugs information. Brand names.
where buy levonorgestrel prices
Some information about medicine. Read information now.
Новости Актау https://news.org.kz/top/ надежный источник актуальной информации о событиях в Актау и Казахстане. Здесь можно найти свежие новости, аналитические материалы, репортажи и интервью с экспертами. Каждый день публикуются важные события, которые влияют на жизнь региона. Оставайтесь в курсе того, что происходит в Актау, Казахстане и за его пределами!
can i get cheap celebrex without dr prescription
Профессиональный сервисный центр по ремонту сотовых телефонов в Москве.
Мы предлагаем: ремонт мобильных устройств
Наши мастера оперативно устранят неисправности вашего устройства в сервисе или с выездом на дом!
Профессиональный сервисный центр срочный ремонт телефона ремонт мобильных телефонов в москве
can i order cheap tegretol without prescription
Medicine information leaflet. Generic Name.
can you buy cheap propecia pills
Best what you want to know about drug. Read information now.
Abrone is a top AI https://abrone.com and data analytics company, focused on transforming businesses with advanced data science, machine learning, and AI solutions. We help global enterprises harness their data’s full potential, driving innovation and growth. Our expert teams provide end-to-end services, from data strategy to AI automation, ensuring measurable results and lasting value creation.
how to buy generic zetia pill
Medicament information leaflet. What side effects?
where to get tetracycline tablets
All news about drug. Read information here.
can i buy glycomet for sale
Pills information leaflet. Brand names.
how to get cheap plan b without rx
Best what you want to know about medication. Read here.
where can i get cheap betapace price
Drug information leaflet. Long-Term Effects.
can i purchase generic atarax without dr prescription
Some news about drug. Get here.
how to buy imdur
st666
Nhà cái ST666 được biết đến là sân chơi uy tín cung cấp các sản phẩm trò chơi cực kỳ đa dạng và chất lượng. Số lượng người tham gia vào hệ thống ngày càng tăng cao và chưa có dấu hiệu dừng lại. Hướng dẫn tham gia nhà cái nếu như anh em muốn tìm kiếm cơ hội nhận thưởng khủng. Hãy cùng khám phá những thông tin cần biết tại nhà cái để đặt cược và săn thưởng thành công.
Смешные анекдоты https://humoracademy.nethouse.ru/page/1737096.
order generic fulvicin without prescription
Крупнейший трейдер продажи металлопроката. 24/7. Скидка на опт. Доставка за 2 часа цена арматура оптом
BlackSprut
Профессиональный сервисный центр по ремонту бытовой техники с выездом на дом.
Мы предлагаем: ремонт бытовой техники в челябинске
Наши мастера оперативно устранят неисправности вашего устройства в сервисе или с выездом на дом!
Drugs information. What side effects?
can i buy cheap fexofenadine without dr prescription
Actual information about meds. Read here.
порно анал
bs2best at
cs2 gambling csgo gambling
https://dzen.ru/a/ZteElmwP2GBACIcU
best csgo gambling sites best csgo gambling sites
Drugs information. What side effects can this medication cause?
can i purchase generic phenytoin pill
Actual news about medicine. Get now.
индивидуалки
Свежие приколы http://anekdotshutka.ru.
Na’Vi и Counter-Strike 2 https://natus-vincere.all-gem-stones.net как легендарная команда адаптируется к новому ландшафту киберспорта и сохраняет свою конкурентоспособность.
Medicament information for patients. What side effects can this medication cause?
buying generic levitra pill
All news about medicines. Read now.
child porn скачать
Веселые приколы http://anekdotshutka.ru.
G2 Esports https://g2-esports.antiloh.info осваивает Counter-Strike 2 принимая новые вызовы игры и адаптируя стратегии для достижения успеха на мировых турнирах.
https://dzen.ru/a/Ztd9FgeY7TNrq8a8
bs2site at
В современном мире интернет-торговли платформа Авито стала одним из самых популярных мест для покупки и продажи различных товаров и услуг. Каждый день миллионы пользователей взаимодействуют друг с другом, обмениваются сообщениями, предлагают свои товары и, конечно же, успешно завершают сделки https://eztalk.ru/news-983-ispolzovanie-virtualnogo-nomera-dlya-telegramm-kak-eto-moget-uluchshit-vashu-konfidentsialnost-i-zas.html
В современном мире интернет-торговли платформа Авито стала одним из самых популярных мест для покупки и продажи различных товаров и услуг. Каждый день миллионы пользователей взаимодействуют друг с другом, обмениваются сообщениями, предлагают свои товары и, конечно же, успешно завершают сделки https://ae.kompass.com/p/kompass-posts/ua103618/unlock-seamless-communication-with-virtual-numbers-in-the-uae/86a1fb06-166e-4096-a465-bfdc7ad5beb8/
Присоединяйтесь к @casino_7kk, чтобы скачать APK для 7k Casino и активировать промокод ANDROID777 https://t.me/casino_7kk
Веселые приколы и анекдоты http://anekdotshutka.ru.
Meds information. Cautions.
can you get generic levonorgestrel online
Actual what you want to know about drug. Get information now.
Medicines prescribing information. Brand names.
where buy generic minocycline without dr prescription
Actual what you want to know about medicines. Read now.
Как Team Spirit https://team-spirit.bukvitsa.com добилась успеха в CS2 и как игра влияет на киберспорт в 2024 году.
nothing special
_________________
казино выплатило
Взять онлайн займ https://zaimobot.online через бот Telegram на карту в официальных микрофинансовых компаниях под ноль процентов без отказа.
купить диплом горного russa-diploms.ru .
Смешные приколы, шутки и картинки http://anekdotshutka.ru.
bs2site
Medicines information leaflet. Cautions.
how to get atarax without dr prescription
All what you want to know about meds. Read information now.
История успеха игры Counter-Strike 2 https://eternal-fire.eschool.pro и команды Eternal Fire: от восхождения турецкого киберспорта до побед на мировой арене.
FaZe Clan https://faze-clan.file-up.net укрепили свои позиции, Counter-Strike 2 открыла новую эру киберспорта, а адаптировавшись и побеждая в обновленной игре.
Новини Одеса https://faine-misto.od.ua Файне місто Одеса. Події та новини Одеси та Одеської області сьогодні.
Meds prescribing information. Drug Class.
buying fexofenadine without a prescription
Everything about medicament. Read here.
Виртуальный номер представляет собой телефонный номер, который работает через интернет, а не через традиционные телефонные сети. Этот номер можно использовать для приема и отправки звонков и сообщений, как обычный телефон, но с множеством дополнительных преимуществ https://myukraina.com.ua/uslugi/telegram-ne-prykhodyt-kod-na-telefon-chto-delat.html
Drug information leaflet. Short-Term Effects.
cost cheap clomid prices
Best news about drug. Get here.
Виртуальный номер представляет собой телефонный номер, который работает через интернет, а не через традиционные телефонные сети. Этот номер можно использовать для приема и отправки звонков и сообщений, как обычный телефон, но с множеством дополнительных преимуществ https://promorb.ru/biznes-idei/virtualnyj-nomer-telefona-sovremennye-vozmozhnosti-dlya-biznesa-i-lichnogo-ispolzovaniya
real estate Montenegro Montenegro villas for sale
доставка почта китая доставка напрямую из китая
Смешные приколы http://prikoly-tut.ru.
Meds information sheet. Brand names.
zocor without insurance
Actual what you want to know about medication. Get here.
https://zhimlezha.ru/kak-uluchshit-sluh.php
https://www.darjeanne.com/kvartiry-dlja-komandirovannyh-snjat-kvartiru-na-17/
where can i get generic aciphex tablets
купить аккумулятор интернет магазине недорого аккумуляторы легковые
Linebet Casino https://linebet.fun and Betting Company in Egypt. Get bonuses when you register. Play slot machines, poker, roulette and sports betting for money
https://zhimlezha.ru/kak-uluchshit-sluh.php
bs2best at
Успех Team Liquid https://liquid.ideaprog.download в Counter-Strike 2: новые горизонты. Команда Team Liquid адаптировалась к новым вызовам, добиваясь выдающихся успехов.
Успех игры Counter-Strike 2 https://complexity.nostalgie30-80.com и команды Complexity. Complexity продолжают доминировать на киберспортивной сцене, используя новые стратегии и тактики.
Начните массовую индексацию ссылок в Google прямо cейчас!
Быстрая индексация ссылок имеет ключевое значение для успеха вашего онлайн-бизнеса. Чем быстрее поисковые системы обнаружат и проиндексируют ваши ссылки, тем быстрее вы сможете привлечь новую аудиторию и повысить позиции вашего сайта в результатах поиска.
Не теряйте времени! Начните пользоваться нашим сервисом для ускоренной индексации внешних ссылок в Google и Yandex. Зарегистрируйтесь сегодня и получите первые результаты уже завтра. Ваш успех в ваших руках!
order generic biaxin without prescription
3 простых способа сделать номер для машины, оригинальные идеи для номера, все о создании номера для машины в домашних условиях, DIY: изготовление номера для авто, какие бывают номера для автомобиля: выбирайте лучший, изготовление номеров на автомобиль: просто и быстро, примеры оригинальных номеров на автомобиль, как сделать номер на машину своими руками: пошаговая инструкция, как выбрать идеальный номер на автомобиль, 3 простых шага для замены номера на машине, идеи для уникального номера на машину, советы по выбору номера на автомобиль, как сделать номер на автомобиль красиво и аккуратно, стильные варианты номеров для автомобиля, как сделать стильный номер для машины, DIY: как сделать креативный номер на авто, как сделать номер для автомобиля с минимальными затратами, как сделать необычный номер для машины: советы и рекомендации, как сделать стильный номер на машину за минуты.
дубликат госномера на автомобиль https://www.dublikat-kvadrat-numbers.ru/ .
Virtus.pro встречает вызовы https://virtus-pro.slavcred.ru новой эры с выходом Counter-Strike 2, демонстрируя тактическое мастерство и инновационные подходы к игре.
С выходом КС 2 https://donk.stroki.net киберспорт переживает новую волну интереса, и донк, как один из его ярких представителей, продолжает вдохновлять молодое поколение игроков.
Смешные приколы http://prikoly-tut.ru.
Mint Mobile re-imagined the wireless shopping experience and made it easy and online-only. No stores. No salespeople. Just huge direct to you savings on http://www.alpencampingsonline.eu/index.php?id=goto&web=https://www.ecgma.co.za/
Свежие приколы http://prikoly-tut.ru.
Mint Mobile re-imagined the wireless shopping experience and made it easy and online-only. No stores. No salespeople. Just huge direct to you savings on http://www.lethalitygaming.com/proxy.php?link=https://mintmobile.co.za/
https://bimacp.com/kvartiry-na-sutki-v-minske-svobodnye-segodnja-32/
can i buy cheap prandin without prescription
Профессиональный сервисный центр по ремонту сотовых телефонов в Москве.
Мы предлагаем: ближайшая мастерская по ремонту телефонов
Наши мастера оперативно устранят неисправности вашего устройства в сервисе или с выездом на дом!
https://wmcasino88bet.com/snjat-kvartiru-na-sutki-v-minske-arenda-kvartir-5/
купить диплом в стерлитамаке russa-diploms.ru .
https://выкуп-авто74.рф/
can i order celebrex
Веселые анекдоты https://teletype.in/@anekdoty/smeshnye-anekdoty.
Kometa Casino: Идеальный вариант для любителей азартного досуга
Если вы являетесь интересуетесь азартными играми и выбираете площадку, которая обеспечивает широкий набор слотов и живых казино, а также большие бонусы, Kometa Casino — это тот сайт, где вы найдете яркие эмоции. Давайте рассмотрим, что превращает данное казино выдающимся и по каким причинам клиенты отдают предпочтение этой платформе для досуга.
### Главные особенности Казино Kometa
Kometa Casino — это всемирная платформа, которая была запущена в 2024 году и уже привлекла внимание клиентов по глобально. Вот некоторые факты, что выделяют этот сайт:
Черта Детали
Дата запуска 2024
Охват Международная
Число игр Более 1000
Сертификация Кюрасао
Мобильный доступ Доступна
Методы платежей Популярные платежные системы
Служба поддержки 24 часа в сутки
Приветственные бонусы Приветственные бонусы и Еженедельные выигрыши
Безопасность SSL Шифрование
### Зачем играют в Казино Kometa?
#### Программа лояльности
Одним из интересных функций Казино Kometa становится поощрительная программа. Чем больше вы играете, тем больше ваши вознаграждения. Система включает 7 этапов:
– **Земля (уровень 1)**: Кэшбек 3% от потраченных средств за 7 дней.
– **Луна (уровень 2)**: 5% кэшбек на ставки от 5 000 до 10 000 RUB.
– **Венера (уровень 3)**: Кэшбек 7% при игре от 10 001 до 50 000 ?.
– **Уровень 4 — Марс**: 8% бонуса при ставках от 50 001 до 150 000 RUB.
– **Юпитер (уровень 5)**: Кэшбек 10% при общей ставке свыше 150 000 RUB.
– **Уровень 6 — Сатурн**: 11% кэшбек.
– **Уровень 7 — Уран**: Максимальный возврат 12%.
#### Еженедельные бонусы и кэшбек
С целью удержания игровой активности, Казино Kometa предлагает регулярные бонусы, кэшбек и спины для всех новых игроков. Частые бонусы способствуют сохранять интерес на протяжении всей игры.
#### Огромный каталог игр
Огромное количество развлечений, включая автоматы, карточные игры и игры с живыми дилерами, превращают Казино Kometa местом, где вы найдете подходящее развлечение. Каждый может играть классическими играми, а также новинками от лучших поставщиков. Прямые дилеры создают атмосфере еще больше реализма, создавая атмосферу настоящего казино.
CS2 открывает новые горизонты https://smooya.tula24.net для игроков и команд. С улучшенной механикой стрельбы и графикой, игра становится более динамичной и зрелищной.
cost tricor online
csgo betting cs2 gambling
Смешные анекдоты https://prikolyshutki.wordpress.com/2024/10/16/smeshnye-anekdoty/.
Если основной сайт недоступен, воспользуйтесь рабочим зеркалом 1xslots https://1xslots-russia.top/zerkalo/
https://corcodile.com/2024/09/23/snjat-kvartiru-na-sutki-v-minske-arenda-kvartiry-33/
С каждым днем КС 2 https://malbsmd.serafimovich.org продолжает развиваться, привнося новые возможности и контент.
https://gjbrq.com/nfl-football-handicapping-what-looking-for-2/
С выходом КС 2 https://b1t.s1mple-cs-go.ru и такими игроками, как b1t, киберспорт вступает в новую эру.
Веселые анекдоты https://prikolyshutki.wordpress.com/2024/10/16/smeshnye-anekdoty/.
where to buy generic cefadroxil prices
Захватывающий мир CS 2 https://aleksib.monesy-cs-go.ru новая веха в киберспорте! Улучшенная графика, продуманный геймплей и свежие возможности для командной игры ждут вас. CS 2 открывает дверь в будущее соревнований, где каждый матч — это шаг к вершинам мирового киберспорта.
Looking for a new sex toy to use with your partner? Tease and explore each other with our exciting range of https://www.trialscentral.com/adserver/www/delivery/ck.php?ct=1&oaparams=2__bannerid=12__zoneid=3__cb=0fa56a7b00__oadest=https://www.sexand.toys/
buy cheap periactin without insurance
Интерес к киберспорту https://zywoo.cs2-esports.ru продолжает расти, и с каждым новым турниром появляются новые фанаты и игроки
https://www.tbusinessweek.com/snjat-kvartiru-na-sutki-ili-na-chas-v-minske-18-2/
На сайте вы найдёте подробные таблицы аккордов, которые помогут вам быстро освоить новые песни. Представлены аккорды для всех уровней, включая аккорды для гитары для начинающих. Если вы только начали учиться, раздел гитара для начинающих будет полезен для быстрого прогресса.
can you buy generic celebrex without insurance
https://www.ceyloncampus.lk/index.php/2024/09/23/snjat-kvartiru-na-sutki-v-minske-dlja-vecherinki-2/
Ремонт начинается после одобрения заказчиком общей стоимости ремонт android ремонта.
My webpage: https://device-rf.ru/catalog/servis/
Платформа для ставок 1вин с множеством событий и азартных игр. Удобный интерфейс, моментальные выплаты и привлекательные бонусы делают ставки ещё увлекательнее. Откройте мир азарта и выигрышей с надежным сервисом и постоянными акциями для пользователей.
московский музей анимации измайловское ш 73ж музей анимации измайлово
https://themefar.com/sports-betting-7-tips-be-successful-2/
Платформа для ставок 1вин с множеством событий и азартных игр. Удобный интерфейс, моментальные выплаты и привлекательные бонусы делают ставки ещё увлекательнее. Откройте мир азарта и выигрышей с надежным сервисом и постоянными акциями для пользователей.
mailsco online
https://www.kidsneedsbd.com/bez-rubriki/389-objavlenij-snjat-kvartiru-na-sutki-v-grodno-14/
москва измайловское шоссе 73ж московский музей анимации музей анимации измайлово
Платформа для ставок 1win с множеством событий и азартных игр. Удобный интерфейс, моментальные выплаты и привлекательные бонусы делают ставки ещё увлекательнее. Откройте мир азарта и выигрышей с надежным сервисом и постоянными акциями для пользователей.
Собираюсь на юг и хочу максимально сэкономить на такси. Какое такси лучше выбрать? Есть ли надежные сервисы с доступными ценами? Может, стоит попробовать совместные поездки, чтобы разделить расходы с другими пассажирами? Имеет ли смысл заблаговременно бронировать такси, или на месте можно найти более доступный тариф? Может, у кого-то есть промокоды на поездки? Буду благодарна за советы и предложения, чтобы избежать неожиданных трат и сделать поездку комфортной и бюджетной. Жду ваших предложений! Вот нашла статью , как думаете реально пишут?
https://ubksg.ru/2024/10/08/Отдых-начинается-с-дороги-такси-из-аэропорта-до-вашего-отеля
Dankbros is one of Canada’s most reputable online marijuana dispensaries. We guarantee that you’ll receive the best strains, concentrates, and accessories https://affiliate-url-conversion-api.gmo-insight.jp/partner_space/2/product/136/impression/0eae73d7-5cd0-4b50-ac29-f796903084ac/redirect?url=https://www.dankbros.net/
музей анимации официальный сайт музей анимации в москве официальный сайт
cost biaxin without prescription
abilify maintena cost
Платформа для ставок 1вин с множеством событий и азартных игр. Удобный интерфейс, моментальные выплаты и привлекательные бонусы делают ставки ещё увлекательнее. Откройте мир азарта и выигрышей с надежным сервисом и постоянными акциями для пользователей.
https://karmasports.net/2024/09/18/snjat-nedvizhimost-na-sutki-v-minske-posutochnaja-18/
музей анимации в измайловском кремле московский музей анимации измайловское ш 73ж москва
номер документа об образовании russa-diploms.ru .
where to buy celebrex pills
buying cheap amoxil online
Dankbros is one of Canada’s most reputable online marijuana dispensaries. We guarantee that you’ll receive the best strains, concentrates, and accessories https://www.lolinez.com/?https://www.banana.clothing/
музей анимации в измайловском кремле официальный музей анимации в измайловском кремле
Оптоволоконные лазерные станки для металлорезки
Предлагаем инновационные оптоволоконные лазерные станки, обеспечивающие точную резку металла с минимальными затратами на обслуживание.
лазерные станки по металлу лазерная резка листового металла .
Не могу разобраться какой это бренд?
Профессиональный сервисный центр по ремонту сотовых телефонов в Москве.
Мы предлагаем: ноутбук ремонт сервисный
Наши мастера оперативно устранят неисправности вашего устройства в сервисе или с выездом на дом!
bs2best at
https://www.merrypom.it/?p=21890
dosage of amoxil 500 mg
Обучение и поддержка операторов лазерных станков
Мы не только продаем лазерные станки, но и обучаем ваших сотрудников их эффективной эксплуатации, а также оказываем поддержку на всех этапах работы.
лазерный станок цена станки лазерной резки металла .
Другими дополнительными предложениями zinkra несомненно являются всевозможные конкурсы выходного дня и безвозмездные вращения в.
my web site покерок скачать
cost periactin without rx
https://www.kidsneedsbd.com/bez-rubriki/389-objavlenij-snjat-kvartiru-na-sutki-v-grodno-14/
can i order cheap betapace pill
https://юристы-твери.рф/
https://stmichaelsyeadon.org/snjat-nedvizhimost-na-sutki-v-minske-posutochnaja-5-2/
безвзносовые бонусы в большинстве случаев даются новичкам и дают команду совершить https://gipsyteam.poker/pokerrumy/pokerking определённое действие.
order cheap celebrex pill
이용 안내 및 주요 정보
배송대행 이용방법
배송대행은 해외에서 구매한 상품을 중간지점(배대지)에 보내고, 이를 통해 한국으로 배송받는 서비스입니다. 먼저, 회원가입을 진행하고, 해당 배대지 주소를 이용해 상품을 주문한 후, 배송대행 신청서를 작성하여 배송 정보를 입력합니다. 모든 과정은 웹사이트를 통해 관리되며, 필요한 경우 고객센터를 통해 지원을 받을 수 있습니다.
구매대행 이용방법
구매대행은 해외 쇼핑몰에서 직접 구매가 어려운 경우, 대행 업체가 대신 구매해주는 서비스입니다. 고객이 원하는 상품 정보를 제공하면, 구매대행 신청서를 작성하고 대행료와 함께 결제하면 업체가 구매를 완료해줍니다. 이후 상품이 배대지로 도착하면 배송대행 절차를 통해 상품을 수령할 수 있습니다.
배송비용 안내
배송비용은 상품의 무게, 크기, 배송 지역에 따라 다르며, 계산기는 웹사이트에서 제공됩니다. 부피무게가 큰 제품이나 특수 제품은 추가 비용이 발생할 수 있습니다. 항공과 해운에 따른 요금 차이도 고려해야 합니다.
부가서비스
추가 포장 서비스, 검역 서비스, 폐기 서비스 등이 제공되며, 필요한 경우 신청서를 작성하여 서비스 이용이 가능합니다. 파손 위험이 있는 제품의 경우 포장 보완 서비스를 신청하는 것이 좋습니다.
관/부가세 안내
수입된 상품에 대한 관세와 부가세는 상품의 종류와 가격에 따라 부과됩니다. 이를 미리 확인하고, 추가 비용을 예상하여 계산하는 것이 중요합니다.
수입금지 품목
가스제품(히터), 폭발물, 위험물 등은 수입이 금지된 품목에 속합니다. 항공 및 해상 운송이 불가하니, 반드시 해당 품목을 확인 후 주문해야 합니다.
폐기/검역 안내
검역이 필요한 상품이나 폐기가 필요한 경우, 사전에 관련 부가서비스를 신청해야 합니다. 해당 사항에 대해 미리 안내받고 처리할 수 있도록 주의해야 합니다.
교환/반품 안내
교환 및 반품 절차는 상품을 배송받은 후 7일 이내에 신청이 가능합니다. 단, 일부 상품은 교환 및 반품이 제한될 수 있으니 사전에 정책을 확인하는 것이 좋습니다.
재고관리 시스템
재고관리는 배대지에서 보관 중인 상품의 상태를 실시간으로 확인할 수 있는 시스템입니다. 재고 신청을 통해 상품의 상태를 확인하고, 필요한 경우 배송 또는 폐기 요청을 할 수 있습니다.
노데이타 처리방법
노데이타 상태의 상품은 배송 추적이 어려운 경우 발생합니다. 이런 경우 고객센터를 통해 문의하고 문제를 해결해야 합니다.
소비세환급 및 Q&A
일본에서 상품을 구매할 때 적용된 소비세를 환급받을 수 있는 서비스입니다. 해당 신청서는 구체적인 절차에 따라 작성하고 제출해야 합니다. Q&A를 통해 자주 묻는 질문을 확인하고, 추가 문의 사항은 고객센터에 연락해 해결할 수 있습니다.
고객지원
고객센터는 1:1 문의, 카카오톡 상담 등을 통해 서비스 이용 중 발생하는 문제나 문의사항을 해결할 수 있도록 지원합니다.
서비스 관련 공지사항
파손이 쉬운 제품의 경우, 추가 포장 보완을 반드시 요청해야 합니다.
가스제품(히터)은 통관이 불가하므로 구매 전 확인 바랍니다.
항공 운송 비용이 대폭 인하되었습니다.
DANKBROS LTD – Free company information from Companies House including registered office address, filing history, accounts, annual return, officers http://www.heritageabq.org/?URL=www.banana.clothing/
https://uzimapms.com/7-luchshih-sajtov-dlja-skachivanija-apk-fajlov-na-3/
Платформа 1win предлагает широкий выбор спортивных событий, киберспорта и азартных игр. Пользователи получают высокие коэффициенты, быстрые выплаты и круглосуточную поддержку. Программа лояльности и бонусы делают игру выгоднее.
bs2best
buy balloons stores custom balloons with inscription Dubai
https://shundorban.com/kvartiry-na-sutki-v-minske-nedorogo-16/
get femara prices
Свежие анекдоты http://anekdot-top.ru.
new year balloons with logo to order https://helium-balloon-price.com
buy balloons stores Dubai helium balloons
where to buy helium balloons Dubai new year balloons with logo to order Dubai
https://kyrossmedia.com/snjat-dom-na-sutki-v-grodno-s-banej-nedorogo-31-2/
custom balloons with inscription https://helium-balloon-price.com
Веселые анекдоты http://anekdot-top.ru.
custom helium balloons with delivery Dubai price balloons Dubai
helium balloons with cheap delivery Dubai buy helium balloons with delivery Dubai
where to buy helium balloons custom balloons with delivery inexpensively
https://www.ideawood.eu/2024/09/23/snjat-kvartiru-na-sutki-ili-na-chas-v-minske-8/
buy helium balloons Dubai price balloons
фильмы новые смотреть онлайн в хорошем качестве смотреть фильмы онлайн в качестве 1080
Оформите срочные кредиты без проверки кредитной истории и получите деньги на карту в кратчайшие сроки. Никаких проверок, только паспорт и банковская карта. Решение даже при плохой истории.
how to buy cheap celebrex without dr prescription
can i purchase synthroid pill
Meds information leaflet. Brand names.
where to buy generic olmesartan for sale
Some news about meds. Read here.
일본배대지
이용 안내 및 주요 정보
배송대행 이용방법
배송대행은 해외에서 구매한 상품을 중간지점(배대지)에 보내고, 이를 통해 한국으로 배송받는 서비스입니다. 먼저, 회원가입을 진행하고, 해당 배대지 주소를 이용해 상품을 주문한 후, 배송대행 신청서를 작성하여 배송 정보를 입력합니다. 모든 과정은 웹사이트를 통해 관리되며, 필요한 경우 고객센터를 통해 지원을 받을 수 있습니다.
구매대행 이용방법
구매대행은 해외 쇼핑몰에서 직접 구매가 어려운 경우, 대행 업체가 대신 구매해주는 서비스입니다. 고객이 원하는 상품 정보를 제공하면, 구매대행 신청서를 작성하고 대행료와 함께 결제하면 업체가 구매를 완료해줍니다. 이후 상품이 배대지로 도착하면 배송대행 절차를 통해 상품을 수령할 수 있습니다.
배송비용 안내
배송비용은 상품의 무게, 크기, 배송 지역에 따라 다르며, 계산기는 웹사이트에서 제공됩니다. 부피무게가 큰 제품이나 특수 제품은 추가 비용이 발생할 수 있습니다. 항공과 해운에 따른 요금 차이도 고려해야 합니다.
부가서비스
추가 포장 서비스, 검역 서비스, 폐기 서비스 등이 제공되며, 필요한 경우 신청서를 작성하여 서비스 이용이 가능합니다. 파손 위험이 있는 제품의 경우 포장 보완 서비스를 신청하는 것이 좋습니다.
관/부가세 안내
수입된 상품에 대한 관세와 부가세는 상품의 종류와 가격에 따라 부과됩니다. 이를 미리 확인하고, 추가 비용을 예상하여 계산하는 것이 중요합니다.
수입금지 품목
가스제품(히터), 폭발물, 위험물 등은 수입이 금지된 품목에 속합니다. 항공 및 해상 운송이 불가하니, 반드시 해당 품목을 확인 후 주문해야 합니다.
폐기/검역 안내
검역이 필요한 상품이나 폐기가 필요한 경우, 사전에 관련 부가서비스를 신청해야 합니다. 해당 사항에 대해 미리 안내받고 처리할 수 있도록 주의해야 합니다.
교환/반품 안내
교환 및 반품 절차는 상품을 배송받은 후 7일 이내에 신청이 가능합니다. 단, 일부 상품은 교환 및 반품이 제한될 수 있으니 사전에 정책을 확인하는 것이 좋습니다.
재고관리 시스템
재고관리는 배대지에서 보관 중인 상품의 상태를 실시간으로 확인할 수 있는 시스템입니다. 재고 신청을 통해 상품의 상태를 확인하고, 필요한 경우 배송 또는 폐기 요청을 할 수 있습니다.
노데이타 처리방법
노데이타 상태의 상품은 배송 추적이 어려운 경우 발생합니다. 이런 경우 고객센터를 통해 문의하고 문제를 해결해야 합니다.
소비세환급 및 Q&A
일본에서 상품을 구매할 때 적용된 소비세를 환급받을 수 있는 서비스입니다. 해당 신청서는 구체적인 절차에 따라 작성하고 제출해야 합니다. Q&A를 통해 자주 묻는 질문을 확인하고, 추가 문의 사항은 고객센터에 연락해 해결할 수 있습니다.
고객지원
고객센터는 1:1 문의, 카카오톡 상담 등을 통해 서비스 이용 중 발생하는 문제나 문의사항을 해결할 수 있도록 지원합니다.
서비스 관련 공지사항
파손이 쉬운 제품의 경우, 추가 포장 보완을 반드시 요청해야 합니다.
가스제품(히터)은 통관이 불가하므로 구매 전 확인 바랍니다.
항공 운송 비용이 대폭 인하되었습니다.
cost of generic cetirizine online
Medication information leaflet. Cautions.
cost cheap diflucan without dr prescription
Best about medicament. Read now.
Luka Doncic and Boban Marjanovic have been seen together frequently off the court, and their friendship has been well-documented through social https://wobattery.com/trigger.php?r_link=https://lukafriend.com/
Профессиональный сервисный центр по ремонту духовых шкафов в Москве.
Мы предлагаем: ремонт терморегулятора духовки
Наши мастера оперативно устранят неисправности вашего устройства в сервисе или с выездом на дом!
Luka Doncic and Boban Marjanovic have been seen together frequently off the court, and their friendship has been well-documented through social https://rechner.atikon.at/lbg.at/newsletter/linktracking?subscriber=&delivery=38116&url=https://gg4.store/
Шкафы купе Киев
https://financior.co.uk/skolko-stojat-samye-dorogie-kvartiry-na-sutki-v-15-2/
Лазерные станки для резки труб и листового металла
Наш ассортимент включает лазерные станки для резки труб и листового металла. Это идеальное решение для производства с высокой точностью и эффективностью.
лазерный станок чпу для резки металла лазерный станок по металлу цена .
оформление земельного участка в собственность
https://lovemadness.co.uk/snjat-kvartiru-na-sutki-v-minskoj-oblasti-bystroe-30/
межевание границ участка
buy liquid prednisolone online
Обслуживание и запчасти для лазерных станков
Мы предоставляем полный комплекс услуг по техническому обслуживанию лазерных станков, а также поставляем оригинальные запчасти для их бесперебойной работы.
лазерный станок чпу для резки металла лазерная резка металла станок цена .
Казино Kometa: Идеальный выбор для любителей игр на удачу
В случае если вы являетесь любите ставками и выбираете платформу, которая обеспечивает широкий ассортимент слотов и лайв-игр, а также щедрые бонусы, Kometa Casino — это то место, на котором вы найдете незабываемые впечатления. Попробуем узнаем, какие факторы делает данное казино уникальным и почему посетители выбирают этой платформе для досуга.
### Главные особенности Kometa Casino
Kometa Casino — это всемирная платформа, которая была создана в 2024 году и сейчас уже завоевала интерес клиентов по всему миру. Вот основные моменты, что выделяют этот сайт:
Характеристика Описание
Год создания 2024
География Доступа Всемирная
Объем игр Более 1000
Регистрация Кюрасао
Мобильная Версия Доступна
Способы Оплаты Visa, Mastercard, Skrill
Техподдержка 24 часа в сутки
Бонусы и Акции Щедрые бонусы
Безопасность Шифрование SSL
### Что привлекает в Казино Kometa?
#### Бонусная система
Одним из интересных особенностей Kometa Casino становится поощрительная программа. Чем больше вы играете, тем больше ваши вознаграждения. Программа включает семи уровней:
– **Земля (уровень 1)**: Кэшбек 3% 3% от затрат за неделю.
– **Луна (уровень 2)**: Возврат 5% при ставках от 5 000 до 10 000 RUB.
– **Венера (уровень 3)**: 7% возврата при ставках от 10 001 до 50 000 ?.
– **Уровень 4 — Марс**: 8% кэшбек при ставках от 50 001 до 150 000 ?.
– **Юпитер (уровень 5)**: 10% возврата при общей ставке свыше 150 000 RUB.
– **Сатурн (уровень 6)**: 11% кэшбек.
– **Уран (уровень 7)**: Максимальный кэшбек максимум 12%.
#### Еженедельные бонусы и кэшбек
Чтобы держать азарт на высоте, Казино Kometa предоставляет регулярные бонусы, возврат средств и фриспины для новых пользователей. Регулярные вознаграждения помогают сохранять интерес на протяжении всей игры.
#### Большое количество развлечений
Более 1000 игр, включая автоматы, настольные игры и живое казино, создают Казино Kometa местом, где любой найдет игру по душе. Игроки могут насладиться стандартными автоматами, так и новейшими играми от известных разработчиков. Дилеры в реальном времени придают атмосфере еще больше реализма, формируя атмосферу азартного дома.
как оформить дом в собственность
can you buy prednisolone without a prescription
The purpose of 3D rendering is to visualize and memorize exterior type and qualities of a https://nandbox.com/innovative-3d-architectural-visualization-by-100cgi-studio-redefining-design-presentations/.
https://www.goecomax.com/snjat-kvartiru-v-grodno-na-sutki-arenda-kvartir-6/
Сервисный центр предлагает сколько стоит ремонт моноколеса legway ремонт моноколеса legway на дому
suprax cefixime 200mg francais
Лазерная резка металла: передовые технологии для промышленности
Наши лазерные станки для резки металла используют передовые технологии, обеспечивая максимальную производительность и точность.
станок для лазерной резки металла цена станок лазерной резки металла с чпу цена .
ou vendre or a frejus achat or
GTA V Online самп ютуберы
https://bristolblockdriveways.co.uk/snjat-kvartiru-na-sutki-ili-na-chas-v-minske-9-2/
ready-made resumes of an engineer good resume of an engineer
Смешные анекдоты http://anekdot-top.ru.
регистрация земельного участка в росреестре
https://www.makatais.com/snjat-kvartiru-na-sutki-v-pervomajskom-rajone-16/
This kit comes in a zippered pouch and includes 2 specially developed Scuba Wrenches, high quality crescent wrench, Phillips head and flat head screw drivers https://www.innsbruck-christuskirche.at/?URL=https://www.boikhuco.co.za/
сколько стоит межевание земельного участка
This kit comes in a zippered pouch and includes 2 specially developed Scuba Wrenches, high quality crescent wrench, Phillips head and flat head screw drivers http://cms.sennews.net/share.php?url=https://diversdeluxe.co.za/
https://impacksafagroup.sn/kvartiry-na-sutki-v-grodno-tenancy-by-8/
https://famouszoom.com/vmesto-google-play-i-app-store-alternativnye-2/
rgbet
Cách Tối Đa Hóa Tiền Thưởng Tại RGBET
META title: Cách tối ưu hóa tiền thưởng trên RGBET
META description: Học cách tối đa hóa tiền thưởng của bạn trên RGBET bằng các mẹo và chiến lược cá cược hiệu quả nhất.
Giới thiệu
Tiền thưởng là cơ hội tuyệt vời để tăng cơ hội thắng lớn mà không phải bỏ ra nhiều vốn. RGBET cung cấp rất nhiều loại khuyến mãi hấp dẫn, hãy cùng khám phá cách tối ưu hóa chúng!
1. Đọc kỹ điều kiện khuyến mãi
Mỗi chương trình thưởng đều có điều kiện riêng, bạn cần đọc kỹ để đảm bảo không bỏ lỡ cơ hội.
2. Đặt cược theo mức yêu cầu
Để nhận thưởng, hãy đảm bảo rằng số tiền cược của bạn đạt yêu cầu tối thiểu.
3. Tận dụng tiền thưởng nạp đầu tiên
Đây là cơ hội để bạn có thêm vốn ngay từ đầu. Hãy lựa chọn mức nạp phù hợp với ngân sách.
4. Theo dõi khuyến mãi hàng tuần
RGBET liên tục đưa ra các chương trình khuyến mãi hàng tuần. Đừng bỏ lỡ cơ hội nhận thêm tiền thưởng!
5. Sử dụng điểm VIP
Khi bạn đạt mức VIP, điểm thưởng có thể được chuyển thành tiền mặt, giúp bạn tối ưu hóa lợi nhuận.
Kết luận
Biết cách tận dụng tiền thưởng không chỉ giúp bạn có thêm tiền cược mà còn tăng cơ hội thắng lớn.
Новини Черкаси https://u-misti.cherkasy.ua події міста сьогодні. Життя Черкас та Черкаської області.
регистрация дома на земельном участке
https://dzen.ru/a/ZsxoR0vBjlOS9P1n
https://mackowe.pl/kvartiry-na-sutki-v-minske-snjat-kvartiru-na-chasy-8/
DeepNude https://technology289.com/discover-the-unique-features-of-the-ai-nudify-app/ is an app that undresses women in photographs, revealing their intimate areas hidden behind clothing.
Все о зачатии и беременности https://z-b-r.org полезная информация о подготовке к беременности, расчёт овуляции, развитие плода по неделям, советы по здоровью и питанию, подготовка к родам.
акт разбивки осей здания
https://dzen.ru/a/Zsxddg6-hDn2eZih
https://bonissoniimoveis.com.br/2024/09/23/1324-objavlenija-snjat-kvartiru-v-minske-na-novyj-12/
Веселые приколы https://teletype.in/@anekdoty/prikoly-nastroenie.
Medicines information. What side effects?
how to buy generic atarax prices
Actual information about medicament. Read now.
can you get accutane pill
Realizzazione di video https://orbispro.it per pubblicita, eventi, video aziendali. Una gamma completa di servizi, dalla scrittura della sceneggiatura al montaggio, alla correzione del colore e al sound design.
where can i get celebrex without insurance
Your go-to Filipino technology forum for discussions on mobile networks, internet, phones, media, computers, gaming, news, and a variety of topics related to http://sc.haomuren.org/gate/gb/www.phforums.co.za/
can i purchase cipro without insurance
Drug information leaflet. Short-Term Effects.
can i buy generic diflucan pills
Best trends of medicament. Read now.
why is doxycycline prescribed
rgbet
Tại Sao Nên Chọn RGBET Là Nền Tảng Cá Cược Trực Tuyến Hàng Đầu
META title: Vì sao RGBET là nền tảng cá cược tốt nhất cho người chơi Việt Nam
META description: Tìm hiểu những lý do RGBET là lựa chọn hàng đầu cho người chơi Việt Nam với giao diện hiện đại, khuyến mãi hấp dẫn và nạp rút nhanh chóng.
Giới thiệu
RGBET không chỉ là một trang cá cược trực tuyến thông thường. Với những tính năng nổi bật và các chương trình khuyến mãi hấp dẫn, đây là một trong những nền tảng được người chơi Việt Nam tin tưởng nhất.
1. Giao diện thân thiện
Giao diện của RGBET dễ sử dụng, thích hợp cho cả người mới và người chơi lâu năm.
2. Khuyến mãi hấp dẫn
Nền tảng này cung cấp nhiều chương trình khuyến mãi như thưởng nạp đầu, cashback, và chương trình VIP.
3. Nạp và rút tiền nhanh chóng
RGBET hỗ trợ nhiều phương thức thanh toán an toàn và nhanh chóng, từ ngân hàng nội địa đến ví điện tử.
4. Hỗ trợ khách hàng 24/7
RGBET có đội ngũ hỗ trợ luôn sẵn sàng giải đáp mọi thắc mắc của người chơi mọi lúc.
Kết luận
RGBET không chỉ đem lại trải nghiệm cá cược tuyệt vời mà còn đảm bảo sự tiện lợi và uy tín cho người chơi.
Your go-to Filipino technology forum for discussions on mobile networks, internet, phones, media, computers, gaming, news, and a variety of topics related to http://aquaguard.com/?URL=https://mintmobile.co.za/
can you get cheap celebrex pills
Medicament information leaflet. What side effects can this medication cause?
can i get cheap plan b without dr prescription
Everything trends of medication. Read information now.
where to get generic deltasone no prescription
where to get cheap imdur online
Medication prescribing information. Effects of Drug Abuse.
can i get cheap ramipril online
Actual what you want to know about drug. Get now.
where buy cheap singulair prices
cost of lipitor
Полезный сервис быстрого загона ссылок сайта в индексация поисковой системы – индексация в гугл
Pills information for patients. Long-Term Effects.
order cheap cipro pill
All what you want to know about pills. Get now.
can you buy avodart no prescription
Жіночий журнал https://lady.kyiv.ua про красу та здоров’я
can i get celebrex tablets
Drug information sheet. Short-Term Effects.
where buy effexor without a prescription
Everything trends of medicines. Get here.
how is Cleocin metabolized
interesting post
_________________
casino knokke
+ for the post
_________________
бездепозитный бонус реально
where can i buy seroquel prices
Meds information for patients. Long-Term Effects.
where can i get generic levonorgestrel
Best information about pills. Read information here.
can i purchase cheap advair diskus pill
Garansi Kekalahan
NAGAEMPIRE: Platform Sports Game dan E-Games Terbaik di Tahun 2024
Selamat datang di Naga Empire, platform hiburan online yang menghadirkan pengalaman gaming terdepan di tahun 2024! Kami bangga menawarkan sports game, permainan kartu, dan berbagai fitur unggulan yang dirancang untuk memberikan Anda kesenangan dan keuntungan maksimal.
Keunggulan Pendaftaran dengan E-Wallet dan QRIS
Kami memprioritaskan kemudahan dan kecepatan dalam pengalaman bermain Anda:
Pendaftaran dengan E-Wallet: Daftarkan akun Anda dengan mudah menggunakan e-wallet favorit. Proses pendaftaran sangat cepat, memungkinkan Anda langsung memulai petualangan gaming tanpa hambatan.
QRIS Auto Proses dalam 1 Detik: Transaksi Anda diproses instan hanya dalam 1 detik dengan teknologi QRIS, memastikan pembayaran dan deposit berjalan lancar tanpa gangguan.
Sports Game dan Permainan Kartu Terbaik di Tahun 2024
Naga Empire menawarkan berbagai pilihan game menarik:
Sports Game Terlengkap: Dari taruhan olahraga hingga fantasy sports, kami menyediakan sensasi taruhan olahraga dengan kualitas terbaik.
Kartu Terbaik di 2024: Nikmati permainan kartu klasik hingga variasi modern dengan grafis yang menakjubkan, memberikan pengalaman bermain yang tak terlupakan.
Permainan Terlengkap dan Toto Terlengkap
Kami memiliki koleksi permainan yang sangat beragam:
Permainan Terlengkap: Temukan berbagai pilihan permainan seperti slot mesin, kasino, hingga permainan berbasis keterampilan, semua tersedia di Naga Empire.
Toto Terlengkap: Layanan Toto Online kami menawarkan pilihan taruhan yang lengkap dengan odds yang kompetitif, memberikan pengalaman taruhan yang optimal.
Bonus Melimpah dan Turnover Terendah
Bonus Melimpah: Dapatkan bonus mulai dari bonus selamat datang, bonus setoran, hingga promosi eksklusif. Kami selalu memberikan nilai lebih pada setiap taruhan Anda.
Turnover Terendah: Dengan turnover rendah, Anda dapat meraih kemenangan lebih mudah dan meningkatkan keuntungan dari setiap permainan.
Naga Empire adalah tempat yang tepat bagi Anda yang mencari pengalaman gaming terbaik di tahun 2024. Bergabunglah sekarang dan rasakan sensasi kemenangan di platform yang paling komprehensif!
can i order celebrex without insurance
Medication information leaflet. What side effects can this medication cause?
can i purchase cheap zocor tablets
Actual what you want to know about medication. Get here.
where can i buy generic deltasone price
Женский портал https://glamour.kyiv.ua это твой гид по красоте, здоровью, моде и личностному развитию. Здесь ты найдёшь полезные советы, вдохновение и поддержку на пути к гармонии с собой.
Медицинский онлайн журнал https://medicalanswers.com.ua актуальная информация о здоровье, профилактике и лечении заболеваний.
how can i get celebrex price
Новости Украины и мира https://lentanews.kyiv.ua оперативные и объективные сводки событий.
Последние события https://lenta.kyiv.ua из мира политики, экономики, культуры и спорта. Всё, что происходит в Украине и за её пределами, с экспертной оценкой и объективной подачей.
order cefixime price
Новости Украины https://gau.org.ua оперативные сводки, политические события, экономика, общественные и культурные тенденции.
Основные новости https://mediashare.com.ua за сегодня Свежие события в мире и Украине
Свежие новости 24/7 https://prp.org.ua политика, экономика, спорт, культура и многое другое. Оперативные сводки, эксклюзивные материалы и аналитика от экспертов. Оставайтесь в курсе главных событий в стране и мире!
how to buy generic zetia pills
Medicament prescribing information. Long-Term Effects.
get generic paxil prices
Some about drugs. Get now.
Самые важные новости https://pto-kyiv.com.ua на одном портале: политика, экономика, происшествия, спорт и культура. Оперативно, достоверно, актуально — следите за событиями вместе с нами!
cetirizine dihydrochloride side effects
Новости онлайн https://status.net.ua самые свежие события, объективная аналитика и мнения экспертов.
Новости вокруг света https://infotolium.com путешествия и развлечения. Культура и искусство, юмор, приколы. Наука и техника. Продукты питания.
how can i get generic tofranil for sale
Автообзоры https://proauto.kyiv.ua тест-драйвы, новости рынка и советы экспертов. Узнавайте всё о новых моделях и автоаксессуарах на нашем портале!
Самые свежие новости https://autoclub.kyiv.ua автоиндустрии, тест-драйвы, технические советы и обзоры автомобилей. Всё, что нужно автолюбителю!
Свежие приколы http://shutki-anekdoty.ru/.
can i buy cheap celebrex for sale
where to buy cheap cetirizine
Produzione video professionale https://orbispro.it creazione di spot pubblicitari, film aziendali e contenuti video. Ciclo completo di lavoro, dall’idea al montaggio. Soluzioni creative per promuovere con successo il tuo brand.
The most modern pocket option platform for trading on financial markets. Register a Free Demo Account and start using the full potential for earning on trading operations.
kometa casino приложение
Kometa Casino: Превосходный вариант для любителей азартных игр
Когда вы увлекаетесь азартными играми и рассматриваете платформу, которая дает доступ к большой ассортимент игровых автоматов и лайв-игр, а к тому же щедрые бонусы, Kometa Casino — это тот сайт, в котором вы найдете незабываемый опыт. Предлагаем узнаем, что делает данное казино таким особенным и почему игроки отдают предпочтение его для игры.
### Ключевые черты Kometa Casino
Kometa Casino — это международная игровая платформа, которая была запущена в 2024 году и сейчас уже привлекла признание пользователей по международно. Вот некоторые черты, которые отличают Kometa Casino:
Характеристика Описание
Дата запуска 2024
География Доступа Всемирная
Количество Игр Больше тысячи
Лицензия Curacao
Мобильный доступ Присутствует
Способы Оплаты Популярные платежные системы
Техподдержка Круглосуточная поддержка
Приветственные бонусы Щедрые бонусы
Безопасность Шифрование SSL
### Зачем играют в Kometa Casino?
#### Система поощрений
Одним из интересных функций Kometa Casino становится уникальная программа лояльности. Чем больше ставок, тем выше ваши бонусы. Система включает 7 этапов:
– **Земля (уровень 1)**: Кэшбек 3% от потраченных средств за 7 дней.
– **Луна (уровень 2)**: Возврат 5% на ставки от 5 000 до 10 000 ?.
– **Венера (уровень 3)**: Возврат 7% при ставках от 10 001 до 50 000 ?.
– **Уровень 4 — Марс**: 8% кэшбек при сумме ставок от 50 001 до 150 000 RUB.
– **Юпитер (уровень 5)**: 10% возврата при общей ставке свыше 150 000 рублей.
– **Сатурн (уровень 6)**: 11% кэшбек.
– **Уровень 7 — Уран**: Максимальный кэшбек 12%.
#### Еженедельные бонусы и кэшбек
Чтобы держать игровой активности, Kometa Casino предоставляет бонусы каждую неделю, кэшбек и фриспины для всех новых игроков. Регулярные вознаграждения обеспечивают удерживать внимание на протяжении всей игры.
#### Огромный каталог игр
Более 1000 игр, включая игровые машины, настольные развлечения и живое казино, делают Казино Kometa сайтом, где каждый найдет развлечение на вкус. Игроки могут насладиться классическими играми, так и новейшими играми от ведущих провайдеров. Дилеры в реальном времени придают играм еще больше реализма, воссоздавая дух казино.
Изготавливаем изделия https://coping-top.ru из восстановленного камня: печи с мангалом и барбекю, решетки, бордюры. Прочный и экологичный материал, широкий выбор цветов и текстур.
Новый авто портал https://mirauto.kyiv.ua для автолюбителей. Обзоры авто, новости, тест-драйвы и советы по обслуживанию автомобиля в одном месте.
Смешные приколы http://shutki-anekdoty.ru/.
https://www.localappliancerentals.com.au/bez-rubriki/kvartira-na-sutki-v-grodno-nedorogo-ceny-snjat-2/
how to buy generic sildigra without rx
Produzione video professionale https://orbispro.it creazione di spot pubblicitari, film aziendali e contenuti video. Ciclo completo di lavoro, dall’idea al montaggio. Soluzioni creative per promuovere con successo il tuo brand.
Produzione video professionale https://orbispro.it creazione di spot pubblicitari, film aziendali e contenuti video. Ciclo completo di lavoro, dall’idea al montaggio. Soluzioni creative per promuovere con successo il tuo brand.
https://amanahfire.com/2024/09/18/snjat-kvartiru-na-sutki-v-minske-arenda-kvartir-65/
cost generic sildigra price
Produzione video professionale https://orbispro.it creazione di spot pubblicitari, film aziendali e contenuti video. Ciclo completo di lavoro, dall’idea al montaggio. Soluzioni creative per promuovere con successo il tuo brand.
Produzione video professionale https://orbispro.it creazione di spot pubblicitari, film aziendali e contenuti video. Ciclo completo di lavoro, dall’idea al montaggio. Soluzioni creative per promuovere con successo il tuo brand.
https://sybil.webversatility.com/2024/09/23/arenda-kvartir-na-sutki-minsk-mir-bez-posrednikov-8/
buying sildigra without a prescription
Смешные приколы, шутки и картинки http://shutki-anekdoty.ru/.
https://mandarintherapist.com/archives/3117
buy prednisone 20 mg
can you get zyrtec without prescription
https://akademiaretron.pl/2024/09/18/kvartira-na-sutki-v-minske-nedorogo-ceny-snjat-11-2/
Автомобильные новости https://sedan.kyiv.ua Украины и мира, тест-драйвы новых авто, советы экспертов
Женский портал https://bestwoman.kyiv.ua современная мода, тренд, стиль; полезные советы; секреты хорошей фигуры; уроки макияжа, внешность и красота
Женская красота https://7krasotok.com здоровье – женский онлайн журнал. Новости звезд, тренды моды и красоты, правильное питание, рецепты вкусных блюд.
Советы по тренировкам https://bahgorsovet.org.ua питанию и здоровому образу жизни. Актуальная информация для всех, кто хочет улучшить свою физическую форму.
Полезные статьи https://entertainment.com.ua о здоровье, уходе за собой, моде и личностном развитии. Все для женщин, стремящихся к успеху.
Всё о здоровье https://expertlaw.com.ua как питаться правильно, сохранять физическую активность и заботиться о теле и душе.
Статьи о здоровье https://pobedilivmeste.org.ua питании и фитнесе. Практические рекомендации для поддержания вашего организма в отличном состоянии.
Compete in free social slot tournaments at CorgiSlots and win daily rewards with friends
can i buy glycomet without dr prescription
https://sanyepicsolucao.com.br/kvartiry-na-sutki-v-minske-svobodnye-segodnja-34/
Новости автоиндустрии https://eurasiamobilechallenge.com обзоры моделей, советы по обслуживанию и вождению. Всё для автолюбителей и профессионалов на одном сайте!
Советы по стилю https://biglib.com.ua красоте и психологии. Поддерживайте баланс между карьерой и личной жизнью с нашим журналом.
Идеи для стиля https://bbb.dp.ua красоты и развития карьеры. Экспертные советы для тех, кто стремится к гармонии в жизни.
Женский взгляд https://e-times.com.ua на моду, красоту и карьеру. Читайте полезные статьи и вдохновляйтесь новыми идеями каждый день!
Женский журнал https://leif.com.ua о стиле жизни, моде, красоте и саморазвитии. Узнайте актуальные советы и идеи для гармоничной и успешной жизни каждой женщины.
Онлайн-клуб рукоделия https://godwood.com.ua для любителей и мастеров. Уроки, мастер-классы, идеи и советы по вязанию, шитью, вышивке и другим техникам. Общайтесь с единомышленниками, делитесь проектами и развивайте свои навыки в уютной онлайн-среде.
เกมสล็อตออนไลน์
สล็อต888 เป็นหนึ่งในแพลตฟอร์มเกมสล็อตออนไลน์ที่ได้รับความนิยมสูงสุดในปัจจุบัน โดยมีความโดดเด่นด้วยการให้บริการเกมสล็อตที่หลากหลายและมีคุณภาพ รวมถึงฟีเจอร์ที่ช่วยให้ผู้เล่นสามารถเพลิดเพลินกับการเล่นได้อย่างเต็มที่ ในบทความนี้ เราจะมาพูดถึงฟีเจอร์และจุดเด่นของสล็อต888 ที่ทำให้เว็บไซต์นี้ได้รับความนิยมเป็นอย่างมาก
ฟีเจอร์เด่นของ PG สล็อต888
ระบบฝากถอนเงินอัตโนมัติที่รวดเร็ว สล็อต888 ให้บริการระบบฝากถอนเงินแบบอัตโนมัติที่สามารถทำรายการได้ทันที ไม่ต้องรอนาน ไม่ว่าจะเป็นการฝากหรือถอนก็สามารถทำได้ภายในไม่กี่วินาที รองรับการใช้งานผ่านทรูวอลเล็ทและช่องทางอื่น ๆ โดยไม่มีขั้นต่ำในการฝากถอน
รองรับทุกอุปกรณ์ ทุกแพลตฟอร์ม ไม่ว่าคุณจะเล่นจากอุปกรณ์ใดก็ตาม สล็อต888 รองรับทั้งคอมพิวเตอร์ แท็บเล็ต และสมาร์ทโฟน ไม่ว่าจะเป็นระบบ iOS หรือ Android คุณสามารถเข้าถึงเกมสล็อตได้ทุกที่ทุกเวลาเพียงแค่มีอินเทอร์เน็ต
โปรโมชั่นและโบนัสมากมาย สำหรับผู้เล่นใหม่และลูกค้าประจำ สล็อต888 มีโปรโมชั่นต้อนรับ รวมถึงโบนัสพิเศษ เช่น ฟรีสปินและโบนัสเครดิตเพิ่ม ทำให้การเล่นเกมสล็อตกับเราเป็นเรื่องสนุกและมีโอกาสทำกำไรมากยิ่งขึ้น
ความปลอดภัยสูงสุด เรื่องความปลอดภัยเป็นสิ่งที่สล็อต888 ให้ความสำคัญเป็นอย่างยิ่ง เราใช้เทคโนโลยีการเข้ารหัสข้อมูลขั้นสูงเพื่อปกป้องข้อมูลส่วนบุคคลของลูกค้า ระบบฝากถอนเงินยังมีมาตรการรักษาความปลอดภัยที่เข้มงวด ทำให้ลูกค้ามั่นใจในการใช้บริการกับเรา
ทดลองเล่นสล็อตฟรี
สล็อต888 ยังมีบริการให้ผู้เล่นสามารถทดลองเล่นสล็อตได้ฟรี ซึ่งเป็นโอกาสที่ดีในการทดลองเล่นเกมต่าง ๆ ที่มีอยู่บนเว็บไซต์ เช่น Phoenix Rises, Dream Of Macau, Ways Of Qilin, Caishens Wins และเกมยอดนิยมอื่น ๆ ที่มีกราฟิกสวยงามและรูปแบบการเล่นที่น่าสนใจ
ไม่ว่าจะเป็นเกมแนวผจญภัย เช่น Rise Of Apollo, Dragon Hatch หรือเกมที่มีธีมแห่งความมั่งคั่งอย่าง Crypto Gold, Fortune Tiger, Lucky Piggy ทุกเกมได้รับการออกแบบมาเพื่อสร้างประสบการณ์การเล่นที่น่าจดจำและเต็มไปด้วยความสนุกสนาน
บทสรุป
สล็อต888 เป็นแพลตฟอร์มที่ครบเครื่องเรื่องเกมสล็อตออนไลน์ ด้วยฟีเจอร์ที่ทันสมัย โปรโมชั่นที่น่าสนใจ และระบบรักษาความปลอดภัยที่เข้มงวด ทำให้คุณมั่นใจได้ว่าการเล่นกับสล็อต888 จะเป็นประสบการณ์ที่ปลอดภัยและเต็มไปด้วยความสนุก
https://www.perrysrl.it/?p=88090
портал о рукоделии https://lugor.org.ua советы по вязанию, вышивке и шитью, мастер-классы, схемы и идеи для творчества. Полезные статьи для начинающих и опытных мастеров, вдохновение и практические рекомендации.
Hello i like this site is good thank you 1006115 Kraken: как за
Онлайн журнал для женщин https://lubimoy.com.ua мода, красота, здоровье, отношения, карьера и саморазвитие. Актуальные статьи, советы экспертов и вдохновение для повседневной жизни. Новости, тренды и полезные рекомендации.
Женский журнал онлайн https://martime.com.ua мода, уход за собой, здоровье, карьера и личная жизнь. Свежие статьи, советы и идеи для вдохновения и развития современной женщины.
Интерактивный женский журнал https://muz-hoz.com.ua стильные образы, идеи для развития, практические советы по здоровью и отношениям. Всё, что нужно для гармоничной жизни и самореализации.
Алкошоп и Alcoshop — это идеальный выбор для любителей напитков, которым важно качество и удобство. Доставка работает круглосуточно, что позволяет наслаждаться напитками в удобное время. Позвонив по номеру +74993433939, вы можете оформить заказ быстро и без лишних хлопот.
Круглосуточная доставка через Алкошоп позволяет без труда заказать алкоголь на дом. Вы можете позвонить на +74993433939 или оформить заказ онлайн, что делает процесс максимально удобным. Сервис гарантирует доставку в любое время суток.
Для заказа алкоголя в Москве круглосуточно на дом достаточно связаться с Алкошоп. В Alcoshop доступен большой выбор алкоголя, что позволит найти нужный товар для любого случая. Доставка осуществляется быстро и надежно, делая каждый заказ без лишних ожиданий.
Hello i like this site is good thank you 1006115 kraken клирнет ссылка
Профессиональный сервисный центр по ремонту сотовых телефонов в Москве.
Мы предлагаем: цены на ремонт ноутбуков
Наши мастера оперативно устранят неисправности вашего устройства в сервисе или с выездом на дом!
https://labdrbellour.com/snjat-kvartiru-na-sutki-v-minske-arenda-kvartir-36/
Полезные советы https://oa.rv.ua для женщин на все случаи жизни: уход за собой, отношения, карьера, здоровье и домашний уют. Откройте для себя практичные решения и вдохновение для каждой сферы жизни!
Лучшие советы для женщин https://oun-upa.org.ua от моды до здоровья, отношения, карьера и семейные лайфхаки. Всё, что нужно для баланса и гармонии в жизни.
Советы для женщин https://olive.kiev.ua секреты красоты, здоровье, психология, карьера и домашний уют. Полезные рекомендации для улучшения жизни каждый день!
Советы для женщин https://reyesmusicandevents.com на каждый день: красота, здоровье, семья и карьера. Лайфхаки и вдохновение для современной и уверенной в себе женщины.
can i purchase doxycycline price
http://pimpros.com/kvartira-na-sutki-v-minske-nedorogo-ceny-snjat-21/
Всё для женщин https://socvirus.com.ua полезные советы по уходу за собой, отношениям, карьере и созданию домашнего уюта.
Идеи для рукоделия https://sweaterok.com.ua мастер-классы, инструкции и вдохновение для создания уникальных изделий. Узнайте больше о шитье, вязании, вышивке и других видах творчества!
Женский портал https://tiamo.rv.ua с советами для красоты, здоровья, отношений и карьеры. Живите на полную с нашими рекомендациями!
Советы для женщин https://spkokna.com.ua на каждый день: стиль, уход, здоровье и гармоничные отношения. Вдохновение и полезные идеи!
Практичные советы https://vybir.kiev.ua для женщин: мода, здоровье, карьера и семья. Легко находите ответы на любые вопросы!
Лайфхаки для женщин https://womanclub.in.ua как быть стильной, здоровой и находить баланс в личной жизни и работе. Полезные советы каждый день.
Женские секреты https://whoiswho.com.ua полезные советы для красоты, здоровья, семейного счастья и карьерных успехов. Присоединяйтесь к лучшей версии себя!
Женский блог https://ww2planes.com.ua полезные советы по стилю, уходу, здоровью и развитию карьеры. Всё для того, чтобы жить ярко и гармонично.
where can i get advair diskus
Hello i like this site is good thank you 1006115 Кракен: доступ через VPN
Недорогие экскурсии в Хургаде цены 2024-2025. Бесплатный трансфер. Русскоязычный гид. Более 3000 реальных отзывов.
Недорогие экскурсии на Пхукете цены и описание. На острова Пхи Пхи, катание на слонах. Русские гиды, моментальное бронирование
Недорогие экскурсии в Шарм эль Шейхе цены и описание. В Каир, Луксор, на острова
Недорогие экскурсии в Царское Село. Янтарная комната, Большой Екатерининский дворец, описание и отзывы
There are many benefits to using a Taiwan virtual number to receive text messages . First, it provides users with a temporary and secure phone number without having to buy a new SIM card. Second, it is suitable for a variety of scenarios, including social media registration, online shopping, and two-factor authentication http://www.d7jq.cn/20241017/23562857.html
cost cheap sildigra pill
how to buy cheap celebrex without a prescription
There are many benefits to using a Taiwan virtual number to receive text messages . First, it provides users with a temporary and secure phone number without having to buy a new SIM card. Second, it is suitable for a variety of scenarios, including social media registration, online shopping, and two-factor authentication http://www.o25.com.cn/20241017/98598380.html
cheap celebrex online
can you get prevacid price
Свежие приколы и анекдоты http://shutki-anekdoty.ru/.
สล็อต888 เป็นหนึ่งในแพลตฟอร์มเกมสล็อตออนไลน์ที่ได้รับความนิยมสูงสุดในปัจจุบัน โดยมีความโดดเด่นด้วยการให้บริการเกมสล็อตที่หลากหลายและมีคุณภาพ รวมถึงฟีเจอร์ที่ช่วยให้ผู้เล่นสามารถเพลิดเพลินกับการเล่นได้อย่างเต็มที่ ในบทความนี้ เราจะมาพูดถึงฟีเจอร์และจุดเด่นของสล็อต888 ที่ทำให้เว็บไซต์นี้ได้รับความนิยมเป็นอย่างมาก
ฟีเจอร์เด่นของ PG สล็อต888
ระบบฝากถอนเงินอัตโนมัติที่รวดเร็ว สล็อต888 ให้บริการระบบฝากถอนเงินแบบอัตโนมัติที่สามารถทำรายการได้ทันที ไม่ต้องรอนาน ไม่ว่าจะเป็นการฝากหรือถอนก็สามารถทำได้ภายในไม่กี่วินาที รองรับการใช้งานผ่านทรูวอลเล็ทและช่องทางอื่น ๆ โดยไม่มีขั้นต่ำในการฝากถอน
รองรับทุกอุปกรณ์ ทุกแพลตฟอร์ม ไม่ว่าคุณจะเล่นจากอุปกรณ์ใดก็ตาม สล็อต888 รองรับทั้งคอมพิวเตอร์ แท็บเล็ต และสมาร์ทโฟน ไม่ว่าจะเป็นระบบ iOS หรือ Android คุณสามารถเข้าถึงเกมสล็อตได้ทุกที่ทุกเวลาเพียงแค่มีอินเทอร์เน็ต
โปรโมชั่นและโบนัสมากมาย สำหรับผู้เล่นใหม่และลูกค้าประจำ สล็อต888 มีโปรโมชั่นต้อนรับ รวมถึงโบนัสพิเศษ เช่น ฟรีสปินและโบนัสเครดิตเพิ่ม ทำให้การเล่นเกมสล็อตกับเราเป็นเรื่องสนุกและมีโอกาสทำกำไรมากยิ่งขึ้น
ความปลอดภัยสูงสุด เรื่องความปลอดภัยเป็นสิ่งที่สล็อต888 ให้ความสำคัญเป็นอย่างยิ่ง เราใช้เทคโนโลยีการเข้ารหัสข้อมูลขั้นสูงเพื่อปกป้องข้อมูลส่วนบุคคลของลูกค้า ระบบฝากถอนเงินยังมีมาตรการรักษาความปลอดภัยที่เข้มงวด ทำให้ลูกค้ามั่นใจในการใช้บริการกับเรา
ทดลองเล่นสล็อตฟรี
สล็อต888 ยังมีบริการให้ผู้เล่นสามารถทดลองเล่นสล็อตได้ฟรี ซึ่งเป็นโอกาสที่ดีในการทดลองเล่นเกมต่าง ๆ ที่มีอยู่บนเว็บไซต์ เช่น Phoenix Rises, Dream Of Macau, Ways Of Qilin, Caishens Wins และเกมยอดนิยมอื่น ๆ ที่มีกราฟิกสวยงามและรูปแบบการเล่นที่น่าสนใจ
ไม่ว่าจะเป็นเกมแนวผจญภัย เช่น Rise Of Apollo, Dragon Hatch หรือเกมที่มีธีมแห่งความมั่งคั่งอย่าง Crypto Gold, Fortune Tiger, Lucky Piggy ทุกเกมได้รับการออกแบบมาเพื่อสร้างประสบการณ์การเล่นที่น่าจดจำและเต็มไปด้วยความสนุกสนาน
บทสรุป
สล็อต888 เป็นแพลตฟอร์มที่ครบเครื่องเรื่องเกมสล็อตออนไลน์ ด้วยฟีเจอร์ที่ทันสมัย โปรโมชั่นที่น่าสนใจ และระบบรักษาความปลอดภัยที่เข้มงวด ทำให้คุณมั่นใจได้ว่าการเล่นกับสล็อต888 จะเป็นประสบการณ์ที่ปลอดภัยและเต็มไปด้วยความสนุก
buy generic aciphex without dr prescription
Профессиональный сервисный центр по ремонту моноблоков iMac в Москве.
Мы предлагаем: сервис по ремонту аймаков
Наши мастера оперативно устранят неисправности вашего устройства в сервисе или с выездом на дом!
Легальная покупка диплома ПТУ с сокращенной программой обучения
wow-tour.ru/diplom-v-szhatyie-sroki-shag-k-uspehu-bez-zaderzhek
Веселые приколы и анекдоты http://shutki-anekdoty.ru/.
Смешные анекдоты http://shutki-anekdoty.ru/anekdoty.
can i purchase pregabalin prices
cost of proscar without dr prescription
Скачать приложение LineBet https://linebet-download.com последнюю версию для Android телефонов в формате APK. Обзор букмекерского приложения LineBet.
Скачать игры на Андроид https://appdatabase.ru бесплатно на русском языке. Откройте для себя новые приключения!
Скачать бесплатные приложения https://apprepository.ru и игры для Андроид. Все программы доступны на русском языке.
how to buy advair diskus no prescription
Алкопланет и alcoplanet предлагают удобную и быструю доставку алкоголя. Позвонив по номеру +74993850909, вы сможете получить любимые напитки быстро и без проблем. Доставка доступна по всей Москве, что гарантирует оперативное получение заказов.
Если вам нужна круглосуточная доставка, Алкопланет — это надежный партнер. Связавшись по +74993850909, вы сможете заказать алкоголь на дом без задержек. Благодаря alcoplanet, вы легко и просто организовать доставку на дом.
Алкопланет предлагает разнообразие алкогольных напитков с доставкой. С помощью +74993850909 можно заказать алкоголь круглосуточно в Москве. Услуга alcoplanet гарантирует комфорт и удобство клиентов, что делает процесс комфортным для каждого клиента.
Свежие и смешные анекдоты http://shutki-anekdoty.ru/anekdoty.
https://mahaksadrlab.ir/suprugi-reshili-otdohnut-v-grodno-i-snjali-13-2/
The latest news https://workgid.com from the world of tourism, travel and recreation. Tourism and travel – all the most interesting on the topic
Натяжные потолки https://formulapotolkov.ru заказать недорого потолок под ключ с установкой
ST666 – Nhà Cái Uy Tín Với Nhiều Khuyến Mãi Hấp Dẫn
ST666 là một trong những sòng bài trực tuyến uy tín nhất, mang đến cho các thành viên nhiều chương trình khuyến mãi đa dạng và hấp dẫn. Chúng tôi luôn hy vọng rằng những ưu đãi đặc biệt này sẽ mang lại trải nghiệm cá cược tuyệt vời cho tất cả thành viên của mình.
Khuyến Mãi Nạp Đầu Thưởng 100%
NO.1: Thưởng 100% lần nạp đầu tiên Thông thường, các khuyến mãi nạp tiền lần đầu đi kèm với yêu cầu vòng cược rất cao, thường từ 20 vòng trở lên. Tuy nhiên, ST666 hiểu rằng người chơi thường đắn đo khi quyết định nạp tiền vào sòng bài trực tuyến. Do đó, chúng tôi chỉ yêu cầu 8 vòng cược, cho phép người chơi rút tiền một cách nhanh chóng trong vòng 5 phút.
Thưởng 100% khi Đăng Nhập ST666
NO.2: Thưởng 16% mỗi ngày ST666 mang đến cho bạn một ưu đãi không thể bỏ lỡ. Mỗi khi bạn nạp tiền vào tài khoản hàng ngày, bạn sẽ được nhận thêm 16% số tiền nạp. Đây là cơ hội tuyệt vời dành cho những ai yêu thích cá cược trực tuyến và muốn gia tăng cơ hội chiến thắng của mình.
Bảo Hiểm Hoàn 10% Mỗi Ngày
NO.3: Bảo hiểm hoàn tiền 10% ST666 không chỉ hỗ trợ người chơi trong những lần may mắn mà còn luôn đồng hành khi bạn không gặp may. Chương trình khuyến mãi “bảo hiểm hoàn tiền 10% tổng tiền nạp mỗi ngày” là cách chúng tôi khích lệ và động viên tinh thần game thủ, giúp bạn tiếp tục hành trình chinh phục các thử thách cá cược.
Giới Thiệu Bạn Bè Thưởng 999K
NO.4: Giới thiệu bạn bè – Thưởng 999K Chương trình “Giới thiệu bạn bè” của ST666 giúp bạn có cơ hội cá cược cùng bạn bè và người thân. Không những vậy, bạn còn có thể nhận được phần thưởng lên đến 999K khi giới thiệu người bạn của mình tham gia ST666. Đây chính là một ưu đãi tuyệt vời giúp bạn vừa có thêm người đồng hành, vừa nhận được thưởng hấp dẫn.
Đăng Nhập Nhận Ngay 280K
NO.5: Điểm danh nhận thưởng 280K Nếu bạn là thành viên thường xuyên của ST666, hãy đừng quên nhấp vào hộp quà hàng ngày để điểm danh. Chỉ cần đăng nhập liên tục trong 7 ngày, cơ hội nhận thưởng 280K sẽ thuộc về bạn!
Kết Luận
ST666 luôn nỗ lực không ngừng để mang lại những chương trình khuyến mãi hấp dẫn và thiết thực nhất cho người chơi. Dù bạn là người mới hay đã gắn bó lâu năm với nền tảng, ST666 cam kết cung cấp trải nghiệm cá cược tốt nhất, an toàn và công bằng. Hãy tham gia ngay để không bỏ lỡ các cơ hội tuyệt vời từ ST666!