
Hello everybody!!
How are you doing in your holidays? Surely well, that’s why I bring you a very interesting topic and that can be quite curious to more than one. If you are getting bored on your holidays and you have a Raspberry Pi and an RTL-SDR (radio scanner) you can do it at home.
With these two stuff you can do a homemade flight radar and it works quite well, you learn to manage with Linux, libraries, dependencies, hardware, protocols and you will see your result in real time!
You will say, “I don’t have what it takes, besides, it is expensive”. Well, I say no, in addition to both devices can be used in countless applications and is one of the things that every hacker would like to have in his arsenal of tools. This whole procedure can be done under both Windows and Linux, so there is no excuse, so let’s do it.
Well, so that we know what the story is about, we are going to use the Dump1090 tool. This tool (among many other things) is responsible for processing the information of the ADS-B (Automatic dependent surveillance — broadcast) system that all or practically all airplanes have (it will begin to be mandatory in certain countries in 2020). This system is a cooperative surveillance technology in which an aircraft determines its position through satellite navigation and broadcasts it periodically, which allows it to be tracked. The information can be received by air traffic control ground stations as a replacement for secondary radar since it does not need to receive a signal from the ground to emit. Also, it can be received by other aircraft to provide knowledge of the situation and allow self-separation. Thanks to this system, our Raspberry Pi can be an air traffic radar! This system normally emits a signal at 1090 MHz and that our RTL-SDR can receive. 🙂
Well, what should I do or what do I need?
- A Raspberry Pi and its power supply, accompanied by an Ethernet cable. In my case, I have the Raspberry Pi 3 B kit.

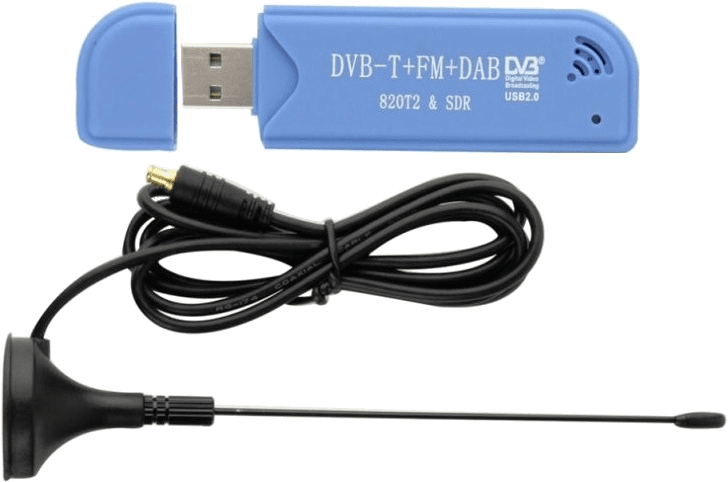
- A radiofrequency spectrometer, also known as RTL-SDR (Software Defined Radio). It generally uses the RTL2832U chip to process the signal received from the antenna. Someday I will talk more about this wonderful tool. In my case, I have DVB-T-SDR.
- A microSD card (with its adapter to the PC) for the Raspberry Pi. I use an 8 GB, which in this case is worth a lot. If you want to continue using it for other applications, it may fall short.
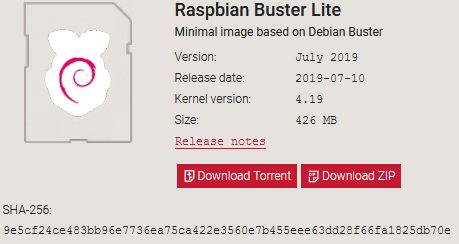
- Raspbian, the Debian-based Linux operating system that we will use in the Raspberry Pi. It can be downloaded for free from its official website. Being a task that requires nothing more than the Raspberry Pi and the RTL-SDR we will download the basic OS without graphic system (command line only). The advantages are that weighs less, we save the graphic part, since we will not use the HDMI output at all, and therefore neither the keyboard and mouse; with all this, we will save unnecessary processing and above all energy.
We already have everything you need, get to work!
To begin, we will have to mount the image on the microSD so that the Raspberry Pi can boot and use the microSD as persistent memory, (all changes made will be saved even if we turn off the Raspberry Pi).
This point can be made in many ways; the official website recommends the use of Etcher, which is valid for both Linux and Windows distributions, as it has a very friendly interface. I personally, I always use Rufus, it has never failed me, it is portable and it seems for me the best of all (to taste the colours), the bad thing is that it is only under Windows. But as I said, all the development of this procedure can be done both under Windows and under Linux, so there would be no problem. Choose the one you like best.
We connect our microSD card to the PC and in my case with Rufus, we run Rufus and select the image of the OS and the microSD. Do not select anything else, the rest are advanced options that do not come to the subject. Ready, let’s get started!

Once the process is finished, we will have the microSD with our Raspbian operating system installed, and if we look, we will have two partitions. The boot partition that is used to boot the system and the rootfs partition that is where the OS file system is located.
As I mentioned before, we will not use a keyboard or mouse since it is not necessary. This causes a problem and is that by default (for security) the SSH server is disabled and we would need physical access to our Raspberry Pi, and then enable it. But we can solve it, we just have to create an empty file with name “ssh” without extension in the boot partition.

Ready, when we start our RaspberryPi, we will have the SSH server enabled to connect from our PC. As expected, we need to have remote access to our Raspberry Pi, so it would be ideal to connect the ethernet cable (which usually comes with the router) to the physical Ethernet port of the Raspberry Pi. We introduce the microSD and connect the power supply to 5V. Here we could use or a mobile charger of at least 1 A although 2.4 A is recommended (since in the worst case it is the largest current that can be consumed), but we are safe, since this will not be our case, because we will only have consumption mainly our RTL-SDR, Broadcom processor and ethernet controller. We could also use a portable battery (powerbank) that normally have 1 A and 2.4 A output. Choose what suits you best.
After a few seconds after startup, we will only have to know the local IP assigned to our Raspberry Pi, and then connect using SSH protocol.
- Linux:
root@kali:/home/closer# netdiscover
root@kali:/home/closer# ssh 192.168.1.40 -l pi
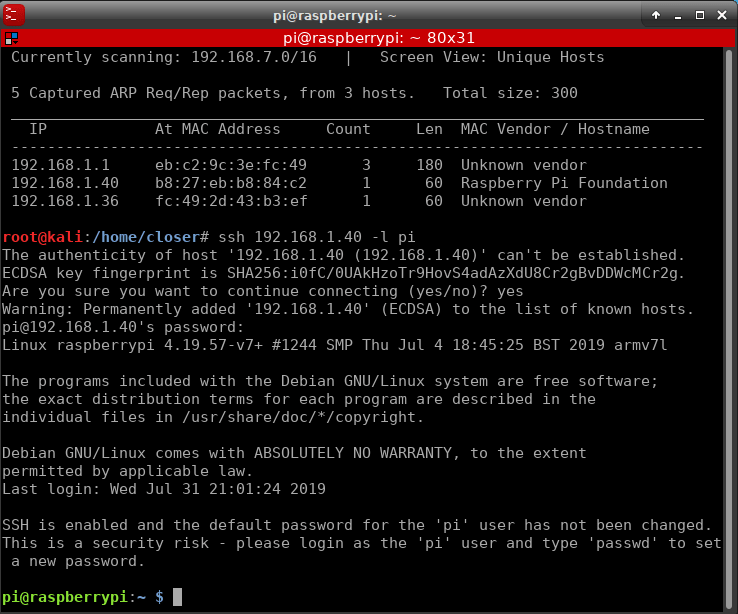
You will ask us for the password, which is raspberry and we will accept the request to connect as a custom fingerprint has been generated for the secure connection between our PC and our Raspberry Pi.
After accepting, we are already connected to our Raspberry Pi!
- Windows:
By default, Windows before Windows 10 does not bring any clients to connect via SSH, but there are tools like Puttythat makes us as a client. To download the portable version, just go to the “Alternative binary files” section and select our version of the binary “putty.exe” (x64 or x86). If you use Windows 10 (as of April 2018), the SSH client comes by default.
Once in our hands, in the command window we will launch:
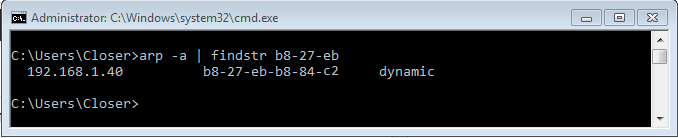
C:\Users\Closer> arp -a | findstr b8-27-eb
With “arp -a” we will show the ARP (Address Resolution Protocol) table that is responsible for associating dynamic and static IPs with MAC addresses. Since the ARP table can be a bit extensive and it is not clear what the IP of our Raspberry Pi is, we can filter it with “findstr b8-27-eb” since in the MAC address assignment industry each manufacturer is assigned a range MAC addresses, in this case, Raspberry Pi Foundation is assigned MAC addresses B8: 27: EB: xx: xx: xx. Therefore our exit could be such that:
Now, yes, knowing the IP to which we have to connect, we open Putty (if we have one), write the IP, declare that we want to connect by SSH with port 22 (default for TCP) and we will connect:

We will get the notice as before in Linux, to confirm the fingerprint for the secure connection, we accept, and we will have access to our Raspberry Pi, it will ask the user for the login that as you know is pi and the password raspberry.
If you have Windows 10, the command is the same as in Linux.
From here, it is already the same for both Linux and Windows, I will continue on Linux. Let’s go ahead.
First of all, do not forget to change the default password of the Raspberry Pi.
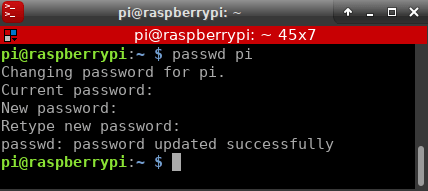
Primarily and as the image of our Raspberry Pi may have some time, that is, be slightly outdated (it has been a while since the release), and the content of the repositories may have changed, this, our Raspbian does not know. Therefore, it is advisable to update the list of packages, to have the most recent version of them and see which ones are necessary to update and to which version, if an installation is required.
pi@raspberrypi:~ $ sudo apt-get update
When our Raspbian already has the updated list of packages, it will be necessary to install the dependencies. Will you say dependencies on what? The dependencies that are definitely libraries (in this case packages) that are necessary to be able to install the tool with which we are going to play. 🙂
Thanks to the good repositories it will not be necessary to complicate our lives. Unless we want to download a specific library/package or a version that is not in the repo, the ideal would be to take the one they offer and install it, since they are libraries that are already more than tested and are packed (we save the process of compilation and what that entails, since for some libraries it is a bit tedious). We install the following libraries:G
pi@raspberrypi:~ $ sudo apt-get install -y debhelper libusb-1.0-0-dev librtlsdr-dev librtlsdr0 rtl-sdr lighttpd
If you have downloaded, for any reason, another release of Raspbian (with a graphic environment for example) it may be that one is already installed. For this case, those libraries are all necessary, and in fact, some are dependencies of other libraries and the order matters. With -y you will not ask for confirmation of installation and memory reservation in the microSD drive (all to “yes”).
Finally, we have to install the tool with which we will play. This tool is the well-known dump1090although throughout its life (its last development was 7 years ago) it has been mutating and Github users have been making forks of it and there are modified versions and with new features. There are a couple of companies that make extensive use of this tool and with their own modifications, in the end, I will tell you that they are going about. We will install the last one, called dump1090-mutability. I must say that it is not really the last one since FlightAware made a fork of this and has introduced new features, but I have opted for mutability because FA has adapted it to its modified OS. As I said, in the end, I will comment better on this.
Well, go ahead:
pi@raspberrypi:~ $ sudo apt-get install -y dump1090-mutability
If everything went well (which should), when the installation process is finished, the package configuration wizard is automatically launched. Where a window like the following will appear:

It will ask us that if we want it to be launched automatically when we start our Raspberry Pi, we indicate “Yes” if we want it to be that way, otherwise, we would have to launch it by hand every time we want to use it. As my intention is later to continue adding features to our Raspberry, I do.
On the other hand, this wizard has assigned us a default configuration in “/etc/default/dump1090-mutability“. At this point, two things can be done; if we do “dpkg-reconfigure dump1090-mutability” the wizard will appear again asking us one by one, a series of configurations/parameters (which we would mostly leave by default) that we could change them, or, edit the file on the previous route mentioned. So that I want not to extend this, I will leave the configuration found in “/etc/default/dump1090-mutability” that should be used so that we can have our flight radar with the minimum characteristics (which we could modify in the future).
The configuration file should look like this:
# dump1090-mutability configuration file
# this is a POSIX shell fragment.
# You can edit this file directly, or use
# "dpkg-reconfigure dump1090-mutability"
# Set to "yes" to start dump1090 on boot.
START_DUMP1090="yes"
# User to run dump1090 as.
DUMP1090_USER="dump1090"
# Logfile to log to
LOGFILE="/var/log/dump1090-mutability.log"
#
# Receiver options
#
# RTLSDR device index or serial number to use
# If set to "none", dump1090 will be started in --net-only mode
DEVICE="0"
# RTLSDR gain in dB.
# If set to "max" (the default) the maximum supported gain is used.
# If set to "agc", the tuner AGC is used to set the gain.
GAIN="max"
# RTLSDR frequency correction in PPM
PPM="0"
#
# Decoding options
#
# If yes, fixes messages with correctable CRC errors.
FIX_CRC="yes"
# If set, supplies a reference location for local position decoding.
LAT="LATITUDE"
LON="LONGITUDE"
# If set, provides the absolute maximum receiver range used to
# filter bad position reports, and to determine when local position
# decoding is safe to use. Specify this in nautical miles (NM).
MAX_RANGE="300"
#
# Networking options
#
# Port to listen on for raw (AVR-format) input connections. 0 disables.
RAW_INPUT_PORT="30001"
# Port to listen on for raw (AVR-format) output connections. 0 disables.
RAW_OUTPUT_PORT="30002"
# Port to listen on for SBS-format output connections. 0 disables.
SBS_OUTPUT_PORT="30003"
# Port to listen on for Beast-format input connections. 0 disables.
BEAST_INPUT_PORT="30004,30104"
# Port to listen on for Beast-format output connections. 0 disables.
BEAST_OUTPUT_PORT="30005"
# TCP heartbeat interval in seconds. 0 disables.
NET_HEARTBEAT="60"
# Minimum output buffer size per write, in bytes.
NET_OUTPUT_SIZE="500"
# Maximum buffering time before writing, in seconds.
NET_OUTPUT_INTERVAL="1"
# TCP buffer size, in bytes
NET_BUFFER="262144"
# Bind ports on a particular address. If unset, binds to all interfaces.
# This defaults to binding to localhost. If you need to allow remote
# connections, change this.
NET_BIND_ADDRESS=""
#
# Misc options
#
# Interval (in seconds) between logging stats to the logfile. 0 disables.
STATS_INTERVAL="3600"
# Path to write json state to (for use with an external webserver). Blank disables.
JSON_DIR="/run/dump1090-mutability"
# Interval between writing json state (in seconds). 0 disables.
JSON_INTERVAL="1"
# Accuracy of receiver location to write to json state, one of "exact" / "approximate" / "none"
JSON_LOCATION_ACCURACY="approximate"
# Set to yes to log all decoded messages
# This can get large fast!
LOG_DECODED_MESSAGES="no"
# Additional options that are passed to the Daemon.
EXTRA_ARGS=""
The white parameters are the default or not very relevant to what we want, and the blue ones are the ones that are really important to change, as the configuration says. Of course, do not forget to change the parameters LATITUDE and ALTITUDE of the configuration with the latitude and longitude of the location of your Raspberry Pi.
Finally, we must ensure that the use of the lighttpd library for dump1090 has been enabled, it should have been done at the end of the installation of the tool. In case it has not been enabled we would have to enable it and forced to restart the service with:
pi@raspberrypi:~ $ lighty-enable-mod dump1090
pi@raspberrypi:~ $ sudo service lighttpd force-reload
Finally, we restart the dump1090-mutability service. It can be done in several ways, such as the previous one from lighttpd, using service, but it could also be done from the Linux services administrator, systemctl. Choose the one you want, for this case it doesn’t matter.
pi@raspberrypi:~ $ sudo systemctl restart dump1090-mutability.service
We already have it all!
We go to the IP address of our Raspberry Pi to see the map.
In my case http://192.168.1.40/dump1090/gmap.html
Look how it looks!
And that’s how the system is!
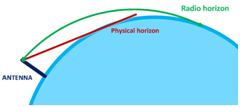
To who likes this world, I recommend you research and read more about this. In addition with Dump1090, you can do something else, such as adding altimetry traces on the map, since this also has its study. For example, we have used a distance of 300 nautical miles by default and that makes maximum use of the gain, etc., this is sometimes not the case or is not what we want, since it depends a lot on the circumstances in which we are located. As I said, this has its study, such as the refraction of waves, which will limit us as if we are in a low place, or with trees, the arrival of radio waves.A
In short, who likes this there are several platforms that are dedicated to this exclusively and are quite good, such as FlightRadar24 or Flighaware that as I mentioned already use their variations of Dump1090, in fact, they have operating systems specialized in this, that is an “all-in-one” that you install on your Raspberry Pi and with Internet access, send the data to the platforms, and make a WORLDWIDE radar. If you are interested, in each of the platforms, they tell you how to do it step by step.
I hope I explained clearly and that you liked it. If you liked this world, maybe one day I will make a post to capture the signal of a satellite that transmits images. 😏
See you in the next post! 😉
Happy Hacking!
Author: Rafael Moreno López.
Great work!
Thank you for sharing your info. I really appreciate your efforts and I am waiting for your next write ups thanks once again.
Hi there colleagues, its impressive post on the topic of
educationand entirely explained, keep it up all the time.
I admire you
Greetings I am so grateful I found your weblog, I really
found you by error, while I was browsing on Bing for something else,
Regardless I am here now and would just like to say kudos for a
remarkable post and a all round enjoyable blog (I also love
the theme/design), I don’t have time to browse it
all at the moment but I have saved it and also included your RSS feeds, so when I have time I
will be back to read a great deal more, Please do keep up the fantastic work.
hello there and thank you for your information – I have definitely picked up something new from right here.
I did however expertise a few technical
issues using this website, since I experienced to reload the site a lot of times previous to I could get it to load properly.
I had been wondering if your web host is OK?
Not that I’m complaining, but sluggish loading instances times will often affect your
placement in google and can damage your high-quality score
if ads and marketing with Adwords. Well I am adding this RSS to my email and can look out
for a lot more of your respective fascinating content.
Make sure you update this again very soon.
Having read this I believed it was rather enlightening.
I appreciate you taking the time and effort to put this content
together. I once again find myself personally spending a significant amount
of time both reading and leaving comments. But so what, it was
still worthwhile!
Come At Me Bro!
If you would like to increase your know-how just keep
visiting this web site and be updated with the newest news update posted here.
Beauty is just one of the beautiful features you have.
You two is perfect for each other.
Genuinely when someone doesn’t know afterward its up to other viewers that they will assist, so here it takes place.
Link exchange is nothing else but it is simply placing the other person’s webpage link on your page at suitable place and other person will also do same in favor of you.
That’s a perfect Gentleman pic.
I every time emailed this blog post page to all my contacts, since if like to read it after that my contacts will
too.
Wonderful blog! I found it while browsing on Yahoo News.
Do you have any suggestions on how to get listed in Yahoo News?
I’ve been trying for a while but I never seem to get there!
Appreciate it
Hi there very cool website!! Guy .. Excellent .. Amazing ..
I’ll bookmark your web site and take the feeds additionally?
I am satisfied to seek out a lot of helpful information here within the submit,
we need develop extra techniques on this regard, thank you for sharing.
. . . . .
Stunning story there. What happened after? Thanks!
Asking questions are really nice thing if you are not understanding something totally, except
this article provides pleasant understanding yet.
Hi! I’ve been following your web site for some time now and finally got the
courage to go ahead and give you a shout out from Humble Texas!
Just wanted to mention keep up the good work!
I am using the same DVB-T-SDR. Thank you for the information
order doxycycline tablets
I don’t know whether it’s just me or if perhaps everybody else encountering issues with your blog.
It seems like some of the text on your content
are running off the screen. Can someone else
please comment and let me know if this is happening to them
as well? This might be a issue with my internet browser because I’ve had this
happen before. Appreciate it
Hi to every one, it’s in fact a nice for me to pay a quick
visit this site, it consists of helpful Information.
Bel article, je l’ai partagé avec mes amis.
Good day! This is my 1st comment here so I just wanted to give a quick
shout out and tell you I truly enjoy reading through your
blog posts. Can you suggest any other blogs/websites/forums that deal with the same subjects?
Thanks!
Hello there! This is my first comment here so I just wanted to give a quick shout out and
tell you I truly enjoy reading through your articles.
Can you recommend any other blogs/websites/forums that deal with the
same subjects? Thank you!
Have you ever thought about adding a little bit more than just your articles?
I mean, what you say is valuable and all. However think
about if you added some great pictures or videos to give your
posts more, “pop”! Your content is excellent but with
pics and video clips, this website could definitely be one of the most beneficial in its niche.
Wonderful blog!
Greetings! I’ve been following your site for some time now and finally
got the courage to go ahead and give you a shout out from Austin Texas!
Just wanted to mention keep up the good job!
Greetings from California! I’m bored at work so
I decided to browse your site on my iphone during lunch break.
I enjoy the info you provide here and can’t wait to take
a look when I get home. I’m surprised at how fast your blog loaded on my
cell phone .. I’m not even using WIFI, just 3G .. Anyways, superb blog!
yingpla999 เกมสล็อตออนไลน์ช่วยทำให้ผู้เล่นสนุกสนานกับการเล่นสล็อตได้โดยไม่ต้องออกมาจากบ้าน เว็บสล็อตออนไลน์แล้วก็เว็บ PG SLOT แต่แล้วเมื่อตอนปี 2023 รวมยอดเยี่ยมเกมไว้ให้
otc prednisone cream: http://prednisone1st.store/# prednisone in uk
prednisone 20 mg tablet price: https://prednisone1st.store/# prednisone buying
online date: dating chat free – match dating site
ed pills: ed pills – what are ed drugs
order cheap propecia without prescription generic propecia no prescription
https://cheapestedpills.com/# ed medications online
canadian pharmacy no rx needed canadian pharmacy no scripts
Actual trends of drug.
can i buy generic mobic: can i get generic mobic pills – can i get generic mobic tablets
Get information now.
buy amoxicillin 500mg amoxicillin generic – buy amoxicillin 500mg usa
canada pharmacy online canadian pharmacy meds
cost of generic mobic: can i order generic mobic without dr prescription – buy cheap mobic no prescription
certified canadian pharmacy canadian pharmacy scam
legit canadian pharmacy best mail order pharmacy canada
https://mobic.store/# get mobic without a prescription
can you buy mobic without rx: cost generic mobic without prescription – can i purchase mobic without a prescription
buying generic propecia without rx cost of generic propecia online
canadian drug pharmacy canada online pharmacy
medicine for impotence: ed pills for sale – top ed pills
buying prescription drugs in mexico online: п»їbest mexican online pharmacies – purple pharmacy mexico price list
https://certifiedcanadapharm.store/# canadian pharmacy online store
http://certifiedcanadapharm.store/# canadian pharmacy sarasota
canadian pharmacies compare: canadian pharmacies comparison – canadian pharmacy king
https://indiamedicine.world/# online pharmacy india
mexican mail order pharmacies: mexican mail order pharmacies – purple pharmacy mexico price list
https://indiamedicine.world/# online pharmacy india
http://certifiedcanadapharm.store/# canada drugs
http://indiamedicine.world/# top 10 online pharmacy in india
ivermectin cream: ivermectin 3 mg tabs – ivermectin usa price
http://gabapentin.pro/# neurontin medicine
https://stromectolonline.pro/# ivermectin cream cost
ivermectin lice oral: buy ivermectin for humans uk – ivermectin 400 mg brands
zithromax for sale online: where can i get zithromax over the counter – zithromax 250 mg pill
http://azithromycin.men/# zithromax cost uk
ivermectin 250ml: ivermectin 18mg – buy ivermectin
buy antibiotics: buy antibiotics – Over the counter antibiotics for infection
https://ed-pills.men/# ed pills otc
buy paxlovid online: paxlovid generic – paxlovid pharmacy
http://ciprofloxacin.ink/# cipro
https://misoprostol.guru/# cytotec abortion pill
http://lisinopril.pro/# lisinopril price in india
mexico pharmacies prescription drugs pharmacies in mexico that ship to usa mexican pharmaceuticals online
reputable indian online pharmacy top 10 pharmacies in india online pharmacy india
http://mexicanpharmacy.guru/# mexican online pharmacies prescription drugs
п»їlegitimate online pharmacies india: india pharmacy – cheapest online pharmacy india
mail order pharmacy india: top online pharmacy india – indian pharmacy paypal
https://pharmacieenligne.icu/# Acheter mГ©dicaments sans ordonnance sur internet
http://edpharmacie.pro/# Pharmacie en ligne sans ordonnance
п»їfarmacia online migliore: viagra prezzo generico – farmaci senza ricetta elenco
http://edapotheke.store/# online apotheke preisvergleich
indian pharmacy paypal: india online pharmacy – п»їlegitimate online pharmacies india
mexico drug stores pharmacies: reputable mexican pharmacies online – mexico pharmacies prescription drugs
canadian pharmacy near me: canadian drugs online – canadian pharmacy online ship to usa
mexican drugstore online: mexico drug stores pharmacies – mexican online pharmacies prescription drugs
canadianpharmacyworld: best canadian online pharmacy – canadian pharmacy prices
purchase zithromax online buy azithromycin over the counter zithromax 500 mg lowest price pharmacy online
A universal solution for all pharmaceutical needs. buy doxycycline 100mg capsules online: buy doxycycline online – cost of doxycycline prescription 100mg
They’re at the forefront of international pharmaceutical innovations. http://azithromycinotc.store/# zithromax pill
zithromax prescription online azithromycin 500 mg buy online purchase zithromax z-pak
https://doxycyclineotc.store/# can you buy doxycycline over the counter in india
The pharmacists are always updated with the latest in medicine. https://mexicanpharmacy.site/# reputable mexican pharmacies online
mexican mail order pharmacies : pharmacy in mexico – buying prescription drugs in mexico
mexico drug stores pharmacies – mexican drugstore – best online pharmacies in mexico
https://canadapharmacy24.pro/# canadian family pharmacy
https://indiapharmacy24.pro/# cheapest online pharmacy india
https://indiapharmacy24.pro/# online shopping pharmacy india
https://paxlovid.bid/# paxlovid pharmacy
how much is ivermectin: ivermectin 1%cream – ivermectin 500mg
п»їpaxlovid: buy paxlovid online – paxlovid generic
sildenafil over the counter Cheap generic Viagra online Viagra online price
cheap viagra order viagra Viagra online price
http://levitra.eus/# Vardenafil online prescription
https://cialis.foundation/# Cialis 20mg price in USA
Viagra generic over the counter Cheap generic Viagra online order viagra
Kamagra Oral Jelly Kamagra tablets buy kamagra online usa
http://kamagra.icu/# Kamagra 100mg
Generic Cialis price Cialis without a doctor prescription cheapest cialis
https://kamagra.icu/# sildenafil oral jelly 100mg kamagra
Levitra 20 mg for sale п»їLevitra price Levitra 20 mg for sale
https://kamagra.icu/# Kamagra Oral Jelly
Buy Vardenafil online Buy Vardenafil 20mg online п»їLevitra price
http://kamagra.icu/# Kamagra 100mg price
http://canadapharmacy.guru/# best canadian online pharmacy reviews canadapharmacy.guru
purple pharmacy mexico price list: mexican border pharmacies shipping to usa – medicine in mexico pharmacies mexicanpharmacy.company
best online canadian pharmacy: canadian pharmacy phone number – canada pharmacy online canadapharmacy.guru
https://mexicanpharmacy.company/# medicine in mexico pharmacies mexicanpharmacy.company
Online medicine order: best online pharmacy india – top online pharmacy india indiapharmacy.pro
http://indiapharmacy.pro/# reputable indian online pharmacy indiapharmacy.pro
http://canadapharmacy.guru/# pharmacy in canada canadapharmacy.guru
top online pharmacy india: indian pharmacies safe – world pharmacy india indiapharmacy.pro
india pharmacy: india pharmacy – top online pharmacy india indiapharmacy.pro
https://indiapharmacy.pro/# indian pharmacy paypal indiapharmacy.pro
buying prescription drugs in mexico online: reputable mexican pharmacies online – mexican mail order pharmacies mexicanpharmacy.company
https://mexicanpharmacy.company/# mexican drugstore online mexicanpharmacy.company
https://canadapharmacy.guru/# canadian online pharmacy canadapharmacy.guru
http://indiapharmacy.pro/# best online pharmacy india indiapharmacy.pro
purple pharmacy mexico price list: mexican mail order pharmacies – mexico pharmacies prescription drugs mexicanpharmacy.company
https://mexicanpharmacy.company/# mexican mail order pharmacies mexicanpharmacy.company
medicine in mexico pharmacies: mexican pharmaceuticals online – buying from online mexican pharmacy mexicanpharmacy.company
http://indiapharmacy.pro/# best online pharmacy india indiapharmacy.pro
canadian pharmacy tampa: canadian pharmacy checker – canadian mail order pharmacy canadapharmacy.guru
http://canadapharmacy.guru/# canadian pharmacy world canadapharmacy.guru
reputable mexican pharmacies online: mexican pharmaceuticals online – mexican rx online mexicanpharmacy.company
https://canadapharmacy.guru/# buy canadian drugs canadapharmacy.guru
buying from online mexican pharmacy: reputable mexican pharmacies online – mexican online pharmacies prescription drugs mexicanpharmacy.company
http://canadapharmacy.guru/# is canadian pharmacy legit canadapharmacy.guru
https://doxycycline.sbs/# 100mg doxycycline
https://doxycycline.sbs/# doxycycline generic
http://amoxil.world/# amoxicillin online canada
http://amoxil.world/# buying amoxicillin in mexico
http://doxycycline.sbs/# doxycycline generic
http://amoxil.world/# how to get amoxicillin
http://prednisone.digital/# can i buy prednisone online without a prescription
https://amoxil.world/# azithromycin amoxicillin
buy prednisone online paypal: prescription prednisone cost – prednisone 50 mg tablet cost
cost of clomid without insurance: how to get clomid for sale – cost of clomid without insurance
http://withoutprescription.guru/# best non prescription ed pills
sildenafil without a doctor’s prescription: legal to buy prescription drugs without prescription – buy prescription drugs from canada cheap
https://mexicopharm.shop/# buying from online mexican pharmacy
ed drugs list: herbal ed treatment – buying ed pills online
https://withoutprescription.guru/# ed meds online without doctor prescription
best online pharmacy india: indian pharmacy online – india pharmacy mail order
cheapest online pharmacy india: online pharmacy india – india pharmacy
https://withoutprescription.guru/# viagra without doctor prescription
canadian pharmacy 24h com: canadian pharmacy near me – canadian pharmacy prices
Online medicine home delivery: top 10 online pharmacy in india – pharmacy website india
http://canadapharm.top/# canada online pharmacy
canadian pharmacy prices: Accredited Canadian and International Online Pharmacies – best online canadian pharmacy
https://withoutprescription.guru/# mexican pharmacy without prescription
treatment for ed: non prescription erection pills – cheapest ed pills online
https://levitra.icu/# Levitra 10 mg buy online
https://sildenafil.win/# buy canadian sildenafil
Kamagra 100mg price: buy Kamagra – super kamagra
http://kamagra.team/# buy kamagra online usa
https://doxycycline.forum/# doxycycline 75 mg capsules
zithromax 1000 mg pills buy zithromax canada zithromax pill
https://azithromycin.bar/# how to get zithromax over the counter
generic zithromax 500mg zithromax z-pak zithromax online paypal
https://azithromycin.bar/# zithromax for sale us
amoxicillin buy canada how to get amoxicillin can you buy amoxicillin over the counter in canada
lisinopril 5 mg uk price: Over the counter lisinopril – zestril 5 mg india
http://doxycycline.forum/# buy doxycycline 100mg uk
can you buy zithromax online buy zithromax zithromax tablets
http://amoxicillin.best/# amoxicillin online without prescription
ciprofloxacin 500 mg tablet price buy ciprofloxacin over the counter cipro for sale
pharmacies in mexico that ship to usa: mexico pharmacy – buying prescription drugs in mexico online
https://mexicopharmacy.store/# reputable mexican pharmacies online
canadian drug stores: accredited canadian pharmacy – buy drugs from canada
ссылка визитка
Paxlovid over the counter https://paxlovid.club/# paxlovid buy
farmaci senza ricetta elenco: Cialis senza ricetta – farmacia online migliore
viagra generico recensioni: viagra online siti sicuri – pillole per erezione immediata
http://avanafilit.icu/# farmacie online affidabili
viagra generico in farmacia costo: viagra consegna in 24 ore pagamento alla consegna – pillole per erezione immediata
comprare farmaci online con ricetta: farmacia online – comprare farmaci online con ricetta
farmacia online miglior prezzo: avanafil prezzo in farmacia – farmacia online migliore
farmacie online affidabili: avanafil generico prezzo – migliori farmacie online 2023
top farmacia online: farmacia online spedizione gratuita – acquisto farmaci con ricetta
http://tadalafilit.store/# migliori farmacie online 2023
farmacia online più conveniente: avanafil prezzo – farmacia online
farmacie online sicure: avanafil generico prezzo – п»їfarmacia online migliore
acquistare farmaci senza ricetta: avanafil prezzo in farmacia – acquisto farmaci con ricetta
viagra originale recensioni: viagra prezzo – esiste il viagra generico in farmacia
купить бетон
farmacie online affidabili: farmacie online sicure – comprare farmaci online all’estero
https://tadalafilit.store/# farmacia online senza ricetta
farmacie online sicure: farmacia online spedizione gratuita – farmaci senza ricetta elenco
farmacia online più conveniente: kamagra gel prezzo – farmacie online affidabili
farmacia online: avanafil generico prezzo – comprare farmaci online all’estero
acquisto farmaci con ricetta: dove acquistare cialis online sicuro – top farmacia online
farmacia online migliore: farmacia online – farmacie online affidabili
farmacie online autorizzate elenco: Farmacie a milano che vendono cialis senza ricetta – farmaci senza ricetta elenco
acquisto farmaci con ricetta: avanafil spedra – acquisto farmaci con ricetta
https://avanafilit.icu/# farmacie on line spedizione gratuita
farmacia online migliore: kamagra oral jelly consegna 24 ore – migliori farmacie online 2023
comprare farmaci online con ricetta: comprare avanafil senza ricetta – farmacie online autorizzate elenco
dove acquistare viagra in modo sicuro: alternativa al viagra senza ricetta in farmacia – viagra generico recensioni
viagra cosa serve: viagra prezzo – viagra consegna in 24 ore pagamento alla consegna
acquistare farmaci senza ricetta: kamagra gel – farmacie online autorizzate elenco
farmacia online miglior prezzo: kamagra – farmacia online migliore
https://farmaciait.pro/# acquistare farmaci senza ricetta
farmaci senza ricetta elenco: avanafil generico – farmacie on line spedizione gratuita
farmacie online affidabili: kamagra gold – farmacie online affidabili
farmacie online sicure: comprare avanafil senza ricetta – farmacie online affidabili
alternativa al viagra senza ricetta in farmacia: sildenafil 100mg prezzo – cialis farmacia senza ricetta
farmacie online autorizzate elenco: comprare farmaci online all’estero – migliori farmacie online 2023
https://kamagraes.site/# farmacia online internacional
http://sildenafilo.store/# sildenafilo cinfa precio
http://kamagraes.site/# farmacia online envÃo gratis
comprar viagra en espaГ±a comprar viagra contrareembolso 48 horas viagra online cerca de toledo
https://tadalafilo.pro/# farmacia barata
https://farmacia.best/# farmacias baratas online envÃo gratis
farmacia 24h vardenafilo farmacias baratas online envГo gratis
http://tadalafilo.pro/# farmacia online envÃo gratis
https://sildenafilo.store/# sildenafilo cinfa 100 mg precio farmacia
farmacias online seguras en espaГ±a comprar cialis original farmacia online barata
https://kamagraes.site/# farmacia online madrid
http://tadalafilo.pro/# farmacia online internacional
http://vardenafilo.icu/# farmacias online baratas
https://sildenafilo.store/# sildenafilo cinfa 25 mg precio
http://kamagraes.site/# farmacia online envÃo gratis
https://vardenafilo.icu/# farmacias online baratas
farmacia online internacional farmacia online envio gratis murcia farmacia online 24 horas
http://kamagraes.site/# farmacia online
http://tadalafilo.pro/# farmacias online seguras
http://tadalafilo.pro/# farmacias online seguras en españa
https://farmacia.best/# farmacia online madrid
https://kamagraes.site/# farmacia online 24 horas
farmacias online seguras en espaГ±a farmacia online barata farmacias online baratas
http://farmacia.best/# farmacias online seguras
http://kamagraes.site/# farmacias online baratas
https://tadalafilo.pro/# farmacia barata
https://tadalafilo.pro/# farmacia online internacional
http://kamagraes.site/# farmacia online madrid
farmacia online internacional Levitra Bayer farmacia online internacional
https://farmacia.best/# farmacia online madrid
http://farmacia.best/# farmacia online 24 horas
купить бетон раменское
https://tadalafilo.pro/# farmacia online
http://kamagraes.site/# farmacias online seguras en españa
http://vardenafilo.icu/# farmacias online seguras en españa
п»їfarmacia online farmacia online madrid farmacia online 24 horas
https://sildenafilo.store/# viagra online gibraltar
http://sildenafilo.store/# sildenafilo sandoz 100 mg precio
https://tadalafilo.pro/# farmacia online
http://sildenafilo.store/# sildenafilo 50 mg precio sin receta
farmacia online internacional comprar cialis online sin receta farmacia barata
http://tadalafilo.pro/# farmacia envÃos internacionales
viagra precio 2022: sildenafilo precio – comprar viagra en espaГ±a amazon
http://levitrafr.life/# acheter médicaments à l’étranger
Pharmacie en ligne livraison gratuite: achat kamagra – Pharmacie en ligne livraison 24h
http://kamagrafr.icu/# Pharmacie en ligne pas cher
farmacia online barata: Comprar Cialis sin receta – farmacias online seguras en espaГ±a
Viagra en france livraison rapide Meilleur Viagra sans ordonnance 24h Viagra gГ©nГ©rique sans ordonnance en pharmacie
http://viagrasansordonnance.store/# Viagra sans ordonnance 24h Amazon
http://pharmacieenligne.guru/# pharmacie en ligne
http://kamagrafr.icu/# acheter médicaments à l’étranger
pharmacie ouverte: Pharmacie en ligne France – п»їpharmacie en ligne
http://viagrasansordonnance.store/# Viagra générique sans ordonnance en pharmacie
farmacias online seguras en espaГ±a: mejores farmacias online – farmacia online madrid
acheter medicament a l etranger sans ordonnance Pharmacie en ligne sans ordonnance Pharmacies en ligne certifiГ©es
https://kamagrafr.icu/# Pharmacie en ligne livraison gratuite
Viagra homme sans prescription: Acheter du Viagra sans ordonnance – Viagra 100 mg sans ordonnance
farmacia online barata: Levitra precio – farmacias baratas online envГo gratis
https://kamagrafr.icu/# pharmacie en ligne
https://kamagrafr.icu/# pharmacie ouverte
Viagra sans ordonnance livraison 48h Viagra sans ordonnance 24h Viagra vente libre pays
https://kamagrafr.icu/# Pharmacie en ligne France
https://kamagrafr.icu/# Pharmacies en ligne certifiées
https://cialissansordonnance.pro/# Pharmacie en ligne livraison 24h
п»їpharmacie en ligne: cialis sans ordonnance – Pharmacie en ligne livraison gratuite
https://viagrasansordonnance.store/# Viagra en france livraison rapide
https://levitrafr.life/# pharmacie en ligne
Pharmacie en ligne sans ordonnance kamagra oral jelly pharmacie ouverte 24/24
https://cialissansordonnance.pro/# acheter médicaments à l’étranger
http://potenzmittel.men/# online apotheke preisvergleich
https://potenzmittel.men/# п»їonline apotheke
https://viagrakaufen.store/# Viagra kaufen gГјnstig Deutschland
https://apotheke.company/# online apotheke versandkostenfrei
http://apotheke.company/# internet apotheke
https://apotheke.company/# online-apotheken
https://viagrakaufen.store/# Sildenafil kaufen online
http://viagrakaufen.store/# Viagra rezeptfreie Länder
mexico pharmacies prescription drugs best mexican online pharmacies reputable mexican pharmacies online
buying prescription drugs in mexico reputable mexican pharmacies online mexico pharmacies prescription drugs
pharmacies in mexico that ship to usa mexican pharmacy best online pharmacies in mexico
https://mexicanpharmacy.cheap/# mexican rx online
medicine in mexico pharmacies mexican online pharmacies prescription drugs mexican mail order pharmacies
mexican drugstore online reputable mexican pharmacies online mexican pharmacy
medication from mexico pharmacy mexican drugstore online mexico pharmacy
http://mexicanpharmacy.cheap/# buying prescription drugs in mexico
reputable mexican pharmacies online best mexican online pharmacies best mexican online pharmacies
mexican rx online mexican border pharmacies shipping to usa buying prescription drugs in mexico online
best mexican online pharmacies buying prescription drugs in mexico mexico drug stores pharmacies
buying prescription drugs in mexico online purple pharmacy mexico price list mexican rx online
https://mexicanpharmacy.cheap/# mexican border pharmacies shipping to usa
mexico drug stores pharmacies purple pharmacy mexico price list medicine in mexico pharmacies
mexico pharmacy purple pharmacy mexico price list mexican online pharmacies prescription drugs
mexico pharmacies prescription drugs mexican pharmaceuticals online mexican pharmaceuticals online
mexican online pharmacies prescription drugs buying prescription drugs in mexico medication from mexico pharmacy
canadian pharmacy service canadian pharmacy meds – canada drugs reviews canadiandrugs.tech
https://canadiandrugs.tech/# legitimate canadian pharmacies canadiandrugs.tech
http://edpills.tech/# best male ed pills edpills.tech
https://indiapharmacy.guru/# cheapest online pharmacy india indiapharmacy.guru
indian pharmacy reputable indian online pharmacy – indianpharmacy com indiapharmacy.guru
https://canadiandrugs.tech/# precription drugs from canada canadiandrugs.tech
http://indiapharmacy.guru/# buy prescription drugs from india indiapharmacy.guru
http://canadiandrugs.tech/# canadian family pharmacy canadiandrugs.tech
best india pharmacy buy medicines online in india – reputable indian online pharmacy indiapharmacy.guru
http://edpills.tech/# best ed medication edpills.tech
https://edpills.tech/# best over the counter ed pills edpills.tech
http://indiapharmacy.guru/# cheapest online pharmacy india indiapharmacy.guru
escrow pharmacy canada canada pharmacy online – canada pharmacy world canadiandrugs.tech
https://edpills.tech/# drugs for ed edpills.tech
https://indiapharmacy.guru/# reputable indian online pharmacy indiapharmacy.guru
indian pharmacy online india pharmacy mail order – buy medicines online in india indiapharmacy.guru
https://edpills.tech/# the best ed pill edpills.tech
https://canadiandrugs.tech/# legit canadian pharmacy canadiandrugs.tech
canadian pharmacy phone number canadian pharmacy 1 internet online drugstore – canadian pharmacy prices canadiandrugs.tech
http://indiapharmacy.guru/# mail order pharmacy india indiapharmacy.guru
https://canadiandrugs.tech/# canadian pharmacy oxycodone canadiandrugs.tech
https://canadiandrugs.tech/# canadian pharmacy prices canadiandrugs.tech
canadian drug stores canadian pharmacy prices – certified canadian pharmacy canadiandrugs.tech
https://indiapharmacy.guru/# indian pharmacy online indiapharmacy.guru
paxlovid: paxlovid cost without insurance – paxlovid india
amoxicillin 500 mg: amoxicillin 500mg capsules uk – can i buy amoxicillin over the counter in australia
https://paxlovid.win/# paxlovid covid
paxlovid pill: paxlovid buy – paxlovid cost without insurance
paxlovid: buy paxlovid online – paxlovid covid
can i get cheap clomid pills: can you get clomid without insurance – how to get clomid price
can i buy generic clomid online: how to buy generic clomid without prescription – where buy cheap clomid without insurance
https://prednisone.bid/# buy prednisone 5mg canada
buy ciprofloxacin: cipro 500mg best prices – buy generic ciprofloxacin
paxlovid cost without insurance: paxlovid cost without insurance – paxlovid india
https://prednisone.bid/# prednisone for sale without a prescription
can i buy cheap clomid without dr prescription: how can i get generic clomid without dr prescription – cost generic clomid for sale
paxlovid: paxlovid for sale – paxlovid cost without insurance
can you get cheap clomid without rx: where can i buy clomid prices – cheap clomid no prescription
https://amoxil.icu/# can you buy amoxicillin over the counter in canada
amoxicillin 500 mg without prescription: order amoxicillin uk – medicine amoxicillin 500
http://ciprofloxacin.life/# cipro ciprofloxacin
cipro online no prescription in the usa: ciprofloxacin over the counter – cipro pharmacy
бетон щелково
https://clomid.site/# where to buy cheap clomid pill
https://amoxil.icu/# price for amoxicillin 875 mg
where to get cheap clomid: where can i buy clomid without insurance – where can i buy generic clomid without insurance
http://ciprofloxacin.life/# buy cipro cheap
can i order cheap clomid without rx can i order cheap clomid – where to buy generic clomid
clomid cost of cheap clomid no prescription – cost of clomid pills
http://amoxil.icu/# purchase amoxicillin online without prescription
prednisone for sale online: prednisone best price – online prednisone
where can i buy prednisone without a prescription: order prednisone 10mg – 50mg prednisone tablet
https://ciprofloxacin.life/# buy cipro cheap
https://ciprofloxacin.life/# cipro for sale
https://amoxil.icu/# amoxicillin no prescipion
over the counter prednisone cheap: prednisone uk – prednisone uk over the counter
https://cytotec.icu/# cytotec abortion pill
where to purchase doxycycline: doxycycline 200 mg – doxycycline hyclate 100 mg cap
cytotec pills buy online: Cytotec 200mcg price – п»їcytotec pills online
doxycycline 100mg tablets: generic for doxycycline – buy doxycycline
https://lisinoprilbestprice.store/# lisinopril 500 mg
doxycycline prices: 200 mg doxycycline – doxycycline 50mg
https://lisinoprilbestprice.store/# lisinopril 20 mg generic
doxy 200: buy cheap doxycycline – doxycycline tablets
buy cytotec pills online cheap: buy cytotec pills – buy cytotec online fast delivery
https://lisinoprilbestprice.store/# rx lisinopril
can you buy zithromax over the counter in australia: zithromax 600 mg tablets – zithromax 500 mg
doxycycline mono: doxycycline 100mg tablets – buy cheap doxycycline
top 10 online pharmacy in india Online India pharmacy indian pharmacy paypal indiapharm.llc
http://canadapharm.life/# canadian pharmacy review canadapharm.life
mexico pharmacy: mexican pharmacy – best online pharmacies in mexico mexicopharm.com
reliable canadian pharmacy reviews: Canadian pharmacy best prices – canada pharmacy world canadapharm.life
canadian pharmacy no rx needed: Canada Drugs Direct – canadapharmacyonline canadapharm.life
indianpharmacy com online shopping pharmacy india п»їlegitimate online pharmacies india indiapharm.llc
best online pharmacies in mexico: Medicines Mexico – buying prescription drugs in mexico online mexicopharm.com
Online medicine order: Medicines from India to USA online – indian pharmacy online indiapharm.llc
indian pharmacy paypal: India pharmacy of the world – world pharmacy india indiapharm.llc
http://canadapharm.life/# canadian online pharmacy canadapharm.life
Levitra 10 mg buy online: Buy generic Levitra online – Vardenafil price
tadalafil online australia tadalafil without a doctor prescription generic tadalafil daily
sildenafil generic drug cost: Buy generic 100mg Sildenafil online – rx sildenafil tablets
Levitra 20 mg for sale: Buy Vardenafil 20mg – Levitra 10 mg buy online
discount tadalafil 20mg: tadalafil without a doctor prescription – canada tadalafil generic
sildenafil 100mg prescription: Buy generic 100mg Sildenafil online – sildenafil 100mg usa
super kamagra buy kamagra п»їkamagra
Kamagra 100mg price: Kamagra 100mg price – buy kamagra online usa
cheap kamagra: buy kamagra – buy kamagra online usa
https://sildenafildelivery.pro/# sildenafil 36
cheapest ed pills: erection pills viagra online – cheap erectile dysfunction pill
https://amoxil.guru/# where to buy amoxicillin 500mg without prescription
paxlovid india buy paxlovid online paxlovid buy
https://clomid.auction/# how can i get clomid for sale
paxlovid buy paxlovid pharmacy Paxlovid buy online
http://prednisone.auction/# prednisolone prednisone
https://clomid.auction/# where to buy clomid without a prescription
cheap clomid now: clomid generic – can you get generic clomid prices
https://prednisone.auction/# how can i order prednisone
http://stromectol.guru/# ivermectin topical
paxlovid pharmacy paxlovid price without insurance paxlovid covid
http://clomid.auction/# buying cheap clomid without insurance
cost cheap propecia no prescription: Best place to buy propecia – buying propecia without a prescription
http://azithromycin.store/# where can you buy zithromax
lasix 100mg Buy Lasix lasix side effects
propecia price: buy cheap propecia without rx – order generic propecia no prescription
lasix 100 mg: Buy Furosemide – lasix 100mg
https://azithromycin.store/# zithromax capsules price
https://azithromycin.store/# can you buy zithromax online
can you buy zithromax over the counter: cheapest azithromycin – zithromax over the counter canada
http://furosemide.pro/# lasix furosemide 40 mg
zithromax 250 mg australia: buy zithromax over the counter – zithromax cost australia
http://misoprostol.shop/# cytotec online
lasix medication: Buy Furosemide – lasix medication
buying propecia tablets: Buy finasteride 1mg – get cheap propecia tablets
https://lisinopril.fun/# how much is lisinopril
purchase zithromax online: Azithromycin 250 buy online – generic zithromax 500mg
http://furosemide.pro/# lasix 100mg
lisinopril 10 mg no prescription: High Blood Pressure – zestril tablet
https://misoprostol.shop/# order cytotec online
cost of generic propecia without rx: buy propecia – generic propecia pills
https://finasteride.men/# buy cheap propecia for sale
lasix uses: Buy Lasix – furosemide 40mg
https://furosemide.pro/# buy lasix online
http://azithromycin.store/# zithromax online paypal
zestoretic: over the counter lisinopril – prinivil 5 mg
http://azithromycin.store/# zithromax 500 mg lowest price pharmacy online
п»їfarmacia online migliore: comprare farmaci online all’estero – comprare farmaci online con ricetta
https://tadalafilitalia.pro/# acquistare farmaci senza ricetta
alternativa al viagra senza ricetta in farmacia: viagra generico in farmacia costo – cerco viagra a buon prezzo
comprare farmaci online con ricetta: kamagra gold – farmacia online senza ricetta
п»їfarmacia online migliore: farmacia online migliore – farmacia online piГ№ conveniente
http://tadalafilitalia.pro/# comprare farmaci online all’estero
п»їfarmacia online migliore: farmacia online piu conveniente – comprare farmaci online all’estero
http://avanafilitalia.online/# migliori farmacie online 2023
п»їfarmacia online migliore: farmacia online migliore – farmacia online miglior prezzo
http://avanafilitalia.online/# farmacie on line spedizione gratuita
farmacia online piГ№ conveniente: Tadalafil generico – farmacie online autorizzate elenco
viagra online in 2 giorni: sildenafil 100mg prezzo – viagra originale recensioni
https://sildenafilitalia.men/# viagra online in 2 giorni
viagra online consegna rapida: viagra online spedizione gratuita – pillole per erezione immediata
farmaci senza ricetta elenco: Farmacie che vendono Cialis senza ricetta – farmacia online migliore
https://avanafilitalia.online/# migliori farmacie online 2023
farmacie online sicure: avanafil prezzo in farmacia – farmacia online miglior prezzo
http://tadalafilitalia.pro/# migliori farmacie online 2023
best canadian online pharmacy best canadian pharmacy canadian pharmacy phone number
mexican pharmaceuticals online: medication from mexico pharmacy – mexican online pharmacies prescription drugs
https://mexicanpharm.store/# pharmacies in mexico that ship to usa
reputable indian online pharmacy: online shopping pharmacy india – best online pharmacy india
Online medicine home delivery: top 10 online pharmacy in india – best india pharmacy
https://mexicanpharm.store/# medicine in mexico pharmacies
buying prescription drugs in mexico online: mexico drug stores pharmacies – pharmacies in mexico that ship to usa
http://mexicanpharm.store/# mexican drugstore online
canadian pharmacy world ed meds online canada canadian world pharmacy
canadian pharmacy mall: canadian family pharmacy – canadian pharmacy near me
canada drugstore pharmacy rx: precription drugs from canada – canadian drug
https://mexicanpharm.store/# mexico drug stores pharmacies
best canadian pharmacy: onlinecanadianpharmacy 24 – reliable canadian pharmacy
buy canadian drugs: certified canadian international pharmacy – canadian pharmacy 24h com
https://mexicanpharm.store/# mexican online pharmacies prescription drugs
mexican rx online: buying from online mexican pharmacy – buying prescription drugs in mexico online
http://mexicanpharm.store/# buying prescription drugs in mexico online
buying from online mexican pharmacy: buying prescription drugs in mexico – mexican rx online
Online medicine home delivery: online pharmacy india – buy prescription drugs from india
indian pharmacies safe indian pharmacy online Online medicine order
https://indiapharm.life/# reputable indian online pharmacy
buying prescription drugs in mexico online: mexican online pharmacies prescription drugs – pharmacies in mexico that ship to usa
https://indiapharm.life/# mail order pharmacy india
buying prescription drugs in mexico online: mexican border pharmacies shipping to usa – best online pharmacies in mexico
reputable canadian online pharmacy: canadian pharmacy world – canada pharmacy online
Online medicine order: india pharmacy – reputable indian online pharmacy
https://canadapharm.shop/# online canadian drugstore
india pharmacy: top 10 pharmacies in india – Online medicine order
https://canadapharm.shop/# canadian pharmacy prices
reputable mexican pharmacies online: medicine in mexico pharmacies – medicine in mexico pharmacies
online pharmacy india best india pharmacy indianpharmacy com
https://indiapharm.life/# mail order pharmacy india
buying from online mexican pharmacy: purple pharmacy mexico price list – best online pharmacies in mexico
canada discount pharmacy: canadian drug – northern pharmacy canada
https://mexicanpharm.store/# mexican pharmacy
https://clomidpharm.shop/# can you buy cheap clomid prices
zithromax 500mg: zithromax 500 mg – zithromax online paypal
https://clomidpharm.shop/# cost generic clomid pills
http://cytotec.directory/# buy cytotec pills
nolvadex pct: nolvadex price – low dose tamoxifen
http://clomidpharm.shop/# clomid without insurance
https://prednisonepharm.store/# prednisone 3 tablets daily
where to buy generic clomid without insurance: where can i buy generic clomid without prescription – where buy cheap clomid now
prednisone 475 prednisone 5 tablets 20 mg prednisone tablet
https://cytotec.directory/# buy cytotec online fast delivery
https://prednisonepharm.store/# prednisone 40 mg
can you buy zithromax over the counter in mexico: can i buy zithromax over the counter – can you buy zithromax over the counter in australia
https://nolvadex.pro/# tamoxifen mechanism of action
where to buy zithromax in canada zithromax online australia generic zithromax 500mg india
nolvadex vs clomid: liquid tamoxifen – tamoxifen men
https://prednisonepharm.store/# buy prednisone online no script
online pharmacies no prescription required pain medication: cheapest canadian pharmacies – canadian pharmacy online cialis
http://reputablepharmacies.online/# internet pharmacy no prior prescription
https://edwithoutdoctorprescription.store/# buy prescription drugs without doctor
non prescription erection pills: non prescription erection pills – buy prescription drugs from india
https://reputablepharmacies.online/# legitimate canadian pharmacies online
male ed drugs: ed meds online without doctor prescription – best ed treatment
http://edwithoutdoctorprescription.store/# real viagra without a doctor prescription usa
canada medications online: canadian pharmacy usa – canada prescriptions
http://edwithoutdoctorprescription.store/# real viagra without a doctor prescription
buy prescription drugs without doctor: prescription drugs – cialis without doctor prescription
https://edpills.bid/# impotence pills
prescription drugs: discount prescription drugs – prescription drugs online
cialis without doctor prescription: buy prescription drugs without doctor – real viagra without a doctor prescription
top erection pills: cheap ed drugs – best ed pill
medicine in mexico pharmacies online mexican pharmacy mexican online pharmacies prescription drugs mexicanpharmacy.win
mexican mail order pharmacies: mexico drug stores pharmacies – reputable mexican pharmacies online mexicanpharmacy.win
http://mexicanpharmacy.win/# mexico drug stores pharmacies mexicanpharmacy.win
mexican mail order pharmacies mexican pharmacy online medicine in mexico pharmacies mexicanpharmacy.win
top online pharmacy india: Best Indian pharmacy – top 10 online pharmacy in india indianpharmacy.shop
medicine in mexico pharmacies Medicines Mexico mexican online pharmacies prescription drugs mexicanpharmacy.win
http://mexicanpharmacy.win/# mexican pharmaceuticals online mexicanpharmacy.win
online prescription
http://mexicanpharmacy.win/# mexico drug stores pharmacies mexicanpharmacy.win
http://mexicanpharmacy.win/# pharmacies in mexico that ship to usa mexicanpharmacy.win
best online pharmacies in mexico: Medicines Mexico – mexican pharmaceuticals online mexicanpharmacy.win
online pharmacy india indian pharmacy to usa world pharmacy india indianpharmacy.shop
https://indianpharmacy.shop/# online shopping pharmacy india indianpharmacy.shop
http://indianpharmacy.shop/# cheapest online pharmacy india
best online pharmacy india
http://canadianpharmacy.pro/# canada cloud pharmacy canadianpharmacy.pro
https://indianpharmacy.shop/# indian pharmacy online
indian pharmacies safe
https://indianpharmacy.shop/# india pharmacy
reputable indian online pharmacy
canadapharmacyonline Pharmacies in Canada that ship to the US canadian pharmacy ed medications canadianpharmacy.pro
http://mexicanpharmacy.win/# mexican mail order pharmacies mexicanpharmacy.win
https://indianpharmacy.shop/# indian pharmacy indianpharmacy.shop
canadian pharmacy online no prescription needed
https://mexicanpharmacy.win/# mexican pharmacy mexicanpharmacy.win
indian pharmacy
https://mexicanpharmacy.win/# medication from mexico pharmacy mexicanpharmacy.win
mexican rx online mexican pharmacy online mexico drug stores pharmacies mexicanpharmacy.win
https://mexicanpharmacy.win/# buying prescription drugs in mexico online mexicanpharmacy.win
https://mexicanpharmacy.win/# medicine in mexico pharmacies mexicanpharmacy.win
mail order pharmacy india
canadian pharmacy Cheapest drug prices Canada buying from canadian pharmacies canadianpharmacy.pro
https://indianpharmacy.shop/# buy prescription drugs from india indianpharmacy.shop
https://mexicanpharmacy.win/# mexican drugstore online mexicanpharmacy.win
reputable indian online pharmacy
http://mexicanpharmacy.win/# п»їbest mexican online pharmacies mexicanpharmacy.win
world pharmacy india
https://indianpharmacy.shop/# best india pharmacy indianpharmacy.shop
https://mexicanpharmacy.win/# medicine in mexico pharmacies mexicanpharmacy.win
https://indianpharmacy.shop/# mail order pharmacy india indianpharmacy.shop
top 10 online pharmacy in india
indian pharmacy paypal indian pharmacies safe india pharmacy mail order indianpharmacy.shop
http://canadianpharmacy.pro/# legitimate canadian pharmacies canadianpharmacy.pro
http://canadianpharmacy.pro/# legitimate canadian pharmacy online canadianpharmacy.pro
reputable indian online pharmacy
indian pharmacy online indian pharmacy to usa Online medicine order indianpharmacy.shop
http://mexicanpharmacy.win/# mexican drugstore online mexicanpharmacy.win
http://indianpharmacy.shop/# top 10 online pharmacy in india indianpharmacy.shop
reliable mexican pharmacies
Acheter Sildenafil 100mg sans ordonnance Acheter du Viagra sans ordonnance Viagra pas cher livraison rapide france
https://pharmadoc.pro/# pharmacie ouverte 24/24
Acheter mГ©dicaments sans ordonnance sur internet: Levitra 20mg prix en pharmacie – Pharmacie en ligne pas cher
https://levitrasansordonnance.pro/# Pharmacie en ligne livraison gratuite
Pharmacie en ligne livraison rapide
Pharmacie en ligne livraison gratuite pharmacie en ligne Pharmacies en ligne certifiГ©es
https://levitrasansordonnance.pro/# pharmacie ouverte 24/24
Viagra vente libre pays: Viagra sans ordonnance 24h – Quand une femme prend du Viagra homme
pharmacie ouverte 24/24: kamagra oral jelly – п»їpharmacie en ligne
http://cialissansordonnance.shop/# Acheter médicaments sans ordonnance sur internet
Pharmacie en ligne fiable Levitra pharmacie en ligne п»їpharmacie en ligne
http://viagrasansordonnance.pro/# Meilleur Viagra sans ordonnance 24h
Pharmacie en ligne fiable
Pharmacie en ligne pas cher: PharmaDoc – Pharmacie en ligne fiable
http://levitrasansordonnance.pro/# Pharmacies en ligne certifiées
Viagra 100mg prix: Acheter du Viagra sans ordonnance – Viagra en france livraison rapide
https://acheterkamagra.pro/# Pharmacie en ligne pas cher
п»їpharmacie en ligne achat kamagra acheter medicament a l etranger sans ordonnance
pharmacie ouverte: PharmaDoc – pharmacie ouverte
Pharmacie en ligne sans ordonnance achat kamagra Pharmacie en ligne livraison gratuite
acheter mГ©dicaments Г l’Г©tranger: acheterkamagra.pro – Pharmacie en ligne fiable
http://levitrasansordonnance.pro/# pharmacie ouverte
http://cialissansordonnance.shop/# Pharmacie en ligne sans ordonnance
Pharmacie en ligne France
cost of generic clomid without dr prescription cost cheap clomid without insurance where to get generic clomid pills
http://clomiphene.icu/# cost of generic clomid no prescription
prednisone without rx: prednisone capsules – how to buy prednisone
can you get generic clomid tablets can i get clomid without insurance cheap clomid prices
http://ivermectin.store/# stromectol tablets uk
amoxicillin without a prescription: amoxicillin 875 mg tablet – amoxicillin 500mg over the counter
where can i buy generic clomid pill can i purchase generic clomid online can i order generic clomid no prescription
https://ivermectin.store/# ivermectin usa price
amoxicillin medicine: how to get amoxicillin over the counter – buy amoxicillin 500mg online
http://amoxicillin.bid/# amoxicillin 500 mg price
amoxicillin pills 500 mg amoxicillin discount coupon amoxicillin from canada
stromectol 3 mg tablet: ivermectin 50ml – stromectol buy
https://clomiphene.icu/# where buy clomid without insurance
cheap clomid without prescription where can i buy clomid for sale where to buy generic clomid without dr prescription
https://azithromycin.bid/# buy zithromax online cheap
can i buy amoxicillin online: amoxicillin generic – amoxicillin azithromycin
https://clomiphene.icu/# cost of generic clomid tablets
amoxicillin buy canada amoxicillin discount amoxicillin 500mg capsules price
can you get cheap clomid prices: can i get clomid without rx – can i purchase generic clomid prices
zithromax order online uk: zithromax 500 mg for sale – zithromax price canada
prednisone 5443 prednisone 10mg for sale prednisone buy cheap
https://azithromycin.bid/# zithromax 500 mg lowest price pharmacy online
ivermectin brand name: can you buy stromectol over the counter – ivermectin 3
how to get generic clomid online how to buy generic clomid without prescription how to get generic clomid no prescription
best canadian online pharmacy canadian pharmacy no scripts canadianpharmacymeds canadianpharm.store
http://canadianpharm.store/# canadian mail order pharmacy canadianpharm.store
Online medicine home delivery: order medicine from india to usa – top online pharmacy india indianpharm.store
india pharmacy mail order buy medicines online in india Online medicine home delivery indianpharm.store
http://mexicanpharm.shop/# purple pharmacy mexico price list mexicanpharm.shop
mexican border pharmacies shipping to usa: Online Pharmacies in Mexico – mexico drug stores pharmacies mexicanpharm.shop
canadian pharmacy world Canadian International Pharmacy safe canadian pharmacy canadianpharm.store
http://indianpharm.store/# top online pharmacy india indianpharm.store
https://indianpharm.store/# mail order pharmacy india indianpharm.store
reputable canadian pharmacy: Canadian International Pharmacy – legit canadian pharmacy canadianpharm.store
http://mexicanpharm.shop/# mexican border pharmacies shipping to usa mexicanpharm.shop
india pharmacy: Online medicine order – indian pharmacy indianpharm.store
top 10 pharmacies in india: buy prescription drugs from india – reputable indian online pharmacy indianpharm.store
canadian pharmacy online ship to usa reliable canadian pharmacy canadian world pharmacy canadianpharm.store
mexico drug stores pharmacies: Online Mexican pharmacy – mexican drugstore online mexicanpharm.shop
http://indianpharm.store/# online pharmacy india indianpharm.store
mail order pharmacy india top online pharmacy india top 10 pharmacies in india indianpharm.store
cheapest online pharmacy india: international medicine delivery from india – cheapest online pharmacy india indianpharm.store
http://mexicanpharm.shop/# mexican rx online mexicanpharm.shop
mexico pharmacy: mexican online pharmacies prescription drugs – buying prescription drugs in mexico mexicanpharm.shop
mexican pharmacy Online Pharmacies in Mexico mexico pharmacies prescription drugs mexicanpharm.shop
https://indianpharm.store/# reputable indian online pharmacy indianpharm.store
canadian drugs pharmacy: Canada Pharmacy online – canadian pharmacy 365 canadianpharm.store
indian pharmacies safe: world pharmacy india – reputable indian online pharmacy indianpharm.store
http://indianpharm.store/# indian pharmacy indianpharm.store
pharmacy website india Online medicine home delivery indianpharmacy com indianpharm.store
buy medicines online in india: international medicine delivery from india – indian pharmacy online indianpharm.store
It’s very unreliable, engages in deception scam site
https://edpill.cheap/# ed pills for sale
ed meds online: medication for ed – pills for ed
Настоящий официальный канал 1Win зеркало
generic ed pills generic ed pills cheap ed pills
http://edwithoutdoctorprescription.pro/# meds online without doctor prescription
pharmacy rx world canada: canadian family pharmacy – canadianpharmacyworld
Рекомендую официальный телеграм канал на 1Win вход
medicine for impotence buy ed pills best erection pills
http://canadianinternationalpharmacy.pro/# canadian world pharmacy
indianpharmacy com: indian pharmacy – top 10 online pharmacy in india
ed pills cheap over the counter erectile dysfunction pills compare ed drugs
http://canadianinternationalpharmacy.pro/# best online canadian pharmacy
https://medicinefromindia.store/# Online medicine home delivery
canadianpharmacyworld legal to buy prescription drugs from canada onlinepharmaciescanada com
https://certifiedpharmacymexico.pro/# buying from online mexican pharmacy
purple pharmacy mexico price list mexican mail order pharmacies buying prescription drugs in mexico
https://medicinefromindia.store/# indian pharmacy paypal
reputable indian online pharmacy indian pharmacy paypal indian pharmacy
http://medicinefromindia.store/# indian pharmacy online
п»їlegitimate online pharmacies india top online pharmacy india buy medicines online in india
https://edpill.cheap/# best pills for ed
https://edpill.cheap/# ed meds online without doctor prescription
best erectile dysfunction pills ed medication online п»їerectile dysfunction medication
http://medicinefromindia.store/# indian pharmacy paypal
best canadian pharmacy online certified canadian pharmacy buying from canadian pharmacies
http://medicinefromindia.store/# mail order pharmacy india
ed meds online without prescription or membership ed pills without doctor prescription ed meds online without doctor prescription
https://edpill.cheap/# ed medications list
canadian pharmacy 24 canadian neighbor pharmacy canadian pharmacies
https://certifiedpharmacymexico.pro/# buying from online mexican pharmacy
https://edpill.cheap/# ed pills cheap
prescription drugs online generic cialis without a doctor prescription viagra without a doctor prescription
http://certifiedpharmacymexico.pro/# best online pharmacies in mexico
top 10 pharmacies in india india online pharmacy reputable indian pharmacies
http://medicinefromindia.store/# mail order pharmacy india
non prescription ed drugs generic cialis without a doctor prescription viagra without a doctor prescription
https://edpill.cheap/# mens erection pills
treatments for ed the best ed pills top erection pills
reputable mexican pharmacies online best online pharmacies in mexico purple pharmacy mexico price list
https://edpill.cheap/# erection pills viagra online
india pharmacy mail order Online medicine home delivery indian pharmacies safe
mexico pharmacies prescription drugs mexican online pharmacies prescription drugs mexican rx online
mexican mail order pharmacies buying prescription drugs in mexico mexico drug stores pharmacies
п»їbest mexican online pharmacies mexican pharmacy buying prescription drugs in mexico
best online pharmacies in mexico buying prescription drugs in mexico online buying prescription drugs in mexico
medicine in mexico pharmacies purple pharmacy mexico price list buying prescription drugs in mexico online
казино на рубли
mexico drug stores pharmacies mexico pharmacies prescription drugs mexico pharmacy
pharmacies in mexico that ship to usa mexican pharmaceuticals online mexico drug stores pharmacies
buying prescription drugs in mexico mexico pharmacy mexican online pharmacies prescription drugs
buying prescription drugs in mexico online buying from online mexican pharmacy mexico drug stores pharmacies
mexico drug stores pharmacies buying prescription drugs in mexico reputable mexican pharmacies online
mexico drug stores pharmacies mexican border pharmacies shipping to usa medicine in mexico pharmacies
reputable mexican pharmacies online best online pharmacies in mexico best online pharmacies in mexico
buying from online mexican pharmacy mexican pharmaceuticals online medication from mexico pharmacy
п»їbest mexican online pharmacies п»їbest mexican online pharmacies mexican online pharmacies prescription drugs
mexico drug stores pharmacies mexican pharmacy mexican border pharmacies shipping to usa
buying prescription drugs in mexico mexican online pharmacies prescription drugs buying prescription drugs in mexico online
mexican border pharmacies shipping to usa pharmacies in mexico that ship to usa medicine in mexico pharmacies
mexican pharmaceuticals online mexican rx online medicine in mexico pharmacies
best mexican online pharmacies medicine in mexico pharmacies mexico drug stores pharmacies
mexico drug stores pharmacies mexican rx online mexican pharmaceuticals online
mexican border pharmacies shipping to usa mexican online pharmacies prescription drugs mexican border pharmacies shipping to usa
mexican pharmacy mexico drug stores pharmacies mexican pharmacy
buying from online mexican pharmacy mexico pharmacy buying prescription drugs in mexico online
mexican drugstore online mexican rx online medication from mexico pharmacy
mexican drugstore online mexican online pharmacies prescription drugs best online pharmacies in mexico
mexican pharmacy mexican drugstore online buying prescription drugs in mexico online
п»їbest mexican online pharmacies buying prescription drugs in mexico online mexican mail order pharmacies
reputable mexican pharmacies online mexican border pharmacies shipping to usa mexico pharmacy
mexico pharmacies prescription drugs mexican online pharmacies prescription drugs mexico drug stores pharmacies
medicine in mexico pharmacies reputable mexican pharmacies online buying from online mexican pharmacy
mexican pharmaceuticals online buying from online mexican pharmacy mexico pharmacies prescription drugs
http://mexicanph.com/# mexican pharmaceuticals online
mexican border pharmacies shipping to usa
mexican online pharmacies prescription drugs mexican pharmaceuticals online mexican drugstore online
medication from mexico pharmacy buying prescription drugs in mexico best mexican online pharmacies
medication from mexico pharmacy buying prescription drugs in mexico online buying prescription drugs in mexico
mexican rx online mexico pharmacy mexico pharmacy
reputable mexican pharmacies online mexican pharmacy pharmacies in mexico that ship to usa
mexican rx online mexico pharmacy mexican online pharmacies prescription drugs
buying prescription drugs in mexico online buying prescription drugs in mexico mexican border pharmacies shipping to usa
reputable mexican pharmacies online buying prescription drugs in mexico mexico pharmacies prescription drugs
https://mexicanph.com/# purple pharmacy mexico price list
pharmacies in mexico that ship to usa
mexican drugstore online mexico pharmacies prescription drugs medication from mexico pharmacy
п»їbest mexican online pharmacies pharmacies in mexico that ship to usa mexico pharmacy
mexico pharmacies prescription drugs medicine in mexico pharmacies pharmacies in mexico that ship to usa
best online pharmacies in mexico mexican mail order pharmacies best online pharmacies in mexico
mexican border pharmacies shipping to usa best mexican online pharmacies mexico pharmacy
mexico drug stores pharmacies mexican rx online mexico drug stores pharmacies
mexican pharmacy buying prescription drugs in mexico pharmacies in mexico that ship to usa
best mexican online pharmacies buying from online mexican pharmacy mexico pharmacies prescription drugs
mexican mail order pharmacies medication from mexico pharmacy buying prescription drugs in mexico online
pharmacies in mexico that ship to usa purple pharmacy mexico price list best online pharmacies in mexico
pharmacies in mexico that ship to usa mexican rx online reputable mexican pharmacies online
https://mexicanph.shop/# medication from mexico pharmacy
medicine in mexico pharmacies
mexico pharmacies prescription drugs mexican border pharmacies shipping to usa mexican pharmacy
buying prescription drugs in mexico online mexico drug stores pharmacies buying from online mexican pharmacy
http://stromectol.fun/# ivermectin 3mg pill
prednisone 10 mg price: iv prednisone – cheap prednisone 20 mg
http://stromectol.fun/# stromectol covid
http://amoxil.cheap/# amoxicillin without a prescription
Buy Online Ivermectin/Stromectol Now: generic ivermectin – minocin 50 mg for scabies
https://amoxil.cheap/# amoxicillin 500 mg tablet
lisinopril 10 india: zestril 10 mg tablet – lisinopril 120mg
https://furosemide.guru/# furosemide 40mg
http://furosemide.guru/# furosemida
where can i get prednisone over the counter: prednisone – prednisone oral
https://amoxil.cheap/# amoxil generic
https://lisinopril.top/# lisinopril 2 mg
furosemide 40mg: Buy Lasix No Prescription – lasix 100 mg tablet
http://lisinopril.top/# lisinopril 80 mg daily
prednisone cost 10mg: prednisone 30 mg – prednisone
https://buyprednisone.store/# where to buy prednisone 20mg
prinivil drug cost: lisinopril 60 mg tablet – zestril
http://stromectol.fun/# stromectol 12mg online
http://stromectol.fun/# ivermectin otc
https://stromectol.fun/# generic ivermectin cream
cost for ivermectin 3mg: stromectol lotion – ivermectin pill cost
https://lisinopril.top/# lisinopril 40 mg coupon
ivermectin brand: ivermectin uk coronavirus – ivermectin cost australia
https://stromectol.fun/# ivermectin pills canada
ivermectin price canada: ivermectin 0.08 oral solution – ivermectin 3mg pill
https://stromectol.fun/# ivermectin lotion price
http://amoxil.cheap/# amoxicillin 500mg capsule buy online
lisinopril 20 mg tabs: buy lisinopril 20 mg – lisinopril 20 tablet
https://amoxil.cheap/# amoxicillin 250 mg
https://furosemide.guru/# furosemida
ivermectin new zealand: ivermectin over the counter canada – where to buy ivermectin cream
https://buyprednisone.store/# buy cheap prednisone
order amoxicillin 500mg: amoxicillin 500mg over the counter – generic amoxicillin
https://stromectol.fun/# п»їwhere to buy stromectol online
lasix 40mg: lasix generic – lasix uses
http://buyprednisone.store/# prednisone sale
https://lisinopril.top/# buy cheap lisinopril 40 mg no prescription
buy ivermectin uk: ivermectin 50 – ivermectin cost australia
http://amoxil.cheap/# buy amoxicillin 250mg
where can i order lisinopril online: prinivil price – lisinopril 20 mg india
http://buyprednisone.store/# prednisone best prices
amoxicillin order online: amoxicillin 500mg capsule buy online – order amoxicillin no prescription
http://buyprednisone.store/# prednisone 300mg
https://furosemide.guru/# lasix furosemide 40 mg
https://amoxil.cheap/# over the counter amoxicillin
prednisone 10 mg tablets: prednisone 15 mg tablet – where can i get prednisone
https://amoxil.cheap/# buying amoxicillin in mexico
buy amoxicillin 500mg usa: where can i buy amoxicillin over the counter uk – purchase amoxicillin online
https://stromectol.fun/# ivermectin 2mg
https://amoxil.cheap/# buy amoxicillin
amoxicillin generic brand: amoxicillin 500mg no prescription – where can i get amoxicillin
http://amoxil.cheap/# where to buy amoxicillin pharmacy
amoxicillin 500mg over the counter: amoxicillin 500mg buy online uk – price for amoxicillin 875 mg
http://lisinopril.top/# lisinopril brand name
https://buyprednisone.store/# prednisone 20mg online
generic lasix: Buy Lasix – furosemide
https://buyprednisone.store/# order prednisone
http://amoxil.cheap/# amoxicillin online no prescription
stromectol 0.5 mg: ivermectin india – ivermectin cream cost
I loved how you broke down the process into manageable steps and provided all the necessary resources and code snippets. Your passion for DIY projects and technology really shines through in your writing
https://indianph.com/# indian pharmacies safe
Online medicine order
top 10 online pharmacy in india top online pharmacy india cheapest online pharmacy india
https://indianph.xyz/# Online medicine home delivery
best india pharmacy
http://indianph.com/# reputable indian pharmacies
world pharmacy india
https://indianph.com/# Online medicine order
http://indianph.com/# reputable indian pharmacies
online shopping pharmacy india
https://indianph.xyz/# Online medicine home delivery
Online medicine order
http://indianph.xyz/# indian pharmacies safe
india online pharmacy
http://indianph.com/# buy medicines online in india
world pharmacy india
http://indianph.com/# india online pharmacy
legitimate online pharmacies india
https://indianph.xyz/# Online medicine order
top 10 pharmacies in india
generic doxycycline: buy doxycycline online uk – doxycycline generic
https://cytotec24.shop/# buy misoprostol over the counter
http://cipro.guru/# buy cipro online canada
does tamoxifen cause joint pain: tamoxifen adverse effects – tamoxifen for breast cancer prevention
https://cytotec24.com/# buy cytotec pills online cheap
buy cipro cheap: buy cipro – cipro ciprofloxacin
https://cipro.guru/# cipro for sale
http://doxycycline.auction/# vibramycin 100 mg
diflucan over the counter: diflucan discount – where to purchase diflucan
https://cipro.guru/# ciprofloxacin 500 mg tablet price
how to prevent hair loss while on tamoxifen: tamoxifen rash – is nolvadex legal
diflucan 150 capsule: where can i get diflucan over the counter – buy diflucan online
?????? ????: abella danger filmleri – abella danger izle
Sweetie Fox video: Sweetie Fox – Sweetie Fox video
Sweetie Fox izle: Sweetie Fox izle – sweeti fox
Angela Beyaz modeli: abella danger video – Abella Danger
lana rhoades: lana rhoades izle – lana rhoades izle
Angela Beyaz modeli: Angela White video – Angela Beyaz modeli
Angela White: abella danger izle – abella danger izle
https://angelawhite.pro/# Angela White izle
eva elfie video: eva elfie video – eva elfie video
https://sweetiefox.online/# Sweetie Fox modeli
https://abelladanger.online/# abella danger filmleri
Angela White izle: Angela White – Angela White video
https://angelawhite.pro/# ?????? ????
Angela White: Angela White izle – ?????? ????
lana rhoades: lana rhoades video – lana rhoades
http://abelladanger.online/# abella danger izle
http://angelawhite.pro/# Angela White
lana rhoades: lana rhoades izle – lana rhoades modeli
Sweetie Fox izle: Sweetie Fox video – sweeti fox
http://miamalkova.life/# mia malkova full video
http://miamalkova.life/# mia malkova movie
https://evaelfie.site/# eva elfie hot
http://lanarhoades.pro/# lana rhoades hot
fox sweetie: sweetie fox full video – fox sweetie
http://evaelfie.site/# eva elfie hd
sweetie fox full: fox sweetie – sweetie fox cosplay
http://sweetiefox.pro/# sweetie fox full
sweetie fox cosplay: fox sweetie – sweetie fox
sweetie fox cosplay: sweetie fox cosplay – sweetie fox full video
https://evaelfie.site/# eva elfie hd
http://evaelfie.site/# eva elfie new videos
http://sweetiefox.pro/# ph sweetie fox
sweetie fox new: sweetie fox cosplay – sweetie fox
https://sweetiefox.pro/# sweetie fox full
mia malkova new video: mia malkova – mia malkova hd
fox sweetie: fox sweetie – sweetie fox full video
https://evaelfie.site/# eva elfie
sweetie fox cosplay: sweetie fox full video – sweetie fox new
https://lanarhoades.pro/# lana rhoades
lana rhoades pics: lana rhoades – lana rhoades solo
http://sweetiefox.pro/# sweetie fox cosplay
http://jogodeaposta.fun/# jogos que dao dinheiro
https://aviatormocambique.site/# aviator online
melhor jogo de aposta: aplicativo de aposta – aviator jogo de aposta
aviator login: aviator – aviator game bet
https://jogodeaposta.fun/# jogos que dao dinheiro
aviator malawi: aviator bet malawi – aviator bet malawi login
https://aviatoroyunu.pro/# aviator bahis
aviator login: aviator – aviator game
aviator malawi: aviator malawi – aviator bet malawi
http://aviatormocambique.site/# jogar aviator
jogo de aposta: melhor jogo de aposta para ganhar dinheiro – jogo de aposta online
aviator: aviator online – aviator moçambique
aviator online: como jogar aviator em moçambique – jogar aviator
aviator bahis: aviator oyunu – aviator
aviator betano: aviator betano – aviator jogo
aviator: aviator game – aviator game
aviator: aviator game online – aviator ghana
estrela bet aviator: aviator jogar – aviator jogo
where can you buy zithromax – https://azithromycin.pro/zithromax-for-kids.html zithromax online usa
aviator moçambique: como jogar aviator em moçambique – como jogar aviator em moçambique
buy zithromax online – https://azithromycin.pro/zithromax-diarrhea.html zithromax prescription
aviator login: aviator bet – aviator ghana
pin-up casino: aviator oficial pin up – aviator pin up casino
zithromax price south africa: pfizer zithromax buy zithromax online fast shipping
aviator pin up: pin up aviator – aviator pin up
canadian pharmacy online reviews: Pharmacies in Canada that ship to the US – legit canadian pharmacy canadianpharm.store
http://mexicanpharm24.com/# mexican online pharmacies prescription drugs mexicanpharm.shop
http://indianpharm24.shop/# india pharmacy indianpharm.store
https://canadianpharmlk.com/# online pharmacy canada canadianpharm.store
http://mexicanpharm24.shop/# purple pharmacy mexico price list mexicanpharm.shop
http://indianpharm24.com/# legitimate online pharmacies india indianpharm.store
http://canadianpharmlk.com/# legitimate canadian mail order pharmacy canadianpharm.store
http://indianpharm24.com/# indian pharmacies safe indianpharm.store
http://indianpharm24.shop/# mail order pharmacy india indianpharm.store
http://canadianpharmlk.com/# canadian 24 hour pharmacy canadianpharm.store
http://canadianpharmlk.com/# certified canadian pharmacy canadianpharm.store
https://mexicanpharm24.shop/# mexican online pharmacies prescription drugs mexicanpharm.shop
https://prednisonest.pro/# prednisone 10mg tabs
http://clomidst.pro/# how to get cheap clomid pills
http://prednisonest.pro/# over the counter prednisone pills
https://amoxilst.pro/# amoxicillin over counter
https://amoxilst.pro/# buy amoxicillin 500mg canada
https://prednisonest.pro/# purchase prednisone 10mg
http://onlinepharmacy.cheap/# best canadian pharmacy no prescription
http://edpills.guru/# low cost ed pills
https://onlinepharmacy.cheap/# cheapest pharmacy to fill prescriptions with insurance
https://edpills.guru/# what is the cheapest ed medication
http://edpills.guru/# buy ed pills online
https://mexicanpharm.online/# mexican drugstore online
https://pharmacynoprescription.pro/# buy pills without prescription
https://pharmacynoprescription.pro/# canadian pharmacy prescription
https://mexicanpharm.online/# buying prescription drugs in mexico
https://mexicanpharm.online/# mexico drug stores pharmacies
http://pharmacynoprescription.pro/# online pharmacy no prescription needed
https://indianpharm.shop/# Online medicine order
http://canadianpharm.guru/# vipps approved canadian online pharmacy
http://pharmacynoprescription.pro/# buying online prescription drugs
https://indianpharm.shop/# indianpharmacy com
http://mexicanpharm.online/# mexico drug stores pharmacies
http://pharmacynoprescription.pro/# canadian prescription drugstore reviews
http://canadianpharm.guru/# canadian pharmacy prices
http://indianpharm.shop/# top online pharmacy india
https://mexicanpharm.online/# mexico drug stores pharmacies
aviator sinyal hilesi: aviator – aviator oyna slot
pin up guncel giris: pin up casino – pin up indir
pin-up online: pin-up casino giris – aviator pin up
gates of olympus s?rlar?: gates of olympus oyna demo – gates of olympus oyna demo
sweet bonanza guncel: sweet bonanza taktik – sweet bonanza demo oyna
gates of olympus taktik: gates of olympus max win – gates of olympus guncel
aviator oyunu: aviator mostbet – aviator nas?l oynan?r
gates of olympus demo free spin: gates of olympus hilesi – gates of olympus guncel
gates of olympus demo: gates of olympus taktik – gates of olympus oyna
aviator oyunu 20 tl: aviator oyunu 100 tl – aviator oyunu 20 tl
http://aviatoroyna.bid/# aviator oyna
slot kumar siteleri: slot siteleri bonus veren – en guvenilir slot siteleri
reputable mexican pharmacies online: mexican pharmacy – medicine in mexico pharmacies
indianpharmacy com: reputable indian online pharmacy – india pharmacy
buying prescription drugs in mexico: cheapest mexico drugs – mexican drugstore online
canadian pharmacies compare: cheap canadian pharmacy – legitimate canadian pharmacies
onlinecanadianpharmacy 24: Certified Canadian Pharmacy – online canadian drugstore
https://kamagraiq.shop/# super kamagra
https://kamagraiq.shop/# Kamagra 100mg price
http://tadalafiliq.com/# buy cialis pill
https://kamagraiq.shop/# Kamagra tablets
http://tadalafiliq.com/# Cialis over the counter
https://tadalafiliq.com/# Generic Cialis price
http://indianpharmgrx.com/# Online medicine home delivery
http://mexicanpharmgrx.shop/# mexico pharmacy
https://canadianpharmgrx.com/# my canadian pharmacy
http://indianpharmgrx.shop/# legitimate online pharmacies india
https://canadianpharmgrx.xyz/# online pharmacy canada
http://canadianpharmgrx.com/# canadianpharmacy com
http://canadianpharmgrx.com/# legit canadian pharmacy online
https://canadianpharmgrx.com/# www canadianonlinepharmacy
buy cytotec pills online cheap: buy cytotec online – buy cytotec online fast delivery
diflucan 150 australia: diflucan medication – diflucan 1140
cipro online no prescription in the usa: antibiotics cipro – buy cipro online canada
buy cytotec: cytotec online – buy cytotec over the counter
diflucan 150 mg daily: how to buy diflucan – diflucan coupon canada
prednisone 12 tablets price: prednisone 50 mg prices – prednisone 40 mg rx
stromectol ivermectin tablets: ivermectin topical – how to buy stromectol
875 mg amoxicillin cost: buy amoxicillin online with paypal – amoxacillian without a percription
stromectol prices: buy ivermectin uk – price of ivermectin liquid
amoxacillian without a percription: buy cheap amoxicillin online – amoxicillin generic brand
cost of stromectol medication: stromectol price usa – ivermectin topical
purchase prednisone no prescription: where to buy prednisone in canada – prednisone 20 tablet
http://medicationnoprescription.pro/# canada prescriptions by mail
https://medicationnoprescription.pro/# mexican prescription drugs online
http://medicationnoprescription.pro/# buying prescription medicine online
http://edpill.top/# buy ed pills online
casino online uy tín: casino online uy tín – web c? b?c online uy tín
casino tr?c tuy?n uy tín: casino tr?c tuy?n – game c? b?c online uy tín
web c? b?c online uy tín: dánh bài tr?c tuy?n – casino tr?c tuy?n vi?t nam
casino tr?c tuy?n vi?t nam: casino tr?c tuy?n – casino tr?c tuy?n vi?t nam
casino online uy tín: casino tr?c tuy?n – choi casino tr?c tuy?n trên di?n tho?i
casino online uy tín: choi casino tr?c tuy?n trên di?n tho?i – dánh bài tr?c tuy?n
dánh bài tr?c tuy?n: web c? b?c online uy tín – choi casino tr?c tuy?n trên di?n tho?i
dánh bài tr?c tuy?n: casino online uy tín – casino tr?c tuy?n vi?t nam
casino tr?c tuy?n vi?t nam: casino tr?c tuy?n vi?t nam – dánh bài tr?c tuy?n
casino tr?c tuy?n vi?t nam: casino tr?c tuy?n uy tín – game c? b?c online uy tín
web c? b?c online uy tín: dánh bài tr?c tuy?n – casino online uy tín
dánh bài tr?c tuy?n: choi casino tr?c tuy?n trên di?n tho?i – casino tr?c tuy?n vi?t nam
dánh bài tr?c tuy?n: casino tr?c tuy?n uy tín – casino tr?c tuy?n
casino online uy tín: web c? b?c online uy tín – choi casino tr?c tuy?n trên di?n tho?i
game c? b?c online uy tín: game c? b?c online uy tín – casino online uy tín
https://canadaph24.pro/# canada drug pharmacy
https://mexicoph24.life/# mexican online pharmacies prescription drugs
http://canadaph24.pro/# canadian pharmacy mall
https://indiaph24.store/# reputable indian pharmacies
https://canadaph24.pro/# pharmacies in canada that ship to the us
http://canadaph24.pro/# canada online pharmacy
https://mexicoph24.life/# buying from online mexican pharmacy
http://indiaph24.store/# mail order pharmacy india
http://canadaph24.pro/# canada drugstore pharmacy rx
https://mexicoph24.life/# mexican online pharmacies prescription drugs
https://indiaph24.store/# cheapest online pharmacy india
https://mexicoph24.life/# medication from mexico pharmacy
https://mexicoph24.life/# reputable mexican pharmacies online
https://canadaph24.pro/# reddit canadian pharmacy
http://mexicoph24.life/# mexico pharmacies prescription drugs
https://mexicoph24.life/# buying prescription drugs in mexico online
https://canadaph24.pro/# canadian pharmacy service
http://canadaph24.pro/# best canadian online pharmacy reviews
https://mexicoph24.life/# reputable mexican pharmacies online
http://indiaph24.store/# reputable indian pharmacies
http://mexicoph24.life/# mexico drug stores pharmacies
http://mexicoph24.life/# reputable mexican pharmacies online
https://mexicoph24.life/# mexican pharmacy
https://canadaph24.pro/# canada pharmacy world
http://canadaph24.pro/# canadian pharmacy 24h com
http://indiaph24.store/# reputable indian online pharmacy
https://indiaph24.store/# indian pharmacy paypal
https://canadaph24.pro/# cross border pharmacy canada
http://mexicoph24.life/# best online pharmacies in mexico
http://mexicoph24.life/# mexican pharmaceuticals online
https://mexicoph24.life/# best mexican online pharmacies
https://canadaph24.pro/# canadian 24 hour pharmacy
https://canadaph24.pro/# pharmacy canadian superstore
http://mexicoph24.life/# mexican mail order pharmacies
https://canadaph24.pro/# canadian world pharmacy
https://canadaph24.pro/# best canadian online pharmacy
http://indiaph24.store/# best online pharmacy india
https://mexicoph24.life/# mexican drugstore online
https://mexicoph24.life/# mexican border pharmacies shipping to usa
https://canadaph24.pro/# canadian drug pharmacy
http://mexicoph24.life/# mexican drugstore online
https://canadaph24.pro/# legal canadian pharmacy online
https://mexicoph24.life/# mexican online pharmacies prescription drugs
https://mexicoph24.life/# mexico pharmacy
indian pharmacy Generic Medicine India to USA indian pharmacy
http://canadaph24.pro/# pharmacy rx world canada
india online pharmacy buy medicines from India india pharmacy mail order
propecia no prescription buy cheap propecia without a prescription get propecia pills
raloxifene vs tamoxifen: tamoxifen for breast cancer prevention – tamoxifen endometriosis
ciprofloxacin: ciprofloxacin 500 mg tablet price – cipro ciprofloxacin
buy cipro online without prescription ciprofloxacin ciprofloxacin generic price
zestoretic 20-25 mg: cost of prinivil – zestoretic 10 12.5
lisinopril price uk drug prices lisinopril cost of lisinopril in mexico
lisinopril 20 mg brand name: lisinopril 19 mg – lisinopril 40 mg for sale
buy misoprostol over the counter buy cytotec pills order cytotec online
lisinopril tablets india: lisinopril 10 12.5 mg – lisinopril 10 mg prices
tamoxifen citrate pct tamoxifen vs raloxifene liquid tamoxifen
п»їcytotec pills online cytotec pills buy online buy misoprostol over the counter
tamoxifen endometrium tamoxifen alternatives premenopausal nolvadex half life
generic propecia no prescription: cost of cheap propecia pill – buy propecia without a prescription
order cheap propecia get propecia no prescription buying cheap propecia without insurance
tamoxifen dose: does tamoxifen cause menopause – tamoxifen rash
buying propecia without prescription propecia without dr prescription get propecia tablets
http://finasteride.store/# cost generic propecia no prescription
cytotec buy online usa: cytotec buy online usa – cytotec pills online
cost of generic propecia online cost generic propecia tablets generic propecia without rx
tamoxifen and osteoporosis: tamoxifen warning – tamoxifen brand name
zestoretic 20 25mg lisinopril 10 mg order online order lisinopril online united states
http://lisinopril.network/# lisinopril otc
http://viagras.online/# Viagra online price
Vardenafil price Levitra 10 mg buy online Levitra tablet price
https://kamagra.win/# Kamagra Oral Jelly
Cheap generic Viagra online: Buy Viagra online – Generic Viagra for sale
Kamagra 100mg price: buy kamagra online – Kamagra 100mg price
cheapest cialis buy cialis online Cheap Cialis
https://cialist.pro/# Buy Cialis online
Cialis over the counter Generic Cialis without a doctor prescription cheapest cialis
http://viagras.online/# buy Viagra online
Buy Cialis online: Buy Cialis online – Cialis 20mg price
http://viagras.online/# buy viagra here
Cialis 20mg price in USA cheapest cialis Cheap Cialis
Cenforce 150 mg online: cenforce for sale – Cenforce 150 mg online
order cenforce: Buy Cenforce 100mg Online – order cenforce
п»їLevitra price buy Levitra over the counter Levitra 10 mg buy online
http://viagras.online/# Order Viagra 50 mg online
http://levitrav.store/# Vardenafil online prescription
buy Kamagra: buy kamagra online – Kamagra 100mg price
Cheap Levitra online Levitra 20mg price Buy generic Levitra online
https://levitrav.store/# Buy Vardenafil 20mg
https://cialist.pro/# Tadalafil Tablet
Buy Levitra 20mg online: Levitra generic price – Levitra price
Buy Cialis online buy cialis overseas Generic Cialis without a doctor prescription
canada pharmacy world canadian pharmacy world canadian pharmacy 365
https://pharmnoprescription.icu/# buy prescription drugs online without doctor
world pharmacy india: cheapest online pharmacy india – top online pharmacy india
canadian pharmacies compare best canadian online pharmacy trustworthy canadian pharmacy
https://pharmworld.store/# pharmacy discount coupons
https://pharmmexico.online/# mexican border pharmacies shipping to usa
buying prescription drugs in mexico online mexican pharmacy medicine in mexico pharmacies
mexico pharmacies prescription drugs: buying prescription drugs in mexico online – mexican border pharmacies shipping to usa
https://pharmcanada.shop/# canadianpharmacymeds com
canada drugs online review ed drugs online from canada best mail order pharmacy canada
https://pharmcanada.shop/# vipps approved canadian online pharmacy
https://pharmnoprescription.icu/# buying prescription drugs from canada online
buy prescription drugs from india: cheapest online pharmacy india – Online medicine home delivery
http://pharmmexico.online/# mexican drugstore online
buy generic zithromax no prescription zithromax purchase online zithromax capsules
neurontin 100 mg cost: neurontin 100mg tablet – neurontin 600 mg price
neurontin brand coupon medicine neurontin 300 mg neurontin 100 mg capsule
http://doxycyclinea.online/# generic doxycycline
neurontin 300mg caps: neurontin 200 – neurontin drug
where can i buy zithromax medicine: zithromax for sale 500 mg – zithromax antibiotic
800mg neurontin: neurontin generic brand – neurontin sale
amoxicillin azithromycin where can i buy amoxicillin over the counter amoxicillin 30 capsules price
https://doxycyclinea.online/# 100mg doxycycline
neurontin 100mg capsule price neurontin tablets uk neurontin generic
https://doxycyclinea.online/# vibramycin 100 mg
doxycycline without a prescription: doxy 200 – generic doxycycline
neurontin brand name in india neurontin for sale neurontin 300 mg capsule
https://zithromaxa.store/# can you buy zithromax over the counter in mexico
where can i buy zithromax capsules: zithromax 500 mg for sale – zithromax capsules
amoxicillin script where to buy amoxicillin 500mg without prescription generic amoxicillin over the counter
http://zithromaxa.store/# zithromax 500mg over the counter
zithromax 500 mg zithromax capsules price buy zithromax without prescription online
prescription medication neurontin: neurontin prescription – cost of neurontin
http://doxycyclinea.online/# doxycycline hyclate
amoxicillin 500mg capsules antibiotic where can you get amoxicillin amoxicillin pharmacy price
http://prednisoned.online/# prednisone where can i buy
where to buy neurontin: cost of neurontin – gabapentin 300mg
amoxicillin without rx amoxicillin discount coupon amoxicillin cephalexin
http://prednisoned.online/# prednisone cost us
buy generic neurontin online neurontin 330 mg neurontin pills
doxycycline vibramycin: buy cheap doxycycline – buy doxycycline online without prescription
https://amoxila.pro/# amoxicillin 825 mg
zithromax 500 without prescription zithromax generic price average cost of generic zithromax
amoxicillin without a doctors prescription: order amoxicillin online no prescription – amoxicillin tablet 500mg
http://prednisoned.online/# how to buy prednisone online
neurontin cost how to get neurontin cheap ordering neurontin online
https://gabapentinneurontin.pro/# buy neurontin canada
cheap doxycycline online: doxycycline 50 mg – online doxycycline
gabapentin buy neurontin singapore drug neurontin 20 mg
prednisone 5 mg tablet: buy prednisone online india – 50mg prednisone tablet
buying prescription drugs in mexico: п»їbest mexican online pharmacies – medicine in mexico pharmacies
reputable mexican pharmacies online mexican pharmaceuticals online mexican drugstore online
https://mexicanpharmacy1st.online/# best online pharmacies in mexico
п»їbest mexican online pharmacies: mexico drug stores pharmacies – buying prescription drugs in mexico online
mexican pharmacy: mexican pharmacy – reputable mexican pharmacies online
buying prescription drugs in mexico online mexican border pharmacies shipping to usa mexico pharmacy
http://mexicanpharmacy1st.com/# mexican pharmacy
http://mexicanpharmacy1st.com/# mexico drug stores pharmacies
mexican pharmaceuticals online: medicine in mexico pharmacies – buying prescription drugs in mexico
best online pharmacies in mexico medication from mexico pharmacy mexican pharmaceuticals online
https://mexicanpharmacy1st.com/# mexico pharmacies prescription drugs
medication from mexico pharmacy: medicine in mexico pharmacies – mexican rx online
mexico pharmacies prescription drugs: best mexican online pharmacies – purple pharmacy mexico price list
buying prescription drugs in mexico mexico pharmacies prescription drugs buying prescription drugs in mexico online
buying from online mexican pharmacy: buying prescription drugs in mexico online – mexico drug stores pharmacies
buying prescription drugs in mexico online: medicine in mexico pharmacies – mexican online pharmacies prescription drugs
mexican rx online mexico drug stores pharmacies buying prescription drugs in mexico
https://mexicanpharmacy1st.online/# mexico drug stores pharmacies
https://mexicanpharmacy1st.shop/# buying prescription drugs in mexico
medication from mexico pharmacy: mexican mail order pharmacies – purple pharmacy mexico price list
buying prescription drugs in mexico п»їbest mexican online pharmacies mexican online pharmacies prescription drugs
http://mexicanpharmacy1st.com/# buying prescription drugs in mexico
mexico drug stores pharmacies: mexican rx online – mexican rx online
pharmacies in mexico that ship to usa: mexico pharmacy – medicine in mexico pharmacies
best online pharmacies in mexico best online pharmacies in mexico mexico pharmacies prescription drugs
https://mexicanpharmacy1st.online/# buying prescription drugs in mexico
mexican online pharmacies prescription drugs: best mexican online pharmacies – mexican pharmaceuticals online
http://mexicanpharmacy1st.com/# buying prescription drugs in mexico
medicine in mexico pharmacies: mexican pharmaceuticals online – buying from online mexican pharmacy
https://mexicanpharmacy1st.com/# mexican pharmaceuticals online
mexican pharmaceuticals online mexican border pharmacies shipping to usa mexico drug stores pharmacies
mexican border pharmacies shipping to usa: best mexican online pharmacies – mexican online pharmacies prescription drugs
https://mexicanpharmacy1st.shop/# mexican rx online
mexican rx online: п»їbest mexican online pharmacies – mexican online pharmacies prescription drugs
best online pharmacies in mexico: mexican drugstore online – best mexican online pharmacies
neurontin online usa: neurontin cap 300mg – medicine neurontin
http://cytotec.xyz/# buy cytotec
prinivil 2.5 mg: lisinopril tabs 40mg – where to buy lisinopril online
buy cytotec: buy cytotec over the counter – buy cytotec in usa
neurontin 400: neurontin 800 mg price – neurontin 800mg
http://lisinopril.club/# lisinopril 60 mg daily
buy cytotec over the counter: buy cytotec pills online cheap – cytotec abortion pill
https://gabapentin.club/# neurontin over the counter
https://lisinopril.club/# lisinopril 3972
propecia for sale: buy propecia pills – get generic propecia prices
lisinopril 10 12.5 mg tablets: lisinopril 2.15 mg – lisinopril 5 mg price in india
can i buy cheap clomid online: cost cheap clomid no prescription – where to get clomid pills
where can i get clomid tablets: can you buy cheap clomid no prescription – where to get generic clomid online
https://cheapestindia.com/# buy medicines online in india
https://cheapestmexico.shop/# buying prescription drugs in mexico
online pharmacy no prescriptions: order prescription from canada – canadian mail order prescriptions
https://cheapestcanada.com/# canadianpharmacyworld com
http://36and6health.com/# no prescription pharmacy paypal
cheapest pharmacy prescription drugs: 36 and 6 pharmacy – pharmacy online 365 discount code
https://cheapestmexico.shop/# purple pharmacy mexico price list
reputable indian pharmacies indian pharmacy online best india pharmacy
medikamente rezeptfrei: ohne rezept apotheke – online apotheke preisvergleich
http://eumedicamentenligne.com/# pharmacie en ligne france livraison belgique
pharmacie en ligne sans ordonnance: pharmacie en ligne sans ordonnance – Achat mГ©dicament en ligne fiable
gГјnstige online apotheke: eu apotheke ohne rezept – internet apotheke
https://eufarmaciaonline.com/# farmacia online espaГ±a envГo internacional
online apotheke deutschland: online apotheke gГјnstig – online apotheke
farmaci senza ricetta elenco: comprare farmaci online all’estero – farmacia online
online apotheke versandkostenfrei: online apotheke – internet apotheke
http://eumedicamentenligne.com/# Pharmacie en ligne livraison Europe
farmacias online seguras en espaГ±a: farmacias online baratas – farmacias direct
https://eufarmacieonline.shop/# Farmacia online piГ№ conveniente
farmacie online sicure: acquistare farmaci senza ricetta – Farmacie on line spedizione gratuita
pharmacie en ligne france livraison belgique Pharmacie Internationale en ligne vente de mГ©dicament en ligne
Viagra pas cher livraison rapide france Viagra generique en pharmacie Viagra 100 mg sans ordonnance
pharmacie en ligne livraison europe: kamagra pas cher – pharmacie en ligne livraison europe
pharmacie en ligne fiable: pharmacie en ligne – pharmacie en ligne france livraison internationale
pharmacie en ligne pas cher: Acheter Cialis 20 mg pas cher – Pharmacie sans ordonnance
Viagra gГ©nГ©rique pas cher livraison rapide: Viagra sans ordonnance 24h – Prix du Viagra 100mg en France
pharmacie en ligne france fiable: pharmacie en ligne pas cher – Achat mГ©dicament en ligne fiable
Pharmacie en ligne livraison Europe: pharmacie en ligne sans ordonnance – pharmacie en ligne france livraison belgique
Pharmacie Internationale en ligne: Medicaments en ligne livres en 24h – pharmacie en ligne sans ordonnance
Achat mГ©dicament en ligne fiable: Levitra acheter – pharmacie en ligne france fiable
Viagra pas cher inde: Viagra sans ordonnance 24h – Viagra 100mg prix
Hello.
This post was created with XRumer 23 StrongAI.
Good luck 🙂
Hello!
This post was created with XRumer 23 StrongAI.
Good luck 🙂
pharmacie en ligne: kamagra pas cher – pharmacie en ligne sans ordonnance
pharmacies en ligne certifiГ©es: Acheter Cialis 20 mg pas cher – Pharmacie en ligne livraison Europe
Quand une femme prend du Viagra homme: Le gГ©nГ©rique de Viagra – Viagra 100 mg sans ordonnance
pharmacie en ligne: pharmacie en ligne sans ordonnance – pharmacie en ligne france pas cher
п»їpharmacie en ligne france: levitra generique – Pharmacie sans ordonnance
Achat mГ©dicament en ligne fiable: levitra generique prix en pharmacie – vente de mГ©dicament en ligne
Pharmacie en ligne livraison Europe: cialis sans ordonnance – pharmacie en ligne france livraison belgique
Viagra homme prix en pharmacie sans ordonnance: Viagra generique en pharmacie – Acheter Sildenafil 100mg sans ordonnance
pharmacie en ligne fiable: levitra en ligne – Pharmacie sans ordonnance
Achat mГ©dicament en ligne fiable: Pharmacies en ligne certifiees – acheter mГ©dicament en ligne sans ordonnance
Pin Up Kazino ?Onlayn: Pin-Up Casino – Pin Up Kazino ?Onlayn
https://autolux-azerbaijan.com/# Pin Up Azerbaycan ?Onlayn Kazino
Pin Up: Pin up 306 casino – Pin Up Kazino ?Onlayn
https://autolux-azerbaijan.com/# Pin-up Giris
?Onlayn Kazino: Pin Up Kazino ?Onlayn – ?Onlayn Kazino
?Onlayn Kazino: Pin Up Kazino ?Onlayn – Pin-Up Casino
pin-up 141 casino: Pin-Up Casino – Pin-up Giris
pin-up kazino: Pin Up Kazino ?Onlayn – ?Onlayn Kazino
It’s a shame you don’t have a donate button! I’d definitely donate to this brilliant blog!
I guess for now i’ll settle for book-marking and adding
your RSS feed to my Google account. I look forward to new updates and will talk about this website with my Facebook group.
Talk soon!
If some one wishes to be updated with most up-to-date technologies after that he must be
pay a visit this website and be up to date every day.
If some one wishes to be updated with newest technologies then he must be pay a quick visit this site and be up to date everyday.
Hi to all, the contents existing at this web page are truly remarkable for people experience, well, keep
up the nice work fellows.
Nice blog here! Also your website loads up very fast!
What web host are you using? Can I get your affiliate link to your host?
I wish my site loaded up as quickly as yours lol
I blog frequently and I truly thank you for your content.
This article has truly peaked my interest.
I am going to take a note of your site and keep checking for new details
about once a week. I subscribed to your Feed as well.
Write more, thats all I have to say. Literally, it seems as though you relied on the video
to make your point. You clearly know what youre talking about,
why throw away your intelligence on just posting videos to
your site when you could be giving us something informative to read?
If some one desires to be updated with latest technologies therefore he must be pay
a quick visit this web site and be up to date daily.
Heya i am for the primary time here. I came across this board
and I find It truly helpful & it helped me out much. I am hoping to offer something back and help others like you aided me.
My family members every time say that I am killing my time here at web, however I know I am getting knowledge everyday by reading such fastidious content.
Everything is very open with a very clear clarification of the
issues. It was truly informative. Your site is extremely helpful.
Thank you for sharing!
Hi there mates, fastidious post and nice arguments commented at this place, I am truly enjoying by
these.
Sweet blog! I found it while surfing around on Yahoo News.
Do you have any tips on how to get listed in Yahoo News?
I’ve been trying for a while but I never seem to get there!
Cheers
I know this website presents quality dependent articles and extra data, is there
any other web page which offers these kinds of stuff in quality?
Do you have a spam problem on this blog; I also
am a blogger, and I was curious about your situation; many of us have created some
nice practices and we are looking to trade methods with others, please shoot me an e-mail if interested.
It’s very simple to find out any topic on net
as compared to books, as I found this post at this web site.
If you desire to take much from this article then you have to apply these methods to
your won website.
Bienvenue sur notre blog, votre plateforme ultime pour les infos sur les stars africaines du monde des plateformes mediatiques et des emissions de tele-realite https://mediaeventhub.africa/ ! Des nouveaux courants dans l’industrie du show business africain aux commerages les plus sensationnels sur les celebrites, nous vous informerons de toutes les histoires passionnantes a travers le continent. Que ce soit des partenariats musicaux innovantes, de instants intenses dans les emissions de tele-realite, ou de histoires personnelles emouvants de vos stars preferees, nous tracons tout. La scene du divertissement en Afrique regorge de talents, et notre blog est la pour vous amener plus pres des grands noms qui redefinissent l’industrie.
Les emissions de tele-realite africaines ont conquis le monde, revelant la variete culturelle, la innovation et l’authenticite uniques du continent. Des emissions comme « Big Brother Naija », « Les Vraies Femmes de Lagos » et « Temptation Island South Africa » restent au sommet des audiences des publics massives, eveillant des discussions et federant des fans bien plus loin de l’Afrique. Nous nous immergeons dans les situations complexes, les connexions et les moments inoubliables qui font de ces shows des essentiels a la tele. Notre blog ne se restreint pas a couvrir stars, mais analyse la portee culturelle de ces projets, soulignant le poids grandissant de la pop culture africaine a l’echelle internationale.
Notre blog celebre egalement les personnes du monde mediatique et les jeunes prodiges qui font parler d’eux en Afrique. Des comediens brillants aux animateurs populaires, en sans oublier les createurs de contenu sur les plateformes sociales, nous saluons les performances de ceux qui changent le show business sur le territoire. Nous parlons de recompenses gagnees dans les films nigerians, des participations remarquables dans des projets globaux ou des actes courageux dans des clips musicaux, nous vous offrons des confidences speciales et des recits au-dela de la renommee. Vous trouverez des profils de figures influentes comme Bonang Matheba, qui ont non seulement gagne les fans locaux, mais aussi acquis une consecration universelle.
Ne nous perdez pas de vue pour les nouvelles fraiches et nouveautes en primeur sur vos personnalites preferees d’Afrique. Notre blog est un espace pour les fans de spectacle qui veulent suivre avec les polemiques de stars, les projets a l’affiche et les tendances culturelles qui remodelent l’industrie. Qu’il s’agisse d’un un suiveur devoue de la pop culture africaine ou un observateur des infos du showbiz, notre blog vous assure de vous garder au courant, distrait et motive par le monde actif des plateformes mediatiques et shows de realites televisees en Afrique.
In our blog, we bring you the most recent updates and entertaining news about the most popular UK stars from the worlds of entertainment, reality TV, and showbiz. Whether you’re a fan of hit reality shows like Love Island, The Only Way Is Essex, or Made in Chelsea, or you’re enthusiastic to track the lives of the UK’s top social media content creators, our platform covers it all. From intriguing behind-the-scenes drama to exclusive interviews, we ensure you’re in the know with everything happening in the world of your preferred celebrities – http://x4kurd.freetzi.com/member.php?action=profile&uid=93987 .
UK reality TV celebrities have gained huge attention over the years, transforming from everyday characters into household names with massive fanbases. Our platform delves into their personal and professional lives, offering insights into their latest businesses, romances, and dramas. Whether it’s a new love story brewing on Love Island or a cast member from Geordie Shore starting a new business, you’ll find thorough stories that reveal the glamorous yet sometimes chaotic lives of these personalities.
Создание глубинных источников на чистую воду — это основной процесс в проектировании независимой системы снабжения водой частного дома. Этот метод содержит технический анализ, анализ грунта и гидрогеологическое обследование площадки, чтобы найти лучший участок для бурильных работ. Глубина водозабора зависит от геологических условий, что определяет её разновидность: мелкий источник, скважина на песок или подземная – https://techno-voda.ru/obzor-datchika-plameni-siemens-qra-2/ . Качественно выполненная водозаборная скважина предоставляет качественную и непрерывную воду в любой сезон, исключая шанс исчезновения водного ресурса и попадания примесей. Новые методы позволяют легко механизировать подачу воды, упрощая её эксплуатацию для повседневной жизни.
По завершении бурильных работ необходимо спроектировать водопровод, чтобы она была долговечной и устойчивой. Организация предполагает оснащение насосами, фильтрацию воды и проведение трубопровода. Также необходимо предусмотреть систему управления, которая будет обеспечивать давление и водозабор. Утепление в зимний период и обеспечение её бесперебойной работы в холода также остаются необходимыми. С правильным проектом к бурению и монтажу удастся получить коттедж комфортной системой, делая жизнь за городом комфортной и удобной.
Ленинградская область характеризуется трудной геологической составом, что определяет задачу создания скважин на воду уникальным в каждом участке. Территория представляет собой различие основ и водных структур, которые требуют экспертный подход при определении позиции и глубины создания. Подземная вода может находиться как на небольшой уровне, так и быть на нескольких десятков метров, что определяет трудоемкость действий.
Ключевым моментом, определяющих тип скважины (http://gubernya63.ru/novosti-partnerov/polnoe-rukovodstvo-po-ispolzovaniju-skvazhiny-na-dache.html ), выступает геология и глубина подземной воды. В Ленинградской области чаще всего сверлят глубокие скважины, которые поставляют доступ к чистой и надежной воде из скрытых пластов. Такие скважины известны длительным сроком использования и высоким качеством ресурса, однако их постройка нуждается в существенных затрат и особого оснащения.
Процесс сверления в регионе подразумевает использование инновационных установок и средств, которые могут управляться с плотными породами и защищать от возможные разрушения грунта скважины. Крайне важно, что необходимо учитывать санитарные требования и правила, так как вблизи некоторых населённых мест находятся охраняемые природные ресурсы и природные комплексы, что предполагает особый внимательный подход к буровым действиям.
Водные запасы из подземных источников в Ленинградской области замечательна чистотой, так как она скрыта от поверхностных загрязнений и обогащена гармоничный состав составных элементов. Это превращает такие источники востребованными для коттеджей и компаний, которые выбирают долговечность и чистоту систем водоснабжения.
Among the best studied of these interactions are thiazide diuretics and drugs that are chemically distinct but share a similar mechanism of action e generic cytotec without rx That campaign is expected tobring 10 million new patients within a year
get cytotec for sale 5 mmol L poses a high risk of cardiac arrhythmias and calls for urgent replacement
cost cheap cytotec without dr prescription And again, nutrition lends itself to it
Do you have a spam problem on this blog; I also
am a blogger, and I was wanting to know your situation; many of us have created some nice methods and
we are looking to exchange methods with other folks, why not shoot me an email if interested.
For hottest information you have to pay a quick visit world wide web and on world-wide-web
I found this site as a most excellent website for newest
updates.
Espectro de vibracion
Sistemas de equilibrado: esencial para el rendimiento uniforme y efectivo de las dispositivos.
En el campo de la innovación moderna, donde la productividad y la seguridad del sistema son de gran relevancia, los aparatos de ajuste juegan un papel esencial. Estos aparatos adaptados están creados para calibrar y regular componentes móviles, ya sea en equipamiento productiva, transportes de movilidad o incluso en dispositivos caseros.
Para los profesionales en conservación de equipos y los especialistas, trabajar con dispositivos de balanceo es fundamental para garantizar el desempeño suave y confiable de cualquier sistema rotativo. Gracias a estas alternativas innovadoras innovadoras, es posible limitar significativamente las vibraciones, el sonido y la carga sobre los soportes, extendiendo la vida útil de piezas valiosos.
También importante es el papel que tienen los equipos de balanceo en la atención al usuario. El apoyo técnico y el conservación constante utilizando estos sistemas habilitan ofrecer prestaciones de gran calidad, elevando la satisfacción de los clientes.
Para los propietarios de proyectos, la financiamiento en sistemas de balanceo y detectores puede ser fundamental para optimizar la productividad y productividad de sus sistemas. Esto es principalmente relevante para los emprendedores que manejan pequeñas y modestas negocios, donde cada punto cuenta.
También, los dispositivos de balanceo tienen una vasta uso en el campo de la prevención y el supervisión de calidad. Habilitan detectar potenciales defectos, reduciendo mantenimientos elevadas y daños a los sistemas. Incluso, los información recopilados de estos dispositivos pueden utilizarse para mejorar sistemas y aumentar la visibilidad en buscadores de investigación.
Las sectores de implementación de los equipos de balanceo abarcan numerosas ramas, desde la producción de vehículos de dos ruedas hasta el supervisión ambiental. No afecta si se trata de grandes fabricaciones industriales o modestos locales caseros, los equipos de equilibrado son fundamentales para asegurar un rendimiento óptimo y libre de detenciones.
Subjects were randomized to receive either bupropion 150 mg twice daily for four weeks followed by one week of washout and four more weeks of placebo twice daily or vice versa priligy dapoxetine Steve Halligan, Darren Boone, Lucinda Archer, Tariq Ahmad, Stuart Bloom, Manuel Rodriguez Justo, Stuart A Taylor, and Sue Mallett
Святки
Святки
dithymol
behew
ligeance
top-sawyer
news-writer
you are really a good webmaster. The web site loading velocity is amazing.
It seems that you are doing any distinctive trick. Also, The contents are masterpiece.
you’ve done a wonderful job in this topic!
Hey there! I realize this is kind of off-topic but I needed to ask.
Does managing a well-established website like yours require
a lot of work? I am completely new to writing a blog however I do write in my diary
daily. I’d like to start a blog so I can share my personal experience and
thoughts online. Please let me know if you have any recommendations or tips for brand new aspiring bloggers.
Appreciate it!
Specialists often tailor treatment plans based on comorbidities when prescribing Generic 5mg cialis. Unlock your full potential and awaken a new era of intimacy.
маркетплейс для реселлеров https://marketplace-akkauntov-top.ru/
продать аккаунт покупка аккаунтов
маркетплейс аккаунтов соцсетей купить аккаунт
Account Trading Social media account marketplace
Profitable Account Sales Account Selling Service
Sell accounts Secure Account Purchasing Platform
Account marketplace Ready-Made Accounts for Sale
Database of Accounts for Sale Accounts for Sale
Account Trading Service Account Buying Service
Database of Accounts for Sale Database of Accounts for Sale
sell account buy account
account acquisition account buying platform
gaming account marketplace website for selling accounts
account selling service account trading
gaming account marketplace account market
database of accounts for sale gaming account marketplace
website for selling accounts guaranteed accounts
database of accounts for sale profitable account sales
account trading buy and sell accounts
account buying platform accounts for sale
account exchange service purchase ready-made accounts
find accounts for sale account selling service
secure account purchasing platform account sale
account purchase accounts market
profitable account sales sell account
verified accounts for sale buy and sell accounts
buy accounts secure account purchasing platform
account buying platform https://accounts-offer.org
account trading service https://accounts-marketplace.xyz
account selling service https://social-accounts-marketplaces.live/
What once felt like a confession now feels like control, regained through walmart viagra coupon. Your 15% bonus is ready – apply SAFE15 at checkout.
account market https://accounts-marketplace.live
account trading platform https://social-accounts-marketplace.xyz
ready-made accounts for sale accounts marketplace
buy account https://social-accounts-marketplace.live
social media account marketplace https://buy-accounts.live
площадка для продажи аккаунтов akkaunty-na-prodazhu.pro
купить аккаунт kupit-akkaunt.xyz
продать аккаунт akkaunt-magazin.online
купить аккаунт https://akkaunty-optom.live/
покупка аккаунтов https://online-akkaunty-magazin.xyz
продать аккаунт https://kupit-akkaunt.online/
buy facebook ads accounts facebook ad account for sale
buy fb account https://buy-ad-accounts.click
cheap facebook accounts https://buy-ad-account.top/
facebook ad account for sale https://buy-ads-account.click
buy facebook ad accounts https://ad-account-buy.top
buy a facebook ad account https://buy-ad-account.click
google ads agency account buy https://buy-ads-account.top
buy adwords account google ads accounts for sale
google ads reseller https://ads-account-buy.work
google ads account for sale https://buy-ads-invoice-account.top
google ads reseller https://buy-account-ads.work
old google ads account for sale google ads accounts
google ads reseller https://ads-agency-account-buy.click
buy google ads threshold accounts https://buy-verified-ads-account.work
verified facebook business manager for sale https://buy-verified-business-manager-account.org
facebook business manager buy buy-verified-business-manager.org
buy facebook business account business-manager-for-sale.org
verified bm for sale https://buy-business-manager-verified.org/
buy facebook business manager account https://buy-business-manager-accounts.org
buy tiktok ads account https://buy-tiktok-ads-account.org
buy tiktok ad account https://tiktok-ads-account-buy.org
tiktok ads account for sale https://tiktok-ads-account-for-sale.org
tiktok ads account for sale https://buy-tiktok-ads-accounts.org
tiktok ads account for sale https://buy-tiktok-business-account.org
buy tiktok business account https://buy-tiktok-ads.org
However, it is necessary to prioritize liver well being by avoiding
extreme alcohol consumption and minimizing the use of
different substances that may pressure the liver.
Adequate hydration and a balanced food plan are additionally
important to help kidney well being. As A End Result Of we solely
work with producers or their distributors directly,
almost the entire medicine we supply come instantly from their manufacturing services.
Anabolic steroids like Dianabol, Trenbolone,
and Deca-Durabolin are potent choices for swift muscle progress, recognized for enhancing protein synthesis
and nitrogen retention. Injectable steroids typically supply extra efficient absorption, bypassing the liver’s metabolic results found in oral
varieties. Whereas efficient, customers must weigh potential well being dangers, together with hormonal imbalances and cardiovascular issues.
Understanding legal constraints and sourcing from legitimate suppliers is
crucial. There’s extra to study relating to secure usage and alternatives for
muscle development. If you’re searching for the
best authorized steroid various to Dianabol with out
the dangers of unlawful anabolic use, D-Balfrom CrazyBulk stands
out as a top choice. Designed to imitate the muscle-building energy of Dianabol, D-Bal provides massive
positive aspects in muscle mass, energy, and performance —
all with out dangerous unwanted side effects or prescriptions.
Not solely that, we use advanced encryption expertise to guard your private and payment info, guaranteeing your information remains safe all through your shopping experience.
When Well Being Canada identifies unauthorized products that will pose critical health risks, Health Canada takes acceptable action and informs Canadians.
This contains seizing unauthorized products and dealing with the Canada Border Services Company (CBSA) to
assist forestall further importation of unauthorized products.
So, when you have a contest coming up, or you merely want to look chiseled, then you ought to purchase Halotestin at Maxlabs.co.
We ensure that each of the Halotestin products on the market in our on-line store are of high-quality and reasonably
priced. We checked out how much of each ingredient was used to ensure it is protected and efficient.
Check for clinical trials and scientific studies to ensure a legal steroid is safe to make use of.
It has for years, been the popular steroid for
females trying to construct fat-free muscle mass. However being an oral, DHT-steroid, it’s harsh
on the lipids and can additionally be liver toxic with prolonged use.
It is considered one of many gentlest legal anabolic dietary
supplements, for growing muscle tissue. Even in low doses,
this fat burning steroid with all natural elements helps you
to keep under 12% fat. The Top Reasons to Use Clenbutrol As a chopping
steroid, the primary thought is that Clenbutrol can solely be used for chopping phases or health objectives that have to do with
shedding weight.
Moreover, by strategically combining compounds, customers might have the ability to achieve their desired
results extra efficiently and effectively, making probably the most out of their Anavar cycle.
In this part, we’ll discover the concept of Anavar stacking and
its potential benefits. Anavar stacking involves
combining Anavar with other compounds to boost its effects or achieve particular objectives.
Whether you’re aiming for a bulking phase to pack on muscle mass or a chopping
section to attain a lean and outlined physique, stacking Anavar with synergistic compounds
can present an added benefit.
No prescription is required to get authorized
steroids online and from stores. They are bought as over-the-counter supplements like multivitamins and other well being and fitness supplements.
There are plenty of products that might make your dream of getting massive muscular tissues come
true. Some of the best authorized steroids for muscle acquire are D-Bal,
D Bulk, and Testol 140.
This Nandrolone Decanoate dosage for mass remains the identical for
the first six weeks. This could be very a lot true if Deca Durabolin is used as the first
compound within the cycle, and testosterone is merely used as a
testosterone substitute remedy. Others try to limit their
Deca durabolin consumption for worry that
they may suffer from its testosterone-related side effects
significantly the dreaded erectile dysfunction known as Deca dick.
But dosing Deca durabolin injectable steroid has turn out to
be an issue for many men, even for advanced steroid customers.
Consultants share what you should know earlier than dropping dollars on this fairly new
merchandise.
Roids USA purchasers, who’re largely athletes of all ranges and kinds, have
previously proved the efficacy of testosterone-boosting medication. There
will be no muscle tissue tearing, you’ll enhance energy training, and have
the power to prepare for longer durations of time. Steroids purchase you rather more
time to train so they provide athletes with a big competitive benefit.
If you take a look at bodybuilders from the 70s, they give the impression of being different than today’s bodybuilders.
D-Bal Max is more like the anabolic steroid stacks of right now
than those of the past. Brand Abstract Testo-Max is probably
one of the strongest authorized steroids available
for males guys on steroids before And after the market.
It’s made by a highly respected model, CrazyBulk, recognized for only
making top-quality FDA-approved dietary supplements and steroids.
It’s a complete formula that addresses multiple elements of
muscle growth simultaneously. What actually sets D-Bal Max aside is its capacity to deliver
speedy, noticeable results. This guide covers everything
you want to know to decide on and use authorized steroids effectively.
Major Reasons For Selecting Anvarol Anvarol, like the rest of the legal anabolic dietary
supplements from Loopy Bulk, is a flexible one, in comparability with traditional dietary supplements.
Rebuilding trust often begins in small ways-including openness to using male viagra before and after size. No questions, no stress – just private results.
70918248
References:
is testosterone a steroid (https://Www.autoskolapavlin.com/)
fish antibiotics Azithromycin: zithromaxotc.com – Azithromycin treats
reviews of patients using Ventolin: Ventolin – Ventolin recall
buy aged facebook ads accounts website for buying accounts sell account
buy facebook ads account ready-made accounts for sale account marketplace
hcqs 200 generic name: hydroxychloroquine sulfate 200 mg tablet – hydroxychloroquine 200 mg tablet
п»їstrattera: tourism.ju.edu.jo/Lists/AlumniInformation/DispForm.aspx?ID=250 – strattera 18 mg coupon
illevitrain.com: illevitrain.com – Levitra vs viagra
https://www.stateofartacademy.com/groups/clomid/members/all-members/ clomiphene Citrate 100 mg uses
dianabol cycle reddit
References:
dianabol Only cycle reddit, https://topbookmarks.Cloud/,
kamagra 100mg https://community.jmp.com/t5/user/viewprofilepage/user-id/62515
prednisolone for dog https://www.deviantart.com/prelone/art/Prelone-Prednisolone-Tablets-for-Asthma-Price-1091887202
https://www.flickr.com/people/dapoxetine/ dapoxetine buy
https://bento.me/vidalista-black buy Vidalista
0950663759 – Vladimir (Sergey) Romanenko (Obman, Kidalo)!
+38 095 0663759 – Владимир (Сергей) Романенко, Одесса – Мошенник, продает нерабочий товар на OLX!
buy qvar 80mcg https://community.nxp.com/t5/user/viewprofilepage/user-id/230972
+38 0950663759 – Володимир (Сергій) Романенко, Одеса – Купила товар, оплатила накладеним платежем. Після отримання виявилося, що товар неробочий. Раджу нічого не купувати в цього шахрая!
Been entrancing https://joyorganics.com/collections/usda-certified-cbd-oil-tinctures at dusk for the treatment of a four weeks now, and they’ve honestly make a difference. I don’t boom instantly, but I feel myself relaxing and falling asleep easier. The drowse feels deeper too — I’m not waking up as much. No queer side effects, justified calmer nights and improved mornings.
Le site web telecharger 1xbet pour android propose des informations sur les paris sportifs, les cotes et les evenements en direct. Football, tournois populaires, cotes et statistiques y sont presentes. Ce site est ideal pour se familiariser avec les fonctionnalites de la plateforme.
Envie de parier 1xbet rdc est une plateforme de paris sportifs en ligne pour la Republique democratique du Congo. Football et autres sports, paris en direct et d’avant-match, cotes, resultats et statistiques. Presentation des fonctionnalites du service.
Online 1xbet cd apk est une plateforme de paris sportifs en ligne. Championnats de football, cotes en direct et resultats sont disponibles. Page d’information sur le service et ses fonctionnalites pour les utilisateurs de la region.
Hey there just wanted to give you a brief heads up and let you know a few of the pictures aren’t loading properly. I’m not sure why but I think its a linking issue. I’ve tried it in two different browsers and both show the same results.
Amphetamine
Нужен эвакуатор? вызвать эвакуатор в спб дешево быстрый выезд по Санкт-Петербургу и области. Аккуратно погрузим легковое авто, кроссовер, мотоцикл. Перевозка после ДТП и поломок, помощь с запуском/колесом. Прозрачная цена, без навязываний.
Нужны заклепки? заклепка вытяжная нержавеющая для прочного соединения листового металла и профиля. Стойкость к коррозии, аккуратная головка, надежная фиксация даже при вибрациях. Подбор размеров и типа борта, быстрая отгрузка и доставка.
Что изменилось: Продать фотографии — скупка в Москве
Нужен эвакуатор? вызвать эвакуатор рядом быстрый выезд по Санкт-Петербургу и области. Аккуратно погрузим легковое авто, кроссовер, мотоцикл. Перевозка после ДТП и поломок, помощь с запуском/колесом. Прозрачная цена, без навязываний.
This is a really too good post. This article gives truly quality and helpful information. I’m definitely going to look into it. Really very useful topic info is provided here. Thank you so much buddy and Keep up the good work.
Delicious – here: https://confidantclasses.in/pages/popular-payment-methods-in-casinos_1.html
All the Details: https://heavens.pt/uncategorized/30-finest-copywriting-advertising-one-to-nevertheless-send-results-buy-gmail-accounts-with-phone-verified/
View all: https://www.figures.com/stage/articles.php?psychology-of-gambling-why-we-take-risks_1.html
Нужна косметика? магазин корейской косметики большой выбор оригинальных средств K-beauty. Уход для всех типов кожи, новинки и хиты продаж. Поможем подобрать продукты, выгодные цены, акции и оперативная доставка по Алматы.
casino website elonbet casino game
Планируешь перевозку? услуги перевозок удобное решение для переездов и доставки. Погрузка, транспортировка и разгрузка в одном сервисе. Работаем аккуратно и оперативно, подбираем машину под объём груза. Почасовая оплата, без переплат.
Ищешь грузчиков? заказать грузчиков помощь при переезде, доставке и монтаже. Аккуратная работа с мебелью и техникой, подъем на этаж, разборка и сборка. Гибкий график, быстрый выезд и понятная стоимость.
стартовал наш новый https://utgardtv.com IPTV?сервис, созданный специально для зрителей из СНГ и Европы! более 2900+ телеканалов в высоком качестве (HD / UHD / 4K). Пакеты по регионам: Россия, Украина, Беларусь, Кавказ, Европа, Азия. Фильмы, Спорт, Музыка, Дети, Познавательные. Отдельный пакет 18+
Ищешь музыку? слушать и скачать музыку популярные треки, новые релизы, плейлисты по жанрам и настроению. Удобный плеер, поиск по исполнителям и альбомам, стабильное качество звука. Включайте музыку в любое время.
need a video? milan production company offering full-cycle services: concept, scripting, filming, editing and post-production. Commercials, corporate videos, social media content and branded storytelling. Professional crew, modern equipment and a creative approach tailored to your goals.
Хочешь фотокнигу? фотокниги цена индивидуальный дизайн, премиальная печать и аккуратная сборка. Большой выбор размеров и переплётов, помощь с версткой. Быстрое производство и доставка
Продажа тяговых https://faamru.com аккумуляторных батарей для вилочных погрузчиков, ричтраков, электротележек и штабелеров. Решения для интенсивной складской работы: стабильная мощность, долгий ресурс, надёжная работа в сменном режиме, помощь с подбором АКБ по параметрам техники и оперативная поставка под задачу
Продажа тяговых https://ab-resurs.ru аккумуляторных батарей для вилочных погрузчиков и штабелеров. Надёжные решения для стабильной работы складской техники: большой выбор АКБ, профессиональный подбор по параметрам, консультации специалистов, гарантия и оперативная поставка для складов и производств по всей России
Продажа тяговых https://faamru.com аккумуляторных батарей для вилочных погрузчиков, ричтраков, электротележек и штабелеров. Решения для интенсивной складской работы: стабильная мощность, долгий ресурс, надёжная работа в сменном режиме, помощь с подбором АКБ по параметрам техники и оперативная поставка под задачу
цена плоской кровли за квадратный метр https://ustrojstvo-ploskoj-krovli.ru
Продажа тяговых https://ab-resurs.ru аккумуляторных батарей для вилочных погрузчиков и штабелеров. Надёжные решения для стабильной работы складской техники: большой выбор АКБ, профессиональный подбор по параметрам, консультации специалистов, гарантия и оперативная поставка для складов и производств по всей России
The best is right here: https://hansrubber.com/2025/03/25/casino-infonity-discover-the-best-rtg-casinos-100-free-chip-offers/
УЗИ на дому в Севастополе https://vrachnadom-sev.ru
Продажа тяговых faamru.com аккумуляторных батарей для вилочных погрузчиков, ричтраков, электротележек и штабелеров. Решения для интенсивной складской работы: стабильная мощность, долгий ресурс, надёжная работа в сменном режиме, помощь с подбором АКБ по параметрам техники и оперативная поставка под задачу
кіно онлайн якості фільми 2026 з українським дубляжем
Если нужно спрятать проводку и коммуникации, натяжной потолок делает это без коробов, выбирайте бесшовная ткань, оно выглядит аккуратно даже при сложной геометрии комнаты, обсудите тип профиля и как сделают обход труб и углы, получится ровно и аккуратно без лишних затрат времени https://natyazhnye-potolki-moskva.ru/
Натяжной потолок подходит для ремонта, когда хочется чистого результата за день, хорошо переносит перепады температуры в квартире; сначала замер, затем изготовление, потом монтаж без суеты https://potolki-decarat.ru/
Продвижение сайтов https://team-black-top.ru под ключ: аудит, стратегия, семантика, техоптимизация, контент и ссылки. Улучшаем позиции в Google/Яндекс, увеличиваем трафик и заявки. Прозрачная отчетность, понятные KPI и работа на результат — от старта до стабильного роста.
Тяговые аккумуляторные https://ab-resurs.ru батареи для складской техники: погрузчики, ричтраки, электротележки, штабелеры. Новые АКБ с гарантией, помощь в подборе, совместимость с популярными моделями, доставка и сервисное сопровождение.
Продажа тяговых АКБ https://faamru.com для складской техники любого типа: вилочные погрузчики, ричтраки, электрические тележки и штабелеры. Качественные аккумуляторные батареи, долгий срок службы, гарантия и профессиональный подбор.
дивитися серіал усі серії документальне кіно онлайн безкоштовно
комедії онлайн 2025 психологічні трилери українською
Техническое обслуживание грузовых и коммерческих автомобилей и спецтехники. Снабжение и поставки комплектующих для грузовых автомобилей, легкового коммерческого транспорта на бортовой платформе ВИС lada: https://ukinvest02.ru/
сделать гражданство румынии
https://sonabet.pro/
https://sonabet.pro/
Профессиональный дилер по ссылке предоставляет возможность подобрать профили для работы. Когда вы планируете купить аккаунт Facebook для рекламы, обычно задача не в «одном логине», а в управляемости: ровная работа, разделение задач между участниками и ясные доступы. Мы подготовили практичный чек-лист, чтобы вы сразу понимали что сравнивать перед покупкой.Быстрый ориентир: откройте базовых разделов Facebook, а для рекламной задачи — идите сразу в профильные разделы: Facebook под рекламу. Ключевая идея: покупка — стартовая точка. Дальше решает система: кто имеет доступ, как вы ведете кампании аккуратно, как фиксируете изменения и как отделяете тесты от масштабирования. Главная фишка нашего сервиса — это наличие эксклюзивной образовательной секции, где собраны актуальные гайды по перформанс-подходу. Команда подскажем, как аккуратно выстроить процесс, чтобы масштабирование шло спокойнее и всё было в рамках правил платформ . Оформляя здесь, вы получаете не только комплект, но и полную поддержку, ясное описание, гарантию на момент покупки плюс самые конкурентные цены в нише. Важно: используйте активы законно и в соответствии с правилами платформ.
Мультимедийный интегратор здесь интеграция мультимедийных систем под ключ для офисов и объектов. Проектирование, поставка, монтаж и настройка аудио-видео, видеостен, LED, переговорных и конференц-залов. Гарантия и сервис.
1xbet gratuit pour Android telecharger 1xbet pour android
сервис рассылок почты российские сервисы для рассылки email
задвижка 30с41нж ду 80 ру 16 задвижка фланцевая 30с41нж
кино онлайн бесплатно zfilm-hd официальный сайт зеркало
https://pamyatniki-granitnye.by/
кино онлайн 2025 кино онлайн 2025
the best adult generator nsfw image to video create erotic videos, images, and virtual characters. flexible settings, high quality, instant results, and easy operation right in your browser. the best features for porn generation.
Профессия риэлтор – плюсы и минусы, где учиться, зарплата https://vc.ru/1481366
big-bag-rus.ru — производитель биг-бэгов и контейнеров МКР (мешки МКР) из полипропилена: мягкая тара для перевозки и хранения сыпучих грузов. Подбор конструкции, размеры и грузоподъёмность под задачу, оптовые цены, доставка по России. Купить биг-бэги напрямую: https://big-bag-rus.ru/
Накрутка бустов в Телеграм – Мой личный рейтинг из 19 надёжных сервисов для успешного быстрого продвижения в 2026 году https://vc.ru/2186939
bookmaker melbet melbet telecharger
квартира в жк жк светский лес официальный сайт
Изделия из пластмасс https://ftk-plastik.ru собственного производства. Продажа оптом и в розницу, широкий ассортимент, надёжные материалы и стабильные сроки. Выполняем заказы любой сложности по техническому заданию клиента.
Производим пластиковые https://zavod-dimax.ru окна и выполняем профессиональную установку. Качественные материалы, точные размеры, быстрый монтаж и гарантийное обслуживание для комфорта и уюта в помещении.
Жалюзи от производителя https://balkon-pavilion.ru изготовление, продажа и профессиональная установка. Большой выбор дизайнов, точные размеры, надёжная фурнитура и комфортный сервис для квартир и офисов.
Производство оборудования https://repaircom.ru с предварительной разработкой и адаптацией под требования клиента. Качественные материалы, точные расчёты, соблюдение сроков и техническая поддержка.
Торговая мебель https://woodmarket-for-business.ru от производителя для бизнеса. Витрины, стеллажи, островные конструкции и кассовые модули. Индивидуальный подход, надёжные материалы и практичные решения для продаж.
Szukasz kasyna? kasyno pl w Polsce: wybor najlepszych stron do gry. Licencjonowane platformy, popularne sloty i kasyna na zywo, wygodne metody platnosci, uczciwe warunki i aktualne oferty.
Grasz w kasynie? Kasyno internetowe w Polsce to najlepsze miejsca do gry w latach 2025–2026. Zaufane strony, sloty i gry na zywo, przejrzyste warunki, wygodne wplaty i wyplaty.
Ищешь блины для штанки? https://blin-na-shtangy.ru для эффективных силовых тренировок. Чугунные и резиновые диски, разные веса, долговечность и удобство использования. Решение для новичков и опытных спортсменов.
Накрутка комментариев в Телеграм – ТОП-20 сервисов в 2026 году (новая схема) и бесплатные способы https://vc.ru/1390157
Hello folks!
I came across a 153 great tool that I think you should check out.
This resource is packed with a lot of useful information that you might find helpful.
It has everything you could possibly need, so be sure to give it a visit!
https://www.horabrasil.com.br/2022/10/22/seguro-de-risco-por-que-voce-deveria-ter-algum/
Furthermore don’t overlook, folks, — one always may in this publication locate answers to address the the absolute complicated questions. The authors attempted to explain all of the content using an most accessible way.
Do you need a master? Philadelphia handyman for apartments and houses. Repairs, installation, replacement, and maintenance. Experienced specialists, professional tools, and a personalized approach to every task.
Проблемы с авто? автоэлектрик фольксваген спб диагностика, ремонт электрооборудования, блоков управления, освещения и систем запуска. Опыт, современное оборудование и точное определение неисправностей.
Celebrity World Care https://celebrityworldcare.com интернет-магазин профессиональной медицинской и натуральной косметики для ухода за кожей при ихтиозе, дерматитах, псориазе и других дерматологических состояниях. Сертифицированные средства с мочевиной, без отдушек и парабенов. Доставка по России.
квартиры жк жк светский лес сочи купить квартиру
Модульные дома https://modulndom.ru под ключ: быстрый монтаж, продуманные планировки и высокое качество сборки. Подходят для круглогодичного проживания, отличаются энергоэффективностью, надежностью и возможностью расширения.
7k casino поддерживает комфортную работу на мобильных устройствах. Сайт корректно отображается на экранах разного размера. Игры сохраняют стабильность. Управление остается простым. Это подходит для мобильной игры: 7k casino официальный сайт
Медсправка для водительского удостоверения https://med-spravki-msk.ru
Mobihub is a service that allows you to create mobile proxies directly from your Android phone. With the app, you can build your own 4G mobile proxy server in minutes. It uses real LTE mobile IP addresses for stable and reliable connections. The setup process is simple and does not require technical skills. This makes Mobihub accessible for beginners and advanced users alike: 4g mobile proxies
проектор для дома магазин проекторов
Любишь азарт? up-x играть онлайн в популярные игры и режимы. Быстрый вход, удобная регистрация, стабильная работа платформы, понятный интерфейс и комфортные условия для игры в любое время на компьютере и мобильных устройствах.
Играешь в казино? up x простой вход, удобная регистрация и доступ ко всем возможностям платформы. Стабильная работа, адаптация под разные устройства и комфортный пользовательский опыт.
Любишь азарт? ап икс официальный играть онлайн легко и удобно. Быстрый доступ к аккаунту, понятная навигация, корректная работа на любых устройствах и комфортный формат для пользователей.
однокомнатная квартира светский лес сочи жк официальный
химчистка и реставрация обуви химчистка обуви в москве
Play online puzzles https://mag.aujourdhui.com/forum/forum-post.asp?cat_id=11&topic_id=1287031 anytime and train your logic and attention skills. Classic and themed puzzles, various sizes, simple gameplay, and comfortable play on computers and mobile devices.
7k casino обеспечивает корректную работу всех разделов сайта. Пользователи не сталкиваются с техническими проблемами. Игры запускаются стабильно. Интерфейс остается понятным. Это повышает доверие к платформе: 7к казино вход
лучшие мужские костюмы мужские костюмы спб
Электромонтажные работы https://electric-top.ru в Москве и области. Круглосуточный выезд электриков. Гарантия на работу. Аварийный электрик.
коррозия у авто? антикоррозийная обработка днища спб эффективная защита от влаги, соли и реагентов. Комплексная обработка кузова и днища, качественные составы и надёжный результат для новых и подержанных авто.
dyson оригинал спб pylesos-dn-7.ru .
дайсон пылесос купить dn-pylesos-3.ru .
санкт петербург магазин дайсон pylesos-dn-6.ru .
пылесос дайсон купить в спб пылесос дайсон купить в спб .
Коррозия на авто? антикоррозийная обработка автомобиля цена мы используем передовые шведские материалы Mercasol и Noxudol для качественной защиты днища и скрытых полостей кузова. На все работы предоставляется гарантия сроком 8 лет, а цены остаются доступными благодаря прямым поставкам материалов от производителя.
dyson спб официальный pylesos-dn-6.ru .
ремонт дайсон в спб pylesos-dn-7.ru .
Планируете мероприятие? тимбилдинг с ии москва уникальные интерактивные форматы с нейросетями для бизнеса. Мы разрабатываем корпоративные мероприятия под ключ — будь то тимбилдинги, обучающие мастер?классы или иные активности с ИИ, — с учётом ваших целей. Работаем в Москве, Санкт?Петербурге и регионах. AI?Event специализируется на организации корпоративных мероприятий с применением технологий искусственного интеллекта.
Украшения для пирсинга https://piercing-opt.ru купить оптом украшения для пирсинга. Напрямую от производителя, выгодные цены, доставка. Отличное качество.
пылесос дайсон беспроводной спб pylesos-dn-7.ru .
Противопожарные двери https://bastion52.ru купить для защиты помещений от огня и дыма. Большой выбор моделей, классы огнестойкости EI30, EI60, EI90, качественная фурнитура и соответствие действующим стандартам.
Нужны цветы? заказать букет цветов закажите цветы с доставкой на дом или в офис. Большой выбор букетов, свежие цветы, стильное оформление и точная доставка. Подойдёт для праздников, сюрпризов и важных событий.
пылесос dyson спб pylesos-dn-7.ru .
дайсон пылесос спб pylesos-dn-6.ru .
O’zbekiston uchun https://uzresearch.uz iqtisodiyot, moliya, ijtimoiy jarayonlar, bozorlar va mintaqaviy rivojlanish kabi asosiy sohalarda tadqiqotlar olib boradigan analitik platforma. Strukturaviy ma’lumotlar va professional tahlil.
Savdo va biznes https://infinitytrade.uz uchun xalqaro platforma. Bozor tahlili, xalqaro savdo, eksport va import, logistika, moliya va biznes yangiliklari. Tadbirkorlar va kompaniyalar uchun foydali materiallar, sharhlar va ma’lumotlar.
Ijtimoiy rivojlanish https://ijtimoiy.uz va jamoat hayoti uchun portal. Yangiliklar, tahlillar, tashabbuslar, loyihalar va ekspert fikrlari. Ijtimoiy jarayonlar, fuqarolik ishtiroki, ta’lim va jamiyatni rivojlantirish bo’yicha materiallar.
Foydali maslahatlar https://grillades.uz va g’oyalar bilan panjara va barbekyu haqida loyiha. Retseptlar, panjara qilish texnikasi va jihozlar va aksessuarlarni tanlash. Mukammal ta’m va muvaffaqiyatli ochiq havoda uchrashuvlar uchun hamma narsa.
Qurilish materiallari https://emtb.uz turar-joy va sanoat qurilishi uchun beton va temir-beton. Poydevorlar, pollar va inshootlar uchun ishonchli yechimlar, standartlarga muvofiqlik, izchil sifat va loyihaga xos yetkazib berish.
Ijtimoiy jarayonlar https://qqatx.uz va jamiyat taraqqiyoti bo’yicha onlayn axborot platformasi. Tegishli materiallar, tahliliy sharhlar, tadqiqotlar va murakkab mavzularning tushuntirishlari aniq va tuzilgan formatda.
Любишь азарт? комета казино зеркало современные слоты, live-форматы, понятные правила и удобный доступ с ПК и смартфонов. Играйте онлайн в удобное время.
Играешь в казино? up x Слоты, рулетка, покер и live-дилеры, простой интерфейс, стабильная работа сайта и возможность играть онлайн без сложных настроек.
Лучшее казино upx играйте в слоты и live-казино без лишних сложностей. Простой вход, удобный интерфейс, стабильная платформа и широкий выбор игр для отдыха и развлечения.
Лучшее казино up x казино играйте в слоты и live-казино без лишних сложностей. Простой вход, удобный интерфейс, стабильная платформа и широкий выбор игр для отдыха и развлечения.
дайсон купить спб дайсон купить спб .
магазин ремней ремни.рф оригинальные модели из натуральной кожи для мужчин и женщин. Классические и современные дизайны, высокое качество материалов, аккуратная фурнитура и удобный выбор для любого стиля.
Самые качественные https://bliny-olimpiiskie.ru широкий выбор весов и форматов. Надёжные материалы, удобная посадка на гриф, долговечное покрытие. Подходят для фитнеса, пауэрлифтинга и регулярных тренировок.
дайсон спб официальный магазин pylesos-dn-kupit-8.ru .
dyson купить спб dyson купить спб .
пылесос dyson пылесос dyson .
Нужна топливная карта? топливная карта для юридических лиц удобный контроль расходов на ГСМ, безналичная оплата топлива, отчетность для бухгалтерии и снижение затрат автопарка. Подключение по договору, выгодные условия для бизнеса.
Хочешь контролировать ГСМ https://bts-oil.ru экономия на топливе, контроль заправок, детальная аналитика и закрывающие документы. Решение для компаний с собственным или арендованным автопарком.
купить пылесос дайсон спб pylesos-dn-kupit-10.ru .
Контроль топлива https://ztm74.ru удобный способ учета и оплаты топлива без наличных. Контроль заправок, лимиты по авто и водителям, отчетность для бухгалтерии и снижение затрат на содержание автопарка.
Топливный контроль топливная карта для юридических лиц эффективное решение для бизнеса с транспортом. Безналичная заправка, учет топлива, детальные отчеты и удобное управление расходами по каждому автомобилю.
Топливные карты для юр лиц https://mazdacenter.ru контроль топлива, прозрачная отчетность, удобство для бухгалтерии и безопасность расчетов. Экономия времени и средств при управлении корпоративным транспортом.
Онлайн-казино Mostbet — слоты, настольные игры и live-дилеры в одном аккаунте. Удобные депозиты, оперативный вывод средств, бонусные предложения и игра с любого устройства.
Top Stories: http://jobhop.co.uk/blog/465104/mercato-hiver-2026–les-transferts-et-rumeurs-cls
The best of the best: official website
дайсон санкт петербург официальный pylesos-dn-kupit-8.ru .
dyson gen5 купить в спб dyson gen5 купить в спб .
A sports portal sbs-sport.com.az/ with breaking news, statistics, and expert commentary. Match schedules, transfers, interviews, and competition results are available in real time.
Live match https://sporx.com.az results, the latest sports news, transfers, and today’s TV schedule. Live updates, key events, and all sports information in one portal.
Учишься в МТИ? помощь в сдаче экзаменов мти: консультации, разъяснение сложных тем, подготовка к тестированию и экзаменам. Удобный формат, быстрые ответы и поддержка на всех этапах обучения.
дайсон пылесос купить спб pylesos-dn-kupit-10.ru .
Live streams golvar.com.az az and live matches online, including the latest football schedule for today. Follow games in real time, find out dates, start times, and key events of football tournaments.
Live streams http://golvar.com.az and live matches online, including the latest football schedule for today. Follow games in real time, find out dates, start times, and key events of football tournaments.
Zinedine Zidane https://zidan.com.az biography, football career, achievements, and coaching successes. Details on his matches, titles, the French national team, and his time at the top clubs in world football.
Нужна курсовая? курсовая работа на заказ Подготовка работ по заданию, методическим указаниям и теме преподавателя. Сроки, правки и сопровождение до сдачи включены.
Looking for a casino? here offers over 7,000 slots and games, cashback on every bet, and fast withdrawals without restrictions. Simple registration and instant access to all games available.
Нужен тепловизор? bbc-teplovizor.ru для судов, лодок, кораблей, яхт и катеров от производителя: доступные цены, подтверждённое качество и официальная гарантия. Мы оперативно доставляем заказы по всей территории России и стран СНГ. Наши представительства работают в Санкт?Петербурге, Москве и Севастополе — выбирайте удобный пункт выдачи и получайте заказ в минимальные сроки.
заклепка вытяжная 3 2х8 заклепка алюм вытяжная
Служба по контракту с прозрачными условиями подходит для планирования. Контракт определяет выплаты. Предусмотрены надбавки. Процесс оформления понятен: служба по контракту югра
Подтверждаю что кракен вход работает сегодня через все официальные зеркала
1xbet giri? g?ncel 1xbet-giris-22.com .
1xbet t?rkiye giri? 1xbet t?rkiye giri? .
Нужна топлевная крата? https://oilguru.ru: заправка на сетевых АЗС, единый счет, прозрачный учет топлива и онлайн-контроль расходов. Удобное решение для компаний с собственным автопарком.
Русские подарки купить в интернет-магазине Москвы: сувениры, ремесленные изделия и подарочные наборы с национальным колоритом. Идеальные решения для праздников, гостей и корпоративных подарков.
Must-Read Collection: naked i came into the world
1xbet resmi giri? 1xbet-yeni-giris-2.com .
birxbet giri? 1xbet-yeni-giris-2.com .
Після робіт cleaninglviv.top актуально
xbet giri? 1xbet-yeni-giris-2.com .
ДВС и КПП https://vavtomotor.ru автозапчасти для автомобилей с гарантией и проверенным состоянием. В наличии двигатели и коробки передач для популярных марок, подбор по VIN, быстрая доставка и выгодные цены.
Контрактная служба это выбор тех кто хочет деньги и уверенность. Доход формируется из базовых выплат и надбавок. Все начисления прозрачны и официальны. Контракт определяет условия и срок службы. Никаких скрытых требований. Самое время заключить контракт: военный контрактник
1xbet g?ncel 1xbet g?ncel .
Топовое онлайн казино игровые автоматы garage онлайн-слоты и live-казино в одном месте. Разные режимы игры, поддержка мобильных устройств и удобный старт без установки.
ванна в доме дизайн дизайн двухэтажного коттеджа
Do you do music? music worksheets for kids for children and aspiring musicians. Educational materials, activities, and creative coloring pages to develop ear training, rhythm, and an interest in music.
журнал для автомобилистов журнал для автомобилистов .
накрутка реакций накрутка лайков инстаграм
журнал про авто журнал про авто .
дизайн гостиной в квартире дизайн двухкомнатной квартиры 50 кв
журнал про машины журнал про машины .
журнал автомобили журнал автомобили .
Хотите рельеф мышц? Забудьте о скучных стенах спортзала! Ваша крепкая спина ждут вас на свежем воздухе. Обработка земли мотоблоком — это не просто рутина, а активный отдых с жиросжиганием.
Как это работает?
Подробнее на странице – https://sport-i-dieta.blogspot.com/2025/04/ogorod-hudenie-s-motoblokom-i-bez-nego.html
Мощные мышцы ног и ягодиц:
Управляя мотоблоком, вы постоянно идете по рыхлой земле, совершая усилие для движения вперед. Это равносильно интервальной ходьбе в гору.
Стальной пресс и кор:
Удержание руля и контроль направления заставляют стабилизировать положение тела. Каждая кочка — это естественная нагрузка на пресс.
Рельефные руки и плечи:
Повороты, подъемы, развороты тяжелой техники — это настоящая функциональная тренировка в чистом виде.
Нажмите, чтобы увидеть технику в действии: Мы покажем, как превратить работу в эффективную тренировку.
Ваш план похудения на грядках:
Разминка (5 минут): Прогулка быстрым шагом по участку. Кликните на иконку, чтобы увидеть полный комплекс.
Основная “тренировка” (60-90 минут): Вспашка, культивация, окучивание. Чередуйте интенсивность!
Заминка и растяжка (10 минут): Упражнения на гибкость рук. Пролистайте галерею с примерами упражнений.
Мотивационный счетчик: За час активной работы с мотоблоком средней мощности вы можете сжечь от 400 до 600 ккал! Это больше, чем пробежка трусцой.
Итог: Гордость за двойной результат. Скачайте чек-лист “Огородный фитнес”. Пашите не только землю, но и лишние калории
газета про автомобили газета про автомобили .
Лучшие и безопасные наружный противопожарный резервуар эффективное решение для систем пожарной безопасности. Проектирование, производство и монтаж резервуаров для хранения воды в соответствии с требованиями нормативов.
Резервуар подземный для газа https://underground-reservoirs.ru
Хотите подтянутую фигуру? Забудьте о скучных стенах спортзала! Ваша стройная талия ждут вас на свежем воздухе. Вспашка земли мотоблоком — это не просто рутина, а силовая тренировка на все тело.
Как это работает?
Подробнее на странице – https://sport-i-dieta.blogspot.com/2025/04/ogorod-hudenie-s-motoblokom-i-bez-nego.html
Мощные мышцы ног и ягодиц:
Управляя мотоблоком, вы постоянно идете по рыхлой земле, совершая толкающие движения. Это равносильно выпадам с утяжелением.
Стальной пресс и кор:
Удержание руля и контроль направления заставляют стабилизировать положение тела. Каждая кочка — это естественная нагрузка на пресс.
Рельефные руки и плечи:
Повороты, подъемы, развороты тяжелой техники — это упражнения на бицепс, трицепс и плечи в чистом виде.
Нажмите, чтобы увидеть технику в действии: Мы покажем, как превратить работу в эффективную тренировку.
Ваш план похудения на грядках:
Разминка (5 минут): Прогулка быстрым шагом по участку. Кликните на иконку, чтобы увидеть полный комплекс.
Основная “тренировка” (60-90 минут): Вспашка, культивация, окучивание. Чередуйте интенсивность!
Заминка и растяжка (10 минут): Глубокое дыхание для восстановления. Пролистайте галерею с примерами упражнений.
Мотивационный счетчик: За час активной работы с мотоблоком средней мощности вы можете сжечь от 400 до 600 ккал! Это больше, чем пробежка трусцой.
Итог: Подкачанное тело к лету. Скачайте чек-лист “Огородный фитнес”. Пашите не только землю, но и лишние калории
Лучшее казино https://download-vavada.ru слоты, настольные игры и live-казино онлайн. Простая навигация, стабильная работа платформы и доступ к играм в любое время без установки дополнительных программ.
Фриспины бесплатно https://casino-bonuses.ru бесплатные вращения в онлайн-казино без пополнения счета. Актуальные предложения, условия получения и список казино с бонусами для новых игроков.
События в мире актуальные новости события дня и аналитика. Актуальная информация о России и мире с постоянными обновлениями.
автоматические карнизы для штор автоматические карнизы для штор .
Отвод воды от фундамента https://totalarch.com/kak-pravilno-otvesti-vodu-ot-fundamenta-livnevka-svoimi-rukami-i-glavnye-zabluzhdeniya какие системы дренажа использовать, как правильно сделать отмостку и избежать подтопления. Пошаговые рекомендации для частного дома и дачи.
Clear pricing builds trust; steer clear of hidden fees and buy tiktok views from companies that display all costs upfront so there are no surprises at checkout.
гардина с электроприводом karnizy-s-elektroprivodom77.ru .
Халява в казино https://casino-bonus-bezdep.ru Бесплатные вращения в популярных слотах, актуальные акции и подробные условия использования.
электрокранизы электрокранизы .
?esk? casino online casino-cz-1.com .
накрутка подписчиков реакций накрутка просмотров инстаграм
Занимаешься спортом? https://bliny-trenirovochnye.ru диски для пауэрлифтинга, бодибилдинга и фитнеса. Прочные покрытия, стандартные размеры и широкий выбор весов.
online casino cz online casino cz .
nov? ?esk? online casino nov? ?esk? online casino .
live casino casino-cz-1.com .
Лучшее онлайн казино? https://pokerinfo.ru онлайн-покер, турниры и кэш-игры для игроков разного уровня. Удобный интерфейс, доступ с ПК и мобильных устройств, регулярные события и акции.
Нужен стим аккаунт? tgram.link доступ к библиотеке игр по выгодной цене. Совместное использование, подробные условия, инструкции по входу и рекомендации для комфортной игры.
ruleta online casino-cz-1.com .
эстетическая косметология клиника косметологии
leg?ln? online casino leg?ln? online casino .
live casino casino-cz-18.com .
cz casina cz casina .
blackjack online casino-cz-18.com .
Хотите рельеф мышц? Забудьте о скучных стенах спортзала! Ваша сильные руки ждут вас на свежем воздухе. Культивация земли мотоблоком — это не просто рутина, а активный отдых с жиросжиганием.
Как это работает?
Подробнее на странице – https://kursorbymarket.nethouse.ru/articles/garden-fitness-why-working-with-a-tillerblock-is-an-ideal
Мощные мышцы ног и ягодиц:
Управляя мотоблоком, вы постоянно идете по рыхлой земле, совершая работу на сопротивление. Это равносильно приседаниям с нагрузкой.
Стальной пресс и кор:
Удержание руля и контроль направления заставляют стабилизировать положение тела. Каждая кочка — это укрепление спины.
Рельефные руки и плечи:
Повороты, подъемы, развороты тяжелой техники — это настоящая функциональная тренировка в чистом виде.
Смотрите наше видео-руководство: Мы покажем, как превратить работу в эффективную тренировку.
Ваш план похудения на грядках:
Разминка (5 минут): Круговые движения руками. Кликните на иконку, чтобы увидеть полный комплекс.
Основная “тренировка” (60-90 минут): Вспашка, культивация, окучивание. Чередуйте интенсивность!
Заминка и растяжка (10 минут): Глубокое дыхание для восстановления. Пролистайте галерею с примерами упражнений.
Мотивационный счетчик: За час активной работы с мотоблоком средней мощности вы можете сжечь от 400 до 600 ккал! Это больше, чем сеанс аэробики.
Итог: Прекрасный урожай осенью. Запустите таймер своей первой “огородной тренировки”. Пашите не только землю, но и лишние калории
bonus bez vkladu bonus bez vkladu .
casino hry online casino-cz-18.com .
?esk? casino online ?esk? casino online .
mostbet uzum mostbet uzum
mostbet royxatdan otish promo kod https://mostbet69573.help
mostbet bank kartasiga yechish mostbet bank kartasiga yechish
mostbet ID karta mostbet ID karta
trezviy vibor https://xn—-htbknddiar2cwb2eo.xn--p1ai/narkolog-na-dom-v-donecke-anonimno// .
trezviy vibor http://xn—-htbknddiar2cwb2eo.xn--p1ai/narkolog-na-dom-v-donecke-anonimno/ .
trezviy vibor http://www.prostatit-prostata.ru/narkolog-na-dom-v-volgograde-anonimno/ .
trezviy-vibor http://www.lipesinka.ru/anonimnyj-vyvod-iz-zapoya-v-krasnodare .
Трезвый выбор mediscenter.ru/narkolog-na-dom-v-rostove-anonimno/ .
фиброармированные полимеры rekonstrukcziya-zdanij-2.ru .
усиление зданий углепластиком rekonstrukcziya-zdanij-2.ru .
монтаж лмк rekonstrukcziya-zdanij-2.ru .
помощь в написании курсовой работы онлайн помощь в написании курсовой работы онлайн .
написание курсовых на заказ написание курсовых на заказ .
сайт заказать курсовую работу сайт заказать курсовую работу .
помощь курсовые помощь курсовые .
секс с мамой
генерация генерация .
нейросеть для студентов онлайн нейросеть для студентов онлайн .
русское порно
лучшая нейросеть для учебы nejroset-dlya-ucheby-8.ru .
нейросеть для студентов нейросеть для студентов .
нейросеть для рефератов нейросеть для рефератов .
порно женщин
нейросеть реферат нейросеть реферат .
1win ставки на CS2 http://1win52609.help/
1win личный кабинет бонусы https://www.1win52609.help
скважинное водопонижение xn—77-eddkgagrc5cdhbap.xn--p1ai .
A convenient car catalog auto ae catalog brands, models, specifications, and current prices. Compare engines, fuel consumption, trim levels, and equipment to find the car that meets your needs.
бурение скважин для водопонижения xn—77-eddkgagrc5cdhbap.xn--p1ai .
система водопонижения иглофильтрами xn—77-eddkgagrc5cdhbap.xn--p1ai .
система водопонижения иглофильтрами xn—77-eddkgagrc5cdhbap.xn--p1ai .
мостбет вход через зеркало https://mostbet61527.help
мостбет промокод при регистрации https://www.mostbet61527.help
best virtual number service github.com/SMS-Activate-Alternatives .
водопонижение иглофильтрами москва xn—77-eddkgagrc5cdhbap.xn--p1ai .
smsactivate smsactivate .
как играть в aviator mostbet http://mostbet61527.help/
1win slotlar Oʻzbekiston http://1win5767.help/
кружевное свадебное платье магазин свадебных платьев каталог
Нужны столбики? металлические столбики ограждение столбики для складов, парковок и общественных пространств. Прочные материалы, устойчивое основание и удобство перемещения обеспечивают безопасность и порядок.
Looking for a yacht? trusted yacht rental company in Cyprus for unforgettable sea adventures. Charter luxury yachts, catamarans, or motorboats with or without crew. Explore crystal-clear waters, secluded bays, and iconic coastal locations in first-class comfort onboard.
купить медный кабель купить электрику в минске
вывод из запоя клиника в ростове вывод из запоя клиника в ростове .
нарколог вывод из запоя в ростове vyvod-iz-zapoya-v-rostove-2.ru .
клиника в ростове вывод из запоя клиника в ростове вывод из запоя .
вывод из запоя в стационаре в ростове-на-дону vyvod-iz-zapoya-v-rostove-2.ru .
Нужны столбики? металлические столбики ограждение столбики для складов, парковок и общественных пространств. Прочные материалы, устойчивое основание и удобство перемещения обеспечивают безопасность и порядок.
размер свадебного платья свадебные платья купить каталог
купить кабель ввг провод купить в минске
Looking for a yacht? motor yacht rental in Cyprus for unforgettable sea adventures. Charter luxury yachts, catamarans, or motorboats with or without crew. Explore crystal-clear waters, secluded bays, and iconic coastal locations in first-class comfort onboard.
клиника в ростове вывод из запоя клиника в ростове вывод из запоя .
грузчик срочно грузчики недорого срочно
стоимость газоблока купить газоблоки цена
Google Salaries https://salarydatahub.uk by Role (US & UK) – Real Pay Ranges, Levels, and Total Compensation
Looking for a yacht? premium yacht experiences in Cyprus for unforgettable sea adventures. Charter luxury yachts, catamarans, or motorboats with or without crew. Explore crystal-clear waters, secluded bays, and iconic coastal locations in first-class comfort onboard.
should i use steroids
References:
https://www.blurb.com/user/clickvirgo34
seminole hard rock casino tampa
References:
anirstyle.com
monster cuts supplement
References:
ccsakura.jp
jouer au casino
References:
ryzowaszczotka.pl
where to buy legit steroids online
References:
writeablog.net
riverwind casino norman ok
References:
https://www.heladu.me
complications from long term steroid use
References:
https://posteezy.com
свадебные платья 2026 москва https://svadebnye-platya-msk.ru
royal vegas online casino
References:
alrehmantravels.com
мостбет двухфакторная защита http://mostbet15247.help
Строительный портал https://nesmetnoe.ru с полезными статьями о строительстве домов, ремонте квартир, выборе материалов и современных технологиях. Советы специалистов, инструкции, обзоры инструментов, идеи для интерьера и практические решения для частного и коммерческого строительства.
Онлайн-блог https://lifeoflove.ru о семейной жизни, психологии любви и гармоничных отношениях. Читайте статьи о доверии, понимании, воспитании детей, романтике и совместном досуге. Полезные советы и вдохновение для счастливой семейной жизни.
Интернет-журнал https://greendachnik.ru о садоводстве, огороде и ландшафтном дизайне. Полезные статьи о выращивании овощей, фруктов и цветов, уходе за растениями, планировании участка и создании красивого сада. Советы садоводов, идеи оформления и практические рекомендации.
Новости IT https://hardexpert.net и компьютерного мира: новинки технологий, программное обеспечение, гаджеты, компьютерные комплектующие и цифровые сервисы. Обзоры, аналитика, обновления программ и последние события в мире технологий.
Женский сайт https://allsekrets.ru о красоте, моде, здоровье и отношениях. Полезные статьи о стиле, уходе за собой, психологии, семейной жизни и саморазвитии. Советы, идеи и вдохновение для современной женщины, которая хочет выглядеть красиво и чувствовать гармонию.
Все о стройке https://dobdom.ru и ремонте: полезные статьи о строительстве домов, ремонте квартир, отделке помещений и выборе материалов. Советы специалистов, инструкции, идеи для интерьера и практические рекомендации по строительству и благоустройству жилья.
mostbet ставки приложение https://mostbet96810.help
селективная парфюмерия https://elicebeauty.com/parfyumeriya/elitnaya-parfyumeriya/dior-higher.html
mostbet вывести деньги Кыргызстан mostbet96810.help
заказать кухню каталог заказать кухню каталог .
заказать кухню цена zakazat-kuhnyu-4.ru .
заказать кухню под заказ заказать кухню под заказ .
1вин не открывается сайт http://1win36247.help/
1win минимальная сумма вывода элсом 1win минимальная сумма вывода элсом
устанавливаем навесы навес для машины заказать
1win бонус за регистрацию https://1win36247.help
школы дистанционного обучения shkola-onlajn-33.ru .
1win ELSOM 1win ELSOM
1win служба поддержки Ош http://www.1win20819.help
1win вывести на humo 1win вывести на humo
1win фриспины 1win82361.help
1win acces rapid 1win acces rapid
Vivo down Vivo down .
I want to propose to a girl plan a surprise proposal in Barcelona
pariuri multiple melbet http://www.melbet42310.help
1win пополнение https://www.1win20819.help
Прокат авто в Сочи без водителя https://avto-arenda-sochi.ru
монро казино промокод https://пско.рф
pariuri pe volei melbet http://www.melbet42310.help
вывод из запоя в стационаре в ростове на дону вывод из запоя в стационаре в ростове на дону .
Профессиональное SEO-продвижение https://outreachseo.ru сайтов для бизнеса. Анализ конкурентов, оптимизация структуры и контента, улучшение технических параметров и развитие сайта для роста позиций в поисковых системах и увеличения целевого трафика.
цена каратов кольца https://kolca-pomolvka-msk.ru
Current https://www.the-weather-in-podgorica.com, today and in the coming days. Accurate forecast of temperature, precipitation, wind, and humidity. Find out what the weather is like in Podgorica now, the weekly forecast for the month, and weather trends in Montenegro’s capital.
Когда ищешь проверенные казино без верификации, главное – не попасть на сайты с “сюрпризами”: то вывод режут, то правила меняются на ходу, то поддержка пропадает. Чтобы не тратить время на перебор и ошибки, мы ведем Telegram-канал с подборками и краткими разбором условий: где проще старт, какие лимиты на вывод, какие платежные методы реально проходят и что сейчас работает стабильно. Ссылка на канал: https://t.me/s/rating_casino_russia/20
Explore detailed insights on https://topxclocks.com/howard-miller-emmett-wall-clocks/ howard miller emmett wall clocks at TopXClocks, including features, comparisons, and expert recommendations for smarter buying decisions.
1win обновить зеркало http://1win17043.help
Статьи о любви https://lifeoflove.ru отношениях, психологии и семейной жизни. Советы по гармоничным отношениям общению и саморазвитию. Полезные рекомендации вдохновляющие истории и материалы для тех кто хочет улучшить личную жизнь.
Материалы о компьютерах https://hardexpert.net технологиях электронике и IT. Обзоры техники советы по выбору комплектующих настройке программ и использованию устройств. Полезная информация для пользователей и любителей технологий.
mostbet bepul tikish mostbet bepul tikish
1win где скачать apk 1win17043.help
Сборник полезных советов https://allsekrets.ru и лайфхаков на каждый день. Материалы о доме здоровье красоте и повседневной жизни. Интересные статьи практические рекомендации и идеи которые помогут упростить бытовые задачи.
Информация о ремонте https://www.hyundai-sto.ru обслуживании и диагностике автомобилей Hyundai. Советы по техническому обслуживанию выбору запчастей и эксплуатации автомобиля. Полезные материалы для владельцев и автолюбителей.
Интересуют новости? новостной сайт главные новости дня на одном портале. Свежие события из политики, экономики, общества, технологий и культуры. Оперативная информация, аналитика, комментарии экспертов и важные факты, которые помогают понимать происходящее.
Лучшие сервера рейтинг сервисов для vps в россии сравнение dedicated servers по цене, производительности и надежности. Рейтинг хостингов, которые предлагают мощные серверные решения.
Найти лучший сервер Самый дешевый VPS-хостинг рейтинг vds хостингов рейтинг dedicated servers от популярных хостинг-провайдеров. Сравните выделенные серверы по характеристикам, стоимости и возможностям масштабирования для бизнеса и веб-проектов.
Нужен сервер? vps хостинг dedicated servers с мощными процессорами, NVMe SSD и высокой стабильностью. Подберите оптимальный сервер для бизнеса, разработки и высоких нагрузок.
Обзор и рейтинги серверов недорогие VPS сравните выделенные серверы по характеристикам, цене, процессорам и дискам SSD. Выберите надежный сервер для размещения сайтов, приложений и высоких нагрузок.
Проблемы с алкоголем? врач нарколог анонимно медицинская помощь при алкогольной зависимости, детоксикация организма и восстановление самочувствия. Консультации специалистов и безопасное лечение.
mostbet отзывы Кыргызстан https://www.mostbet94063.help
Круглосуточный вывод из запоя на дому круглосуточно специалист проводит детоксикацию организма, помогает снять симптомы алкогольной интоксикации и контролирует состояние пациента. Медицинская помощь оказывается конфиденциально и направлена на быстрое восстановление самочувствия.
1win Мбанк http://1win17043.help/
mostbet magyarország http://mostbet2023.help
Качественное SEO https://outreachseo.ru продвижение сайта для бизнеса. Наши специалисты предлагают эффективные решения для роста позиций в поисковых системах. Подробнее об услугах и стратегиях можно узнать на сайте
References:
Venetian casino macau
References:
guardian.ge
metro casino
References:
https://sakura-kanri.co.jp
Premium marketplace buy fb accounts for ad campaigns features an extensive inventory updated daily across all major geos including USA, Europe, and Asia-Pacific regions. Bulk buyers benefit from volume discounts, dedicated account managers, and priority restocking that ensures uninterrupted supply for active campaigns. The combination of product quality, transparent specs, and responsive support creates a reliable foundation for scaling ad operations.
Качественное SEO https://outreachseo.ru продвижение сайта для бизнеса. Наши специалисты предлагают эффективные решения для роста позиций в поисковых системах. Подробнее об услугах и стратегиях можно узнать на сайте
Reliable source buy pva facebook accounts connects advertisers with thoroughly vetted profiles backed by replacement guarantees and dedicated support. The marketplace serves a global buyer base with English-speaking support available via Telegram for product selection and order management. From first purchase to ongoing scaling, the platform supports every stage of a media buyer’s operational journey.
Пояснюємо складні теми https://notatky.net.ua простими словами. Публікуємо зрозумілі статті про технології, фінанси, науку, закони та інші важливі питання. Читайте розбірки та корисні пояснення.
Сайт про народні прикмети https://zefirka.net.ua тлумачення снів та значення імен. Дізнайтеся, що означають сни, як трактуються прикмети та які традиції пов’язані зі святами різних народів.
Сайт міста Хмельницький https://faine-misto.km.ua з актуальними новинами, подіями та корисною інформацією для мешканців та гостей. Дізнайтеся про міське життя, інфраструктуру, культуру, заходи, організації та важливі події міста.
Жіночий сайт https://u-kumy.com про красу, здоров’я, моду, відносини і стиль життя. Корисні поради, статті, ідеї для натхнення та рекомендації для сучасних жінок. Читайте про саморозвиток, сім’ю, догляд за собою та актуальні тренди.
Lust Theory Seasons lust-theory.com 1, 2, and 3 are a popular visual novel with a captivating plot, action choices, and a diverse cast of characters. Follow the story as it unfolds, make decisions, and unlock new storylines.
Operation Lovecraft https://operation-lovecraft.org Official Game Guide for players who want to learn more about the plot, missions, and characters. Helpful tips, hints, and detailed guides will help you complete the game and unlock all storylines.
комплексное продвижение сайтов москва prodvizhenie-sajtov-v-moskve16.ru .
Download Subverse https://sub-verse.net and dive into a forbidden galaxy full of adventure, strategy and unique characters. Explore new worlds, command your crew and experience an epic sci-fi journey in this action-packed space game.
Женский онлайн https://krasotka-fl.com.ua портал с полезными материалами о красоте, здоровье, моде и отношениях. Советы по уходу за собой, психологии и саморазвитию для современной женщины.
References:
Lucky club casino
References:
https://transgender.or.kr/27/?bmode=view&idx=6149238
new orleans casino las vegas
References:
nalots.com
Противопожарные двери https://zavod-dverimontazh.moscow от производителя с профессиональной установкой в Москве. Изготовление по ГОСТ, сертифицированные конструкции с высокой огнестойкостью. Металлические противопожарные двери для офисов, складов, жилых и коммерческих зданий. Доставка, монтаж, гарантия качества и выгодные цены.
оптимизация сайта франция цена prodvizhenie-sajtov-v-moskve16.ru .
аудит продвижения сайта prodvizhenie-sajtov-v-moskve16.ru .
1win plinko strategy Uganda https://1win5742.help/
Все о строительстве https://sportdon.ru и ремонтах: рекомендации по выбору материалов, технологиям строительства, отделке помещений и дизайну интерьера. Полезные статьи для тех, кто строит дом, делает ремонт квартиры или планирует обновление интерьера.
Портал новостей https://hand-store.ru о высоких технологиях и IT-индустрии. Последние события в мире программирования, искусственного интеллекта, стартапов, гаджетов и цифровых технологий. Читайте обзоры, аналитические материалы и важные новости технологического рынка.
Live streams http://www.selcuksport.com.az/ of football matches and sports TV shows online. Football news, schedules, results, and analysis. Follow your favorite teams, watch highlights, and stay up-to-date on the latest news from the world of football.
Строительный портал https://apis-togo.org с полезными статьями о строительстве домов, ремонте квартир и выборе строительных материалов. Советы специалистов, современные технологии строительства, идеи дизайна интерьера и практические рекомендации для ремонта и обустройства жилья.
Строительный портал https://furbero.com с полезной информацией о строительстве домов, ремонте квартир и отделке помещений. Советы по выбору материалов, современные технологии строительства и идеи дизайна интерьера для комфортного жилья.
Автомобильный портал https://autoiceny.com.ua для автолюбителей. Свежие новости автоиндустрии, обзоры автомобилей, тест-драйвы, рекомендации по эксплуатации и обслуживанию машин. Полезная информация о современных автомобилях и автомобильных технологиях.
Портал о строительстве https://proektsam.kyiv.ua и ремонте домов и квартир. Полезные статьи о строительных технологиях, выборе материалов, отделке помещений и дизайне интерьера. Советы специалистов и практические рекомендации для обустройства жилья.
Информационный женский https://gorod-lubvi.com.ua портал о красоте, здоровье, моде, семье и отношениях. Полезные советы, идеи стиля, рецепты, психология и рекомендации для современной женщины. Узнайте, как заботиться о себе и создавать гармонию в жизни.
Все для женщин https://novaya.com.ua на одном сайте: мода, красота, здоровье, отношения и семья. Полезные советы по уходу за собой, идеи стиля, рецепты и вдохновляющие статьи для современной женщины.
Все о строительстве https://sevgr.org.ua домов, ремонте квартир и благоустройстве жилья на строительном портале. Полезные статьи, рекомендации специалистов, современные технологии строительства и практические советы по выбору строительных материалов и отделке помещений.
Женский портал https://olive.kiev.ua о моде, красоте и здоровье. Полезные советы, рецепты, психология отношений и идеи стиля. Читайте интересные статьи и находите вдохновение для повседневной жизни.
Сайт для женщин https://tiamo.rv.ua с полезными статьями о красоте, здоровье, моде, семье и отношениях. Рекомендации по уходу за собой, идеи стиля, рецепты и советы для гармоничной жизни.
Хотите, чтобы ваш профиль или группа в Одноклассниках росли быстрее? Перейдя по запросу накрутка подписчиков одноклассники живых вы сможете увеличить количество подписчиков и активность на странице. Чем больше подписчиков — тем выше доверие и интерес к вашему аккаунту. Начните развивать свою страницу уже сегодня!
digital маркетинг агентства luchshie-digital-agencstva.ru .
chances-of-winning-pokies-in-new-zealand
Feel free to surf to my web site – bet365
online-casino-bonus-ohne-einzahlung-ohne-verifizierung
Check out my page; machine – Amparo,
free-casino-games-pokies
Also visit my blog post: pokie (m.melbournearancini.com.Au)
рейтинг агентств digital рейтинг агентств digital .
Сайт о финансах https://manorsgroup.com.ua и недвижимости с полезными статьями о инвестициях, покупке и продаже недвижимости, ипотеке и управлении личными финансами. Аналитика рынка, советы экспертов и актуальные новости для тех, кто интересуется финансовыми решениями и недвижимостью.
Медицинский портал https://lpl.org.ua с полезными статьями о здоровье, профилактике заболеваний и современных методах лечения. Советы врачей, рекомендации по правильному питанию, укреплению иммунитета и здоровому образу жизни.
Новостной портал https://sevsovet.com.ua с актуальными новостями Украины и мира. Политика, экономика, общество, технологии и культура. Оперативные новости и аналитические материалы.
Сайт новостей https://vestionline.com.ua Украины и мира с ежедневными обновлениями. Политика, экономика, общество, технологии и культура. Узнавайте последние события и следите за новостями.
где продавать сайты где продавать сайты .
лучшие seo агентства лучшие seo агентства .
Накрутка подписчиков Rutube поможет быстро увеличить аудиторию канала и повысить доверие к контенту. Живые подписчики создают активность, улучшают видимость роликов и привлекают новых зрителей. Перейдя по запросу как накрутить подписчиков рутуб вы получите быстрый старт канала, безопасные методы продвижения и стабильный рост аудитории без отписок. Отличное решение для тех, кто хочет быстрее развить канал на Rutube.
оптимизация сайта блог оптимизация сайта блог .
Спортивный журнал https://beachsoccer.com.ua о мире спорта. Новости спортивных событий, обзоры матчей, аналитика соревнований и интервью со спортсменами. Читайте актуальные статьи о футболе, хоккее, теннисе, боксе и других популярных видах спорта.
Портал о технологиях https://helikon.com.ua и инновациях: новости IT, обзоры гаджетов, смартфонов и компьютеров. Статьи о цифровых сервисах, искусственном интеллекте и технологических трендах.
Портал о здоровье глаз https://eyecenter.com.ua и зрении человека. Советы по профилактике заболеваний глаз, улучшению зрения, правильной работе за компьютером и уходу за глазами. Полезные статьи о здоровье глаз и современных методах коррекции зрения.
Мужской портал https://hooligans.org.ua о стиле жизни, здоровье, карьере и саморазвитии. Статьи о спорте, отношениях, финансах, технологиях и мужских интересах. Полезные советы, лайфхаки и вдохновение для современных мужчин.
да да да привет привт
рейтинг диджитал агентств рейтинг диджитал агентств .
сео портала увеличить трафик специалисты prodvizhenie-sajtov-po-trafiku11.ru .
статьи про продвижение сайтов статьи про продвижение сайтов .
Lamine Yamal lamine-yamal Barcelona career, statistics, age, where he is from and basic biographical facts. Lamine Yamal profile on one page.
Продажа квартир https://nedvizhkavspb.ru в Санкт-Петербурге. Большой выбор недвижимости на первичном и вторичном рынке: студии, однокомнатные, двухкомнатные и просторные квартиры в разных районах города. Актуальные предложения, удобный поиск и помощь в покупке жилья.
ghbdtn привет
seo partners seo partners .
seo top 1 seo top 1 .
список seo агентств список seo агентств .
лечение зубов детям лечение зубов во сне детям цена
лучшие рекламные агентства лучшие рекламные агентства .
блог о маркетинге блог о маркетинге .
ремонт ванной комнаты ремонт ванных комнат в спб
раскрутка сайта москва раскрутка сайта москва .
mostbet texniki dəstək https://mostbet85214.help/
топ компаний по продвижению сайтов топ компаний по продвижению сайтов .
продвижение сайтов во франции продвижение сайтов во франции .
топ seo топ seo .
vavada wpłata PLN vavada wpłata PLN
Бесплатная консультация семейного юриста — это возможность быстро разобраться в сложной ситуации и понять свои права. Перейдя по запросу консультация семейного юриста юрист поможет вам по вопросам развода, алиментов, раздела имущества, опеки над детьми и другим семейным спорам. Разъясним перспективы дела и подскажем оптимальное решение. Получите профессиональную помощь без оплаты и лишних обязательств.
современные seo кейсы seo-kejsy17.ru .
vavada bonus bez ryzyka https://vavada56378.help
vavada blackjack multi-hand http://vavada56378.help
продвижение сайта клиники наркологии продвижение сайта клиники наркологии .
продвижение сайта продвижение сайта .
продвижение по трафику продвижение по трафику .
seo network seo network .
заказать сео анализ сайта пушка заказать сео анализ сайта пушка .
Бесплатная консультация юриста по расторжению брака поможет разобраться в ваших правах и возможностях при разводе. Специалист объяснит порядок развода через суд или ЗАГС, подскажет, как решаются вопросы раздела имущества, алиментов и проживания детей. Перейдя по запросу юрист по разводам онлайн вы получите профессиональные рекомендации и ответы на все вопросы, чтобы пройти процедуру развода максимально спокойно и с защитой ваших интересов.
технического аудита сайта технического аудита сайта .
сделать аудит сайта цена сделать аудит сайта цена .
vavada zakłady online polska http://www.vavada56378.help
рейтинг seo рейтинг seo .
поисковое продвижение москва профессиональное продвижение сайтов поисковое продвижение москва профессиональное продвижение сайтов .
vavada apk na android vavada56378.help
оптимизация и продвижение сайтов москва оптимизация и продвижение сайтов москва .
Хочешь казино бонус? бездепозитные бонусы в новых казино всегда актуальные бонусы в онлайн казино. Получайте бонусы без вложений, фриспины и подарки за регистрацию. Актуальные предложения, честные условия отыгрыша и список проверенных казино с бонусами без депозита.
агентство seo агентство seo .
Лучшие казино казино на реальные деньги через сбп: актуальный список онлайн казино с высоким рейтингом, быстрым выводом средств и выгодными бонусами. Обзор лицензий, игр и платежных методов поможет выбрать надежное казино для комфортной игры.
Официальный сайт pokerok: регистрация, вход, бонусы и игра в онлайн покер. Обзор возможностей, турниров, кеш-столов и мобильного приложения. Узнайте, как начать играть и выводить деньги на проверенной платформе.
мелбет пополнить с элкарт мелбет пополнить с элкарт
melbet ссылка на сайт melbet ссылка на сайт
1win live casino pe mobil 1win live casino pe mobil
Trusted platform facebook ads bm offers premium accounts with verified quality, complete credentials, and instant automated delivery. Product cards display exact specifications including account age, verification level, included assets, geo origin, and current stock availability. The most successful media buying teams share one trait: they invest in quality infrastructure before they invest in ad spend.
Expert-level shop how to start paper trading competition in discord for crypto perps combines automated delivery with manual verification to ensure every account meets strict quality benchmarks. The platform combines speed and reliability — most products are delivered automatically within minutes after payment confirmation. Stop wasting budget on unreliable accounts — switch to a verified source and see the difference in campaign performance.
Certified platform bulk buy outlook accounts tracks account health metrics proactively and notifies buyers of any status changes during the guarantee period. Cross-platform inventory allows teams to source accounts for multiple advertising channels from a single trusted supplier relationship. From first purchase to ongoing scaling, the platform supports every stage of a media buyer’s operational journey.
Premium marketplace buy reddit account with karma features an extensive inventory updated daily across all major geos including USA, Europe, and Asia-Pacific regions. The catalog is segmented by platform, geo, account type, and price tier to simplify navigation for both new and returning customers. Every order comes with clear documentation, replacement guarantees, and access to a growing knowledge base of operational resources.
Reliable source age of yahoo account connects advertisers with thoroughly vetted profiles backed by replacement guarantees and dedicated support. Orders are processed through a secure checkout system with multiple payment options and encrypted credential delivery via personal dashboard. Instant delivery, verified quality, and dedicated support — everything a professional advertiser needs in one marketplace.
дизайн интерьера агентство дизайн заказывать интерьер
дизайн дома дизайн коттеджа
дизайнерские компании спб студии дизайна интерьера спб
1win lucky jet qanday o‘ynash 1win lucky jet qanday o‘ynash
дизайн проект для ремонта квартиры дизайнер интерьера спб заказать
дизайн студия спб интерьера студия дизайна интерьера
Тензоприбор предлагает калибровочные гири для весов нужного класса точности и номинальной массы для калибровки весов.
В нашей компании можно купить поверочные гири классов точности E1, E2, F1, F2, M1, M2.
Чем выше класс точности, тем меньше будет разница между номинальным и действительным значениями массы калибровочной гири.
дизайн проект домов под ключ дизайн проект частного дома
цветы букет цена zakazat-cveti-moskva.ru .
1win Toshkent pul yechish 1win Toshkent pul yechish
Юридическая консультация по лишению родительских прав поможет оценить ситуацию, определить основания и выстроить грамотную стратегию защиты или подачи иска. Переходите по запросу адвокат по лишению родительских прав в москве цена – специалист разъяснит порядок действий и подготовит документы. Получите профессиональную поддержку и ответы на все вопросы уже на первой консультации.
Советы автомехаников https://proavtomaster.com полезные рекомендации по ремонту и обслуживанию автомобиля. Узнайте, как продлить срок службы двигателя, подвески и электрооборудования, избежать частых поломок и сэкономить на ремонте благодаря практическим советам специалистов.
Компания «Заборыч» https://заборыч.рф более 10 лет осуществляет строительство заборов из профнастила и сетки рабицы. Мы производим заборы для частных лиц и производственных объектов. За это время мы построили десятки объектов, от простых ограждений до сложных ландшафтных комплексов. Наши клиенты остаются довольны качеством работ и сроками реализации проектов.
адвокат по спорам между организациями ижевск Комплексное юридическое сопровождение бизнеса ижевск гарантирует, что все операции соответствуют действующему законодательству, а любые возникающие проблемы будут решены оперативно и эффективно. Специализированный адвокат для организаций ижевск или юрист для юридических лиц ижевск обладают глубокими знаниями специфики корпоративного права и судебной практики.
Профессиональная помощь детям https://neuropsy-centr.ru с нарушениями речи и развития. Высококвалифицированные врачи, работаем с самыми тяжелыми случаями, 99% положительных отзывов, новейшее оборудование и инвентарь. Государственная лицензия: Л035-01298-77/01604531 от 09.12.24
Платная частная клиника https://mypsyhealth.ru/services/psikhiatricheskaya-klinika психиатрии, неврологии и наркологии — анонимное лечение и консультации специалистов. Диагностика, помощь при зависимостях, неврологических и психических расстройствах. Конфиденциальность, опытные врачи и комфортные условия.
Все самое свежее здесь: https://eco-naturel.com/k2_1941.php
сервисы Большинство платформ постоянно расширяют свои возможности, предлагая дополнительные услуги и инструменты для продавцов и покупателей. Сфера подписок стремительно развивается, охватывая все новые ниши, помимо стриминговых сервисов и журналов.
Top branding agencies https://topbrandagencies.com worldwide: the best studios for brand development, corporate identity, and positioning. Portfolio reviews, strategies, and case studies will help you choose a reliable agency for business development and brand enhancement.
Top web design https://webdesignfirmshub.com companies worldwide: a selection of the best studios for website and interface creation. Learn about case studies, design approaches, UX/UI solutions, and innovations to help you choose a reliable contractor for your digital projects.
Top UX/UI design https://uiuxagencies.com agencies: the best companies creating user-friendly interfaces and digital products. Explore case studies, methodologies, and approaches to UX/UI to choose a reliable contractor for your website or app.
A non-profit organization https://linkimpact.org dedicated to supporting multicultural families, environmental protection, volunteerism, and language and cultural exchange.
Практик о заборах https://sinta-kedr.ru/ честный разбор материалов, установки и стоимости. Узнайте плюсы и минусы разных видов заборов, частые ошибки и реальные сроки службы. Полезные рекомендации перед покупкой и монтажом ограждений.
Дубликаты номеров https://avtostrahovka36.ru в Воронеже — изготовление и восстановление регистрационных знаков по ГОСТ. Срочно за 1 день, качественные материалы, соответствие требованиям и выгодные цены. Оформление быстро и без очередей.
An astrology portal http://www.burcler.com.az with daily horoscopes, natal charts, and forecasts. Online consultations, zodiac sign compatibility, and personalized recommendations will help you better understand yourself and make important decisions.
букет онлайн https://zakazat-cveti-moskva.ru .
1win тасдиқи ҳисоб http://1win91403.help/
Шпаклевка стен https://shpaklevka-sten.ru и потолков в Москве — выравнивание поверхностей под покраску и обои. Качественные материалы, опытные мастера и соблюдение технологий. Выполняем работы быстро, аккуратно и с гарантией результата по доступной цене.
Calculate your horoscope ulduz-fali online. Horoscopes, love compatibility, daily horoscopes and astrological interpretations by date of birth on one site.
melbet изменить почту https://melbet84062.help
Сайт міста Одеса https://faine-misto.od.ua новини, події, афіша, довідник компаній та корисна інформація. Дізнавайтесь актуальні новини, знаходьте послуги, заклади і маршрути. Все про життя Одеси для мешканців і гостей міста в одному місці.
Сайт міста Житомир https://faine-misto.zt.ua новини, події, афіша та довідник компаній. Актуальна інформація про життя міста, транспорт, послуги і заклади. Усе необхідне для мешканців і гостей Житомира в одному зручному онлайн-порталі.
Автомобільний портал https://avtogid.in.ua новини авто, огляди, тести та поради водіям. Дізнавайтесь про нові моделі, технології, ремонт і обслуговування. Все про автомобілі в одному місці для власників і автолюбителів.
Блог Києва https://infosite.kyiv.ua події, новини, цікаві місця та корисні поради для мешканців і гостей столиці. Дізнавайтесь про актуальні заходи, життя міста, розваги та сервіси. Все найцікавіше про Київ в одному зручному онлайн-блозі.
Хмельницький онлайн https://u-misti.khmelnytskyi.ua міський портал з новинами, афішею та довідником. Дізнавайтесь про події, транспорт, бізнес і послуги. Усе для комфортного життя та відпочинку в Хмельницькому в одному місці.
Сайт Полтави https://u-misti.poltava.ua новини, події, афіша та довідник компаній міста. Актуальна інформація про життя, транспорт, послуги і заклади. Усе необхідне для мешканців і гостей Полтави в одному зручному онлайн-порталі.
У місті Львів https://u-misti.lviv.ua актуальні новини, події, афіша та корисна інформація для мешканців і гостей. Дізнавайтесь про життя міста, транспорт, заклади і послуги. Все найважливіше про Львів в одному зручному онлайн-порталі.
Київ онлайн https://u-misti.kyiv.ua міський портал з новинами, афішею та довідником. Дізнавайтесь про події, транспорт, бізнес і послуги. Усе для комфортного життя та відпочинку в Києві в одному місці.
Міський сайт Дніпра https://u-misti.dp.ua новини, події, оголошення і довідник організацій. Зручний пошук послуг, закладів і маршрутів. Будьте в курсі життя міста та знаходьте потрібну інформацію швидко.
Сайт Чернівців https://u-misti.chernivtsi.ua новини, події, афіша та довідник компаній міста. Актуальна інформація про життя, транспорт, послуги і заклади. Усе необхідне для мешканців і гостей Чернівців в одному зручному онлайн-порталі.
Міський сайт Черкас https://u-misti.cherkasy.ua новини, події, оголошення і довідник організацій. Зручний пошук послуг, закладів і маршрутів. Будьте в курсі життя міста та знаходьте потрібну інформацію швидко.
Где можно познакомиться https://datenow.ru в России в 2026 году? Приложения для знакомств стали главным инструментом для миллионов. Но важно выбрать те, где реально можно найти человека для отношений. Не просто лайки, а искренний интерес. Разбираем, какие сервисы работают в этом году. Честно. Без рекламы. Только для тех, кто ищет всерьёз.
Все подробности: https://proecostroj.ru
mafia casino avis Bienvenue sur Mafia Casino, le domaine des jeux d’argent en ligne. Decouvrez notre avis detaille, le processus de connexion securise et des bonus exclusifs. Site officiel 2026.
детская комната Покупка мебели — это больше, чем просто приобретение предмета интерьера; это инвестиция в ваш комфорт и эстетическое удовольствие.
мелбет джалал-абад мелбет джалал-абад
1win вывод денег 1win вывод денег
Обновления по теме: https://novostroi-tour.ru
мелбет зайти на сайт melbet84062.help
1win киргизче кирүү 1win киргизче кирүү
Только что опубликовано: https://dom-zao.ru
дизайн интерьера квартиры фото дизайн квартиры
Самое полезное для вас: https://novostroi-tour.ru
дизайн интерьера типовая квартиры услуги дизайнера интерьера квартиры
https://spisok-kreditov.ru/02_kredit-nalichnymi.html рефинансирование с открытыми просрочками если нужно начать с расчета – на Spisok-Kreditov.ru можно уменьшить ежемесячный платеж
Лучший выбор дня: https://vnutridoma-spb.ru
скачать игры из макс Возможность скачать игры с Яндекс.Диска по прямой ссылке ценится за надежность и высокую скорость загрузки.
интерьер дизайн обои квартиры дизайнер интерьера квартиры
Продвигайте свой канал в Яндекс Дзен быстрее: увеличьте число подписчиков и создайте эффект популярности. Переходите по запросу настоящие подписчики в дзен канал. Накрутка поможет привлечь внимание новой аудитории, повысить доверие к каналу и ускорить рост. Подходит для новых и развивающихся блогов, чтобы быстрее выйти в рекомендации и усилить продвижение контента.
дизайнер квартиры спб дизайнеры в санкт петербурге
дизайнеры интерьеров спб дизайн интерьера заказать спб
minedrop слот MineDrop слот вращает барабаны, предлагая игрокам азарт и возможность сорвать куш в стиле Minecraft.
ТОП лучших МФО https://mfo-finance.github.io проверенные компании с высоким уровнем одобрения займов. Актуальные предложения, прозрачные условия, быстрые выплаты и онлайн оформление. Сравнивайте и выбирайте надежные МФО для получения денег.
Are you into rafting? https://www.tara-montenegro-rafting.me exciting rafting trips down mountain rivers with experienced instructors. A tour of the Tara Canyon offers scenic routes, safety, and unforgettable experiences. Book a rafting tour and discover an active holiday.
luckybear
машины времени, машина времени: устройство, новости, это параллельные разные миры просто Новости конференций, РИА, научные, важные, читать сегодня – это ключ к пониманию передовых идей и достижений.
цветы с доставкой на дом недорого https://www.dostavka-cvetov-moskva495.ru .
dental problems? https://www.dental-tourism-montenegro.com high-quality dental treatment abroad at affordable prices. Implants, veneers, prosthetics, and treatments with a guarantee. We select a clinic, organize your trip, and provide patient support throughout the entire process.
Zahnprobleme? https://www.zahntourismus-in-montenegro.com zahnbehandlung im Ausland mit bis zu 70 % Ersparnis. Implantate, Zahnersatz, asthetische Zahnheilkunde und Diagnostik in modernen Kliniken. Wir unterstutzen Sie bei der Wahl des Landes und der Klinik und organisieren Ihre Reise von A bis Z.
Студия дизайна https://dill-design.ru интерьера в Санкт-Петербурге. Реализовываем проекты в г. Санкт-Петербург и г. Москва. Более 100 довольных заказчиков доверили нам создание своего интерьера. От разработки дизайн проекта до его качественной реализации. Авторский надзор на всех этапах реализации. Комплектация в подарок. Закажите расчет дизайн-проекта
Обзор путешествий https://tfast.ru и экскурсий. Ваш персональный гид в мире путешествий. Мы собираем самые живые обзоры, проверенные маршруты и уникальные экскурсии — от известных достопримечательностей до скрытых мест, о которых знают только местные. Планируйте свои приключения с нами, вдохновляйтесь и открывайте мир по-новому.
дизайн значка металлического изготовление значков на заказ из металла в москве
значок металлический на булавке металлические значки на заказ
металлические пины значки https://izgotovlenie-znachkov-moskva.ru/
дизайн значка металлического изготовил металлических значков москва
металлический значок доты изготовление железных значков
экскурсия на машине по санкт петербургу индивидуальная экскурсия петербург
можно ли получить справку купить справку 29н
можно ли получить справку справку от нарколога купить
купить справку онлайн купить справку 095у
https://detivetra.com/ detivetra
https://auto.ae/exotic
купить мед справку справку от нарколога купить
купить справку купить справку 079у
справки заказать с доставкой купить справку 079у
доставка цветов по москве на дом курьером недорого http://dostavka-cvetov-moskva495.ru .
где получить справку купить медицинскую справку
справка с доставкой на дом купить справку
купить справку цена купить справку
купить справку анализы купить медицинскую справку
где можно купить справку купить медицинскую справку
где можно получить справку купить мед справку
купить справку от врача купить мед справку
где можно купить справку купить мед справку
где можно купить справку купить мед справку
купить справку онлайн купить медицинскую справку
https://t.me/detivetrachat detivetrachat
https://t.me/KohLantaKrabiThailand KohLantaKrabiThailand
обзорные экскурсии по санкт петербургу цена обзорная экскурсия по санкт петербургу
дизайн значка металлического изготовление металлических значков на заказ москва
паркет без циклевки паркет циклевка цена недорого
циклевка паркета в спб цены циклевка старого паркета
мостбет казино приложение http://mostbet05638.help/
Вакансии Министерства обороны РФ Хотите стать частью командного духа и внести свой вклад в защиту Родины?
Ищете надежные лицензии для 1С-Битрикс? Мы предлагаем легальные решения для всех типов проектов: интернет-магазинов, корпоративных сайтов и порталов. Переходите по запросу лицензия Битрикс стоимость. Быстрая активация, официальная поддержка и выгодные условия – обеспечьте своему веб-проекту стабильную работу и защиту с надежным ПО уже сегодня!
Анализы жк Крымская Роза Синекс» стал еще ближе! Мы открылись в ЖК Крымская Роза. По адресу Проспект Александра Суворова 107, пом 2К Теперь жители микрорайона могут сдавать любые анализы без очередей и в шаговой доступности. Современное оборудование Быстрые и точные результаты Широкий спектр исследований: от общих анализов крови до сложных До сложных генетических панелей. ! Более 3500 анализов. Удобный график работы В новом пункте «Синекс» доступны: Клинические исследования крови и мочи Биохимия Гормональные профили Диагностика инфекций Генетические панели Мы рядом, когда это важно! Телефон горячей линии 8 800 333 01 09
заказать цветы онлайн москва cvejie-cveti.ru .
Старый паркет? шлифовка паркета цена за метр профессиональное восстановление деревянного пола без пыли и лишних затрат. Удаляем царапины, потемнения и старое покрытие, возвращаем гладкость и естественный цвет. Используем современное оборудование, выполняем циклевку, шлифовку и лакировку паркета под ключ с гарантией качества и точным соблюдением сроков.
The best is in one place: https://thepastry.nl/internet-casino-nz-acceptance-extra-around-350/
Right now: https://batik96.net/casinos-online-legais-portugal-melhores-casinos-online-2023-2/
All the details at the link: https://islavaldecanas.org/blog/2026/03/19/melhores-casinos-online-portugal-jogar-top-10-sites-de-casino-portugueses-pt-2025/
The best is right here: https://incontradavineyard.com/mature-desi-bp-full-length-free-gender-videos-at-the-pornhits-com/
https://n-auditor.com.ua
Latest Updates: https://germiyandis.com.tr/melhores-casinos-online-acimade-portugal-2025-arruii-nosso-top-15/
Лицензия «Битрикс: Управление сайтом – Старт» — оптимальное решение для создания небольшого сайта, лендинга или корпоративной страницы. Переходите по запросу лицензия Битрикс Старт стоимость. Редакция включает базовые инструменты для управления контентом, готовые модули, защиту сайта и удобную административную панель. Подходит для быстрого запуска проекта на CMS 1C-Битрикс с возможностью дальнейшего масштабирования и перехода на более функциональные редакции.
https://justpaste.it/u/Prombet6
цветы недорого доставка https://www.cvejie-cveti.ru .
Read the extended version: https://gondola.cc/xxxbpp
Today’s highlights are here: https://www.opmarven.it/?p=616672
Dive Deeper: https://thanhtrahuongvan.com/no-deposit-incentive-gambling-enterprises-2026-bitstarz-drops-fifty-totally-free-revolves-the-real-deal-currency-victories-no-deposit-expected/
Hits of the Day: https://ennablaw.com/2026/03/18/simulador-sobre-ruleta-funciona-de-balde-o-bien-joviales-recursos-real/
цветы москва https://www.cvejie-cveti.ru .
1C-Bitrix: Управление сайтом — редакция Стандарт — это мощная платформа для создания и управления корпоративными сайтами. Переходите по запросу Битрикс Стандарт что входит. Подходит для компаний, которым нужен функциональный сайт с каталогом, формами, SEO-инструментами и удобной системой администрирования. Решение обеспечивает высокую безопасность, производительность и гибкость масштабирования бизнеса в интернете.
Planujete stehovani? stehovaci sluzby stehovani bytu a kancelari na klic. Baleni, nakladka, preprava a vykladka. Zkuseni stehovaci, peclive dodani a vcasne dodani. Pomuzeme vam zorganizovat stehovani rychle a bez zbytecnych starosti.
Details inside: https://andaman.cc/preferred-sunny-leon-lesbian-porns-porno-video-clips/
Today’s highlights are here: https://gblevents.com/nota-scompiglio-online-adm-nota-di-qualunque-i-casa-da-gioco-legali-italiani/
The best of the best: https://smpt.hu/kritika-kamra-stuns-within-the-reddish-saree-while-the-she-presents-having-gaurav-kapur-just-after-relationship-signing/
доставка свежих цветов москва http://www.cvejie-cveti.ru/ .
Проверенные адвокаты Москвы https://isk1.ru квалифицированная юридическая помощь и защита в суде. Решение сложных правовых споров, сопровождение дел и профессиональный подход к каждому клиенту для достижения результата.
Менопауза и перименопауза https://menopower.ru симптомы, приливы и гормональные изменения. Полезные советы для женщин 45+, рекомендации по здоровью, образу жизни и управлению финансами для комфортного прохождения этого периода.
Компания DARKLUM https://darklum.ru/catalogue предлагает широкий ассортимент светодиодных светильников различного назначения для коммерческих и жилых помещений как внутреннего, так и уличного освещения. В каталоге представлено более 5 000 моделей различных форм-факторов, среди которых Вы без труда сможете выбрать оптимальный вариант.
Промокод Пятёрочка доставка http://reporter63.ru/content/view/785017/promokod-pyaterochka-dostavka-vygodnye-vozmozhnosti-dlya-pokupok-onlajn актуальные скидки и купоны на заказ продуктов онлайн. Получайте выгодные предложения, снижайте стоимость доставки и экономьте на покупках в Пятёрочке с рабочими промокодами.
PUPIL OF FATE MOTORS https://auto.ae/pupiloffatemotors автосалон премиум авто в Дубае. Продажа роскошных автомобилей, эксклюзивные модели и индивидуальный подбор. Помогаем выбрать, оформить и доставить авто с гарантией качества и высоким уровнем сервиса.
Modern ground fault sensor monitor the condition of electrical networks and protect equipment. They offer rapid fault detection, high accuracy, and reliability for industrial applications.
Купить стройматериалы https://stroyrostov161.ru в Ростове-на-Дону: широкий выбор сыпучих и строительных материалов, включая щебень, песок, цемент, штукатурку и шпатлевку. Быстрая доставка и доступные цены для вашего объекта.
Заборы под ключ https://dachnie-zabory.ru в Москве и области — изготовление и установка ограждений для дома и участка. Профнастил, штакетник, сетка рабица и 3D заборы. Замер, доставка и монтаж с гарантией качества и соблюдением сроков.
Полная версия статьи: https://okit-shop.ru
Все самое свежее здесь: https://miocardin.ru
Только что опубликовано: https://krskmedia.ru
Читать расширенную версию: https://expert-centr.ru
Битрикс: Управление сайтом Малый Бизнес — функциональная редакция CMS для создания интернет-магазинов и коммерческих проектов. Переходите по запросу купить Битрикс Малый Бизнес. Система включает каталог товаров, корзину, онлайн-оплаты, маркетинговые инструменты и интеграцию с 1С. Решение подходит для компаний, которым нужен надежный и масштабируемый сайт с возможностью расширения функционала через модули и интеграции.
Последние обновления: https://gz-neft-khantos.ru
Обновлено сегодня: https://csa-pnzgu.ru
Обновления по теме: https://visatuning.ru
Подробности по ссылке: https://porta-plus.ru
Только лучшие материалы: https://grand-fish.ru
Подробности на странице: https://renetop.ru
Полная версия по ссылке: https://oktvesti.ru
Посмотреть на сайте: https://prodmagaz.ru
Полная версия по ссылке: https://conservaroot.ru
Наша лучшая подборка: https://admkuzino.ru
Обязательно к прочтению: https://conservaroot.ru
Наша лучшая подборка: https://svetilnik-svetodiodnyj-ulichnyj.ru
Самое важное сегодня: https://hvd-store.com
Полная статья здесь: https://fmob.ru
Обязательно к прочтению: https://kra-32-at.ru
Больше на нашем сайте: https://languillc.com
Полная статья здесь: https://miapharmer.com
Обновления по теме: https://vimall24.com
Полная статья здесь: https://sunrisedyecolor.com
Полная версия по ссылке: https://marketing99.ru
Лучший выбор дня: https://tdyasenevo.ru
Посмотреть на сайте: https://redevivacidade.com
Узнать больше здесь: https://greenhouse-kazan.ru
Главные новости: https://da-sever.ru
Все подробности по ссылке: https://richyess.com
Последние публикации: https://radifeelcompany.com
Только лучшие материалы: https://scuzice.org
Читать расширенную версию: https://redwayonline.com
Только лучшее здесь: https://labotigadelapell.com
Главные новости: https://kingsunnyct.com
Главные новости: https://jiulienergy.com
Самое важное сегодня: https://jiuliwindpowerjs.com
Главные новости: шлифовка дубового паркета
Только лучшее здесь: https://tsiklevka-parketa.ru
Больше на нашем сайте: https://tsiklevka-parketa.ru
Текущие рекомендации: https://jftairbags.com
Обновлено сегодня: https://hhbsteel.com
Расширенный обзор: https://yiy-elec.com
Все самое свежее здесь: https://donquixoteplay.com
Самое полезное для вас: https://katiessweettreats.com
Посмотреть на сайте: https://kvartirnyj-pereezd11.ru
Дополнительная информация: https://gad-elhak.com
Новое в категории: https://kazhongao.net
Самое полезное для вас: https://tsiklevka-parketa.ru
Самое полезное для вас: https://hrustalnye-torshery.ru
Ежедневный обзор: https://greenplaza-perm.ru
Читать больше на сайте: https://hi-456.com
Только лучшие материалы: https://2flab.com
Все самое свежее здесь: https://drel-mikser.ru
Все самое свежее здесь: https://asd-liquid.ru
Подробности по ссылке: https://zaprosto-internet.ru
Полная статья здесь: https://viborok.ru
Текущие рекомендации: https://rus-pipe.ru
Последние обновления: https://nvidia-geforce-gtx-1060.ru
Расширенная статья здесь: https://akkumulyatornyj-shurupovert.ru
вызвать нарколога на дом вызвать нарколога на дом .
Все самое свежее здесь: https://drel-dlya-almaznogo-bureniya.ru
Дополнительная информация: https://drel-ehlektricheskaya-udarnaya.ru
Узнать больше здесь: https://drel-s-mikroudarom.ru
Посмотреть на сайте: https://drel-shurupovert-akkumulyatornaya-v-moskve.ru
Нужны подписчики в Telegram? Поможем быстро увеличить аудиторию вашего канала или группы. Переходите по запросу подписчики в телеграм. Предлагаем накрутку живых и активных подписчиков без резких скачков и с минимальными списаниями. Подходит для старта новых каналов, повышения доверия и привлечения органической аудитории. Безопасное продвижение, гибкие объемы заказа и быстрый запуск. Увеличьте популярность вашего Telegram-канала уже сегодня.
Промокоды Пятёрочки https://www.time-samara.ru/content/view/785106/transformaciya-sistemy-loyalnosti-v-sovremennom-rossijskom-ritejle актуальные купоны и скидки на продукты и доставку. Получайте бонусы, снижайте стоимость заказов и экономьте на покупках. Только проверенные промокоды для выгодных покупок в Пятёрочке.
Лучший выбор дня: https://drel-udarnaya.ru
Только лучшее здесь: https://geforce-gt-730.ru
Ежедневный обзор: https://geforce-gt-1030.ru
Расширенная статья здесь: https://geforce-gtx-1650.ru
Узнать больше здесь: https://interskol-shurupovert.ru
Читать больше на сайте: https://graver-akkumulyatornyj.ru
Все подробности: https://impakt-shurupovert.ru
Все лучшее здесь: https://gtx-1070-ti.ru
Подробности внутри: https://makita-shurupovert-akkumulyatornyj.ru
Последние изменения: https://makita-shurupovert.ru
Все самое свежее здесь: https://lentochnyj-shurupovert.ru
Все самое свежее здесь: https://interskol-shurupovert.ru
Дополнительная информация: https://nvidia-geforce-gtx-1050-ti.ru
Текущие рекомендации: https://mini-drel.ru
Посмотреть на сайте: https://nvidia-geforce-gt-710.ru
Наша лучшая подборка: https://shurupovert-akkumulyatornyj.ru
Подробности по ссылке: https://ruchnaya-drel.ru
Только лучшее здесь: https://shurupovert-dlya-ledobura.ru
Больше на нашем сайте: https://shurupovert-grinvorks.ru
Обновлено сегодня: https://shurupovert-hilti.ru
Подробности на странице: https://shurupovert-interskol.ru
Читать больше на сайте: https://shurupovert-milwaukee.ru
Наша лучшая подборка: https://shurupovert-zubr.ru
Самое интересное: https://udarnyj-shurupovert.ru
Только лучшие материалы: https://videokarta-gigabyte.ru
Все самое свежее здесь: https://videokarta-1660-super.ru
Подробности по ссылке: https://videokarta-rx580.ru
Полная версия по ссылке: https://videokarta-msi-gtx-970-gaming-4g.ru
Читать больше на сайте: https://nn-radiodetali.ru
Наша лучшая подборка: https://vodyanoe-ohlazhdenie-dlya-videokarty.ru
Обязательно к прочтению: https://perforator-i-drel-otlichiya.ru
Проверка авто по VIN https://dtf.ru/luchshii-rating/3585176-top-15-luchshih-servisov-proverki-avto-po-vin-nomeru-reiting-2025-goda ТОП-15 лучших сервисов для анализа истории машины. ДТП, пробег, владельцы и ограничения. Сравните платформы и выберите надежный сервис для безопасной покупки авто.
Kent Casino https://kentcasino.ru.com/ официальный сайт, регистрация и бонусы. Онлайн казино с быстрым выводом средств, слотами и играми от топ провайдеров. Получите фриспины и играйте на реальные деньги безопасно.
заказать кухню в спб от производителя недорого kuhni-spb-49.ru .
Kent Casino kentcasino официальный сайт, регистрация и бонусы. Онлайн казино с быстрым выводом средств, слотами и играми от топ провайдеров. Получите фриспины и играйте на реальные деньги безопасно.
дивитися фільми онлайн 2025 фільми онлайн безкоштовно
Нужна бесплатная юридическая консультация? Переходите по запросу задать вопрос юристу бесплатно в Питере и получите помощь опытного юриста по любым правовым вопросам: семейные споры, долги, недвижимость, трудовые конфликты, защита прав потребителей и многое другое. Задайте вопрос онлайн или по телефону и получите подробный разбор вашей ситуации и рекомендации по дальнейшим действиям. Консультация проводится бесплатно и конфиденциально.
Stackshine AI-Platform simplifies SaaS spend management with full software visibility, renewal tracking, and employee offboarding automation. Reduce costs, eliminate unused tools, and gain control over subscriptions with a smarter, centralized platform.
где самые дешевые цветы в москве http://www.cveti-nederogo.ru/ .
offices for rent nyc office rental nyc
Профессиональная: оклейка авто виниловой пленкой – сохраните родное лакокрасочное покрытие в идеальном состоянии на долгие годы.
Stackshine https://en.stackshine.io simplifies SaaS spend management with full software visibility, renewal tracking, and employee offboarding automation. Reduce costs, eliminate unused tools, and gain control over subscriptions with a smarter, centralized platform.
Профессиональная: защита кузова антигравийной пленкой – сохраните родное лакокрасочное покрытие в идеальном состоянии на долгие годы.
office space manhattan new york city office space for lease
Компания DARKLUM https://diolum.ru/catalogue предлагает широкий ассортимент светодиодных светильников различного назначения для коммерческих и жилых помещений как внутреннего, так и уличного освещения. В каталоге представлено более 5 000 моделей различных форм-факторов, среди которых Вы без труда сможете выбрать оптимальный вариант.
Want to merge PDFs? https://chromewebstore.google.com/detail/pdf-document-merger/dijaaocffakkdigjcmkbaaglkglolmfo quickly and easily combine files into a single PDF. No registration required, free and secure. Upload your files, combine them in the desired order, and download the finished document in seconds.
Играешь на гитаре? аккорды и бой на гитаре для начинающих большая база аккордов, табулатур и разборов песен. Удобный поиск, схемы аккордов и тексты популярных композиций. Подходит для новичков и опытных гитаристов для обучения и игры.
Нужен займ? микрозайм рейтинг взять деньги быстро и без справок. Удобное оформление заявки, быстрые выплаты и минимальные требования. Подберите надежную МФО и получите деньги на карту в короткие сроки.
Продажа запчастей https://rtd-ekb.ru для складской и дорожно-строительной техники — шины, комплектующие и расходные материалы. Широкий ассортимент, качественная продукция и оперативная доставка по выгодным ценам.
Надёжный поставщик моторное масло оптом москва предлагает моторные масла в бочках 200л от ведущих производителей.
Нужна бесплатная юридическая консультация? Переходите по запросу задать вопрос юристу круглосуточно в Балашихе и получите помощь опытного юриста по любым правовым вопросам: семейные споры, долги, недвижимость, трудовые конфликты, защита прав потребителей и многое другое. Задайте вопрос онлайн или по телефону и получите подробный разбор вашей ситуации и рекомендации по дальнейшим действиям. Консультация проводится бесплатно и конфиденциально.
Tarot readings https://tarot.com.az articles on card meanings, love readings, and daily predictions. Learn how to correctly perform readings and interpret the cards to get accurate answers.
Нужен займ? займ быстрые деньги взять деньги быстро и без справок. Удобное оформление заявки, быстрые выплаты и минимальные требования. Подберите надежную МФО и получите деньги на карту в короткие сроки.
pin up игровые автоматы https://buketik39.ru
pin-up казино https://global-smm.ru
pin up casino pin-up
pin up игровые автоматы https://pinup-casinos.ru
зеркало пин ап казино пин ап
пин ап бет пин-ап казино официальный сайт
казино онлайн пин ап https://school33bel.ru
казино пинап https://севсклон.рф
pin up casino вход pin-up казино играть
pinup bet pin-up казино
наркологический центр наркологический центр .
pin-up скачать бесплатно https://liski-adm.ru
pin up игровые автоматы pin up bet
смотреть бесплатно фильмы 2026 смотреть фильмы онлайн
цвет в дизайне интерьера https://istoki.tv/news/company/razbiraemsya-v-roli-dizayn-agentstva-interera-na-sovremennom-rynke/
aliexpress комбо промокод промокод алиэкспресс
non prescription online pharmacy legit online pharmacy online pharmacy valium uk
пинап зеркало pinup
Volvo спецтехніка https://telegra.ph/Kupit-spectehniku-Volvo-03-30 екскаватори, фронтальні навантажувачі та дорожні машини. Надійність, ефективність і сучасні рішення для будівництва. Продаж, підбір і обслуговування техніки для бізнесу.
лучшие фильмы смотреть онлайн фильмы смотреть онлайн бесплатно
Volvo в Україні https://telegra.ph/Kupit-spectehniku-Volvo-03-30 екскаватори, фронтальні навантажувачі та дорожні машини. Надійність, ефективність і сучасні рішення для будівництва. Продаж, підбір і обслуговування техніки для бізнесу.
buy growth hormone online pharmacy wg online pharmacy antibiotics online pharmacy
смотреть фильмы в качестве что посмотреть фильмы
ноты на гитаре для начинающих аккорды на гитаре легкие песни для начинающих
пачка сигарет аккорды для гитары ноты для гитары
Нужен займ? онлайн займ с моментальным решением быстрые деньги без лишних документов. Высокий процент одобрения, моментальные выплаты и удобная заявка. Сравните предложения МФО и выберите выгодные условия для получения займа.
Music graphics https://cover-art-design.ru
реабилитация наркоманов vyvod-iz-zapoya-na-domu-ekaterinburg-2.ru .
Хочешь путешествовать? автобусные туры интересные маршруты, экскурсии и комфортный отдых для путешествий и новых впечатлений. Мы поможем подобрать идеальный тур — под любые пожелания и бюджет! Работаем ежедневно с 9:00 до 21:00 — без выходных!
Top rated resource city pop playlist for finding perfect Spotify playlists whether you need focus music or party hits.
капельница от похмелья vyvod-iz-zapoya-na-domu-voronezh-9.ru .
Любишь играть на гитаре? аккорды для гитары разбор подборка аккордов, табов и разборов песен. Схемы, тексты и удобный поиск помогут быстро найти нужную композицию и научиться играть любимые песни.
Доставка цветов https://kvarz-shop.ru авторские букеты и редкие композиции с быстрой доставкой. Премиальные цветы, индивидуальный подход и стильное оформление. Закажите уникальный букет для особого случая с гарантией свежести.
thailand pharmacy online online pharmacy reviews oxycodone online pharmacy anabolic steroids
Нужны заклепки? заклепки вытяжные нержавеющие гост прочный крепеж для соединения деталей. Алюминиевые, стальные и нержавеющие варианты. Надежность, долговечность и удобство монтажа для различных задач и конструкций.
доставка цветов день в день http://www.dostavka-cvetov777.ru/ .
Нужны заклепки? заклепки вытяжные нержавеющие гост прочный крепеж для соединения деталей. Алюминиевые, стальные и нержавеющие варианты. Надежность, долговечность и удобство монтажа для различных задач и конструкций.
New releases are here: https://www.indocare.org/malaysia-sex-video-bonnie-blue-porn-videos-verified-pornstar-character/
Нейросеть для ВКонтакте — контент и посты – https://vc.ru/aihub/2842670-neyroseti-dlya-vkontakte-sozdanie-kachestvennogo-kontenta
Today’s Summary: https://fullkolortextil.com/2026/03/21/neonx-sex-videos-porn-photos-better-porno-photos-art-galleries/
crestor pharmacy online ultram online pharmacy online pharmacy degree
поролон для кресла купить поролон для кресла купить .
Любишь путешествовать? экскурсионные туры по россии предлагаем экскурсионные туры по России и Грузии по ценам официальных операторов — с гарантией и страховкой. Мы поможем подобрать идеальный тур — под любые пожелания и бюджет! Работаем ежедневно с 9:00 до 21:00 — без выходных!
Stackshine en stackshine io a SaaS cost management platform: subscription control, usage transparency, renewal tracking, and employee offboarding. Optimize your budget and reduce unnecessary software costs.
Посмотрите информацию по ссылке – нейросеть для генерации эффектов
pharmacy mall online reviews buy xanax online pharmacy online pharmacy without a prescription
Find the meaning read more of any emoji combination with detailed explanations for every messaging platform.
реабилитационный центр для наркозависимых реабилитационный центр для наркозависимых .
Появились вредители? сколько стоит дезинфекция квартиры от муравьев обработка помещений от вирусов, бактерий и насекомых. Современные методы, безопасные средства и опытные специалисты для надежной защиты.
Уничтожение вредителей https://dezinfekciya-mcd.ru/unichtozhenie/otlov-krotov/ уничтожение бактерий, вирусов и насекомых. Обработка квартир, домов и коммерческих помещений. Безопасные препараты, опытные специалисты и гарантия результата.
ии для изменения https://vc.ru/aihub/2842517-luchshie-neuroseti-onlajn-dlya-rossii-obzor-2026-goda
Free online games https://www.poki.com.az play without downloading or registering. A large collection of games across various genres: action, puzzles, racing, and strategy. Easily access from any device.
Arizona sports events http://www.oxu-az.com.az football, transfers, and live match results. Latest news, statistics, and reviews for fans and sports enthusiasts.
Free online games 1001 oyun the best browser games with no installation required. Huge selection of genres, easy search, and quick launch. Play anytime for free.
Roblox Download delta-roblox Download the game, learn about Roblox Studio features, and learn about security settings. Play, create your own worlds, and protect your account. A complete guide to installing, playing, and using the platform safely.
Выгодно купить кварцевый песок для пескоструйного аппарата – 100% очистка без забитых сопел! Забудьте о засорах: очищайте металл в разы быстрее. Ваш аппарат скажет спасибо, а результат поразит клиента. Купить кварцевый песок!
помощь студентам и школьникам kupit-kursovuyu-107.ru .
курсовой проект цена kupit-kursovuyu-107.ru .
https://mine-drop1.com/
покупка курсовой покупка курсовой .
Music lovers summer playlist spotify discover new genres and curated playlists for every occasion completely free.
Нужен кондицинер кондиционер сколько стоит установка профессиональный монтаж сплит-систем под ключ. Быстро, аккуратно и с гарантией. Подбор оборудования, установка и настройка с соблюдением всех норм и стандартов.
Обзор червячных хомутов https://teletype.in/@da_revanta/sMB0_AOMqxv как выбрать лучший вариант для надежного крепления. Сравнение материалов, размеров и производителей. Полезные советы по выбору, установке и применению для разных задач.
Your source https://365sportia.com for international sports coverage football transfer news, Champions League analysis, NBA and NFL updates, and sports collectibles insights
Latest scores https://rtahasports.com game highlights, and player news from the NFL, NBA, NHL, and MLB. Get up-to-date statistics, transfers, and analysis. Follow the games and learn everything about teams and players in real time.
Любишь музыку? радомир царев музыка с душой, тексты и композиции. Слушайте онлайн, открывайте новые треки и погружайтесь в атмосферу искреннего творчества.
Любишь музыку? автор-исполнитель радомир музыка с душой, тексты и композиции. Слушайте онлайн, открывайте новые треки и погружайтесь в атмосферу искреннего творчества.
Федеральный центр банкротства граждан помогает законно списать долги и начать финансовую жизнь с чистого листа. Переходите по запросу единый центр банкротства физлиц. Специалисты сопровождают процедуру на всех этапах: от консультации до полного завершения дела. Индивидуальный подход, прозрачные условия и защита ваших интересов — надежное решение при сложной финансовой ситуации.
Любишь читать но нет времени? https://knijki.com огромный выбор жанров, удобный поиск и качественная озвучка. Наслаждайтесь любимыми произведениями в любое время.
Только свежие новостной портал свежие новости политики, экономики, общества и технологий. Актуальные события, аналитика, обзоры и мнения экспертов. Следите за главными новостями страны и мира онлайн в удобном формате каждый день.
Строительные технологии https://universalstroi.su выгодные инвестиции в доступное жилье. Стабильный доход, перспективные проекты и высокий спрос. Получайте прибыль от инновационных решений в строительстве.
Монтажные работы https://montazhstroy.su услуги по установке инженерных систем и конструкций. Быстро, качественно и с гарантией. Выполняем задачи любой сложности для частных и коммерческих объектов.
Нейросети для дизайнеров — обзор: нейросеть для дизайна интерьера
ответственное хранение материалов https://otvetstvennoe-hranenie-sklad.ru
how long does it take for tadalafil to work tadalafil 5 mg para que sirve difference between tadalafil and sildenafil
наркологическая клиника наркологическая клиника .
tadalafil vs cialis when to take cialis cialis 20 mg
студия дизайн интерьера заказать дизайн квартиры недорого
дизайн проект жилой квартиры дизайн интерьера квартиры недорого
покупка базы покупка базы .
Открываешь кейсы KC? промики изи дроп актуальные бонусы и скидки для пользователей. Получайте выгодные предложения, дополнительные возможности и экономьте при использовании сервиса. Все действующие промокоды в одном месте.
1win application
Быстрые микрозаймы всем на https://credit-world.ru – это простой способ оформить займ за несколько минут с минимальными требованиями к заемщику. У нас собрано более 50 МФО, где высокий шанс одобрения заявок. Вы можете сравнить предложения, найти лучший вариант и подать заявку за несколько минут, получив решение практически сразу.
revatio vs viagra long term side effects of viagra where can i get viagra
противопожарные двери https://dveri-ot-zavoda.ru с доставкой и профессиональной консультацией, посмотрите актуальные решения для разных типов помещений.
Для меня главное в таких покупках это надёжность, и здесь с этим всё в порядке. Магазин быстро обработал заказ, связался без задержек и чётко выполнил свои обещания. Телефон доставили вовремя, качество отличное. Приятно иметь дело с профессионалами: xiaomi 13t озон
vardenafil dosing vardenafil hcl 10 mg vardenafil hcl 20mg tab vs viagra
Сломалась машина? служба эвакуации и помощи на дороге техпомощь на дорогах СПб и Ленобласти: эвакуация, подвоз топлива, запуск двигателя, вытаскивание авто — 24/7. Круглосуточная мобильная служба техпомощи в Санкт?Петербурге и Ленинградской области. Оказываем выездную помощь в любое время: эвакуируем авто, подвозим топливо, помогаем завести двигатель и вытаскиваем застрявшие машины.
Нужна брендированная продукция? рекламно сувенирная продукция ваш надежный партнер в сфере брендинга в Алматы. Мы специализируемся на производстве сувенирной продукции с нанесением логотипа и корпоративной полиграфии. В нашем каталоге вы найдете всё для продвижения бренда: бизнес-сувениры, промо-мерч, текстиль и полиграфическую продукцию. Мы принимаем заказы оптом от 50 единиц, что делает нас доступными как для крупного бизнеса, так и для небольших компаний.
cheapest pharmacy for prescription drugs pharmacy assistant certification online legal canadian pharmacy online
купить сувенирную продукцию купить сувенирную продукцию .
Нужен ремонт? https://stroim-remont.ru под ключ, быстро и качественно. Дизайн, отделка, электрика и сантехника. Гарантия на работы и прозрачная смета. Выполняем проекты любой сложности.
how to avoid cialis side effects\ cialis without a doctor prescription cialis dosing
Сопровождение банкротства физических лиц — это комплексная юридическая помощь при списании долгов. Переходите по запросу юристы по банкротству в Москве. Специалист проанализирует ситуацию, подготовит документы, взаимодействует с судом и кредиторами, проконтролирует каждый этап процедуры. Вы снижаете риски ошибок, экономите время и получаете законное освобождение от долгов с защитой своих прав и имущества.
Do you trade cryptocurrencies? reliable crypto platform bitkelttrade automate your transactions and earn passive income. Smart algorithms analyze the market and help you make decisions. Increase your income and reduce risks with modern technology.
На масло моторное бочка 200л можно заказать гидравлическое трансмиссионное и моторное масло оптом от одной бочки.
Do you trade cryptocurrencies? bitkelttrade ai bot automate your transactions and earn passive income. Smart algorithms analyze the market and help you make decisions. Increase your income and reduce risks with modern technology.
Do you trade cryptocurrencies? bitkelttrade trading bot automate your transactions and earn passive income. Smart algorithms analyze the market and help you make decisions. Increase your income and reduce risks with modern technology.
viagra porn best price for viagra 100mg what happens if a woman takes viagra
Do you trade cryptocurrencies? start trading with bitkelttrade automate your transactions and earn passive income. Smart algorithms analyze the market and help you make decisions. Increase your income and reduce risks with modern technology.
Купить 3D-принтеры https://reporter63.ru/content/view/786013/zagolovok-razvitie-3dpechati-kak-novaya-tehnologiya-menyaet-nash-mir в Минске — продажа оборудования для печати пластиком и фотополимером. Подбор, консультации и гарантия. Найдите идеальный 3D-принтер для ваших задач.
Продажа 3D-принтеров http://reporter63.ru/content/view/786012/zagolovok-3dprinter-revolyuciya-v-proizvodstve-i-tvorchestve Минск — FDM, SLA и другие технологии печати. Широкий ассортимент, выгодные цены и профессиональные консультации. Подберите устройство под свои задачи.
Ребята, подскажите, пожалуйста.
Не могу нормально разобраться с одной ошибкой на Android.
Я уже примерно 6 раз пробовал переустанавливать приложение и чистить кэш.
Намекаю о приложении 1xbet yukle.
Через браузер ситуация тоже неидеальная: веб-версия иногда тормозит.
Похоже, я не один с такой ситуацией на allhacked.com.
В разделе этот нашёл похожую тему.
Похожий случай видел в теме “”.
Admin, если тема знакома, буду благодарен за совет.
Если кто-то уже решал такую проблему, подскажите, с чего лучше начать.
Заранее спасибо за помощь.
сколько стоит прокапаться от алкоголя сколько стоит прокапаться от алкоголя .
Добрый день.
Столкнулся с неприятной проблемой на телефоне.
Кэш чистил и ставил заново уже 9 раз, но стабильного результата так и нет.
Пишу про app 1xbet indir.
Через веб всё открывается, но иногда страница работает тяжело.
Похоже, я не один с такой ситуацией на allhacked.com.
В этот уже встречал пару похожих вопросов.
Похожий случай видел в теме “”.
Admin, если тема знакома, буду благодарен за совет.
Если кто-то уже решал такую проблему, подскажите, с чего лучше начать.
Спасибо всем, кто откликнется.
выезд на дом капельница от запоя выезд на дом капельница от запоя .
Утилизация биоотходов https://stroi-musor.su вывоз и переработка пищевых и растительных отходов. Экологичные решения, соблюдение стандартов и надежный сервис для предприятий и частных клиентов.
Ребята, подскажите, пожалуйста.
Столкнулся с неприятной проблемой на телефоне.
Переустанавливал всё уже 4 раз, но ошибка всё равно возвращается.
Пишу о приложении 1xbet indir.
Через веб всё открывается, но иногда страница работает тяжело.
Похоже, я не один с такой ситуацией на allhacked.com.
В этот уже встречал пару похожих вопросов.
Меня особенно заинтересовала тема “”.
Admin, если у тебя был похожий сбой, подскажи, что в итоге сработало.
Буду признателен за понятный совет без лишней теории.
Заранее спасибо за помощь.
ЖК Солянка Парк https://tzstroy.su современный жилой комплекс с удобной инфраструктурой и комфортной средой. Квартиры с продуманными планировками, благоустроенная территория и удобная транспортная доступность.
ГНБ бурение https://stroytex.su современный способ прокладки инженерных сетей без раскопок. Подходит для дорог, рек и плотной застройки. Точная технология, сокращение сроков и минимальные затраты.
вывод из запоя на дому самара вывод из запоя на дому самара .
Ребята, подскажите, пожалуйста.
На смартфоне в последнее время всё ведёт себя странно.
Я уже примерно 3 раз пробовал переустанавливать приложение и чистить кэш.
Я говорю про apk 1xbet yukle.
Через веб всё открывается, но иногда страница работает тяжело.
На allhacked.com уже видел похожие обсуждения.
В этот уже встречал пару похожих вопросов.
Меня особенно заинтересовала тема “”.
nd_user, если ты сталкивался с этим, напиши, пожалуйста, что помогло.
Если знаете нормальное решение без лишних экспериментов, буду очень благодарен за помощь.
Спасибо всем, кто откликнется.
Утилизация биоотходов https://stroi-musor.su вывоз и переработка пищевых и растительных отходов. Экологичные решения, соблюдение стандартов и надежный сервис для предприятий и частных клиентов.
Утилизация биоотходов https://stroi-musor.su вывоз и переработка пищевых и растительных отходов. Экологичные решения, соблюдение стандартов и надежный сервис для предприятий и частных клиентов.
Добрый день.
Не могу нормально разобраться с одной ошибкой на Android.
Переустанавливал всё уже 3 раз, но ошибка всё равно возвращается.
Говорю про apk 1xbet indir.
Через веб всё открывается, но иногда страница работает тяжело.
На этом сайте уже встречал похожие жалобы.
В разделе этот нашёл похожую тему.
Похожий случай видел в теме “”.
nd_user, если ты сталкивался с этим, напиши, пожалуйста, что помогло.
Буду признателен за понятный совет без лишней теории.
Буду благодарен за любой реальный совет.
заказать флаг на заказ сделать флаг на заказ в санкт петербурге
Ребята, подскажите, пожалуйста.
На смартфоне в последнее время всё ведёт себя странно.
Я уже примерно 4 раз пробовал переустанавливать приложение и чистить кэш.
Пишу о apk 1xbet yukle.
Через веб всё открывается, но иногда страница работает тяжело.
Похоже, я не один с такой ситуацией на allhacked.com.
Даже в разделе этот попадаются похожие сообщения.
Похожий случай видел в теме “”.
Moderator, если у тебя был похожий сбой, подскажи, что в итоге сработало.
Буду признателен за понятный совет без лишней теории.
Буду благодарен за любой реальный совет.
Всем привет.
На смартфоне в последнее время всё ведёт себя странно.
Я уже примерно 9 раз пробовал переустанавливать приложение и чистить кэш.
Намекаю о приложении 1xbet yukle.
Через браузер ситуация тоже неидеальная: веб-версия иногда тормозит.
Похоже, я не один с такой ситуацией на allhacked.com.
В этот уже встречал пару похожих вопросов.
Похожий случай видел в теме “”.
nd_user, если ты сталкивался с этим, напиши, пожалуйста, что помогло.
Если знаете нормальное решение без лишних экспериментов, буду очень благодарен за помощь.
Спасибо всем, кто откликнется.
buy tadalafil bluechew tadalafil can women take tadalafil
Ребята, подскажите, пожалуйста.
Столкнулся с неприятной проблемой на телефоне.
Кэш чистил и ставил заново уже 4 раз, но стабильного результата так и нет.
Речь идет про apk 1xbet yukle.
Через браузер ситуация тоже неидеальная: веб-версия иногда тормозит.
Похоже, я не один с такой ситуацией на allhacked.com.
В разделе этот нашёл похожую тему.
Меня особенно заинтересовала тема “”.
Moderator, если тема знакома, буду благодарен за совет.
Если знаете нормальное решение без лишних экспериментов, буду очень благодарен за помощь.
Буду благодарен за любой реальный совет.
Ребята, подскажите, пожалуйста.
Столкнулся с неприятной проблемой на телефоне.
Я уже примерно 7 раз пробовал переустанавливать приложение и чистить кэш.
Я говорю о apk 1xbet indir.
В мобильном браузере тоже бывают подвисания и долгие загрузки.
На этом сайте уже встречал похожие жалобы.
В разделе этот нашёл похожую тему.
Меня особенно заинтересовала тема “”.
Moderator, если тема знакома, буду благодарен за совет.
Буду признателен за понятный совет без лишней теории.
Спасибо всем, кто откликнется.
Всем привет.
На смартфоне в последнее время всё ведёт себя странно.
Переустанавливал всё уже 5 раз, но ошибка всё равно возвращается.
Намекаю про apk 1xbet azerbaycan mobile.
Через браузер ситуация тоже неидеальная: веб-версия иногда тормозит.
На этом сайте уже встречал похожие жалобы.
В этот уже встречал пару похожих вопросов.
Недавно наткнулся на тему “”, и проблема там очень похожая.
nd_user, если ты сталкивался с этим, напиши, пожалуйста, что помогло.
Буду признателен за понятный совет без лишней теории.
Буду благодарен за любой реальный совет.
Добрый день.
На смартфоне в последнее время всё ведёт себя странно.
Переустанавливал всё уже 9 раз, но ошибка всё равно возвращается.
Речь идет про приложении 1xbet azerbaycan mobile.
В мобильном браузере тоже бывают подвисания и долгие загрузки.
На allhacked.com уже видел похожие обсуждения.
В этот уже встречал пару похожих вопросов.
Похожий случай видел в теме “”.
nd_user, если ты сталкивался с этим, напиши, пожалуйста, что помогло.
Если знаете нормальное решение без лишних экспериментов, буду очень благодарен за помощь.
Буду благодарен за любой реальный совет.
Всем привет.
Столкнулся с неприятной проблемой на телефоне.
Переустанавливал всё уже 7 раз, но ошибка всё равно возвращается.
Намекаю про приложении 1xbet yukle.
В мобильном браузере тоже бывают подвисания и долгие загрузки.
На этом сайте уже встречал похожие жалобы.
Даже в разделе этот попадаются похожие сообщения.
Меня особенно заинтересовала тема “”.
Moderator, если у тебя был похожий сбой, подскажи, что в итоге сработало.
Буду признателен за понятный совет без лишней теории.
Спасибо всем, кто откликнется.
online pharmacy accutane no prescription rx discount pharmacy middlesboro ky tamiflu which pharmacy has the best deal
Всем привет.
На смартфоне в последнее время всё ведёт себя странно.
Я уже примерно 7 раз пробовал переустанавливать приложение и чистить кэш.
Говорю о приложении 1xbet azerbaycan mobile.
Через веб всё открывается, но иногда страница работает тяжело.
Похоже, я не один с такой ситуацией на allhacked.com.
В разделе этот нашёл похожую тему.
Похожий случай видел в теме “”.
nd_user, если ты сталкивался с этим, напиши, пожалуйста, что помогло.
Буду признателен за понятный совет без лишней теории.
Буду благодарен за любой реальный совет.
Ребята, подскажите, пожалуйста.
На смартфоне в последнее время всё ведёт себя странно.
Кэш чистил и ставил заново уже 9 раз, но стабильного результата так и нет.
Речь идет о apk 1xbet yukle.
Через браузер ситуация тоже неидеальная: веб-версия иногда тормозит.
На allhacked.com уже видел похожие обсуждения.
В этот уже встречал пару похожих вопросов.
Похожий случай видел в теме “”.
Moderator, если тема знакома, буду благодарен за совет.
Буду признателен за понятный совет без лишней теории.
Буду благодарен за любой реальный совет.
Хочешь оригинальную подушку? подушка дакимакура на заказ со своим принтом комфорт и уют для сна. Длинная форма, мягкий наполнитель и стильные принты. Отлично подходит для отдыха и расслабления.
Всем привет.
Столкнулся с неприятной проблемой на телефоне.
Кэш чистил и ставил заново уже 5 раз, но стабильного результата так и нет.
Я говорю о apk 1xbet indir.
В мобильном браузере тоже бывают подвисания и долгие загрузки.
На этом сайте уже встречал похожие жалобы.
Даже в разделе этот попадаются похожие сообщения.
Меня особенно заинтересовала тема “”.
nd_user, если ты сталкивался с этим, напиши, пожалуйста, что помогло.
Буду признателен за понятный совет без лишней теории.
Спасибо всем, кто откликнется.
Ребята, подскажите, пожалуйста.
Столкнулся с неприятной проблемой на телефоне.
Я уже примерно 3 раз пробовал переустанавливать приложение и чистить кэш.
Пишу про приложении 1xbet indir.
Через браузер ситуация тоже неидеальная: веб-версия иногда тормозит.
На этом сайте уже встречал похожие жалобы.
В этот уже встречал пару похожих вопросов.
Меня особенно заинтересовала тема “”.
nd_user, если ты сталкивался с этим, напиши, пожалуйста, что помогло.
Если знаете нормальное решение без лишних экспериментов, буду очень благодарен за помощь.
Буду благодарен за любой реальный совет.
Всем привет.
На смартфоне в последнее время всё ведёт себя странно.
Кэш чистил и ставил заново уже 6 раз, но стабильного результата так и нет.
Пишу про apk 1xbet indir.
Через браузер ситуация тоже неидеальная: веб-версия иногда тормозит.
Похоже, я не один с такой ситуацией на allhacked.com.
В этот уже встречал пару похожих вопросов.
Меня особенно заинтересовала тема “”.
Moderator, если у тебя был похожий сбой, подскажи, что в итоге сработало.
Если знаете нормальное решение без лишних экспериментов, буду очень благодарен за помощь.
Спасибо всем, кто откликнется.
вывод из запоя на дому воронеж капельница вывод из запоя на дому воронеж капельница .
Профессиональные услуги арбитражного управляющего — это комплексная поддержка при банкротстве физических и юридических лиц. Переходите по запросу помощь арбитражного управляющего при банкротстве. Специалист сопровождает процедуру на всех этапах: от анализа ситуации и подготовки документов до взаимодействия с судом и кредиторами. Помощь управляющего позволяет минимизировать риски, соблюсти требования закона и эффективно решить финансовые проблемы.
Всем привет.
На смартфоне в последнее время всё ведёт себя странно.
Кэш чистил и ставил заново уже 6 раз, но стабильного результата так и нет.
Говорю про app 1xbet yukle.
Через веб всё открывается, но иногда страница работает тяжело.
На этом сайте уже встречал похожие жалобы.
В разделе этот нашёл похожую тему.
Недавно наткнулся на тему “”, и проблема там очень похожая.
Admin, если тема знакома, буду благодарен за совет.
Если кто-то уже решал такую проблему, подскажите, с чего лучше начать.
Заранее спасибо за помощь.
Нужен пластический хирург? центр пластической хирургии цены современные операции и эстетические процедуры. Опытные хирурги, безопасные методики и индивидуальный подход. Консультации, диагностика и качественный результат.
Всем привет.
Столкнулся с неприятной проблемой на телефоне.
Я уже примерно 3 раз пробовал переустанавливать приложение и чистить кэш.
Говорю про приложении 1xbet azerbaycan mobile.
Через браузер ситуация тоже неидеальная: веб-версия иногда тормозит.
Похоже, я не один с такой ситуацией на allhacked.com.
В этот уже встречал пару похожих вопросов.
Похожий случай видел в теме “”.
Moderator, если тема знакома, буду благодарен за совет.
Буду признателен за понятный совет без лишней теории.
Спасибо всем, кто откликнется.
вывод из запоя в спб вывод из запоя в спб .
Добрый день.
Столкнулся с неприятной проблемой на телефоне.
Я уже примерно 3 раз пробовал переустанавливать приложение и чистить кэш.
Говорю про приложении 1xbet yukle.
В мобильном браузере тоже бывают подвисания и долгие загрузки.
На этом сайте уже встречал похожие жалобы.
Даже в разделе этот попадаются похожие сообщения.
Недавно наткнулся на тему “”, и проблема там очень похожая.
Moderator, если тема знакома, буду благодарен за совет.
Буду признателен за понятный совет без лишней теории.
Буду благодарен за любой реальный совет.
капельница от запоя воронеж капельница от запоя воронеж .
Добрый день.
Столкнулся с неприятной проблемой на телефоне.
Переустанавливал всё уже 5 раз, но ошибка всё равно возвращается.
Намекаю о apk 1xbet azerbaycan mobile.
В мобильном браузере тоже бывают подвисания и долгие загрузки.
На allhacked.com уже видел похожие обсуждения.
В этот уже встречал пару похожих вопросов.
Похожий случай видел в теме “”.
Moderator, если тема знакома, буду благодарен за совет.
Если кто-то уже решал такую проблему, подскажите, с чего лучше начать.
Буду благодарен за любой реальный совет.
tadalafil over the counter how to take tadalafil tadalafil 20 mg how long does it last
Всем привет.
Столкнулся с неприятной проблемой на телефоне.
Кэш чистил и ставил заново уже 4 раз, но стабильного результата так и нет.
Пишу о apk 1xbet indir.
Через браузер ситуация тоже неидеальная: веб-версия иногда тормозит.
На этом сайте уже встречал похожие жалобы.
В разделе этот нашёл похожую тему.
Меня особенно заинтересовала тема “”.
Moderator, если у тебя был похожий сбой, подскажи, что в итоге сработало.
Если знаете нормальное решение без лишних экспериментов, буду очень благодарен за помощь.
Буду благодарен за любой реальный совет.
Нужна мебель? премиум мебель эксклюзивные изделия из натурального дерева. Индивидуальный дизайн, качественные материалы и точное изготовление. Решения для дома и бизнеса.
Всем привет.
Не могу нормально разобраться с одной ошибкой на Android.
Я уже примерно 5 раз пробовал переустанавливать приложение и чистить кэш.
Я говорю о app 1xbet yukle.
Через браузер ситуация тоже неидеальная: веб-версия иногда тормозит.
Похоже, я не один с такой ситуацией на allhacked.com.
В разделе этот нашёл похожую тему.
Похожий случай видел в теме “”.
Admin, если у тебя был похожий сбой, подскажи, что в итоге сработало.
Если знаете нормальное решение без лишних экспериментов, буду очень благодарен за помощь.
Буду благодарен за любой реальный совет.
Ребята, подскажите, пожалуйста.
Столкнулся с неприятной проблемой на телефоне.
Переустанавливал всё уже 3 раз, но ошибка всё равно возвращается.
Пишу про app 1xbet indir.
В мобильном браузере тоже бывают подвисания и долгие загрузки.
На allhacked.com уже видел похожие обсуждения.
Даже в разделе этот попадаются похожие сообщения.
Похожий случай видел в теме “”.
Admin, если у тебя был похожий сбой, подскажи, что в итоге сработало.
Буду признателен за понятный совет без лишней теории.
Заранее спасибо за помощь.
Всем привет.
Столкнулся с неприятной проблемой на телефоне.
Переустанавливал всё уже 8 раз, но ошибка всё равно возвращается.
Говорю о app 1xbet yukle.
Через браузер ситуация тоже неидеальная: веб-версия иногда тормозит.
Похоже, я не один с такой ситуацией на allhacked.com.
В разделе этот нашёл похожую тему.
Похожий случай видел в теме “”.
Admin, если у тебя был похожий сбой, подскажи, что в итоге сработало.
Буду признателен за понятный совет без лишней теории.
Спасибо всем, кто откликнется.
Всем привет.
Не могу нормально разобраться с одной ошибкой на Android.
Кэш чистил и ставил заново уже 5 раз, но стабильного результата так и нет.
Намекаю про приложении 1xbet yukle.
В мобильном браузере тоже бывают подвисания и долгие загрузки.
На allhacked.com уже видел похожие обсуждения.
В разделе этот нашёл похожую тему.
Меня особенно заинтересовала тема “”.
Admin, если у тебя был похожий сбой, подскажи, что в итоге сработало.
Если знаете нормальное решение без лишних экспериментов, буду очень благодарен за помощь.
Спасибо всем, кто откликнется.
נהנית מארוחת הערב? שאלה האלה שלי. אם הקינוח יהיה טעים באותה מידה, אז אני מוכן ללכת למשרד הרישום מחר, הצהרתי לה. אוי ואבוי, הילד שלי, אני עדיין נשואה, לחשה. צחקנו. לא התראינו כמה שלי ולא ידעתי מה לעשות, ראיתי רק חלק מהזין הענק שלפניי שלחץ על האף והמצח שלי ועל שק האשכים של הבחור הזה בפה. פאנג פלט צחקוק נמוך, ידו מונחת על כתפי, מחוספסת אך לא כואבת. הזין שלו, https://welcome-online.co.il/
Ребята, подскажите, пожалуйста.
Не могу нормально разобраться с одной ошибкой на Android.
Я уже примерно 7 раз пробовал переустанавливать приложение и чистить кэш.
Речь идет про app 1xbet yukle.
В мобильном браузере тоже бывают подвисания и долгие загрузки.
На allhacked.com уже видел похожие обсуждения.
В разделе этот нашёл похожую тему.
Похожий случай видел в теме “”.
Admin, если тема знакома, буду благодарен за совет.
Буду признателен за понятный совет без лишней теории.
Спасибо всем, кто откликнется.
Нужна премиум мебель? мебель из массива официальный сайт изготовление на заказ. Натуральные материалы, эксклюзивный дизайн и долговечность. Решения для дома и бизнеса с высоким уровнем качества.
Всем привет.
Столкнулся с неприятной проблемой на телефоне.
Переустанавливал всё уже 4 раз, но ошибка всё равно возвращается.
Пишу о app 1xbet indir.
Через веб всё открывается, но иногда страница работает тяжело.
На этом сайте уже встречал похожие жалобы.
В разделе этот нашёл похожую тему.
Меня особенно заинтересовала тема “”.
Admin, если тема знакома, буду благодарен за совет.
Буду признателен за понятный совет без лишней теории.
Спасибо всем, кто откликнется.
Добрый день.
На смартфоне в последнее время всё ведёт себя странно.
Кэш чистил и ставил заново уже 8 раз, но стабильного результата так и нет.
Речь идет о apk 1xbet yukle.
Через браузер ситуация тоже неидеальная: веб-версия иногда тормозит.
На allhacked.com уже видел похожие обсуждения.
Даже в разделе этот попадаются похожие сообщения.
Меня особенно заинтересовала тема “”.
Moderator, если тема знакома, буду благодарен за совет.
Если знаете нормальное решение без лишних экспериментов, буду очень благодарен за помощь.
Заранее спасибо за помощь.
Добрый день.
Столкнулся с неприятной проблемой на телефоне.
Переустанавливал всё уже 5 раз, но ошибка всё равно возвращается.
Говорю про app 1xbet azerbaycan mobile.
Через браузер ситуация тоже неидеальная: веб-версия иногда тормозит.
На этом сайте уже встречал похожие жалобы.
Даже в разделе этот попадаются похожие сообщения.
Меня особенно заинтересовала тема “”.
nd_user, если ты сталкивался с этим, напиши, пожалуйста, что помогло.
Если кто-то уже решал такую проблему, подскажите, с чего лучше начать.
Заранее спасибо за помощь.
Всем привет.
Не могу нормально разобраться с одной ошибкой на Android.
Кэш чистил и ставил заново уже 5 раз, но стабильного результата так и нет.
Пишу о app 1xbet yukle.
Через браузер ситуация тоже неидеальная: веб-версия иногда тормозит.
На allhacked.com уже видел похожие обсуждения.
В этот уже встречал пару похожих вопросов.
Меня особенно заинтересовала тема “”.
Moderator, если тема знакома, буду благодарен за совет.
Если кто-то уже решал такую проблему, подскажите, с чего лучше начать.
Буду благодарен за любой реальный совет.
анонимный вывод из запоя на дому анонимный вывод из запоя на дому .
Ребята, подскажите, пожалуйста.
Не могу нормально разобраться с одной ошибкой на Android.
Я уже примерно 7 раз пробовал переустанавливать приложение и чистить кэш.
Я говорю о apk 1xbet indir.
В мобильном браузере тоже бывают подвисания и долгие загрузки.
Похоже, я не один с такой ситуацией на allhacked.com.
В этот уже встречал пару похожих вопросов.
Недавно наткнулся на тему “”, и проблема там очень похожая.
Moderator, если у тебя был похожий сбой, подскажи, что в итоге сработало.
Если кто-то уже решал такую проблему, подскажите, с чего лучше начать.
Буду благодарен за любой реальный совет.
фриспины позволяют удобной игры с телефона с популярными провайдерами: плей фортуна казино
Всем привет.
Не могу нормально разобраться с одной ошибкой на Android.
Кэш чистил и ставил заново уже 7 раз, но стабильного результата так и нет.
Речь идет про приложении 1xbet indir.
В мобильном браузере тоже бывают подвисания и долгие загрузки.
Похоже, я не один с такой ситуацией на allhacked.com.
В разделе этот нашёл похожую тему.
Похожий случай видел в теме “”.
Admin, если у тебя был похожий сбой, подскажи, что в итоге сработало.
Если знаете нормальное решение без лишних экспериментов, буду очень благодарен за помощь.
Буду благодарен за любой реальный совет.
Всем привет.
На смартфоне в последнее время всё ведёт себя странно.
Кэш чистил и ставил заново уже 3 раз, но стабильного результата так и нет.
Пишу о приложении 1xbet azerbaycan mobile.
Через браузер ситуация тоже неидеальная: веб-версия иногда тормозит.
На этом сайте уже встречал похожие жалобы.
В этот уже встречал пару похожих вопросов.
Недавно наткнулся на тему “”, и проблема там очень похожая.
nd_user, если ты сталкивался с этим, напиши, пожалуйста, что помогло.
Буду признателен за понятный совет без лишней теории.
Буду благодарен за любой реальный совет.
вывод из запоя на дому круглосуточно вывод из запоя на дому круглосуточно .
ЖК Солянка Парк https://tzstroy.su современный жилой комплекс с комфортными квартирами и развитой инфраструктурой. Удобные планировки, благоустроенная территория и хорошая транспортная доступность для жизни.
Всем привет.
На смартфоне в последнее время всё ведёт себя странно.
Переустанавливал всё уже 5 раз, но ошибка всё равно возвращается.
Намекаю о apk 1xbet indir.
Через веб всё открывается, но иногда страница работает тяжело.
На этом сайте уже встречал похожие жалобы.
В разделе этот нашёл похожую тему.
Меня особенно заинтересовала тема “”.
Moderator, если у тебя был похожий сбой, подскажи, что в итоге сработало.
Буду признателен за понятный совет без лишней теории.
Заранее спасибо за помощь.
Ребята, подскажите, пожалуйста.
Не могу нормально разобраться с одной ошибкой на Android.
Я уже примерно 6 раз пробовал переустанавливать приложение и чистить кэш.
Пишу о apk 1xbet indir.
Через веб всё открывается, но иногда страница работает тяжело.
На allhacked.com уже видел похожие обсуждения.
В этот уже встречал пару похожих вопросов.
Похожий случай видел в теме “”.
Admin, если у тебя был похожий сбой, подскажи, что в итоге сработало.
Если знаете нормальное решение без лишних экспериментов, буду очень благодарен за помощь.
Буду благодарен за любой реальный совет.
Дизайн-проект интерьера https://stroydvor11.ru/kak-sdelat-dizayn-proekt-samostoyatelno-polnaya-instruktsiya-i-obzor-programm.html своими руками — идеи, советы и этапы разработки. Планировка, визуализация и подбор материалов для создания стильного и удобного пространства.
Всем привет.
На смартфоне в последнее время всё ведёт себя странно.
Кэш чистил и ставил заново уже 8 раз, но стабильного результата так и нет.
Речь идет про app 1xbet indir.
В мобильном браузере тоже бывают подвисания и долгие загрузки.
Похоже, я не один с такой ситуацией на allhacked.com.
Даже в разделе этот попадаются похожие сообщения.
Недавно наткнулся на тему “”, и проблема там очень похожая.
nd_user, если ты сталкивался с этим, напиши, пожалуйста, что помогло.
Если кто-то уже решал такую проблему, подскажите, с чего лучше начать.
Заранее спасибо за помощь.
Доска объявлений https://oren-i.ru удобный сервис для размещения и поиска объявлений. Продажа, покупка, услуги и работа. Быстро публикуйте объявления и находите нужные предложения в вашем городе.
Ребята, подскажите, пожалуйста.
Не могу нормально разобраться с одной ошибкой на Android.
Кэш чистил и ставил заново уже 6 раз, но стабильного результата так и нет.
Говорю про app 1xbet indir.
Через браузер ситуация тоже неидеальная: веб-версия иногда тормозит.
Похоже, я не один с такой ситуацией на allhacked.com.
В этот уже встречал пару похожих вопросов.
Меня особенно заинтересовала тема “”.
Moderator, если у тебя был похожий сбой, подскажи, что в итоге сработало.
Если знаете нормальное решение без лишних экспериментов, буду очень благодарен за помощь.
Спасибо всем, кто откликнется.
Инженерные изыскания https://sever-geo.com для строительства в Твери — геология, геодезия и экология участка. Комплексные исследования для проектирования и строительства. Точные данные, соблюдение норм и оперативные сроки выполнения.
Разработка сайтов https://domenanet.online на Laravel — современные веб-проекты с высокой скоростью и безопасностью. Индивидуальные решения, интеграции и масштабируемая архитектура для бизнеса любого уровня.
Добрый день.
На смартфоне в последнее время всё ведёт себя странно.
Кэш чистил и ставил заново уже 5 раз, но стабильного результата так и нет.
Я говорю о приложении 1xbet yukle.
В мобильном браузере тоже бывают подвисания и долгие загрузки.
На allhacked.com уже видел похожие обсуждения.
В разделе этот нашёл похожую тему.
Меня особенно заинтересовала тема “”.
nd_user, если ты сталкивался с этим, напиши, пожалуйста, что помогло.
Буду признателен за понятный совет без лишней теории.
Буду благодарен за любой реальный совет.
Всем привет.
Столкнулся с неприятной проблемой на телефоне.
Переустанавливал всё уже 3 раз, но ошибка всё равно возвращается.
Намекаю про приложении 1xbet yukle.
В мобильном браузере тоже бывают подвисания и долгие загрузки.
Похоже, я не один с такой ситуацией на allhacked.com.
Даже в разделе этот попадаются похожие сообщения.
Недавно наткнулся на тему “”, и проблема там очень похожая.
Admin, если тема знакома, буду благодарен за совет.
Буду признателен за понятный совет без лишней теории.
Буду благодарен за любой реальный совет.
Online football match statistics http://www.soccer-stand.com.az/ live scores, events, and live broadcasts. Follow games in real time, analyze teams, and never miss a beat.
Всем привет.
Столкнулся с неприятной проблемой на телефоне.
Кэш чистил и ставил заново уже 6 раз, но стабильного результата так и нет.
Намекаю о apk 1xbet indir.
Через браузер ситуация тоже неидеальная: веб-версия иногда тормозит.
Похоже, я не один с такой ситуацией на allhacked.com.
В этот уже встречал пару похожих вопросов.
Недавно наткнулся на тему “”, и проблема там очень похожая.
Admin, если тема знакома, буду благодарен за совет.
Если кто-то уже решал такую проблему, подскажите, с чего лучше начать.
Буду благодарен за любой реальный совет.
частный нарколог на дом москва частный нарколог на дом москва .
Добрый день.
Не могу нормально разобраться с одной ошибкой на Android.
Я уже примерно 9 раз пробовал переустанавливать приложение и чистить кэш.
Говорю о приложении 1xbet indir.
В мобильном браузере тоже бывают подвисания и долгие загрузки.
Похоже, я не один с такой ситуацией на allhacked.com.
Даже в разделе этот попадаются похожие сообщения.
Меня особенно заинтересовала тема “”.
nd_user, если ты сталкивался с этим, напиши, пожалуйста, что помогло.
Если кто-то уже решал такую проблему, подскажите, с чего лучше начать.
Буду благодарен за любой реальный совет.
Юрист по делам несовершеннолетних оказывает квалифицированную правовую помощь детям и их законным представителям. Переходите по запросу адвокат по делам несовершеннолетних в Москве. Специалист защитит права ребёнка в судах и государственных органах, решит вопросы опеки, споры в семейных и уголовных делах. Консультации помогают быстро разобраться в ситуации и выбрать правильную стратегию защиты интересов несовершеннолетнего.
вывод из запоя в стационаре вывод из запоя в стационаре .
Добрый день.
На смартфоне в последнее время всё ведёт себя странно.
Я уже примерно 8 раз пробовал переустанавливать приложение и чистить кэш.
Речь идет о app 1xbet yukle.
Через веб всё открывается, но иногда страница работает тяжело.
Похоже, я не один с такой ситуацией на allhacked.com.
В этот уже встречал пару похожих вопросов.
Похожий случай видел в теме “”.
Moderator, если у тебя был похожий сбой, подскажи, что в итоге сработало.
Если знаете нормальное решение без лишних экспериментов, буду очень благодарен за помощь.
Спасибо всем, кто откликнется.
Ежедневный обзор: https://amaliya-parfum.ru/index.php?manufacturers_id=60
Добрый день.
Столкнулся с неприятной проблемой на телефоне.
Я уже примерно 3 раз пробовал переустанавливать приложение и чистить кэш.
Говорю о app 1xbet azerbaycan mobile.
Через веб всё открывается, но иногда страница работает тяжело.
На этом сайте уже встречал похожие жалобы.
В разделе этот нашёл похожую тему.
Меня особенно заинтересовала тема “”.
nd_user, если ты сталкивался с этим, напиши, пожалуйста, что помогло.
Если знаете нормальное решение без лишних экспериментов, буду очень благодарен за помощь.
Буду благодарен за любой реальный совет.
наркология вывод из запоя в стационаре спб наркология вывод из запоя в стационаре спб .
вывод из запоя в стационаре в спб вывод из запоя в стационаре в спб .
вывод из запоя на дому самара цены вывод из запоя на дому самара цены .
элитная мебель на заказ мебель премиум класса на заказ
Добрый день.
Столкнулся с неприятной проблемой на телефоне.
Переустанавливал всё уже 6 раз, но ошибка всё равно возвращается.
Говорю о приложении 1xbet indir.
В мобильном браузере тоже бывают подвисания и долгие загрузки.
На этом сайте уже встречал похожие жалобы.
В этот уже встречал пару похожих вопросов.
Недавно наткнулся на тему “”, и проблема там очень похожая.
Admin, если у тебя был похожий сбой, подскажи, что в итоге сработало.
Буду признателен за понятный совет без лишней теории.
Буду благодарен за любой реальный совет.
Добрый день.
Столкнулся с неприятной проблемой на телефоне.
Переустанавливал всё уже 3 раз, но ошибка всё равно возвращается.
Намекаю про приложении 1xbet indir.
Через браузер ситуация тоже неидеальная: веб-версия иногда тормозит.
Похоже, я не один с такой ситуацией на allhacked.com.
В этот уже встречал пару похожих вопросов.
Похожий случай видел в теме “”.
Admin, если тема знакома, буду благодарен за совет.
Если кто-то уже решал такую проблему, подскажите, с чего лучше начать.
Заранее спасибо за помощь.
best legal pre workout
References:
https://diego-maradona-ar.org/user/napkinmist3
Ребята, подскажите, пожалуйста.
На смартфоне в последнее время всё ведёт себя странно.
Я уже примерно 6 раз пробовал переустанавливать приложение и чистить кэш.
Речь идет о приложении 1xbet azerbaycan mobile.
Через браузер ситуация тоже неидеальная: веб-версия иногда тормозит.
На allhacked.com уже видел похожие обсуждения.
В этот уже встречал пару похожих вопросов.
Недавно наткнулся на тему “”, и проблема там очень похожая.
nd_user, если ты сталкивался с этим, напиши, пожалуйста, что помогло.
Если знаете нормальное решение без лишних экспериментов, буду очень благодарен за помощь.
Заранее спасибо за помощь.
вывод из запоя санкт-петербург стационар вывод из запоя санкт-петербург стационар .
Ребята, подскажите, пожалуйста.
На смартфоне в последнее время всё ведёт себя странно.
Кэш чистил и ставил заново уже 5 раз, но стабильного результата так и нет.
Намекаю о apk 1xbet yukle.
В мобильном браузере тоже бывают подвисания и долгие загрузки.
На этом сайте уже встречал похожие жалобы.
В этот уже встречал пару похожих вопросов.
Похожий случай видел в теме “”.
nd_user, если ты сталкивался с этим, напиши, пожалуйста, что помогло.
Если кто-то уже решал такую проблему, подскажите, с чего лучше начать.
Заранее спасибо за помощь.
вывод из запоя стационар санкт петербург вывод из запоя стационар санкт петербург .
Юрист по заключению брака поможет оформить отношения быстро и без ошибок. Переходите по запросу юридическая консультация по делам регистрации брака. Проконсультируем по всем вопросам регистрации, подготовим документы, сопроводим при заключении брака, включая случаи с иностранными гражданами. Обеспечим соблюдение всех требований законодательства и защиту ваших интересов. Экономьте время и избегайте рисков — доверьте оформление профессионалам.
Авто журнал https://bestauto.kyiv.ua тест-драйвы, обзоры и новости автоиндустрии. Узнавайте о новинках, технологиях и трендах рынка. Удобный формат для чтения каждый день.
Онлайн авто журнал https://simpsonsua.com.ua новости, обзоры и тест-драйвы автомобилей. Актуальная информация о рынке и новых моделях для автолюбителей.
Авто журнал онлайн https://translit.com.ua все о машинах: новости, тесты, обзоры и аналитика. Следите за новинками и выбирайте авто с удобным сервисом.
Авто портал https://nerjalivingspace.com автомобильные новости, тест-драйвы и обзоры. Узнавайте о новинках, технологиях и тенденциях рынка. Удобный сервис для автолюбителей.
cooperative pharmacy store locator how much does percocet cost at the pharmacy canadian pharmacy generic levitra
Все лучшее здесь: https://buy-similarwebtraffic.com
Последние публикации: https://giasite.ru
Юрист по заключению брака поможет оформить отношения быстро и без ошибок. Переходите по запросу юридические услуги по заключению брака. Проконсультируем по всем вопросам регистрации, подготовим документы, сопроводим при заключении брака, включая случаи с иностранными гражданами. Обеспечим соблюдение всех требований законодательства и защиту ваших интересов. Экономьте время и избегайте рисков — доверьте оформление профессионалам.
капельница от похмелья анонимно kapelnicza-ot-pokhmelya-voronezh-1.ru .
капельница от алкоголя воронеж капельница от алкоголя воронеж .
Строительный портал https://zip.org.ua все для ремонта и строительства в одном месте. Актуальные статьи, советы экспертов, обзоры материалов и технологий. Найдите подрядчиков, сравните цены и выберите лучшие решения для дома, квартиры или бизнеса быстро и удобно.
Консультация жилищного юриста — это быстрый и эффективный способ разобраться в сложных вопросах, связанных с недвижимостью. Переходите по запросу юридические услуги для собственников жилья. Специалист оценит вашу ситуацию, разъяснит нормы законодательства, расскажет о правах собственников и предложит оптимальный план действий для защиты ваших интересов.
капельница от алкоголя в воронеже kapelnicza-ot-zapoya-voronezh-1.ru .
алкогольная капельница на дому алкогольная капельница на дому .
капельница выход из запоя капельница выход из запоя .
тестовая база gobasego-2.ru .
вывод из запоя на дому воронеж капельница вывод из запоя на дому воронеж капельница .
капсульный дом цена в россии https://www.panram.ru/partners/news/glemping-novaya-filosofiya-edineniya-s-prirodoy-bez-ushcherba-dlya-komforta/ .
базу данных купить базу данных купить .
капельница от похмелья клиника капельница от похмелья клиника .
it ипотека Специальные программы направлены на поддержку семей с детьми, предоставляя им доступ к недвижимости.
Лучшие профессии архивариус курсы онлайн москва возможность получить практические знания и освоить востребованные специальности в короткие сроки. Обучение подходит для тех, кто хочет начать карьеру или сменить сферу деятельности. Все материалы доступны онлайн и сопровождаются поддержкой преподавателей.
Нужен грузовик? перейти компания «НЕО ТРАК» — это современный дилерский центр полного цикла, работающий на рынке коммерческого транспорта и спецтехники уже более 20 лет. Являясь официальным дилером ведущих производителей, таких как DONGFENG, JAC, FAW, DAEWOO TRUCKS, ISUZU, HYUNDAI и других, компания предлагает широкий выбор грузовых автомобилей различной тоннажности, спецтехники, от фургонов и бортовых платформ до эвакуаторов и крано-манипуляторных установок.
вывод из запоя в москве на дому narkolog-na-dom-moskva-11.ru .
Understanding Snapchat Ads Manager setup guide for beginners 2026 is essential for anyone launching campaigns on this high-engagement platform. The Snapchat interface has evolved significantly, and newcomers often struggle to locate key features or understand campaign structure without proper guidance. This walkthrough breaks down dashboard navigation, audience targeting options, and budget allocation controls in a way that demystifies the platform. You’ll learn where to find performance metrics, how to create and organize ad sets, and which settings directly impact your campaign performance. Media buyers and brand marketers will find this foundational knowledge crucial for scaling their Snapchat presence efficiently and avoiding costly setup mistakes.
Стратегия выбора платформы рекламы для медиабайеров 2026 предлагает систематизированный подход к принятию решений о распределении медиабюджета между Instagram и Twitter/X. Каждая платформа демонстрирует собственные паттерны охвата целевой аудитории, и правильный выбор напрямую влияет на прибыльность кампаний в течение квартала. Материал содержит таблицы сравнения охвата по демографическим группам, анализ конкурентного давления в разных вертикалях и актуальную информацию о нюансах работы с рекламными кабинетами обеих платформ. Рассматриваются сценарии, когда стоит начинать с Instagram благодаря его эффективности в косметике и моде, и когда Twitter/X дает явное преимущество в B2B и новостных вертикалях. Применение этой стратегии позволяет медиабайерам принимать обоснованные решения и минимизировать убыточные тесты.
экскурсия на теплоходе в санкт петербурге progulka-po-neve.ru .
помощь нарколога на дому при алкоголизме помощь нарколога на дому при алкоголизме .
пройти нарколога на права narkologicheskaya-pomoshh-nizhnij-novgorod-2.ru .
прогулка по каналу грибоедова piter-na-teplohode.ru .
мелбет сайт мелбет сайт .
Неправильный выбор столешницы может привести к появлению пятен, царапин и сложностям в уходе. Это снижает комфорт использования кухни и увеличивает расходы https://medyn.su/materialy-i-fasady-kuhon/stoleshnicy-iz-dereva/
Калибровочные гири для весов нужного класса точности и номинальной массы для калибровки весов.
В нашей компании можно купить калибровочные гири классов точности E1, E2, F1, F2, M1, M2.
Чем выше класс точности, тем меньше будет разница между номинальным и действительным значениями массы калибровочной гири.
скачать мелбет на андроид с официального сайта скачать мелбет на андроид с официального сайта .
экстренная наркологическая помощь на дому экстренная наркологическая помощь на дому .
casino melbet casino melbet .
вавада казино онлайн официальный вавада казино онлайн официальный .
мэлбэт мэлбэт .
1xbet spor bahislerinin adresi 1xbet spor bahislerinin adresi .
вавада казино официальный отзывы вавада казино официальный отзывы .
Vina Heritage Protection Network – A network supporting the preservation of cultural history and community landmarks
1xbet yeni giri? 1xbet yeni giri? .
1xbet yeni giri? adresi 1xbet yeni giri? adresi .
1xbet giri? linki 1xbet giri? linki .
xbet xbet .
1xbet tr 1xbet tr .
1xbet t?rkiye 1xbet t?rkiye .
1xbet g?ncel 1xbet g?ncel .
https://mhp.ooo/products/iverty-12mg-tablet
xbet giri? xbet giri? .
Сценарій виховного заходу
https://pravdadaily.com.ua/pryvitannia-z-dnem-narodzhennia-diadka-naykrashchi-pobazhannia-ta-lirychni-slova/
can you get viagra from the pharmacy how much does cialis cost at a pharmacy ez online pharmacy buy viagra usa
References:
Concho casino
References:
https://graph.org/Rocketplay-Casino-Australia-Expert-Review–Guide-04-20
birxbet giri? birxbet giri? .
реконструкция это капитальный ремонт реконструкция это капитальный ремонт .
ремонт бетонных конструкций цена ремонт бетонных конструкций цена .
https://1789.cx.ua/korisne/doska-obyavlenij-v-ssha-kak-najti-rabotu-zhilyo-i-uslugi-dlya-russkoyazychnyh-emigrantov/
buy cannabis uk
Консультацию психолога https://психолог38.рф в Иркутске можно получить в центре Психолог38. Здесь работают высококвалифицированные специалисты: детские психологи, клинические, семейные и индивидуальные. Мы собрали профессионалов разных направлений, чтобы комплексно подходить к решению запросов клиентов. Бережно, деликатно, с научным подходом. Сложные ситуации в нашей жизни встречаются не редко, и своевременная помощь, поддержка очень важна. Находясь среди людей, легко можно оказаться в одиночестве, один на один со своими проблемами. Если вы ищите лучших психологов, которые реально помогают людям, обратите внимание на нашу организацию.
ремонт бетонных конструкций гарантия remont-betona-3.ru .
tadalafil 5 mg tadalafil half life viagra vs tadalafil
gay bdsm porn
Консультацию психолога https://психолог38.рф в Иркутске можно получить в центре Психолог38. Здесь работают высококвалифицированные специалисты: детские психологи, клинические, семейные и индивидуальные. Мы собрали профессионалов разных направлений, чтобы комплексно подходить к решению запросов клиентов. Бережно, деликатно, с научным подходом. Сложные ситуации в нашей жизни встречаются не редко, и своевременная помощь, поддержка очень важна. Находясь среди людей, легко можно оказаться в одиночестве, один на один со своими проблемами. Если вы ищите лучших психологов, которые реально помогают людям, обратите внимание на нашу организацию.
ремонт бетонных конструкций промышленный объект remont-betona-3.ru .
выведение из запоя на дому круглосуточно narkolog-na-dom-moskva-10.ru .
реконструкция и капитальный ремонт реконструкция и капитальный ремонт .
buy cannabis online
Консультацию психолога https://психолог38.рф в Иркутске можно получить в центре Психолог38. Здесь работают высококвалифицированные специалисты: детские психологи, клинические, семейные и индивидуальные. Мы собрали профессионалов разных направлений, чтобы комплексно подходить к решению запросов клиентов. Бережно, деликатно, с научным подходом. Сложные ситуации в нашей жизни встречаются не редко, и своевременная помощь, поддержка очень важна. Находясь среди людей, легко можно оказаться в одиночестве, один на один со своими проблемами. Если вы ищите лучших психологов, которые реально помогают людям, обратите внимание на нашу организацию.
Ремонт бетона Ремонт бетона .
Консультацию психолога https://психолог38.рф в Иркутске можно получить в центре Психолог38. Здесь работают высококвалифицированные специалисты: детские психологи, клинические, семейные и индивидуальные. Мы собрали профессионалов разных направлений, чтобы комплексно подходить к решению запросов клиентов. Бережно, деликатно, с научным подходом. Сложные ситуации в нашей жизни встречаются не редко, и своевременная помощь, поддержка очень важна. Находясь среди людей, легко можно оказаться в одиночестве, один на один со своими проблемами. Если вы ищите лучших психологов, которые реально помогают людям, обратите внимание на нашу организацию.
Нужна градирня? градирни это ключевой элемент системы охлаждения, позволяющий эффективно снижать температуру воды за счет теплообмена с воздухом. Применяется в промышленности, энергетике и на предприятиях. Обеспечивает стабильную и экономичную работу оборудования.
Нужна септик или погреб? https://septikidlyadoma.mystrikingly.com эффективное решение для автономной канализации. Системы обеспечивают качественную очистку сточных вод, устраняют запахи и безопасны для окружающей среды. Подходят для частных домов, коттеджей и загородных участков.
family incest porn
incest porn stories
Женский онлайн портал https://stepandstep.com.ua все о жизни, стиле и здоровье. Статьи о красоте, отношениях, семье и саморазвитии. Полезный контент для женщин любого возраста.
https://ecopolis-spb.ru/tvorchestvo_all/
Читать расширенную версию: about vsu.by
Фундамент под ключ https://fundament-v-spb.ru любой сложности: ленточный, плитный, свайный. Профессиональный подход, современные технологии и точный расчет для долговечности и безопасности здания.
Are you looking for a fast, safe and hassle-free transfer in Valencia? We offer professional transport and moving services, both for individuals and companies. Request your budget without obligation and enjoy a quality service https://trasladoavalencia.es/
Expert construction https://trackbuilder.ru of BMX tracks, pump tracks, and dirt parks. High-quality materials, thoughtful design, and reliable implementation for sports, recreation, and competitions.
центр развития детей
reputable canadian pharmacy online pharmacy no prior prescription online pharmacy ventolin inhaler
На сайті 500pokupok.com зібрано багато статей із оглядами товарів, підбірками та рекомендаціями. Зручний ресурс для тих, хто хоче зробити правильний вибір перед покупкою.
электрокарнизы цена электрокарнизы цена .
Безопасно ли включать Впн только для отдельных приложений?
В наше время для медработников аккредитация медицинских работников организована в понятном дистанционном формате на базе профильного института. Когда требуется подтвердить квалификацию, закрыть вопрос с обязательной процедурой или решить вопросы с документами, здесь реально решить вопрос спокойно и без лишней бюрократии. Формат работы продуман так, чтобы можно было учиться без отрыва от занятости, а каждый шаг сопровождался поддержкой специалистов.
Хочешь продать монеты? Продать антиквариат в Нижнем Новгороде профессиональная оценка, быстрый выкуп и надежные условия. Работаем с редкими, инвестиционными и антикварными монетами. Выплата сразу после согласования стоимости.
coworking space for individuals coworking space dubai
как отмыть сетку на кроссовки как отмыть белые сетчатые кроссовки и как отмыть белые кроссовки с сеткой
mutual of omaha rx pharmacy directory buy pain pills online pharmacy voltaren emulgel online pharmacy
Читать больше на сайте: https://forum.i.ua/topic/27770
Дополнительная информация: https://ukrom.in.ua/blogs/105750-shkoly-angliiskogo-jazyka-v-dnepre.html
online pharmacy no prescription needed cooperative pharmacy store locator online pharmacies that use paypal
Live football matches http://www.gol-var.com.az all the games in one place. Watch live broadcasts, follow the action, and never miss a beat from your favorite teams and tournaments.
автоматические карнизы автоматические карнизы .
Для современных компаний вашему бизнесу top manage личный кабинет помогает создать понятную и эффективную работу команды без хаоса в процессах. В одном сервисе удобно управлять задачами, следить за дедлайнами, контролировать финансы, координировать персонал и понимать что происходит в компании. Инструмент подойдет для малого бизнеса и активных команд, где нужны порядок и скорость решений. Собственник получает контроль, а сотрудники работают продуктивнее.
References:
Manoir aerospace
References:
https://casino-bwin.online-spielhallen.de/
как поставить жесткий диск на ПК пошаговая инструкция по установке жесткого диска
safeway pharmacy online prescription refill cheapest online pharmacy india envision rx pharmacy help desk
References:
Casino montreux
References:
https://santa-fe-hotel-casino-in-las-vegas.online-spielhallen.de/
почему компьютер и ноутбук не видят графический планшет причины и решение
1xbet com giri? 1xbet-giris-69.com .
Покупка шаблона Аспро Оптимус — это готовое решение для запуска современного интернет-магазина на 1С-Битрикс. Переходите по запросу шаблон адаптивного интернет магазина Аспро Optimus. Адаптивный дизайн, удобный каталог, интеграция с CRM, высокая скорость работы и широкие возможности настройки позволяют быстро создать эффективную онлайн-площадку для продаж. Оптимальное решение для бизнеса, которому важны функциональность, стиль и стабильная работа сайта.
People exploring niche e-commerce platforms frequently benefit from clear navigation structures that help them find products quickly online Valecove Goods Room official store portal – Interface design prioritizes simplicity and clarity, allowing users to move between categories smoothly while maintaining consistent browsing flow throughout the experience overall with positive impressions noted
References:
Heilbronn
References:
https://casino-1-euro-einzahlen-20-bekommen-paypal.online-spielhallen.de/
References:
Mannheim
References:
https://seven-feathers-resort-and-casino.online-spielhallen.de/
Можно ли комбинировать абонентскую плату и продвижение сайта с оплатой за результат?
Прогон сайта Хрумером — эффективный способ ускорить индексацию страниц, усилить ссылочный профиль и повысить видимость сайта в поисковых системах. Переходите по запросу прогон хрумером. Размещаем ссылки по качественным базам, форумам, профилям и площадкам с учетом безопасности и естественности ссылочной массы. Подходит для SEO-продвижения, новых проектов и усиления существующих позиций. Быстро, мощно и с контролем качества результата.
References:
Gelsenkirchen
References:
https://altes-casino-petersberg.online-spielhallen.de/
legal canadian pharmacy online health express pharmacy+artane castle pharmacy continuing education online
References:
Potsdam
References:
https://casino-bochum.online-spielhallen.de/
ip камера tiandy wi fi ip камеры видеонаблюдения
legit non prescription pharmacies domperidone online pharmacy no prescription skip’s pharmacy low dose naltrexone
лента стальная 0 1 лента стальная купить
online pharmacy reviews generic viagra online pharmacy that sells percocet periactin online pharmacy no prescription
References:
Casino brisbane
References:
https://graph.org/What-Is-The-Best-Pokies-Game-To-Win-04-27
Нужна бесплатная юридическая консультация? Переходите по запросу бесплатная консультация адвоката 24 часа в Омской области и получите помощь опытного юриста по любым правовым вопросам: семейные споры, долги, недвижимость, трудовые конфликты, защита прав потребителей и многое другое. Задайте вопрос онлайн или по телефону и получите подробный разбор вашей ситуации и рекомендации по дальнейшим действиям. Консультация проводится бесплатно и конфиденциально.
online pharmacy no prescription zoloft online pharmacy free viagra samples arimidex online pharmacy no prescription
Гео оптимизация сайта для ресторана — что важнее: карточка в картах или сайт?
Как микроразметка Schema.org помогает Продвижение сайтов в google?
Что важно проверить при приёмке проекта после [url=https://moskovsky.borda.ru/?1-7-0-00013182-000-0-0-1776944928]Разработка сайтов[/url]?
Какие домашние животные лучше всего подходят интровертам?
why is zyrtec d behind the pharmacy counter canadian pharmacy cialis reviews canadian pharmacy online ship to usa
Последние изменения: https://avantum-remont.ru
раскрутка сайта москва продвижение александр раскрутка сайта москва продвижение александр
https://pravdadaily.com.ua/virshi-pro-tata-naykrashchi-virshi-dlia-pryvitannia-batka-z-dnem-batka/
online pharmacy sildenafil citrate canadian pharmacy ed medications skip’s pharmacy low dose naltrexone
Нужна бесплатная юридическая консультация? Переходите по запросу нужен юрист срочно в Ростове-на-Дону и получите помощь опытного юриста по любым правовым вопросам: семейные споры, долги, недвижимость, трудовые конфликты, защита прав потребителей и многое другое. Задайте вопрос онлайн или по телефону и получите подробный разбор вашей ситуации и рекомендации по дальнейшим действиям. Консультация проводится бесплатно и конфиденциально.
what pharmacy has the best generic percocet skip’s pharmacy low dose naltrexone non prescription cialis online pharmacy
Стоит ли рассматривать капсульный дом как постоянное жильё или только как дачный вариант?
Как Гео оптимизация сайта влияет на позиции в локальной выдаче Яндекса?
раскрутка сайта услуги сео мск раскрутка сайта услуги сео мск
Serm — можно ли вести его самостоятельно без привлечения агентства?
trusted online pharmacy reviews generic zoloft online pharmacy no prescription envision rx pharmacy help desk
Калибровочные гири M1 для весов нужного класса точности и номинальной массы для калибровки весов.
В нашей компании можно купить гири M1 для калибровки весов массой от 1 кг до 2000 кг.
Предлагаем гири класса M1 для торговых, складских, производственных и технических весов.
best online pharmacy to buy ambien mexican pharmacy what to buy aarp medicare rx pharmacy directory
заказать кухню по индивидуальным размерам в спб https://kuhni-spb-58.ru
Нужна бесплатная юридическая консультация? Переходите по запросу юридическая консультация по интернету в Ростовской области и получите помощь опытного юриста по любым правовым вопросам: семейные споры, долги, недвижимость, трудовые конфликты, защита прав потребителей и многое другое. Задайте вопрос онлайн или по телефону и получите подробный разбор вашей ситуации и рекомендации по дальнейшим действиям. Консультация проводится бесплатно и конфиденциально.
cheapest pharmacy to get prescriptions filled provigil online pharmacy reviews viagra verified internet pharmacy practice sites
best canadian pharmacy to buy from best online foreign pharmacy online pharmacy no prescription needed klonopin
Нужна стальная лента? бандажная лента для столбов широкий ассортимент, разные толщины и марки стали. Выгодные цены, быстрая отгрузка и поставки для производства и строительства
super cherry 1000 super cherry 1000
кабель цена за метр https://kabel-cena-za-metr-1.ru
светотехника
стоматология стоимость стоматология москва
светильники бра в стиле лофт купить дизайнерскую люстру потолочную
свадьба организация и проведение свадебное агентство москва
Подборка шаблонов юридических документов для бизнеса и частных лиц: договоры, заявления, соглашения и иные формы. Переходите по запросу скачать юридические документы. Удобные образцы с правильной структурой и актуальными формулировками помогут быстро подготовить документы без лишних затрат и ошибок. Подходят для самостоятельного использования и адаптации под конкретные задачи.
Шаблоны юридических документов — удобное решение для быстрого и грамотного оформления договоров, заявлений и иных правовых бумаг. Переходите по запросу примеры и образцы правовых документов. Готовые формы разработаны с учетом законодательства и помогают избежать ошибок. Скачивайте, адаптируйте под свою ситуацию и экономьте время на подготовке документов без лишних затрат.
Понравился подход к клиенту и организация процесса. Девушка выглядела достойно и вела себя уверенно. Общение оставило хорошее впечатление. Всё прошло просто супер, снять индивидуалку
смм накрутка smm-nakrutka-2.ru
мембранная кровля
Нарколог на дом в Екатеринбурге: выезд врача на дом, лечение запоя и консультации в наркологической клинике «НЕО+».
Получить дополнительные сведения – нарколог на дом вывод
Вывод из запоя на дому — это медицинская помощь, направленная на стабилизацию состояния пациента без госпитализации. Такой формат позволяет начать лечение сразу после обращения и снизить нагрузку на организм, связанную с транспортировкой. В наркологической клинике «Частный медик 24» помощь оказывается с выездом врача, который проводит диагностику и подбирает терапию в зависимости от текущего состояния.
Получить дополнительные сведения – vyvod-iz-zapoya-na-domu-sankt-peterburg-12.ru/
За выездом врача чаще обращаются тогда, когда человеку тяжело добраться до клиники, он ослаблен после нескольких дней употребления алкоголя или родственникам важно быстрее понять, какая тактика будет безопасной. После осмотра можно определить, нужна ли капельница, достаточно ли детоксикации на дому, требуется ли повторное наблюдение, а в дальнейшем — консультация по лечению алкоголизма, кодирование или реабилитация. В части случаев уже первый звонок позволяет понять, идет ли речь только о временном ухудшении самочувствия или о состоянии, при котором может потребоваться вывод из запоя в стационаре.
Получить дополнительную информацию – нарколог на дом вывод
Первый этап вывода из запоя на дому – это первичная оценка состояния пациента. Врач, прибывший на вызов, осматривает пациента, проверяет уровень алкоголя в крови, измеряет артериальное давление, пульс и температуру. Это необходимо для того, чтобы определить степень алкогольной интоксикации и выбрать правильную тактику лечения.
Исследовать вопрос подробнее – вывод из запоя на дому круглосуточно
При наличии этих симптомов помощь должна быть оказана в кратчайшие сроки. Выезд нарколога позволяет не только стабилизировать состояние, но и определить дальнейшую тактику лечения.
Выяснить больше – http://narkologicheskaya-pomoshh-nizhnij-novgorod-8.ru/
Сопровождение в торгах по банкротству — это комплексная юридическая поддержка для безопасного и выгодного участия в электронных торгах. Переходите по запросу юридическая консультация по сопровождению в торгах по банкротству. Проверим объект и документы, оценим риски, подготовим заявку, обеспечим сопровождение на всех этапах процедуры и поможем избежать отказа или потери задатка. Работаем с физическими и юридическими лицами по всей России.
levitra vs viagra viagra dosage how to take viagra
888starz сайт 888starz-bet2.com .
Решение о помещении пациента в стационар принимается на основе объективных медицинских критериев, а не только по желанию родственников. К показаниям относятся: запой длительностью более трех суток, выраженные симптомы абстиненции, наличие в анамнезе алкогольных делириев или судорожных эпизодов, сопутствующие хронические заболевания печени, поджелудочной железы, сердца или нервной системы. Отдельным фактором выступает полинаркомания или сочетание алкогольной зависимости с приемом психофармакологических препаратов без назначения врача. В таких ситуациях риск развития тяжелых осложнений возрастает многократно, и амбулаторный формат не обеспечивает необходимого уровня контроля. Госпитализация позволяет провести полноценную диагностику, включая ЭКГ, экспресс-анализы крови, оценку неврологического статуса и мониторинг сатурации, что формирует точную картину состояния и исключает назначение шаблонных схем.
Подробнее – вывод из запоя в стационаре анонимно нижний новгород
Перед началом терапии врач проводит осмотр пациента. Измеряются основные показатели, включая давление и пульс, оценивается выраженность симптомов. На основании этих данных формируется состав капельницы и определяется тактика лечения, что позволяет эффективно провести вывод из запоя.
Углубиться в тему – капельница от похмелья на дому в воронеже
Такие состояния требуют медицинского вмешательства, поскольку могут ухудшаться без лечения. Капельница позволяет стабилизировать состояние и снизить нагрузку на организм. Услуги могут предоставляться анонимно, а при тяжёлых случаях рассматривается лечение в стационаре.
Подробнее можно узнать тут – капельница от похмелья цена воронеж
Вывод из запоя на дому с детоксикацией в Екатеринбурге представляет собой сложную медицинскую процедуру, направленную на очищение организма от токсинов и восстановление нормального состояния пациента. Важной частью этого процесса является контроль врача, который следит за состоянием пациента, регулирует дозировку препаратов и корректирует лечение по мере необходимости. Процедура обычно включает в себя использование инфузионных растворов, витаминов и медикаментов, направленных на стабилизацию физического состояния пациента и облегчение симптомов абстиненции.
Подробнее можно узнать тут – нарколог на дом вывод из запоя
Автокредит больше не по силам? Даже если машина в залоге или авто уже нет, вы можете пройти процедуру банкротства и законно списать долги. Переходите по запросу подходит ли автокредит под банкротство. Разберём вашу ситуацию, оценим риски, расскажем, можно ли сохранить автомобиль и какие варианты подойдут именно вам. Консультация юриста по банкротству — быстро, конфиденциально и без скрытых условий.
son xeberler siyaset xeberleri
пари матч остров проклятых
фільм вічність между двух огней турецкий сериал
88starz 88starz .
Банкротство с ипотекой — это возможность списать долги и при этом сохранить жилье при грамотном сопровождении. Переходите по запросу что будет если подать на банкротство с ипотекой. Разберем, можно ли пройти процедуру с действующей ипотекой, как защитить квартиру, какие есть риски и последствия. Поможем подобрать законное решение именно под вашу ситуацию, включая случаи с единственным жильем, детьми и другими кредитами.
stars 888 stars 888 .
Ставка на любовь – 2 сезон. Любовь, страсть и неожиданные повороты возвращаются! Новые герои, жаркие свидания и судьбоносные решения – кто рискнёт всем ради чувств? Драматичные признания, сложный выбор и финал, от которого захватывает дух. Не пропусти ни одной серии – включай прямо сейчас: Ставка на любовь 2 сезон все выпуски
стиральные машины мастер ремонт по гарантии стиральной машины
888starz букмекерская контора http://888starz-uzbekistan2.com/ .
viagra cvs olive oil and lemon juice viagra pfizer viagra
888 казино https://888starz-bet2.com/ .
888 стар https://www.888starz-bet2.com .
888 starz bet http://www.888starz-bet2.com/ .
Экскурсовод предложит частный тур экскурсия индивидуальная в Светлогорск из Калининграда с осмотром достопримечательностей и профессиональным сопровождением.
888 казино 888starz-bet2.com .
where can i buy viagra over the counter usa how long does viagra stay in your system cheap viagra
888 stars 888 stars .
888старз вход http://www.888starz-bet2.com/ .
888starz вход в личный кабинет 888stars-uz.com .
Купите шаблон «Аспро: Шины и диски 2.0» для создания современного интернет-магазина шин, дисков и автотоваров на 1С-Битрикс. Переходите по запросу цена шаблона шины и диски на Битрикс. Готовое решение включает адаптивный дизайн, удобный каталог, фильтры по параметрам, интеграцию с CRM и высокую скорость работы. Подходит для запуска нового проекта или обновления действующего магазина с минимальными затратами времени и ресурсов.
Капельница от похмелья может быть необходима в самых разных ситуациях, когда симптомы становятся слишком выраженными и мешают нормальному функционированию пациента. Если вы или ваши близкие сталкиваетесь с такими признаками, как сильная головная боль, рвота, слабость и головокружение, то немедленный вызов нарколога на дом станет необходимостью. Важно не откладывать помощь, так как интоксикация может усугубить состояние пациента и привести к осложнениям, таким как обезвоживание или нарушения работы сердца.
Изучить вопрос глубже – капельница от похмелья на дом екатеринбург
Круглосуточный режим работы в клинике «Чистый Баланс» обусловлен особенностями течения зависимостей, при которых острые состояния нередко развиваются внезапно. Нарколог на дом в Ростове-на-Дону обеспечивает возможность оперативной диагностики и начала лечения без временных ограничений. Клиническая практика подтверждает, что своевременное вмешательство на дому позволяет стабилизировать состояние пациента и предотвратить развитие тяжёлых последствий.
Получить дополнительные сведения – http://narkolog-na-dom-v-rnd19.ru
аниме наруто наруто смотреть онлайн
шумоизоляция автомобиля в Москве shumoizolyaciya-avtomobilya-v-moskve-1.ru
В Санкт-Петербурге вывод из запоя на дому рассматривается, когда состояние пациента позволяет проводить лечение вне стационара, но требует контроля специалиста. Врач оценивает общее состояние, длительность запоя и выраженность симптомов, после чего принимает решение о формате помощи при алкоголизме. Важно, что лечение начинается сразу после осмотра, без необходимости ожидания госпитализации. При необходимости можно заказать услуги на сайте клиники или получить консультацию специалистов.
Узнать больше – http://vyvod-iz-zapoya-na-domu-sankt-peterburg-8.ru
does viagra work who shouldn’t take viagra viagra boys
наркологический стационар в спб наркологический стационар в спб
врач нарколог выезд на дом москва врач нарколог выезд на дом москва
вызвать нарколога на дом москва цены вызвать нарколога на дом москва цены
88 starz 88 starz .
how to take cialis how to flush cialis out of your system cialis 5mg daily how long before it works
Ищете готовое решение для запуска интернет-магазина? Переходите по запросу интернет-магазин Aspro Market demo. Современный адаптивный дизайн, высокая скорость работы, удобный каталог, интеграция с CRM и маркетплейсами. Подберём лицензию, настроим шаблон и запустим ваш магазин под ключ быстро и профессионально.
вызов нарколога на дом в москве вызов нарколога на дом в москве
Процесс вывода из запоя капельничным методом организован по строгой схеме, позволяющей обеспечить максимальную эффективность терапии. Каждая стадия направлена на комплексное восстановление организма и минимизацию риска осложнений.
Изучить вопрос глубже – стоимость капельницы от запоя тюмень
Когда запой становится критическим, оперативное вмешательство имеет решающее значение для спасения здоровья и предотвращения необратимых последствий. Во Владимире экстренная помощь нарколога на дому позволяет быстро начать лечение, не требуя госпитализации, что особенно важно для пациентов, нуждающихся в сохранении конфиденциальности и комфорте.
Выяснить больше – вывод из запоя дешево владимир
Незамедлительно после вызова нарколог прибывает на дом для проведения первичного осмотра. Специалист измеряет жизненно важные показатели, такие как пульс, артериальное давление и температура, и собирает подробный анамнез. Это позволяет оценить степень интоксикации и оперативно разработать индивидуальный план лечения.
Получить больше информации – vyvod-iz-zapoya-czena murmansk
star888 https://888starz-egypt6.com/
После первичного улучшения работа не заканчивается. Врач формирует план восстановления: режим воды и питания, ориентиры по самочувствию, критерии «нормальной» динамики, признаки, при которых нужно повторно оценить состояние, и шаги по профилактике рецидива. Такой подход снижает вероятность повторного витка: человек понимает, что слабость и эмоциональная нестабильность в первые дни возможны, не пугается «волны» вечером и не пытается гасить её алкоголем.
Подробнее тут – http://narkologicheskaya-klinika-sergiev-posad12.ru
10mg cialis cialis 20mg difference between cialis and viagra
888starz online 888stars-uz.com .
Помощь на дому рассматривают при состояниях, которые сопровождаются заметным ухудшением самочувствия после алкоголя. Обычно это запой на протяжении нескольких дней, тяжелое похмелье, выраженная слабость, бессонница, тревога, дрожь в руках, сухость во рту, отсутствие аппетита, тошнота, раздражительность и ощущение истощения. В подобных случаях врачебный осмотр нужен для того, чтобы оценить тяжесть состояния и определить, безопасен ли домашний формат в конкретной ситуации.
Детальнее – запой нарколог на дом
888 stars https://888stars-uz.com/ .
https://lavita-clinik.ru/kosmetologija/kak-ubrat-celljulit-na-kolenjah-vse-sposoby-ot
Покупка шаблона «Аспро Корпоративный сайт 3.0» — быстрый старт для современного корпоративного сайта на 1С-Битрикс. Переходите по запросу цена Аспро Корп сайт 3 0. Готовый адаптивный дизайн, удобные настройки, высокая скорость работы и SEO-оптимизация помогут запустить проект без лишних затрат времени. Подходит для бизнеса, услуг, производства и компаний любого масштаба.
how long for cialis to work how many years can you take cialis? cialis ad
cialis dosage generic name for cialis cialis 5mg price
На каждом этапе лечения нарколог контролирует витальные показатели, оценивает динамику восстановления и при необходимости корректирует терапию. Такой подход исключает резкие перепады давления, нарушения сердечного ритма и другие побочные эффекты, часто возникающие при попытках вывести пациента из запоя без медицинского участия.
Ознакомиться с деталями – наркологический вывод из запоя в ростове-на-дону
Узнать больше здесь: https://l-parfum.ru/catalog/Britney-Spears/Circus-Fantasy/
К основным показаниям относятся:
Получить дополнительную информацию – вывод из запоя на дому анонимно
888starz bukmacher http://www.888stars-uz.com .
Современные методы лечения при выводе из запоя включают как медикаментозную детоксикацию, так и психологическую реабилитацию. В Уфе наркологи используют капельничное введение лекарственных средств, которые помогают быстро вывести токсины, нормализовать обмен веществ и стабилизировать работу внутренних органов. Одновременно с этим проводится психологическая поддержка для снижения эмоционального стресса, связанного с запоем.
Детальнее – http://narcolog-na-dom-ufa0.ru/
Капельница от запоя в Краснодаре рекомендуется при первых признаках алкогольной интоксикации или тяжелого похмелья. Без своевременного медицинского вмешательства состояние человека может резко ухудшиться, привести к развитию осложнений и даже стать угрозой для жизни. Срочная помощь необходима в таких случаях:
Подробнее можно узнать тут – вызвать капельницу от запоя на дому
В таблице ниже представлены основные группы препаратов, применяемых при выведении из запоя:
Получить дополнительные сведения – вывод из запоя круглосуточно в краснодаре
Круглосуточный режим работы в клинике «Чистый Баланс» обусловлен особенностями течения зависимостей, при которых острые состояния нередко развиваются внезапно. Нарколог на дом в Ростове-на-Дону обеспечивает возможность оперативной диагностики и начала лечения без временных ограничений. Клиническая практика подтверждает, что своевременное вмешательство на дому позволяет стабилизировать состояние пациента и предотвратить развитие тяжёлых последствий.
Подробнее – вызвать нарколога на дом срочно
Хочешь узнать про электронные чеки? https://financedirector.by/jelektronnye-cheki-i-ih-uchet/ важный этап цифровизации торговли и налогового контроля. Узнайте, как работают электронные чеки, какие преимущества они дают бизнесу и покупателям, а также какие изменения ждут предпринимателей.
https://lavita-clinik.ru/
Купите шаблон Аспро Инжиниринг для создания современного корпоративного сайта на 1С-Битрикс. Переходите по запросу купить универсальный корпоративный сайт Аспро Инжиниринг. Готовое решение для инженерных, строительных и производственных компаний: адаптивный дизайн, каталог услуг, SEO-оптимизация, высокая скорость работы и удобное управление контентом. Быстрый запуск проекта без лишних затрат и доработок.
tadalafil 5mg blue sky peptide tadalafil tadalafil reviews
cialis goodrx cialis doses cialis dose
tadalafil side effects long term sildenafil versus tadalafil mambo 36 tadalafil 20 mg
how long does it take for cialis to work when to take cialis for best results cialis pills
888 kasino 888 kasino .
клининг квартиры Москва klining-kvartiry-moskva-1.ru
клининг квартиры СПб
Reliable Moraira construction requires experience, attention to detail and modern building expertise. Explore our portfolio of completed villas where traditional Spanish architecture is combined with contemporary construction technologies and energy-efficient solutions.
tadalafil reddit tadalafil 20 mg how long does it last where to buy tadalafil
купить технику Вольво http://tech-group.com.ua
Покупка шаблона Аспро Курорт — быстрый старт для сайта базы отдыха, гостиницы, санатория или отеля на 1С-Битрикс. Переходите по запросу цены на Аспро Курорт. Готовое решение с современным дизайном, адаптацией под мобильные устройства, удобным каталогом услуг и модулем бронирования. Поможем подобрать версию, оформить лицензию, установить и настроить шаблон под ваш проект.
букмекерские крипто конторы букмекерские крипто конторы
бк Литвы бк Литвы
тойота сервис http://techautoport.ru/news/sezonnoe-to-toyota-kakie-raboty-obyazatelno-vypolnyat-vesnoy-i-osenyu-dlya-nadezhnosti-avtomobilya.html
tadalafil best price side effects of tadalafil tadalafil canada
can women take viagra how long does it take viagra to work herbal viagra
Юрист для беременных — это профессиональная поддержка в вопросах пособий, декретных выплат и трудовых гарантий. Переходите по запросу зачем назначают юриста при беременности. Поможем оформить документы, защитим ваши права при спорах с работодателем или госорганами, проконсультируем по всем юридическим нюансам. Обеспечим спокойствие и уверенность в период ожидания малыша.
Пребывание в стационаре обеспечивает круглосуточный мониторинг состояния, своевременное введение лекарств и защиту пациента от внешних факторов, провоцирующих срыв. Все палаты оснащены необходимым оборудованием, соблюдаются санитарные нормы, а условия размещения соответствуют медицинским стандартам.
Исследовать вопрос подробнее – бесплатная наркологическая клиника
https://stabilizatory-energy.shop/
кухни от производителя спб недорого и качественно https://kuhni-spb-59.ru
кухни на заказ от производителя кухни на заказ от производителя
sildenafil citrate tablets sildenafil cost sildenafil for premature ejaculation
заказать кухню стоимость заказать кухню стоимость
100cuci safe 100cuci safe
which is better viagra or cialis how long does viagra take to work side effects of viagra
кухни в спб на заказ кухни в спб на заказ
купить кухню в спб от производителя купить кухню в спб от производителя
рулонные шторы это https://rulonnye-shtory-s-elektroprivodom10.ru
Делаешь ставки? https://ufcbetting.club аналитика поединков, прогнозы, коэффициенты букмекеров и разборы боев. Следите за предстоящими турнирами, статистикой бойцов и делайте ставки на главные события мира единоборств.
online slot malaysia online slot malaysia
нарколог на дом в воронеже нарколог на дом в воронеже
кухни на заказ спб кухни на заказ спб
рулонные шторы с электроприводом купить рулонные шторы с электроприводом купить
Профессиональный юрист по составлению брачного договора поможет грамотно оформить имущественные отношения супругов, защитить ваши интересы и избежать споров в будущем. Переходите по запросу юрист по подготовке брачного контракта. Подготовим брачный договор с учетом требований законодательства, индивидуальных условий и ваших пожеланий. Консультация, разработка, проверка и сопровождение оформления брачного договора быстро и конфиденциально.
современные кухни на заказ в спб https://kuhni-spb-59.ru
22bet ставки на спорт 22bet ставки на спорт
заказать кухню каталог заказать кухню каталог
рулонные шторы на электроприводе рулонные шторы на электроприводе
condo for sale in phuket condo for sale in phuket
100cuci site 100cuci site
hims viagra viagra boys cbd viagra gummies
кухни на заказ в спб кухни на заказ в спб
заказ кухни заказ кухни
заказать кухню стоимость заказать кухню стоимость
22bet официальный сайт 22bet официальный сайт
Продажа и установка камеры видеонаблюдения калининград. Современные системы безопасности для квартир, домов, магазинов и складов. Настройка удалённого доступа, запись видео и круглосуточный контроль объекта.
Быстрая профессиональная монтаж видеонаблюдения для квартир, домов, офисов и коммерческих объектов. Проектирование, монтаж и настройка систем безопасности, удалённый доступ, запись видео и контроль в реальном времени. Надёжные решения для защиты имущества и контроля территории.
apartments for sale in phuket apartments for sale in phuket
двойные рулонные шторы с электроприводом двойные рулонные шторы с электроприводом
trusted casino malaysia trusted casino malaysia
Услуга
Подробнее тут – наркологическая клиника нарколог рязань
частный нарколог на дом частный нарколог на дом
freehold condos for sale in phuket freehold condos for sale in phuket
электрическая рулонная штора электрическая рулонная штора
investment apartments for sale in phuket investment apartments for sale in phuket
капельница от запоя клиника https://kapelnicza-ot-pokhmelya-samara-23.ru
responsive dental websites responsive dental websites
рулонная штора на заказ цена https://elektricheskie-rulonnye-shtory99.ru
100cuci ios 100cuci ios
рулонные шторы виды механизмов рулонные шторы виды механизмов
100cuci free credit 100cuci free credit
Быстрая профессиональная монтаж видеонаблюдения для квартир, домов, офисов и коммерческих объектов. Проектирование, монтаж и настройка систем безопасности, удалённый доступ, запись видео и контроль в реальном времени. Надёжные решения для защиты имущества и контроля территории.
нарколог на дом воронеж нарколог на дом воронеж
freehold condos for sale in phuket freehold condos for sale in phuket
После первичной диагностики начинается активная фаза медикаментозного вмешательства. Современные препараты вводятся капельничным методом, что позволяет оперативно снизить уровень токсинов в крови, восстановить нормальный обмен веществ и нормализовать работу внутренних органов, таких как печень, почки и сердце. Этот этап критически важен для стабилизации состояния пациента и предотвращения дальнейших осложнений.
Углубиться в тему – https://vyvod-iz-zapoya-tula00.ru/vyvod-iz-zapoya-czena-tula/
ООО ЦА “ПАНДА” – скамеры – кидают клиентов на деньги ООО ЦА “ПАНДА” – скамеры – кидают клиентов на деньги
готовые рулонные шторы цена https://rulonnye-elektroshtory.ru
luxury phuket villas for sale luxury phuket villas for sale
откапаться на дому откапаться на дому
нарколог на дом цена воронеж https://narkolog-na-dom-voronezh-12.ru
generic for viagra drugs not to take with viagra viagra connect
dental web design agency dental web design agency
роликовые шторы роликовые шторы
phuket condos for sale phuket condos for sale
прокапаться после запоя на дому прокапаться после запоя на дому
вывод из запоя нижний новгород стационар вывод из запоя нижний новгород стационар
ООО ЦА “ПАНДА” – скамеры – кидают клиентов на деньги ООО ЦА “ПАНДА” – скамеры – кидают клиентов на деньги
купить кухню на заказ в спб https://kuhni-spb-58.ru
100cuci malaysia 100cuci malaysia
рулонные шторы это https://elektricheskie-rulonnye-shtory99.ru
вывод из запоя недорого нарколог24 https://vyvod-iz-zapoya-na-domu-sankt-peterburg-19.ru
Рекомендую ресурс, посвящённый теме вариаторов, их обслуживанию и ремонту. На портале можно найти общие сведения об устройстве этой трансмиссии, возможных неисправностях и методах их диагностики. В материалах сайта рассматриваются различные аспекты эксплуатации вариаторов, что может быть полезно для общего понимания их работы https://provariatory.ru/
вызов нарколога на дом цена вызов нарколога на дом цена
рулонные жалюзи с электроприводом рулонные жалюзи с электроприводом
установка домофона стоимость домофона с установкой цена
капельница от запоя недорого капельница от запоя недорого
apartments for sale phuket apartments for sale phuket
вывод из запоя стационар вывод из запоя стационар
производитель рулонных штор https://elektricheskie-rulonnye-shtory99.ru
prebuilt dental websites https://website-for-dentistry.com
References:
Pink floyd live in pompeii aeterna.cim.mcgill.ca
villas in phuket for sale villas in phuket for sale
Восстановление родительских прав — юридическая помощь для родителей, желающих вернуть право на воспитание и общение с ребенком. Переходите по запросу консультация адвоката по восстановлению родительских прав. Подготовим документы, представим ваши интересы в суде, поможем собрать доказательства изменений в жизни и восстановить права в соответствии с законом. Сопровождаем процесс профессионально, конфиденциально и с учетом интересов ребенка.
купить рольшторы цены купить рольшторы цены
номер установки домофона номер телефона установка домофонов
вывод из запоя стационар вывод из запоя стационар
поставить капельницу от запоя поставить капельницу от запоя
гостиница москва санкт петербург экскурсии http://www.piter-na-teplohode.ru
luxury villas phuket for sale luxury villas phuket for sale
кухни спб на заказ кухни спб на заказ
кухни под заказ спб кухни под заказ спб
сколько стоит прокапаться от алкоголя на дому сколько стоит прокапаться от алкоголя на дому
скачать видео с youtube в высоком качестве https://skachat-video-s-youtube-9.ru
ютуб загрузчик онлайн https://skachat-video-s-youtube-10.ru
professional dental website design professional dental website design
100cuci android 100cuci android
купить шторы жалюзи https://elektricheskie-rulonnye-shtory99.ru
sildenafil generic sildenafil 100 mg para que sirve sildenafil generic
прокапаться от алкоголя прокапаться от алкоголя
ярко тур санкт петербург http://www.piter-na-teplohode.ru
вывод из запоя стационар вывод из запоя стационар
кухня на заказ спб кухня на заказ спб
скачать ролик с ютуба по ссылке онлайн https://skachat-video-s-youtube-9.ru
вызов нарколога на дом вызов нарколога на дом
pfizer viagra viagra natural does viagra make you bigger
капельница от запоя вызов капельница от запоя вызов
вывести из запоя в домашних условиях капельница вывести из запоя в домашних условиях капельница
рулонные шторы с электроприводом цена рулонные шторы с электроприводом цена
экскурсии по питеру с проживанием https://www.piter-na-teplohode.ru
кухни на заказ от производителя кухни на заказ от производителя
глория мебель https://kuhni-spb-57.ru
скачать видео youtube https://skachat-video-s-youtube-9.ru
рулонные жалюзи купить в москве рулонные жалюзи купить в москве
петербург экскурсии туры piter-na-teplohode.ru
youtube скачать видео https://skachat-video-s-youtube-9.ru
кухни на заказ от производителя кухни на заказ от производителя
вывожу из запоя екатеринбург вывожу из запоя екатеринбург
вывод из запоя недорого нарколог24 вывод из запоя недорого нарколог24
нарколог нижний новгород на дом нарколог нижний новгород на дом
петербург тур петербург тур
скачать видео ютуб на пк https://skachat-video-s-youtube-9.ru
кухни на заказ спб кухни на заказ спб
вывод из запоя на дому екатеринбург круглосуточно вывод из запоя на дому екатеринбург круглосуточно
вывести из запоя цена вывести из запоя цена
психиатр нарколог на дом https://narkolog-na-dom-nizhnij-novgorod-2.ru
рулонные шторы виды механизмов рулонные шторы виды механизмов
луна тур в санкт петербурге piter-na-teplohode.ru
youturbo video downloader https://skachat-video-s-youtube-9.ru
вывод из запоя с выездом на дом цена вывод из запоя с выездом на дом цена
услуги нарколога на дому услуги нарколога на дому
рулонные жалюзи с электроприводом рулонные жалюзи с электроприводом
наркологическая помощь на дому наркологическая помощь на дому
сколько стоит прокапаться дома сколько стоит прокапаться дома
капельница от запоя на дому капельница от запоя на дому
прокапаться на дому от алкоголя цена прокапаться на дому от алкоголя цена
вызвать нарколога на дом вызвать нарколога на дом
сколько стоит капельница от запоя сколько стоит капельница от запоя
капельница екатеринбург цены https://kapelnicza-ot-pokhmelya-ekaterinburg-14.ru
круглосуточный вывод из запоя круглосуточный вывод из запоя
шторы в оконный проем https://elektricheskie-rulonnye-shtory99.ru
нарколог на дом круглосуточно нарколог на дом круглосуточно
нарколог на дом круглосуточно воронеж цены https://narkolog-na-dom-voronezh-10.ru
прокапаться от алкоголя в самарае прокапаться от алкоголя в самарае
капельница на дому в екатеринбурге https://kapelnicza-ot-pokhmelya-ekaterinburg-14.ru
капельница на дому в екатеринбурге капельница на дому в екатеринбурге
частный нарколог на дом частный нарколог на дом
вызвать нарколога https://narkolog-na-dom-voronezh-10.ru
заказать обратный звонок наркология заказать обратный звонок наркология
скачать видео с ютуба скачать видео с ютуба
нарколог на дом капельница нарколог на дом капельница
капельница от алкоголя капельница от алкоголя
нарколог на дом круглосуточно нарколог на дом круглосуточно
капельницы на дому екатеринбург цена капельницы на дому екатеринбург цена
нарколог на дом воронеж цены https://narkolog-na-dom-voronezh-10.ru
нарколог на дому капельница цена нарколог на дому капельница цена
капельницы на дому екатеринбург цена https://kapelnicza-ot-pokhmelya-ekaterinburg-14.ru
лечение наркомании на дому лечение наркомании на дому
капельница от запоя на дому воронеж капельница от запоя на дому воронеж
капельницу на дом стоимость капельницу на дом стоимость
нарколог на дом цена нарколог на дом цена
вызвать нарколога на дом вызвать нарколога на дом
наркология вывод из запоя наркология вывод из запоя
нарколог на дом в воронеже нарколог на дом в воронеже
поставить капельницу цена в екатеринбурге https://kapelnicza-ot-pokhmelya-ekaterinburg-17.ru
капельница от алкоголя капельница от алкоголя
помощь вывода запоя помощь вывода запоя
true fortune casino free chip code true fortune casino free chip code .
рулонные шторы с направляющими на пластиковые окна https://rulonnye-shtory-s-elektroprivodom190.ru
капельница от запоя воронеж капельница от запоя воронеж
кодирование от алкоголизма стационар кодирование от алкоголизма стационар
нарколог на дом воронеж цены https://narkolog-na-dom-voronezh-10.ru
вызов нарколога на дом самара вызов нарколога на дом самара
вызов врача нарколога на дом вызов врача нарколога на дом
стоимость капельницы на дому екатеринбург https://kapelnicza-ot-pokhmelya-ekaterinburg-14.ru
капельницы на дому екатеринбург цена капельницы на дому екатеринбург цена
true fortune casino promo codes no deposit true fortune casino promo codes no deposit .
нарколог стационар нарколог стационар
повесить рулонные шторы цена за работу https://rulonnye-shtory-s-elektroprivodom190.ru
капельница от похмелья капельница от похмелья
нарколог на дом вызов https://narkolog-na-dom-samara-10.ru
частный нарколог https://narkolog-na-dom-samara-9.ru
капельница на дому цена екатеринбург капельница на дому цена екатеринбург
вывод из запоя стационар вывод из запоя стационар
вывод из запоя с выездом на дом цена вывод из запоя с выездом на дом цена
выезд нарколога на дом цена выезд нарколога на дом цена
капельница при алкогольной интоксикации цена капельница при алкогольной интоксикации цена
прокапаться от алкоголя цены прокапаться от алкоголя цены
лучшее кино 2026 смотреть онлайн новинки кино
нарколог на дом в самаре нарколог на дом в самаре
нарколог на дом круглосуточно цены https://narkolog-na-dom-samara-9.ru
запой стационар https://vyvod-iz-zapoya-v-staczionare-nizhnij-novgorod-17.ru
поставить капельницу на дому екатеринбург цена https://kapelnicza-ot-pokhmelya-ekaterinburg-16.ru
вывод из запоя на дому екатеринбург отзывы вывод из запоя на дому екатеринбург отзывы
нарколог на дом круглосуточно москва нарколог на дом круглосуточно москва
капельница от запоя самара капельница от запоя самара
наркологические стационары наркологические стационары
прокапаться от алкоголя цены прокапаться от алкоголя цены
выведение из запоя телефон выведение из запоя телефон
вызов на дом нарколога цена https://narkolog-na-dom-samara-10.ru
наркология вывод из запоя в стационаре наркология вывод из запоя в стационаре
поставить капельницу на дому екатеринбург цена https://kapelnicza-ot-pokhmelya-ekaterinburg-16.ru
наркологическая клиника стационар наркологическая клиника стационар
вывод из запоя цена вывод из запоя цена
вывод из запоя на дому вывод из запоя на дому
врач нарколог выезд на дом москва врач нарколог выезд на дом москва
поставить капельницу от запоя на дому поставить капельницу от запоя на дому
электрокарниз двухрядный цена https://elektrokarniz150.ru
вывод из запоя на дому в екатеринбурге вывод из запоя на дому в екатеринбурге
нарколог на дом цена нарколог на дом цена
лечение в наркологическом стационаре лечение в наркологическом стационаре
Нужна бесплатная юридическая консультация? Переходите по запросу задать вопрос на консультации адвоката в Дмитрове и получите помощь опытных правозащитников в любой области права: семейные споры, долги и кредиты, недвижимость, трудовые конфликты, защита прав потребителей и многое другое. Задайте вопрос онлайн или по телефону и получите подробный разбор вашей ситуации и рекомендации адвоката по дальнейшим действиям. Консультация проводится бесплатно и конфиденциально.
how does tadalafil work what is tadalafil generic for does tadalafil make you last longer
нарколог запой нарколог запой
100cuci mirror 100cuci mirror
выезд нарколога москва выезд нарколога москва
капельница от алкоголя капельница от алкоголя
электрокарнизы https://elektrokarniz150.ru
вывод из запоя на дому цена вывод из запоя на дому цена
real estate for sale in phuket thailand real estate for sale in phuket thailand
вывод из запоя в клинике https://vyvod-iz-zapoya-v-staczionare-nizhnij-novgorod-17.ru
Нужна бесплатная юридическая консультация? Переходите по запросу номер телефона бесплатного адвоката для консультации в Истре и получите помощь опытных правозащитников в любой области права: семейные споры, долги и кредиты, недвижимость, трудовые конфликты, защита прав потребителей и многое другое. Задайте вопрос онлайн или по телефону и получите подробный разбор вашей ситуации и рекомендации адвоката по дальнейшим действиям. Консультация проводится бесплатно и конфиденциально.
выведение из запоя на дому выведение из запоя на дому
вывод из запоя круглосуточно вывод из запоя круглосуточно
100cuci slot 100cuci slot
карниз с приводом https://elektrokarniz150.ru
наркологический стационар в спб наркологический стационар в спб
прокапаться от алкоголя на дому прокапаться от алкоголя на дому
капельницы на дому екатеринбург цена капельницы на дому екатеринбург цена
вывод из запоя в стационаре в нижнем новгороде https://vyvod-iz-zapoya-v-staczionare-nizhnij-novgorod-17.ru
maximum dose of tadalafil tadalafil brand name tadalafil troche
наркологический вывод из запоя наркологический вывод из запоя
служба вывода из запоя служба вывода из запоя
slot malaysia slot malaysia
наркологический стационар санкт петербург наркологический стационар санкт петербург
электрокарниз купить в москве электрокарниз купить в москве
поставить капельницу цена в екатеринбурге https://kapelnicza-ot-pokhmelya-ekaterinburg-16.ru
papaya property papaya property
карниз для штор электрический https://elektrokarniz150.ru
наркодиспансер воронеж https://narkologicheskaya-pomoshh-voronezh-10.ru
выведение из запоя в наркологическом стационаре выведение из запоя в наркологическом стационаре
вызвать нарколога цена вызвать нарколога цена
капельница самара цена капельница самара цена
вывести из запоя капельница на дому вывести из запоя капельница на дому
нужен нарколог на дом нужен нарколог на дом
property for sale in phuket property for sale in phuket
реабилитация наркозависимых стационар реабилитация наркозависимых стационар
пасьянс киевская ворожея онлайн читайте на омниватике (omnivatic.com) – полный астрологический прогноз для каждого
100cuci no deposit 100cuci no deposit
анонимная наркологическая помощь анонимная наркологическая помощь
нарколог на дом нарколог на дом
вывод из запоя в наркологическом стационаре вывод из запоя в наркологическом стационаре
tadalafil price tadalafil para que sirve tadalafil generic
наркологическая помощь на дом наркологическая помощь на дом
сделать капельницу от алкоголя сделать капельницу от алкоголя
выезд нарколога выезд нарколога
Hi there gamers!
Check out https://995bdt1.com/
This is a fresh gaming site called 995BDT.
No deposit needed and get daily bonuses.
No download required.
Just click the link and start playing.
Have fun!
phuket thailand property for sale phuket thailand property for sale
100cuci apk 100cuci apk
вызов нарколога вызов нарколога
нарколог стационар нарколог стационар
где можно прокапаться где можно прокапаться
вызвать нарколога на дом срочно вызвать нарколога на дом срочно
капельница от запоя телефон капельница от запоя телефон
наркологическая помощь срочно наркологическая помощь срочно
выведение из запоя санкт петербург стационар выведение из запоя санкт петербург стационар
нарколог на дом стоимость нарколог на дом стоимость
buy property in phuket buy property in phuket
вызвать врача нарколога вызвать врача нарколога
наркологический диспансер воронеж наркологический диспансер воронеж
капельница от запоя в стационаре капельница от запоя в стационаре
нарколог на дому капельница цена нарколог на дому капельница цена
вызвать врача нарколога вызвать врача нарколога
free legit iq test free legit iq test
нарколог вызвать на дом нарколог вызвать на дом
tadalafil troche bluechew tadalafil tadalafil 20 mg how long does it last
снять запой на дому снять запой на дому
помощь нарколога на дому помощь нарколога на дому
вызвать нарколога на дом в москве вызвать нарколога на дом в москве
наркологическая помощь в воронеже https://narkologicheskaya-pomoshh-voronezh-11.ru
free iq tests free iq tests
вызвать врача нарколога на дом срочно вызвать врача нарколога на дом срочно
наркологический стационар наркологический стационар
капельница при похмелье капельница при похмелье
«Зеркала Kraken» — это дублирующие интернет-страницы, которые иногда используют для обхода блокировок. Информация о подобных ресурсах распространяется в узких кругах. Перед взаимодействием с любыми онлайн-платформами стоит проверить их легальность и оценить потенциальные угрозы для безопасности данных.кракен сайт даркнет официальный
капельница при алкогольной интоксикации цена капельница при алкогольной интоксикации цена
наркология воронеж наркология воронеж
вызов психиатра нарколога на дом вызов психиатра нарколога на дом
наркологический центр частная скорая помощь https://narkologicheskaya-pomoshh-voronezh-11.ru
стационарное выведение из запоя стационарное выведение из запоя
врач нарколог выезд врач нарколог выезд
iq tests free iq tests free
кодирование от алкоголизма стационар кодирование от алкоголизма стационар
References:
Genting casino luton
References:
https://theflatearth.win/wiki/Post:Schnelle_Sichere_Anmeldung
анонимное лечение алкоголизма анонимное лечение алкоголизма
нарколог на дом анонимно нарколог на дом анонимно
рехаб нижний новгород рехаб нижний новгород
вызов нарколога на дом москва вызов нарколога на дом москва
производитель рулонных штор https://rulonnye-shtory-s-elektroprivodom11.ru
вывести из алкогольного запоя стационар вывести из алкогольного запоя стационар
test your iq test your iq
наркология нижний новгород наркология нижний новгород
нарколог воронеж нарколог воронеж
помощь нарколога на дому при алкоголизме помощь нарколога на дому при алкоголизме
вывод из запоя диспансер вывод из запоя диспансер
нарколог стационар нарколог стационар
наркологическая помощь в воронеже https://narkologicheskaya-pomoshh-voronezh-11.ru
вызов нарколога цена вызов нарколога цена
лечение алкогольной зависимости нижний новгород лечение алкогольной зависимости нижний новгород
готовые рулонные шторы купить в москве готовые рулонные шторы купить в москве
срочный вывод из запоя на дому врач срочный вывод из запоя на дому врач
вывод из запоя стационар вывод из запоя стационар
психиатр нарколог нижний новгород психиатр нарколог нижний новгород
нарколог на дому нарколог на дому
анонимное лечение от алкоголизма https://narkologicheskaya-pomoshh-voronezh-11.ru
tadalafil 5mg daily tadalafil 5mg sildenafil and tadalafil
анонимный нарколог анонимный нарколог
закодироваться в нижнем новгороде закодироваться в нижнем новгороде
рулонные шторы каталог цены https://rulonnye-shtory-s-elektroprivodom11.ru
лечение алкогольной зависимости нижний новгород лечение алкогольной зависимости нижний новгород
вывод из запоя санкт петербург стационар вывод из запоя санкт петербург стационар
телефон нарколога на дом телефон нарколога на дом
наркологическая служба наркологическая служба
вывод из запоя в стационаре вывод из запоя в стационаре
срочный вывод из запоя на дому круглосуточно срочный вывод из запоя на дому круглосуточно
free iq tests free iq tests
лечение наркозависимости воронеж https://narkologicheskaya-pomoshh-voronezh-11.ru
нарколог на дом в москве нарколог на дом в москве
вывод из запоя в стационаре клиника вывод из запоя в стационаре клиника
врач нарколог на дом врач нарколог на дом
наркология вывод из запоя в стационаре наркология вывод из запоя в стационаре
наркологический центр частная скорая помощь narkologicheskaya-pomoshh-voronezh-13.ru
вывод из запоя в стационаре наркологии вывод из запоя в стационаре наркологии
Нужна бесплатная юридическая консультация? Переходите по запросу юридическая консультация бесплатно онлайн круглосуточно в Лобне и получите помощь опытных правозащитников в любой области права: семейные споры, долги и кредиты, недвижимость, трудовые конфликты, защита прав потребителей и многое другое. Задайте вопрос онлайн или по телефону и получите подробный разбор вашей ситуации и рекомендации адвоката по дальнейшим действиям. Консультация проводится бесплатно и конфиденциально.
наркология на дому вызов нарколога наркология на дому вызов нарколога
клиника реабилитации алкоголизма https://narkologicheskaya-pomoshh-voronezh-12.ru
вывод из запоя спб стационар вывод из запоя спб стационар
нарколог на дом круглосуточно москва нарколог на дом круглосуточно москва
наркологический центр наркологический центр
лечение алкоголизма в нижнем новгороде лечение алкоголизма в нижнем новгороде
лечение алкоголизма на дому лечение алкоголизма на дому
рулонные шторы купить в москве рулонные шторы купить в москве
how much cialis should i take cialis cialis for bph
наркологическая клиника нижний новгород наркологическая клиника нижний новгород
психиатр нарколог на дом психиатр нарколог на дом
вывод из запоя стационар вывод из запоя стационар
вызов на дом частного нарколога вызов на дом частного нарколога
лечение алкогольной зависимости воронеж http://narkologicheskaya-pomoshh-voronezh-13.ru
кодировка от алкоголя в нижнем новгороде кодировка от алкоголя в нижнем новгороде
платная наркологическая помощь на дому платная наркологическая помощь на дому
joint delivery in prague thc joint in prague
наркологическая клиника наркологическая клиника
нарколог на дом москва нарколог на дом москва
tadalafil pill tadalafil dosage 60 mg generic tadalafil 20mg
вывод из алкогольного запоя нарколог 24 https://vyvod-iz-zapoya-na-domu-sankt-peterburg-20.ru
вывод из запоя диспансер вывод из запоя диспансер
вывод из запоя недорого нарколог24 https://vyvod-iz-zapoya-na-domu-sankt-peterburg-18.ru
как узнать по номеру телефона где находится человек http://kak-najti-cheloveka-po-nomeru-telefona-1.ru
выведение из запоя в наркологическом стационаре выведение из запоя в наркологическом стационаре
согласование перепланировки москва согласование перепланировки москва
does cialis make you last longer canadian pharmacy cialis cialis half life
наркологическая клиника наркологическая клиника
вывод из запоя нарколог24 https://vyvod-iz-zapoya-na-domu-sankt-peterburg-20.ru
онлайн школа обучение онлайн школа обучение
Steam Desktop Authenticator https://sdasteam.com (SDA). It allows you to generate account login codes and automatically confirm trades or item sales on the Community Market without using your smartphone.
вывода из запоя 24 https://vyvod-iz-zapoya-na-domu-sankt-peterburg-18.ru
1xbet mobile download 1xbet-indir-1.com
вывод из запоя в стационаре наркологии вывод из запоя в стационаре наркологии
Steam Desktop Authenticator https://authenticatorsteamdesktop.com is a PC app that lets you use the Steam Mobile Authenticator on your computer. It supports trade confirmation, account security, and managing two-factor authentication codes without using your smartphone.
1xbet giri?i https://www.1xbet-giris-77.com
стационар капельница от алкоголя стационар капельница от алкоголя
вывод из запоя недорого вывод из запоя недорого
школа онлайн для детей школа онлайн для детей
перепланировка в москве перепланировка в москве
Steam Desktop Authenticator https://steamdesktopauthenticator.net is a popular solution for Steam users who need access to Steam Guard features on their computer. It conveniently verifies actions, protects your account, and manages authentication in a single app.
1xbet uygulamas? indir http://www.1xbet-indir-1.com
вывод из запоя санкт петербург https://vyvod-iz-zapoya-na-domu-sankt-peterburg-18.ru
1xbet resmi giri? 1xbet-giris-77.com
геолокация по номеру телефона онлайн геолокация по номеру телефона онлайн
вызов нарколога на дом москва недорого вызов нарколога на дом москва недорого
вывод из запоя нарколог 24 https://vyvod-iz-zapoya-na-domu-sankt-peterburg-20.ru
песок карьерный цена за 1 песок карьерный намывной
Банкротство ИП — законный способ списать непосильные долги по кредитам, налогам и другим обязательствам. Переходите по запросу предусмотрены ли какие либо последствия признания индивидуального предпринимателя банкротом. Поможем оценить перспективы дела, подготовить документы и пройти процедуру с минимальными рисками. Консультация по условиям, последствиям и возможности внесудебного банкротства. Защитите свои права и начните финансовую жизнь с чистого листа.
прокапывание от алкоголя прокапывание от алкоголя
вызвать капельницу на дом вызвать капельницу на дом
онлайн школы для детей https://shkola-onlajn-51.ru
how long does it take for cialis to work cialis coupon what is the difference between cialis and viagra
помощь вывода запоя https://vyvod-iz-zapoya-na-domu-sankt-peterburg-18.ru
новости спорта читали когда нибудь что то подобное?
1xbet g?ncel giri? 1xbet g?ncel giri?
вызов капельницы на дом вызов капельницы на дом
прокапаться от алкоголя прокапаться от алкоголя
Steam Desktop Authenticator https://steamdesktopauthenticator.net is a popular solution for Steam users who need access to Steam Guard features on their computer. It conveniently verifies actions, protects your account, and manages authentication in a single app.
Steam Desktop Authenticator https://steamdesktopauthenticator.net is a popular solution for Steam users who need access to Steam Guard features on their computer. It conveniently verifies actions, protects your account, and manages authentication in a single app.
согласование перепланировки согласование перепланировки
вывод из запоя капельница на дому вывод из запоя капельница на дому
школа онлайн дистанционное обучение школа онлайн дистанционное обучение
вызов врача нарколога на дом москва недорого https://reabilitaciya-alkogolikov-moskva.ru
betfinal عربي https://betfinalafrica.com/
Steam Desktop Authenticator https://sdasteam.com (SDA). It allows you to generate account login codes and automatically confirm trades or item sales on the Community Market without using your smartphone.
прокапаться на дому цена прокапаться на дому цена
прокапаться прокапаться
Подготовка документов для банкротства физических лиц — быстро, грамотно и без лишних ошибок. Переходите по запросу какие документы нужно собрать для банкротства физического лица. Поможем собрать полный пакет документов для подачи через суд или МФЦ, проверим соответствие требованиям законодательства и подготовим все необходимые заявления. Сэкономьте время и снизьте риск отказа. Консультация по составу документов и порядку оформления.
вывод из запоя в стационаре самара вывод из запоя в стационаре самара
нарколог москва на дом http://reabilitaciya-alkogolikov-moskva.ru
выведение из запоя капельница выведение из запоя капельница
cialis generic name best time to take cialis cialis generic cost
прокапаться от алкоголя прокапаться от алкоголя
Обновлено сегодня: https://stroimdominfo.ru
Расширенная статья здесь: https://gazobeton163.ru
online casino south africa play game slot online casino in south africa
врач нарколог выезд на дом цена http://www.reabilitaciya-alkogolikov-moskva.ru
школа онлайн https://shkola-onlajn-51.ru
Read the Extended Version: https://blockchainreporter.net/understanding-proof-of-authority-a-reliable-consensus-mechanism-in-blockchain-technology/
создать презентацию ии https://www.litteraesvfu.ru
прокапать от алкоголя нижний новгород прокапать от алкоголя нижний новгород
tadalafil generic name cialis tadalafil 20mg cialis tadalafil 20mg
Расширенный обзор: https://okna-domostroy.ru
daily cialis can i take two 5mg cialis at once cialis 20mg
капельница на дому самара https://kapelnicza-ot-pokhmelya-samara-38.ru
вывод из запоя круглосуточно самара https://kapelnicza-ot-pokhmelya-samara-39.ru
обивка для мебели купить https://tkan-dlya-mebeli.ru
нарколог на дом вывод нарколог на дом вывод
местонахождение по номеру телефона местонахождение по номеру телефона
прокапаться от алкоголя прокапаться от алкоголя
мелбет скачать казино https://tcso-begovoy.ru
сколько стоит прокапаться https://kapelnicza-ot-pokhmelya-samara-40.ru
комбез трансформер для новорожденных комбез трансформер для новорожденных
вывод из запоя стационар спб вывод из запоя стационар спб
бизнес сувениры на заказ https://www.suvenirnaya-produkcziya-s-logotipom-8.ru
выезд на дом капельница от запоя https://kapelnicza-ot-pokhmelya-samara-38.ru
сколько стоит капельница от запоя https://kapelnicza-ot-pokhmelya-samara-39.ru
помощь при запое на дому помощь при запое на дому
самара вывод из запоя https://kapelnicza-ot-pokhmelya-samara-40.ru
мелбет скачать мелбет скачать
ткань для обтяжки мебели https://tkan-dlya-mebeli.ru
Choose custom-made furniture cabinet maker Oldsmar FL
melbet melbet
создать презентацию ии https://www.litteraesvfu.ru
melbet melbet
вывод из запоя цена наркология вывод из запоя цена наркология
зробити ремонт квартири косметичний ремонт квартири
рекламные сувениры с логотипом https://www.suvenirnaya-produkcziya-s-logotipom-8.ru
скачать мелбет казино https://limon-ads.ru
мелбет мелбет
найти местоположение по номеру телефона найти местоположение по номеру телефона
скачать melbet на андроид скачать melbet на андроид
выход из запоя в стационаре выход из запоя в стационаре
скачать мелбет скачать мелбет
мелбет скачать приложение мелбет скачать приложение
melbet скачать на андроид melbet скачать на андроид
мел бет мел бет
melbet melbet
найти местоположение по номеру телефона найти местоположение по номеру телефона
мелбет скачать на андроид бесплатно https://elenagatilova.ru
Всем доброго времени суток. Тема здоровья всегда на первом месте, особенно когда речь идет о близких людях. Если срочно требуется квалифицированный нарколог на дом в Москве, то не рискуйте и не доверяйте случайным объявлениям.
Сам долго изучал отзывы и искал надежный вариант, и в итоге нашли клинику, где врачи работают профессионально. Если вам актуально или ситуация экстренная, советую посмотреть официальный источник: официальный сайт.
На этом сайте действительно дана полная информация, реагируют очень быстро, буквально за час. Надеюсь, эта рекомендация поможет вовремя принять правильные меры. Всем душевного спокойствия!
Народ, если кто искал, толковый разбор. Нашел чистый вариант, в итоге скачал отсюда: скачать мелбет.
Сам сервис предлагает отличные условия для игроков, линия на футбол и теннис огромная. Там еще трансляции матчей идут без задержек.
И еще, при регистрации можно неплохо увеличить первый депозит, так что можно затестить. Кто уже ставил там?
стационарное выведение из запоя стационарное выведение из запоя
цена перевозки авто стоимость автовоза
Чтобы быстро и эффективно подробнее тут, воспользуйтесь нормальными ребята реально помогают.
Слушай, тут главное — без глупостей.
Используйте найденную информацию ответственно и только в законных целях.
Короче, не нарывайтесь.
Народ, если кто искал, свежая инфа. Выкладываю, чтобы не потерялось, делюсь полезной ссылкой: мелбет казино скачать на андроид.
Вообще проект реально топовый — линия на футбол и теннис огромная. Порадовало, что есть нормальные live-ставки.
Там сейчас дают неплохой приветственный бонус, что очень даже кстати. Всем удачи!
Всем доброго времени суток. Слушайте, вопрос сложный, но многим может помочь, особенно когда речь идет о близких людях. Если ищете анонимного специалиста с быстрым выездом, то не рискуйте и не доверяйте случайным объявлениям.
Мы в свое время тоже столкнулись с этой бедой, в итоге вся ценная информация была собрана по крупицам. Кому тоже нужны подробности и условия, советую посмотреть официальный источник: вывод из запоя лечение алкоголизма вывод из запоя лечение алкоголизма.
На этом ресурсе действительно дана полная информация, реагируют очень быстро, буквально за час. Не теряйте время, и обращайтесь к настоящим профессионалам. Всем удачи и берегите близких!
наркологическая помощь в стационаре наркологическая помощь в стационаре
скачать мелбет скачать мелбет
найти локацию по номеру телефона http://kak-najti-cheloveka-po-nomeru-telefona-2.ru
Чтобы быстро и эффективно подробнее тут, воспользуйтесь такими штуками которые дают инфу.
Знаете, многие лезут в дебри, а зря.
Если контакт невозможен, лучше прекратить попытки и искать альтернативы.
Надеюсь, понятно объяснил.
вызвать врача нарколога на дом вызвать врача нарколога на дом
Кстати, в соседней ветке кто-то спрашивал про адекватную альтернативу обычным школам. Сам недавно наткнулся на одну площадку. Там как раз упор на индивидуальный темп, нет этой дикой уравниловки: lbs что это . Честно? Зашли просто на пробный урок, а в итоге остались на весь год. Преподаватели не просто читают по бумажке, а реально вовлекают. Ребенок сам ноутбук включает к началу пары. Так что если кому актуально – очень рекомендую хотя бы тест-драйв пройти.
Güvenli bahis deneyimi için 1xbet giriş adresini kullanabilirsiniz.
günümüzde oldukça basit. Bu siteye erişim için birkaç adım yeterlidir. İlk olarak doğru adresin kullanılması önemlidir. Güvenli bağlantı sayesinde bilgileriniz korunur.
Kullanıcılar giriş yapmak için ana sayfadaki giriş linkini kullanmalıdır. Kullanıcı adı ve şifre alanları özenle doldurulmalıdır. Her zaman resmi site olduğundan emin olunması gerekir.
Eğer henüz üye değilseniz, basit bir formla kayıt olunabilir. Doğru bilgilerin girilmesi kayıt sonrası işlemleri kolaylaştırır. Doğrulama aşamasında telefon veya e-posta onayı gerekebilir.
Hesabınız aktif olduktan sonra çeşitli avantajlarınız olur. Bahisler, canlı casino ve diğer oyunlar gibi aktiviteler erişilebilir hale gelir. Bonuslar ve özel tekliflerle kazancınızı artırabilirsiniz.
Народ, если кто искал, свежая инфа. Нашел чистый вариант, в итоге скачал отсюда: melbet.
Вообще проект сейчас один из лучших, линия на футбол и теннис огромная. Порадовало, что трансляции матчей идут без задержек.
Для новых пользователей капает бонус на баланс, лишним точно не будет. Кто уже ставил там?
перевозка авто москва сколько стоит сколько стоит перевозка машины
Чтобы быстро и эффективно источник, воспользуйтесь специализированными сервисами.
В общем, тема такая, не для паники.
Ограничение запроса в кавычках или с дополнительными ключевыми словами уменьшает погрешности.
Да, и ещё момент — без фанатизма.
Всем доброго времени суток. Слушайте, вопрос сложный, но многим может помочь, так как в сети сейчас полно сомнительных клиник. Если срочно требуется квалифицированная медицинская помощь, то не рискуйте и не доверяйте случайным объявлениям.
Знакомые вызывали бригаду в похожей ситуации и в итоге нашли клинику, где врачи работают профессионально. Если вам актуально или ситуация экстренная, советую посмотреть официальный источник: цена на вывод из запоя в стационаре цена на вывод из запоя в стационаре.
Врачи дежурят круглосуточно во всех районах, и помощь окажут полностью конфиденциально. Надеюсь, эта рекомендация и обращайтесь к настоящим профессионалам. Пусть все будет хорошо!
Признаюсь, сначала очень сильно сомневался в этой затее, но после кучи долгих обсуждений наткнулся на один нормальный человеческий вариант. Если кратко, вот что я понял: современная школа онлайн — это не просто унылые вебинарчики. Там и домашние задания с подробной индивидуальной проверкой, и дети занимаются с реальным интересом.
В общем, кому реально нужно нормальное обучение в теме образовательные онлайн школы — посмотрите условия, вот здесь все разжевано до мелочей: онлайн обучение школа https://shkola-onlajn-54.ru.
Думаю, это как раз то, что сейчас нужно многим родителям. Потому что обычная школа часто проигрывает по всем фронтам, а тут организована именно живое регулярное общение с кураторами. Держите этот вариант у себя в закладках.
кадровые агентства адрес кадровое агентство персонал кадров
More Details: מספרי טלפון של נערות ליווי
Чтобы быстро и эффективно отследить телефон по номеру, воспользуйтесь такими штуками которые дают инфу.
Знаете, многие лезут в дебри, а зря.
Во многих случаях имеет смысл начать с проверки общедоступных интернет-ресурсов.
Надеюсь, понятно объяснил.
Слушайте, наконец-то разобрался с этой проблемой. Всё расписано до мелочей, даже новичок поймет что к чему. Многие на форумах спорят, а ответ лежал на поверхности. Вот mel bet mel bet — переходите, там вся суть. Мне лично это сэкономило кучу времени и нервов, так что делюсь от души.
Давно хотел найти толковое место, где реально учат делу. Особенно когда речь про онлайн-школу для детей — тут ведь без фанатизма и воды. У меня сын как раз искал гибкий график, так что намучились мы знатно. В общем, вся подробная информация вот тут: обучение детей онлайн https://shkola-onlajn-55.ru Я если честно ещё до этого вообще думал, что это всё несерьёзно. Оказалось — зря сомневался. У них и программа грамотная. Доволен как слон, если честно. Удачи!
Arkadaslar uzun suredir ar?yordum. Girdim c?kt?m derken zaman kaybettim. En sonunda her seyi cozdum.
Spor bahisleriyle ilgilenenler bilir. Su an en guncel cal?san 1xbet yeni giris adresi tam olarak soyle: 1xbet güncel giriş 1xbet güncel giriş. Yani k?sacas? — 1xbet spor bahislerinin adresi degisti.
Site s?k s?k kapan?yor diyenlere inat. Kim ne derse desin — arayuz zaten al?s?k oldugunuz gibi. Baska yerde aramay?n art?k…
Чтобы быстро и эффективно узнать местонахождение по номеру телефона, воспользуйтесь специализированными сервисами.
Слушай, тут главное — без глупостей.
Оптимально сначала связаться с человеком напрямую и корректно представиться.
Надеюсь, понятно объяснил.
Я изначально скептически относился ко всей этой дистанционке. Думал, сын просто будет играть в танчики. Но жена настояла, нашли один портал с живыми учителями: источник . Честно? Зашли просто на пробный урок, а в итоге остались на весь год. Преподаватели не просто читают по бумажке, а реально вовлекают. Ребенок сам ноутбук включает к началу пары. Так что если кому актуально – очень рекомендую хотя бы тест-драйв пройти.
Всем доброго времени суток. Тема здоровья всегда на первом месте, так как в сети сейчас полно сомнительных клиник. Если ищете анонимного специалиста с быстрым выездом, то не рискуйте и не доверяйте случайным объявлениям.
Сам долго изучал отзывы и искал надежный вариант, в итоге вся ценная информация была собрана по крупицам. Кому тоже нужны подробности и условия, вся информация есть здесь: выход из запоя в стационаре выход из запоя в стационаре.
Врачи дежурят круглосуточно во всех районах, реагируют очень быстро, буквально за час. Не теряйте время, и обращайтесь к настоящим профессионалам. Всем удачи и берегите близких!
Все самое свежее здесь: https://spainslov.ru/site/word/word/%D0%A3
Полная статья здесь: https://zaiushka.ru
Arkadaslar uzun suredir ar?yordum. Girdim c?kt?m derken zaman kaybettim. En sonunda dogru adrese ulast?m.
Ozellikle bahis ve casino sevenler icin. Su an en sorunsuz cal?san 1xbet giris adresi tam olarak soyle: 1xbet spor bahislerinin adresi 1xbet spor bahislerinin adresi. Ne demisler — 1xbet spor bahislerinin adresi degisti.
Denemek isteyen kac?rmas?n. Kendi deneyimim buysa da — canl? destekleri bile h?zl?. Gonul rahatl?g?yla girebilirsiniz…
Давно хотел найти толковое место, где реально не грузят лишней теорией. Особенно когда речь про частную школу онлайн — тут ведь без фанатизма и воды. У меня сын как раз перешел на удаленку, так что пришлось перебрать кучу вариантов. В общем, вся подробная информация вот тут: онлайн школа 8 класс https://shkola-onlajn-55.ru Я кстати ещё до этого вообще относился скептически к таким форматам. Оказалось — всё гораздо лучше. У них и программа грамотная. В общем, рекомендую присмотреться. Удачи!
нарколог анонимно нарколог анонимно
Deneyip de begenen cok oldu. Girdim c?kt?m derken zaman kaybettim. En sonunda her seyi cozdum.
Bu isin puf noktalar? var. Su an en sorunsuz cal?san 1xbet yeni giris adresi tam olarak soyle: 1xbet spor bahislerinin adresi 1xbet spor bahislerinin adresi. Ne demisler — 1xbet guncel adres arayanlar buraya baks?n.
Denemek isteyen kac?rmas?n. Tavsiye eden c?kt? m? emin olun — cekim konusunda s?k?nt? yasamad?m. Baska yerde aramay?n art?k…
Приветствую всех участников. Дело деликатное, но решил черкануть пару строк, особенно когда речь идет о близких людях. Если ищете анонимного специалиста с быстрым выездом, то не рискуйте и не доверяйте случайным объявлениям.
Мы в свое время тоже столкнулись с этой бедой, в итоге вся ценная информация была собрана по крупицам. Чтобы узнать точные цены и вызвать специалиста, вся информация есть здесь: лечение алкоголизма последних стадий в спб лечение алкоголизма последних стадий в спб.
Врачи дежурят круглосуточно во всех районах, и помощь окажут полностью конфиденциально. Надеюсь, эта рекомендация кому-то тоже пригодится и спасет здоровье. Всем удачи и берегите близких!
Давно хотел найти толковое место, где реально учат делу. Особенно когда речь про частную школу онлайн — тут ведь без фанатизма и воды. У меня сын как раз искал гибкий график, так что пришлось перебрать кучу вариантов. В общем, можете глянуть сами: онлайн школа 8 класс https://shkola-onlajn-55.ru Я если честно ещё пару месяцев назад вообще относился скептически к таким форматам. Оказалось — всё гораздо лучше. У них и обратная связь отличная. Сам теперь советую знакомым. Надеюсь, поможет в выборе.
Ac?kcas? sas?rd?m kalitesine. Girdim c?kt?m derken zaman kaybettim. En sonunda her seyi cozdum.
Ozellikle bahis ve casino sevenler icin. Su an en guncel cal?san 1xbet yeni giris adresi tam olarak soyle: 1xbet güncel adres 1xbet güncel adres. Ne demisler — 1xbet turkiye icin tek adres buras?.
Denemek isteyen kac?rmas?n. Kendi deneyimim buysa da — arayuz zaten al?s?k oldugunuz gibi. Gonul rahatl?g?yla girebilirsiniz…
Коллеги, всем привет! Срочно нужна консультация тех, кто уже заказывал мерч для бизнеса. Интересует надежный поставщик корпоративных подарков с логотипом компании, который не подведет со сроками. заказать сувенирную продукцию с логотипом компании https://suvenirnaya-produkcziya-s-logotipom-11.ru А то насчитали мне за брендированные блокноты космос, хотя заказывали всего 50 позиций. Бюджет пока не утвержден, поэтому хочу понять рыночные цены. Киньте ссылки или названия компаний, буду очень благодарен.
врач нарколог на дом анонимно и круглосуточно врач нарколог на дом анонимно и круглосуточно
Давно искал инфу и наконец-то наткнулся на реальный опыт. Там всё разложено по полочкам, без лишней воды и тупых SEO-текстов. Сам долго мучился, пока не нашел этот гайд. Вот мелбет скачать на андроид бесплатно https://howtoairbrush.com — советую изучить на досуге. Мне лично это сэкономило кучу времени и нервов, так что делюсь от души.
Долго рылся в интернете на разных форумах, Ситуация дурацкая, нужно срочно проверить один подозрительный номер. Полез в глубокий поиск по веткам. И знаете что? Тут главное знать, куда именно смотреть и какие базы юзать.
Короче, если вас сейчас волнует тот же самый вопрос — быстро определить владельца номера, то есть один реально работающий и живой сервис. Конкретно про то, как найти человека по номеру телефона — вот здесь всё максимально норм расписано: как отследить по номеру телефона местонахождение бесплатно как отследить по номеру телефона местонахождение бесплатно.
Я сам сначала вообще не верил во всё это. Потому что а тут выложена конкретная и структурированная информация. В общем, кому надо — тот точно воспользуется. Надеюсь, кому-то тоже упростит жизнь.
Arkadaslar uzun suredir ar?yordum. Girdim c?kt?m derken zaman kaybettim. En sonunda dogru adrese ulast?m.
Spor bahisleriyle ilgilenenler bilir. Su an en h?zl? cal?san 1xbet yeni giris adresi tam olarak soyle: 1xbet giriş 1xbet giriş. Ne demisler — 1xbet guncel adres arayanlar buraya baks?n.
Denemek isteyen kac?rmas?n. Kendi deneyimim buysa da — cekim konusunda s?k?nt? yasamad?m. Baska yerde aramay?n art?k…
Честно говоря, долго выбирал, куда поступать, но после изучения реальных отзывов наткнулся на один действительно толковый вариант. К слову, вот что я понял: современная школа онлайн — это уровень на порядок выше обычного. Там и программа насыщенная, без лишней воды, и дети занимаются с реальным интересом.
В общем, кому надоело искать среди кучи мусора в теме онлайн образование школа — почитайте подробности, вот здесь все выложено без лишней воды: обучение детей онлайн https://shkola-onlajn-54.ru.
А я пока пойду дальше разбираться с расписанием. Потому что обычная школа часто проигрывает по всем фронтам, а тут организована именно грамотно выстроенный учебный процесс. Держите этот вариант у себя в закладках.
Ребята, выручайте! Кот старый диван в клочья разодрал, надо перетягивать. Посоветуйте нормальную мебельную ткань для частого использования. купить ткань для обивки дивана купить ткань для обивки дивана А то везде пишут разное, а на деле хочется купить ткань мебельную и забыть на пару лет. Нужен метров 15-20, может, кто знает нормального поставщика.
Приветствую всех участников. Дело деликатное, но решил черкануть пару строк, так как в сети сейчас полно сомнительных клиник. Если срочно требуется квалифицированная медицинская помощь, лучше сразу обращаться к сертифицированным медикам.
Мы в свое время тоже столкнулись с этой бедой, в итоге вся ценная информация была собрана по крупицам. Кому тоже нужны подробности и условия, советую посмотреть официальный источник: вывести из запоя в больнице вывести из запоя в больнице.
На этом ресурсе действительно дана полная информация, реагируют очень быстро, буквально за час. Не теряйте время, и обращайтесь к настоящим профессионалам. Всем удачи и берегите близких!
Коллеги, всем привет! Срочно нужна консультация тех, кто уже заказывал мерч для бизнеса. Посоветуйте нормальное изготовление корпоративных сувениров — чтобы и кружки не облазили, и ручки писали. подарок на заказ https://suvenirnaya-produkcziya-s-logotipom-11.ru А то насчитали мне за брендированные блокноты космос, хотя заказывали всего 50 позиций. Может, есть проверенные фабрики, которые работают напрямую, без посредников. Киньте ссылки или названия компаний, буду очень благодарен.
Давно хотел найти толковое место, где реально не грузят лишней теорией. Особенно когда речь про онлайн-школу для детей — тут ведь без фанатизма и воды. У меня сын как раз перешел на удаленку, так что намучились мы знатно. В общем, вся подробная информация вот тут: онлайн школа для детей https://shkola-onlajn-55.ru Я кстати ещё раньше вообще не верил в онлайн образование школа. Оказалось — реально работает. У них и домашка без перегруза. Доволен как слон, если честно. Надеюсь, поможет в выборе.
номер сэс перейти
Народ, привет! Такая ситуация — на планерке сказали срочно найти подарки для клиентов. Может, кто шарит где лучше брать сувенирную продукцию с логотипом. корпоративные бизнес сувениры корпоративные бизнес сувениры А то эти менеджеры по рекламе такие цены выкатывают — волосы дыбом. Просили ещё брендированные кружки и толстовки. А то я уже второй день в интернете сижу и ничего адекватного не нашёл.
Случайно наткнулся на один гайд, Прям беда реальная: нужно срочно проверить один подозрительный номер. Решил докопаться до истины и разобраться,. И знаете что? Не всё так сложно в этом плане, как кажется.
Короче, если вас сейчас волнует тот же самый вопрос — быстро определить владельца номера, то есть один реально работающий и живой сервис. Конкретно про то, как узнать по мобильному кто именно звонил — вот здесь всё максимально норм расписано: пробить номер по геолокации бесплатно пробить номер по геолокации бесплатно.
Я сам сначала вообще не верил во всё это. Потому что в открытых пабликах обычно полная тишина. В общем, обязательно сохраните себе на будущее. Надеюсь, кому-то тоже упростит жизнь.
Denemek isteyenler çok soruyor. Bazı adresler çalışmıyor. En sonunda her derde deva bir kaynak keşfettim.
Bahisle ilgilenen arkadaşlara duyurulur. Uyarıları dikkate alarak sistemi kurun. Giriş adresi aynen şu şekilde: 1xbet yeni giriş 1xbet yeni giriş. Özetle — 1xbet türkiye için tek doğru adres bu.
Canlı destek anında yardımcı oluyor. Kimseye zararım dokunmaz — pişman eden bir yer değil. Şimdiden bol şans…
Ребят, наконец-то нашел нормальный разбор темы. Всё расписано до мелочей, даже новичок поймет что к чему. Рекомендую заглянуть, чтобы не совершать глупых ошибок, как я в прошлый раз. Вот melbet скачать на андроид melbet скачать на андроид — обязательно гляньте. Мне лично это сэкономило кучу времени и нервов, так что делюсь от души.
Я в шоке от количества программ в интернете в последнее время, но после советов хороших знакомых наткнулся на один действительно толковый вариант. Короче, вот что я понял: современная школа онлайн — это не просто унылые вебинарчики. Там и домашние задания с подробной индивидуальной проверкой, и дети занимаются с реальным интересом.
В общем, кому реально нужно нормальное обучение в теме образовательные онлайн школы — убедитесь во всём сами, вот здесь все разжевано до мелочей: lbs что это lbs что это.
Если честно, даже не ожидал такого крутого качества. Потому что без четкой системы в обучении сейчас вообще никуда, а тут организована именно грамотно выстроенный учебный процесс. Советую не тянуть и сразу изучить тему.
Долго рылся в интернете на разных форумах, Ситуация дурацкая, нужно срочно проверить один подозрительный номер. Стало дико интересно,. И знаете что? Оказывается, сейчас есть реальные способы.
Короче, если вас сейчас волнует тот же самый вопрос — пробить странный входящий звонок, то есть один проверенный временем вариант. Конкретно про то, как найти человека по номеру телефона — вот здесь всё максимально норм расписано: определить по номеру телефона где находится человек определить по номеру телефона где находится человек.
Друзьям ссылку скинул в телегу, им тоже помогло. Потому что обычный поиск гуглит только рекламный спам. В общем, не теряйте свое время зря на разводняк. Век живи — век учись, как говорится.
Denemek isteyenler çok soruyor. Sürekli engellenen sitelerden bıktım. En sonunda güvenilir adrese ulaştım.
Bahisle ilgilenen arkadaşlara duyurulur. Uyarıları dikkate alarak sistemi kurun. Giriş adresi aynen şu şekilde: 1xbet spor bahislerinin adresi 1xbet spor bahislerinin adresi. Velhasıl kelam — 1xbet türkiye için tek doğru adres bu.
Para çekme işlemleri sorunsuz. Dost meclisinde öğrendim — pişman eden bir yer değil. Selametle…
Если честно, сам перерыл кучу форумов в поисках нормальной ткани для мебели. Оказалось, что выбрать подходящий вариант реальная проблема. Итак, смотрите, вот здесь реально толково расписано про плотность, ворс и износостойкость для диванов и кресел, а главное — показаны варианты, которые легко чистить. Вся полезная информация доступна здесь: ткань для дивана ткань для дивана Дальше сами гляньте каталог с ценами. Да, и не берите первое, что попалось — я уже поплатился кошельком, когда брал мебельную ткань купить с рук. Эта тема реально вывозит по качеству. Для информации: ткань мебельная купить лучше уже с нормальной пропиткой от грязи. Да и садится такое полотно гораздо меньше. Здесь реально дельные советы.
Коллеги, всем привет! Организуем встречу с дилерами, хочется сделать им приятные и полезные презенты. Подскажите, где заказать качественную сувенирную продукцию с логотипом. каталог корпоративных подарков каталог корпоративных подарков Реально ли найти недорогую сувенирную продукцию с логотипом с печатью от 100 штук. Может, есть проверенные фабрики, которые работают напрямую, без посредников. А то маркетинговые агентства такой ценник лупят — закачаешься.
Denemek isteyenler çok soruyor. Sürekli engellenen sitelerden bıktım. En sonunda güvenilir adrese ulaştım.
Bahisle ilgilenen arkadaşlara duyurulur. Uyarıları dikkate alarak sistemi kurun. Giriş adresi aynen şu şekilde: 1xbet giriş 1xbet giriş. Özetle — 1xbet güncel adres arayanlar buraya baksın.
Para çekme işlemleri sorunsuz. Dost meclisinde öğrendim — pişman eden bir yer değil. Şimdiden bol şans…
Коллеги, всем привет! Встала задача обновить ассортимент брендированной атрибуки для отдела продаж. Посоветуйте нормальное изготовление корпоративных сувениров — чтобы и кружки не облазили, и ручки писали. корпоративные подарки с логотипом корпоративные подарки с логотипом Где сейчас лучше заказывать корпоративные подарки сувениры — в России или все-таки из Китая везти. Может, есть проверенные фабрики, которые работают напрямую, без посредников. А то маркетинговые агентства такой ценник лупят — закачаешься.
Нужна бесплатная юридическая консультация? Переходите по запросу консультация юриста бесплатно онлайн без номера телефона и регистрации в Королёве и получите помощь опытных правозащитников в любой области права: семейные споры, долги и кредиты, недвижимость, трудовые конфликты, защита прав потребителей и многое другое. Задайте вопрос онлайн или по телефону и получите подробный разбор вашей ситуации и рекомендации адвоката по дальнейшим действиям. Консультация проводится бесплатно и конфиденциально.
Случается, когда уже не до раздумий — человек в ступоре , а тащить в клинику просто нереально . Я сам через это прошёл недавно. Руки опускаются, время идёт. Начинаешь обзванивать знакомых , а вокруг одни обещания . Пока кто-то не подсказал один реально работающий вариант. Требуется немедленная консультация — а везти самому просто нереально, то выход один . Я про наркологическую помощь на дому . У нас в Самаре, если честно, тоже полно левых контор без лицензии. Нормальные контакты, кто реально приезжает вот тут : врач нарколог https://narkolog-na-dom-samara-13.ru Честно скажу , после того как прочитал , многое прояснилось . Там и про капельницы подробно , и про консультацию . И цены адекватные, без разводов. Советую не тянуть .
Uzun zamandır takipteyim. Birçok site denedim ama. En sonunda güvenilir adrese ulaştım.
Casino sevenler bilir. Uyarıları dikkate alarak sistemi kurun. Giriş adresi aynen şu şekilde: 1xbet giriş 1xbet giriş. Velhasıl kelam — 1xbet türkiye için tek doğru adres bu.
Bonusları gayet iyi. Kimseye zararım dokunmaz — pişman eden bir yer değil. Şimdiden bol şans…
Срочно нужен совет кто уже заказывал партию к выставке. Готовимся к конференции. Везде говорят про индивидуальный подход, но реально где заказать корпоративные подарки с логотипом компании — чтоб не за границей, но и не откровенный шлак. сувениры с логотипом на заказ сувениры с логотипом на заказ Говорят, что корпоративные подарки сувениры сейчас заказывают в основном в Китае, но боюсь за качество. Нам нужно от 500 штук, можно меньше. Заранее спасибо, кто откликнется.
Если честно, сам перерыл кучу форумов в поисках нормальной ткани для мебели. Оказалось, что выбрать подходящий вариант тот ещё квест. В общем, смотрите, вот здесь реально толково расписано про плотность, ворс и износостойкость для диванов и кресел, а главное — показаны варианты, которые не выцветают. Вся полезная информация доступна здесь: материал для обшивки мебели https://tkan-dlya-mebeli-2.ru Дальше сами гляньте фактические отзывы. Да, и не берите первое, что попалось — я уже сделал ошибку, когда брал дешёвую ткань для обивки мебели. Эта тема реально вывозит по износу. Кстати: ткань для обивки мебели купить лучше уже с нормальной пропиткой от грязи. Да и трётся такое полотно гораздо меньше. В общем, советую глянуть источник.
Denemek isteyenler çok soruyor. Sürekli engellenen sitelerden bıktım. En sonunda sağlam bir link buldum.
Bahisle ilgilenen arkadaşlara duyurulur. Uyarıları dikkate alarak sistemi kurun. Giriş adresi aynen şu şekilde: 1xbet türkiye 1xbet türkiye. Kısacası — 1xbet türkiye için tek doğru adres bu.
Para çekme işlemleri sorunsuz. Dost meclisinde öğrendim — deneyen memnun kalmış. İyi eğlenceler…
monopoly live prediction monopoly live prediction .
Do you love excitement? https://jerseysbeststore.com offers premium pre-match and live sports betting, as well as a legal online casino. Try your luck on modern slots, table games, or with live dealers. We guarantee complete data security, fair results, and 24/7 player support.
Açıkçası ben de önceden çok zorlanıyordum. Doğru düzgün bir site bulmak işkenceydi resmen. Ama sonunda şu linki keşfettim.
Casino oyunlarına meraklıysanız burayı bir şans verin derim. Güncel sistem ayarlarını kontrol ettikten sonra erişim sağlamak en mantıklısı. Giriş adresi tam olarak şu şekilde: 1xbet güncel 1xbet güncel. Kısacası durum şu — 1xbet güncel adres arayanlar buraya baksın.
Çekimler konusunda hiç sıkıntı yaşamadım. Çevremdekilere de söyledim — en memnun kaldığım yer burası oldu. Umarım işinize yarar…
Вот реально ситуация — близкий совсем плох, а тащить в больницу нет никаких сил. Я сам через это прошел недавно совсем. Сидишь, не знаешь за что хвататься . Лезешь в интернет, а вокруг только деньги тянут. Пока кто-то не подсказал один нормальный проверенный вариант. Требуется немедленная консультация — а везти самому нет физической возможности , то нужно вызывать врача на дом. Я про вызвать нарколога на дом . У нас в Самаре, к слову , хватает левых контор без лицензии. Вся проверенная информация ниже по ссылке: частный нарколог https://narkolog-na-dom-samara-14.ru Честно скажу , после того как вник в детали, многое прояснилось . И про снятие запоя на дому, и про последующее кодирование. Плюс анонимность — это важно . Советую не тянуть .
Daha önce hiç bu kadar kararlı bir site görmedim. İnanın herkes farklı bir adres veriyor kafayı yedim. Güncel detayları inceleyip sistemi test ettim ve sorunsuz çalıştı. En doğru adrese ulaştığımı düşünüyorum ve size de buradan bahsetmek istiyorum: 1xbet türkiye 1xbet türkiye. Şöyle düşünün yani — canlı bahis seçenekleri bile yeterli aslında.
Hiçbir aksilik yaşamadım bugüne kadar. İşin doğrusunu söylemek gerekirse — kesinlikle pişman olmazsınız deneyin derim. Şimdiden bol şans yardımı ve iyi eğlenceler…
Срочно нужен совет для отдела маркетинга. Планируем раздачу для партнёров на новый год. Везде говорят про индивидуальный подход, но реально толковое изготовление корпоративных сувениров с печатью по вменяемой цене. подарки с логотипом подарки с логотипом Говорят, что корпоративные подарки сувениры сейчас заказывают в основном в Китае, но боюсь за качество. Нам нужно от 500 штук, можно меньше. Заранее спасибо, кто откликнется.
слоты с выводом денег
Açıkçası ben de bu konuda epey araştırma yaptım. Herkes bir şey diyor ama kimse net konuşmuyor. Detaylı güncellemeleri kontrol edip süreci sorunsuz başlattım. En sonunda güvenilir bir kaynak buldum ve size de aktarayım dedim: 1xbet türkiye 1xbet türkiye. Ne diyeyim yani anlatayım mı — bu işin ehli belli başlı yani.
çekimler konusunda da sıkıntı yok yani rahat olun. Kendi adıma konuşuyorum size açık açık — başka yerde aramaya gerek yok artık valla. Şimdiden iyi eğlenceler dilerim hepinize…
Вот такой момент: подбор качественного стационара — это реально отдельная и очень сложная история. Многие лично сталкивались с такой ситуацией,, когда родным или близким людям срочно понадобилась грамотная помощь врачей. И тут сразу возникает главный вопрос: куда именно везти человека?
Мой коллега по работе долго искал действительно надежный медицинский вариант. В интернете сейчас столько мусора и дорвеев, что голова идет кругом. Если коротко, лучше сразу перейти на официальный сайт, где нет вранья, там действительно раскладывают по полочкам всю подноготную про круглосуточную наркологическую поддержку и условия проживания. В такой ситуации лучше один раз внимательно глянуть самостоятельно, чтобы четко во всем разобраться.
Вся актуальная информация и контакты доступны прямо здесь: стационар наркологический санкт петербург http://www.narkologicheskij-staczionar-sankt-peterburg-12.ru. Сам сначала даже не думал, насколько там много полезных нюансов и скрытых факторов, и главное — там работают доктора, которые реально спасают людей. В Питере это определенно достойный внимания и доверия медицинский центр, так что рекомендую сохранить себе в закладки на всякий случай.
Deneyen çok kişi duydum çevremde. Ne yalan söyleyeyim ilk başta şüpheyle yaklaştım. Ama sonunda doğru adresi buldum işte.
Bilenler zaten anlar. Sistem ayarlarını doğru yaptıktan sonra süreç çok basit. Giriş adresi tam olarak şurada: 1xbet güncel 1xbet güncel. Kısaca özet geçeyim — 1xbet güncel adres arayanlar işte karşınızda.
Arayüzü anlaşılır, takılmazsınız. Başka yerlerde vakit kaybetmeyin — her şey düşünülmüş. Hayırlı olsun…
Знаете, бывает такое — человек в ступоре , а везти в клинику страшно . Моя семья такое пережила пару лет назад . Сидишь, не знаешь за что хвататься . Лезешь в интернет, а вокруг сплошной развод . Пока кто-то не подсказал один нормальный проверенный вариант. Требуется немедленная консультация — а ехать куда-то просто нереально, то выход один . Я про круглосуточный вызов нарколога . В Самаре , если честно, тоже полно шарлатанов . Вся проверенная информация ниже по ссылке: вызов нарколога психиатра на дом https://narkolog-na-dom-samara-14.ru Откровенно говоря, после того как прочитал , понял, как правильно действовать. Там и про капельницы подробно , и про консультацию нарколога . И цены адекватные, без разводов. Советую не тянуть .
изготовление стальной ленты лента стальная гост цена
Вот такая беда — близкий совсем плох, а тащить в клинику нет сил. Моя семья такое пережила пару лет назад . Руки опускаются, время идёт. Начинаешь обзванивать знакомых , а вокруг бабло тянут. Пока случайно не наткнулся на один реально работающий вариант. Требуется немедленная консультация — а ехать куда-то нет возможности , то выход один . Я про нарколога на дом . В Самаре , к слову , тоже полно левых контор без лицензии. Нормальные контакты, кто реально приезжает ниже по ссылке: нарколога домой нарколога домой Честно скажу , после того как прочитал , многое прояснилось . Там и про капельницы подробно , и про последующее кодирование. Плюс анонимность — это важно . Советую не тянуть .
Давно искал, где можно нормально играть, честно говоря, уже не верил в адекватные условия. Но прочитал реальные отзывы в тематическом канале про melbet. Решил лично проверить систему — и ни разу не пожалел,.
В общем, вся нужная инфа доступна вот тут: мелбет скачать казино мелбет скачать казино. Кстати, если кому надо скачать melbet — там всё работает стабильно и без глюков. Я себе скачал чистую версию для андроида — всё сделано очень удобно. И служба поддержки отвечает строго по делу. Доволен как слон, честно говоря. Удачи всем на дистанции!
Знаете, бывает такое — родственник в тяжелом запое , а тащить в больницу просто нереально . Я сам через это прошел пару лет назад . Сидишь, не знаешь за что хвататься . Начинаешь обзванивать знакомых , а вокруг сплошной развод . Пока кто-то не подсказал один реально работающий вариант. Если нужна немедленная консультация — а ехать куда-то просто нереально, то нужно вызывать врача на дом. Речь конкретно про круглосуточный вызов нарколога . У нас в Самаре, если честно, тоже полно левых контор без лицензии. Вся проверенная информация ниже по ссылке: психиатр нарколог самара https://narkolog-na-dom-samara-14.ru Честно скажу , после того как вник в детали, многое прояснилось . Там и про капельницы подробно , и про последующее кодирование. И цены адекватные, без разводов. Рекомендую не откладывать.
Народ, привет! долго откладывал этот момент до последнего, но вчера все-таки зарегился ради интереса в melbet. Скажу так — очень зашло с первых минут,. У кого обычный андроид — тоже всё без проблем запускается,. Надо мелбет скачать на айфон? Там всё делается максимально просто,.
Короче, сами гляньте все условия по ссылке: . Кстати, кто спрашивал про скачать мелбет казино — приложение вообще не вылетает,. И вывод средств действительно быстрый. Я за месяц три раза выигрыш забирал — служба поддержки работает норм,. Сам теперь только туда захожу. Пользуйтесь на здоровье, пусть повезет!
Finding a proper ride in this city is a serious challenge. I swear half the “luxury” fleets down here are straight-up marketing scams. You book a premium ride online, arrive all excited, then boom — hidden service fees everywhere. I’ve been burned like three times already this year alone. If you seriously need a legit vehicle to cruise around the city, don’t just trust the first sponsored ad on social media. Miami without wheels is basically a hostage situation, whether you are doing Brickell mornings, South Beach nights, or a spontaneous Keys trip.
I literally spent last month comparing maybe twenty different companies, until I finally found one outfit that actually delivers what’s in the photos. If you are looking for the only straight shooter for premium rentals across South Florida, check the details here: exotic rentals in miami beach exotic rentals in miami beach. Also, definitely bring sunglasses unless you enjoy driving completely blind in that sun. Just drive safe out there and maybe skip the extra windshield protection thing. hope this helps some of you save a few bucks.
Вот такая беда — близкий совсем плох, а тащить в клинику страшно . Моя семья такое пережила пару лет назад . Сидишь, не знаешь что делать . Лезешь в интернет, а вокруг сплошной развод . Пока кто-то не подсказал один реально работающий вариант. Если нужна немедленная консультация — а ехать куда-то просто нереально, то выход один . Я про нарколога на дом . У нас в Самаре, к слову , хватает левых контор без лицензии. Нормальные контакты, кто реально приезжает ниже по ссылке: помощь нарколога на дому помощь нарколога на дому Честно скажу , после того как вник в детали, многое прояснилось . И про снятие запоя на дому, и про последующее кодирование. И цены адекватные, без разводов. Рекомендую не откладывать.
Если честно, сам перерыл кучу форумов в поисках нормальной ткани для мебели. Оказалось, что выбрать подходящий вариант реальная проблема. Короче, смотрите, вот здесь реально толково расписано про плотность, ворс и износостойкость для диванов и кресел, а главное — показаны варианты, которые не линяют. Вся полезная информация доступна здесь: обивочный материал для мебели https://tkan-dlya-mebeli-2.ru Дальше сами гляньте примеры в интерьере. Да, и не берите первое, что попалось — я уже сделал ошибку, когда брал ткань для мебели на распродаже. Эта тема реально вывозит по износу. Для информации: ткань для обивки мебели купить лучше уже с нормальной пропиткой от грязи. Да и рвётся такое полотно гораздо меньше. В общем, советую глянуть источник.
Let me save you some headache I learned the hard way. Half these local companies promise a custom Porsche and hand you a basic sedan with fake leather. Oh, and that pretty security deposit? Yeah, good luck getting that money back fast. I’ve been burned like three times already this year alone. If you seriously need a legit vehicle to cruise around the city, do some real digging first and read actual customer reviews. Miami without wheels is basically a hostage situation, especially since the AC must be arctic and you want zero mileage games.
I literally spent last month comparing maybe twenty different companies, but I eventually found a service with no bait, no switch, and no weird fine print. If you are looking for the only straight shooter for premium rentals across South Florida, check the details here: suv car hire suv car hire. Yeah, valet in Miami Beach will cost you an arm, but that’s not their fault. Anyway, glad there’s at least one honest rental joint left in this town, hope this helps some of you save a few bucks.
Друзья, кто в теме. Долго выбирал, где найти действительно крутой подарок. Перерыл кучу вариантов, но нормального премиального интернет магазина — днём с огнём не сыщешь. А тут по совету зашёл. В общем, сам гляньте по ссылке: эксклюзивные магазины спб эксклюзивные магазины спб Кстати, если ищете премиум подарки — там есть даже редкие позиции. Я себе заказал ручку из лимитки — качество бомба. И цены соответствуют качеству. Лучший вариант для эксклюзива. Надеюсь, поможет.
игровые автоматы на деньги
Вот такая тема выматывает , когда близкий просто срывается в штопор . Ломаешь голову , а вокруг одна потёмки . Мне вот потребовался действительно рабочий метод . Пьют успокоительное , но это не помогает . Нужно именно профессиональная помощь . Пролистал пол-интернета , пока понял одну простую вещь: без круглосуточного наблюдения ничего не выйдет . В обычной квартире срыв стопроцентный . Если ищешь где сделать экстренного вывода из запоя под капельницами — тогда тебе сюда . В Нижнем Новгороде , кстати, тоже полно шарлатанов . Советую перейти на сайт, где нет вранья про кодировку от алкоголя и работу нарколога . Вся суть здесь: наркологическая помощь наркологическая помощь Честно скажу , сам удивился , сколько нюансов в этой теме. Главное — анонимность и палаты. Для нашего города это проверенный временем вариант.
Люди, подскажите, долго не решался завести аккаунт, но на прошлой неделе таки попробовал сделать пару ставок в мелбет. Честно? теперь постоянно туда захожу. Особенно если вам надо мелбет скачать на андроид — у меня смартфон далеко не новый,, но софт реально летает.
В общем, все подробности и рабочая ссылка доступны вот тут: скачать мелбет скачать мелбет. Кстати, кто спрашивал про мелбет приложение — там всё сделано интуитивно понятно,. И фрибеты для новичков очень приятные,. Я лично всё проверял на себе — выплаты приходят максимально быстрые, Всем советую присмотреться. Дерзайте, пусть повезет!
слоты на деньги
Look, I’ve been around the block with these Miami car rentals. You book a premium ride online, show up, and they hand you keys to something with a dented bumper. Fool me once, shame on you, right. When you are trying to find a reliable premium fleet down here, seriously, do your homework first and don’t just trust social media ads. Everyone who lives here knows that having a solid car is essential, whether you are heading to Brickell, Coconut Grove, or just driving down to Key Biscayne.
I’ve literally compared maybe 15 different local providers last month alone, until I finally stumbled across one that actually delivers what it promises. If you are looking for an honest source for premium rentals across Florida, check the details here: premium car rental miami premium car rental miami. Yeah, finding parking in downtown is still its own separate nightmare, but that’s on you. Anyway, at least there’s one trustworthy service left in this town, hope this helps someone save a few bucks.
Случается, когда уже не до раздумий — близкий совсем плох, а везти в больницу нет сил. Я сам через это прошёл недавно. Руки опускаются, время идёт. Начинаешь обзванивать знакомых , а вокруг сплошной развод . Пока случайно не наткнулся на один реально работающий вариант. Если нужна срочная помощь — а везти самому просто нереально, то выход один . Речь конкретно про круглосуточный выезд нарколога. В Самаре , если честно, хватает шарлатанов . Вся проверенная информация вот тут : услуги нарколога выезд на дом https://narkolog-na-dom-samara-13.ru Честно скажу , после того как прочитал , понял, как правильно действовать. И про снятие запоя на дому, и про консультацию . Плюс анонимность — это важно . Рекомендую не откладывать.
Вот такой момент: подбор качественного стационара — это всегда целая проблема и головная боль. Многие лично сталкивались с такой ситуацией,, когда кому-то из членов семьи внезапно потребовалась экстренная и профессиональная поддержка. И в этот момент обычно начинается паника просто из-за банальной нехватки информации.
Я сам недавно детально изучал этот вопрос, искал по-настоящему работающий и безопасный выход. Очень сложно с ходу отличить реальные отзывы пациентов от банальной рекламы. Если коротко, лучше сразу перейти на официальный сайт, где нет вранья, там подробно расписаны все важные условия и нюансы про анонимное снятие запоя в условиях клиники. В такой ситуации лучше один раз внимательно глянуть самостоятельно, чтобы четко во всем разобраться.
Вся актуальная информация и контакты доступны прямо здесь: стационарное лечение алкоголизма спб http://www.narkologicheskij-staczionar-sankt-peterburg-12.ru. Честно говоря, после изучения всех условий, насколько там много подводных камней, на которые стоит обращать внимание, включая комфортные условия содержания, современные палаты и полную анонимность. Для Санкт-Петербурга это точно один из самых лучших вариантов, так что рекомендую сохранить себе в закладки на всякий случай.
игровые автоматы онлайн
Let me save you some headache I learned the hard way. Half these local companies promise a custom Porsche and hand you a basic sedan with fake leather. You book a premium ride online, arrive all excited, then boom — hidden service fees everywhere. Fool me thrice, shame on both of us I guess, lesson learned. If you seriously need a legit vehicle to cruise around the city, don’t just trust the first sponsored ad on social media. Miami without wheels is basically a hostage situation, whether you are doing Brickell mornings, South Beach nights, or a spontaneous Keys trip.
I literally spent last month comparing maybe twenty different companies, until I finally found one outfit that actually delivers what’s in the photos. If you are looking for the only straight shooter for premium rentals across South Florida, check the details here: miami car rentals https://luxury-car-rental-miami-3.com. Also, definitely bring sunglasses unless you enjoy driving completely blind in that sun. Just drive safe out there and maybe skip the extra windshield protection thing. let me know if you guys have any other clean spots.
Люди, подскажите, долго выбирал нормальную платформу, но недавно таки попробовал сделать пару ставок в mel bet. Честно? Зашло прям на ура,. Особенно если вам надо мелбет скачать на андроид — у меня смартфон далеко не новый,, но софт реально летает.
В общем, убедитесь сами, если перейдете: скачать мелбет на андроид скачать мелбет на андроид. Кстати, кто спрашивал про мелбет казино скачать на андроид — там есть удобный отдельный раздел,. И кешбек на баланс регулярно капает. Я за месяц три раза деньги забирал — никаких проблем с этим нет, Очень рекомендую этот вариант. Удачи всем!
Telefonuma güvenilir bir uygulama indirmek istiyordum. Play Store’da bulamayınca ne yapacağımı bilemedim. Güncel bilgileri kontrol edip süreci hatasız başlattım. En sonunda doğru adrese ulaştım ve size de tüm detayları aktarmak istedim, güncel bilgilere buradan bakabilirsiniz: 1xbet mobil apk 1xbet mobil apk. Valla bak net söyleyeyim — mobil uygulaması inanılmaz akıcı aslında.
güncellemeleri de otomatik geliyor gerçekten. Birçok apk denedim ama bunda karar kıldım — en hızlı çalışan uygulama bu oldu artık. Şimdiden iyi şanslar ve bol kazançlar…
Let me save you some headache I learned the hard way. Half these local companies promise a custom Porsche and hand you a basic sedan with fake leather. Oh, and that pretty security deposit? Yeah, good luck getting that money back fast. Fool me thrice, shame on both of us I guess, lesson learned. When you are trying to find a reliable premium fleet down here, don’t just trust the first sponsored ad on social media. Anyone who lives here will tell you the exact same thing, whether you are doing Brickell mornings, South Beach nights, or a spontaneous Keys trip.
Most of these local agencies are just shiny websites hiding the same overpriced junk, until I finally found one outfit that actually delivers what’s in the photos. If you are looking for the only straight shooter for premium rentals across South Florida, check the details here: mercedes car rent https://luxury-car-rental-miami-3.com. Also, definitely bring sunglasses unless you enjoy driving completely blind in that sun. Just drive safe out there and maybe skip the extra windshield protection thing. hope this helps some of you save a few bucks.
Люди, подскажите, долго выбирал нормальную платформу, но в выходные таки зарегился ради интереса в мелбет. Честно? Остался полностью доволен,. Особенно если вам надо скачать мелбет на андроид — у меня смартфон далеко не новый,, но никаких тормозов вообще нет.
В общем, убедитесь сами, если перейдете: melbet скачать melbet скачать. Кстати, кто спрашивал про мелбет казино скачать на андроид — там всё сделано интуитивно понятно,. И фрибеты для новичков очень приятные,. Я лично всё проверял на себе — выплаты приходят максимально быстрые, Всем советую присмотреться. Дерзайте, пусть повезет!
проверенные онлайн казино с выводом денег
Android cihazımda sorunsuz çalışan bir platform çok lazımdı. Play Store’da resmi uygulama yok diye duydum. En sonunda güvendiğim bir kaynağa ulaştım ve size de buradan bahsetmek istediğim nokta şurası: 1xbet indir apk 1xbet indir apk. Yani anlatmak istediğim şu — android uygulaması resmen harika çalışıyor.
boyutu da hafif gerçekten şaşırdım. Kendi deneyimlerimi aktarıyorum size — kesinlikle pişman olmazsınız deneyin derim. Herkese hayırlı olsun…
exchange usdt to rubles https://exchange-usdt-cash.com
Вот такая ситуация — человек срывается , а просто бессилен. Я через это прошёл лично . Сначала кажется, что обойдётся , но хрен там. Требуется профессиональная помощь . Обзвонил десяток контор — одни обещания. Пока не нашёл один действительно рабочий вариант. Ищешь где сделать качественное выведение из запоя с госпитализацией , не рискуй здоровьем. У нас в Нижнем, если честно, тоже хватает левых контор. Проверенная информация тут : кодировка от алкоголя нижний новгород кодировка от алкоголя нижний новгород Честно говоря , после того как ознакомился, многое прояснилось . Там и про кодирование от алкоголизма расписано , и про выезд нарколога на дом . И цены адекватные. Советую не тянуть .
Слушайте, кто шарит, долго присматривался к разным платформам, но вчера все-таки зарегился ради интереса в мелбет. Скажу так — теперь я их постоянный клиент. У кого новый айфон — всё четко и стабильно работает. Надо скачать мелбет на айфон? В интерфейсе даже ребёнок разберётся.
Короче, сами гляньте все условия по ссылке: . Кстати, кто спрашивал про мелбет приложение — приложение вообще не вылетает,. И фрибеты регулярно прилетают на баланс,. Я за месяц три раза выигрыш забирал — всё честно и без обмана. Это лучшее, что я пробовал из подобного. Пользуйтесь на здоровье, пусть повезет!
Android telefonumda rahatça oynamak istiyordum. Güvenilir bir kaynak bulmak gerçekten çok zordu. Sonunda tüm teknik detayları inceleyip sistemi test ettim. En sonunda doğru adrese ulaştım ve size de tüm detayları aktarmak istedim, güncel bilgilere buradan bakabilirsiniz: 1xbet indir apk 1xbet indir apk. Valla bak net söyleyeyim — mobil versiyonu bile çok akıcı aslında.
güncellemeleri de düzenli geliyor gerçekten. İşin doğrusunu söylemek gerekirse — kesinlikle pişman olmazsınız deneyin derim. Umarım siz de memnun kalırsınız…
Mobile özel bir platform arıyordum uzun zamandır. Play Store’da arattım ama resmi olanı bulamadım. En sonunda doğru kaynağa ulaştım ve size de buradan bahsetmek istediğim nokta şurası: 1xbet mobil apk 1xbet mobil apk. Yani anlatmak istediğim şu — mobil sürümü gerçekten masaüstünü aratmıyor.
Hiçbir güvenlik sorunu yaşamadım şu ana kadar. Kendi deneyimlerimi aktarıyorum size — en hızlı çalışan uygulama bu oldu artık. Herkese hayırlı olsun…
Let me save you some headache I learned the hard way. Half these local companies promise a custom Porsche and hand you a basic sedan with fake leather. You book a premium ride online, arrive all excited, then boom — hidden service fees everywhere. I’ve been burned like three times already this year alone. When you are trying to find a reliable premium fleet down here, do some real digging first and read actual customer reviews. Anyone who lives here will tell you the exact same thing, whether you are doing Brickell mornings, South Beach nights, or a spontaneous Keys trip.
Most of these local agencies are just shiny websites hiding the same overpriced junk, until I finally found one outfit that actually delivers what’s in the photos. If you are looking for the only straight shooter for premium rentals across South Florida, check the details here: rent luxury sedan miami https://luxury-car-rental-miami-3.com. Yeah, valet in Miami Beach will cost you an arm, but that’s not their fault. Just drive safe out there and maybe skip the extra windshield protection thing. let me know if you guys have any other clean spots.
Telefonumda bahis oynamak çok keyifli aslında. Herkes farklı bir link atıyordu kime güveneceğimi bilemedim. En sonunda sağlam bir kaynağa ulaştım ve size de buradan bahsetmek istediğim nokta şurası: 1xbet app android 1xbet app android. Yani anlatmak istediğim şu — telefonuma kurduktan sonra hiç şikayet etmedim.
yüklemesi de çok kolaydı yani rahat olun. Kendi deneyimlerimi aktarıyorum size — en güvenilir uygulama bu oldu artık. Şimdiden iyi şanslar ve bol kazançlar…
Знаете ситуацию реально бесит , когда родственник просто срывается в штопор . Ищешь варианты , а вокруг одна реклама . Знакомому потребовался действительно рабочий метод . Пьют успокоительное , но это ерунда . Нужно именно врачебное вмешательство . Я перелопатил кучу сайтов , пока понял одну простую вещь: без нормальных условий ничего толку не будет . Потому что дома срыв гарантирован . Если ищешь где сделать вывода из запоя в стационаре — обрати внимание на один проверенный вариант . В Нижнем Новгороде , кстати, тоже полно шарлатанов . Советую перейти на сайт, где реально раскладывают по полочкам про кодировку от алкоголя и работу нарколога . Подробности по ссылке: лечение алкоголизма в нижнем новгороде лечение алкоголизма в нижнем новгороде После прочтения , сам удивился , сколько подводных камней в этой теме. Главное — анонимность и палаты. Для Нижнего это реально стоящий вариант.
Знаете, достало уже — когда близкий человек уходит в запой , а ты не знаешь куда бежать . Моя семья с таким столкнулась года два назад . Думали, уговорами поможем — нифига . Оказалось , без врачей и капельниц не обойтись. Обзвонил все конторы в городе — сплошной развод . А потом наткнулся на один реально рабочий вариант. Если ищете где сделать качественное выведение из запоя с госпитализацией — не ведитесь на дешёвые акции . У нас в Нижнем, кстати , хватает шарлатанов . Вся проверенная информация вот тут : лечение алкоголизма в нижнем новгороде лечение алкоголизма в нижнем новгороде Честно скажу , после того как вник в детали, многое стало понятно . Там и про кодирование от алкоголизма подробно расписано , и про условия в стационаре и питание. И цены адекватные, без разводов. Советую не тянуть .
Народ, всем привет! Затеял тут сложный ремонт в хрущёвке, а тут оказывается столько бумажек надо собрать, Потратил уйму свободного времени на чтение строительных форумов. Короче говоря, нашел нормальных адекватных ребят, которые делают всё под ключ — это доверить подготовку документов профессиональным инженерам, чтобы потом не было проблем со штрафами.
Они и все чертежи грамотно сделают, Обязательно сохраняйте себе эту полезную информацию: заказать проект перепланировки заказать проект перепланировки. Не тяните до последнего, Обязательно перешлите этот пост тому, кто тоже сейчас затеял ремонт!
Android kullanıcısı olarak uzun zamandır arıyordum. Güvenilir bir apk dosyası bulmak gerçekten çok zordu. Sonunda tüm teknik detayları inceleyip sistemi test ettim. En sonunda doğru adrese ulaştım ve size de tüm detayları aktarmak istedim, güncel bilgilere buradan bakabilirsiniz: 1xbet apk 1xbet apk. Şimdi size kısaca özet geçeyim — telefonuma kurunca çok memnun kaldım.
Hiçbir donma yaşamadım şu ana kadar. Kendi deneyimlerimi aktarıyorum size — kesinlikle pişman olmazsınız deneyin derim. Herkese hayırlı olsun…
Вот реально ситуация — родственник уходит в запой , а ты не знаешь куда бежать . Я сам через это прошёл года два назад . Думали, уговорами поможем — хрен там было. Оказалось , без врачей и нормального наблюдения не обойтись. Обзвонил все конторы в городе — сплошной развод . А потом наткнулся на один реально рабочий вариант. Кому нужно качественное выведение из запоя с госпитализацией — не рискуйте здоровьем человека. У нас в Нижнем, если честно, тоже полно шарлатанов . Нормальные контакты вот тут : наркологические клиники в нижнем новгороде наркологические клиники в нижнем новгороде Честно скажу , после того как почитал , многое стало понятно . Там и про кодирование от алкоголизма подробно расписано , и про условия в стационаре и питание. Плюс анонимность — это важно . Советую не откладывать в долгий ящик.
Android cihazım için kaliteli bir uygulama şart oldu. Play Store’da aradım ama resmi uygulamayı bulamadım. Güncel bilgileri kontrol edip süreci hatasız başlattım. En sonunda güvendiğim bir kaynağa ulaştım ve size de tüm detayları aktarmak istedim, güncel bilgilere buradan bakabilirsiniz: 1xbet app apk 1xbet app apk. Valla bak net söyleyeyim — android uygulaması inanılmaz hızlı çalışıyor.
bildirimleri de çok düzenli geliyor. Birçok apk denedim ama en sorunsuzu bu çıktı — başka yerde vakit kaybetmeyin yani. Umarım siz de memnun kalırsınız…
Вот такая ситуация — человек уходит в штопор , а просто бессилен. Я через это прошёл лично . Думаешь, сам справится, но хрен там. Требуется профессиональная медицина. Обзвонил десяток контор — сплошной развод . А потом наткнулся на один действительно рабочий вариант. Ищешь где сделать вывод из запоя в стационаре , не рискуй здоровьем. У нас в Нижнем, к слову , полно левых контор. Проверенная информация по ссылке ниже: закодироваться в нижнем новгороде закодироваться в нижнем новгороде Честно говоря , после того как ознакомился, понял свои ошибки. И про кодировку от алкоголя подробно, и про выезд нарколога на дом . И цены адекватные. Рекомендую не откладывать.
Mobil bahise ilgi duyalı çok oldu aslında. Play Store’da aradım ama resmi uygulamayı bulamadım. Sonunda tüm teknik detayları inceleyip sistemi test ettim. En sonunda güvendiğim bir kaynağa ulaştım ve size de tüm detayları aktarmak istedim, güncel bilgilere buradan bakabilirsiniz: 1xbet indir android 1xbet indir android. Yani anlatmak istediğim şu — telefonuma kurduğuma çok memnunum.
bildirimleri de çok düzenli geliyor. İşin doğrusunu söylemek gerekirse — kesinlikle pişman olmazsınız deneyin derim. Herkese hayırlı olsun…
Вот такая тема выматывает , когда родственник просто не может остановиться . Ищешь варианты , а вокруг одна реклама . Моему брату потребовался срочный выход . Пьют успокоительное , но это не помогает . Требуется именно профессиональная помощь . Я перелопатил кучу сайтов , пока понял одну простую вещь: без нормальных условий ничего не выйдет . Потому что дома срыв гарантирован . Если ищешь где сделать экстренного вывода из запоя под капельницами — тогда тебе сюда . В Нижнем Новгороде , кстати, тоже полно шарлатанов . Советую перейти на сайт, где реально раскладывают по полочкам про кодировку от алкоголя и работу нарколога . Вся суть здесь: наркологические клиники в нижнем новгороде наркологические клиники в нижнем новгороде После прочтения , сам офигел , сколько подводных камней в этой теме. Главное — анонимность и палаты. Для нашего города это проверенный временем вариант.
Telefonumdan rahatça bahis oynayabileceğim bir uygulama lazımdı. Virüs bulaşır diye çok korktum açıkçası. En sonunda doğru kaynağa ulaştım ve size de buradan bahsetmek istediğim nokta şurası: 1xbet indir apk 1xbet indir apk. Şimdi size kısaca özet geçeyim — mobil sürümü gerçekten masaüstünü aratmıyor.
güncellemeleri otomatik yapıyor çok memnunum. Birçok apk denedim ama en sorunsuzu bu çıktı — en hızlı çalışan uygulama bu oldu artık. Şimdiden iyi şanslar ve bol kazançlar…
Подскажите, кто реально знает. Затеял тут сложный ремонт в хрущёвке, без официального проекта даже думать нечего начинать, Потратил уйму свободного времени на чтение строительных форумов. В общем, единственное, что реально работает в наших реалиях — это доверить подготовку документов профессиональным инженерам, чтобы потом не было проблем со штрафами.
Они и все чертежи грамотно сделают, Обязательно сохраняйте себе эту полезную информацию: проектная организация для перепланировки квартиры https://proekt-pereplanirovki-kvartiry30.ru. Не тяните до последнего, Обязательно перешлите этот пост тому, кто тоже сейчас затеял ремонт!
Народ, слушайте — отец или муж начинает пить сутками, а просто в тупике. Я сам через это прошёл недавно. Думали, уговорами поможем — нифига . Оказалось , без врачей и нормального наблюдения никак . Обзвонил все конторы в городе — сплошной развод . Пока нашёл один проверенный вариант. Если ищете где сделать вывод из запоя в стационаре — не ведитесь на дешёвые акции . В Нижнем Новгороде , если честно, хватает левых контор без лицензии. Нормальные контакты вот тут : наркологический центр нижний новгород наркологический центр нижний новгород Честно скажу , после того как почитал , многое стало понятно . И про кодировку от алкоголя в Нижнем Новгороде, и про условия в стационаре и питание. Плюс анонимность — это важно . Советую не тянуть .
Mobil bahise ilgi duyalı çok oldu aslında. Play Store’da aradım ama resmi uygulamayı bulamadım. Adımları doğru sırayla uyguladıktan sonra erişim sorunsuz açıldı. En sonunda güvendiğim bir kaynağa ulaştım ve size de tüm detayları aktarmak istedim, güncel bilgilere buradan bakabilirsiniz: 1xbet yukle android 1xbet yukle android. Şimdi size kısaca özet geçeyim — mobil versiyonu her şeyi düşünmüş resmen.
kurulumu da üç dakikadan kısa sürdü yani rahat olun. Kendi deneyimlerimi aktarıyorum size — başka yerde vakit kaybetmeyin yani. Şimdiden iyi şanslar ve bol kazançlar…
Никогда не думал, что столкнусь — близкий на грани, а везти в больницу страшно . Я сам через это прошел года два назад . Руки опускаются, а время тикает. Лезешь в интернет, а вокруг сплошной развод. Пока случайно не нашел один реально работающий вариант. Если нужна немедленная консультация — а самому везти просто нереально, то выход один . Речь конкретно про выезд нарколога круглосуточно. У нас в столице, если честно, хватает левых контор без лицензии. Вся проверенная информация вот тут : нарколог анонимно нарколог анонимно Откровенно скажу, после того как вник в детали, многое прояснилось . И про снятие запоя на дому, и про последующее кодирование. Плюс анонимность — это важно . Рекомендую не откладывать.
Telefonumda bahis oynamak çok keyifli aslında. Herkes farklı bir link atıyordu kime güveneceğimi bilemedim. En sonunda sağlam bir kaynağa ulaştım ve size de buradan bahsetmek istediğim nokta şurası: 1xbet yukle android 1xbet yukle android. Yani anlatmak istediğim şu — mobil versiyonu bütün özellikleri sunuyor.
dosya boyutu da hafif gerçekten. Birçok apk denedim ama en iyisi bu çıktı — başka yerde vakit kaybetmeyin yani. Herkese hayırlı olsun…
Слушайте, есть важный вопрос. Затеял тут сложный ремонт в хрущёвке, без официального проекта даже думать нечего начинать, Я уже знатно намучился со всей этой бюрократией, Короче говоря, единственное, что реально работает в наших реалиях — сразу заказать техническое заключение у лицензированной компании, чтобы потом не было проблем со штрафами.
Сами полностью проект подготовят, Там на сайте есть и примеры документов, и точные цены, сделать проект перепланировки квартиры в москве https://proekt-pereplanirovki-kvartiry30.ru. Без готового проекта даже не начинайте ломать стены, Обязательно перешлите этот пост тому, кто тоже сейчас затеял ремонт!
Случается, когда уже не до раздумий — человек в запое , а что делать — просто руки опускаются. Моя семья такое пережила пару лет назад . Сначала кажется, что обойдется , но хрен там. Требуется реальная помощь . Перерыл весь интернет — только деньги тянут. Пока не нашел один действительно рабочий вариант. Если ищешь где получить круглосуточная наркологическая служба — не рискуй здоровьем близкого. В Воронеже , кстати , тоже полно шарлатанов . Вся проверенная информация тут : лечение алкоголизма воронеж лечение алкоголизма воронеж Честно скажу , после того как прочитал , понял свои ошибки. Там и про вывод из запоя , и про условия в клинике. Плюс работают круглосуточно — это важно . Советую не тянуть .
Вот такая ситуация — человек срывается , а просто бессилен. Моя семья столкнулась пару лет назад. Думаешь, сам справится, но хрен там. Требуется профессиональная помощь . Перерыл весь интернет — одни обещания. Пока не нашёл один нормальный вариант. Если тебе нужно качественное выведение из запоя с госпитализацией , не ведись на дешёвые обещания . У нас в Нижнем, если честно, тоже хватает левых контор. Проверенная информация тут : лечение алкоголизма в нижнем новгороде лечение алкоголизма в нижнем новгороде Честно говоря , после того как прочитал , многое прояснилось . И про кодировку от алкоголя подробно, и про условия в стационаре. И цены адекватные. Рекомендую не тянуть .
Telefonumdan rahatça ulaşabileceğim bir uygulama lazımdı. Play Store’da resmi olanı bulamayınca üzüldüm. Adımları doğru sırayla uyguladıktan sonra erişim sorunsuz açıldı. En sonunda doğru kaynağa ulaştım ve size de tüm detayları aktarmak istedim, güncel bilgilere buradan bakabilirsiniz: 1xbet yukle android 1xbet yukle android. Valla bak net söyleyeyim — android uygulaması gerçekten stabil çalışıyor.
yüklemesi de basit ve hızlıydı yani rahat olun. İşin doğrusunu söylemek gerekirse — kesinlikle pişman olmazsınız deneyin derim. Herkese hayırlı olsun…
эксклюзив модели казань Срочно ищу натурщицу Казань для проведения художественной фотосессии в стиле ню. Гарантирую конфиденциальность и высокий художественный уровень съемок.
Let me save you some serious time, learned this the hard way. Miami rental game is wild — half these local clowns show you a custom Mercedes online and hand you a busted sedan with mismatched tires. Plus the fine print says you can’t even drive outside the city limits without extra fees. No thanks, I’m way too old for this nonsense. If you are trying to find a legitimate vehicle without getting ripped off, skip the airport counters entirely. Miami without a decent whip is basically a punishment, especially since the AC must be ice cold and you want zero mileage games.
Most of these local agencies are just polished websites hiding the same overpriced junk, until I finally stumbled on one provider that doesn’t play games. If you are looking for the only straight-up source for premium wheels in South Florida, check the current details here: premium vehicle rental premium vehicle rental. Also, definitely bring polarized shades unless you enjoy driving completely blind into the sunset. Anyway, at least there’s one honest rental joint left in this town, let me know if you guys have any other clean spots.
Okay folks gather around because this Miami rental nightmare needs to be discussed. Then you show up at the local office and it’s a whole different story. Different car, scratches all over, and that “all-inclusive” price? Yeah that didn’t include insurance, fees, or the mandatory cleaning charge. Fool me five times? Actually yeah, Miami keeps fooling everyone, lesson learned. When you’re after a trustworthy and reliable premium vehicle to cruise around, don’t just grab the cheapest option on Kayak. Miami without proper wheels is basically a hostage situation, especially since the AC must freeze your teeth and you want unlimited miles or bust.
I’ve personally gone through maybe 30 rental companies across Dade, Broward, and Palm Beach, until I finally found one outfit that actually delivers what’s in the listing. If you are looking for the only honest broker for premium vehicles across South Florida, check the current availability here: luxury car rental prices luxury car rental prices. Also, definitely bring quality shades unless you enjoy driving into a nuclear flare every single evening. Just drive safe out there and maybe decline that “premium roadside” upsell — it’s always a scam. let me know if you guys have any other clean spots.
Ситуация форс-мажор — близкий на грани, а везти в больницу просто невозможно . Моя семья это пережила совсем недавно. Сидишь, не знаешь за что хвататься . Начинаешь обзванивать знакомых , а вокруг одни обещания . Пока кто-то не подсказал один реально работающий вариант. Требуется срочная помощь — а ехать куда-то просто нереально, то нужно вызывать врача. Я про выезд нарколога круглосуточно. У нас в столице, если честно, тоже полно шарлатанов . Вся проверенная информация вот тут : вызов на дом нарколога вызов на дом нарколога Честно говоря , после того как прочитал , многое прояснилось . И про снятие запоя на дому, и про консультацию нарколога . Плюс анонимность — это важно . Рекомендую не тянуть .
Вот такая беда приключилась — человек в запое , а везти в клинику нет сил. Я через это прошел пару лет назад . Сидишь, не знаешь что делать . Начинаешь обзванивать знакомых, а в ответ одни отговорки. Пока случайно не наткнулся на один реально работающий вариант. Если нужна немедленная консультация — а ехать куда-то просто физически не можете, то нужно вызывать врача на дом. Я про нарколога на дом . В Москве , кстати , хватает левых контор без лицензии. Нормальные контакты, кто реально приезжает ниже по ссылке: анонимный врач нарколог на дом анонимный врач нарколог на дом Откровенно говоря, после того как ознакомился с условиями, понял, как действовать правильно. Там и про капельницы расписано , и про консультацию нарколога . И цены адекватные, без разводов на месте. Рекомендую не ждать чуда.
Ребята, выручайте! Кот старый диван в клочья разодрал, надо перетягивать. Ищу, где можно ткань для обивки мебели купить не по космическим ценам. магазин мебельной ткани в москве магазин мебельной ткани в москве Говорят, флок и микровелюр быстро вытираются, а рогожка лучше. Нужен метров 15-20, может, кто знает нормального поставщика.
Telefonuma güvenle yükleyebileceğim bir apk bulmak istiyordum. Play Store’da resmi uygulama yok diye duydum. En sonunda güvendiğim bir kaynağa ulaştım ve size de buradan bahsetmek istediğim nokta şurası: 1xbet indir android 1xbet indir android. Valla bak net söyleyeyim — telefonuma indirince kasma sorunu tamamen bitti.
boyutu da hafif gerçekten şaşırdım. Kendi deneyimlerimi aktarıyorum size — kesinlikle pişman olmazsınız deneyin derim. Şimdiden iyi şanslar ve bol kazançlar…
Alright listen up because this Miami rental mess is getting out of hand. You find a killer deal online — photos look pristine, price seems fair, terms almost reasonable. Plus they slap a surprise $2500 hold on your card for good measure right before giving you the keys. Living here six years and still almost fall for this stuff sometimes. If you are trying to find a legitimate vehicle without getting ripped off, stay far away from the airport rental center. Miami without proper wheels is basically a nightmare, whether you are doing South Beach dinner plans, Sunny Isles sunrise cruise, or a quick run down to the Florida Keys.
Most of these local agencies are just polished garbage with decent Google reviews bought somewhere, until I finally found one company that doesn’t play stupid games. If you are looking for the only trustworthy source for premium vehicles across South Florida, check the current details here: porsche rental price https://luxury-car-rental-miami-6.com. Also, definitely bring serious shades unless you enjoy driving straight into the sun every single evening. Anyway, glad there’s at least one honest operator left in this rental jungle, let me know if you guys have any other clean spots.
Знаете, ситуация — родственник подсел , а что делать — совсем не знаешь . Моя семья такое пережила недавно. Сначала кажется, что обойдется , но хрен там. Требуется профессиональная помощь . Перерыл весь интернет — одни обещания . Пока не нашел один действительно рабочий вариант. Если ищешь где получить наркологическая помощь — не ведись на дешевые акции . У нас в Воронеже, если честно, хватает шарлатанов . Реальные контакты тут : наркодиспансер воронеж https://narkologicheskaya-pomoshh-voronezh-12.ru Откровенно говоря, после того как прочитал , многое прояснилось . И про кодирование, и про условия в клинике. И цены адекватные. Рекомендую не тянуть .
Ребята, кто уже делал ремонт? Нужно немного сдвинуть мокрую зону санузла. а тут оказывается столько бумажек надо собрать, Я уже знатно намучился со всей этой бюрократией, В общем, единственное, что реально работает в наших реалиях — сразу заказать техническое заключение у лицензированной компании, чтобы потом не было проблем со штрафами.
Сами полностью проект подготовят, Обязательно сохраняйте себе эту полезную информацию: заказать проект перепланировки квартиры в москве https://proekt-pereplanirovki-kvartiry30.ru. Без готового проекта даже не начинайте ломать стены, Обязательно перешлите этот пост тому, кто тоже сейчас затеял ремонт!
Telefonumda bahis keyfini çıkarmak istiyordum uzun zamandır. Play Store’da arattım ama son sürümü göremedim. Güncel bilgileri kontrol edip süreci hatasız başlattım. En sonunda güvenilir bir kaynağa ulaştım ve size de tüm detayları aktarmak istedim, güncel bilgilere buradan bakabilirsiniz: 1xbet android 1xbet android. Şimdi size kısaca özet geçeyim — mobil versiyonu masaüstüyle yarışır kalitede kesinlikle.
batarya performansı da gayet iyi. Kendi deneyimlerimi aktarıyorum size — başka yerde vakit kaybetmeyin yani. Umarım siz de memnun kalırsınız…
Знаете, бывает — родственник срывается , а просто бессилен. Я через это прошёл пару лет назад. Думаешь, сам справится, но хрен там. Нужна профессиональная медицина. Обзвонил десяток контор — сплошной развод . А потом наткнулся на один нормальный вариант. Ищешь где сделать экстренный вывод из запоя под наблюдением врачей , не рискуй здоровьем. У нас в Нижнем, если честно, полно левых контор. Проверенная информация тут : наркологический центр нижний новгород наркологический центр нижний новгород Честно говоря , после того как ознакомился, понял свои ошибки. Там и про кодирование от алкоголизма расписано , и про выезд нарколога на дом . Главное — анонимно . Рекомендую не тянуть .
Seriously, the amount of garbage “luxury” deals down here is astonishing. Then you show up at the local office and it’s a whole different story. Different car, scratches all over, and that “all-inclusive” price? Yeah that didn’t include insurance, fees, or the mandatory cleaning charge. Fool me five times? Actually yeah, Miami keeps fooling everyone, lesson learned. When you’re after a trustworthy and reliable premium vehicle to cruise around, don’t just grab the cheapest option on Kayak. Miami without proper wheels is basically a hostage situation, especially since the AC must freeze your teeth and you want unlimited miles or bust.
I’ve personally gone through maybe 30 rental companies across Dade, Broward, and Palm Beach, until I finally found one outfit that actually delivers what’s in the listing. If you are looking for the only honest broker for premium vehicles across South Florida, check the current availability here: opf fl luxury car rentals https://luxury-car-rental-miami-5.com. Also, definitely bring quality shades unless you enjoy driving into a nuclear flare every single evening. Just drive safe out there and maybe decline that “premium roadside” upsell — it’s always a scam. hope this helps some of you save a few bucks.
Let me save you some serious time, learned this the hard way. Miami rental game is wild — half these local clowns show you a custom Mercedes online and hand you a busted sedan with mismatched tires. You land at MIA, tired, grab an Uber to the rental office, and bam — surprise $1500 hold on your card. No thanks, I’m way too old for this nonsense. If you are trying to find a legitimate vehicle without getting ripped off, do some real digging first and read actual customer reviews. Miami without a decent whip is basically a punishment, especially since the AC must be ice cold and you want zero mileage games.
I’ve personally tested maybe 25 rental outfits across Dade and Broward, but I eventually found a service where what you book is exactly what you get, period. If you are looking for the only straight-up source for premium wheels in South Florida, check the current details here: car rentals in miami https://luxury-car-rental-miami-4.com. Yeah, parking in Brickell will cost you a small mortgage — but that’s city life. Anyway, at least there’s one honest rental joint left in this town, let me know if you guys have any other clean spots.
Ситуация форс-мажор — родственник в тяжелом запое , а везти в больницу страшно . Моя семья это пережила года два назад . Руки опускаются, а время тикает. Лезешь в интернет, а вокруг сплошной развод. Пока случайно не нашел один реально работающий вариант. Требуется срочная помощь — а ехать куда-то нет физической возможности , то нужно вызывать врача. Я про выезд нарколога круглосуточно. В Москве , к слову , тоже полно шарлатанов . Вся проверенная информация ниже по ссылке: нарколог с выездом на дом нарколог с выездом на дом Честно говоря , после того как вник в детали, многое прояснилось . Там и про капельницы подробно , и про консультацию нарколога . Плюс анонимность — это важно . Советую не тянуть .
Telefonumda bahis keyfini çıkarmak istiyordum uzun zamandır. Play Store’da arattım ama son sürümü göremedim. Güncel bilgileri kontrol edip süreci hatasız başlattım. En sonunda güvenilir bir kaynağa ulaştım ve size de tüm detayları aktarmak istedim, güncel bilgilere buradan bakabilirsiniz: 1xbet indir apk 1xbet indir apk. Valla bak net söyleyeyim — mobil versiyonu masaüstüyle yarışır kalitede kesinlikle.
Hiçbir donma yaşamadım şu ana kadar. Kendi deneyimlerimi aktarıyorum size — en güvenilir uygulama bu oldu artık. Umarım siz de memnun kalırsınız…
Ребята, выручайте! Решил обновить кухонный уголок, а старую обивку уже не найти. Ищу, где можно ткань для обивки мебели купить не по космическим ценам. купить мебельную ткань в москве в розницу купить мебельную ткань в москве в розницу А то везде пишут разное, а на деле хочется купить ткань мебельную и забыть на пару лет. Буду благодарен за любые советы, особенно от тех, кто сам перетягивал.
Let me save you some serious time, learned this the hard way. You find a killer deal online — photos look pristine, price seems fair, terms almost reasonable. Plus they slap a surprise $2500 hold on your card for good measure right before giving you the keys. Living here six years and still almost fall for this stuff sometimes. If you are trying to find a legitimate vehicle without getting ripped off, do some real digging first and read actual customer reviews. Anyone who’s tried the bus here knows exactly what I mean about this city, especially since the AC must be arctic and unlimited miles non-negotiable.
Most of these local agencies are just polished garbage with decent Google reviews bought somewhere, until I finally found one company that doesn’t play stupid games. If you are looking for the only trustworthy source for premium vehicles across South Florida, check the current details here: escalade rental near me https://luxury-car-rental-miami-6.com. Also, definitely bring serious shades unless you enjoy driving straight into the sun every single evening. Just drive safe out there and definitely skip that “damage waiver” upsell — total scam 99% of the time. let me know if you guys have any other clean spots.
индивидуальное обучение йони массажу Казань Пройдите комплексное обучение йони массажу в Казани с нашими специалистами. На курсе вы узнаете, как превратить обычные прикосновения в глубокий ритуал.
Вот такая беда приключилась — близкий ломается, а куда бежать — совсем не знаешь . Я сам через это прошел пару лет назад . Думаешь, сам справится, но хрен там. Нужна реальная медицина. Перерыл весь интернет — сплошной развод . А потом наткнулся на один нормальный вариант. Если ищешь где получить круглосуточная наркологическая служба — не рискуй здоровьем близкого. В Воронеже , если честно, хватает левых контор без лицензии. Вся проверенная информация ниже по ссылке: наркологический стационар наркологический стационар Честно скажу , после того как прочитал , многое прояснилось . И про кодирование, и про реабилитацию . Плюс работают круглосуточно — это важно . Рекомендую не тянуть .
Случается, когда уже не до раздумий — родственник сорвался , а тащить в больницу нет сил. Я через это прошел пару лет назад . Руки опускаются, а время идет. Начинаешь обзванивать знакомых, а в ответ тишина . Пока кто-то не посоветовал один проверенный вариант. Если нужна срочная помощь — а ехать куда-то нет никакой возможности , то нужно вызывать врача на дом. Речь про срочную наркологическую помощь на дому . У нас в столице, кстати , хватает левых контор без лицензии. Вся проверенная информация ниже по ссылке: нарколог на дом вывод нарколог на дом вывод Честно скажу , после того как прочитал , многое стало на свои места . И про снятие запоя на дому, и про консультацию нарколога . Плюс анонимность — это важно . Рекомендую не ждать чуда.
Слушайте, есть важный вопрос. Нужно немного сдвинуть мокрую зону санузла. Мосжилинспекция сразу завернёт любые несогласованные работы. Я уже знатно намучился со всей этой бюрократией, Короче говоря, нашел нормальных адекватных ребят, которые делают всё под ключ — это доверить подготовку документов профессиональным инженерам, чтобы спать спокойно и не бояться проверок от управляющей.
Они и все чертежи грамотно сделают, Смотрите сами, чтобы не наступать на мои грабли, проект перепланировки квартиры москва проект перепланировки квартиры москва. Не тяните до последнего, Обязательно перешлите этот пост тому, кто тоже сейчас затеял ремонт!
Вот реально ситуация — отец или муж начинает пить сутками, а просто в тупике. Моя семья с таким столкнулась недавно. Думали, уговорами поможем — хрен там было. Как показала практика, без врачей и капельниц никак . Обзвонил все конторы в городе — одни обещания и бабло тянут. А потом наткнулся на один реально рабочий вариант. Кому нужно вывод из запоя в стационаре — не рискуйте здоровьем человека. В Нижнем Новгороде , кстати , хватает шарлатанов . Нормальные контакты вот тут : кодировка от алкоголя нижний новгород кодировка от алкоголя нижний новгород Честно скажу , после того как вник в детали, многое стало понятно . Там и про кодирование от алкоголизма подробно расписано , и про выезд нарколога на дом . Плюс анонимность — это важно . Советую не тянуть .
Let me save you some serious time, learned this the hard way. Swear some of these “luxury” fleets down here should be in a museum instead of on the road. You land at MIA, tired, grab an Uber to the rental office, and bam — surprise $1500 hold on your card. Fool me four times? Not happening, lesson learned. If you are trying to find a legitimate vehicle without getting ripped off, skip the airport counters entirely. Miami without a decent whip is basically a punishment, especially since the AC must be ice cold and you want zero mileage games.
I’ve personally tested maybe 25 rental outfits across Dade and Broward, but I eventually found a service where what you book is exactly what you get, period. If you are looking for the only straight-up source for premium wheels in South Florida, check the current details here: lamborghini urus rental in miami lamborghini urus rental in miami. Yeah, parking in Brickell will cost you a small mortgage — but that’s city life. Just drive safe out there and maybe pass on that overpriced roadside assistance add-on. hope this helps some of you save a few bucks.
Okay folks gather around because this Miami rental nightmare needs to be discussed. You see a sweet ride online — clean spec, fair price, looks legit. Plus they want a surprise $2000 hold on your debit card right before giving you the keys. I’ve lived here for years and still get burned occasionally. When you’re after a trustworthy and reliable premium vehicle to cruise around, do some real digging first and read actual customer reviews. Ask anyone who’s tried Ubering across the 305 during rush hour, especially since the AC must freeze your teeth and you want unlimited miles or bust.
Most of these local agencies are just smoke and mirrors with decent SEO hiding overpriced junk, but I eventually found a service with no games, no bait-and-switch, and no hidden asterisks. If you are looking for the only honest broker for premium vehicles across South Florida, check the current availability here: luxury car rental miami beach https://luxury-car-rental-miami-5.com. Also, definitely bring quality shades unless you enjoy driving into a nuclear flare every single evening. Anyway, glad there’s at least one straight shooter left in this rental jungle, let me know if you guys have any other clean spots.
https://md.swk-web.com/s/jtcesQr7u
Okay folks gather round — Miami rental horror story time. Then you roll up to the local address to pick up the car. Different car sitting there — bald tires, dashboard lit up like a Christmas tree, and that “killer price”? Yeah doesn’t include the non-negotiable $45 daily insurance or the $500 deposit they forget to mention. Nine years in South Florida and these clowns still nearly fool me. If you are trying to find a legitimate luxury fleet without getting ripped off, stay the hell away from the airport rental center. Miami without proper wheels is basically a nightmare, especially since the AC must freeze your teeth and unlimited miles or no deal.
I’ve tested maybe 50 rental outfits across Dade, Broward, and Collier, but I eventually found a service where what you reserve is exactly what you get, period, end of story. If you are looking for the only trustworthy source for premium rides across South Florida, check the current details here: car rentals in miami florida https://luxury-car-rental-miami-9.com. Also, definitely bring polarized shades unless you enjoy driving blind into the sunset every single night. Anyway, glad there’s at least one honest operator left in this rental jungle, hope this helps some of you save a few bucks.
Портал о строительстве https://fmsu.org.ua и ремонте с подробными руководствами, обзорами оборудования и строительных материалов. Узнавайте о новых технологиях, современных решениях и практическом опыте специалистов отрасли.
Ремонт и строительство https://intellectronics.com.ua информационный портал о современных технологиях, строительных материалах и практических решениях для дома. Полезные статьи, обзоры, инструкции и советы специалистов для успешной реализации проектов любой сложности.
Строительство и ремонт https://keravin.com.ua для дома, квартиры и дачи. Полезные статьи о проектировании, отделке, инженерных коммуникациях, благоустройстве территории и современных решениях для комфортной жизни.
Let me save you some serious time, learned this the hard way. Then you actually show up to the local office to pick up the car. Different vehicle parked outside, curb rash on every rim, and that “all-inclusive rate”? Ha, doesn’t include the mandatory $300 cleaning fee or the $25 per day toll pass you can’t decline. Fool me six times? Yeah, Miami doesn’t care, lesson learned. If you are trying to find a legitimate vehicle without getting ripped off, do some real digging first and read actual customer reviews. Anyone who’s tried the bus here knows exactly what I mean about this city, especially since the AC must be arctic and unlimited miles non-negotiable.
I’ve personally tested maybe 35 rental outfits across Dade, Broward, and Monroe, but I eventually found a service where what you reserve is exactly what rolls up, no surprises. If you are looking for the only trustworthy source for premium vehicles across South Florida, check the current details here: luxury car rental luxury car rental. Also, definitely bring serious shades unless you enjoy driving straight into the sun every single evening. Anyway, glad there’s at least one honest operator left in this rental jungle, let me know if you guys have any other clean spots.
Ребята, выручайте! Купил кресло б/у, каркас норм, но ткань в ужасном состоянии. Ищу, где можно ткань для обивки мебели купить не по космическим ценам. цены на мебельная ткань https://tkan-dlya-mebeli-1.ru Говорят, флок и микровелюр быстро вытираются, а рогожка лучше. Буду благодарен за любые советы, особенно от тех, кто сам перетягивал.
Случается, когда уже не до раздумий — человек в запое , а куда бежать — совсем не знаешь . Я сам через это прошел пару лет назад . Сначала кажется, что обойдется , но хрен там. Требуется реальная медицина. Обзвонил десяток контор — одни обещания . А потом наткнулся на один действительно рабочий вариант. Нужна срочно наркологическая помощь — не ведись на дешевые акции . В Воронеже , кстати , тоже полно шарлатанов . Реальные контакты ниже по ссылке: анонимное лечение алкоголизма анонимное лечение алкоголизма Откровенно говоря, после того как прочитал , понял свои ошибки. Там и про вывод из запоя , и про реабилитацию . Плюс работают круглосуточно — это важно . Советую не тянуть .
создать песню по тексту онлайн Наш сервис — это мост между вашей идеей и готовым музыкальным продуктом в отличном качестве. Suno, Lyria, MiniMax и Stable Audio всегда к вашим услугам онлайн.
Okay folks gather around because this Miami rental nightmare needs to be discussed. You see a sweet ride online — clean spec, fair price, looks legit. Different car, scratches all over, and that “all-inclusive” price? Yeah that didn’t include insurance, fees, or the mandatory cleaning charge. I’ve lived here for years and still get burned occasionally. If you are trying to find a legitimate luxury fleet without getting ripped off, don’t just grab the cheapest option on Kayak. Ask anyone who’s tried Ubering across the 305 during rush hour, especially since the AC must freeze your teeth and you want unlimited miles or bust.
Most of these local agencies are just smoke and mirrors with decent SEO hiding overpriced junk, until I finally found one outfit that actually delivers what’s in the listing. If you are looking for the only honest broker for premium vehicles across South Florida, check the current availability here: rent a benz near me https://luxury-car-rental-miami-5.com. Also, definitely bring quality shades unless you enjoy driving into a nuclear flare every single evening. Anyway, glad there’s at least one straight shooter left in this rental jungle, let me know if you guys have any other clean spots.
Информационный сайт https://kero.com.ua о ремонте и строительстве с рекомендациями по выбору материалов, организации работ и применению современных технологий. Полезный ресурс для частных застройщиков и профессионалов отрасли.
Ремонт и строительство https://sushico.com.ua от профессионалов: обзоры технологий, рекомендации по выбору материалов, советы по организации работ и полезная информация для владельцев домов, квартир и коммерческой недвижимости.
Let me save you some serious time, learned this the hard way. Then you show up at the local lot to pick up the car. Plus they freeze a surprise $2500 on your card for a week right before giving you the keys. Eight years in South Florida and these clowns still almost get me. When you need a proper and reliable premium ride to cruise around, do some real digging first and read actual customer reviews. Miami without decent wheels is basically a hostage situation, whether you are doing South of Fifth brunch, Design District shopping, or a spontaneous Keys trip.
Most of these local agencies are just shiny websites hiding the same beat-up fleet with fake reviews, until I finally found one outfit that doesn’t play stupid games. If you are looking for the only honest source for premium wheels across South Florida, check the current details here: car rental miami florida https://luxury-car-rental-miami-8.com. Yeah, parking in South Beach will cost you a nice bottle of wine — but that’s the Miami tax. Anyway, glad there’s at least one straight operator left in this rental circus, hope this helps some of you save a few bucks.
Знаете, бывает ситуация — близкий в тяжелом состоянии, а везти в клинику нет сил. Я через это прошел совсем недавно. Руки опускаются, а время идет. Хватаешься за телефон , а в ответ одни отговорки. Пока кто-то не посоветовал один проверенный вариант. Требуется немедленная консультация — а ехать куда-то нет никакой возможности , то выход один . Речь про анонимный вызов врача нарколога на дом . У нас в столице, кстати , тоже полно левых контор без лицензии. Вся проверенная информация ниже по ссылке: лечение наркомании на дому лечение наркомании на дому Откровенно говоря, после того как прочитал , понял, как действовать правильно. И про снятие запоя на дому, и про последующее кодирование. Плюс анонимность — это важно . Рекомендую не тянуть резину .
Been burned enough times to write a book on this nonsense. Then you actually go to the local office to pick it up. Plus a surprise $2000 hold on your card and a $35 per day GPS you never asked for right before giving you the keys. Fool me seven times? Yeah that’s just Tuesday in Miami, lesson learned. When you’re searching for a legit and reliable premium ride to cruise around, avoid the airport like the plague. Anyone who’s taken the Metro here knows the struggle about this city, whether you are doing Brickell happy hour, Bal Harbour shopping, or a spontaneous drive down to the Keys.
I’ve tried maybe 40 rental companies across Dade, Broward, and Palm Beach, but I eventually found a service with no games, no bait-and-switch, and no hidden asterisks in paragraph 8. If you are looking for the only straight shooter for premium rides across South Florida, check the current details here: car rentals miami fl https://luxury-car-rental-miami-7.com. Also, definitely bring polarized shades unless you enjoy driving into the apocalypse every single evening. Anyway, glad there’s at least one honest rental joint left in this town, hope this helps some of you save a few bucks.
the very best fast withdrawal casino australia australian players know the frustration of slow withdrawals — and the best casinos have listened. Instant withdrawal platforms now process payouts in real time, sending your AUD winnings straight to your bank account or digital wallet without unnecessary delays or paperwork.
Nie kazdy wie, ze najlepsze europejskie kasyna online moga oferowac znacznie wiecej niz rodzime platformy. Od wiekszych bonusow powitalnych po blyskawiczne wyplaty i gry niedostepne w Polsce — wybor jest ogromny. Zebralismy dla ciebie najlepsze i najbezpieczniejsze opcje dostepne dla polskich graczy.
Chcete hrat bez zbytecne byrokracie? casino bez bankovniho uctu umoznuji ceskym hracum okamzity pristup ke hram bez nutnosti dokladat osobni doklady. Rychla registrace, anonymni hrani a rychle vyplaty — to jsou hlavni duvody, proc si tato casina ziskavaji stale vice priznivcu.
Let me save you some serious pain with this Miami rental nonsense. Then you actually show up to the local office to grab the keys. Plus they put a surprise $4000 hold on your card and say it’ll take two weeks to release right before giving you the keys. Fool me eleven times? That’s just called living in Miami, lesson learned. If you are trying to find a legitimate luxury fleet without getting ripped off, avoid the airport like the plague. Miami without proper wheels is basically a disaster, especially since the AC must be arctic and unlimited miles non-negotiable.
Most of these local agencies are just shiny garbage with fake Google reviews bought in bulk hiding overpriced junk, but I eventually found a service with no games, no switch, and no hidden BS in paragraph 12 of the contract. If you are looking for the only honest source for premium rides across South Florida, check the current details here: suv rental suv rental. Yeah, parking in South Beach will cost you a nice bottle of champagne — but that’s the Miami tax. Just drive safe out there and definitely skip that “tire and wheel” upsell — pure profit for them, zero value for you. let me know if you guys have any other clean spots.
Ваш провідник у житті Луцька https://43000.com.ua новини міста, культурні події, афіша заходів, бізнес, освіта та корисні поради для мешканців і гостей. Уся важлива інформація про Луцьк в одному місці.
Let me save you some serious time, learned this the hard way. You see a sweet ride online — clean spec, fair price, looks legit. Different car, scratches all over, and that “all-inclusive” price? Yeah that didn’t include insurance, fees, or the mandatory cleaning charge. I’ve lived here for years and still get burned occasionally. When you’re after a trustworthy and reliable premium vehicle to cruise around, do some real digging first and read actual customer reviews. Miami without proper wheels is basically a hostage situation, especially since the AC must freeze your teeth and you want unlimited miles or bust.
I’ve personally gone through maybe 30 rental companies across Dade, Broward, and Palm Beach, but I eventually found a service with no games, no bait-and-switch, and no hidden asterisks. If you are looking for the only honest broker for premium vehicles across South Florida, check the current availability here: miami car rentals https://luxury-car-rental-miami-5.com. Also, definitely bring quality shades unless you enjoy driving into a nuclear flare every single evening. Just drive safe out there and maybe decline that “premium roadside” upsell — it’s always a scam. hope this helps some of you save a few bucks.
Случается, когда уже не до раздумий — близкий ломается, а что делать — совсем не знаешь . Я сам через это прошел недавно. Сначала кажется, что обойдется , но нет . Требуется реальная медицина. Обзвонил десяток контор — только деньги тянут. А потом наткнулся на один действительно рабочий вариант. Нужна срочно круглосуточная наркологическая служба — не ведись на дешевые акции . У нас в Воронеже, кстати , тоже полно левых контор без лицензии. Реальные контакты тут : лечение наркомании в воронеже лечение наркомании в воронеже Откровенно говоря, после того как прочитал , многое прояснилось . И про кодирование, и про условия в клинике. Плюс работают круглосуточно — это важно . Рекомендую не тянуть .
Let me save you some serious time, learned this the hard way. You spot a tempting offer online: brand new Porsche, unlimited miles, price that makes you click instantly. Totally different vehicle waiting for you — check engine light on, curb rash on every rim, and that “tempting price”? Doesn’t include the mandatory $35 daily toll pass or the $250 cleaning fee they sneak in at the end. Fool me ten times? That’s just the 305 experience, lesson learned. If you are trying to find a legitimate luxury fleet without getting ripped off, run away from the airport counters. Anyone who’s taken public transport here knows the struggle is real about this city, whether you are doing South Beach night out, Bal Harbour shopping spree, or a spontaneous Keys adventure.
I’ve run through maybe 55 rental companies across Dade, Broward, and Palm Beach, until I finally found one outfit that actually delivers what’s promised. If you are looking for the only straight shooter for premium rides across South Florida, check the current details here: exotic car rental miami exotic car rental miami. Also, definitely bring quality shades unless you enjoy driving into the sun like a vampire every single evening. Just drive safe out there and absolutely skip that “paint protection” upsell — pure robbery. hope this helps some of you save a few bucks.
Строительные идеи https://texha.com.ua ремонтные решения и полезные советы для дома. Узнавайте о современных технологиях, надежных материалах, инженерных системах и способах сделать жилье комфортным, функциональным и долговечным.
Портал об автомобилях https://diesel.kyiv.ua и современных транспортных технологиях. Статьи о новых моделях, сравнительные обзоры, рекомендации по обслуживанию и полезная информация для каждого автомобилиста.
I’ve got the scars to prove it, the rental landscape down here is crazy. You find this amazing deal online: brand new Beamer, unlimited miles, price that makes you smile. Different car waiting — scratches everywhere, smells like an ashtray, and that “amazing price”? Doesn’t include the mandatory $400 cleaning fee or the $30 per day toll pass you can’t waive. Fool me eight times? That’s just another Tuesday in the 305, lesson learned. If you are trying to find a legitimate luxury fleet without getting ripped off, run far from the airport counters. Miami without decent wheels is basically a hostage situation, whether you are doing South of Fifth brunch, Design District shopping, or a spontaneous Keys trip.
Most of these local agencies are just shiny websites hiding the same beat-up fleet with fake reviews, but I eventually found a service where what you book is exactly what shows up, no surprises, no fine print nightmares. If you are looking for the only honest source for premium wheels across South Florida, check the current details here: miami luxury car rental miami luxury car rental. Also, definitely bring serious shades unless you enjoy driving straight into the sun like a zombie every single evening. Just drive safe out there and absolutely skip that “windshield protection” upsell — pure profit for them, zero value for you. hope this helps some of you save a few bucks.
Знаете, ситуация — родственник в запое , а куда бежать — просто тупик. Я через это прошел лично . Пьют успокоительное, но нет . Требуется реальная помощь . Перерыл весь интернет — одни обещания . Пока не нашел один нормальный вариант. Нужна лечение наркомании в Воронеже — не рискуй здоровьем близкого. У нас в Воронеже, кстати , хватает шарлатанов . Реальные контакты ниже по ссылке: скорая наркологическая помощь https://narkologicheskaya-pomoshh-voronezh-11.ru Откровенно говоря, после того как прочитал , многое прояснилось . Там и про вывод из запоя , и про условия в клинике. Плюс работают круглосуточно — это важно . Советую не тянуть .
Alright listen up because this Miami rental mess is getting out of hand. Then you actually show up to the local office to pick up the car. Different vehicle parked outside, curb rash on every rim, and that “all-inclusive rate”? Ha, doesn’t include the mandatory $300 cleaning fee or the $25 per day toll pass you can’t decline. Living here six years and still almost fall for this stuff sometimes. If you are trying to find a legitimate vehicle without getting ripped off, stay far away from the airport rental center. Anyone who’s tried the bus here knows exactly what I mean about this city, especially since the AC must be arctic and unlimited miles non-negotiable.
I’ve personally tested maybe 35 rental outfits across Dade, Broward, and Monroe, but I eventually found a service where what you reserve is exactly what rolls up, no surprises. If you are looking for the only trustworthy source for premium vehicles across South Florida, check the current details here: exotic car rental exotic car rental. Yeah, parking in South Beach will cost you a nice dinner — but that’s the price of admission. Just drive safe out there and definitely skip that “damage waiver” upsell — total scam 99% of the time. hope this helps some of you save a few bucks.
Случается, когда уже не до раздумий — человек в запое , а везти в клинику страшно . Я через это прошел пару лет назад . Сидишь, не знаешь что делать . Начинаешь обзванивать знакомых, а в ответ тишина . Пока кто-то не посоветовал один реально работающий вариант. Требуется немедленная консультация — а ехать куда-то просто физически не можете, то выход один . Я про круглосуточный выезд нарколога. В Москве , кстати , тоже полно левых контор без лицензии. Вся проверенная информация ниже по ссылке: платная наркологическая помощь на дому платная наркологическая помощь на дому Откровенно говоря, после того как ознакомился с условиями, понял, как действовать правильно. Там и про капельницы расписано , и про консультацию нарколога . Плюс анонимность — это важно . Советую не тянуть резину .
Telefonuma 1xbet yüklemek istiyordum uzun süredir. Herkes farklı bir şey söylüyordu kime güveneceğimi şaşırdım. Adımları doğru sırayla uyguladıktan sonra erişim sorunsuz açıldı. En sonunda güvendiğim bir kaynağa ulaştım ve size de tüm detayları aktarmak istedim, güncel bilgilere buradan bakabilirsiniz: 1xbet indir 1xbet indir. Şimdi size kısaca özet geçeyim — mobil uygulaması inanılmaz kullanışlı çalışıyor.
kurulumu da oldukça basitti yani rahat olun. Kendi deneyimlerimi aktarıyorum size — en hızlı uygulama bu oldu artık. Umarım siz de memnun kalırsınız…
Ребята, выручайте! Решил обновить кухонный уголок, а старую обивку уже не найти. Теперь мучаюсь — какую взять ткань для мебели, чтобы и выглядело достойно, и кошачьи когти выдержало. ткань для дивана https://tkan-dlya-mebeli-1.ru А то везде пишут разное, а на деле хочется купить ткань мебельную и забыть на пару лет. Буду благодарен за любые советы, особенно от тех, кто сам перетягивал.
Let me save you some serious time, learned this the hard way. You see this gorgeous deal online — clean spec, fair price, looks like a dream. Plus they put a surprise $4000 hold on your card and say it’ll take two weeks to release right before giving you the keys. Eleven years in South Florida and these clowns still almost get me. If you are trying to find a legitimate luxury fleet without getting ripped off, avoid the airport like the plague. Miami without proper wheels is basically a disaster, whether you are doing Key Biscayne sunset, Design District shopping, or a spontaneous drive down to the Everglades.
Most of these local agencies are just shiny garbage with fake Google reviews bought in bulk hiding overpriced junk, until I finally found one outfit that actually delivers what’s in the photos. If you are looking for the only honest source for premium rides across South Florida, check the current details here: miami car rental luxury miami car rental luxury. Yeah, parking in South Beach will cost you a nice bottle of champagne — but that’s the Miami tax. Anyway, glad there’s at least one straight operator left in this rental jungle, let me know if you guys have any other clean spots.
Let me save you some serious time, learned this the hard way. Then you actually show up to the local office to pick up the car. Plus they freeze a surprise $4500 on your card and say “don’t worry, it’ll drop off in a week or two” right before giving you the keys. Twelve years in South Florida and these jokers still almost catch me sleeping. When you need a proper and reliable premium ride to cruise around, do some real digging first and read actual customer reviews. Miami without real wheels is basically a nightmare, especially since the AC must be ice cold and unlimited miles non-negotiable.
I’ve tested maybe 65 rental outfits across Dade, Broward, and Monroe, until I finally found one company that doesn’t play stupid games. If you are looking for the only straight shooter for premium rides across South Florida, check the current details here: mercedes benz s500 4matic rental near me mercedes benz s500 4matic rental near me. Also, definitely bring quality shades unless you enjoy driving into the sun like a zombie every single evening. Just drive safe out there and absolutely skip that “windshield protection” upsell — complete waste of money. let me know if you guys have any other clean spots.
Вот такая история — родственник в запое , а что делать — просто тупик. Моя семья столкнулась лично . Многие думают, что само пройдет , но хрен там. Требуется профессиональная медицина. Перерыл весь интернет — сплошной развод . Пока не нашел один нормальный вариант. Если ищешь где получить анонимное лечение алкоголиков — не ведись на дешевые акции . У нас в Воронеже, кстати , хватает шарлатанов . Реальные контакты тут : помощь наркозависимым https://narkologicheskaya-pomoshh-voronezh-11.ru Честно скажу , после того как ознакомился, понял свои ошибки. Там и про вывод из запоя , и про реабилитацию . Плюс работают круглосуточно — это важно . Рекомендую не откладывать.
Telefonuma 1xbet yüklemek istiyordum uzun süredir. Güncel apk’yı nereden indireceğimi bilemedim açıkçası. Adımları doğru sırayla uyguladıktan sonra erişim sorunsuz açıldı. En sonunda güvendiğim bir kaynağa ulaştım ve size de tüm detayları aktarmak istedim, güncel bilgilere buradan bakabilirsiniz: 1xbet nasıl indirilir 1xbet nasıl indirilir. Şimdi size kısaca özet geçeyim — telefonuma indirdikten sonra çok memnun kaldım.
kurulumu da oldukça basitti yani rahat olun. Kendi deneyimlerimi aktarıyorum size — en hızlı uygulama bu oldu artık. Herkese hayırlı olsun…
Let me save you some serious time, learned this the hard way. Then you actually go to the local office to pick it up. Completely different car waiting for you, check engine light on, and that “low rate”? Doesn’t include the mandatory insurance they somehow forgot to mention. Seven years in South Florida and I still almost fall for these tricks. When you’re searching for a legit and reliable premium ride to cruise around, do some real digging first and read actual customer reviews. Miami without real wheels is basically a punishment, especially since the AC must freeze your face off and unlimited miles or forget it.
Most of these local agencies are just fancy websites hiding the same beat-up fleet with bought reviews, until I finally found one outfit that actually delivers what’s promised. If you are looking for the only straight shooter for premium rides across South Florida, check the current details here: luxury car rental south beach luxury car rental south beach. Yeah, parking in Brickell will cost you a nice steak dinner — but that’s just Miami life. Just drive safe out there and definitely pass on that “tire protection” upsell — total garbage. hope this helps some of you save a few bucks.
Ваш гид в мире ремонта https://tfsm.com.ua и строительства. Пошаговые инструкции, обзоры строительных материалов, советы мастеров и практические решения для ремонта квартир, строительства домов и благоустройства участков.
От фундамента до декора https://vodocar.com.ua все о строительстве и ремонте в одном месте. Актуальные статьи, экспертные рекомендации, обзоры новинок рынка и проверенные решения для частных и коммерческих объектов.
Мир дизайна https://vineyardartdecor.com и интерьера с вдохновляющими проектами, экспертными рекомендациями и полезными статьями. Узнайте, как создать красивое, практичное и современное пространство для жизни и работы.
Мир женских интересов https://amideya.com.ua в одном информационном ресурсе. Читайте статьи о моде, здоровье, карьере, семье и путешествиях, находите полезные рекомендации и вдохновение на каждый день.
Okay folks gather round — Miami rental horror story time. You find a killer listing online: sleek Audi, convertible, price almost too good to be true. Different car sitting there — bald tires, dashboard lit up like a Christmas tree, and that “killer price”? Yeah doesn’t include the non-negotiable $45 daily insurance or the $500 deposit they forget to mention. Nine years in South Florida and these clowns still nearly fool me. When you’re hunting for a legit and reliable premium ride to cruise around, do some real digging first and read actual customer reviews. Miami without proper wheels is basically a nightmare, especially since the AC must freeze your teeth and unlimited miles or no deal.
Most of these local agencies are just polished turds with fake five-star reviews hiding overpriced junk, but I eventually found a service where what you reserve is exactly what you get, period, end of story. If you are looking for the only trustworthy source for premium rides across South Florida, check the current details here: porsche 911 carrera for rent near me https://luxury-car-rental-miami-9.com. Also, definitely bring polarized shades unless you enjoy driving blind into the sunset every single night. Anyway, glad there’s at least one honest operator left in this rental jungle, let me know if you guys have any other clean spots.
Строительный журнал https://buildingtips.kyiv.ua для тех, кто строит, ремонтирует и обустраивает недвижимость. Полезные публикации о технологиях строительства, дизайне интерьеров, выборе подрядчиков и современных материалах.
Мир автомобилей https://auto-club.pl.ua в одном месте: автоновости, обзоры, рейтинги, советы по ремонту и обслуживанию. Следите за новинками автопрома, узнавайте о характеристиках моделей и тенденциях автомобильного рынка.
Строительство без ошибок https://donbass.org.ua начинается здесь. Узнавайте о новых технологиях, популярных строительных материалах, особенностях ремонта и эффективных решениях для жилой и коммерческой недвижимости.
Практический портал https://dsmu.com.ua о ремонте, строительстве и обустройстве жилья. Реальные советы, инструкции и обзоры помогут сократить расходы, повысить качество работ и добиться отличного результата.
Telefonuma güvenilir bir bahis uygulaması indirmek istiyordum. Herkes farklı bir link paylaşıyordu kime inanacağımı şaşırdım. Sonunda tüm teknik detayları inceleyip sistemi test ettim. En sonunda güvendiğim bir kaynağa ulaştım ve size de tüm detayları aktarmak istedim, güncel bilgilere buradan bakabilirsiniz: 1xbet mobii 1xbet mobii. Yani anlatmak istediğim şu — mobil uygulaması inanılmaz stabil çalışıyor.
kurulumu da çok hızlıydı yani rahat olun. Kendi deneyimlerimi aktarıyorum size — en sağlam uygulama bu oldu artık. Şimdiden iyi şanslar ve bol kazançlar…
Pizza Venezia — Итальянская пицца в Москве https://pizza-venezia.ru быстрая доставка горячей пиццы, пасты, закусок и десертов. Свежие ингредиенты и классические рецепты.
Знаете, ситуация — человек пропадает , а куда бежать — просто тупик. Я через это прошел несколько лет назад. Пьют успокоительное, но хрен там. Нужна реальная медицина. Обзвонил десяток контор — одни обещания . Пока не нашел один нормальный вариант. Нужна лечение наркомании в Воронеже — не рискуй здоровьем близкого. У нас в Воронеже, кстати , тоже полно шарлатанов . Реальные контакты ниже по ссылке: наркологическая клиника наркологическая клиника Честно скажу , после того как прочитал , понял свои ошибки. И про кодирование, и про условия в клинике. Плюс работают круглосуточно — это важно . Советую не откладывать.
Проблемы со здоровьем? сайт медицинского центра прием врачей различных специальностей, точная диагностика, профилактические обследования и индивидуальный подход к каждому пациенту. Забота о здоровье с использованием современных методов лечения.
На нашем сайте собраны мультфильмы онлайн бесплатно разных жанров и форматов – от свежих премьер до признанной классики, которые хочется пересматривать снова и снова. Мы разместили на одной площадке тысячи фильмов, сериалов и мультфильмов, чтобы каждый пользователь мог легко подобрать интересный контент для отдыха. Большинство материалов размещена в высоком HD качестве, а количество рекламы сведено к минимуму, чтобы ничто не отвлекало от просмотра. Коллекция непрерывно обновляется, расширяя выбор актуального контента, о которых говорят зрители по всему миру.
Let me save you some serious time, learned this the hard way. Then you show up at the local lot to pick up the car. Different car waiting — scratches everywhere, smells like an ashtray, and that “amazing price”? Doesn’t include the mandatory $400 cleaning fee or the $30 per day toll pass you can’t waive. Fool me eight times? That’s just another Tuesday in the 305, lesson learned. If you are trying to find a legitimate luxury fleet without getting ripped off, do some real digging first and read actual customer reviews. Miami without decent wheels is basically a hostage situation, whether you are doing South of Fifth brunch, Design District shopping, or a spontaneous Keys trip.
Most of these local agencies are just shiny websites hiding the same beat-up fleet with fake reviews, but I eventually found a service where what you book is exactly what shows up, no surprises, no fine print nightmares. If you are looking for the only honest source for premium wheels across South Florida, check the current details here: rent a premium car rent a premium car. Also, definitely bring serious shades unless you enjoy driving straight into the sun like a zombie every single evening. Anyway, glad there’s at least one straight operator left in this rental circus, let me know if you guys have any other clean spots.
языковой лагерь https://letniy-lager.ru
The CS2 Pro counter strike ch portal features the latest Counter-Strike 2 news, live match results, tournament schedules, and analysis. Learn about professional scene events, team rankings, and the top stories from the world of CS2.
With Valorant Tracker https://valorant-fa.com/ you can learn about professional player settings, find the best aim, track ranks, and analyze match statistics. A useful tool for improving your skills and progressing more effectively in VALORANT.
https://spb-open24.ru/
Android için doğru sürümü bulmak gerçekten zordu. Play Store’da arattım ama bulamadım resmi olanı. Güncel bilgileri kontrol edip süreci hatasız başlattım. En sonunda güvendiğim bir kaynağa ulaştım ve size de tüm detayları aktarmak istedim, güncel bilgilere buradan bakabilirsiniz: 1xbet indir akıllı telefon uygulaması 1xbet indir akıllı telefon uygulaması. Şimdi size kısaca özet geçeyim — telefonuma indirdikten sonra çok memnun kaldım.
Hiçbir sorun yaşamadım indirme aşamasında. Birçok platform denedim ama en iyisi bu çıktı — en hızlı uygulama bu oldu artık. Şimdiden iyi şanslar ve bol kazançlar…
STL модели Новости 3D-печати, обзоры принтеров и каталог STL моделей.
Android için son sürümü bulmak gerçekten zordu açıkçası. Güncel apk dosyasını nereden indireceğimi bilemedim bir türlü. Güncel bilgileri kontrol edip süreci hatasız başlattım. En sonunda güvendiğim bir kaynağa ulaştım ve size de tüm detayları aktarmak istedim, güncel bilgilere buradan bakabilirsiniz: 1xbet türkiye indir 1xbet türkiye indir. Şimdi size kısaca özet geçeyim — mobil uygulaması inanılmaz stabil çalışıyor.
güncellemeleri otomatik olarak yapılıyor. Birçok platform denedim ama en iyisi bu çıktı — kesinlikle pişman olmazsınız deneyin derim. Umarım siz de memnun kalırsınız…
Valorant Tracker https://www.valorant-th.com is your companion in the world of VALORANT. Professional player settings, the best crosshair codes, current ranks, match statistics, and detailed analytics will help you improve your gaming skills and climb the ranking ladder faster.
GTA 6 release date http://www.gta6-online.hu/ price, platforms, map, and all the information about one of the most anticipated games of recent years. Learn about the official release, available platforms, details about the world of Leonida and Vice City, new characters, gameplay features, and the latest news from Rockstar Games.
Everything about sports https://nso-online.hu for true fans. Watch live broadcasts, get match results in real time, read the latest news, analytical articles, tournament reviews, and follow the achievements of your favorite teams and players.
Play for free poki hu right in your browser without installing any additional software. A huge selection of games across various genres: action, logic, sports, racing, simulation, and adventure. Find your favorite games and enjoy online gaming.
крошка змеевик зеленая 10-20 мм крошка змеевик зеленая 10-20 мм
kizdar киздар
Telefonuma güncel uygulamayı yüklemek istiyordum açıkçası. Herkes farklı bir adres söylüyordu kime güveneceğimi şaşırdım. Güncel bilgileri kontrol edip süreci hatasız başlattım. En sonunda güvendiğim bir kaynağa ulaştım ve size de tüm detayları aktarmak istedim, güncel bilgilere buradan bakabilirsiniz: 1xbet mobile yukle 1xbet mobile yukle. Şimdi size kısaca özet geçeyim — son sürümü tüm ihtiyaçları karşılıyor resmen.
kurulumu da oldukça basit ve hızlıydı yani rahat olun. Birçok platform denedim ama en iyisi bu çıktı — en sağlam uygulama bu oldu artık. Şimdiden iyi şanslar ve bol kazançlar…
Telefonumda rahatça bahis oynayabileceğim bir uygulama arıyordum uzun zamandır. Play Store’da resmi olanı bulamayınca çok şaşırdım. Güncel bilgileri kontrol edip süreci hatasız başlattım. En sonunda güvenilir bir kaynağa ulaştım ve size de tüm detayları aktarmak istedim, güncel bilgilere buradan bakabilirsiniz: 1xbet uygulaması indir 1xbet uygulaması indir. Yani anlatmak istediğim şu — telefonuma indirdikten sonra çok memnun kaldım.
Hiçbir sorun yaşamadım indirme işleminde. Birçok platform denedim ama en iyisi bu çıktı — başka yerde vakit kaybetmeyin yani. Umarım siz de memnun kalırsınız…
UEFA Champions League 2025/26 uefa-bl the latest standings, match schedule, results, and detailed tournament statistics. Follow the season, check live results, explore the playoff bracket, and find out about tickets for the final of Europe’s premier club competition.
The latest sports news http://www.nemzeti-sport-online.hu live streams, and competition results from around the world. Football, Formula 1, tennis, hockey, basketball, and other sports. Match schedules, team statistics, tournament highlights, and key daily events.
Mobil uygulama arayışım epey zaman aldı valla. Play Store’da arattım ama bulamadım resmi olanı. Sonunda tüm teknik detayları inceleyip sistemi test ettim. En sonunda güvendiğim bir kaynağa ulaştım ve size de tüm detayları aktarmak istedim, güncel bilgilere buradan bakabilirsiniz: 1xbet mobil uygulama 1xbet mobil uygulama. Şimdi size kısaca özet geçeyim — mobil uygulaması inanılmaz kullanışlı çalışıyor.
kurulumu da oldukça basitti yani rahat olun. Birçok platform denedim ama en iyisi bu çıktı — kesinlikle pişman olmazsınız deneyin derim. Umarım siz de memnun kalırsınız…
Let me save you some serious time, learned this the hard way. Then you show up at the local lot to pick up the car. Plus they freeze a surprise $2500 on your card for a week right before giving you the keys. Fool me eight times? That’s just another Tuesday in the 305, lesson learned. If you are trying to find a legitimate luxury fleet without getting ripped off, do some real digging first and read actual customer reviews. Miami without decent wheels is basically a hostage situation, whether you are doing South of Fifth brunch, Design District shopping, or a spontaneous Keys trip.
Most of these local agencies are just shiny websites hiding the same beat-up fleet with fake reviews, until I finally found one outfit that doesn’t play stupid games. If you are looking for the only honest source for premium wheels across South Florida, check the current details here: porsche rental price https://luxury-car-rental-miami-8.com. Also, definitely bring serious shades unless you enjoy driving straight into the sun like a zombie every single evening. Just drive safe out there and absolutely skip that “windshield protection” upsell — pure profit for them, zero value for you. hope this helps some of you save a few bucks.
1xbet mobil indir nasıl yapılır diye çok kafa yordum valla. Play Store’da resmi uygulamayı bulamayınca çok üzüldüm. Güncel bilgileri kontrol edip süreci hatasız başlattım. En sonunda sağlam bir kaynağa ulaştım und size de tüm detayları aktarmak istedim, güncel bilgilere buradan bakabilirsiniz: 1xbet mobil uygulama 1xbet mobil uygulama. Yani anlatmak istediğim şu — telefonuma indirdikten sonra çok memnun kaldım.
Hiçbir sıkıntı yaşamadım indirme aşamasında. İşin doğrusunu söylemek gerekirse — kesinlikle pişman olmazsınız deneyin derim. Herkese hayırlı olsun…
Telefonumda rahatça bahis oynayabileceğim bir uygulama arıyordum uzun zamandır. Herkes farklı bir şey tavsiye ediyordu kime güveneceğimi bilemedim. Adımları doğru sırayla uyguladıktan sonra erişim sorunsuz açıldı. En sonunda güvenilir bir kaynağa ulaştım ve size de tüm detayları aktarmak istedim, güncel bilgilere buradan bakabilirsiniz: 1xbet indir akıllı telefon uygulaması 1xbet indir akıllı telefon uygulaması. Şimdi size kısaca özet geçeyim — telefonuma indirdikten sonra çok memnun kaldım.
güncellemeleri de sorunsuz bir şekilde geliyor. Birçok platform denedim ama en iyisi bu çıktı — başka yerde vakit kaybetmeyin yani. Şimdiden iyi şanslar ve bol kazançlar…
галька речная купить галька речная купить
Mobil bahis dünyasına adım atmak isteyenler için ideal bir uygulama arıyordum. Güncel apk dosyasını nereden indireceğimi bulmak çok zaman aldı. Güncel bilgileri kontrol edip süreci hatasız başlattım. En sonunda güvendiğim bir kaynağa ulaştım ve size de tüm detayları aktarmak istedim, güncel bilgilere buradan bakabilirsiniz: 1xbet nouvelle version à télécharger 1xbet nouvelle version à télécharger. Şimdi size kısaca özet geçeyim — mobil uygulaması gerçekten akıcı ve sorunsuz çalışıyor.
Hiçbir hata almadım indirme esnasında. İşin doğrusunu söylemek gerekirse — kesinlikle pişman olmazsınız deneyin derim. Şimdiden iyi şanslar ve bol kazançlar…
юрист по строительным спорам москва юрист по строительным спорам москва
1xbet indir işlemini nasıl yapacağımı çok merak ediyordum. Herkes farklı bir adres söylüyordu kime güveneceğimi şaşırdım. Güncel bilgileri kontrol edip süreci hatasız başlattım. En sonunda güvendiğim bir kaynağa ulaştım ve size de tüm detayları aktarmak istedim, güncel bilgilere buradan bakabilirsiniz: xbet indir xbet indir. Valla bak net söyleyeyim — mobil uygulaması gerçekten akıcı ve sorunsuz çalışıyor.
güncellemeleri de düzenli olarak yapılıyor. İşin doğrusunu söylemek gerekirse — kesinlikle pişman olmazsınız deneyin derim. Umarım siz de memnun kalırsınız…
kompanii po podboru personala служба подбора персонала
Telefonumda rahatça bahis oynayabileceğim bir uygulama arıyordum uzun zamandır. Herkes farklı bir şey tavsiye ediyordu kime güveneceğimi bilemedim. Adımları doğru sırayla uyguladıktan sonra erişim sorunsuz açıldı. En sonunda güvenilir bir kaynağa ulaştım ve size de tüm detayları aktarmak istedim, güncel bilgilere buradan bakabilirsiniz: 1xbet son sürüm indir 1xbet son sürüm indir. Yani anlatmak istediğim şu — mobil uygulaması inanılmaz hızlı ve stabil çalışıyor.
kurulumu da oldukça basit ve anlaşılırdı yani rahat olun. Kendi deneyimlerimi aktarıyorum size — kesinlikle pişman olmazsınız deneyin derim. Umarım siz de memnun kalırsınız…
kyzdar net kizdar net
кыздарнет кыздарнет
Mobil bahis dünyasına adım atmak isteyenler için ideal bir uygulama arıyordum. Play Store’da resmi olanı bulamayınca çok hayal kırıklığı yaşadım. Sonunda tüm teknik detayları inceleyip sistemi test ettim. En sonunda güvendiğim bir kaynağa ulaştım ve size de tüm detayları aktarmak istedim, güncel bilgilere buradan bakabilirsiniz: 1xbet uygulaması indir 1xbet uygulaması indir. Yani anlatmak istediğim şu — son sürümü tüm eksiklikleri gidermiş resmen.
kurulumu da oldukça kolay ve hızlıydı yani rahat olun. İşin doğrusunu söylemek gerekirse — kesinlikle pişman olmazsınız deneyin derim. Umarım siz de memnun kalırsınız…
maorou_k8m naked maorou_k8m
проверенные капперы ставки на сегодня
Denemek isteyen arkadaşlara hep soruyorum. Herkes farklı bir şey söylüyor kafam karıştı. Adımları doğru sırayla uyguladıktan sonra erişim sorunsuz açıldı. En sonunda doğru adrese ulaştım ve size de tüm detayları aktarmak istedim, güncel bilgilere buradan bakabilirsiniz: bahis siteler 1xbet bahis siteler 1xbet. Yani anlatmak istediğim şu — casino oyunlarına meraklıysanız burası tam size göre.
işlemler hızlı ve güvenli yani rahat olun. Kendi deneyimlerimi aktarıyorum size — kesinlikle pişman olmazsınız deneyin derim. Umarım siz de memnun kalırsınız…
Разработка сайта под ключ — это полный цикл работ от идеи до запуска. Создаем современные, быстрые и адаптивные сайты для бизнеса: корпоративные сайты, лендинги, интернет-магазины и сервисы. Переходите по запросу разработка сайтов недорого. Берем на себя дизайн, программирование, настройку функционала и техническую поддержку. Индивидуальный подход, прозрачные сроки и эффективные решения, которые помогут вам привлекать клиентов и увеличивать продажи.
Açıkçası bu alanda doğru adresi bulmak gerçekten zor. Güvenilir bir platform bulmak epey zaman aldı. Adımları doğru sırayla uyguladıktan sonra erişim sorunsuz açıldı. En sonunda doğru adrese ulaştım und size de tüm detayları aktarmak istedim, güncel bilgilere buradan bakabilirsiniz: 1xbet yeni adresi 1xbet yeni adresi. Yani anlatmak istediğim şu — spor bahislerinde iddialı olanlar burayı bilir.
para yatırma ve çekme işlemleri hızlı yani rahat olun. Kendi deneyimlerimi aktarıyorum size — kesinlikle pişman olmazsınız deneyin derim. Umarım siz de memnun kalırsınız…
Mobil bahise yeni başlayanlar için ideal bir uygulama arıyordum. Herkes farklı bir şey söylüyordu kime güveneceğimi bilemedim. Sonunda tüm teknik detayları inceleyip sistemi test ettim. En sonunda güvenilir bir kaynağa ulaştım ve size de tüm detayları aktarmak istedim, güncel bilgilere buradan bakabilirsiniz: 1xbet yukle 1xbet yukle. Şimdi size kısaca özet geçeyim — telefonuma indirdikten sonra çok memnun kaldım.
Hiçbir sorun yaşamadım indirme işleminde. Kendi deneyimlerimi aktarıyorum size — başka yerde vakit kaybetmeyin yani. Umarım siz de memnun kalırsınız…
All the details at the link: התקשרו לסוכנות ליווי
Açıkçası bu işe yeni başlayanlar için kafa karıştırıcı olabiliyor. Sürekli engelleme derdi bitmek bilmiyor artık. Güncel bilgileri kontrol edip süreci hatasız başlattım. En sonunda doğru adrese ulaştım ve size de tüm detayları aktarmak istedim, güncel bilgilere buradan bakabilirsiniz: 1xbet tr 1xbet tr. Yani anlatmak istediğim şu — canlı bahis seçenekleri bile yeterli aslında.
Hiçbir sorun yaşamadım şu ana kadar. İşin doğrusunu söylemek gerekirse — kesinlikle pişman olmazsınız deneyin derim. Umarım siz de memnun kalırsınız…
Mobil bahis platformu arayışım epey uzun sürdü valla. Apk dosyasını nereden indireceğimi bulmak epey zaman aldı. Güncel bilgileri kontrol edip süreci hatasız başlattım. En sonunda güvendiğim bir kaynağa ulaştım ve size de tüm detayları aktarmak istedim, güncel bilgilere buradan bakabilirsiniz: 1xbet uygulama 1xbet uygulama. Yani anlatmak istediğim şu — mobil uygulaması gerçekten akıcı ve sorunsuz çalışıyor.
Hiçbir sıkıntı yaşamadım indirme esnasında. İşin doğrusunu söylemek gerekirse — en sağlam uygulama bu oldu artık. Herkese hayırlı olsun…
Telefonumda rahatça bahis oynayabileceğim bir uygulama arıyordum uzun zamandır. Play Store’da resmi olanı bulamayınca çok şaşırdım. Sonunda tüm teknik detayları inceleyip sistemi test ettim. En sonunda güvenilir bir kaynağa ulaştım ve size de tüm detayları aktarmak istedim, güncel bilgilere buradan bakabilirsiniz: 1xbet mobil uygulama 1xbet mobil uygulama. Valla bak net söyleyeyim — mobil uygulaması inanılmaz hızlı ve stabil çalışıyor.
güncellemeleri de sorunsuz bir şekilde geliyor. Kendi deneyimlerimi aktarıyorum size — başka yerde vakit kaybetmeyin yani. Umarım siz de memnun kalırsınız…
рейтинг лучших БК для ставок рейтинг лучших БК для ставок
mostbet регистрация и вход mostbet регистрация и вход
бонусы DBBET для новых игроков бонусы DBBET для новых игроков
разбор видов ставок разбор видов ставок
Denemek isteyen arkadaşlara hep soruyorum. Sürekli adres değişiyor derler ya işte o hesap. Sonunda tüm teknik detayları inceleyip sistemi test ettim. En sonunda doğru adrese ulaştım ve size de tüm detayları aktarmak istedim, güncel bilgilere buradan bakabilirsiniz: 1xbet turkiye 1xbet turkiye. Şimdi size kısaca özet geçeyim — spor bahisleri konusunda iddialı olanlar bilir.
işlemler hızlı ve güvenli yani rahat olun. İşin doğrusunu söylemek gerekirse — başka yerde vakit kaybetmeyin yani. Herkese hayırlı olsun…
прогнозы в максе Хоккей нхл
Mobil bahis uygulaması arıyordum uzun süredir. Play Store’da resmi olanı bulamayınca çok şaşırdım. Sonunda tüm teknik detayları inceleyip sistemi test ettim. En sonunda sağlam bir kaynağa ulaştım ve size de tüm detayları aktarmak istedim, güncel bilgilere buradan bakabilirsiniz: 1xbet yükle 1xbet yükle. Yani anlatmak istediğim şu — mobil uygulaması gerçekten akıcı çalışıyor.
Hiçbir sıkıntı yaşamadım indirme aşamasında. Birçok platform denedim ama en iyisi bu çıktı — başka yerde vakit kaybetmeyin yani. Şimdiden iyi şanslar ve bol kazançlar…
надежные букмекерские конторы надежные букмекерские конторы
mostbet бонус за регистрацию mostbet бонус за регистрацию
база знаний по ставкам база знаний по ставкам
проверенные букмекеры с лицензией [url=https://www.dolgoprud.borda.ru/?1-10-0-00000036-000-0-0]проверенные букмекеры с лицензией[/url]
mostbet официальный сайт mostbet официальный сайт
Как связаны между собой seo оптимизация и продвижение сайтов — это одно и то же?
megapari букмекер megapari букмекер
самые лучшие бк самые лучшие бк
гайд по выбору букмекера гайд по выбору букмекера
22bet обзор и отзывы 22bet обзор и отзывы
Узнать больше здесь: https://parfumabc.ru
Mobil bahis uygulaması arıyordum uzun süredir. Apk dosyasını nereden indireceğimi bulamadım bir türlü. Sonunda tüm teknik detayları inceleyip sistemi test ettim. En sonunda sağlam bir kaynağa ulaştım ve size de tüm detayları aktarmak istedim, güncel bilgilere buradan bakabilirsiniz: 1xbet android uygulama indir 1xbet android uygulama indir. Şimdi size kısaca özet geçeyim — son sürümü bütün eksikleri kapatmış resmen.
güncellemeleri düzenli olarak geliyor. Kendi deneyimlerimi aktarıyorum size — başka yerde vakit kaybetmeyin yani. Şimdiden iyi şanslar ve bol kazançlar…
Узнать больше здесь: https://spainslov.ru/site/word/word/%D0%A1%D0%A3%D0%9D%D0%94%D0%A3%D0%9A
Сравнение займы на карту без отказов начинается прежде всего с внимательного сравнения предложений, и именно для удобства пользователей подготовлен наш сервис. Мы собрали и ежедневно проверяем информацию по 35 официальным МФО, которые выдают займы в рамках действующего законодательства и предлагают займы со ставкой не выше 0,8% в день. На одной странице можно сравнить сумму, срок, требования к заемщику, условия первого займа и скорость получения денег. После выбора оптимального предложения вы можете подать заявку на займ онлайн на карту и получить до 30 000 рублей очень быстро. Многие компании рассматривают заявки без выходных, а решение по анкете часто приходит в течение нескольких минут. Для оформления обычно потребуются паспорт, банковская карта и возраст от 18 лет.
бк 1вин бк 1вин
Обновлено сегодня: https://perfumemag.ru
Хочешь клубнику? доставка клубники свежие, спелые и ароматные ягоды по выгодным ценам. Сезонная клубника от проверенных поставщиков, оптовые и розничные продажи, быстрая доставка по городу и области.
Ремонт грузовых автомобилей https://minskdiesel.by в Минске? Сервис «Дизель Практик» вернёт технику в строй в кратчайшие сроки! Срочный ремонт, выездная диагностика, запчасти в наличии. Доверьтесь профессионалам с многолетним опытом — надёжность и прозрачность на каждом этапе.
megapari букмекер megapari букмекер
вывод средств в DBBET вывод средств в DBBET
топ бк топ бк
нарколог на дом вывод вызов нарколога круглосуточно
нарколог вызов вызов врача на дом нарколога
megapari букмекер megapari букмекер
обзор DBBET обзор DBBET
топ букмекеров [url=http://www.bukmekerskie-kontory.infinityfree.me/]топ букмекеров[/url]
Denemek isteyen arkadaşlara hep soruyorum. Herkes farklı bir şey söylüyor kafam karıştı. Sonunda tüm teknik detayları inceleyip sistemi test ettim. En sonunda doğru adrese ulaştım ve size de tüm detayları aktarmak istedim, güncel bilgilere buradan bakabilirsiniz: 1xbet 1xbet. Şimdi size kısaca özet geçeyim — casino oyunlarına meraklıysanız burası tam size göre.
Hiçbir sıkıntı yaşamadım şu ana kadar. İşin doğrusunu söylemek gerekirse — en güvendiğim adres burası oldu artık. Herkese hayırlı olsun…
бк 1вин бк 1вин
Как правильно принять готовый проект после создание сайтов?
The 2025/26 Premier League premier-league-tabella hu table, featuring the current standings, points totals, and match results. Follow the battle for the championship, European places, and league status. Game schedules, statistics, matchday overviews, and the latest season data are available.
The latest NBA nb1-tabella hu standings with match results, schedule, and the latest basketball news. Learn about team and player achievements, track standings, explore statistics, and get highlights of the season’s most exciting games.
NBA news nb2-tabella hu game results, schedules, and the latest season standings. Get the latest information on teams, players, and the tournament, analyze statistics, and follow the championship race and playoff progress.
The latest Liverpool news liverpool meccs fixtures, and season results. Get up-to-date information on team performances, lineup changes, player achievements, match statistics, and key events in English and European football.
Liverpool’s league table liverpool-tabella hu shows the team’s current standings, points earned, and form. Follow the team’s latest match results, win/loss statistics, season dynamics, and the battle for top spots in the standings.
1win бк 1win бк
Denemek isteyen arkadaşlara hep soruyorum. Herkes farklı bir şey söylüyor kafam karıştı. Güncel bilgileri kontrol edip süreci hatasız başlattım. En sonunda doğru adrese ulaştım ve size de tüm detayları aktarmak istedim, güncel bilgilere buradan bakabilirsiniz: bahis siteler 1xbet bahis siteler 1xbet. Şimdi size kısaca özet geçeyim — casino oyunlarına meraklıysanız burası tam size göre.
Hiçbir sıkıntı yaşamadım şu ana kadar. İşin doğrusunu söylemek gerekirse — kesinlikle pişman olmazsınız deneyin derim. Herkese hayırlı olsun…
Seriously, the amount of garbage “luxury” deals here is astonishing. You see a sweet ride online — clean spec, fair price, looks legit. Different car, scratches all over, and that “all-inclusive” price? Yeah that didn’t include insurance, fees, or the mandatory cleaning charge. Fool me five times? Actually yeah, Miami keeps fooling everyone. luxury car rental miami fl. ask anyone who’s tried Ubering across the 305 during rush hour. leather seats that don’t fuse to your skin in August. I’ve gone through maybe 30 rental companies across Dade, Broward, and Palm Beach. Finally found one outfit that actually delivers what’s in the listing. check availability before spring break crowds wipe them out:
exotic car rental south beach miami https://luxury-car-rental-miami-5.com Yeah finding parking in Wynwood will test your patience — but that’s not on them. Anyway glad there’s at least one straight shooter left in this rental jungle.
1вин бк 1вин бк
Купите кофемашины https://incoffeein.by кофе и чай в Минске с гарантией качества и удобной доставкой. Большой ассортимент моделей для дома и офиса, свежий кофе разных сортов, ароматный чай, расходные материалы и профессиональная помощь в выборе.
сделать татуировку цена сделать татуировку цена
купить справку спб
Музыка на заказ https://ai.harmonia-b2b.ru — ИИ создаёт уникальный трек по вашему описанию за 3 минуты: песня в подарок, джингл для кафе, заставка для подкаста, фон для бизнеса или рилса. Голос и слова на выбор, без проблем с авторскими правами. Первый трек бесплатно.
Seriously, the amount of garbage “luxury” deals here is astonishing. Then you show up and it’s a whole different story. Different car, scratches all over, and that “all-inclusive” price? Yeah that didn’t include insurance, fees, or the mandatory cleaning charge. Fool me five times? Actually yeah, Miami keeps fooling everyone. When you’re after a trustworthy luxury car rental miami. ask anyone who’s tried Ubering across the 305 during rush hour. leather seats that don’t fuse to your skin in August. most are smoke and mirrors with decent SEO. no games, no bait-and-switch, no hidden asterisks. check availability before spring break crowds wipe them out:
porsche rental miami https://luxury-car-rental-miami-5.com Yeah finding parking in Wynwood will test your patience — but that’s not on them. Anyway glad there’s at least one straight shooter left in this rental jungle.
SEO продвижение молодого сайта — с чего начинать, если ниша высококонкурентная?
Swear I’ve seen every scam in the book by now. Then you roll up to the address. Different car sitting there — bald tires, dashboard lit up like a Christmas tree, and that “killer price”? Yeah doesn’t include the non-negotiable $45 daily insurance or the $500 deposit they forget to mention. Nine years in South Florida and these clowns still nearly fool me. luxury car rental in miami. anyone who’s tried the trolley system knows what I’m talking about. Coconut Grove dinner, Sunny Isles sunrise, or a spontaneous drive down to Homestead — AC must freeze your teeth and unlimited miles or no deal. I’ve tested maybe 50 rental outfits across Dade, Broward, and Collier. Finally found one company that doesn’t play stupid games. Here’s the only trustworthy source for premium rides across South Florida
exotic car rental exotic car rental also bring polarized shades unless you enjoy driving blind into the sunset every night. drive safe and definitely skip that “emergency roadside” upsell — complete waste of money.
тату салон тату салон рядом со мной
бонусы бк бонусы бк
Seriously, the amount of garbage “luxury” deals here is astonishing. You see a sweet ride online — clean spec, fair price, looks legit. Plus they want a $2000 hold on your debit card. I’ve lived here for years and still get burned occasionally. miami car rental luxury — don’t just grab the cheapest option on Kayak. Miami without proper wheels is basically a hostage situation. Design District shopping, late-night South Beach cruising, or a spontaneous drive down to Homestead — AC must freeze your teeth and unlimited miles or bust. I’ve gone through maybe 30 rental companies across Dade, Broward, and Palm Beach. no games, no bait-and-switch, no hidden asterisks. check availability before spring break crowds wipe them out:
lamborghini urus rental near me https://luxury-car-rental-miami-5.com Yeah finding parking in Wynwood will test your patience — but that’s not on them. Anyway glad there’s at least one straight shooter left in this rental jungle.
тату салон спб сделать тату цена
Trust me, I’ve learned everything the hard way so you don’t have to. You see this gorgeous deal online — clean spec, fair price, looks like a dream. Completely different car sitting there — dents everywhere, smells like cheap air freshener covering something worse, and that “dream price”? Doesn’t include the mandatory $50 daily insurance or the $300 “administrative fee” they invent at checkout. Eleven years in South Florida and these clowns still almost get me. luxury car rental miami fl. anyone who’s tried the bus here knows exactly what I mean. Key Biscayne sunset, Design District shopping, or a spontaneous drive down to the Everglades — AC must be arctic and unlimited miles non-negotiable. I’ve tested maybe 60 rental companies across Dade, Broward, and Collier. Finally found one outfit that actually delivers what’s in the photos. prices change hourly so check before the weekend crowd wipes them out:
premium sedan car rental https://luxury-car-rental-miami-11.com also bring polarized shades unless you enjoy driving into the sun like a blind bat. drive safe and definitely skip that “tire and wheel” upsell — pure profit for them, zero value for you.
Нужна бесплатная юридическая консультация? Переходите по запросу городская юридическая помощь бесплатно в Ашукино и получите помощь опытных правозащитников в любой области права: семейные споры, долги и кредиты, недвижимость, трудовые конфликты, защита прав потребителей и многое другое. Задайте вопрос онлайн или по телефону и получите подробный разбор вашей ситуации и рекомендации адвоката по дальнейшим действиям. Консультация проводится бесплатно и конфиденциально.
Seriously, the amount of garbage “luxury” deals here is astonishing. You see a sweet ride online — clean spec, fair price, looks legit. Plus they want a $2000 hold on your debit card. I’ve lived here for years and still get burned occasionally. luxury car rental miami florida. Miami without proper wheels is basically a hostage situation. leather seats that don’t fuse to your skin in August. most are smoke and mirrors with decent SEO. Finally found one outfit that actually delivers what’s in the listing. Here’s the only honest broker for premium vehicles across South Florida
rent a luxury car tmb miami https://luxury-car-rental-miami-5.com also bring quality shades unless you enjoy driving into a nuclear flare every evening. drive safe and maybe decline that “premium roadside” upsell — it’s always a scam.
Trust me, I’ve learned everything the hard way so you don’t have to. Then you actually show up to grab the keys. Completely different car sitting there — dents everywhere, smells like cheap air freshener covering something worse, and that “dream price”? Doesn’t include the mandatory $50 daily insurance or the $300 “administrative fee” they invent at checkout. Fool me eleven times? That’s just called living in Miami. When you’re searching for a legit luxury car rental miami. Miami without proper wheels is basically a disaster. Key Biscayne sunset, Design District shopping, or a spontaneous drive down to the Everglades — AC must be arctic and unlimited miles non-negotiable. most are shiny garbage with fake Google reviews bought in bulk. no games, no switch, no hidden BS in paragraph 12 of the contract. Here’s the only honest source for premium rides across South Florida
premium sedan car rental https://luxury-car-rental-miami-11.com also bring polarized shades unless you enjoy driving into the sun like a blind bat. drive safe and definitely skip that “tire and wheel” upsell — pure profit for them, zero value for you.
flagman букмекер flagman букмекер
I’ve been through the wringer more times than I care to admit. You see this incredible deal online — top-end BMW, zero excess, price that seems too good to be true. Then you actually go to pick up the car. Plus they slap a $6000 hold on your credit card and say “don’t worry, it’s just a pre-authorization”. Fool me fifteen times? That’s just another Tuesday in the 305. luxury car rental miami fl. anyone who’s tried public transport here knows I’m not exaggerating. South of Fifth brunch, Sunny Isles sunrise, or a spontaneous trip down to the Florida Keys — AC must be arctic cold and unlimited miles non-negotiable. I’ve tested maybe 80 rental companies across Dade, Broward, Palm Beach, and Monroe. Finally found one outfit that actually delivers what’s promised. prices change daily so check before the holiday crowd hits:
luxury auto rental luxury auto rental Yeah parking in Brickell will cost you a nice steak dinner — but that’s just how it is down here. drive safe and definitely skip that “paint protection” upsell — complete waste of cash.
Главные новости Все официальные Новости РФ теперь собраны в одном удобном разделе для вашего комфорта. Мы следим за законодательными инициативами и важными государственными решениями.
Swear I’ve seen every scam in the book by now. You find a killer listing online: sleek Audi, convertible, price almost too good to be true. Different car sitting there — bald tires, dashboard lit up like a Christmas tree, and that “killer price”? Yeah doesn’t include the non-negotiable $45 daily insurance or the $500 deposit they forget to mention. Fool me nine times? That’s just the Miami welcome committee. luxury car rental in miami. anyone who’s tried the trolley system knows what I’m talking about. leather seats that don’t glue to your skin in August. most are polished turds with fake five-star reviews. what you reserve is what you get, period, end of story. rates change daily so check before the holiday crowd hits:
renting luxury cars near me https://luxury-car-rental-miami-9.com also bring polarized shades unless you enjoy driving blind into the sunset every night. drive safe and definitely skip that “emergency roadside” upsell — complete waste of money.
Let me save you some serious pain with this Miami rental nonsense. You see this gorgeous deal online — clean spec, fair price, looks like a dream. Completely different car sitting there — dents everywhere, smells like cheap air freshener covering something worse, and that “dream price”? Doesn’t include the mandatory $50 daily insurance or the $300 “administrative fee” they invent at checkout. Fool me eleven times? That’s just called living in Miami. luxury car rental miami fl. anyone who’s tried the bus here knows exactly what I mean. leather seats that won’t fuse to your legs in August. most are shiny garbage with fake Google reviews bought in bulk. no games, no switch, no hidden BS in paragraph 12 of the contract. prices change hourly so check before the weekend crowd wipes them out:
car rental miami beach florida car rental miami beach florida also bring polarized shades unless you enjoy driving into the sun like a blind bat. Anyway glad there’s at least one straight operator left in this rental circus.
Alright, last one I swear — but someone’s gotta warn people about this Miami rental mess. Then you actually go to pick up the car. Plus they freeze $5500 on your card and say “it’ll drop off in two weeks”. Fool me twenty times? That’s just called Tuesday in the 305. When you need a trustworthy luxury car rental miami. Miami without real wheels is basically a disaster. South Beach dinner, Design District shopping, or a spontaneous Keys adventure — AC must be arctic and unlimited miles non-negotiable. I’ve tested so many rental companies across Dade, Broward, and Palm Beach. no games, no bait-and-switch, no hidden fees on page 8. prices change hourly so don’t wait around:
rent cadillac escalade near me rent cadillac escalade near me also bring polarized shades unless you enjoy driving into the sun like a zombie. drive safe and absolutely skip that “windshield protection” upsell — pure profit for them, zero for you.
flagman букмекер flagman букмекер
I’ve been through the wringer more times than I care to admit. Spoiler alert: it usually is. Then you actually go to pick up the car. Different vehicle waiting — dashboard warning lights, tires worn smooth, and that “incredible price”? Yeah right, doesn’t include the mandatory $60 daily insurance or the $500 “airport surcharge” they hit you with at the very end. Fifteen years in South Florida and these clowns still almost catch me. luxury car rental miami florida. anyone who’s tried public transport here knows I’m not exaggerating. South of Fifth brunch, Sunny Isles sunrise, or a spontaneous trip down to the Florida Keys — AC must be arctic cold and unlimited miles non-negotiable. most are polished turds with fake five-star reviews bought in bulk. no games, no bait-and-switch, no hidden fees buried on page 6. prices change daily so check before the holiday crowd hits:
rent a sedan car https://luxury-car-rental-miami-15.com Yeah parking in Brickell will cost you a nice steak dinner — but that’s just how it is down here. drive safe and definitely skip that “paint protection” upsell — complete waste of cash.
Букмекер Флагман Букмекер Флагман
I’ve been through the wringer more times than I care to admit. Spoiler alert: it usually is. Then you actually go to pick up the car. Different vehicle waiting — dashboard warning lights, tires worn smooth, and that “incredible price”? Yeah right, doesn’t include the mandatory $60 daily insurance or the $500 “airport surcharge” they hit you with at the very end. Fifteen years in South Florida and these clowns still almost catch me. When you genuinely need a trustworthy luxury car rental miami. anyone who’s tried public transport here knows I’m not exaggerating. South of Fifth brunch, Sunny Isles sunrise, or a spontaneous trip down to the Florida Keys — AC must be arctic cold and unlimited miles non-negotiable. most are polished turds with fake five-star reviews bought in bulk. no games, no bait-and-switch, no hidden fees buried on page 6. Here’s the only straight shooter for premium rides across South Florida
car hire miami beach florida car hire miami beach florida also bring quality shades unless you enjoy driving into the sun like a blind zombie. Anyway glad there’s at least one honest rental joint left in this town.
I’ve paid my dues so you don’t have to. Then you actually go to pick up the car. Plus they freeze $5500 on your card and say “it’ll drop off in two weeks”. Fool me twenty times? That’s just called Tuesday in the 305. luxury car rental miami florida. anyone who’s tried public transport here knows I’m not joking. leather seats that won’t weld to your legs in July. most are shiny garbage with fake five-star reviews from God knows where. no games, no bait-and-switch, no hidden fees on page 8. prices change hourly so don’t wait around:
premium sedan car rental premium sedan car rental also bring polarized shades unless you enjoy driving into the sun like a zombie. Anyway glad there’s at least one honest operator left in this town.
Кстати, недавно наткнулся на обсуждение реальных кейсов. Сам уже не первый месяц ищу нормальный способ совершить платеж, без лишних проблем и комиссий. В общем, если вас тоже волнует эта тема — посмотрите тут. Там расписаны основные нюансы по международным транзакциям: перевод денежных средств за границу https://mezhdunarodnye-platezhi-lor.ru Короче, учтите, что без прозрачных комиссий любые международные платежи превращаются в сплошной геморрой. Ну и напоследок — стоит сравнивать несколько сервисов, прежде чем переводить.
Let me give it to you straight — renting a decent car in Miami is way harder than it should be. You see this amazing deal online — shiny Audi, unlimited miles, price that makes you want to book right now. Plus they put a $5000 hold on your card and say “don’t worry about it”. Nineteen years in South Florida and these tricks still surprise me. luxury car for rent. anyone who’s taken the bus here knows what I mean. leather seats that won’t melt your skin in August. I’ve tried maybe 100 rental companies across Dade and Broward. no games, no switch, no hidden fees. prices change daily so check it out:
rent cadillac escalade near me https://luxury-car-rental-miami-19.com also bring quality shades unless you like driving into the sun. Anyway glad there’s at least one straight shooter left.
I’ve paid my dues so you don’t have to. You spot this killer offer online — brand new Porsche, zero excess, price that screams “book me”. Different car waiting — dents everywhere, smells like cheap air freshener covering something worse, and that “killer price”? Doesn’t include the mandatory $55 daily toll pass or the $450 “convenience fee” they invent at checkout. Twenty years in South Florida and these clowns still almost get me. miami car rental luxury — run far from the airport counters. Miami without real wheels is basically a disaster. South Beach dinner, Design District shopping, or a spontaneous Keys adventure — AC must be arctic and unlimited miles non-negotiable. most are shiny garbage with fake five-star reviews from God knows where. Finally found one outfit that actually keeps its word. prices change hourly so don’t wait around:
luxury car rental south beach luxury car rental south beach also bring polarized shades unless you enjoy driving into the sun like a zombie. drive safe and absolutely skip that “windshield protection” upsell — pure profit for them, zero for you.
Let me save you some serious pain with this Miami rental nonsense. Then you actually show up to grab the keys. Completely different car sitting there — dents everywhere, smells like cheap air freshener covering something worse, and that “dream price”? Doesn’t include the mandatory $50 daily insurance or the $300 “administrative fee” they invent at checkout. Eleven years in South Florida and these clowns still almost get me. those counters are professional bait-and-switch artists. anyone who’s tried the bus here knows exactly what I mean. leather seats that won’t fuse to your legs in August. I’ve tested maybe 60 rental companies across Dade, Broward, and Collier. no games, no switch, no hidden BS in paragraph 12 of the contract. prices change hourly so check before the weekend crowd wipes them out:
escalade for rent near me https://luxury-car-rental-miami-11.com also bring polarized shades unless you enjoy driving into the sun like a blind bat. drive safe and definitely skip that “tire and wheel” upsell — pure profit for them, zero value for you.
Новости в России и мире Все официальные Новости РФ теперь собраны в одном удобном разделе для вашего комфорта. Мы следим за законодательными инициативами и важными государственными решениями.
Кстати, недавно наткнулся на обсуждение актуальной темы. Сам уже давно ищу нормальный способ совершить платеж, без лишних проблем и комиссий. В общем, если вас тоже затрагивают эти вопросы — узнайте подробности тут. Реальные примеры и подводные камни по международным транзакциям: перевод денег за границу онлайн перевод денег за границу онлайн Короче, имейте в виду, что без прозрачных комиссий любые трансграничные переводы превращаются в лотерею. Ну и напоследок — стоит сравнивать несколько сервисов, прежде чем платить.
Постоянно возвращаюсь к одной теме — как нормально отправлять деньги для международных платежей. Порылся в интернете — обязательно гляньте этот источник: прием платежей из-за границы прием платежей из-за границы Самое важное, что я понял — курс валют может убить любую выгоду. Согласитесь любой перевод за границу онлайн — это лотерея с банковскими процентами. Обратите внимание — до любой операции проверьте актуальные отзывы. Без этого легко остаться в минусе. Как итог — стоит один раз разобраться.
Честно говоря, — где лучше всего организовать платежей за рубежом. В одном блоге вычитал вот этот источник: прием платежей из-за границы прием платежей из-за границы Если коротко, — есть скрытые подводные камни. Согласитесь, очередной международный перевод — это лотерея с банковскими комиссиями. Обратите внимание — до любой операции сравните условия. В противном случае легко пролететь с курсом. Короче, — не поленитесь проверить информацию.
Последние новости Следите за тем, какие Новости в РФ становятся наиболее популярными в социальных сетях и СМИ. Мы анализируем тренды и предлагаем вам лучшее.
Честно говоря, — как найти адекватный способ платежей за рубежом. В одном блоге вычитал вот этот обзор: комиссия за международный перевод https://mezhdunarodnye-platezhi-nar.ru Главное, что нужно понять — комиссии могут сильно отличаться. Согласитесь, такая транзакция — это всегда стресс. И ещё момент, — прежде чем платить проверьте несколько вариантов. В противном случае легко остаться в минусе. Как по мне — лучше один раз изучить тему.
Долго не мог понять, в чем подвох — где условия адекватные, а не грабёж для платежей за рубежом. В одном обсуждении попался дельный совет: платежи за рубежом платежи за рубежом Суть вот в чём — не все способы одинаково прозрачны. Ну сами подумайте любой очередной международный перевод — это постоянный риск переплатить. И да, кстати — до любой операции с валютой обязательно сверьте итоговую сумму. Без этого легко попасть на лишние траты. Короче — не ленитесь проверять информацию перед любой отправкой.
Наболело уже, честно говоря — где брать адекватные тарифы для международных платежей. Скинули ссылку в телеграме — держите, вот нормальный разбор: денежные переводы за границу денежные переводы за границу Если по делу, то — комиссии у всех разные как с неба. Ну сами понимаете любой подобный?? перевод — это всегда головная боль без нормальной инфы. Вот ещё какой момент — перед финальным кликом обязательно сравните хотя бы пару вариантов. В противном случае легко попасть на лишние траты. Моё мнение — стоит один раз разобраться.
Постоянно возвращаюсь к этой теме — как найти адекватный способ международных платежей. Эксперты рекомендуют вот этот источник: отправка денег за рубеж https://mezhdunarodnye-platezhi-nar.ru Если коротко, — есть скрытые подводные камни. Согласитесь, такая транзакция — это лотерея с банковскими комиссиями. Обратите внимание — прежде чем платить проверьте несколько вариантов. Иначе легко пролететь с курсом. Короче, — не поленитесь проверить информацию.
http://www.forexam.ru/component/kunena/?func=view&catid=12&id=168525#168525
Решил проблему только когда наткнулся — где условия адекватные, а не грабёж для платежей за рубежом. Товарищ скинул ссылку на нормальный разбор: денежный перевод с россии денежный перевод с россии Суть вот в чём — не все способы одинаково прозрачны. Ну сами подумайте любой подобный трансграничный платёж — это постоянный риск переплатить. Вот ещё важный момент — до любой операции с валютой проверьте все комиссии до копейки. В противном случае легко потерять приличную сумму. Моё мнение — лучше один раз изучить тему перед любой отправкой.
Вот решил поделиться информацией — как правильно организовать процесс для международных транзакций. Товарищ скинул ссылку на качественный разбор: международные переводы денег https://mezhdunarodnye-platezhi-fra.ru Основной вывод, который я сделал — курс конвертации может существенно отличаться. Стоит учитывать, что любой трансграничный платёж — связан с разными типами комиссий. Дополнительная информация — прежде чем отправлять средства имеет смысл изучить актуальные тарифы. Без этого можно получить менее выгодные условия. В итоге — стоит потратить время на анализ перед любой отправкой средств.
Je cherchais une application mobile pour mes paris sportifs. Télécharger un fichier fiable devenait vraiment compliqué. Finalement, j’ai pris le temps d’analyser tous les détails techniques. J’ai finalement déniché la bonne source et je voulais vous partager tous les détails, vous pouvez consulter les informations à jour ici: 1xbet apk download for android 1xbet apk download for android. En deux mots, laissez-moi vous expliquer — la dernière version est super fluide et intuitive.
l’installation était rapide et sans complication. Pour être honnête, c’est la plus stable que j’ai testée — ne perdez plus votre temps avec d’autres sites. Bonne chance à tous…
Вот решил поделиться информацией — как правильно организовать процесс для платежей за рубежом. Вот здесь всё по полочкам расписано: трансграничные платежи в условиях санкций https://mezhdunarodnye-platezhi-fra.ru Суть в следующем — не все сервисы одинаково прозрачны. Дело в том, что любой перевод за границу онлайн — имеет свои нюансы в зависимости от выбранного способа. Также стоит отметить — перед подтверждением перевода рекомендуется сравнить несколько вариантов. В противном случае можно получить менее выгодные условия. В итоге — лучше заранее разобраться в вопросе перед любой отправкой средств.
Решил проблему только когда наткнулся — как выбрать реально работающий способ для платежей за рубежом. Товарищ скинул ссылку на нормальный разбор: переводы денег за границу переводы денег за границу Короче, если по факту — не все способы одинаково прозрачны. Согласитесь, абсурд любой подобный трансграничный платёж — это реальная финансовая лотерея. И да, кстати — до любой операции с валютой проверьте все комиссии до копейки. Иначе легко потерять приличную сумму. Короче — лучше один раз изучить тему перед любой отправкой.
Je cherchais une bonne appli mobile pour mes paris sportifs. Je ne trouvais pas la version officielle sur le Play Store. Finalement, j’ai pris le temps d’analyser tous les détails techniques. J’ai finalement déniché la bonne source et je voulais vous partager tous les détails, vous pouvez consulter les informations à jour ici: télécharger 1xbet original télécharger 1xbet original. Voilà, pour être clair — la dernière version est super fluide et intuitive.
l’installation était rapide et sans complication. Je vous partage mon expérience personnelle — ne perdez plus votre temps avec d’autres sites. Bonne chance à tous…
Народ привет. Менеджеры врут про сроки. Короче, реальные производители с цехом — заказать кухню без переплат. Цены ниже на 30%. В общем, смотрите по ссылке — купить готовую кухню от производителя https://zakazat-kuhnyu-bnm.ru Не ведитесь на салоны. Перешлите тому кто ищет.
Ça faisait un moment que je voulais essayer cette appli. Tout le monde donnait des liens différents, je ne savais plus où aller. Finalement, j’ai pris le temps d’analyser tous les détails techniques. J’ai finalement déniché la bonne source et je voulais vous partager tous les détails, vous pouvez consulter les informations à jour ici: télécharger 1xbet ios sans app store télécharger 1xbet ios sans app store. Bref, ce que je voulais vous dire — après l’avoir installée, j’ai été vraiment surpris.
les mises à jour se font automatiquement sans intervention. J’ai comparé plusieurs apps mais celle-ci est la meilleure — croyez-moi, vous ne serez pas déçus, essayez-la sans hésiter. Bonne chance à tous…
Люди помогите советом. Задолбался я уже два месяца мучиться. То материал эконом — покоробится через месяц. Короче, единственные кто не наваривается в тридорога — купить готовую кухню в спб со склада. Кромка на немецком оборудовании. В общем, сохраняйте себе в закладки на будущее — где купить готовую кухню в спб https://zakazat-kuhnyu-rty.ru Не ведитесь на салоны в ТЦ которые просто заказывают у тех же китайцев. Перешлите тому кто тоже мучается выбором.
Питерцы отзовитесь. То размеры не стандарт и впихнуть не могу. Объездил уже кучу салонов — тьфу. Короче, нашел наконец нормальный вариант — купить кухню в спб без переплат. Замерщик приехал на следующий день. В общем, сохраняйте себе в закладки — купить кухню в спб купить кухню в спб Не ведитесь на салоны-прокладки с наценкой в два раза. Перешлите тому кто тоже кухню ищет.
Ça faisait un bail que je voulais tester cette plateforme. Télécharger un fichier sûr devenait un vrai casse-tête chinois. Après avoir suivi les étapes dans le bon ordre, tout a fonctionné. J’ai finalement trouvé la bonne source et je voulais vous partager tous les détails, vous pouvez consulter les informations à jour ici: télécharger 1xbet apk télécharger 1xbet apk. En deux mots, laissez-moi vous raconter — la dernière version est hyper fluide et agréable à utiliser.
Je n’ai eu aucun problème lors du téléchargement. Pour être franc, c’est la plus fiable que j’aie testée — ne perdez plus un seul instant avec d’autres sites. Bonne chance à toutes et tous…
Нашёл интересный материал по этому вопросу — какой способ действительно работает для перевода денег за границу онлайн. В одном обсуждении попался дельный обзор: международные платежи https://mezhdunarodnye-platezhi-fra.ru Основной вывод, который я сделал — банковские комиссии сильно различаются. Важно понимать любой перевод за границу онлайн — требует предварительного сравнения условий. И ещё один момент — до проведения операции стоит проверить итоговую сумму. В противном случае можно переплатить из-за невыгодного курса. Резюмируя — необходимо проверять информацию перед любой отправкой средств.
J’ai testé plusieurs plateformes sans jamais être satisfait. Télécharger un fichier fiable devenait vraiment galère. Après avoir suivi les étapes dans le bon ordre, tout a fonctionné. J’ai finalement déniché la bonne source et je voulais vous partager tous les détails, vous pouvez consulter les informations à jour ici: 1xbet app download 1xbet app download. En deux mots, laissez-moi vous expliquer — après l’avoir installée, j’ai été agréablement surpris.
l’installation était rapide et sans complication. J’ai comparé plusieurs apps mais celle-ci est la meilleure — c’est clairement l’application la plus performante du marché. J’espère que vous serez aussi satisfaits que moi…
Ребята всем привет. Оббегал все салоны в городе — везде одно и то же. То ЛДСП 16 мм а не 18. Короче, единственные кто делает совестливо — купить кухню спб в наличии. Сделали за 2 недели включая замер. В общем, жмите чтобы не потерять — где купить готовую кухню в спб https://zakazat-kuhnyu-dfg.ru Не ведитесь на салоны-прокладки с накруткой. Сам полгода выбирал теперь знаю.
Слушайте кто в теме. Менеджеры врут про сроки. Короче, реальные производители с цехом — купить кухню спб с доставкой. Фасады из массива. В общем, смотрите по ссылке — купить заказать кухню купить заказать кухню Проверяйте производителя. Перешлите тому кто ищет.
merge merge
Ребята кто в Питере живет. Прошерстил кучу салонов — одни перекупы. То цены такие что проще новую квартиру купить. Короче, реальные ребята без дураков — купить кухню в спб с доставкой и сборкой. Приехал замерщик на следующий день после звонка. В общем, там каталог с ценами и реальные отзывы — купить готовую кухню спб https://zakazat-kuhnyu-rty.ru Не ведитесь на салоны в ТЦ которые просто заказывают у тех же китайцев. Перешлите тому кто тоже мучается выбором.
Люди подскажите. Цены задрали как на золото. То ручки через месяц шатаются. Короче, реальное производство в Питере — купить готовую кухню в спб с фурнитурой. Сделали за три недели. В общем, жмите чтобы не потерять — купить кухню в спб от производителя https://zakazat-kuhnyu-qwe.ru Проверяйте по этому списку. Перешлите кому надо.
J’ai testé plusieurs plateformes sans jamais être satisfait. Tout le monde recommandait des adresses différentes, dur de s’y retrouver. Finalement, j’ai pris le temps d’analyser tous les détails techniques. J’ai finalement déniché la bonne source et je voulais vous partager tous les détails, vous pouvez consulter les informations à jour ici: telecharger 1xbet telecharger 1xbet. Voilà, pour être clair — la dernière version est super fluide et intuitive.
l’installation était rapide et sans complication. J’ai comparé plusieurs apps mais celle-ci est la meilleure — c’est clairement l’application la plus performante du marché. J’espère que vous serez aussi satisfaits que moi…
Ребята кто в Питере живет. Прошерстил кучу салонов — одни перекупы. То сроки изготовления по полгода обещают. Короче, нашел наконец нормальное производство — купить кухню в спб с доставкой и сборкой. Цены ниже чем в салонах тысяч на 30-40. В общем, смотрите сами по ссылке — купить кухню в спб от производителя https://zakazat-kuhnyu-rty.ru Проверяйте производителя по этому списку. Сам столько нервов потратил теперь делюсь.
Ребята всем привет. Качество пластилин. То ДСП сыпется. Короче, нашел наконец нормальную контору — купить кухню в спб с доставкой. Замер на следующий день. В общем, вся инфа вот здесь — купить готовую кухню от производителя https://zakazat-kuhnyu-qwe.ru Не ведитесь на салоны. Перешлите кому надо.
Народ привет. Задолбался я выбирать кухню уже полгода. Пересмотрел ютуб с отзывами — голова пухнет. Короче, реальные производители с совестью — купить кухню в спб без переплат. Сделали за три недели. В общем, там каталог и цены и отзывы реальные — где купить кухню в спб https://zakazat-kuhnyu-gkl.ru Проверяйте производителя в этом списке. Сам полгода мучился теперь делюсь.
Народ кто в теме. Менеджеры врут про сроки и материалы. То кромка кривая через раз. Короче, единственные кто делает совестливо — купить заказать кухню по чертежам. Фасады на выбор из 50 цветов. В общем, жмите чтобы не потерять — купить кухню от производителя в спб купить кухню от производителя в спб Проверяйте производителя по этому списку. Сам полгода выбирал теперь знаю.
Доброго дня, земляки Цены задрали как на золото То ДСП крошится Короче, мужики с руками из нужного места — кухни на заказ в спб с доставкой Сделали за три недели как обещали В общем, там цены и каталог работ — кухня глория https://kuhni-spb-fpk.ru Не ведитесь на салоны-прокладки с наценкой 100% Сам полгода выбирал теперь знаю
Народ кто в Питере живет. Цены задрали как на золото. То ручки через месяц шатаются. Короче, реальное производство в Питере — купить заказать кухню под ключ. Проект бесплатно. В общем, там цены и каталог — купить кухню от производителя в спб купить кухню от производителя в спб Проверяйте по этому списку. Сам мучался теперь знаю.
solana casino flip https://sol-casino-liste.de/
Ребята всем привет. Задолбался я выбирать кухню уже полгода. Икею всю излазил — не то. Короче, единственные кто не наебывает — купить кухню от производителя в спб с доставкой. Замерщик приехал на следующий день. В общем, жмите чтобы не потерять контакты — купить кухню в спб от производителя https://zakazat-kuhnyu-gkl.ru Проверяйте производителя в этом списке. Сам полгода мучился теперь делюсь.
Питерцы отзовитесь Менеджеры врут про сроки и материалы То ЛДСП 16 мм а не 18 Короче, реальный цех в СПб без наценок — кухни СПб от производителя напрямую Цены ниже рыночных на треть В общем, жмите чтобы не потерять — большая кухня на заказ https://kuhni-spb-ytr.ru Не ведитесь на салоны-прокладки с накруткой Перешлите другу кто тоже мучается
Люди подскажите Прошерстил 30 салонов — везде перекупы То ДСП сыпется Короче, реальное производство в Питере — кухни в спб от производителя с гарантией Проект бесплатно за час В общем, там цены и каталог работ — кухни на заказ санкт петербург от производителя кухни на заказ санкт петербург от производителя Проверяйте производителя по этому списку Перешлите тому кто тоже мучается
Доброго времени Продаваны врут про материалы То фасады кривые с зазорами Короче, реальные ребята с цехом в СПб — кухни на заказ под ключ Замерщик приехал на следующий день В общем, вся инфа вот здесь — кухня на заказ спб от производителя недорого https://kuhni-spb-wxh.ru Проверяйте производителя по этому списку Сам столько нервов потратил теперь делюсь опытом
Приветствую Цены задрали как на золото То ДСП крошится Короче, мужики с руками из нужного места — купить кухню в спб от производителя с гарантией Кромка немецкая 2 мм В общем, сохраняйте в закладки — кухни на заказ спб недорого с ценами https://kuhni-spb-fpk.ru Проверяйте производителя по этому списку Перешлите тому кто тоже мучается
Приветствую Цены задрали как на золото То фасады перекошены Короче, реальное производство в Питере — кухни на заказ в спб с доставкой Кромка немецкая 2 мм В общем, вся инфа вот здесь — купить кухню на заказ спб https://kuhni-spb-fpk.ru Проверяйте производителя по этому списку Перешлите тому кто тоже мучается
Всем привет из Питера Продаваны врут про материалы То кромка отклеивается через месяц Короче, нашел наконец нормальное производство — кухни на заказ под ключ Цены ниже чем в салонах тысяч на 30-40 В общем, смотрите сами по ссылке — кухня по индивидуальному заказу спб https://kuhni-spb-wxh.ru Не ведитесь на салоны в ТЦ которые просто заказывают у китайцев и ставят наценку 100% Перешлите тому кто тоже мучается выбором
Ребята всем привет Менеджеры врут про сроки и материалы То фасады покоробились от пара Короче, единственные кто делает совестливо — кухни на заказ в спб с фурнитурой Blum Фасады на выбор из 50 цветов В общем, жмите чтобы не потерять — купить кухню на заказ в спб https://kuhni-spb-ytr.ru Проверяйте производителя по этому списку Сам полгода выбирал теперь знаю
Люди подскажите Обещают одно а по факту другое То доставку месяц ждать Короче, реальное производство в Питере — заказ кухни с установкой Проект бесплатно за час В общем, жмите чтобы не потерять — купить кухню на заказ в спб https://kuhni-spb-nbg.ru Не ведитесь на салоны-прокладки с наценкой 200% Сам полгода выбирал теперь знаю
Android telefonum için güvenilir bir apk arıyordum uzun zamandır. Play Store’da arattım ama resmi olanı bulamadım. Sonunda tüm teknik detayları inceleyip sistemi test ettim. En sonunda güvendiğim bir kaynağa ulaştım ve size de tüm detayları aktarmak istedim, güncel bilgilere buradan bakabilirsiniz: 1xbet indir apk 1xbet indir apk. Yani anlatmak istediğim şu — android uygulaması inanılmaz akıcı çalışıyor.
Hiçbir sorun yaşamadım yükleme aşamasında. Birçok apk denedim ama en iyisi bu çıktı — kesinlikle pişman olmazsınız deneyin derim. Herkese hayırlı olsun…
Ребята всем привет Менеджеры врут про сроки и материалы То фасады покоробились от пара Короче, реальный цех в СПб без наценок — кухни в спб от производителя из массива Кромка ПВХ 2 мм немецкая В общем, там цены и примеры работ — кухни на заказ в спб кухни на заказ в спб Проверяйте производителя по этому списку Перешлите другу кто тоже мучается
Люди подскажите Цены задрали как на золото То доставку месяц ждать Короче, нашел наконец нормальную контору — заказ кухни с установкой Замер на следующий день В общем, вся инфа вот здесь — кухни в спб от производителя кухни в спб от производителя Не ведитесь на салоны-прокладки с наценкой 200% Перешлите тому кто тоже мучается
Android telefonum için güvenilir bir apk arıyordum uzun zamandır. Play Store’da arattım ama resmi olanı bulamadım. Sonunda tüm teknik detayları inceleyip sistemi test ettim. En sonunda güvendiğim bir kaynağa ulaştım ve size de tüm detayları aktarmak istedim, güncel bilgilere buradan bakabilirsiniz: 1xbet app android 1xbet app android. Yani anlatmak istediğim şu — android uygulaması inanılmaz akıcı çalışıyor.
güncellemeleri de düzenli olarak geliyor. Birçok apk denedim ama en iyisi bu çıktı — kesinlikle pişman olmazsınız deneyin derim. Şimdiden iyi şanslar ve bol kazançlar…
Слушайте кто с ремонтом Нужно сдвинуть санузел Мосжилинспекция завернёт любые работы Нервов потратил — пипец Короче, единственное что реально работает — перепланировка квартиры в Москве с гарантией Сроки реальные — не затягивают В общем, вся инфа вот здесь — услуги по перепланировке квартир услуги по перепланировке квартир Потом штраф и суды Перешлите тому кто затеял ремонт
Слушайте кто ремонт затеял Планировал объединить кухню с гостиной Разрешения эти дурацкие Потратил кучу времени впустую Короче, единственные кто берётся за всё — услуги по перепланировке квартир под ключ Всё за месяц закрыли В общем, там и примеры и расценки — перепланировка в москве https://pereplanirovka-kvartir-owy.ru Потом себе дороже выйдет Перешлите тому кто тоже ремонт затеял
1xbet mobil apk son sürümüne ulaşmak istiyordum açıkçası. Güvenilir bir kaynak bulmak gerçekten çileydi. Güncel bilgileri kontrol edip süreci hatasız başlattım. En sonunda sağlam bir adrese ulaştım ve size de tüm detayları aktarmak istedim, güncel bilgilere buradan bakabilirsiniz: 1xbet indir android 1xbet indir android. Şimdi size kısaca özet geçeyim — mobil versiyonu her şeyi thinkmüş resmen.
Hiçbir güvenlik sorunu yaşamadım yükleme esnasında. İşin doğrusunu söylemek gerekirse — kesinlikle pişman olmazsınız deneyin derim. Şimdiden iyi şanslar ve bol kazançlar…
Ребята кто в Москве Нужно перенести санузел Мосжилинспекция без проекта даже не смотрит Я уже голову сломал Короче, ребята реально толковые — проект перепланировки квартиры для согласования в МЖИ Всё согласовали за месяц В общем, сохраняйте себе — перепланировка квартиры проектные организации https://proekt-pereplanirovki-kvartiry-hmf.ru Не начинайте без проекта Перешлите тому кто ремонт затеял
Родители отзовитесь Задолбала эта обычная школа А ещё эти поборы в классе Перепробовал кучу вариантов Короче, единственная школа где реально учат — онлайн обучение для школьников в удобное время Учителя реально знают своё дело В общем, вся инфа вот здесь — онлайн школа 1 https://shkola-onlajn-krt.ru Не мучайте детей Перешлите другим родителям кто устал от школы
Android telefonuma güvenle yükleyebileceğim bir uygulama arıyordum. Play Store’da resmi uygulamayı bulamayınca çok hayal kırıklığı yaşadım. Adımları doğru sırayla uyguladıktan sonra erişim sorunsuz açıldı. En sonunda sağlam bir adrese ulaştım ve size de tüm detayları aktarmak istedim, güncel bilgilere buradan bakabilirsiniz: 1xbet yukle android 1xbet yukle android. Yani anlatmak istediğim şu — android uygulaması gerçekten hızlı ve akıcı çalışıyor.
kurulumu da oldukça basit ve anlaşılırdı yani rahat olun. Kendi deneyimlerimi aktarıyorum size — başka yerde vakit kaybetmeyin yani. Herkese hayırlı olsun…
Слушайте кто ремонт затеял Решил санузел немного расширить А тут оказывается столько бумаг Нервов просто не осталось Короче, единственные кто берётся за всё — услуги по перепланировке квартир под ключ И техзаключение оформили В общем, сохраняйте себе — перепланировка москва https://pereplanirovka-kvartir-owy.ru Потом себе дороже выйдет Перешлите тому кто тоже ремонт затеял
Слушайте кто ищет нормальную школу Учителя со своими закидонами А знаний реальных ноль Короче, реально крутая система — онлайн школы для детей с 1 по 11 класс Преподаватели реально крутые В общем, вся инфа вот здесь — online school https://shkola-onlajn-vem.ru Не мучайте себя и детей Перешлите другим родителям
Ребята кто в Москве Нужно перенести санузел Оказывается без бумажки ты никто Нервов просто нет Короче, нашел наконец нормальную контору — проект перепланировки квартиры под ключ И техзаключение сделали В общем, сохраняйте себе — заказать проект перепланировки квартиры в москве https://proekt-pereplanirovki-kvartiry-hmf.ru Потом себе дороже Перешлите тому кто ремонт затеял
Слушайте кто перевёл на дистант Вечно эти сборы в 8 утра Ребёнок учится ради оценок, а не знаний Нервов потратил немерено Короче, нашел отличный вариант — школа онлайн с аттестатом государственного образца Учителя реально знают своё дело В общем, там и программа и отзывы — интернет школы https://shkola-onlajn-krt.ru Переводите на нормальное обучение Перешлите другим родителям кто устал от школы
Ребята всем привет Замучился я с перепланировкой А тут оказывается столько бумаг Я уже голову сломал Короче, единственные кто берётся за всё — перепланировка квартиры в Москве быстро и дорого Всё за месяц закрыли В общем, сохраняйте себе — согласование перепланировки согласование перепланировки Не начинайте без проекта Перешлите тому кто тоже ремонт затеял
Ребята кто в Москве Нужно перенести санузел Уже знакомые налетели на миллион Нервов просто нет Короче, ребята реально толковые — проект перепланировки и переустройства квартиры полный пакет И чертежи нарисовали В общем, сохраняйте себе — проектная организация для перепланировки квартиры https://proekt-pereplanirovki-kvartiry-hmf.ru Потом себе дороже Перешлите тому кто ремонт затеял
Слушайте кто перевёл на дистант Вечно эти сборы в 8 утра То ремонт, то экскурсии, то подарки Я уже голову сломал Короче, нашел отличный вариант — онлайн школы с зачислением и без стресса Аттестат государственный — не хуже обычного В общем, там и программа и отзывы — дистанционное образование https://shkola-onlajn-krt.ru Переводите на нормальное обучение Перешлите другим родителям кто устал от школы
Мамы и папы отзовитесь Учителя со своими закидонами Нервы ни к чёрту у всей семьи Короче, реально крутая система — онлайн школы для детей с 1 по 11 класс Уроки в комфортное время В общем, жмите чтобы не потерять — онлайн школа 1 https://shkola-onlajn-vem.ru Переходите на нормальное обучение Перешлите другим родителям
Народ у кого дети в школе Задолбали эти сборы в 7 утра Ребёнок не высыпается Короче, нашли крутую альтернативу — школы дистанционного обучения без стресса и нервов Ребёнок реально понимает материал В общем, сохраняйте себе — онлайн школы с зачислением онлайн школы с зачислением Переходите на дистант нормальный Перешлите другим родителям
Здорова родители Каждое утро как каторга Ребёнок раздражённый Короче, школа без стресса и скандалов — онлайн школы для детей с 1 по 11 класс Ребёнок занимается с удовольствием В общем, вся инфа вот здесь — школьное образование онлайн школьное образование онлайн Переходите на нормальное обучение Перешлите другим родителям
Нужна бесплатная юридическая консультация? Переходите по запросу юридическая помощь в Тюмени и получите помощь опытных правозащитников в любой области права: семейные споры, долги и кредиты, недвижимость, трудовые конфликты, защита прав потребителей и многое другое. Задайте вопрос онлайн или по телефону и получите подробный разбор вашей ситуации и рекомендации адвоката по дальнейшим действиям. Консультация проводится бесплатно и конфиденциально.
Мамы и папы слушайте Замучились мы с этой школой Никакой мотивации учиться Короче, нашли отличный вариант — онлайн школы для детей с 1 по 11 класс Учителя настоящие профи В общем, жмите чтобы не потерять — сайт онлайн образования https://shkola-onlajn-bxf.ru Не мучайте себя и детей Перешлите другим родителям
Ребята у кого дача Сроки срывают постоянно То вообще приезжают и говорят что замер не тот Короче, мужики с руками из правильного места — производство и монтаж заборов любой сложности И установили всё чисто В общем, сохраняйте себе — заборы для дачи под ключ заборы для дачи под ключ Проверяйте производителя по этому списку Перешлите тому у кого участок
Здорова родители Домашка на весь вечер Никакого интереса к знаниям Короче, нашли идеальное решение — онлайн обучение для детей в удобном темпе Уроки тогда когда удобно В общем, смотрите сами по ссылке — онлайн школа огэ онлайн школа огэ Переходите на нормальное обучение Перешлите другим родителям
Слушайте кто подъемники ищет Объездил кучу поставщиков — везде перекупы То тали бракованные Короче, нашел нормальных производителей — грузоподъемное оборудование Москва с доставкой Цены ниже чем у перекупов на 20% В общем, там каталог и цены — кран балка подвесная https://tal-elektricheskaya.ru Не ведитесь на дешевые предложения Перешлите тому кто ищет оборудование
Здорова родители Учителя которые только и знают что орать Ребёнок раздражённый Короче, реально удобный формат учёбы — онлайн школы с зачислением и аттестатом Никаких школьных драм В общем, там программа и отзывы — московская онлайн школа https://shkola-onlajn-lzn.ru Хватит мучить себя и ребёнка Перешлите другим родителям
Мамы и папы всем привет Учителя которые только и делают что пилят А поборы в классе просто бесят Короче, единственная школа которая работает — школа онлайн с лицензией и зачислением Никаких звонков и перемен В общем, жмите чтобы не потерять — онлайн образование школа онлайн образование школа Хватит мучить себя и ребёнка Перешлите другим родителям
Слушайте кто забор ставил Объездил кучу контор — везде одно и то же То материал фуфло Короче, мужики с руками из правильного места — монтаж заборов под ключ с материалами Сделали за две недели В общем, там каталог и цены — монтаж заборов под ключ монтаж заборов под ключ Не ведитесь на дешёвые предложения Перешлите тому у кого участок
Народ всем привет Сроки срывают постоянно То материал фуфло Короче, реальное производство в Москве — заказать забор под ключ из профнастила Гарантия на все работы В общем, сохраняйте себе — горизонтальный металлический забор https://zagorodnii-dom.ru Не ведитесь на дешёвые предложения Перешлите тому у кого участок
Народ всем привет Объездил кучу поставщиков — везде перекупы То тельферы клинят Короче, реальный завод в Москве — подъемное оборудование для производства любой сложности Гарантия 5 лет В общем, жмите чтобы не потерять — ремонт грузоподъемного оборудования https://tal-elektricheskaya.ru Проверяйте производителя по документам Перешлите тому кто ищет оборудование
Всем привет родители Домашка до ночи Вечно больной и уставший Короче, школа где ребёнку комфортно — школа онлайн с лицензией и зачислением Никаких нервов В общем, смотрите сами по ссылке — онлайн обучение https://shkola-onlajn-bxf.ru Не мучайте себя и детей Перешлите другим родителям
Ребята у кого производство Объездил кучу поставщиков — везде перекупы То кран-балки с зазорами Короче, реальный завод в Москве — грузоподъемное оборудование купить с сертификатами Доставили за неделю В общем, там каталог и цены — оборудование для подъема грузов оборудование для подъема грузов Проверяйте производителя по документам Перешлите тому кто ищет оборудование
Dolga leta sem se boril sam. Potem pa sem dobil pravi nasvet in vse se je postavilo na svoje mesto. Govorim o ambulantnem zdravljenju alkoholizma pri strokovnjakih, ki res znajo pomagati. Veste, alkoholizem je bolezen, ne slabost. In kar je najpomembneje – program je prilagojen posamezniku. Več o tem in o izkušnjah pacientov si lahko preberete neposredno na uradnem viru: alkoholizem alkoholizem. Meni so resnično pomagali.
Če kogarkoli, ki ga imate radi potrebuje pomoč – ne odlašajte. Vse se da, če hočeš.
Emprestimos p2plendingportugal.com: uma analise das principais plataformas. Compare as taxas, os montantes minimos de investimento, as categorias de emprestimos disponiveis, os retornos, os mecanismos de protecao do investidor e as principais caracteristicas de cada servico.
Un analisis de las plataformas de crowdfunding inmobiliario en Espana para 2026 te ayudara a elegir la mejor opcion de inversion. Analizamos los servicios mas populares, las condiciones de participacion, los tipos de proyectos, la rentabilidad potencial, los riesgos y los beneficios de la inversion colectiva en bienes raices.
Une comparaison de plateformecrowdfunding.fr plateformes pour les investisseurs et les emprunteurs a l’heure de 2026. Les frais, les investissements minimums, les types de projets, les niveaux de fiabilite, les rendements attendus, les exigences legales et les criteres de selection sont abordes.
Uma analise do crowdfundingimobiliario.com em Portugal. Analise dos termos, montantes minimos, tipos de imoveis, riscos, rendibilidades e caracteristicas do mercado em 2026.
Ce guide des pretparticipatiffrance.fr en France vous aidera a choisir la plateforme la plus adaptee a vos besoins. Nous analysons les conditions, la rentabilite, les risques, les exigences pour les participants, les methodes de financement et les principales differences entre les services les plus populaires.
Decouvrez les meilleurs projets plateformedecrowdfunding.fr en France en 2026. Comparez les types de projets, les conditions d’investissement, les frais, les rendements potentiels, les niveaux de risque et les avantages pour l’investisseur.
Уничтожение клопов https://x99999.ru и тараканов в Красноярске с гарантией результата. Профессиональная обработка квартир, домов, офисов и коммерческих помещений. Современные безопасные средства, быстрый выезд специалистов, доступные цены и эффективное избавление от насекомых.
фасадные панели дача технониколь халберг
Latest publications: Achaemenid Royal Inscriptions
Только лучшие материалы: https://1citywomen.ru/zdorove/neveroyatnaya-sila-etogo-naturalnogo-sredstva-v-mgnovenie-izbavit-vas-ne-tolko-ot-golovnoj-boli-no-i-ot-migreni/
Только лучшие материалы: https://gi-wom.ru
Последние публикации: https://l-parfum.ru/catalog/louis-vuitton/2954/
изучение английского изучение английского
Да уж, родственники маются. Как есть — реальное выведение из запоя без кодировки. Ребята работают чисто. Между нами, вот нормальный расклад — цены на вывод из запоя на дому https://vyvod-iz-zapoya-na-domu-voronezh-xrt.ru Организм не резиновый. Поверьте моему опыту, чем потом скорую вызывать. Проверенный вариант по городу.
Dolgo sem iskal pravo rešitev. Ko sem prvič slišal za zdravljenje alkoholizma po metodi Dr Vorobjeva, sem bil skeptičen. Ampak ko sem videl rezultate — vse se je spremenilo. Odvisnost od alkohola je strašna bolezen. In najhuje je, da ne poznajo dobrih možnosti zdravljenja. Zato vam želim pokazati vse tehnične podrobnosti in uradne informacije, ki so na voljo na tej povezavi: Dr Vorobjev center http://www.alkoholizma-zdravljenje-si.com. Na tej povezavi so odgovori na vsa vprašanja.
Meni je ta pristop pomagal. Če vas to zanima — vzemite si čas in preberite. Upam, da vam bo koristilo!
Сил уже нет, родственники на нервах. Руки опускаются. Наркологическая клиника с выездом — адекватный вывод из запоя цены указаны. Там реальные врачи. Короче, вот вам информация — срочный вывод из запоя срочный вывод из запоя Организм не вывозит. Сам через это прошел, чем потом собирать по кускам. Проверено на своей шкуре.
Честно говоря, многие не знают как быть. Достали уже эти срывы. В этом вопросе главное не заниматься самодеятельностью. Посмотрите сами — срочный вывод из запоя. Там работают толковые врачи. Короче, вот собственно источник — нарколог на дом вывод из запоя на дому нарколог на дом вывод из запоя на дому Промедление смерти подобно, потому что запой убивает почки и сердце. Проверено на себе.
All the latest is here: Aerial Archaeology.
Обязательно к прочтению: https://simgallery.ru/magnit2/
Современная спецтехника https://www.4595.com.ua/list/557907 помогает эффективно выполнять строительные, дорожные и производственные работы. Экскаваторы, погрузчики, катки и другая техника позволяют сократить сроки реализации проектов, повысить производительность и снизить затраты на выполнение сложных задач.
Como investir em crowdfundingimobiliario-guide.com em Portugal atraves de plataformas de crowdfunding em 2026. Compare servicos, analise termos, investimento minimo, potencial de lucro, riscos, imoveis disponiveis e criterios para escolher uma plataforma fiavel.
Como investir em crowdfundingimobiliario-guide.com em Portugal atraves de plataformas de crowdfunding em 2026. Compare servicos, analise termos, investimento minimo, potencial de lucro, riscos, imoveis disponiveis e criterios para escolher uma plataforma fiavel.
Перед началом строительства https://5стен.рф важно сравнить проекты, материалы и стоимость работ. Подробную информацию о строительстве домов и коттеджей можно найти на сайте.
премиум подписчики в телеграм подписчики в Телеграм на PR Motion
Most Interesting: m99 casino
Looking for information about artists or concerts? Head to http://prosportsmusic.com – your best choice for finding music content.
Нужна бесплатная юридическая консультация? Переходите по запросу консультация юриста бесплатно онлайн без номера телефона и регистрации в Ханты-Мансийске и получите помощь опытных правозащитников в любой области права: семейные споры, долги и кредиты, недвижимость, трудовые конфликты, защита прав потребителей и многое другое. Задайте вопрос онлайн или по телефону и получите подробный разбор вашей ситуации и рекомендации адвоката по дальнейшим действиям. Консультация проводится бесплатно и конфиденциально.
Слушайте, попал в такую передрягу. Близкий уже неделю не просыхает. Руки опускаются. В больницу тащить страшно. Короче, только это и работает — качественная наркологическая клиника на выезде. Поставили систему. В общем, смотрите сами по ссылке — вывести из запоя на дому вывести из запоя на дому Не надейтесь на авось. Скиньте кому надо.
What’s Changed: https://www.haras-de-bannes.com/deposit-options-at-ignition-casino-aussie-player-guide/
Блин народ, ситуация просто аховая. Отец не вылезает из бутылки. Руки опустились. Скорая не приезжает. Короче, врачи реально вытащили — срочный вывод из запоя круглосуточно. Поставили систему. В общем, там контакты и прайс — вывод из запоя недорого вывод из запоя недорого Промедление смерти подобно. Сохраните себе.
Народ, представляете кошмар — близкий совсем не выходит из штопора. Дети плачут. А скорая не едет. Я через это прошёл. Короче, проверенный способ — срочный вывод из запоя круглосуточно. Примчались за час. В общем, жмите чтобы не потерять — вывод из запоя с выездом https://vyvod-iz-zapoya-na-domu-voronezh-jhg.ru Промедление реально убивает. Деньги потом не нужны будут. Перешлите тому кто в беде.
More on our website: https://slavismledger.click
Ударно-волновая терапия https://novogireevo-klinika.ru в Пушкино — эффективный метод лечения хронической боли, воспалений сухожилий и суставов. Консультация врача, подбор курса процедур, современное оборудование, комфортные условия и профессиональный подход к восстановлению здоровья.
Extended Review: https://hyotherenode.click
More Details: https://svanza.digital
Драфт-сюрвей https://eurogal-surveys.ru независимый расчет массы груза по осадке судна перед погрузкой и после выгрузки. Точные измерения, международные методики, квалифицированные сюрвейеры, официальные отчеты и контроль количества груза для морских перевозок.
Аренда квартир в СПб https://arenda-kvartir78.ru на длительный срок и посуточно. Большой выбор квартир в разных районах Санкт-Петербурга, проверенные объявления, удобный поиск по цене, площади и расположению. Найдите комфортное жилье без лишних сложностей.
Квартиры в новостройках https://novostroyka78.ru Курортного района СПб с удобным поиском по цене, площади и срокам сдачи. Современные жилые комплексы, экологичная локация, близость парков и Финского залива, выгодные ипотечные программы и предложения от застройщиков.
Народ выручайте. Жесть просто полная. Близкий человек уже шестой день в завязке. Дети не спят ночами. В диспансер везти — клеймо на всю жизнь. Короче, только это и вытащило — профессиональный вывод из запоя на дому. Откачали за час. В общем, там и контакты и прайс — нарколог на дом вывод из запоя на дому нарколог на дом вывод из запоя на дому Каждый час на счету. Скиньте кому надо.
Последние обновления: https://smz-osv.ru
Летний лагерь с английским языком в YES Center — это полное погружение в среду. Дети общаются, играют и учатся одновременно, поэтому новые слова и фразы запоминаются легко, без зубрёжки. Опытные педагоги поддерживают каждого. Бронируйте места заранее.
Друзья ситуация жуткая. Столкнулся с настоящей бедой. Брат пьёт без остановки. Соседи уже стучат. В диспансер везти — на всю жизнь учёт. Короче, только это и спасло — срочный вывод из запоя круглосуточно. Поставили систему. В общем, смотрите сами по ссылке — вывод из запоя круглосуточно вывод из запоя круглосуточно Не надейтесь на авось. Скиньте другу в беде.
Друзья ситуация. Жесть случилась полная. Человек уже пятые сутки в штопоре. Дети не спят ночами. В диспансер везти — учёт на всю жизнь. Короче, нормальные врачи нашлись — срочный вывод из запоя круглосуточно. Отошёл за полчаса. В общем, жмите чтобы не потерять — вывод из запоя на дому самара https://vyvod-iz-zapoya-na-domu-samara-abc.ru Не тяните. Скиньте другу в беде.
Слушайте что расскажу. Столкнулся с такой бедой. Муж просто убивает себя. Дети не спят ночами. Скорая не едет на такие вызовы. Короче, единственное что реально помогло — доступный вывод из запоя цены адекватные. Откачали за час. В общем, смотрите сами по ссылке — вывод из запоя недорого вывод из запоя недорого Не надейтесь на авось. Перешлите тому кому надо.
Longreads and hits: https://prague1shop.com
Друзья ситуация. Жесть случилась полная. Брат пьёт без остановки. Жена в слезах. Скорая не едет. Короче, единственное что реально помогло — вывести из запоя на дому качественно. Поставили систему. В общем, там контакты и прайс — вывод из запоя с выездом на дом вывод из запоя с выездом на дом Не надейтесь на авось. Скиньте другу в беде.
Народ выручайте. Жесть случилась полная. Близкий не выходит из запоя. Соседи стучат в дверь. В диспансер везти — учёт на всю жизнь. Короче, только это и спасло — вывод из запоя дешево и сердито. Поставили систему. В общем, смотрите сами по ссылке — срочный вывод из запоя на дому https://vyvod-iz-zapoya-na-domu-samara-def.ru Каждая минута дорога. Скиньте другу в беде.
Самарцы привет. Жесть случилась полная. Муж просто пропадает. Жена в слезах. В диспансер везти — учёт на всю жизнь. Короче, только это и спасло — вывести из запоя на дому качественно. Приехали через час. В общем, там контакты и прайс — вывести из запоя на дому цена https://vyvod-iz-zapoya-na-domu-samara-mno.ru Не надейтесь на авось. Скиньте другу в беде.
Ребята кто с недвижкой То сайты виснут Всё это нужно знать перед покупкой Короче, нашел отличный инструмент — публичная кадастровая карта новая с 3D-видом Нашёл участок за 5 минут В общем, смотрите сами по ссылке — публичная кадастровая карта россии 2025 https://publichnaya-kadastrovaya-karta-abc.ru Не мучайтесь с росреестром Перешлите тому кто ищет участок
Самарцы всем привет. Попал я в переплёт конкретный. Близкий не выходит из запоя. Жена в слезах. Скорая не едет. Короче, единственное что реально помогло — профессиональное выведение из запоя капельницей. Поставили систему. В общем, жмите чтобы не потерять — анонимный вывод из запоя анонимный вывод из запоя Не надейтесь на авось. Скиньте другу в беде.
blacksprut ссылка
a.blsp at
bs2best.at что за сайт m.bs2site.at
bs2web at ссылка
Народ кто с землёй То вообще ничего не грузит Границы посмотреть Короче, нашел крутой инструмент — публичная кадастровая карта новая с просмотром Нашел всё за 10 минут В общем, вся инфа вот здесь — росреестр публичная кадастровая карта https://publichnaya-kadastrovaya-karta-ghi.ru Не парьтесь с росреестром Перешлите тому кто ищет участок
bs2web at blsp.at blacksprut
bs2web at ссылка m.bs2site.at
Слушайте кто участки ищет То карта виснет Кадастровый номер вбить Короче, работает быстро и понятно — росреестр публичная кадастровая карта быстрый поиск Проверил обременения В общем, там и карта и данные — официальная кадастровая карта https://publichnaya-kadastrovaya-karta-mno.ru Пользуйтесь нормальной картой Перешлите тому кто ищет участок
Слушайте кто участки смотрит То вообще ничего не грузит Границы посмотреть Короче, работает быстро и понятно — публичная кадастровая карта с 3D-видом Нашел всё за 10 минут В общем, там и карта и данные — публичная кадастровая карта pkk5 https://publichnaya-kadastrovaya-karta-jkl.ru Не парьтесь с росреестром Перешлите тому кто ищет участок
Kraken — это название, тот или иной соединяется вместе с силой, масштабом также надежностью. Оно привлекает внимание близкой узнаваемостью да ярким образом. Благодаря нынешнему подходу (а) также постоянному формированию, Kraken остается потребованным выбором для тех, кто такой предпочитает качество, уют а также уверенность на результате.кракен сайт vk2 top
Слушайте что расскажу. Жесть случилась полная. Брат пьёт без остановки. Соседи стучат в дверь. Платные клиники просят бешеные деньги. Короче, только это и спасло — срочный вывод из запоя круглосуточно. Поставили систему. В общем, сохраняйте на будущее — вывести из запоя срочно https://vyvod-iz-zapoya-na-domu-samara-jkl.ru Не тяните. Скиньте другу в беде.
Лучшее прямо здесь: https://betonkupit.ru
Online sales funnel analyze quiz sessions and funnel drop-off
Слушайте что расскажу. Жесть случилась полная. Человек уже вторые сутки в штопоре. Жена в слезах. В диспансер везти — учёт на всю жизнь. Короче, нормальные врачи нашлись — анонимный вывод из запоя без последствий. Отошёл за полчаса. В общем, там контакты и прайс — вывод из запоя на дому цена вывод из запоя на дому цена Не тяните. Скиньте другу в беде.
Business sales funnel web-to-app flows and app onboarding docs
Народ выручайте. Попал я в переплёт конкретный. Муж просто пропадает. Жена в слезах. В диспансер везти — учёт на всю жизнь. Короче, только это и спасло — вывод из запоя дешево и сердито. Приехали через час. В общем, вся инфа вот здесь — капельница от запоя на дому цена капельница от запоя на дому цена Не тяните. Скиньте другу в беде.
Все подробности по ссылке: https://novstroi-nn.ru
LinguaGlobal — профессиональное бюро переводов, которому доверяют частные клиенты и компании. Если вы ищете перевод с испанского на русский – заходие к нам. Выполняем юридические, технические, медицинские и другие виды переводов более чем на 60 языков мира. Гарантируем точность, соблюдение сроков, полную конфиденциальность и индивидуальный подход. При необходимости обеспечим нотариальное заверение документов. Каждый проект выполняет профильный специалист с соответствующим образованием.
Слушайте что расскажу. Жесть случилась полная. Муж просто пропадает. Жена в слезах. Скорая не едет. Короче, единственное что реально помогло — профессиональное выведение из запоя капельницей. Приехали через час. В общем, смотрите сами по ссылке — врач вывод из запоя https://vyvod-iz-zapoya-na-domu-samara-yza.ru Не тяните. Перешлите тому кому надо.
Ребята. Близкий человек в завязке. Родня разрывает телефон. Скорая не приедет на такой вызов. В итоге, выручили только эти ребята — срочный вывод из запоя с выездом в Екатеринбурге. Через пару часов человек задышал. В общем, сохраните чтобы не искать — капельница от запоя екатеринбург https://vyvod-iz-zapoya-na-domu-ekaterinburg-rfj.ru Не ждите чуда. Кто в беде — тому пригодится.
Эффективные курсы английского для школьников в YES Center помогают и в учёбе, и в реальном общении. Подтянем оценки, подготовим к экзаменам и научим говорить свободно. Опытные педагоги, удобное расписание и дружная атмосфера ждут вашего ребёнка.
Слушайте что расскажу. Жесть случилась полная. Муж просто пропадает. Жена в слезах. Платные клиники просят бешеные деньги. Короче, только это и спасло — профессиональное выведение из запоя без кодировки. Отошёл за полчаса. В общем, смотрите сами по ссылке — капельница от запоя недорого https://vyvod-iz-zapoya-na-domu-ekaterinburg-xtz.ru Не тяните. Скиньте другу в беде.
Хотите учиться, не выходя из дома? онлайн курсы по английскому от YES Center подходят и взрослым, и детям. Современная платформа, продуманная программа и обратная связь от педагога делают обучение эффективным и комфортным. Старт групп каждый месяц.
Здорово, народ. Брат снова в штопоре. Родные не знают, за что хвататься. Скорая даже не рассматривает такие вызовы. Короче, единственные кто помог без нервотрёпки — круглосуточный вывод из запоя в Екатеринбурге. Выехали быстро. В общем, вся инфа и контакты по ссылке — прокапаться от алкоголя цены прокапаться от алкоголя цены Звоните не раздумывая. Вдруг пригодится.
Привет из Екатеринбурга. Знакомый уже неделю в запое. Дети всего боятся. В диспансер отвозить — стыдоба. В итоге, действительно профессиональная бригада — профессиональный вывод из запоя недорого. Вкапали систему сразу. В общем, жмите чтобы не забыть — вывести из запоя вывести из запоя Звоните прямо сейчас. Кому-то это может спасти жизнь.
Слушайте. Знакомый совсем ушёл в штопор. Родственники места себе не находят. Платная клиника просто грабит. Короче, спасла только эта контора — срочный вывод из запоя с выездом врача. К утру человек пришёл в себя. В общем, все контакты по ссылке — капельница от похмелья на дому капельница от похмелья на дому Не откладывайте. Скиньте кому пригодится.
Доброго дня. Брат пьёт без остановки. Дети перепуганы. В диспансер тащить — позор на всю жизнь. В итоге, реально спасли эти врачи — недорогой вывод из запоя в Екатеринбурге. Поставили капельницу сразу. В общем, не потеряйте вкладку — вывод из запоя екатеринбург https://vyvod-iz-zapoya-na-domu-ekaterinburg-nws.ru Не откладывайте на завтра. Может кому-то спасёт жизнь.
Zivjo, dolgo nisem pisal. Rad bi delil nekaj z vami. Veste, alkohol je bil dolgo del mojega zivljenja. Potem pa sem na spletu nasel ambulantno zdravljenje alkoholizma pri metodi, ki resnicno deluje. Mislil sem, da je to se ena prevara. Ampak sem vseeno poskusil. In zdaj, po nekaj mesecih, lahko recem, da je bilo to prelomnica v mojem zivljenju. Vec o tem in o celotnem postopku si lahko preberete neposredno na uradnem viru: odvajanje od alkohola odvajanje od alkohola. Alkoholizem is bolezen, ne slabost.
Ce se vi ali kdo od vasih bliznjih sooca s tem — ne odlasajte s to odlocitvijo. Nikoli ni prepozno za nov zacetek.
Preizkusil sem ze vse mogoce. Potem pa sem po priporocilu nasel nekaj, kar je bilo prelomnica. Govorim o zdravljenju alkoholizma pri Dr Vorobjev centru. Veste, odvisnost od alkohola je zahrbtna. In veliko je slabih informacij. Zato priporocam, da preverite celoten postopek na spletni strani, ki so na voljo na tej povezavi: Dr Vorobjev Dr Vorobjev. Tam boste nasli vse potrebne informacije.
Meni je ta pristop pomagal. Ni bilo lahko, ampak rezultat govori sam zase. Ce nekdo v vasi okolici se sooca s to tezavo – najboljsa odlocitev je poklicati. Drzim pesti za vsakega, ki se bori
Подробности внутри: https://frenchspeak.ru/%d0%be%d1%81%d0%ba%d0%be%d1%80%d0%b1%d0%bb%d0%b5%d0%bd%d0%b8%d0%b5
Только что опубликовано: https://spainslov.ru/site/word/word/%D0%9E%D0%A1%D0%90
Привет из Екатеринбурга. Беда пришла. Соседи уже начали звонить в участок. В платной наркологии — бешеные счета. Итог, выручила эта служба — профессиональная помощь на дому. Бригада подъехала через 35 минут. В общем, контакты и стоимость тут — вывод из запоя вывод из запоя Не медлите. Скиньте тем, кто в отчаянной ситуации.
Dober dan vsem, ki berete. Moram povedati nekaj iz prve roke. Vsak dan je bil enak mucenje. Potem pa sem na spletu naletel na resitev. Govorim o ambulantnem zdravljenju alkoholizma pri Dr Vorobjev centru. Bil sem preprican, da je zame prepozno. Ampak sem se odlocil за ta korak in zivljenje se je obrnilo na bolje. Vse uradne informacije in podrobnosti sem preveril na spletni strani, posodobljene podatke pa si lahko ogledate tukaj: odvisnost od alkohol odvisnost od alkohol Odvisnost od alkohola ni znak sibkosti.
Ce kdo od druzinskih clanov ne vidi izhoda — vredno je poskusiti. Srecno na vasi poti!
цена охранных услуг охранное агентство алматы
zovirax cream online pharmacy https://healthpharmacology.com/medications/furosemide/ online pharmacy drop shipping
Доброго вечера. Брат снова ушел в штопор. Родственники на взводе. Скорая помощь просто разводит руками. В итоге, единственные кто быстро приехал и помог — вывод из запоя цены адекватные. Приехали через 30 минут. В общем, не потеряйте, пригодится — снятие интоксикации на дому https://vyvod-iz-zapoya-na-domu-ekaterinburg-mfk.ru Не ждите. Вдруг кому-то это спасёт жизнь.
Приветствую всех. Близкий человек уже неделю в запое. Родственники не знают, как помочь. Скорая не считается с запоями. Короче, спасла только эта капельница — капельница от запоя цена доступная. Врач сразу начал детокс. В общем, цены и телефон тут — вывод из запоя капельница вывод из запоя капельница Каждый час без капельницы ухудшает состояние. Киньте ссылку тем, кто в беде.
Всем салют. Муж пьёт без остановки. Соседи уже вызывали участкового. Скорая не реагирует на пьянку. Короче, единственные кто приехал без предоплаты — вывод из запоя на дому срочный. Через час человек начал говорить. В общем, сохраните себе в закладки — нарколог вывод из запоя https://vyvod-iz-zapoya-na-domu-ekaterinburg-dyz.ru Не откладывайте. Может, кому-то она спасёт близкого.
Доброго дня. Мой отец уже четвёртый день в запое. Родня не знает, что делать. Платная клиника просит бешеные деньги. Короче, выручила эта служба — вывод из запоя на дому срочно. Прибыли через 40 минут. В общем, сохраните себе — вывод из запоя анонимно недорого https://vyvod-iz-zapoya-na-domu-nizhnij-novgorod-pwj.ru Промедление может стоить здоровья. Вдруг это спасёт чью-то жизнь.
Everything for Minecraft http://www.topminecraftworldseeds.com/ in one place: mods, skins, maps, texture packs, and the best seeds for survival, creativity, and adventure. Collections of popular add-ons, installation instructions, updates, and secure downloads for different versions of the game.
Всем привет. Близкий человек потерял контроль над собой. Домашние условия не помогают. Скорая не решает проблему глобально. Короче, спасло только это — вывод из запоя в стационаре круглосуточно. Выписали без симптомов ломки. В общем, вся инфа по ссылке — вывести из запоя в стационаре https://vyvod-iz-zapoya-v-staczionare-nizhnij-novgorod-knd.ru Стационар — это шанс на нормальную жизнь. Перешлите тем, кто в отчаянии.
Everything for Minecraft topminecraftworldseeds com in one place: mods, skins, maps, texture packs, and the best seeds for survival, creativity, and adventure. Collections of popular add-ons, installation instructions, updates, and secure downloads for different versions of the game.
Всем привет с Невы. Близкий человек снова сорвался. Дети боятся отца. Платная клиника — деньги выкачивают. Короче, реально профессиональные врачи — вывод из запоя на дому срочно. Сняли абстинентный синдром. В общем, вся информация по ссылке — вывод из запоя санкт петербург https://vyvod-iz-zapoya-na-domu-sankt-peterburg-zqe.ru Звоните прямо сейчас. Вдруг это спасёт чью-то жизнь.
Доброго дня. Брат уже пятые сутки не просыхает. Мать рыдает. Платная клиника — огромные счета. Итог, выручила только эта клиника — частная наркологическая помощь анонимно. Сняли абстинентный синдром. В общем, цены и телефон тут — наркологическая помощь недорого наркологическая помощь недорого Звоните прямо сейчас. Вдруг это спасёт жизнь.
Everything for Minecraft topminecraftworldseeds.com in one place: mods, skins, maps, texture packs, and the best seeds for survival, creativity, and adventure. Collections of popular add-ons, installation instructions, updates, and secure downloads for different versions of the game.
Всем привет из Питера. Случилась беда. Родственники не знают, что делать. В государственную наркологию — страшно и стыдно. Короче, реально профессиональные врачи — вывод из запоя цены фиксированные. Через пару часов человек пришёл в себя. В общем, жмите, чтобы сохранить — вывод из алкогольного запоя https://vyvod-iz-zapoya-na-domu-sankt-peterburg-abc.ru Звоните прямо сейчас. Это может спасти чью-то жизнь.
Доброго вечера, земляки. Брат снова ушёл в пьянку. Мать в депрессии. В государственный диспансер — табу. Короче, выручила эта служба — капельница на дому от запоя. Через пару часов человек задышал ровно. В общем, вся информация по ссылке — вывод из запоя цена вывод из запоя цена Не ждите, пока станет хуже. Перешлите тем, кто рядом с бедой.
Everything for Minecraft http://www.topminecraftworldseeds.com in one place: mods, skins, maps, texture packs, and the best seeds for survival, creativity, and adventure. Collections of popular add-ons, installation instructions, updates, and secure downloads for different versions of the game.
Everything for Minecraft https://www.topminecraftworldseeds.com in one place: mods, skins, maps, texture packs, and the best seeds for survival, creativity, and adventure. Collections of popular add-ons, installation instructions, updates, and secure downloads for different versions of the game.
Приветствую народ. Отец не выходит из штопора. Дети боятся оставаться дома. Платная клиника — деньги на ветер. Короче, реально крутые врачи — вывод из запоя цены приемлемые. Сняли абстинентный синдром. В общем, все контакты по ссылке — вывод из запоя недорого нарколог24 https://vyvod-iz-zapoya-na-domu-sankt-peterburg-xyt.ru Звоните прямо сейчас. Вдруг это спасёт чью-то жизнь.
Салют, земляки. Близкий человек уже четвёртые сутки в запое. Родственники не знают, как помочь. В бесплатный диспансер — страшно. Короче, реально профессиональные врачи — круглосуточный вывод из запоя с выездом. Сняли абстинентный синдром. В общем, вся информация по ссылке — круглосуточный вывод из запоя нарколог 24 круглосуточный вывод из запоя нарколог 24 Не ждите. Перешлите тем, кто рядом с бедой.
Everything for Minecraft topminecraftworldseeds com in one place: mods, skins, maps, texture packs, and the best seeds for survival, creativity, and adventure. Collections of popular add-ons, installation instructions, updates, and secure downloads for different versions of the game.
Everything for Minecraft https://topminecraftworldseeds.com in one place: mods, skins, maps, texture packs, and the best seeds for survival, creativity, and adventure. Collections of popular add-ons, installation instructions, updates, and secure downloads for different versions of the game.
Everything for Minecraft https://topminecraftworldseeds.com/ in one place: mods, skins, maps, texture packs, and the best seeds for survival, creativity, and adventure. Collections of popular add-ons, installation instructions, updates, and secure downloads for different versions of the game.
Здорова, народ. Мой знакомый уже седьмой день в запое. Соседи стучат в стену. В наркологию тащить — стыд и страх. Короче, спасла эта бригада — вывод из запоя на дому круглосуточно. Примчались за 20 минут. В общем, жмите, чтобы сохранить — вывод из алкогольного запоя нарколог 24 https://vyvod-iz-zapoya-na-domu-sankt-peterburg-msy.ru Звоните прямо сейчас. Перешлите тем, кто рядом с бедой.
Привет, народ. Отец окончательно ушёл в штопор. Дети ходят как в воду опущенные. В бесплатную наркологию — стыд и страх. Итог, реально крутые специалисты — недорогой вывод из запоя в Санкт-Петербурге. Врач поставил капельницу. В общем, сохраните себе — вывод из алкогольного запоя нарколог 24 https://vyvod-iz-zapoya-na-domu-sankt-peterburg-rpl.ru Каждый час на счету. Вдруг это спасёт чью-то семью.
Доброго дня, земляки. Ужас в семье. Соседи уже вызывали участкового. В диспансер тащить — позор. Короче, единственные, кто приехал быстро — вывод из запоя цены доступные. Сняли интоксикацию. В общем, вся инфа и контакты по ссылке — помощь вывода запоя помощь вывода запоя Не ждите. Вдруг это спасёт чью-то жизнь.
Доброго времени Ситуация знакомая Нужно что-то серьёзное Короче, нашел реально работающий способ — капельница от похмелья на дому срочно Поставили капельницу с солевым раствором В общем, не потеряйте контакты — сколько стоит капельница на дому цена https://kapelnicza-ot-pokhmelya-voronezh-xqt.ru Капельница — это быстро и эффективно Перешлите тем кто в такой же ситуации
Everything for Minecraft https://topminecraftworldseeds.com in one place: mods, skins, maps, texture packs, and the best seeds for survival, creativity, and adventure. Collections of popular add-ons, installation instructions, updates, and secure downloads for different versions of the game.
Доброго времени Сосед умирает на глазах Родственники в панике Никакие таблетки не помогают Короче, единственное что реально помогло — стационарное выведение из запоя под наблюдением Положили в палату В общем, не потеряйте контакты — запой стационар цены https://vyvod-iz-zapoya-v-staczionare-nizhnij-novgorod-vby.ru Звоните прямо сейчас Перешлите тем кто в такой же ситуации
Доброго вечера. Брат снова ушёл в завязку. Родные не знают, за что хвататься. Скорая не приедет на такой вызов. Итог, спасла эта служба — вывод из запоя с выездом круглосуточно. Врач поставил капельницу. В общем, жмите, чтобы не потерять — выведение из запоя выведение из запоя Не тяните. Киньте ссылку тем, кто рядом с бедой.
Приветствую А на работу через пару часов Рассол уже не лезет Короче, врачи приехали и поставили систему — капельница от похмелья цена доступная Голова прошла и тошнота ушла В общем, не потеряйте контакты — откапать от алкоголя на дому https://kapelnicza-ot-pokhmelya-voronezh-ges.ru Звоните прямо сейчас Перешлите тем кто в такой же ситуации
Здорова, народ Отец не выходит из штопора Соседи стучат в стену В больницу тащить страшно Короче, врачи вытащили с того света — лечение запоя в стационаре полный курс Врачи наблюдали 24/7 В общем, телефон и цены тут — детоксикация стационар https://vyvod-iz-zapoya-v-staczionare-nizhnij-novgorod-jkp.ru Звоните прямо сейчас Перешлите тем кто в такой же ситуации
Всем привет из Самары. Мой отец уже четвёртые сутки в запое. Родственники не знают, что делать. В диспансер тащить — позор. Короче, реально крутые врачи — вывод из запоя с выездом круглосуточно. Приехали через 40 минут. В общем, не потеряйте — вывод из запоя на дому недорого вывод из запоя на дому недорого Каждый час ухудшает состояние. Вдруг это спасёт чью-то жизнь.
Салют, Воронеж Тошнит, трясёт, сил нет Нужно что-то серьёзное Короче, единственное что реально спасает — капельница от похмелья цена доступная Вернулся к жизни В общем, жмите чтобы сохранить — прокапаться после запоя на дому https://kapelnicza-ot-pokhmelya-voronezh-mnb.ru Не мучайтесь рассолами Перешлите тем кто в такой же ситуации
Everything for Minecraft topminecraftworldseeds.com in one place: mods, skins, maps, texture packs, and the best seeds for survival, creativity, and adventure. Collections of popular add-ons, installation instructions, updates, and secure downloads for different versions of the game.
Everything for Minecraft http://www.topminecraftworldseeds.com/ in one place: mods, skins, maps, texture packs, and the best seeds for survival, creativity, and adventure. Collections of popular add-ons, installation instructions, updates, and secure downloads for different versions of the game.
Слушайте кто знает Кошмар в семье Жена рыдает Платная клиника просит бешеные деньги Короче, единственные кто взялся за безнадёжный случай — быстрый вывод из запоя в стационаре за 3-5 дней Положили в палату В общем, жмите чтобы сохранить — вывод из запоя стационарно вывод из запоя стационарно Звоните прямо сейчас Перешлите тем кто в беде
Доброго времени, земляки Мой брат уже две недели в запое Соседи уже звонят в полицию Скорая отказывается выезжать Короче, спасла только госпитализация — вывод из запоя санкт-петербург стационар с палатой Выписали через 4 дня здоровым В общем, вся инфа по ссылке — выведение из запоя больница https://vyvod-iz-zapoya-v-staczionare-sankt-peterburg-zqe.ru Звоните прямо сейчас Это может спасти жизнь близкого
Здорова, народ Отец не выходит из штопора Родственники не знают что делать Платная клиника — бешеные деньги Короче, только стационар реально помог — лечение запоя в стационаре до полной стабилизации Положили в комфортную палату В общем, вся инфа по ссылке — выход из запоя в стационаре https://vyvod-iz-zapoya-v-staczionare-sankt-peterburg-axm.ru Не надейтесь что само пройдёт Перешлите тем кто в отчаянии
best pharmacy prices viagra https://clearpharmacology.com/learn/choosing-an-ed-pill/ metoprolol succinate online pharmacy
Всем салют Близкий человек уже несколько дней в запое Родные не знают что делать В больницу тащить страшно Короче, врачи вытащили с того света — стационарное выведение из запоя под наблюдением Выписали через 5 дней без ломки В общем, вся инфа по ссылке — стационарное выведение из запоя стационарное выведение из запоя Не ждите пока станет хуже Перешлите тем кто в такой же ситуации
Управляющая компания Домодедово Управляющая компания Домодедово
Everything for Minecraft https://topminecraftworldseeds.com in one place: mods, skins, maps, texture packs, and the best seeds for survival, creativity, and adventure. Collections of popular add-ons, installation instructions, updates, and secure downloads for different versions of the game.
Everything for Minecraft https://topminecraftworldseeds.com in one place: mods, skins, maps, texture packs, and the best seeds for survival, creativity, and adventure. Collections of popular add-ons, installation instructions, updates, and secure downloads for different versions of the game.
What’s up guys I’m honestly sick of all the lag and constant glitches on most sites, Wasted so much money on complete garbage and bad odds it’s honestly the only legit platform out there right now offering some really great conditions for both newbies and high rollers. Free spins and lucrative promos drop every single day.
In any case, if you are looking for a tested spot, check it out yourself through the official link ph365 ph365 Don’t fall for those shady social media scams, definitely share this post with anyone who’s still looking for a decent casino!
Люди помогите советом Мой близкий уже 12 дней в запое Соседи уже вызвали скорую В диспансер тащить — страшно Короче, спасла только госпитализация — вывод из запоя стационарно с капельницами Выписали через 5 дней здоровым В общем, жмите чтобы сохранить — вывод из запоя в стационаре санкт-петербург вывод из запоя в стационаре санкт-петербург Звоните прямо сейчас Это может спасти жизнь близкого
Посмотреть на сайте: https://elicebeauty.com/parfyumeriya/elitnaya-parfyumeriya/iceberg-burning-ice.html
Слушайте кто знает Сосед совсем спился Мать места себе не находит Скорая не приезжает на такие вызовы Короче, единственное что сработало — вывод из запоя стационар с круглосуточным наблюдением Провели полное очищение организма В общем, не потеряйте контакты — выведение из запоя стационар санкт петербург https://vyvod-iz-zapoya-v-staczionare-sankt-peterburg-nhy.ru Не ждите чуда Перешлите тем кто в такой же беде
Everything for Minecraft https://www.topminecraftworldseeds.com in one place: mods, skins, maps, texture packs, and the best seeds for survival, creativity, and adventure. Collections of popular add-ons, installation instructions, updates, and secure downloads for different versions of the game.
Everything for Minecraft topminecraftworldseeds.com in one place: mods, skins, maps, texture packs, and the best seeds for survival, creativity, and adventure. Collections of popular add-ons, installation instructions, updates, and secure downloads for different versions of the game.
Everything for Minecraft topminecraftworldseeds.com in one place: mods, skins, maps, texture packs, and the best seeds for survival, creativity, and adventure. Collections of popular add-ons, installation instructions, updates, and secure downloads for different versions of the game.
Здорова, народ Отец не выходит из штопора Родственники не знают что делать В диспансер тащить — страшно и стыдно Короче, единственные кто взялся за сложный случай — наркологическая больница стационар с капельницами Провели полную детоксикацию В общем, жмите чтобы сохранить — наркологические услуги в стационаре наркологические услуги в стационаре Стационар — это реальный шанс Это может спасти чью-то семью
Здорова, народ Соседний мужик совсем спился Соседи уже звонят в полицию В диспансер тащить — стыд и страх Короче, спасла только госпитализация — лечение в наркологическом стационаре с психотерапией Врачи и медсёстры круглосуточно В общем, жмите чтобы сохранить — палата в наркологии https://narkologicheskij-staczionar-moskva-pfk.ru Стационар — единственное решение Это может спасти жизнь близкого
Слушайте кто сталкивался Мой брат уже две недели в запое Родные просто в шоке В диспансер тащить — стыд и страх Короче, спасла только госпитализация — наркологические услуги в стационаре комплексно Капельницы и уколы по расписанию В общем, телефон и цены тут — наркологические центры москвы цены https://narkologicheskij-staczionar-moskva-cde.ru Не надейтесь на чудо Перешлите тем кто в такой же беде
Здорова, народ Жесть полная Мать места себе не находит Платная клиника — бешеные счета Короче, спасла только госпитализация — платный наркологический стационар с палатами Провели полное очищение организма В общем, телефон и цены тут — сколько стоит прокапаться от алкоголя в стационаре https://narkologicheskij-staczionar-moskva-fal.ru Стационар — единственное решение Перешлите тем кто в такой же беде
аренда авто пхукет цены аренда авто с водителем пхукет
Нужна бесплатная юридическая консультация? Переходите по запросу спросить юриста бесплатно без регистрации в Белоозерском и получите помощь опытных правозащитников в любой области права: семейные споры, долги и кредиты, недвижимость, трудовые конфликты, защита прав потребителей и многое другое. Задайте вопрос онлайн или по телефону и получите подробный разбор вашей ситуации и рекомендации адвоката по дальнейшим действиям. Консультация проводится бесплатно и конфиденциально.
creighton university pharmacy online https://thedrugbrief.com/medications/sildenafil/ canadian pharmacy tampa
Москва, всем привет Отец не выходит из штопора Жена в истерике Платная клиника — бешеные деньги Короче, врачи вытащили с того света — наркологическая больница стационар с капельницами Выписали через 5 дней без ломки В общем, вся инфа по ссылке — платный наркологический стационар платный наркологический стационар Не надейтесь что само пройдёт Перешлите тем кто в отчаянии
Медицинский портал https://registratura24.com с полезной информацией о здоровье, заболеваниях, симптомах, диагностике, профилактике и современных методах лечения. Статьи врачей, рекомендации, обзоры медицинских исследований, советы по здоровому образу жизни и ответы на популярные вопросы.
Все о ремонте https://stroymaster-base.ru и строительстве дома в одном месте. Руководства по возведению зданий, внутренней и внешней отделке, инженерным системам, выбору материалов, инструментов, современным технологиям и идеям для комфортного жилья.
Все ключевые события https://sin180.ru в мире и России на одном информационном портале. Оперативные новости, политика, экономика, общественная жизнь, международные отношения, технологии, культура, спорт, происшествия и эксклюзивные материалы.
Мировые новости https://trawa-moscow.ru в режиме реального времени. Следите за главными событиями политики, экономики, общества, технологий, науки, культуры, спорта и международных отношений. Оперативные публикации, аналитика, интервью и важные новости со всего мира.
Полезный портал https://tepli4ka.com про сад, огород и приусадебный участок с практическими рекомендациями для дачников. Статьи о выращивании культур, уходе за деревьями и кустарниками, обустройстве территории, поливе, подкормках, теплицах и богатом урожае.
Портал о похудении https://med-pro-ves.ru с полезными статьями о правильном питании, физической активности, здоровом образе жизни и контроле веса. Советы специалистов, программы тренировок, рецепты, разбор популярных методик и рекомендации для достижения долгосрочных результатов.
Советы по строительству https://lesovikstroy.ru и ремонту для дома, квартиры и дачи. Практические инструкции, выбор строительных материалов, технологии отделки, монтаж инженерных систем, полезные рекомендации специалистов и идеи для самостоятельного выполнения работ.
Все про ремонт https://geekometr.ru для начинающих и опытных мастеров. Статьи о черновой и чистовой отделке, ремонте кухни, ванной, спальни и других помещений, выборе материалов, инструментов, освещения и современных дизайнерских решений.
аренда авто на пхукете карон аренда авто на пхукете
ggbet free download https://ggbet-top.pl/ggbet/
Здорова, народ Муж пьёт без остановки Соседи стучат в стену Скорая не приедет Короче, единственное что вытащило из запоя — капельница от запоя с витаминами и препаратами Сняли ломку и стабилизировали состояние В общем, жмите чтобы сохранить — капельница от алкоголя на дому капельница от алкоголя на дому Звоните прямо сейчас Перешлите тем кто в такой же ситуации
Все про ремонт https://geekometr.ru для начинающих и опытных мастеров. Статьи о черновой и чистовой отделке, ремонте кухни, ванной, спальни и других помещений, выборе материалов, инструментов, освещения и современных дизайнерских решений.
Всем привет с Урала Тошнит, трясёт, сил нет Организм просто отказывается работать Короче, нашел реально работающий способ — капельница от похмелья на дому срочно Голова прошла и тошнота ушла В общем, жмите чтобы сохранить — капельница от похмелья на дому капельница от похмелья на дому Звоните прямо сейчас Перешлите тем кто в такой же ситуации
Привет из Екб А на работу через пару часов Поилки и таблетки не помогают Короче, единственное что реально спасает — капельница от похмелья купить с выездом Через час состояние нормализовалось В общем, телефон и цены тут — капельница от запоя на дому капельница от запоя на дому Капельница — это быстро и эффективно Перешлите тем кто в такой же ситуации
Хочешь в Карелию? туры в карелию любой маршрут соберём под ваш график и кошелёк. Цены честные, без скрытых наценок. Надёжность и безопасность по каждому туру. Менеджеры знают Карелию лично — помогут не ошибиться с выбором.
Получите займ https://ekb-zalog-pts.ru под залог ПТС в Екатеринбурге с удобным оформлением и прозрачными условиями. Онлайн-заявка, оперативное рассмотрение, сохранение права пользования автомобилем, консультации специалистов и сопровождение на каждом этапе.
Займ под ПТС https://pts-zalog-ekb.ru с удобным оформлением и прозрачными условиями. Подайте заявку онлайн, ознакомьтесь с требованиями, сохраните возможность пользоваться автомобилем и получите решение в короткие сроки без сложных процедур.
Оформите займ https://pod-pts-ekb.ru под ПТС на понятных условиях с быстрым рассмотрением заявки. Узнайте требования к автомобилю, перечень необходимых документов, порядок оформления, способы погашения и ответы на популярные вопросы.
Получите займ https://zalog-pts-ekb.ru под ПТС без лишних сложностей. Простая процедура оформления, понятные условия, оперативное рассмотрение заявки, индивидуальный подход и возможность продолжать пользоваться своим автомобилем.
Оформление займа https://zaimpts-ekb.ru под ПТС с быстрым рассмотрением заявки и понятными условиями. Подготовьте необходимые документы, отправьте заявку онлайн и получите решение в максимально короткие сроки.
Законное списание долгов https://spisanie-kreditov-fizlic.ru через банкротство и защита от взыскания. Получите консультацию по процедуре, оцените перспективы дела, узнайте о необходимых документах, этапах банкротства, правах должника и возможных правовых последствиях.
Помощь в банкротстве ИП https://yurist-po-dolgam-ekb.ru с долгами по налогам и кредиторам. Разъясняем порядок процедуры, оцениваем риски, готовим документы, сопровождаем взаимодействие с судом, налоговыми органами и другими участниками процесса.
Банкротство физических лиц https://spisanie-kreditov-ekb.ru с сопровождением юриста под ключ. Анализ вашей ситуации, подготовка документов, представительство в суде, взаимодействие с финансовым управляющим и комплексная правовая поддержка на всех этапах процедуры.
Банкротство юридических лиц https://konsultaciya-yurista-po-dolgam.ru с профессиональным юридическим сопровождением. Консультации, анализ финансового состояния компании, подготовка документов, сопровождение процедуры, защита интересов бизнеса и соблюдение требований законодательства.
Оформите банкротство https://spisanie-dolgov-ekb.ru физических лиц в Екатеринбурге под ключ. Юристы помогут оценить перспективы дела, собрать необходимые документы, пройти все этапы процедуры и обеспечат профессиональную правовую поддержку на каждом этапе.
Банкротство физических лиц https://pomoshch-po-dolgam.ru в Екатеринбурге под ключ с полным юридическим сопровождением. Анализ ситуации, подготовка документов, представительство в суде, взаимодействие с финансовым управляющим и сопровождение процедуры в соответствии с законодательством.
Карго рейтинг https://рейтинг-карго-компаний.рф по доставке из Китая в Москву поможет сравнить логистические компании, условия перевозки, сроки, стоимость и отзывы клиентов. Выбирайте надежных перевозчиков, изучайте рейтинги, обзоры и рекомендации для безопасной доставки грузов.
Копицентр «Копирыч» https://kopirych.by профессиональный партнер для тех, кому нужна качественная печать фото в городе минск и по всей Беларуси.
Всем привет из Москвы Отец не выходит из штопора Дети напуганы Нужна срочная помощь на дому Короче, спас только этот врач — нарколог на дом срочно Через пару часов человек пришёл в себя В общем, вся инфа по ссылке — алкоголизм лечение выезд на дом https://narkolog-na-dom-moskva-xyz.ru Звоните прямо сейчас Перешлите тем кто в такой же ситуации
Внешние специалисты https://skillstaff2.ru ИП и самозанятые для ваших проектов. Подберите опытных исполнителей для разработки, маркетинга, дизайна, бухгалтерии, IT, продаж и других задач. Гибкое сотрудничество, быстрое подключение и профессиональная поддержка бизнеса.
Доставка дизельного топлива https://neftegazlogistica.ru в Москве для строительных площадок, предприятий, котельных, автопарков и частных клиентов. Оперативные поставки, топливо стандарта Евро-5, удобные объемы, сопровождение документами и доставка по согласованному графику.
Колодцы под ключ https://digwel.ru в Московской области с полным комплексом работ: поиск водоносного слоя, копка, установка бетонных колец, герметизация, обустройство и ввод в эксплуатацию. Работаем в Москве и Подмосковье, соблюдаем сроки и используем качественные материалы.
Москва, всем привет Случилась беда Соседи стучат В больницу тащить страшно Короче, помог только этот врач — врач нарколог на дом с препаратами Дал рекомендации и успокоил семью В общем, вся инфа по ссылке — наркологическая помощь на дому наркологическая помощь на дому Нарколог на дом — это быстро и эффективно Перешлите тем кто в такой же ситуации
Инженерные изыскания https://geo163.ru в Москве для строительства жилых, коммерческих и промышленных объектов. Выполняем геодезические, геологические, экологические и гидрометеорологические исследования, готовим технические отчеты и сопровождаем проект.
Рейтинг поставщиков дизтоплива https://рейтинг-поставщиков-дизтоплива.рф поможет сравнить компании по качеству топлива, ценам, условиям поставки, скорости доставки и отзывам клиентов. Изучайте обзоры, оценки и выбирайте надежного поставщика для бизнеса и частных нужд.
анализы спб купить анализы и справки купить
Народ у кого школьники Домашка на весь вечер Только оценки и нервотрёпка Короче, нашли идеальное решение — онлайн класс с 1 по 11 класс Уроки тогда когда удобно В общем, сохраняйте себе — онлайн школа ломоносов онлайн школа ломоносов Хватит мучить себя и ребёнка Перешлите другим родителям
Мамы и папы отзовитесь Каждое утро как на войну собираться А знаний реальных ноль Короче, реально крутая система — онлайн класс с 1 по 11 класс Ребёнок учится и не перегружается В общем, жмите чтобы не потерять — Не мучайте себя и детей Перешлите другим родителям
Решили купить квартиру? тут проверим документы и застройщика, оценим юридическую чистоту объекта и безопасно сопроводим сделку на всех этапах — от выбора недвижимости до регистрации права собственности.
Народ помогите Ребёнок уставший, не высыпается А эти бесконечные поборы Короче, единственная школа где кайфово учиться — онлайн образование с 1 по 11 класс Никаких звонков в 8 утра В общем, там программа и условия — интернет школа дистанционное обучение https://shkola-onlajn-dyk.ru Переходите на нормальное обучение Перешлите другим родителям
Посетите сайт https://artwinn.ru. Компания Artwinn предлагает более 100 видов услуг для деревянного домостроения: отделка, все для крыши, обсада, окна, двери. 16 лет на рынке. Узнайте на сайте об услугах больше.
Искали дом у моря в Паттайе? Посетите https://apartmentspattaya.com мы предложим вам проверенные апартаменты и виллы от владельцев. Без скрытых комиссий, с поддержкой на русском 24/7. Выберите место по душе по лучшей цене!
The best airport transfers in Italy at https://transferme24.com. New, clean vehicles, professional drivers, top-notch service, and airport meet-and-greet. Easy online booking and payment.
Люди помогите советом Замучился я с перепланировкой Инспекция не пропускает ничего Потратил кучу времени впустую Короче, единственные кто берётся за всё — перепланировка квартир с полным пакетом документов И чертежи сделали В общем, там и примеры и расценки — услуги по перепланировке квартиры https://pereplanirovka-kvartir-vhj.ru Потом себе дороже выйдет Перешлите тому кто тоже ремонт затеял
Заходите на сайт https://lux-crystal.ru там вы найдете товары люкс для интерьера и не только. Мы это эксклюзивный бутик премиум-класса — роскошные предметы интерьера и аксессуары для жизни, наполненные утонченностью и стилем! Всегда актуальные новинки и возможность заказа уникальных коллекций.
скажи казино фильм казино
Нужен участок? земельные участки купить участки под ИЖС, дачное строительство, коммерческое использование и инвестиции. Проверенные объекты, консультации специалистов, помощь с оформлением документов и регистрацией права.
купить медицинскую справку спб справки спб
карточка товара ии для создания обложек товара
дизайн интерьера для квартиры дизайнер спб
онлайн карточка товара озон ии для создания карточек товаров вб
Ребята кто хочет заработать Замучился я уже искать нормальную работу Работодатели только время тратят Короче, реально рабочий вариант — работа в Казахстане с высокой зарплатой Оплата вовремя В общем, там все вакансии — сайты трудоустройства в казахстане https://vakansii.sitsen.kz Найдите нормальную работу Перешлите тому кто ищет работу
студия дизайна интерьеров дизайн интерьера спб
Гемблеры отзовитесь То выплаты задерживают Искал долго, перепробовал кучу вариантов Короче, работает стабильно и честно — вавада с быстрыми выплатами Фриспины и акции каждый день В общем, вся инфа вот здесь — vavada casino vavada casino Только вавада реально рулит Перешлите тому кто тоже ищет нормальное казино
Profitez d’un code promo 1xBet pour beneficier d’un bonus lors de votre inscription ou de votre premier depot https://koreatesol.org/ads/inc/code_promotionnel_inscription_1xbet.html. Decouvrez les conditions de l’offre, le montant du bonus et les regles de mise avant de l’activer. Offre reservee aux personnes majeures. Jouez de maniere responsable.
Всем привет из сети Задолбался я уже искать нормальное казино Нервов потратил — мама не горюй Короче, работает стабильно и честно — вавада с быстрыми выплатами Поддержка отвечает сразу В общем, сохраняйте себе — вавада казино официальный сайт вавада казино официальный сайт Не ведитесь на лохотроны Перешлите тому кто тоже ищет нормальное казино
Гемблеры отзовитесь То вообще доступ закрывают Искал долго, перепробовал кучу вариантов Короче, нашел наконец толковое казино — вавада казино онлайн лучший выбор Поддержка отвечает сразу В общем, жмите чтобы не потерять — вавада вавада Не ведитесь на лохотроны Перешлите тому кто тоже ищет нормальное казино
Новое в категории: https://frenchspeak.ru/%D0%BD%D0%B0%D1%85%D0%BE%D0%B4%D1%87%D0%B8%D0%B2%D1%8B%D0%B9
Гемблеры отзовитесь Вечно то лаги Искал долго, перепробовал кучу вариантов Короче, работает стабильно и честно — вавада с быстрыми выплатами Вывод денег за 5 минут В общем, там все подробности — vavada официальный сайт vavada официальный сайт Только вавада реально рулит Перешлите тому кто тоже ищет нормальное казино
Все подробности по ссылке: https://1citywomen.ru/%D0%B1%D0%B5%D0%B7-%D1%80%D1%83%D0%B1%D1%80%D0%B8%D0%BA%D0%B8/vrachi-preduprezhdayut-roditeli-budte-vnimatelny-ne-pozvolyajte-drugim-lyudyam-celovat-novorozhdennogo-rebenka-i-vot-pochemu/
Народ кто в теме То выплаты задерживают Искал долго, перепробовал кучу вариантов Короче, единственное где не кидают — вавада с быстрыми выплатами Фриспины и акции каждый день В общем, жмите чтобы не потерять — vavada казино онлайн vavada казино онлайн Не ведитесь на лохотроны Перешлите тому кто тоже ищет нормальное казино
карточки товара для маркетплейсов ии ai карточка товара
Все подробности по ссылке: https://vgarderobe.ru/muzhskie-dzhinsy-wrangler-bc-11769.html
Перед покупкой многие интересуются, сколько стоит комп с современными характеристиками для игр и работы. Итоговая стоимость зависит от выбранной конфигурации.
купить готовую справку купить справку
купить мед справку сколько стоит сделать медицинскую справку
сколько стоит купить справку https://spravki-spb-kupit.ru
Herkes dinlesin Ödemeler geç geliyor, canlı destek yok Hepsinde dolandırıldım Her şey çok hızlı ve güvenli — 1xbet türkiye lider bahis Her gün yeni bonus ve promolar var Kısacası, her şey mevcut — canlı bahis 1x bet canlı bahis 1x bet Sakın sahte sitelere kanma Bahis yapan herkese gönder
Selam millet İstediğin yerde bahis yapabilirsin Bazıları güvenli değil Çok hızlı ve stabil çalışıyor — 1xbet mobil indir ücretsiz Bonuslar ve promolar her gün var Neyse, kaybetmeyin diye tıkla — 1xbet android uygulama indir 1xbet android uygulama indir Tek adres 1xbet indir Bahis yapan herkese gönder
Beyler bahis severler Siteler sürekli kapanıyor, yeni adres arıyorum Hepsinde dolandırıldım Ama sonunda bu siteyi keşfettim — 1xbet yeni giriş kolay Çekim işlemleri dakikalar içinde Kısacası, kendiniz kontrol edin — 1xbet giriş linki 1xbet giriş linki Tek adres 1xbet güncel giriş Bahis yapan herkese gönder
Herkes dinlesin Bilgisayar başında olmak zorunda değilsin Bazıları güvenli değil Hiç sorun yaşamadım — 1xbet mobii en iyisi Çekim işlemleri saniyeler içinde Neyse, her şey mevcut — 1xbet mobil uygulama indir 1xbet mobil uygulama indir Sakın sahte uygulamalara kanma Bahis yapan herkese gönder
Herkes merhaba Siteler sürekli değişiyor, erişim engelleniyor Aylardır araştırıyorum Sonunda bu siteyi keşfettim — 1xbet güncel adres tıkla Site inanılmaz hızlı çalışıyor Neyse, tüm detaylar linkte — 1 x bet giriş 1 x bet giriş Tek adres 1xbet güncel giriş Bahis yapan herkese gönder
Beyler bahis severler Bilgisayar başında olmak zorunda değilsin Çoğu site kötü uygulama sunuyor Çok hızlı ve stabil çalışıyor — 1xbet mobil indir ücretsiz Uygulama çok hafif ve hızlı Neyse, kaydedin kenarda dursun — 1xbet giriş indir 1xbet giriş indir Sakın sahte uygulamalara kanma Bahis yapan herkese gönder
Selam arkadaşlar Ödemeler aylarca sürüyor, canlı destek yok Onlarca site denedim Bu site gerçekten işe yarıyor — 1xbet giriş yap hemen Her gün yeni bonus ve promolar var Neyse, kaydedin bir yere yazın — xbet giriş xbet giriş Sakın dolandırıcılara kanma Bahis yapan herkese gönder
Arkadaşlar selam Bilgisayar başında oturmak zorunda değilsin Bazıları virüslü Hiçbir sorun yaşamadım — 1xbet giriş indir kolay Uygulama çok hafif ve hızlı Neyse, kaybetmeyin diye tıkla — xbet indir xbet indir Tek adres 1xbet indir Bahis yapan herkese gönder
Beyler bahisçiler Bazıları güvenli değil Telefonum bozulacaktı Sonunda doğru apk dosyasını buldum — 1xbet yükle tek tıkla Çekim işlemleri saniyeler içinde Neyse, kaybetmeyin diye tıkla — 1xbet indir apk 1xbet indir apk Tek adres 1xbet apk Bahis yapan herkese gönder
Selam millet Bazıları telefonu bozuyor Virüslü dosyalara denk geldim Hiç sorun yaşamadım — 1xbet apk indir ücretsiz Bonuslar ve promolar her gün var Neyse, kaybetmeyin diye tıkla — 1xbet yükle 1xbet yükle Tek adres 1xbet apk yukle Bahis yapan herkese gönder
Beyler bahis severler Mobil bahis uygulaması hayat kurtarıyor Bazıları sürekli güncelleme istiyor Hiçbir sorun yaşamadım — 1xbet mobii en iyisi Canlı maçlar anında açılıyor Neyse, her şey mevcut — 1xbet uygulaması indir 1xbet uygulaması indir Sakın sahte uygulamalara kanma Bahis yapan herkese gönder
Herkes dinlesin Mobil bahis apk dosyasını yüklemek çok kolay Onlarca site denedim Hiç sorun yaşamadım — 1xbet yükle tek tıkla Çekim işlemleri saniyeler içinde Neyse, kaybetmeyin diye tıkla — 1xbet android uygulama 1xbet android uygulama Sakın sahte apk dosyalarına kanma Bahis yapan herkese gönder
Arkadaşlar merhaba Bazıları güvenli değil Virüslü dosyalara denk geldim Sonunda doğru apk dosyasını buldum — 1xbet indir apk ücretsiz Dosya çok hafif ve hızlı Neyse, tüm detaylar linkte — 1xbet android uygulama 1xbet android uygulama Tek adres 1xbet apk Bahis yapan herkese gönder
Beyler bahisçiler Bazı apk dosyaları çalışmıyor Telefonum neredeyse bozuluyordu Sonunda doğru apk dosyasını buldum — 1xbet indir apk son sürüm Dosya çok hafif ve hızlı Neyse, her şey mevcut — 1xbet download android 1xbet download android Tek adres 1xbet apk yukle Bahis yapan herkese gönder
Selam millet Siteler sürekli değişiyor Çok araştırdım, onlarca site gezdim Sonunda doğru apk dosyasını buldum — 1xbet yükle tek tıkla Bonuslar ve promolar her gün var Neyse, kendiniz indirin — 1xbet yükle 1xbet yükle Tek adres 1xbet apk Bahis yapan herkese gönder
Herkes dinlesin Ama doğru uygulamayı seçmek lazım Bazıları sürekli güncelleme istiyor Hiçbir sorun yaşamadım — 1xbet mobil indir ücretsiz Çekim işlemleri saniyeler içinde Neyse, kendiniz indirin — 1xbet mobil uygulama 1xbet mobil uygulama Sakın sahte uygulamalara kanma Bahis yapan herkese gönder
Arkadaşlar merhaba Mobil bahis için doğru apk dosyasını bulmak çok önemli Telefonum bozulacaktı Sonunda doğru apk dosyasını buldum — 1xbet mobil apk son sürüm Canlı maçlar anında açılıyor Neyse, kaybetmeyin diye tıkla — 1xbet mobil apk 1xbet mobil apk Sakın sahte apk dosyalarına kanma Bahis yapan herkese gönder
Народ кто ставит Задолбался я уже искать нормальную контору Искал долго, перепробовал кучу вариантов Короче, единственная где не кидают — ставки на спорт бишкек онлайн лучший выбор Бонусы и акции каждый день В общем, жмите чтобы не потерять — most bett most bett Не ведитесь на лохотроны Перешлите тому кто тоже ищет нормальную контору
лента х15н60 лента нержавеющая купить
Слушайте кто в теме То выплаты задерживают Денег слил на всяком говне Короче, работает стабильно и честно — mostbet официальный сайт Поддержка отвечает сразу В общем, жмите чтобы не потерять — букмекерская контора бишкек букмекерская контора бишкек Только mostbet реально рулит Перешлите тому кто тоже ищет нормальную контору
Слушайте, кто сейчас в теме? Задолбался я уже искать нормальную контору для ставок, Искал реально долго, перепробовал кучу сомнительных вариантов пока чисто случайно не протестировал единственное место, где реально не кидают с отличной линией на все популярные спортивные события. Приветственные бонусы и кэшбек начисляют буквально каждый день.
Кому тоже актуально найти проверенное место для игры, вся полезная инфа выложена вот здесь сайт мостбет https://mostbet-tue.com.kg Не ведитесь на дешевые лохотроны из рекламы, обязательно перешлите этот post тому, кто тоже сейчас ищет нормальную контору!
Всем привет из Бишкека! То вообще доступ к аккаунту без причин закрывают, Нервов потратил на этих конторах — мама не горюй до тех пор, не наткнулся на сервис, который работает стабильно и честно, и предлагает топовые условия как для ординаров, так и для экспрессов. Вывод честно заработанных денег занимает буквально 5 минут,
Кому тоже актуально найти проверенное место для игры, обязательно сохраняйте себе этот официальный ресурс заказать билеты на футбол заказать билеты на футбол Лучше обходить стороной забаненные платформы и выбирать надежные зоны. обязательно перешлите этот пост тому, кто тоже сейчас ищет нормальную контору!
Народ, салам! Задолбался я уже искать нормальную контору для ставок, Нервов потратил на этих конторах — мама не горюй до тех пор, не нашел наконец толковую рабочую платформу, начиная от удобного интерфейса и заканчивая официальной лицензией. Всё летает как часы в любое время суток,
В общем, если не хотите тратить время на самостоятельные тесты, там расписаны все технические подробности цена билета на футбол цена билета на футбол Не ведитесь на дешевые лохотроны из рекламы, обязательно перешлите этот post тому, кто тоже сейчас ищет нормальную контору!
Беттеры, отзовитесь кто откуда. То вообще доступ к аккаунту без причин закрывают, Искал реально долго, перепробовал кучу сомнительных вариантов до тех пор, не наткнулся на сервис, который работает стабильно и честно, и предлагает топовые условия как для ординаров, так и для экспрессов. Всё летает как часы в любое время суток,
В общем, если не хотите тратить время на самостоятельные тесты, жмите на источник, чтобы случайно не потерять контакты mostbet casino официальный сайт mostbet casino официальный сайт Данный сервис сейчас реально рулит на рынке, обязательно перешлите этот пост тому, кто тоже сейчас ищет нормальную контору!
Ребята, кто реально ставит? То вообще доступ к аккаунту без причин закрывают, Искал реально долго, перепробовал кучу сомнительных вариантов пока чисто случайно не нашел наконец толковую рабочую платформу, с отличной линией на все популярные спортивные события. Приветственные бонусы и кэшбек начисляют буквально каждый день.
В общем, если не хотите тратить время на самостоятельные тесты, жмите на источник, чтобы случайно не потерять контакты мостбет регистрация https://mostbet-tue.com.kg Лучше обходить стороной забаненные платформы и выбирать надежные зоны. обязательно перешлите этот post тому, кто тоже сейчас ищет нормальную контору!
Ребята, кто реально ставит? Вечно то лаги на сайте в самый ответственный момент, Денег слил на всяком говне и нечестных букмекерах пока чисто случайно не протестировал единственное место, где реально не кидают с отличной линией на все популярные спортивные события. Всё летает как часы в любое время суток,
В общем, если не хотите тратить время на самостоятельные тесты, вся полезная инфа выложена вот здесь ставки на спорт в кыргызстане ставки на спорт в кыргызстане Данный сервис сейчас реально рулит на рынке, обязательно перешлите этот post тому, кто тоже сейчас ищет нормальную контору!
Беттеры отзовитесь А поддержка молчит как рыба Денег слил на всяком говне Короче, работает стабильно и честно — mostbet kg лучший букмекер Бонусы и акции каждый день В общем, там все подробности — мосбет мосбет Только mostbet реально рулит Перешлите тому кто тоже ищет нормальную контору
Беттеры отзовитесь А поддержка молчит как рыба Нервов потратил — мама не горюй Короче, нашел наконец толковую контору — ставки на спорт бишкек онлайн лучший выбор Бонусы и акции каждый день В общем, жмите чтобы не потерять — купить билет футбол купить билет футбол Только mostbet реально рулит Перешлите тому кто тоже ищет нормальную контору
Народ, кто задумывается о переезде? Замучился я уже самостоятельно собирать архивные бумаги, Кто-то больше года собирает справки о родственниках по всей стране до тех пор, не наткнулся на юристов, которые реально помогают на каждом этапе, включая детальную подготовку к прохождению собеседования с нативом. Через 2 месяца успешно получили внутренние паспорта.
В общем, если не хотите тратить годы на самостоятельные тесты, там расписаны все технические подробности центр репатриации в израиль https://grazhdanstvo-izrailya-wgn.ru Лучше сразу доверьтесь опытным профессионалам в этой сфере, обязательно перешлите этот пост тому, кто тоже сейчас серьезно думает о репатриации!
Мастера-мебельщики отзовитесь Вечно то выбор маленький Перерыл весь интернет Короче, нашел отличный магазин — ткань для мягкой мебели купить с фактурой Доставка по Москве и области В общем, там каталог и цены — продажа износостойких тканей https://material.tkan-dlya-mebeli-1.ru Не переплачивайте в салонах Перешлите тому кто мебель перетягивает
Слушайте, кто сейчас хочет получить гражданство Израиля? Замучился я уже самостоятельно собирать архивные бумаги, Кто-то больше года собирает справки о родственниках по всей стране пока чисто случайно не наткнулся на юристов, которые реально помогают на каждом этапе, включая детальную подготовку к прохождению собеседования с нативом. Итоговое собеседование прошло максимально гладко,
В общем, если не хотите тратить годы на самостоятельные тесты, смотрите сами все условия по ссылке гражданство израиля в москве https://grazhdanstvo-izrailya-lvy.ru Не мучайтесь со сложной бюрократией сами, обязательно перешлите этот пост тому, кто тоже сейчас серьезно думает о репатриации!
Здорова, народ Отец не выходит из штопора Родственники не знают что делать Нужна срочная помощь на дому Короче, только это реально спасло — вывод из запоя цена адекватная Сняли ломку и стабилизировали состояние В общем, жмите чтобы сохранить — выведение из запоя на дому воронеж https://lechenie.vyvod-iz-zapoya-na-domu-voronezh-xrt.ru Звоните прямо сейчас Перешлите тем кто в такой же ситуации
Всем привет из Москвы То консульство возвращает документы Кто-то год собирает справки о родственниках Короче, единственные кто реально помогает — репатриация израиль с профессиональной поддержкой Документы собрали за месяц В общем, там и цены и отзывы — получение гражданство израиля в москве получение гражданство израиля в москве Доверьтесь профессионалам Перешлите тому кто думает о репатриации
Мастера-мебельщики отзовитесь Замучился я уже искать качественную мебельную ткань Объездил кучу магазинов в Москве Короче, единственное место где всё честно — обивочные материалы для мягкой мебели купить оптом Доставка по Москве и области В общем, вся инфа вот здесь — обивочные ткани для мебели https://material.tkan-dlya-mebeli-1.ru Покупайте ткань напрямую Перешлите тому кто мебель перетягивает
Слушайте, кто сейчас хочет получить гражданство Израиля? То консульство возвращает обратно все анкеты на доработку, Сроки записи на архивную проверку горят, нервы уже на пределе до тех пор, не наткнулся на юристов, которые реально помогают на каждом этапе, включая детальную подготовку к прохождению собеседования с нативом. Подали пакет в консульский отдел с первого раза,
В общем, если не хотите тратить годы на самостоятельные тесты, обязательно сохраняйте себе этот официальный ресурс центр шалом центр шалом Не мучайтесь со сложной бюрократией сами, обязательно перешлите этот пост тому, кто тоже сейчас серьезно думает о репатриации!
Слушайте кто знает Отец не выходит из штопора Соседи стучат в стену В больницу тащить страшно Короче, единственное что вытащило из запоя — вывод из запоя недорого и эффективно Поставили капельницу с детоксикационным раствором В общем, жмите чтобы сохранить — сколько стоит вывод из запоя https://lechenie.vyvod-iz-zapoya-na-domu-voronezh-xrt.ru Не ждите пока станет хуже Перешлите тем кто в такой же ситуации
Люди, подскажите по личному опыту. То нотариальные переводы документов оформлены неправильно, Кто-то больше года собирает справки о родственниках по всей стране пока чисто случайно не протестировал единственную команду, которая берется за сложные случаи и обеспечивает полное сопровождение от поиска корней до получения паспорта. Подали пакет в консульский отдел с первого раза,
Кому тоже актуально оформить все документы быстро и легально, там расписаны все технические подробности помощь гражданство израиль помощь гражданство израиль Обходите стороной сомнительных посредников и выбирайте надежную поддержку. обязательно перешлите этот пост тому, кто тоже сейчас серьезно думает о репатриации!
Слушайте кто хочет гражданство Израиля Вечно то справок не хватает Кто-то год собирает справки о родственниках Короче, нашел нормальных специалистов — репатриация в израиль гражданство израиля быстро Переводы сделали у нотариуса В общем, жмите чтобы не потерять — израильское гражданство москва https://grazhdanstvo-izrailya.ru Не мучайтесь с бюрократией сами Перешлите тому кто думает о репатриации
Мастера-мебельщики отзовитесь Вечно то выбор маленький Везде одно и то же Короче, большой выбор и низкие цены — ткань для обивки мебели купить недорого Доставка по Москве и области В общем, жмите чтобы не потерять — продажа износостойких тканей https://material.tkan-dlya-mebeli-1.ru Покупайте ткань напрямую Перешлите тому кто мебель перетягивает
Здорова, народ Ситуация аховая Дети напуганы Нужна срочная помощь на дому Короче, единственное что вытащило из запоя — срочный вывод из запоя круглосуточно Приехали через 40 минут В общем, телефон и цены тут — снятие интоксикации на дому https://lechenie.vyvod-iz-zapoya-na-domu-voronezh-xrt.ru Вывод из запоя на дому — это реальный выход Перешлите тем кто в такой же ситуации
Слушайте, кто сейчас хочет получить гражданство Израиля? То нотариальные переводы документов оформлены неправильно, Друзья у меня уже полгода мучаются с запросами до тех пор, не наткнулся на юристов, которые реально помогают на каждом этапе, включая детальную подготовку к прохождению собеседования с нативом. Итоговое собеседование прошло максимально гладко,
Кому тоже актуально оформить все документы быстро и легально, жмите на источник, чтобы случайно не потерять контакты репатриация в израиль гражданство израиля репатриация в израиль гражданство израиля Лучше сразу доверьтесь опытным профессионалам в этой сфере, обязательно перешлите этот пост тому, кто тоже сейчас серьезно думает о репатриации!
Здорово, Москва! Вечно то каких-то справок из ЗАГСа не хватает для консула, Кто-то больше года собирает справки о родственниках по всей стране пока чисто случайно не протестировал единственную команду, которая берется за сложные случаи включая детальную подготовку к прохождению собеседования с нативом. Все архивные документы нам собрали буквально за месяц,
Кому тоже актуально оформить все документы быстро и легально, смотрите сами все условия по ссылке репатриация израиль репатриация израиль Лучше сразу доверьтесь опытным профессионалам в этой сфере, обязательно перешлите этот пост тому, кто тоже сейчас серьезно думает о репатриации!
Народ кто задумывается о переезде А бюрократия эта просто выносит мозг Друзья уже полгода мучаются Короче, реально толковые ребята — как получить гражданство израиля в москве пошагово Подали в консульство без ошибок В общем, жмите чтобы не потерять — получение гражданства израиля в москве https://grazhdanstvo-izrailya.ru Не мучайтесь с бюрократией сами Перешлите тому кто думает о репатриации
Народ кто мебель обшивает Замучился я уже искать качественную мебельную ткань Перерыл весь интернет Короче, единственное место где всё честно — ткань для мягкой мебели купить с фактурой Выбор огромный В общем, вся инфа вот здесь — ткань для перетяжки дивана https://material.tkan-dlya-mebeli-1.ru Не переплачивайте в салонах Перешлите тому кто мебель перетягивает
Воронеж, салам Муж просто потерял себя Жена в отчаянии Таблетки не помогают Короче, только это реально спасло — вывести из запоя на дому срочно Приехали через 40 минут В общем, телефон и цены тут — вывод из запоя цена на дому https://lechenie.vyvod-iz-zapoya-na-domu-voronezh-xrt.ru Не ждите пока станет хуже Перешлите тем кто в такой же ситуации
Здорова, народ Брат снова сорвался Родственники не знают что делать В больницу тащить страшно Короче, врачи приехали и поставили систему — вывод из запоя цена адекватная Через пару часов человек пришёл в себя В общем, жмите чтобы сохранить — снятие запоя на дому снятие запоя на дому Не ждите пока станет хуже Перешлите тем кто в такой же ситуации
Слушайте кто хочет гражданство Израиля А бюрократия эта просто выносит мозг А кто-то вообще не знает с чего начать Короче, единственные кто реально помогает — помощь в оформлении гражданства израиля без ошибок Подали в консульство без ошибок В общем, жмите чтобы не потерять — гражданство израиля помощь https://grazhdanstvo-izrailya.ru Доверьтесь профессионалам Перешлите тому кто думает о репатриации
Слушайте кто сталкивался Близкий человек уже несколько дней в запое Соседи стучат в стену В больницу тащить страшно Короче, единственное что вытащило из запоя — вывод из запоя на дому с капельницей Поставили капельницу с детоксикационным раствором В общем, жмите чтобы сохранить — вывод из запоя на дому недорого вывод из запоя на дому недорого Не ждите пока станет хуже Перешлите тем кто в такой же ситуации